
There’s no need to panic if your Mac won’t start. Ignore the gut-wrenching feeling that fixing your computer will take a long time. macOS includes some simple fixes that can help get everything right straight away.
You don’t need to take your machine to a service center for repair yet. Save yourself time and money by trying to fix it yourself. If you regularly back up with Time Machine, you have little to lose.
Let’s look at how to revive a Mac that refuses to start.
Before We Begin
These tips are for instances where your Mac refuses to boot. You might see a black screen, you could get an error message, or your computer may hang on the white Apple logo. If your machine is running fine, this troubleshooting guide is not for you.
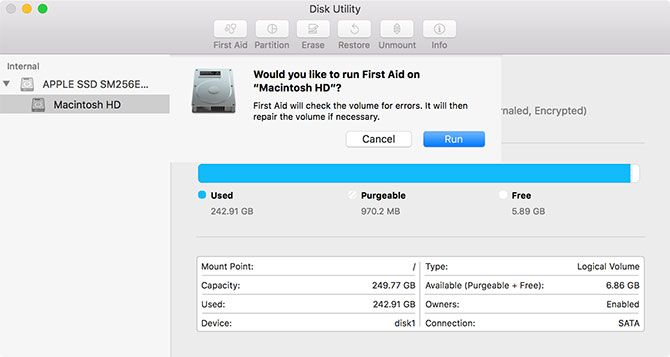
You can, however, run First Aid on your drive anytime in macOS. If you suspect problems with your startup drive due to performance issues or erratic behavior, running First Aid certainly won’t hurt.
To run First Aid on your startup volume, launch Disk Utility and select Macintosh HD (assuming you haven’t renamed your startup volume). Click on First Aid followed by Run to scan the disk for problems and attempt to fix them.
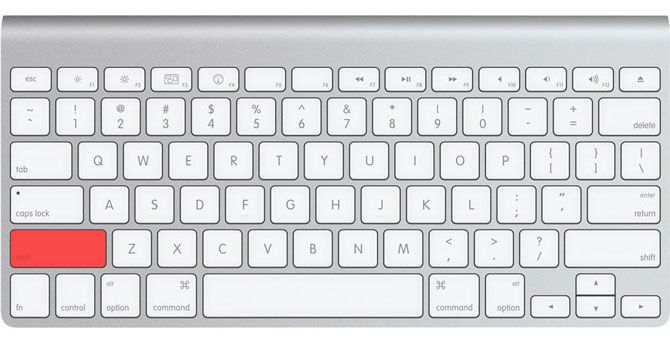
1. Try Safe Mode
By attempting to boot into Safe mode, macOS will scan and repair any errors it finds on the disk. Safe mode boots your operating system with only the bare minimum it needs to run.
No third party kernel extensions will boot, login items are skipped, and it empties certain caches. Simply by booting into safe mode, you’ll check for problems and take out the trash that might cause them.
To boot into Safe mode: Turn your computer off, then press and hold the Shift key while your computer boots. If your computer has hung on boot, shut it down by holding the power button until the machine switches off (around 10 seconds) first.
Should your computer boot properly, try restarting and booting as normal. If your computer hangs again, try using Verbose Mode by holding Cmd + V on startup and checking to see if a specific kernel extension is causing the issue. You can then restart into Safe mode, remove the problem extension, and try again.
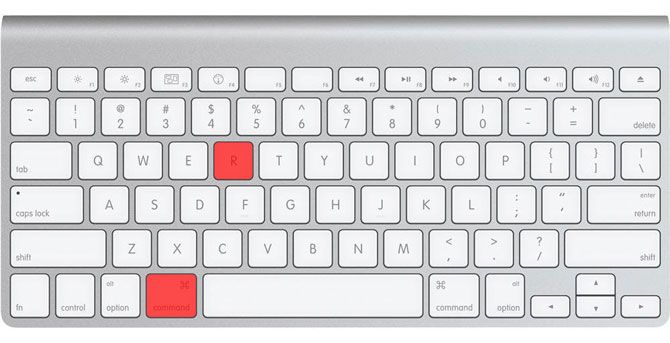
2. Recovery Mode and First Aid
If Safe mode didn’t fix your issue, Recovery mode is your next best bet. Every Mac ships with Recovery mode, which lives on a separate partition on the startup disk. This mode allows you to repair/restore your drive, access the Terminal, and reinstall macOS.
To boot into Recovery mode: Turn your computer off, then press and hold Cmd + R while your computer boots.
If you have trouble booting into Recovery mode, perhaps due to problem with your drive, you can start recovery mode from the internet by holding Cmd + Option + R instead. Keep in mind this requires an internet connection and will take a lot longer, since macOS needs to download the image first.
Once you’ve booted into Recovery mode, you’ll see a few options. Launch Disk Utility and then isolate the drive that’s causing problems—it’s probably labeled Macintosh HD. Select it from the list on the left, then click First Aid followed by Run.
3. Use fsck in Single User Mode
File system consistency check (or fsck for short) is a longstanding Unix tool for checking and fixing drive problems.
Depending on the size of your volume, the type of drive you have installed, and the potential problem, fsck can take a while to complete. Patience and persistence is important if you want to fix your drive this way.
Gonna be a bad weekend, as this is not what a Mac is supposed to look like during boot. Time for some “fsck -fy” action, and prayers… pic.twitter.com/tWAOFaLlc7
— Blaine Chronik (@BlaineChronik) February 23, 2018
To run fsck, you’ll need to boot into Single User mode. This boot mode allows you to make changes to shared user resources. Single User mode doesn’t attempt to boot macOS; it only provides access to a Unix command line.
To boot into Single User mode: Turn your computer off, then press and hold Cmd + S when your computer boots. You’ll soon see a command line prompt. You can type fsck -fy to run fsck.

Note: If you’ve encrypted your drive, you’ll need to select the relevant user account and enter your password to decrypt it. If you have a firmware password set on your Mac, Single User mode is not available to you.
It’s important to wait for fsck to finish before you restart your computer again. If you interrupt the process while it is making changes to your drive, you may incur data loss. When the process finishes you’ll see one of the following messages:
** The volume Macintosh HD could not be repaired.
*****The volume was modified *****
- If you see this message, you should run fsck -fy again. There’s no harm in trying multiple times, since the process makes changes to your drive on each pass.
** The volume Macintosh HD was repaired successfully.
*****The volume was modified *****
- This is a more encouraging message, but you aren’t done yet. Run fsck -fy again.
** The volume Macintosh HD appears to be OK.
- This is what you want to see. fsck has checked the drive and had to make no changes.
When you get the all-clear, it’s time to restart your Mac by running the exit command.
Still Can’t Boot Your Mac?
If your Mac still won’t boot after running First Aid and fsck, you may have some serious problems with your drive. At this stage it’s advisable to back up your files and run Apple Diagnostics to see if there are any obvious problems.
If you really want to try fixing the problem yourself, you’ll need to turn to technician-level Apple Service Diagnostics to learn as much information about the problem as you can.
Recovering Files From Your Mac’s Damaged Disk
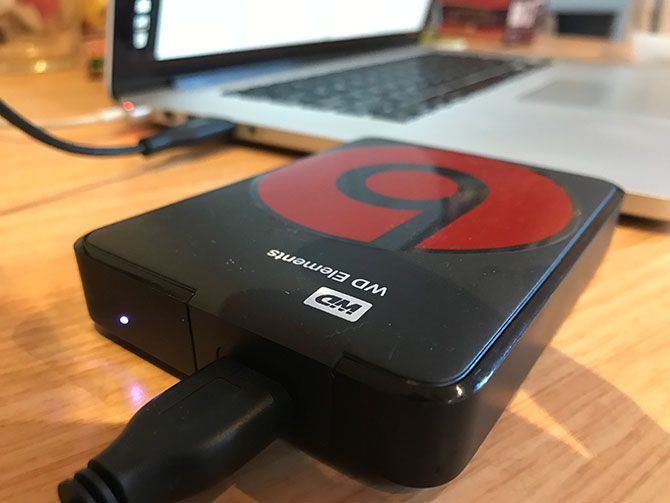
If your disk is damaged beyond repair, there’s a chance you will lose some of your data. The first step to try is creating an image of the drive, for which you’ll need to connect a spare external drive that’s at least as big as the startup disk you’re trying to save.
Boot your Mac into Recovery mode with Cmd + R on startup, then launch Disk Utility. In the menu bar at the top of the screen select File > New Image > Image from “Macintosh HD” (or whatever your drive is called).
Specify your external drive and start the process. This may take a while, and if the drive is damaged it may even fail entirely. If the process is successful, you’ll create a DMG file of your old drive which you can mount and sort through at your own convenience.
Copying the Files Manually
Should the imaging fail, you’ll need to copy your files manually. You can do this in Recovery mode, but you’ll need to launch Terminal on startup instead of Disk Utility. To do so:
- Connect the external drive you want to use as a destination for your files.
- Restart your Mac in Recovery mode by holding Cmd + R on startup, then choose Terminal.
- Use the cp -r command to copy your files to the external drive. For example: cp -r /Volumes/Macintosh\ HD/Users/[username]/Documents /Volumes/Backup/
Let’s break down the command above: cp is the copy command, and -r runs this command recursively. That means it will copy all directories within the directory you specify, then the directories within them, and so on.
The first path is the location of the files you want to copy. Note the backslash (\) in the path name, which you use to specify locations that have spaces in their name. The second path is the location of your external drive, which will always be in /Volumes/ with whatever label you’ve given it (in the example above, the drive is called Backup).
The problem with this approach is that you’ll need to remember where your files are located. You’ll also need to hope that they aren’t stored on a portion of the drive that’s damaged. With your files safe, you can move on to fixing your Mac and reinstalling macOS.
The Importance of Backing Up Your Mac
Hopefully you’re able to recover your drive or any important files you may need. Even with a successful recovery, and the many tools at your disposal, there’s nothing quite like the peace of mind a recent backup provides.
You don’t even have to use Time Machine to keep your Mac safe. Why not try one of the many other Mac backup tools?
Read the full article: How to Repair Your Mac’s Disk Using Safe Mode, fsck, and More
Read Full Article
No comments:
Post a Comment