27 August 2018
What Is the Internet of Things?
What is the so-called “Internet of things” and how does it differ from the regular internet we all know and love? What does “IoT” mean? Is it just a passing buzzword or is it an inevitable future that you’ll need to be aware of sooner or later?
They’re all good questions! We’ll provide all the answers you seek and more.
What Is the Internet of Things?
Right now, the internet mainly consists of human-to-human actions:
- When you visit Facebook, you’re telling your browser to notify Facebook that you want to see your feed, and Facebook sends all that data back to your browser for you to see.
- Upon logging into WhatsApp, you’re telling your app to connect to WhatsApp and let everyone else on WhatsApp know you’re online. When you send a message, it passes through WhatsApp and WhatsApp relays it to the recipient.
- When you play Fortnite, your key presses and mouse movements are sent to Fortnite, interpreted and applied to game objects, and broadcasted to all other players in the game.
For a long time, every action on the internet has been initiated by a human and ultimately passed on to another human. Our current internet is an “internet of people”—with data created, modified, deleted, sent, and received by people.
The Internet of Things (often abbreviated as IoT) is a network of devices where those devices communicate with each other without any human interference. The devices themselves create, modify, delete, send, and receive data between each other on their own, and use that data to make decisions.
That’s the key to IoT: the exchange of data between devices.
How Does the Internet of Things Work?
The Internet of Things only requires three elements:
- A way for devices to connect to other devices
- A way for devices to gather data from other devices
- A method for devices to process that data and make decisions
Devices can piggyback on our existing internet and connect using Wi-Fi, or they can use Bluetooth for closer-ranged direct connectivity without a middleman. Other options exist too, such as ZigBee and Z-Wave.
But even after connecting, devices can only communicate with each other if they can “speak the same language” (i.e. they need to be able to decode the data sent to them). With so many potential “languages,” it’s impossible for one device to support them all.
That’s why many IoT platforms rely on an “interpreter” device. For example, SmartThings products communicate with each other by passing data through a SmartThings Hub. This means each device only needs to know the Hub’s language, while the Hub knows how to speak to each device. This relay allows the devices to indirectly communicate with ease.
What Is an IoT Platform?
You can think of an IoT platform as the set of tools that allows various devices to connect and communicate. We already talked about hubs above, but they’re only one part of an IoT platform.
A platform is the collection of hub (also called a gateway device), plus the communication protocol used by the platform (such as Wi-Fi, ZigBee, or Z-Wave), plus the underlying software that processes and transmits the network data. It also includes the user-facing applications that allow humans to interact with the devices on the platform.
For example, SmartThings has its Hub as the gateway device. It also supports any device that can “speak” Wi-Fi, ZigBee, and Z-Wave. These devices communicate through the Hub (e.g. motion sensor detects movement, notifies the Hub, which turns on connected lightbulbs). The end user can also interact through the SmartThings app (e.g. turning off specific lights). This whole ecosystem is the SmartThings IoT platform.
How Many Devices Are Connected to the Internet of Things?
According to Statista, there were approximately 23 billion connected IoT devices in 2018. That number is expected to grow exponentially, to 31 billion connected IoT devices in 2020 all the way up to 75 billion connected IoT devices in 2025.
The Benefits of the Internet of Things
The Internet of Things can do a lot that humans can’t. This leads to greater efficiency, convenience, and in some cases, even safety.
Devices process data faster than we do.
There’s always significant lag in human-to-human interactions. When you send an email, who knows how long until the recipient reads it, processes it, then writes up a reply? Machines can analyze, interpret, and reply to data much faster than we can.
Devices are better at managing data.
Devices are designed to dedicate all of their resources to a specific set of tasks, whereas humans are multitaskers. We forget easily, but devices don’t.
We can automate almost anything.
Imagine if your coffee maker started making coffee on its own as soon as your alarm clock rang. Or if your lawn sprinklers stayed off when a weather sensor detected rain. Or you received an automatic SMS alert when a family member had a medical issue.
Consider a future where all cars are self-driven and can communicate in real time with nearby cars, leading to fewer accidents and traffic jams. Or where all electrical appliances have access to the city’s electrical grid data and only run during low-demand times of day when electricity is cheapest.
The possibilities are endless.
The Challenges of the Internet of Things
But the Internet of Things isn’t without its downsides.
Too many IoT standards.
Remember, a device can only speak to another device if they understand the same language. Well, there are far too many languages right now, and too many devices are incompatible with each other.
Data security is extremely important.
Device-to-device communication is all good until a human decides to spoof a connection and remotely hijack a device for malicious purposes. This may not be a huge issue for, say, a device that regulates home temperature. But imagine if a hacker gained access to a network of medical devices.
Device malfunctions are also a real concern.
Software and hardware can both be buggy, and sometimes bugs are major. With the Internet of Things, bugs in data collection or data processing can introduce massive problems into large systems that we grow to depend on, and network crashes could be devastating.
Data privacy is more important than ever.
Maybe the widespread collection and processing of data is something that we shouldn’t pursue, even with the promise of a more efficient, more convenient tomorrow.
Read more about why the Internet of Things should scare you.
What Can You Do With the Internet of Things?
The Internet of Things is already used in many ways, and you’ve probably encountered a few without even realizing it.
Smart home automation is the main idea for consumers like you and me. As more devices in your home become connected to each other, the more you can automate and accomplish using sensors, timers, and triggers. Learn more in our smart home guide for newbies.
It’s even better if you have DIY skills and a tinkering spirit. Using a microcontroller and Blynk, you can create all kinds of DIY IoT projects and easily read data from your devices. You can also make some interesting DIY IoT projects using a Raspberry Pi and Windows 10 IoT Core.
The Internet of Things is also revolutionizing healthcare and medical devices. We’re seeing better patient care and tracking, smarter surgeries, earlier detection of ailments, and even robotic healthcare assistants. For example, Wi-Fi pacemakers with alerts have saved victims from impending heart attacks.
For more ideas, check out some fascinating Internet of Things products!
Image Credit: bakhtiarzein/Depositphotos
Read the full article: What Is the Internet of Things?
Read Full Article
5 Mac App Alternatives If You Hate App Subscriptions

The push for subscription pricing is gaining popularity with Mac app developers. You might be disappointed, especially if you like to own apps outright instead of paying for them every month or year.
But since you can’t turn back the clock, it’s best to look for other options that seem viable to you. Start with our alternative recommendations for five popular apps that have switched to subscription models in the past few years.
1. Replace 1Password With Secrets
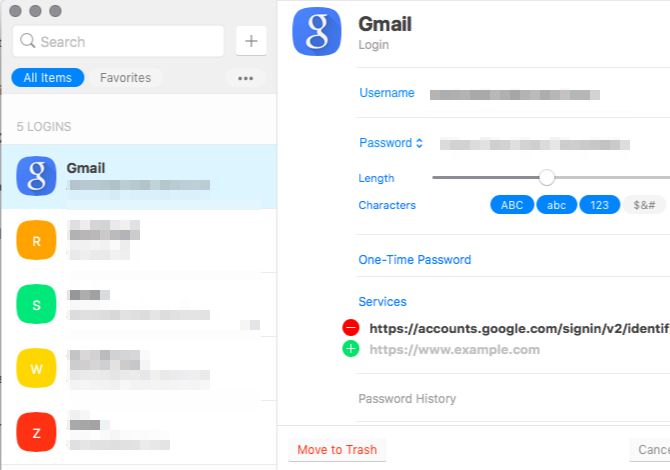
1Password is a powerhouse of an app and, in a way, irreplaceable. You probably won’t find its entire set of features in a single app, but Secrets comes with a few similar ones that are quite useful. One of them is the ability to generate one-time passwords for sites where you have enabled two-step verification.
The second is the vulnerability assessment feature. It uses the Have I Been Pwned database to check whether your logins have been compromised in any data breach.
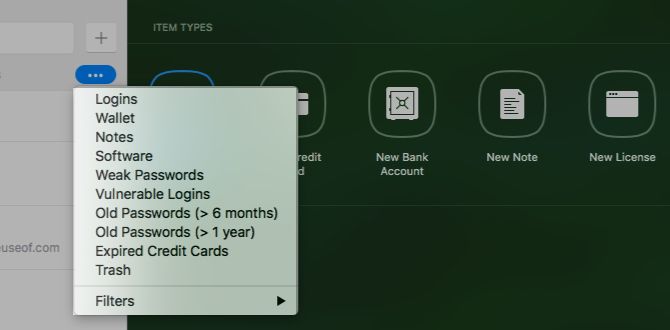
Secrets can also pinpoint old and weak passwords, as well as expired credit cards, for you. You can use its custom filters and tags to replicate 1Password’s multi-vault setup.
With Secrets, you get up to 10 items in the free version and unlimited use in the premium offering.
If you can do without 1Password’s Travel Mode and the Families/Business membership accounts, Secrets is worth a try. It’s available on Setapp, syncs with iCloud, and lets you to import your data from 1Password.
The lack of file attachments, custom fields, and password sharing might be a deal breaker for you. Even if that’s the case, it’s a good idea to keep up with the development of Secrets, as it’s getting better with each iteration.
In the meantime, check out other free alternatives to 1Password.
Download: Secrets for Mac (Free, $20 premium version available) | iOS (Free, $10 premium version available)
2. Replace Ulysses or Bear With Agenda
Trying to match a writing app with Ulysses feature-by-feature is pointless. The best you can do is find a robust app that does what Ulysses does at its core, which is:
- Give you a customizable writing environment
- Organize your notes
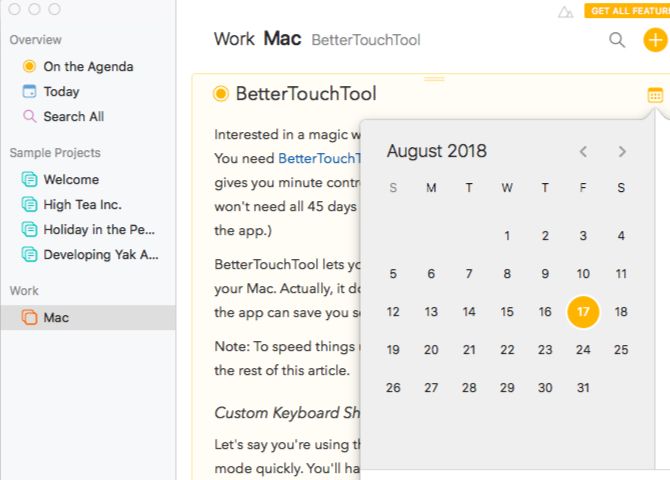
And Agenda can become that app. It takes a timeline-based approach to note-taking, which makes it easy to both look back and plan ahead. You can link notes to specific dates or calendar events to put time-sensitive notes On Your Agenda. The app also supports tag and checklist creation.
You’re sure to find the “related notes” feature particularly handy since it makes switching between notes a lot easier. To learn more about it and all other app features in detail, go through the sample projects that show up in Agenda.
It’s a pity that Agenda doesn’t give you any color/theme options. But that’s likely not a big deal for you when the app has so much else going for it.
While you’re exploring Agenda, you might also want to take a look at the following apps:
- Scrivener (Free trial, $45 license required): Get this if you want a dedicated novel-writing app that’s as feature-rich as Ulysses.
- Typora (Free during beta): The beta tag is deceptive because the app seems ready for the big league.
- Notebooks (Free trial, $19 license required): The lack of a recent Notebooks update is the main reason Agenda wins out over this app on our list.
- SnipNotes ($5): It comes with glowing reviews from the web but, unfortunately, not with a free trial.
Download: Agenda for Mac (Free, $25 Mac + iOS premium version available) | iOS (Free, $10 premium version available)
3. Replace Text Expander With Typinator
Before you look for a TextExpander alternative, see if any Mac apps you already use come with an integrated text expansion feature. There’s Alfred, for example, and BetterTouchTool. If these won’t work for you, you might want to give aText ($5) a shot. It comes with a free trial.
If nothing else short of an app as feature-filled as TextExpander will do, get Typinator. It allows you to insert text snippets and images automatically. The app also has autocorrect functions, date and time calculations, and HTML expansions, among other features.
It’s quite handy that you can customize Typinator on a per-app basis if you want to. One more point in favor of Typinator is that it offers upgrades at a discounted price.
To help users switching over from TextExpander, the makers of Typinator have set up a dedicated information page about using the app. It includes an overview of the differences between Typinator and TextExpander.
PhraseExpress ($25) is another sturdy text expansion app worth trying. You can pay the maintenance costs for, say, three years or five years while buying the app.
Download: Typinator for Mac (Free trial, $29 license required)
4. Replace Photoshop With Affinity Photo

Affinity Photo comes with a clean, well-designed interface. You’ll find a handful of workspaces dedicated to different types of editing operations in the app. These ensure that the advanced tools stay out of your way until you need them.
The app has quite a few useful features including customizable shortcuts, PSD support, and advanced selection tools. It also comes with six extensions that allow you to do light editing work on images stored in your Mac’s Photos app.

Want more power at your fingertips? Try the re-editable filters with live previews and non-destructive editing capabilities.
Affinity Photo includes many concepts and tools similar to those you’ll find in Photoshop, but it would be unfair to call the app a Photoshop clone. The similarities just make it easier to switch over to Affinity Photo from Photoshop.
Of course, depending on the type of creative work you’re involved in, you might miss some of the advanced features of the latter. But there’s no doubt that Affinity Photo has shaped up really well and is worth exploring.
In addition to this app, you might want to check out a few others on our list of free and paid image editors for macOS.
Download: Affinity Photo for Mac (Free trial, $50 license required) | iPad ($20)
5. Replace Day One With Dyrii Journal
For a change, here’s one app that’s switching from the subscription model to one-time pricing. It’s a pity that the developers of Dyrii Journal have put new feature development on hold. But they’ve promised ongoing support for the existing app, which is why you might want to go ahead and give this one a shot.
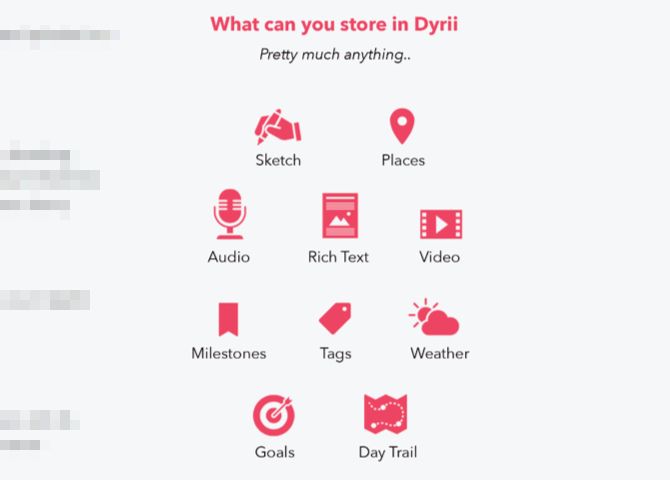
Dyrii Journal allows you to add text, photos, videos, audio, geolocation, and more to your journal. You can even add drawings with the Apple Pencil.
The app makes it easy to import your Day One entries and also allows you to store your data locally. The iCloud sync and mood tracker features make this great app even better.
Now for the not-so-good news.
The current Dyrii Journal version does not come with a free trial. (It did before, as part of the subscription model.) So you’ll have to rely mainly on web reviews, which are highly positive, to decide whether Dyrii Journal is the one for you. It’s a gamble, yes, but if it pays off, you’ll have a solid Day One replacement on your hands. Be sure to do some thorough research first.
MacJournal ($40) is another excellent alternative to keep an eye on. It doesn’t have the visual impact of Day One, but it’s a versatile app. The only catch is that the app hasn’t seen an update in a couple of years, but that’s set to change.
The Agenda app we mentioned above can also make a good journal thanks to its calendar integration.
If you don’t find the perfect journaling app to replace Day One, you might want to turn to the trusty Evernote to record your life.
Download: Dyrii Journal for Mac ($40) | iOS ($10)
Or Take the Middle Path With Setapp
The debate over subscription pricing looks set to continue. Whether you engage in it or not, the crux of the matter is that you either have to pay for subscriptions or grab your data and switch to single-payment apps.
There’s a middle path, too: you can get premium Mac apps with a single Setapp subscription. It’s not the perfect solution, but at least you’ll end up paying for fewer subscriptions overall.
Read the full article: 5 Mac App Alternatives If You Hate App Subscriptions
Read Full Article
YouTube expands its ‘digital wellbeing’ tools to track time spent watching videos
Google today is expanding YouTube’s set of “digital wellbeing” tools, with an added feature that will calculate how much you’re watching videos. The idea is that this will allow users to take better control over their viewing behavior and place limits on their time spent on YouTube by way of other app features that remind you to take a break. The “Time Watched” feature, rolling out today, will inform YouTube users how much they’ve watched today, yesterday, and over the past 7 days, says YouTube.
The company, along with Apple and Facebook, have more recently begun to take responsibility for the addictive nature of their devices and services which were designed to exploit vulnerabilities in human psychology, and are now facing the unintended consequences of those decisions.
At Google, the company is now addressing digital wellbeing across its products, including Android, Gmail, Google Photos, YouTube and elsewhere.
At its Google I/O developer conference earlier this year, it introduced a series of controls for YouTube viewers, including reminders to pause your viewing (“Take a Break”) and those that would disable notification sounds for periods of time, and allow you to receive notifications as a digest.
At the time, Google said it was “soon” preparing to roll out a “Time Watched” profile that will appear in the Account menu – that’s what’s new as of today.
When the feature arrives, you can visit your profile in the account menu to see your stats, including time watched over various time frames, as well as your Daily Average. This information is calculated based on your YouTube watch history, the company says.
That means if you have deleted videos from your history or watched in Incognito Mode, that viewing won’t be counted. Additionally, if you pause your history, you’ll also be unable to track your stats.

It was initially unclear if YouTube TV watch history is being counted. A screenshot shared by Google today says it’s not, nor is YouTube Music. However, the answer on the YouTube Help support site Google linked to in a blog post says it is. We’ve asked Google to clarify which is correct and will update when the company responds. Google says it is not counted, which is good – YouTube TV is basically just like television, which is associated with longer programming blocks, and longer time spent viewing, in many cases.
The new feature is rolling out starting today, YouTube says.
Read Full Article
Microsoft is about to announce Xbox All Access subscription
Microsoft published a news item announcing Xbox All Access on the Xbox blog and then unpublished it. But multiple news outlets spotted the article before Microsoft could take the post down. So now that the cat is out of the bag, it looks like Microsoft’s new hardware and software subscription is real.
There have been rumors over the past few weeks that Microsoft was planning to announce a new subscription. Today’s announcement lines up with those rumors. Microsoft is launching Xbox All Access in the U.S., which includes a console, Xbox Live Gold and Xbox Game Pass.
You get to choose between an Xbox One S for $22 per month or an Xbox One X for $35 per month. After paying for 24 months, the subscription stops and the console is yours. You can then choose to keep paying for Xbox Live Gold and Xbox Game Pass or you can cancel your subscriptions — it’s your console after all.
So let’s do the math. You can currently buy an Xbox One S for around $299. Xbox Live Gold lets you play multiplayer games and access free games for $60 per year. The Xbox Game Pass lets you download and play games from a library of 100+ games for $9.99 per month — it’s a sort of Spotify for video games.
If you buy a console and subscribe for two years, you’ll end up paying around $659. An Xbox All Access subscription lets you save around $130. If you already planned on subscribing to those two services, it sounds like a good deal. If you didn’t really care about Xbox Game Pass, you’ll end up paying more than buying a console the normal way.
The Xbox One X currently costs around $499. If you add two years of Xbox Live Gold and Xbox Game Pass, the bottom line is $859. Two years of Xbox All Access with the Xbox One X costs $840. So it’s not that good a deal if you’re interested in the Xbox One X.
With this new offering, Microsoft shows that it wants to shift its gaming strategy to subscriptions. Buying a console every few years isn’t as lucrative as buying an all-in-one Xbox subscription. Subscriptions increase customer loyalty and create predictable recurring revenue.
More importantly, gaming consoles won’t stick around forever. At some point, games will run on expensive servers in the cloud and you’ll subscribe to a service. Rumor has it that Microsoft is already getting ready to launch a low-powered system to stream games from the cloud. This is what Microsoft is thinking about with Xbox All Access.
Read Full Article
Enable 2FA in Fortnite to Earn a New Emote

Two-factor authentication (2FA) is one of the best defenses you have at your disposal to avoid being hacked. Unfortunately, too many people never enable 2FA, leaving themselves open to attack. However, Epic Games is trying to change all that with a simple bribe.
What Is Two-Factor Authentication?
There are a multitude of ways to keep your online accounts locked down. The most obvious method is to choose strong, unique passwords for every single service you use. Or, if that sounds like too much work, use a password manager instead.
The next step is enabling two-factor authentication. This adds an obstacle to would-be hackers, as 2FA employs a second element for verifying you are who you say you are. The most common element being an SMS message or email with a code attached.
Enable 2FA and Earn a Free Emote
This is the method Epic Games uses with Fortnite. The problem is persuading people to actually enable two-factor authentication on their accounts. Epic’s rather clever solution is to offer a reward to everyone who enables 2FA on their Fortnite account.
Your account security is our top priority!
Protect your account by enabling 2FA (Two-Factor Authentication). As a reward for protecting your account, you’ll unlock the Boogiedown Emote in Fortnite Battle Royale.
Get started here: https://t.co/JSyND2qWfY pic.twitter.com/4E0kyHDkBz
— Fortnite (@FortniteGame) August 23, 2018
Enabling two-factor authentication in Fortnite will unlock the new Boogiedown emote. Emotes being dances you can have your character perform on the battlefield. Emotes are a moneymaker for Epic, so giving one away for free is something of a big deal.
Enable Two-Factor Authentication Today!
While a new emote isn’t a life-changing reward, it’s surely better than nothing. Especially given how easy it is to enable two-factor authentication. Let’s hope this inspires more companies and services to offer rewards to users who enable 2FA.
Fortnite is is huge hit right now, and with the game now available on smartphones, it’s only growing in popularity. With that in mind, you should learn how to safely install Fortnite on Android. And if you’re a parent, we have everything you need to know about Fortnite.
Read the full article: Enable 2FA in Fortnite to Earn a New Emote
Read Full Article

Apple could introduce three devices with iPhone X design
A new report from Bloomberg confirms previous rumors and lines up with Ming-Chi Kuo’s original report from November 2017. It sounds likely that Apple is going to introduce three new phones in September — an updated iPhone X, a bigger phone and a successor to the iPhone 8 with the iPhone X design.
The updated iPhone X could be considered as an “S upgrade” with a better system-on-a-chip and better cameras. The phone itself could look exactly the same as the iPhone X you can buy today. But you can expect faster performance thanks to an updated A12 chip designed by Apple and manufactured by TSMC.
The bigger device could feature a gigantic 6.5-inch display. It should have exactly the same features as the updated iPhone X — stainless steel edges, two cameras on the back, an OLED display, etc. This model could have two SIM slots in some countries to make it easier to roam in other regions and countries.
More interestingly, Apple wants to replace the iPhone 8 with a device inspired by the iPhone X. It could cost around as much as the iPhone 8 today, but it should be a big upgrade for those who are focused on the entry-level model.
Of course, there will be some compromises. For instance, Apple will replace the stainless steel edges with aluminum edges. There should be a single camera on the back. And the display won’t be as sharp as it should be a 6.1-inch LCD display.
A previous rumor indicated that this new model could come in a wide range of colors including grey, white, blue, red and orange. Bloomberg confirms that the disparition of the home button means that this phone will get Face ID.
On the software side, it sounds like the bigger 6.5-inch iPhone could let you run two apps side-by-side, pretty much like opening two apps on the iPad. If Apple follows its usual pattern, the company should unveil these new devices in just a couple of weeks.
Read Full Article
How to Make Your Own Wi-Fi Connected Button With ESP8266

The Internet of Things has vast DIY potential. With enough know-how and a few cheap components, you could build a complex system of connected devices.
Sometimes, however, you want something simple. No bells or whistles, just a button that performs a single task. You might already be familiar with something like this if you’ve ever used an Amazon Dash button to reorder everyday household items.
Today we will make a Wi-Fi enabled button using a NodeMCU, and program it to use IFTTT to do… well, anything! Written instructions following the video, if you prefer.
What You’ll Need
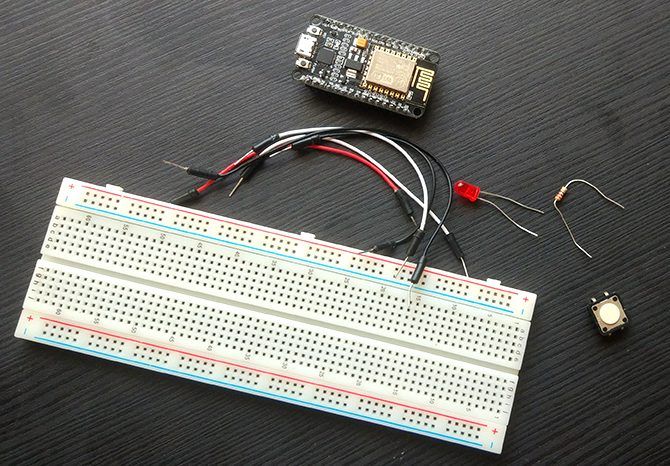
You will need:
- 1 x NodeMCU (ESP8266) board, available for $2-3 on AliExpress
- 1 x Pushbutton
- 1 x LED (optional)
- 1 x 220 Ohm resistor (optional)
- Breadboard and hookup wires
- Micro USB for programming
- Computer with the Arduino IDE installed
Apart from the NodeMCU, you should be able to find most of these parts in any Arduino starter kit. This tutorial will assume you are using the optional LED and resistor, but they are not essential.
Step 1: Setting Up the Circuit
The hardware setup is very simple for this project. Set up your board according to this diagram.

The purple wire attaches pin D0 to one side of the button. The green wire connects the other side of the button to the RST pin. The blue wire runs from pin D1 to the resistor and LED. The negative leg of the LED attaches to the GND pin of the NodeMCU.
When the breadboard is set up it should look something like this:

If you are wondering how I’ve got my LED going to the ground pin using just those tiny bits of cable, our quick breadboard crash course should help clear it up! Check your setup and attach your NodeMCU to the computer via USB.
Step 2: Setting Up the IDE
Before getting on with coding, you need to make some preparations. If you haven’t already, set up the Arduino IDE to recognize your NodeMCU board. You can add it to your boards list via File > Preferences.

You can find a more detailed explanation of this step in our NodeMCU introduction article.
Two libraries are required for this project. Navigate to Sketch > Include Library > Manage Libraries. Search for ESP8266WIFI by Ivan Grokhotkov and install it. This library is written for making Wi-Fi connections with the NodeMCU board.
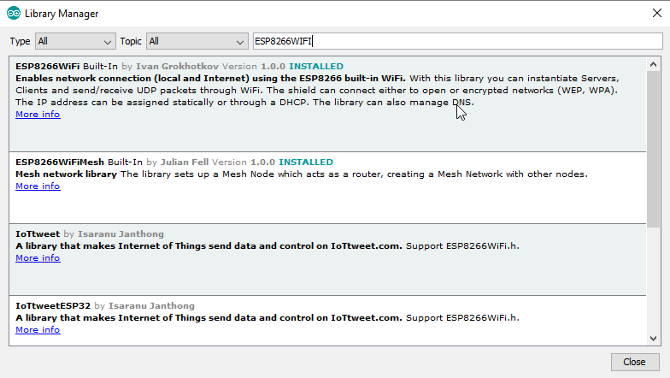
Next search for the IFTTTWebhook by John Romkey and install the latest version. This library is designed to simplify the process of sending webhooks to IFTTT.
That’s all the preparation we need, lets code!
How the Code Will Work
We’ll use the ESP8266WIFI library to establish a Wi-Fi connection. The IFTTTWebhooks library makes a request to IFTTT—in this case, to post to Twitter. Then, instruct the NodeMCU board to sleep when not in use to save power.
When the button is pressed, it will link the D0 and RST pins. This resets the board, and the process happens again.
Most of the code in this tutorial is simple enough for beginners. That said, if you are starting out, you’ll find it a lot easier to understand after following our Arduino beginners guide.
This tutorial goes through the code in chunks to help with understanding. If you want to get straight to business, you can find the complete code at Pastebin. Note that you will still need to fill in your Wi-Fi and IFTTT credentials in this code for it to function!
Step 3: Testing Deep Sleep
To begin, we’ll create a simple test to show how deep sleep works. Open a new sketch in the Arduino IDE. Enter the following two code chunks.
#include <IFTTTWebhook.h>
#include <ESP8266WiFi.h>

#define ledPin 5
#define wakePin 16
#define ssid "YOUR_WIFI_SSID"
#define password "YOUR_WIFI_PASSWORD"
#define IFTTT_API_KEY "IFTTT_KEY_GOES_HERE"
#define IFTTT_EVENT_NAME "IFTTT_EVENT_NAME_HERE"
Here, we include our libraries, along with defining a few variables we will need in our sketch. You’ll notice that the ledPin and wakePin are numbered differently here compared to the Fritzing diagram above. The NodeMCU has a different pinout to Arduino boards. This is not a problem though, due to this handy diagram:

Now create a setup function:
void setup() {
  Serial.begin(115200);
  while(!Serial) {
  }
  Serial.println(" ");// print an empty line before and after Button Press
  Serial.println("Button Pressed");
  Serial.println(" ");// print an empty line
  ESP.deepSleep(wakePin);
}
Here, we set up our serial port, and use a while loop to wait until it begins. Since this code will trigger after pressing the reset button, we print “Button Pressed” to the serial monitor. Then, we tell the NodeMCU to go into deep sleep until the button connecting the wakePin to the RST pin is pressed.
Finally, for testing, add this to your loop() method:
void loop(){
  //if deep sleep is working, this code will never run.
  Serial.println("This shouldn't get printed");
}
Usually, Arduino sketches run the loop function continuously after setup. Since we send the board to sleep before setup ends, the loop never runs.
Save your sketch and upload it to the board. Open the serial monitor and you should see “Button Pressed.” Every time the button triggers, the board resets and the message prints again. It works!
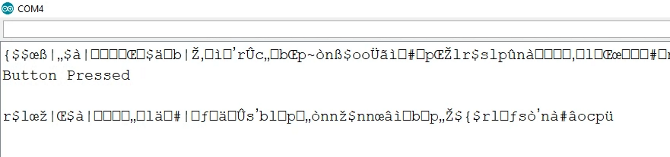
A Note About the Serial Monitor
You may have noticed some nonsense characters in the serial monitor during some of your projects. This is usually due to not setting the serial monitor to the same baud rate as the Serial.begin(XXXX) rate.
Many guides suggest starting the serial connection at a baud rate of 115200 for a project like this. I tried many combinations, and they all had varying degrees of gibberish before and after serial messages. According to various forum posts, this could be down to a faulty board or software compatibility issue. As it doesn’t affect the project too badly, I’m choosing to pretend it’s not happening.
If you are having issues with the serial monitor, try different baud rates and see which works best for you.
Step 4: Connecting to Wi-Fi
Now create a function for connecting to your Wi-Fi network.
void connectToWifi() {
  Serial.print("Connecting to: SSID NAME"); //uncomment next line to show SSID name
  //Serial.print(ssid);
  WiFi.begin(ssid, password);
  Serial.println(" ");// print an empty line
  Serial.print("Attempting to connect: ");

  //try to connect for 10 seconds
  int i = 10;
  while(WiFi.status() != WL_CONNECTED && i >=0) {
    delay(1000);
    Serial.print(i);
    Serial.print(", ");
    i--;
  }
  Serial.println(" ");// print an empty line

  //print connection result
  if(WiFi.status() == WL_CONNECTED){
    Serial.print("Connected.");
    Serial.println(" ");// print an empty line
    Serial.print("NodeMCU ip address: ");
    Serial.println(WiFi.localIP());
  }
  else {
    Serial.println("Connection failed - check your credentials or connection");
  }
}
This method attempts to connect to your network ten times with a second in between. Success or failure of connection prints to the serial monitor.
Step 5: Calling the Connection Method
Right now, the connectToWifi() is never called. Add a call to your setup function between the “Button Pressed” message and sending the board to sleep.
connectToWifi();
In case you are wondering where this fits, it should look like this:
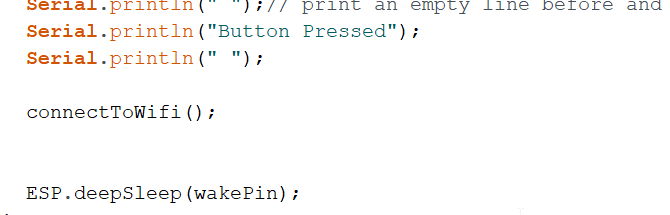
At the top of the sketch replace the ssid and password variables with your Wi-Fi credentials. Save your sketch and upload to the board.
Now when the board boots it will attempt to connect to your Wi-Fi network, before returning to the setup function. Now, lets set up the IFTTT integration.
Step 6: Setting Up IFTTT Integration
IFTTT allows integration with a vast array of web services. We used it in our Wi-Fi PC tower LED tutorial to send an alert whenever a new email is received. Today we’ll be using it to send a tweet at the press of a button.
Navigate to the My Applets page, and select New Applet
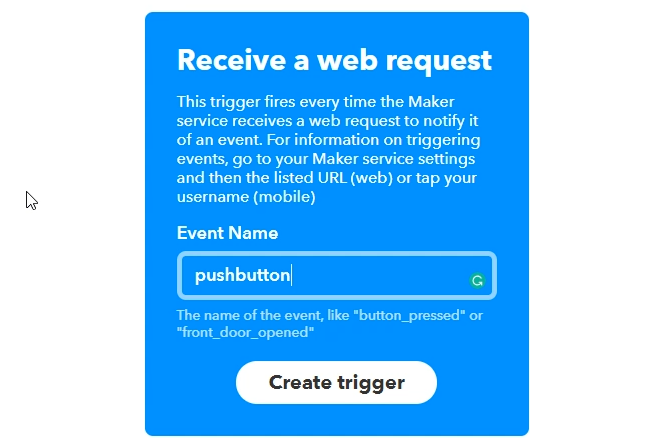
Click on +this and connect to Webhooks. Select “Receive a web request” and name your event. Keep it simple! Note down the event name, you’ll need to add it to your NodeMCU code later. Click “Create Trigger”.
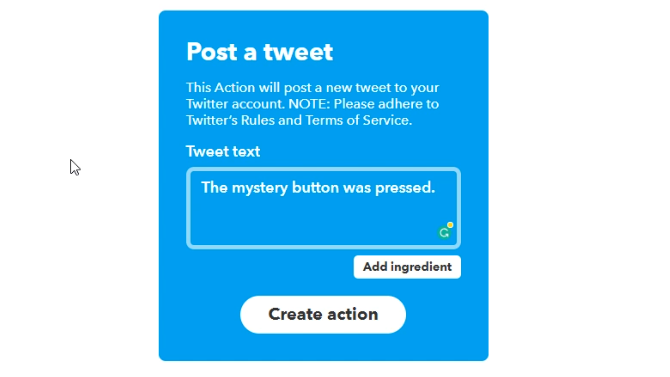
Now select +that. Search for the Twitter service and connect to it—you will need to authorize it to post to your Twitter account. Select “Post a tweet” and choose your message.
The next screen will ask you to review the applet. Click finish. That’s it!
Step 7: Adding IFTTT Credentials to the Code
Back in the Arduino IDE you will need to add your IFTTT API key and event name to your defined variables. To find the API key, navigate to My Applets and select Webhooks under the Services tab. Select Documentation to access your key.
Copy the key, and event name into your code, replacing the temporary names set up for them.
#define IFTTT_API_KEY "IFTTT_KEY_GOES_HERE"
#define IFTTT_EVENT_NAME "IFTTT_EVENT_NAME_HERE"
Note, the inverted commas have to stay, only replace the text.
Between calling the connectToWifi() and sending the board to sleep, create an instance of the IFTTTWebhook library object. The LED signals task completion before deep sleep begins again.
//just connected to Wi-Fi
IFTTTWebhook hook(IFTTT_API_KEY, IFTTT_EVENT_NAME);
hook.trigger();

pinMode(ledPin, OUTPUT);
digitalWrite(ledPin, HIGH);
delay(200);
digitalWrite(ledPin, LOW);
//now sending board to sleep
Calling trigger on the hook object fires off the IFTTT applet, and should post to your Twitter account. Save your sketch and upload it. You now should have a fully functional tweeting button.

If it doesn’t seem to be working, check through your code and credentials carefully for mistakes. If you really get stuck, get the full code from above and compare it to your own.
Done! How Could You Improve It Further?
This is a basic version of a Wi-Fi button, but there are many ways it could be improved. For simplicity, the USB connection is used for power here. A battery would make it entirely mobile, and a case holding the circuit would be the perfect beginner 3D printing project.
Despite using deep sleep, you may find a battery would run out quite quickly. There are many Arduino power saving tips that help in these type of projects. While more difficult than this tutorial, if you made your own power-conscious Arduino from scratch, a battery-powered Wi-Fi button could last for months!
This project would make the perfect for a remote for smart home applications. There are already a considerable amount of home automation applets available on IFTTT. Once you’ve got the basics down, you can use almost any sensor or switch to trigger practically any service you can imagine.
Image Credit: Vadmary/Depositphotos
Read the full article: How to Make Your Own Wi-Fi Connected Button With ESP8266
Read Full Article
Facebook bans Myanmar military accounts for ‘enabling human rights abuses’
Facebook is cracking down on the military leadership in Myanmar, the Southeast Asian country where the social network has been identified as a factor contributing to ethnic tension and violence.
The U.S. company said today that it removed accounts belonging to Senior General Min Aung Hlaing, who is commander-in-chief of the armed forces, and the military-owned Myawady television network.
In total, the purge has swept up 18 Facebook accounts, 52 Facebook Pages and an Instagram account after the company “found evidence that many of these individuals and organizations committed or enabled serious human rights abuses in the country.”
Some 30 million of Myanmar’s 50 million population is estimated to use Facebook, making it a hugely effective broadcast network. But with wide reach comes the potential with misuse, as has been most evident in the U.S.
But the Facebook effect is also huge far from the U.S. A report from the UN issued in March determined that Facebook had played a “determining role” in Myanmar’s crisis. The situation in the country is so severe that an estimated 700,000 Rohingya Muslim refugees are thought to have fled to neighboring Bangladesh following a Myanmar government crackdown that began in August. U.S. Secretary of State Rex Tillerson has labeled the actions as ethnic cleansing.
Facebook’s action today comes a week after an investigative report from Reuters found more than 1,000 posts, comments and images that attacked Rohingya and other Muslim users on the platform.
“During a recent investigation, we discovered that they used seemingly independent news and opinion Pages to covertly push the messages of the Myanmar military. This type of behavior is banned on Facebook because we want people to be able to trust the connections they make,” Facebook said in a statement.
“While we were too slow to act, we’re now making progress – with better technology to identify hate speech, improved reporting tools, and more people to review content,” it added.
Read Full Article