30 October 2018

A fully loaded iPad Pro will cost you $2,227


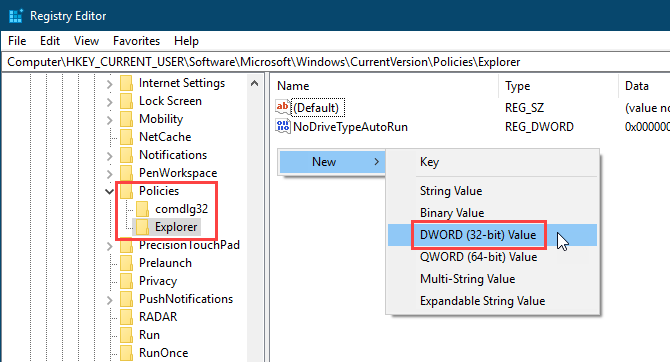
This is a public service announcement. The latest and greatest iPad, namely the 12.9-inch iPad Pro, will cost you $2,227 to buy in its best configuration and with the basic accessories that make it worth having in the first place. Plus tax, of course. I’m not making a value judgment here, just stating the facts. Tablets are getting pretty damn expensive.

To be clear, here’s what you’d be getting for that price.

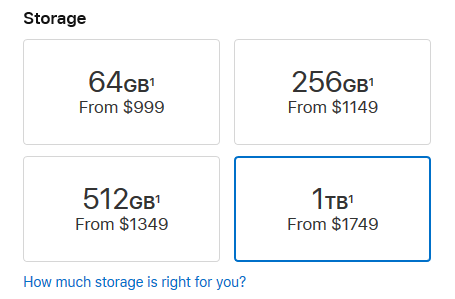
  • iPad Pro base cost $999
  • Upgrade from 64GB to 1TB storage: $750 (!)
  • Cellular chip: $150
  • New Apple Pencil: $129
  • Smart Keyboard Folio: $199

Tax varies. Shipping’s free, at least.

To me the cost of the base device is actually not bad, though I wouldn’t buy it. It really does look like a fine device, if you can get over the curved screen edges and minuscule bezels that will probably make you drop it. I can really see how the 12.9-inch iPad Pro could be a great tool for some artists, assuming they’re already successful enough to afford it. Good stylus surfaces are expensive and the iPad has proven itself to be at the very least competitive.

The storage is, as always, the eye-wateringly expensive upgrade that doesn’t really jive with the cost of the actual components. Good flash storage isn’t super cheap, but it isn’t $750 a terabyte. A good M.2 drive of that capacity and speed is perhaps $150, and that’s including the interface and so on. Apple charging an arm and a leg for upgraded storage is nothing new, but they somehow manage to make it just as shocking every time.

The cellular is another upsell that probably isn’t worth it, considering it also incurs a monthly cost. If it was a low-speed Amazon-style free service, I’d do it in a heartbeat to keep my notes and saved articles up to date. But it’s going to run you $150 up front and probably almost that every year as an added device to your plan. (Could be a nice option to have if you travel a lot, though.)

The accessories are expensive but that new stylus and its snap-on charging (hardly an Apple innovation but nice to have) sure do look nice. You’ll need a keyboard if you’re going to do anything but sketch and read comics on this thing.

Tablet computer or computer tablet?

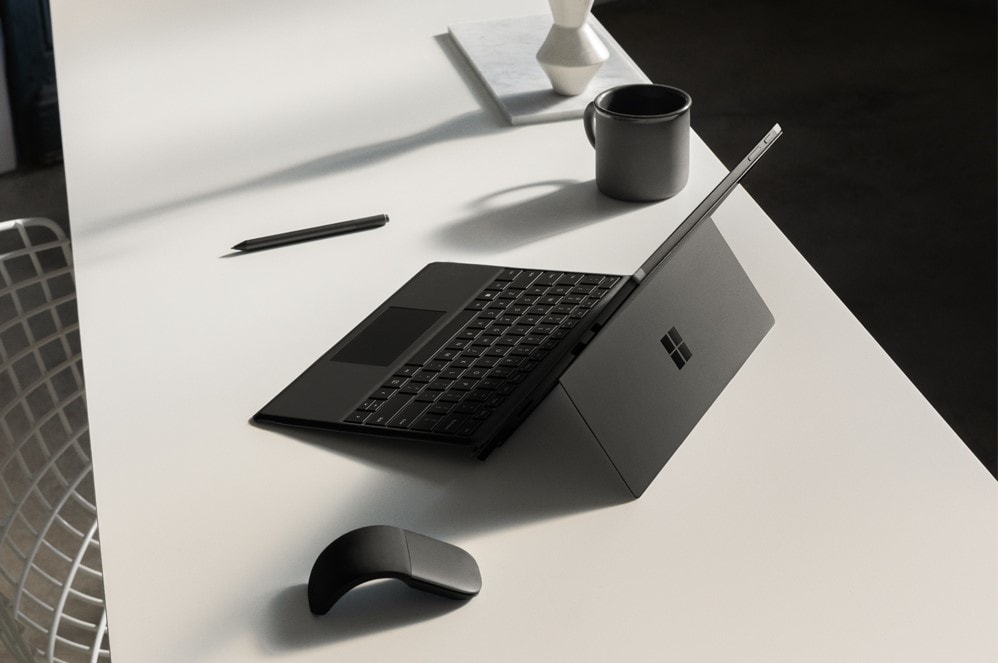
And adding the keyboard is really where you start to blur the line between tablet and “real” computer. Of course the Microsoft Surface, bless its heart and its tiny sales numbers (unflatteringly called out by Apple on stage), is the one that has made strides here over the last few years and Apple is merely drafting it. That’s fine — it’s been the other way around plenty of times.

But the difference when you start looking at the apps and features is pretty serious. The iPad Pro is certainly the most productive and professional tablet out there, but as soon as you add a keyboard and sit it down on your lap, it starts competing with laptops. And the Surface lineup, while it may lack some of the polish of the iPad, is arguably more powerful both in specs (hard to compare Intel’s chips to Apple’s directly in this case) and certainly in software capability.

I suppose that last point is arguable as well but let’s try to be honest with ourselves. A Windows computer can do more than an iPad.

Microsoft’s device, after all, is a full-blown computer that acts like a tablet when you want it to, not vice versa. That’s important. If I was going to spend $2,000 on a daily driver (though honestly, there’s no need to), I sure as hell wouldn’t pick the one with all kinds of weird, half-formed multitasking gestures, semi-functional cross-app compatibility, and app features and selection highly curated and restricted by the people who own the store. And this is coming from someone who likes Macs and iPads!

For the same price as the iPad Pro discussed above, you could get a Surface Pro 6 with 16 gigs of RAM (Apple doesn’t specify how much the iPad Pro has, and if it doesn’t crow about it, that usually means it’s nothing to crow about), a better processor (Intel Core i7, same generation), and… well, if you want that terabyte of storage you’re still going to pay through the nose. Maxing it out (including accessories) costs you a couple hundred more than the best iPad you can get, but I think you’d be getting much more value for your dollar.

Plus the Surface has a headphone jack.

That said, there’s no reason to go all-out on either of these things. That’s the real trap that both companies want you to fall into. Save money and buy last year’s model or the year before, save yourself a thousand bucks, and take a vacation instead. You deserve it.

Apple Fall Event 2018


Read Full Article

Apple ditches the headphone jack on latest iPad Pro models


The headphone jack is missing from the latest versions of the iPad Pro. It’s gone. Dead. Worse yet, the headphones that come with the iPhone will not work either. Apple ditched Lightning for USB-C. Instead, Apple is selling a USB-C to 3.5mm dongle for $9.

The latest iPad Pro models follows the trend lines set by the iPhone. Just like on the iPhone, the Home Button is missing, and the headphone jack is gone. It’s a concession some users might find surprising. On the iPhone, there’s obviously less real estate to integrate a large port but that’s, in theory, less of an issue in a large device like a tablet. But it makes sense. Apple tends to maximize margins by ensuring different products use a similar set of hardware. And since the iPhone hasn’t had a headphone port since 2016, it’s about time the trend hits Apple’s other mobile device.

Headphone users are not the only users left in the dark. The iPad has long been a great device for a stationary audio controller. Now, instead of simply connecting the tablet to a stereo with a 3.5mm cable, a $9 dongle is required. Want to use headphones? Apple would obviously prefer if owners use $159 AirPods though there are a handful of USB-C headphones including these from Google.

Apple Fall Event 2018


Read Full Article

Introducing AdaNet: Fast and Flexible AutoML with Learning Guarantees


Ensemble learning, the art of combining different machine learning (ML) model predictions, is widely used with neural networks to achieve state-of-the-art performance, benefitting from a rich history and theoretical guarantees to enable success at challenges such as the Netflix Prize and various Kaggle competitions. However, they aren’t used much in practice due to long training times, and the ML model candidate selection requires its own domain expertise. But as computational power and specialized deep learning hardware such as TPUs become more readily available, machine learning models will grow larger and ensembles will become more prominent. Now, imagine a tool that automatically searches over neural architectures, and learns to combine the best ones into a high-quality model.

Today, we’re excited to share AdaNet, a lightweight TensorFlow-based framework for automatically learning high-quality models with minimal expert intervention. AdaNet builds on our recent reinforcement learning and evolutionary-based AutoML efforts to be fast and flexible while providing learning guarantees. Importantly, AdaNet provides a general framework for not only learning a neural network architecture, but also for learning to ensemble to obtain even better models.

AdaNet is easy to use, and creates high-quality models, saving ML practitioners the time normally spent selecting optimal neural network architectures, implementing an adaptive algorithm for learning a neural architecture as an ensemble of subnetworks. AdaNet is capable of adding subnetworks of different depths and widths to create a diverse ensemble, and trade off performance improvement with the number of parameters.
AdaNet adaptively growing an ensemble of neural networks. At each iteration, it measures the ensemble loss for each candidate, and selects the best one to move onto the next iteration.
Fast and Easy to Use
AdaNet implements the TensorFlow Estimator interface, which greatly simplifies machine learning programming by encapsulating training, evaluation, prediction and export for serving. It integrates with open-source tools like TensorFlow Hub modules, TensorFlow Model Analysis, and Google Cloud’s Hyperparameter Tuner. Distributed training support significantly reduces training time, and scales linearly with available CPUs and accelerators (e.g. GPUs).
AdaNet’s accuracy (y-axis) per train step (x-axis) on CIFAR-100. The blue line is accuracy on the training set, and red line is performance on the test set. A new subnetwork begins training every million steps, and eventually improves the performance of the ensemble. The grey and green lines are the accuracies of the ensemble before adding the new subnetwork.
Because TensorBoard is one of the best TensorFlow features for visualizing model metrics during training, AdaNet integrates seamlessly with it in order to monitor subnetwork training, ensemble composition, and performance. When AdaNet is done training, it exports a SavedModel that can be deployed with TensorFlow Serving.

Learning Guarantees
Building an ensemble of neural networks has several challenges: What are the best subnetwork architectures to consider? Is it best to reuse the same architectures or encourage diversity? While complex subnetworks with more parameters will tend to perform better on the training set, they may not generalize to unseen data due to their greater complexity. These challenges stem from evaluating model performance. We could evaluate performance on a hold-out set split from the training set, but in doing so would reduce the number of examples one can use for training the neural network.

Instead, AdaNet’s approach (presented in “AdaNet: Adaptive Structural Learning of Artificial Neural Networks” at ICML 2017) is to optimize an objective that balances the trade-offs between the ensemble’s performance on the training set and its ability to generalize to unseen data. The intuition is for the ensemble to include a candidate subnetwork only when it improves the ensemble’s training loss more than it affects its ability to generalize. This guarantees that:
  1. The generalization error of the ensemble is bounded by its training error and complexity.
  2. By optimizing this objective, we are directly minimizing this bound.
A practical benefit of optimizing this objective is that it eliminates the need for a hold-out set for choosing which candidate subnetworks to add to the ensemble. This has the added benefit of enabling the use of more training data for training the subnetworks. To learn more, please walk through our tutorial about the AdaNet objective.

Extensible
We believe that the key to making a useful AutoML framework for both research and production use is to not only provide sensible defaults, but to also allow users to try their own subnetwork/model definitions. As a result, machine learning researchers, practitioners, and enthusiasts are invited to define their own AdaNet adanet.subnetwork.Builder using high level TensorFlow APIs like tf.layers.

Users who have already integrated a TensorFlow model in their system can easily convert their TensorFlow code into an AdaNet subnetwork, and use the adanet.Estimator to boost model performance while obtaining learning guarantees. AdaNet will explore their defined search space of candidate subnetworks and learn to ensemble the subnetworks. For instance, we took an open-source implementation of a NASNet-A CIFAR architecture, transformed it into a subnetwork, and improved upon CIFAR-10 state-of-the-art results after eight AdaNet iterations. Furthermore, our model achieves this result with fewer parameters:
Performance of a NASNet-A model as presented in Zoph et al., 2018 versus AdaNet learning to combine small NASNet-A subnetworks on CIFAR-10.
Users are also invited to use their own custom loss functions as part of the AdaNet objective via canned or custom tf.contrib.estimator.Heads in order to train regression, classification, and multi-task learning problems.

Users can also fully define the search space of candidate subnetworks to explore by extending the adanet.subnetwork.Generator class. This allows them to grow or reduce their search space based on their available hardware. The search space of subnetworks can be as simple as duplicating the same subnetwork configuration with different random seeds, to training dozens of subnetworks with different hyperparameter combinations, and letting AdaNet choose the one to include in the final ensemble.

If you’re interested in trying AdaNet for yourself, please check out our Github repo, and walk through the tutorial notebooks. We’ve included a few working examples using dense layers and convolutions to get you started. AdaNet is an ongoing research project, and we welcome contributions. We’re excited to see how AdaNet can help the research community.

Acknowledgements
This project was only possible thanks to the members of the core team including Corinna Cortes, Mehryar Mohri, Xavi Gonzalvo, Charles Weill, Vitaly Kuznetsov, Scott Yak, and Hanna Mazzawi. We also extend a special thanks to our collaborators, residents and interns Gus Kristiansen, Galen Chuang, Ghassen Jerfel, Vladimir Macko, Ben Adlam, Scott Yang and the many others at Google who helped us test it out.


WhatsApp Video Calling Guide: Everything You Need to Know


whatsapp-video-calls

WhatsApp connects over a billion users around the world. They’re able to communicate through text messages or by using WhatsApp voice calling. And like any instant messenger, WhatsApp has a robust video calling feature as well.

What to Know About WhatsApp Video Calls

whatsapp-video-calling-android-iphone

Video calling is exactly what it sounds like. You “call” a contact you have on WhatsApp, and both of you can see each other on your smartphone screens. It’s what Skype has been doing for years.

WhatsApp video calling works across both Android and iOS. This makes WhatsApp one of the best smartphone apps for cross-platform video calls.

WhatsApp video calling is technically free, in the sense that WhatsApp isn’t charging you any money to make the call. However, video calls require an internet connection, so they will be consuming data from your phone’s data plan. If you are using WhatsApp to call someone over a Wi-Fi connection, your phone’s network carrier (e.g. AT&T, Vodafone, etc.) won’t charge you anything. A quick reminder, you can check how much data WhatsApp is using thanks to these WhatsApp tricks everyone should know.

To ensure you get all the features, download the latest version of WhatsApp.

Download: WhatsApp for Android | iOS (Free)

This is the only official way to get WhatsApp video calling. Don’t fall for WhatsApp scams that offer other ways to get the feature.

What You Can Do With WhatsApp Video Calls

How to make group video calls with Whatsapp

WhatsApp video calls are part of the existing voice calls feature. Placing a video call is pretty simple. Tap the contact you want to talk to, and tap the video camera icon next to their name.

The other person can answer the call (swipe up the blue button), reject the call (swipe up the red phone button), or reject the call and send a text instead (swipe up the message button). If they answer, you’re ready to go.

By default, WhatsApp video calls use the front-facing camera of your phone. However, you can switch this to the rear camera at any point with a tap on the screen. It’s seamless and just works.

You can also mute the microphone, so the other person can see you but not hear you. To mute the audio from the speakers, use your phone’s volume buttons.

Better Internet Speeds for WhatsApp Video Calls

Whenever you make a video call, WhatsApp does not assume any internet speed. So it will calculate your speed each time, and adjust the video quality accordingly. This makes a remarkable difference to how good the video looks.

One Redditor made a short video (linked above) comparing WhatsApp video calls with Apple’s FaceTime. WhatsApp looks far better in that particular battle.

We tried WhatsApp video calling on 4G, 3G, and 2G networks, and it worked on all three. The 2G network’s video quality was poor and pixelated, but it was still smooth enough to know what was happening on screen. The lack of lag was refreshing.

Multitasking While on a WhatsApp Video Call

whatsapp-video-calling-multitasking

The second highlight of WhatsApp’s video calls is the multitasking feature. Most smartphone video calls force you to use the video call and nothing else. You can’t multitask. However, WhatsApp has no such restrictions.

You can tap the “Message” button at any point to check other messages that someone has sent you on WhatsApp, and even reply to them. To return to your video call, just tap the green bar at the top of the app.

Group WhatsApp Video Calls

You can make a WhatsApp video call with up to four people at the same time. Group video calls obviously consume more data as well.

To place a group video call, first start a one-on-one call with anyone in your contact list. Then tap the “Add Participant” button (it looks like a person’s icon, with a plus sign next to it) in the top-right corner of the screen. Now choose another person to invite, and repeat the process for up to four people in total.

It’s simple and easy, but the four-person restriction is annoying. Plus you need everyone else to have WhatsApp too. While it’s good for an informal chat, we still think Appear.in is the best option if you want to talk to more people, without any sign-ups or app requirements.

No WhatsApp Web or Desktop Support

whatsapp-video-calling-picture-in-picture

Currently, WhatsApp video calls are not supported on WhatsApp Web or the desktop app.

While WhatsApp requires a smartphone and an active internet connection, you can still use it on a computer. You can do it via the WhatsApp desktop client or the WhatsApp Web client. However, neither of these support video calls.

On the other hand, apps like Skype or FaceTime are available on both computers and phones, and can make video calls between a computer and a phone.

How Much Data Do WhatsApp Video Calls Use?

whatsapp-video-calling-iphone

WhatsApp’s focus is to make the video call look as good as possible. So if it can give you higher quality, it’s going to do that. And that results in high data usage. If you’re not on Wi-Fi, this can quickly eat through cellular data caps.

On average, we found a minute’s call to use 5MB of data on 4G, 3.75MB on 3G, and 3MB on 2G. This isn’t bad at all, and much less than what we expected. A few Twitter users also recorded similar numbers.

WhatsApp’s settings have an option to reduce the data used on voice calls. If you’re worried about data usage, you can try this option to see if it also reduces video call data.

There’s Much More to WhatsApp

Video calling is an essential tool in any instant messenger, and WhatsApp has done a great job with it. The service is only improving with every passing day, and getting more stable and reliable.

That said, voice calling is just one small part of WhatsApp. There is so much more that the app offers, which makes it more than an instant messenger and actually turns it into a social network in its own right. In case you’ve missed some over the years, check out our list of the best new WhatsApp features.

Read the full article: WhatsApp Video Calling Guide: Everything You Need to Know


Read Full Article

How to Appear Invisible (Offline) on Facebook Chat and Messenger

4k HDR Streaming is Now a Thing, with the AVerMedia Live Gamer 4K (Review and Giveaway)

15 Key iPhone Troubleshooting Tips for All iPhone Models

6 Different Ways to Type on an Android Phone

The Facebook Image Size Guide for 2018


facebook-image-sizes-2018

Whether you’re trying to drive social traffic to your site or simply want your personal profile to look its best, you really need this Facebook image size guide.

From your profile banner to your holiday snaps, visuals really matter on the world’s largest social network. So we’re here to help you find the best image sizes to use on Facebook.

Unfortunately Facebook doesn’t make things easy, with some images appearing differently on mobile and desktop versions. But this Facebook image size guide should help you figure it all out.

Picking the Right Facebook Cover Photo Size

Facebook Cover Photo

Size on Mobile: 640 x 360 pixels

Size on Desktop: 851 x 315 pixels

Best Size: 820 x 462 pixels

Since you can only use one size of image for both mobile and desktop, the ideal minimum cover size is: 820 x 462 pixels (an aspect ratio of 1.77:1). This size displays nicely on both mobile and desktop, and you can position your image precisely when you upload it using Facebook’s own tools. If you use a larger image that still conforms to the same aspect ratio, desktop and tablet users will see an improvement in quality.

The cover photo is the banner at the top of your Facebook page. It’s the first thing visitors will notice when they land on your profile or page, so it’s important to create a unique Facebook cover photo. Things work a little differently for personal profiles and business pages.

For personal profiles, your cover forms a background for your personal profile. On mobile your profile picture appears in the center of the cover photo. For pages, the two are entirely separate. Your cover photo is a chance to say something bold about your brand, while your profile image provides a small snippet of identity.

What’s the Best Facebook Profile Picture Size?

Facebook Profile Photo Size

Mobile and Desktop: 180 x 180 pixels

Profile pictures are easy, since they’re square images. The image will display at 160 x 160 pixels, but Facebook asks for 180 x 180 pixels to scale down. You can basically use any square image you like, whether it’s large at 900 x 900 pixels or small at 200 x 200 pixels. Facebook will automatically resize and compress your image to fit.

Facebook Event Cover Image and Photo Sizes

Facebook Event Cover Photo Size

Best Event Cover Photo size: 1920 x 1080 pixels

Photos in Event Feed: (up to) 470 x 470 pixels

Facebook displays event cover images differently on mobile and desktop, so an aspect ratio of 16:9 is recommended to avoid cropping. An image at full HD resolution will also give your cover enough clarity should anyone click on it from the event page. Feel free to go to an even higher resolution to pack in the pixels.

After checking a whole load of event pages out, it seems event organisers use slightly different sizes but ensure the important content (names, dates, venues) appear somewhat toward the center of the image. Images displayed on your event wall can go up to 470 pixels wide and high, depending on the shape of your image.

The Best Facebook Group Cover Photo Size

Facebook Group Cover Photo Size

Best Cover Photo Size: 820 x 462 pixels

Despite only displaying at 820 x 250 pixels in the desktop news feed, the mobile version of Facebook shows the full 820 x 426 pixels group cover photo size. This is an aspect ratio of 1.77:1, so provided you stay within those boundaries you can create a higher resolution image which will fit perfectly.

Facebook Groups are an increasingly popular way to connect with friends, communities, and customers. And there are some awesome ways to discover new Facebook Groups. As always if you have any really important information that you don’t want hidden from view on desktop, make sure you account for the clipping that will occur at the top and bottom of the image.

What Is the Best Facebook Link Image Size?

Facebook Link Image Size

Size on Mobile: 560 x 292 pixels

Size on Desktop: 470 x 246 pixels

Best Link Image Size: 1200 x 629 pixels

The link image is the image pulled from any link you happen to share on Facebook, such as a blog post or a news story. If you have control over the source medium (your personal blog, for instance) you can design your “featured” image to conform to the 1.9:1 ratio at a size of around 1200 x 629 pixels for the best results.

Other image sizes will be cropped to fit this template. Assuming your image is purely illustrative, and doesn’t require 100 percent accurate reproduction on Facebook (like text, or a logo) this shouldn’t worry you too much. If you’re looking for a good image for an article, check out the best websites for free stock images.

Choosing the Right Facebook Ad Size

Facebook Ad Size

Single image ads: 1200 x 629 pixels

Carousel ads: 1080 x 1080 pixels

Single image ads follow the same precedent set by link images, at a 1.9:1 ratio. If you just want to promote your product with a link to your product page or blog post, 1200 x 629 pixels is fine. For carousel ads, which let you run up to 10 images in a scrolling carousel, stick to the 1:1 image ratio at 1080 x 1080 pixels or higher.

Remember that promoted posts are different to adverts. If you click the “Boost Post” button on your Facebook page to boost a post, you aren’t bound by the same restrictions and don’t require a Facebook ad manager account.

This allows you to do things like create a new post with a square image, put a link in the body of the text, and promote it like you would an advert.

Facebook Is Always Changing

Like Google, nobody knows what Facebook is thinking. And it changes things up regularly. With that in mind it’s best to keep up with the news in order to keep ahead of any changes. The social media giant’s influence continues to grow, and growing with the service is something users will just have to get used to.

However, popularity can cause problems too. The social network’s biggest hack saw 50 million accounts compromised, so make sure you know what to do if your Facebook account has been hacked.

Image Credit: ifong/Depositphotos

Read the full article: The Facebook Image Size Guide for 2018


Read Full Article

Deep Learning vs. Machine Learning vs. AI: How Do They Go Together?

How to Disable Access to the Settings App and Control Panel in Windows 10


disable-control-panel-access

The PC Settings app and the Control Panel allow you to change many different settings in Windows 10. But you may not want all users of a computer to be able to change the settings once they’re set.

For example, you may change specific settings for a child account and then prevent them from accessing settings to reverse your changes. Or maybe you’re setting up computers in a networked environment and you want to set default settings and prevent users from changing them.

Today we’ll show you how to disable access to both the PC Settings app and the Control Panel using the Registry Editor and the Local Group Policy Editor.

First, Change the User Account Type

To disable access to the Settings app and Control Panel, the account you’re changing this for must be an Administrator account. You can temporarily change the account to an Administrator account if it’s a Standard account. But don’t forget to change it back to a Standard account to prevent the user from re-enabling access to the Settings app and Control Panel.

Method 1: Using the Windows Registry

You can use this method of disabling the Settings app and the Control Panel no matter which edition of Windows 10 you’re using. If you’re using Windows 10 Pro or Enterprise, and you’d rather use the Local Group Policy Editor, see the next section.

Making changes to the registry can be risky. The change we talk about here is simple if you stick to our instructions. But it’s a good idea to back up the registry before making changes. You should also make sure you back up your data and consider creating a system restore point.

To revert changes you’ve made to the Windows registry, you can reset the registry to the default values.

To disable the Settings app and the Control Panel, press Windows key + R to open the Run dialog box. Type regedit in the Open box and click OK.

If the User Account Control dialog box displays, click Yes to continue. You may not see this dialog box, depending on your User Account Control settings.

Open the Registry Editor in Windows 10

In the tree structure on the left side of the Registry Editor window, navigate to the following key:

HKEY_CURRENT_USER\Software\Microsoft\Windows\CurrentVersion\Policies\Explorer

Then, right-click on the right side and go to New > DWORD (32-bit) Value.

Add a new DWORD value in the Windows 10 Registry Editor

Name the new key NoControlPanel and double-click on it.

On the Edit DWORD (32-bit) Value dialog box, type 1 in the Value data box and click OK.

Sign out and back in or reboot your computer to finalize the change.

Set NoControlPanel value to 1 in the Windows 10 Registry Editor

To revert the change, open regedit, go back to the key mentioned above, and change the NoControlPanel value to 0, or delete the NoControlPanel value.

Download Our Ready-Made Registry Hack

If you’re running Windows Home, and you’re not comfortable making changes to the registry yourself, you can download our ready-made registry hack (ZIP File). We’ve included one REG file for disabling access to the Settings app and Control Panel and another REG file for enabling access again.

Simply double-click the appropriate REG file and click Yes on the User Account Control dialog box (if it displays). Then, click Yes on the first dialog box and OK on the second.

Make sure you sign out and back in or reboot your computer.

Method 2: Using the Group Policy Editor

If you’re using Windows 10 Pro or Enterprise, you can use the Local Group Policy Editor to disable access to the Settings app and Control Panel.

Press Windows key + R to open the Run dialog box. Type gpedit.msc in the Open box and click OK.

Open the Local Group Policy Editor in Windows 10

In the tree list on the left side of the Local Group Policy Editor window, navigate to the following path:

User Configuration > Administrative Templates > Control Panel

On the right side, double-click Prohibit access to Control Panel and PC settings.

Double-click Prohibit access to Control Panel and PC Settings in the Local Group Policy Editor in Windows 10

Select Enabled at the top of the Prohibit access to Control Panel and PC settings dialog box and click OK.

Enable the Prohibit access to Control Panel and PC Settings setting in the Local Group Policy Editor in Windows 10

To enable access to the Settings app and Control Panel again, open the Local Group Policy Editor and navigate to the path mentioned above again. Then, select either Not Configured or Disabled.

Protect Your Windows Settings Even Further

Once you use either of the above methods in a user account, that user will not be able to open the Settings app. Also, if they try to access the Control Panel, they’ll see the following dialog box.

Message about disabled Control Panel in Windows 10

Windows also removes the Change account settings option on the Start menu’s user menu.

Change account setting option removed from the Start menu's user menu in Windows 10

The ability to disable access to the PC Settings app and Control Panel is especially useful in a network environment where you want to have consistent settings on all the machines on the network and prevent users from changing them.

But, it’s just as useful if other people, like friends and children and other family members, use your computer. There are also other ways you can lock down user accounts in Windows 10.

Read the full article: How to Disable Access to the Settings App and Control Panel in Windows 10


Read Full Article

The iPad finally moves to USB-C


Lightning had a good run, but it’s time to switch everything to USB-C. Apple finally dropped the Lightning port with the new iPad Pro. And it’s much more versatile than Lightning.

For instance, you can plug a 5K display to your iPad Pro and show some video on the external display. It’s still unclear how it’s going to work when it comes to software, but it opens up a lot possibilities.

You can also use USB-C dongles to plus all sort of data accessories. SD card readers, Ethernet cables, etc. The iPad Pro is looking more and more like a traditional laptop. Many third-party accessory makers will probably use this opportunity to develop docks and other hubs.

Finally, the good thing about USB-C is that you can theoretically turn any device into an external battery pack. Using a USB-C to Lightning, you can now charge an iPhone from your iPad. It’s an expensive battery pack, but it can be useful for those who always carry both at the same time.

Now let’s hope this is the first sign that USB-C is coming to the iPhone. I can’t wait to use my laptop charger to charge my phone, or my iPhone charger to charge my Nintendo Switch.

Apple Fall Event 2018


Read Full Article

Apple introduces a new magnetic Apple Pencil


Apple is borrowing some ideas from the competition with the second-generation Apple Pencil. The most exciting thing is that you won’t lose it in your backpack anymore as it uses magnets just like your smart cover.

You can attach it to the tablet and it won’t get in the way if you’re using it in landscape. Even better, you no longer need to remove a cap to plug it to the Lightning port. The Apple Pencil charges when it’s attached to the iPad. It works pretty much like a regular wireless charger.

When you first attach it to your iPad, it automatically pairs with the iPad. Finally, Apple added a gesture on the Pencil so that you can change the color or the shape of your strokes. You just need to tap twice with your finger. Tapping the screen with the Pencil lets you wake up the iPad as well.

The new Pencil seems to work only with the new iPad Pro given that it requires magnetic edges.

Apple Fall Event 2018


Read Full Article

Five things Apple won’t announce today


In honor of Apple Day in Brooklyn we present five things Apple definitely won’t announce today.


Read Full Article