16 July 2018

Google Cloud’s LA region goes online


Google Cloud’s new region in Los Angeles is now online, the company announced today. This isn’t exactly a surprise, given that Google had previously announced a July launch for the region, but it’s a big step for Google, which now boasts five cloud regions in the United States. It was only three years ago that Google opened its second U.S. region and, while it was slow to expand its physical cloud footprint, the company now features 17 regions around the world.

When it first announced this new region, Google positioned it as the ideal region for the entertainment industry. And while that’s surely true, I’m sure we’ll see plenty of other companies use this new region, which features three availability zones, to augment their existing deployments in Google’s other West Coast region in Oregon or as part of their overall global cloud strategy.

The new region is launching with all the core Google Cloud compute services, like App Engine, Compute Engine and Kubernetes Engine, as well as all of Google’s standard database and file storage tools, including the recently launched NAS-like Cloud Filestore service. For businesses that have a physical presence close to L.A., Google also offers two dedicated interconnects to Equinix’s and CoreSite’s local LA1 data centers.

It’s worth nothing that Microsoft, which has long favored a strategy of quickly launching as many regions as possible, already offered its users a region in Southern California. AWS doesn’t currently have a presence in the area, though, unlike Google, AWS does offer a region in Northern California.


Read Full Article

How to Recover a Lost or Misplaced File on Your Computer


find-recover-lost-files

Losing or misplacing a file is no fun. Within seconds, days or even weeks of works could disappear. Before the panic takes over, let’s take a look at five ways you can recover that file and get it back.

How does this happen? It’s actually a lot easier than you might think—and the methods to recover the lost files aren’t complicated either.

When You Forget Where You Saved a File

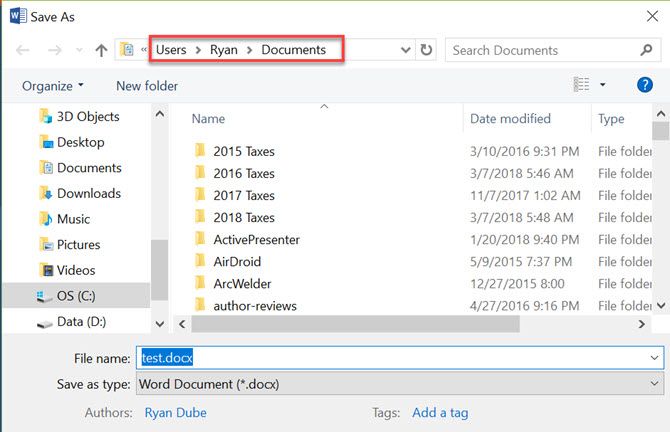
Often when people click on File and Save in Microsoft Excel or Word, they click on the Save button on the Save As screen without really looking at the file path at the top of the screen.

how to recover lost or misplaced files

The moment that file closes, you’re almost out of luck. Without noting where you saved the file, you won’t know where to go to reopen it later.

Thankfully there are ways to find that file even though you can’t remember exactly where it is.

1. Recent Documents or Sheets

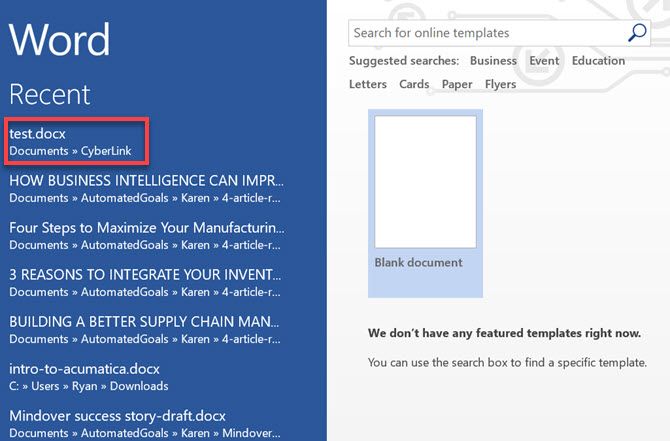
One of the easiest ways to get that file back is to reopen the application and check the list of recent files.

If it’s a Microsoft Office product you’ve used to save the file, you’ll find 25 of the most recently saved files when you first open the application.

Or you can click on File, Open, and Recent Documents.

how to recover lost or misplaced files

If you just saved the file recently, the odds are very good it’ll be on this list.

However, if it’s been a while and you’re looking for an older file that you saved but can’t find, you’ll have to explore other solutions.

2. Windows Search With Partial Name

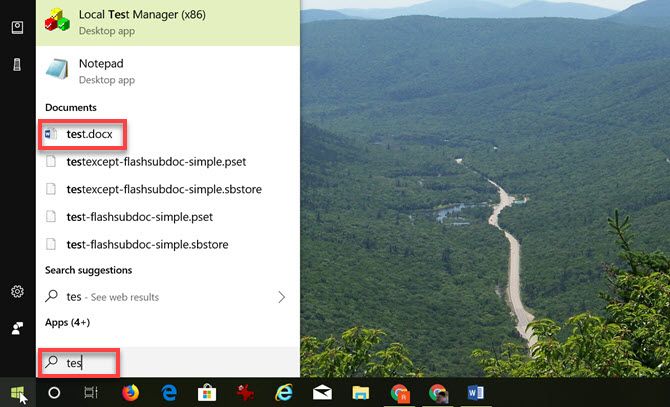
Your next option is to perform a Windows search. This is possible if you at least remember the first few letters of the file name.

To do this, just click on the windows start button, and start typing the name of the file. Just type as much as you can remember, starting with the first letters.

how to recover lost or misplaced files

The file should pop up in the list of files under the search results.

This is a perfect solution if you can remember part of the file name. But even if you can’t, don’t worry. There are still more options to find that file.

3. Search by Extension

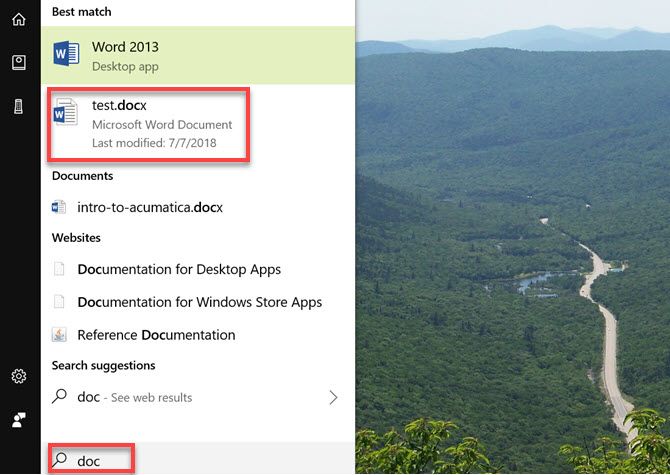
You can also find the file by searching for the extension type. For example, if you know you saved a Word document somewhere, then just search for “doc”. Or if it was an Excel file, then search for “xls”.

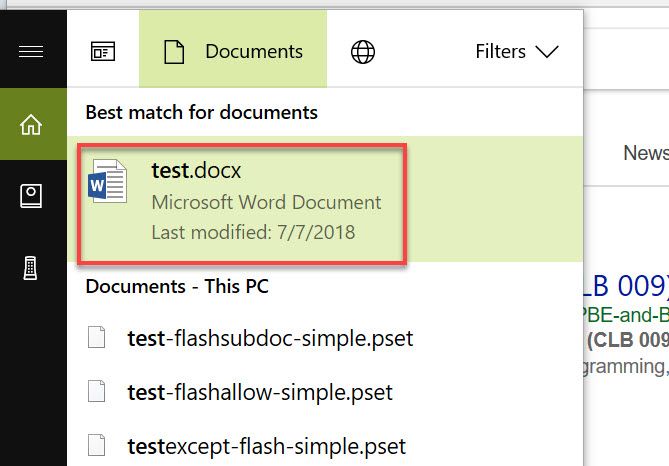
If you recently saved the file, it’ll show up in the search results under “Best match”.

how to recover lost or misplaced files

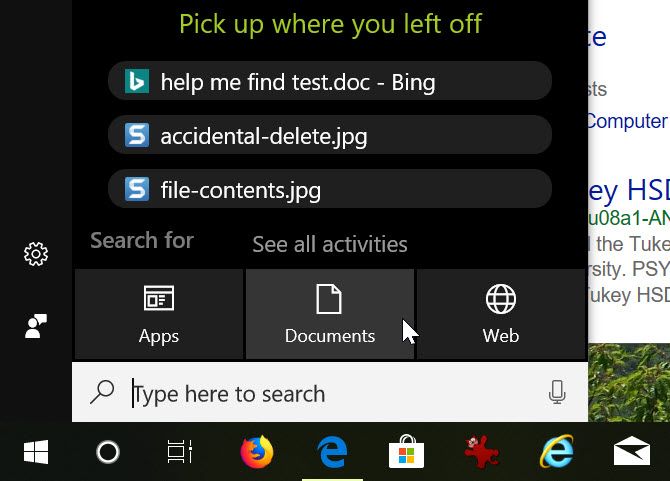
By the way, this also works as well (or maybe even better?) using Cortana, especially for documents. If you click on the Cortana icon in the task bar, you’ll actually see a list of your most recent activities under Pick up where you left off.

how to recover lost or misplaced files

If you just saved the file, it should show up here. However, you can also conduct a search by clicking on Documents under the Search for section.

how to recover lost or misplaced files

Start typing the name of the file, and it should show up under Cortana’s search results.

There may still be cases where you saved the file so long ago that the results don’t include the file. Or, you might have saved the file with a non-Microsoft application and you can’t remember the extension.

Whichever the case may be, it’s okay. You still have a few more options to find that file.

4. File Explorer Search by Modified Date

Even though you created the file a long time ago, it’s still possible to find it by focusing on the relevant date range.

If you know you created the file sometime last month, you can find the file using that criterion.

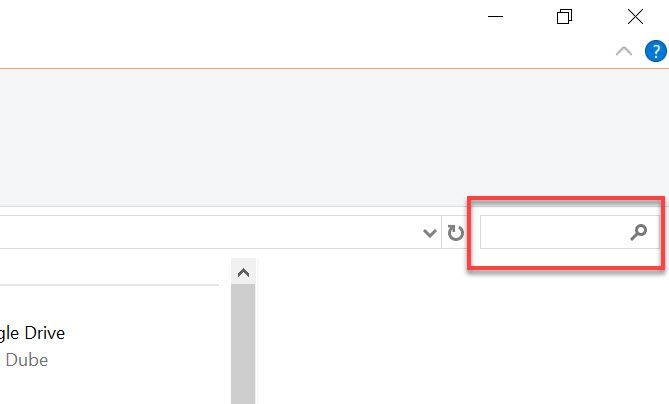
To do this, just open File Explorer, and click on the file search field at the upper right corner of the window.

how to recover lost or misplaced files

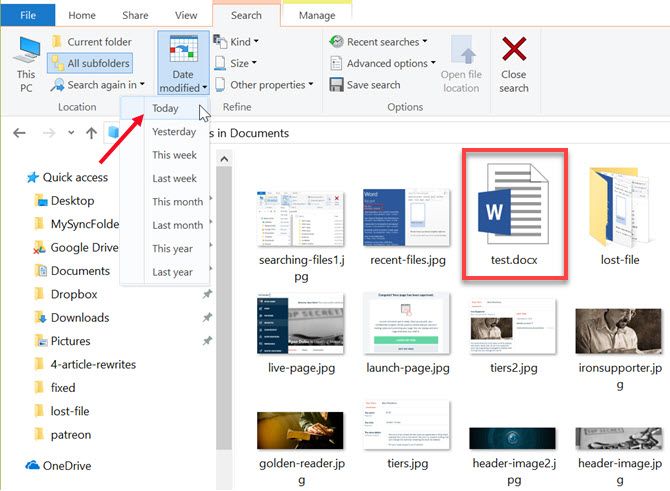
Click on Date modified, and then choose the time period you want to search for.

Choosing something like Yesterday or Last week will show you every single file you’ve modified in that time period.

how to recover lost or misplaced files

The odds are very good that your file will show up in the list. But this depends on how well you remember when you created the file.

If you can’t remember when the file was last modified, then another option is to actually search the contents of the file.

This could be a sentence you remember writing, or a title or header you know was part of the document.

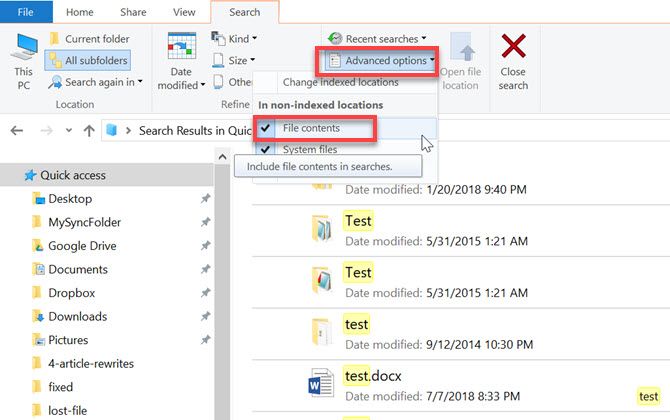
To do this, on the Search menu tab, click Advanced options, and enable File contents.

how to recover lost or misplaced files

Now, when you type in a word or phrase into the search field at the upper right corner of the window, it’ll sift through the contents of files to try and locate it.

Just keep in mind that searching file contents can take a bit more processing time, so you’ll need to give the search results time to show up in the list.

5. Check the Recycle Bin

Most likely, one of the above solutions will have worked for you. However, in a worse case scenario where nothing turns up, there is one last option that could turn up the file.

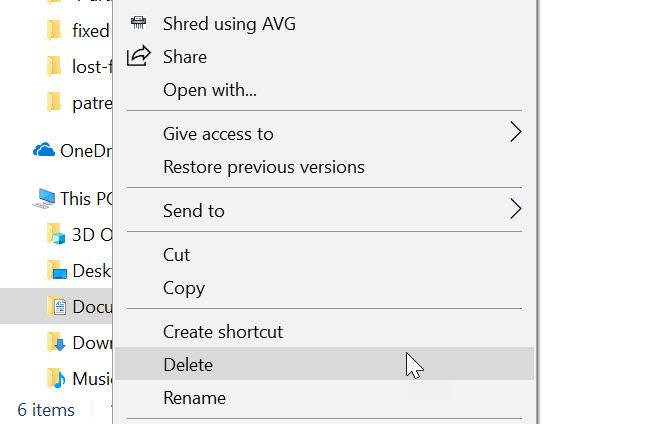
It’s surprisingly common that people accidentally delete files. It might have been accidentally dropping the file on top of the trash bin icon on the desktop. Or it could have been right clicking on the file to rename it or create a shortcut, and accidentally selecting Delete instead.

how to recover lost or misplaced files

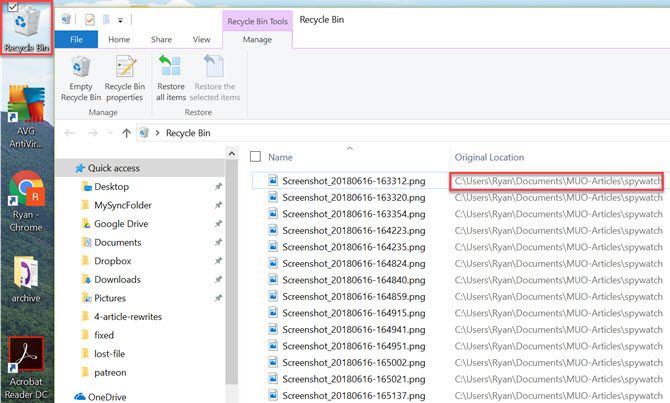
Whatever the reason, it’s always worth double checking the Recycle Bin for your lost file. To do so, just go to your Windows desktop and double-click the Recycle Bin icon.

how to recover lost or misplaced files

If you remember the file name, then you can just scan through these files and try to locate it.

If you don’t know the file name, either the Original Location or the Date Deleted might give you some insight as to whether that’s the right file.

Be Careful About Losing or Misplacing Files!

This is one of those embarrassing things many people don’t want to ask for help for because it’s such a simple mistake. The truth is, even experienced Windows users sometimes forget to check the location of a saved file. Or they drop a file into a random folder without thinking about it.

Your first line of defense against this happening is making a mental note to always check the directory location dropdown in any window where you’re saving a file. Make sure to note the path where you want the file to go before clicking that Save button!

It’s not all doom and gloom. Thanks to recovery software, there are ways you can recover deleted office files.

Image Credit: stokkete/Depositphotos

Read the full article: How to Recover a Lost or Misplaced File on Your Computer


Read Full Article

Apple emoji will soon include people with curly hair, white hair and superpowers


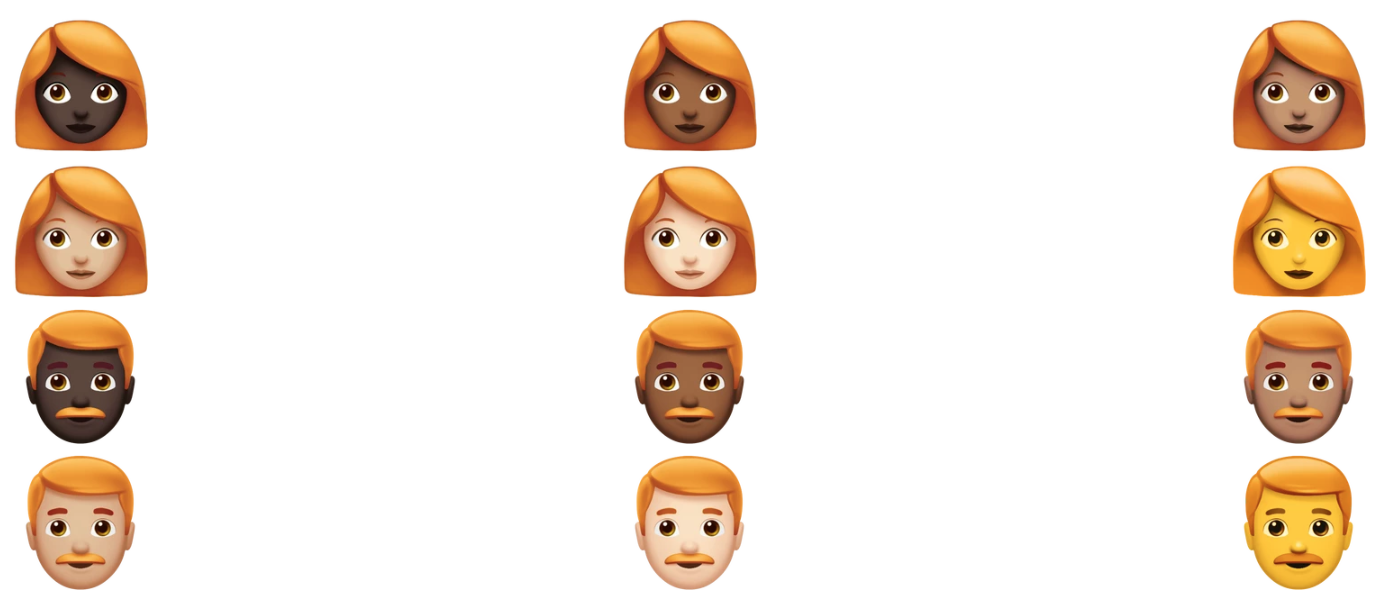
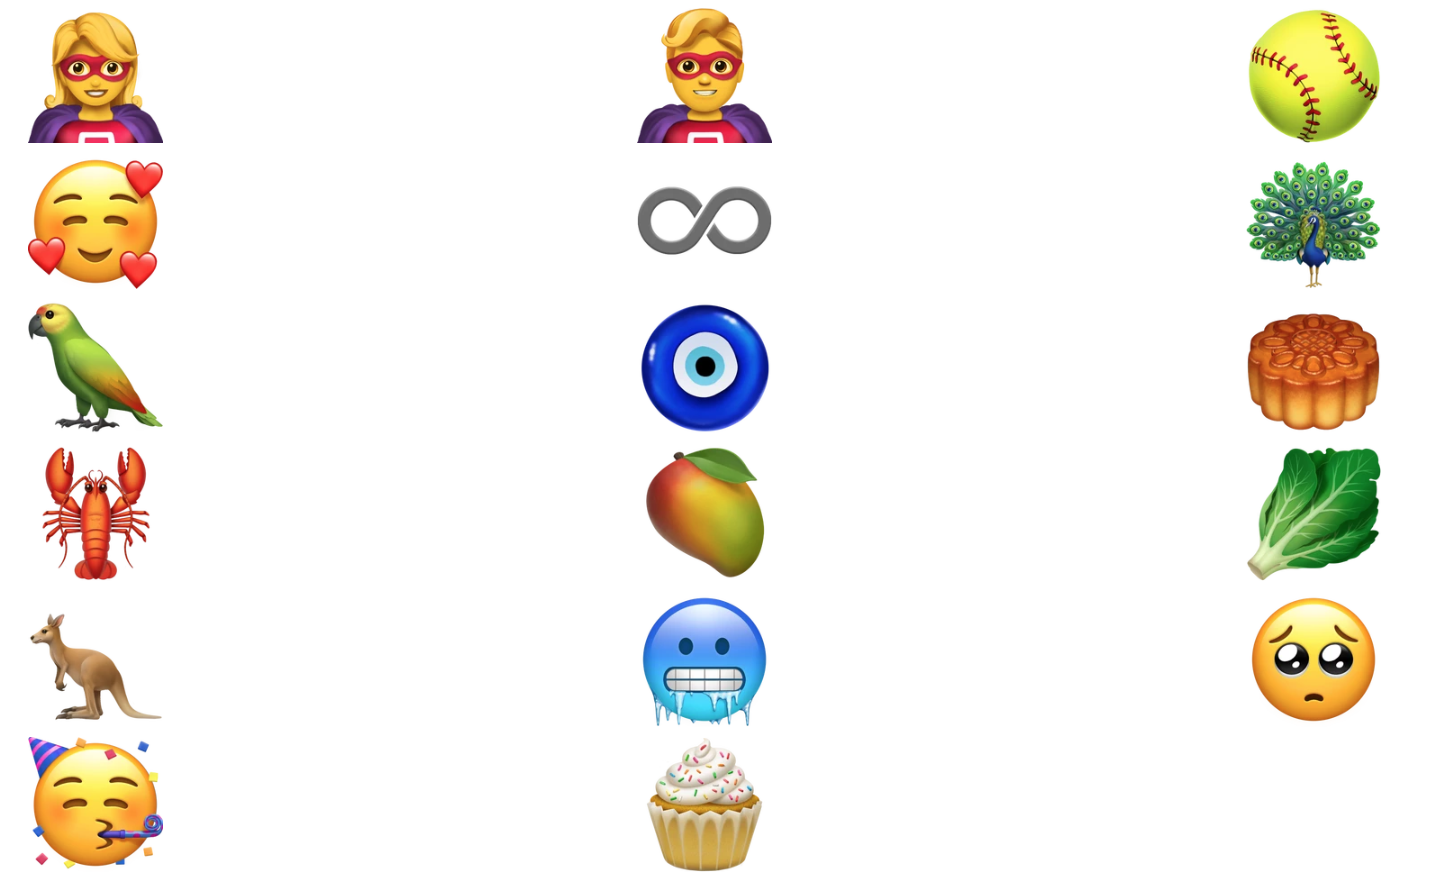
In honor of World Emoji Day (yes, that’s a thing), Apple is previewing some of its upcoming emoji. Later this year, Apple’s emoji set will feature people with a variety of hairstyles and colors, including curly hair, red hair and white hair. What you’re about to see are simply Apple’s take on emoji that were previously approved by the Unicode Consortium’s emoji subcommittee.

Folks with curly hair, rejoice!

Let’s hear it for the red heads


Like white on rice


No hair? No problem


Other fun emoji include a freezing face, peacock, mango, lobster, nazar amulet, superheroes and kangaroo.

Back in March, Apple proposed new emojis to represent people with disabilities in Unicode’s next batch of emoji. Then in May, Unicode announced some of the draft candidates for its next emoji release in Q1 2019 to include some of Apple’s proposed emoji, which featured a guide dog, an ear with a hearing aid and more. If you want to hear more about what goes into emoji approval, be sure to check out this interview with Jeremy Burge, vice-chair of the Unicode Emoji Subcommittee.


Read Full Article

How to Master and Expand Your iPhone’s Share Menu


master-ios-share

There’s more to sharing in iOS than simply posting pictures and videos on social media. The Share button performs a myriad of functions, from sending files to specific apps, to saving links for later, and even running complex multi-step workflows.

You can also use the Share menu to automate processes, save time, and keep your most useful shortcuts close at hand. But in order to make it useful, you’ll need to customize it a bit first.

So here are the basics of sharing in iOS for iPhone and iPad owners.

The Basics of Sharing in iOS

There are two main ways to share something in iOS: using the dedicated Share button, and using context-based menu options. The Share button is easy enough to recognize; it looks like a box with an arrow coming out of it:

iOS Share Button icon

This button often shows up in menu bars for apps like Safari and Music. Tapping it will grab the web page, video, song, or other item you’re currently focused on. Here are a few examples of what the Share button does in different apps:

  • Safari: Shares the open web page.
  • Music: Shares the currently playing track.
  • Photos: Shares the visible video or photo.
  • YouTube: Shares the current video.

You can also share via context menus, which often appear when you select or highlight something. As an example, if you highlight text on a web page, you’ll see an option to Share it.

iOS Share Context Menu

If you tap and hold an image you find on Twitter, you’ll see an iOS context menu appear to share it.

Twitter for iOS Share via Button

These two methods are the easiest way of getting data in and out of applications on iOS. While many apps force you to share content within the developer’s ecosystem (like Facebook), iOS context menus let you move that data to any app or online location you want.

Let’s take a look at what happens when you do try to share using one of these methods.

How to Use the Share Sheet in iOS

When you choose to share an item using iOS, you’ll use the Share sheet. This is a three-tiered sharing interface, allowing you to share with nearby devices, apps, and using actions.

The first tier is for AirDrop:

Share via AirDrop

AirDrop is an Apple-to-Apple wireless sharing protocol. It allows you to share from an iPhone to another iPhone, from an iPhone to a Mac, and from a Mac to an iPhone. Windows and Linux users cannot use the protocol. Any nearby devices will appear in this top row.

The second row is for sharing to apps:

Share to Apps in iOS

This is how you export an image directly to Instagram, add a spreadsheet to your Google Drive, or create a new note in Evernote using the item you’ve just shared. Some of these will appear inline, like the Add to Notes option, while others will launch the respective app.

The final line is for using actions, or “activities” as Apple sometimes refers to them:

Share Actions and Activities in iOS

Actions don’t necessarily involve sharing at all. They include options like saving a photo, opening selected content in a browser, adding bookmarks and favorites, and even copying content to your clipboard. We’ll take a look at how you can vastly expand your available actions later.

How to Customize Your iOS Sharing Options

You can customize both the apps and actions sharing tiers to show only the options you want to use. As you’re likely aware, you need to have an app installed for it to show up in the sharing menu. Installing more apps gives you more options.
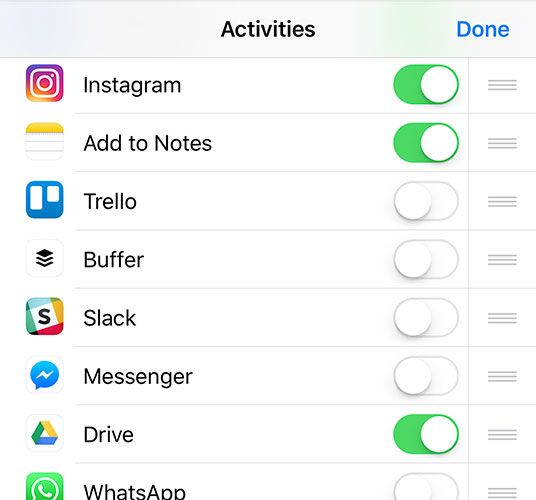
Customize iOS Share Menu

To enable these options, share an item and scroll all the way to the end of the list. Tap the More option to reveal a list of installed sharing locations. To enable one, make sure there’s a green slider next to its name. You can do the same for the actions menu below; just hit More.

We’d recommend only keeping the apps and actions that you actually use. It’s also possible to rearrange these options, so you can put your favorite destinations near the start of the queue. Just tap and hold, then drag an app to where you want it. The same is true for the actions menu, shown below.
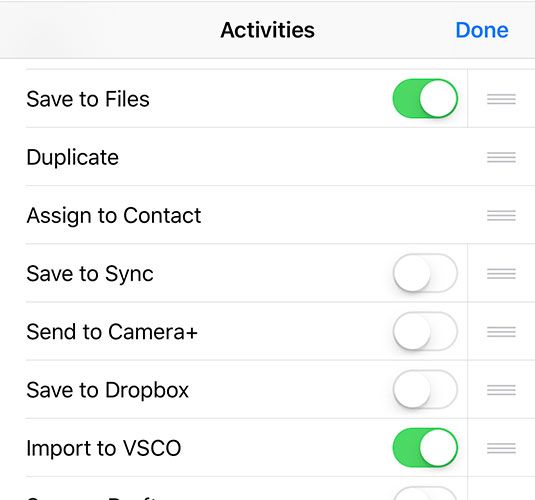
Customize iOS Share Menu

You may discover new sharing methods you hadn’t realized were available before. Remember to check this menu when installing new apps, particularly ones geared towards creating content or storing it.

How to Do Even More With Workflow

Upstart app Workflow made a name for itself with its clever use of iOS inter-app activity. Apple acquired the app shortly after, and it’s now available free to everyone on the App Store. If you don’t have it yet, download Workflow now!

Once installed, make sure to enable the Run Workflow option in the actions (bottom) tier of the Share sheet. Using this shortcut, you can execute complex workflows using shared items, and you don’t even need to compose them yourself.
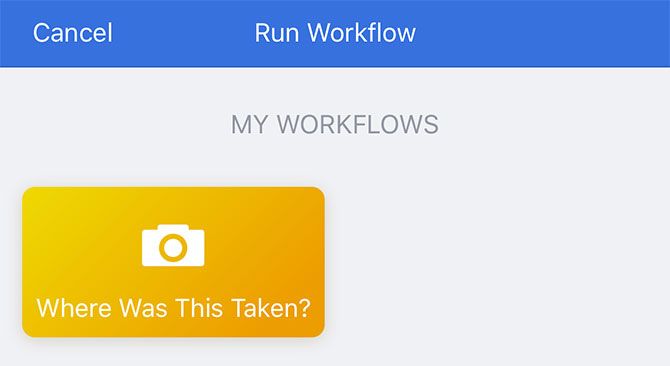
Customize iOS Share Menu

Workflow features a bustling gallery of downloadable workflows for doing more with your device in less time. In order to make your action menu more useful, you’ll need to download workflows that specifically tap into the Share sheet.

Once you’ve got a few action item workflows downloaded, you can hit the Share button, choose Run Workflow, then tap on the relevant workflow to run it. Here are a few of our favorites:

1. Where Was This Taken?

Takes a photo, checks for location data stored within that photo, then places a pin in Maps to show you where the picture was taken. Works great with Photos, plus any images you find on the web or receive from a friend.

Download: Where Was This Taken? Workflow

2. Quick Save Link (to Evernote)

This action grabs the active link (e.g. a web page in Safari) and creates a new note with it in Evernote. You can also use it as a regular workflow to save the current clipboard contents instead.

Download: Quick Save Link Workflow

3. Search Link on Twitter

Curious what Twitter is saying about the day’s biggest news story, new Apple gadget, or movie review? Use this workflow to search Twitter for the current active link.

Download: Search Link on Twitter Workflow

4. Translate Selection (to English)

This is a strictly context-based action. Simply highlight some text, hit Share, then run this workflow to detect the original language and translate the text into English. You could easily customize it to translate to another language if you wanted.

Download: Translate Selection Workflow

5. Self-Destructing Clipboard

Copying sensitive data like passwords or unlisted YouTube videos? Run this workflow to copy the selected item to your clipboard, then paste it as normal. Six minutes later it will clear your clipboard, so you can’t accidentally paste it again.

Download: Self-Destructing Clipboard Workflow

6. Save Links on Page to Reading List

Found an interesting page full of must-read articles? Use this workflow to grab each individual link on the page and save it to Safari’s built-in Reading List service.

Download: Save Links on Page to Reading List Workflow

More Apps Means More Possibilities

If you’re short on sharing locations, you probably don’t have many apps that enable them. Downloading apps like Dropbox and Google Drive will let you share directly to those services. Even apps like Snapchat have built-in Share sheet integration, so make sure you’re making the most of the services you love.

If you’ve found this useful, why not take a look at our in-depth guide to iOS for beginners? You’re bound to learn something, even if you’ve been using an iPhone for years!

Read the full article: How to Master and Expand Your iPhone’s Share Menu


Read Full Article

Airobotics makes autonomous drones in a box


Not far from Tel Aviv a drone flies low over a gritty landscape of warehouses and broken pavement. It slowly approaches its home – a refrigerator-sized box inside a mesh fence, and hovers, preparing to dock. It descends like some giant bug, whining all the way, and disappears into its base where it will be cleaned, recharged, and sent back out into the air. This drone is doing the nearly impossible: it’s flying and landing autonomously and can fly again and again without human intervention and it’s doing it all inside a self-contained unit that is one of the coolest things I’ve seen in a long time.

The company that makes the drone, Airobotics, invited us into their headquarters to see their products in action. In this video we talk with the company about how the drones work, how their clients use the drones for mapping and surveillance in hard-to-reach parts of the world, and the future of drone autonomy. It’s a fascinating look into technology that will soon be appearing in jungles, deserts, and war zones near you.


Read Full Article

Kapwing is Adobe for the meme generation


Need to resize a video for IGTV? Add subtitles for Twitter? Throw in sound effects for YouTube? Or collage it with other clips for the Instagram feed? Kapwing lets you do all that and more for free from a mobile browser or website. This scrappy new startup is building the vertical video era’s creative suite full of editing tools for every occasion.

Pronounced “Ka-pwing,” like the sound of a ricocheted bullet, the company was founded by two former Google Image Search staffers. Now after six months of quiet bootstrapping, it’s announcing a $1.7 million seed round led by Kleiner Perkins.

Kapwing hopes to rapidly adapt to shifting memescape and its fragmented media formats, seizing on opportunities like creators needing to turn their long-form landscape videos vertical for Instagram’s recently launched IGTV. The free version slaps a Kapwing.com watermark on all its exports for virality, but users can pay $20 a month to remove it.

While sites like Imgur and Imgflip offer lightweight tools for static memes and GIFs, “the tools and community for doing that for video are kinda inaccessible,” says co-founder and CEO Julia Enthoven. “You have something you install on your computer with fancy hardware. You should able to create and riff off of people,” even if you just have your phone, she tells me. Indeed, 100,000 users are already getting crafty with Kapwing.

“We want to make these really relevant trending formats so anyone can jump in,” Enthoven declares. “Down the line, we want to make a destination for consuming that content.”

Kapwing co-founders Eric Lu and Julia Enthoven

Enthoven and Eric Lu both worked at Google Image Search in the lauded Associate Product Manager (APM) program that’s minted many future founders for companies like Quip, Asana and Polyvore. But after two years, they noticed a big gap in the creative ecosystem. Enthoven explains that “The idea came from using outdated tools for making the types of videos people want to make for social media — short-form, snackable video you record with your phone. It’s so difficult to make those kinds of videos in today’s editors.”

So the pair of 25-year-olds left in September to start Kapwing. They named it after their favorite sound effect from the Calvin & Hobbes comics when the make-believe tiger would deflect toy gunshots from his best pal. “It’s an onomatopoeia, and that’s sort of cool because video is all about movement and sound.”

After starting with a meme editor for slapping text above and below images, Kapwing saw a sudden growth spurt as creators raced to convert landscape videos for vertical IGTV. Now it has a wide range of tools, with more planned.

The current selection includes:

  • Meme Maker
  • Subtitles
  • Multi-Video Montage Maker
  • Video Collage
  • Video Filters
  • Image To Video Converter
  • Add Overlaid Text To Video
  • Add Music To Video With MP3 Uploads
  • Resize Video
  • Reverse Video
  • Loop Video
  • Trim Video
  • Mute Video
  • Stop Motion Maker
  • Sound Effects Maker

Kapwing definitely has some annoying shortcomings. There’s an 80mb limit on uploads, so don’t expect to be messing with much 4K videos or especially long clips. You can’t subtitle a GIF, and the meme maker flipped vertical photos sideways without warning. It also lacks some of the slick tools that Snapchat has developed, like a magic eraser for Photoshopping stuff out and a background changer.

The No. 1 thing it needs is a selective cropping tool. Instead of letting you manually move the vertical frame around inside a landscape video so you always catch the action, it just grabs the center. That left me staring at blank space between myself and an interview subject when I uploaded this burger robot startup video. It’s something apps like RotateNFlip and Flixup already offer.

Beyond meme-loving teens and semi-pro creators, Kapwing has found an audience amongst school teachers. The simplicity and onscreen instructions make it well-suited for young students, and it works on Chromebooks because there’s no need to download software.

The paid version has found some traction with content marketers and sponsored creators who don’t want a distracting watermark included. That business model is always in danger of encroachment from free tools, though, so Kapwing hopes to also become a place to view the meme content it exports. That network model is more defensible if it gains a big enough audience, and could be monetized with ads. Though it will put it in competition with Imgur, Reddit and the big dogs like Instagram.

“We aspire to become a hub for consumption,” Enthoven concluded. “Consume, get an idea, and share with each other.”


Read Full Article

When In Rome is the first Alexa-powered board game


Years ago, in the heyday of home video, I played a boardgames that used VHS tapes and electronic parts to help spur the action along. From Candy Land VCR to Captain Power, game makers were doing the best they could with a new technology. Now, thanks to Alexa, they can try something even cooler – board games that talk back.

The first company to try this is Voice Originals. Their new game, When In Rome, is a family board game that pits two teams against each other in a race to travel the world. The game itself consists of a board and a few colored pieces and the real magic comes from Alexa. You start the game by enabling the When In Rome skill and then you start the game. Alexa then prompts you with questions as you tool around the board.

The rules are simple because Alexa does most of the work. The game describes how to set up the board and gets you started and then you just trigger with your voice it as you play.

The company’s first game, Beasts of Balance, was another clever hybrid of AR and real life board game action. Both games are a bit gimmicky and a bit high tech – you won’t be able to play these in a cozy beach house without Internet, for example – but it’s a fun departure from the norm.

Like the VCR games of yore, When In Rome depends on a new technology to find a new way to have fun. It’s a clever addition to the standard board game fare and our family had a good time playing it. While it’s not as timeless as a bit of Connect 4 or Risk, it’s a great addition to the boardgames shelf and a cool use of voice technology in gaming.


Read Full Article

Improving Connectomics by an Order of Magnitude


The field of connectomics aims to comprehensively map the structure of the neuronal networks that are found in the nervous system, in order to better understand how the brain works. This process requires imaging brain tissue in 3D at nanometer resolution (typically using electron microscopy), and then analyzing the resulting image data to trace the brain’s neurites and identify individual synaptic connections. Due to the high resolution of the imaging, even a cubic millimeter of brain tissue can generate over 1,000 terabytes of data! When combined with the fact that the structures in these images can be extraordinarily subtle and complex, the primary bottleneck in brain mapping has been automating the interpretation of these data, rather than acquisition of the data itself.

Today, in collaboration with colleagues at the Max Planck Institute of Neurobiology, we published “High-Precision Automated Reconstruction of Neurons with Flood-Filling Networks” in Nature Methods, which shows how a new type of recurrent neural network can improve the accuracy of automated interpretation of connectomics data by an order-of-magnitude over previous deep learning techniques. An open-access version of this work is also available from biorXiv (2017).

3D Image Segmentation with Flood-Filling Networks
Tracing neurites in large-scale electron microscopy data is an example of an image segmentation problem. Traditional algorithms have divided the process into at least two steps: finding boundaries between neurites using an edge detector or a machine-learning classifier, and then grouping together image pixels that are not separated by a boundary using an algorithm like watershed or graph cut. In 2015, we began experimenting with an alternative approach based on recurrent neural networks that unifies these two steps. The algorithm is seeded at a specific pixel location and then iteratively “fills” a region using a recurrent convolutional neural network that predicts which pixels are part of the same object as the seed. Since 2015, we have been working to apply this new approach to large-scale connectomics datasets and rigorously quantify its accuracy.
A flood-filling network segmenting an object in 2d. The yellow dot is the center of the current area of focus; the algorithm expands the segmented region (blue) as it iteratively examines more of the overall image.
Measuring Accuracy via Expected Run Length
Working with our partners at the Max Planck Institute, we devised a metric we call “expected run length” (ERL) that measures the following: given a random point within a random neuron in a 3d image of a brain, how far can we trace the neuron before making some kind of mistake? This is an example of a mean-time-between-failure metric, except that in this case we measure the amount of space between failures rather than the amount of time. For engineers, the appeal of ERL is that it relates a linear, physical path length to the frequency of individual mistakes that are made by an algorithm, and that it can be computed in a straightforward way. For biologists, the appeal is that a particular numerical value of ERL can be related to biologically relevant quantities, such as the average path length of neurons in different parts of the nervous system.
Progress in expected run length (blue line) leading up to the results shared today in Nature Methods. The red line shows progress in the “merge rate,” which measures the frequency with which two separate neurites were erroneously traced as a single object; achieving a very low merge rate is important for enabling efficient strategies for manual identification and correction of the remaining errors in the reconstruction.
Songbird Connectomics
We used ERL to measure our progress on a ground-truth set of neurons within a 1-million cubic micron zebra finch song-bird brain imaged by our collaborators using serial block-face scanning electron microscopy and found that our approach performed much better than previous deep learning pipelines applied to the same dataset.
Our algorithm in action as it traces a single neurite in 3d in a songbird brain.
We segmented every neuron in a small portion of a zebra finch song-bird brain using the new flood-filling network approach, as depicted here:
Reconstruction of a portion of zebra finch brain. Colors denote distinct objects in the segmentation that was automatically generated using a flood-filling network. Gold spheres represent synaptic locations automatically identified using a previously published approach.
By combining these automated results with a small amount of additional human effort required to fix the remaining errors, our collaborators at the Max Planck Institute are now able to study the songbird connectome to derive new insights into how zebra finch birds sing their song and test theories related to how they learn their song.

Next Steps
We will continue to improve connectomics reconstruction technology, with the aim of fully automating synapse-resolution connectomics and contributing to ongoing connectomics projects at the Max Planck Institute and elsewhere. In order to help support the larger research community in developing connectomics techniques, we have also open-sourced the TensorFlow code for the flood-filling network approach, along with WebGL visualization software for 3d datasets that we developed to help us understand and improve our reconstruction results.

Acknowledgements
We would like to acknowledge core contributions from Tim Blakely, Peter Li, Larry Lindsey, Jeremy Maitin-Shepard, Art Pope and Mike Tyka (Google), as well as Joergen Kornfeld and Winfried Denk (Max Planck Institute).