16 March 2018
Anker’s Nebula Capsule portable projector is a pocket powerhouse
Anker is a devie maker that’s rapidly become a go-to brand for affordable, quality accessories include cables, chargers and backup batteries. More recently, it’s started to branch out into additional areas, including projectors through its Nebula brand. The Nebula Capsule is the latest product from that line, a super portable projector with an Android-based OS, a built-in battery and the ability to double as a Bluetooth speaker.
The Nebula Capsule is the smaller sibling to the Nebula Mars portable cinema projector, which is actually far less portable than the newer Capsule. The Mars is more of a home theater projector that you’re also technically able to take with you if you want, whereas the Capsule is roughly the size of a can of Coke, and easy to stash in even smaller bags, or, if you’re not worries bout some bulging, even in a jacket pocket.
Anker initially launched the Capsule on Indiegogo, but now it’s made its way to Amazon where it retails for $349. The projector can extend an image up to 100 inches in diameter, with 100 ANSI lumens of brightness, and it can mange four hours of video playback on its built-in power source. There’s a 360-degree speaker integrated into the base, and it comes with built-in Wi-Fi and Android 7.1, with its own app store to run popular apps like Netflix, Plex, Hulu and Amazon Prime.
The device has micro USB OTG input, and can read from USB drives formatted in FAT32, plus a full-sized HDMI for attaching basically anything. Its native 854×480 resolution isn’t going to win any awards, but it’s hardly important when you’re catching up on a show on the road or playing Switch in your backyard on a stretched out bed sheet. And the trade-off, in terms of portability and versatility, its worth it.
On top of the device, there are arrows that help you adjust volume, and there’s a button to turn it on, as well as a mode switch so you can use it as a Bluetooth speaker I you want. Focus adjustment is handled via a wheel mounted into the side, and this is a bit tricky because it involves a little hunting to get it just right, but the minimal interface options, but again, it’s a practical way of doing it and works given the form factor of the device.
In the box, you also get a remote control, which works via IR (there’s a receiver built into the back of the device). Here, it’d be nicer to have some kid of RF-based remote instead, but the IR version works well enough, and there’s a companion mobile app for both controlling the projector and for mirroring your content. You can’t mirror content-protected media, which is a bit of a pain, but the fact that the Capsule supports streaming media from built-in apps mostly makes up for this.
The speaker is surprisingly powerful, and can fill a small room easily. It’s not going to compete with 5.1 audio systems, or with something like the HomePod, but it’s plenty good enough that watching a show or movie on the Capsule is pleasant, and never falls down on the back of bad sound. Plus, I almost always pack a dedicated Bluetooth speaker on my trips away, anyway – the Capsule doubles as one, and takes up as little or even less space than most, with equivalent sound quality. Acting just as a Bluetooth speaker, the capsule’s battery life extends out to 30 hours.
Considered as a two-for-one combo that includes a great travel projector and a terrific portable Bluetooth speaker, the Anker Nebula Capsule is a hard bargain to pass up.
Read Full Article
Using Deep Learning to Facilitate Scientific Image Analysis
Many scientific imaging applications, especially microscopy, can produce terabytes of data per day. These applications can benefit from recent advances in computer vision and deep learning. In our work with biologists on robotic microscopy applications (e.g., to distinguish cellular phenotypes) we've learned that assembling high quality image datasets that separate signal from noise is a difficult but important task. We've also learned that there are many scientists who may not write code, but who are still excited to utilize deep learning in their image analysis work. A particular challenge we can help address involves dealing with out-of-focus images. Even with the autofocus systems on state-of-the-art microscopes, poor configuration or hardware incompatibility may result in image quality issues. Having an automated way to rate focus quality can enable the detection, troubleshooting and removal of such images.
Deep Learning to the Rescue
In “Assessing Microscope Image Focus Quality with Deep Learning”, we trained a deep neural network to rate the focus quality of microscopy images with higher accuracy than previous methods. We also integrated the pre-trained TensorFlow model with plugins in Fiji (ImageJ) and CellProfiler, two leading open source scientific image analysis tools that can be used with either a graphical user interface or invoked via scripts.
 |
| A pre-trained TensorFlow model rates focus quality for a montage of microscope image patches of cells in Fiji (ImageJ). Hue and lightness of the borders denote predicted focus quality and prediction uncertainty, respectively. |
What about Images without Objects?
An interesting challenge we overcame was that there are often "blank" image patches with no objects, a scenario where no notion of focus quality exists. Instead of explicitly labeling these "blank" patches and teaching our model to recognize them as a separate category, we configured our model to predict a probability distribution across defocus levels, allowing it to learn to express uncertainty (dim borders in the figure) for these empty patches (e.g. predict equal probability in/out-of-focus).
What's Next?
Deep learning-based approaches for scientific image analysis will improve accuracy, reduce manual parameter tuning and may reveal new insights. Clearly, the sharing and availability of datasets and models, and implementation into tools that are proven to be useful within respective communities, will be important for widespread adoption.
Acknowledgements
We thank Claire McQuin, Allen Goodman, Anne Carpenter of the Broad Institute and Kevin Eliceiri of the University of Wisconsin at Madison for assistance with CellProfiler and Fiji integration, respectively.

How to Clear the System and Internet Caches on a Mac
It’s normal for macOS to use some of your hard drive space for everyday operations. Your web browser constantly downloads new data, which it retains to speed up future browsing sessions. Applications like video editors and iTunes keep a media cache of exported files and album artwork.
It’s amazing just how much free space you can reclaim by deleting junk files, provided you know where to look. There’s also good reason to approach this reclamation of drive space with caution.
Today we’ll look at why and how to clear caches on macOS, as well as a few apps that make it super easy.
What Are Caches and Why Delete Them?
Caches are basically temporary files created by your operating system and the applications you use. They could be temporary internet files like images and HTML documents, created by a web browser like Safari or Chrome.

If you edit a lot of photos and videos, you’ll find that your editor of choice retains temporary data that hangs around on your drive. Video editors that render clips and effects during editing have to store this data somewhere, but they don’t always remove these files afterwards.
Many applications keep caches that are just too small to worry about. System components like Spotlight, Contacts, and Maps create relatively lightweight caches that won’t net you a lot of free space should you delete them.

Which brings us to an important point: you don’t need to delete caches. Unless you’re looking for a quick and easy way to regain some free space and you’re constantly juggling applications and files so that your Mac functions normally, it’s best to leave them be.
Many applications run their own cleanup routines to stop caches ballooning to unmanageable sizes. There are a few other valid reasons you might delete caches beyond a desire for more space:
- Fix problems with webpages loading outdated assets.
- Remove personal data stored by websites and applications.
- Force an app to discard old cached information.
Important: Create a Backup First!

You should already be regularly backing up your Mac, whether that’s with the Apple’s own Time Machine, using a third party backup tool, or even an online backup. When you start poking around in the Library folder, you run the risk of breaking something.
While most applications generally won’t store critical information in the cache, it’s certainly possible that deleting something could lead to unwanted data loss and unforeseen behavior. With a recent backup, you can simply restore the caches folder should something go wrong.
How to Clear the Safari Cache on Mac

Clearing your web cache is easy, though if you’re not using Safari as your primary web browser, this won’t be of use to you:
- Launch Safari and click on Safari > Preferences at the top of the screen.
- Click on Advanced then enable Show Develop menu in menu bar at the bottom.
- Close the Preferences window then select Develop at the top of the screen.
- From the Develop menu choose Empty Caches.
Note: This is a bit more drastic than simply clearing your history, accessible under Safari > Clear History. Clearing caches in Develop mode will not remove any personal information other than that stored in temporary files (your history, bookmarks, Downloads folder, and so on are unaffected).
How to Clear Mac System Caches

To clear system caches specific to your user account:
- Launch Finder then click Go > Go to Folder in the menu bar at the top of the screen.
- In the box that appears type
~/Library/Cachesand hit OK. - Choose the files and folders you want to delete, and drag them into the Trash.
- Regain free space by right-clicking on the Trash in your dock and choosing Empty Trash.
If you want to delete caches associated with another user account, you’ll need to head to that specific user’s cache directory. You can do this by changing the folder location in the second step to /Users/username/Library/Caches—replacing username with the user account in question.
To clear system caches that are shared between user accounts, head to /System/Library/Caches instead.
Apps Can Do All of This for You
You could spend your time manually deleting caches, or you could just get an app to do it for you. The beauty of these apps is that they generally do a lot more, and they’re especially good at freeing up space you didn’t know you had.

OnyX is one such free tool that provides simple one-click deletion of caches. Download the version specific to your operating system, and launch the app. Let it analyze your startup disk, then head to the Cleaning tab. Flick through the tabs and indicate what should be deleted, then click Delete Caches.

CCleaner is another tool that will kill your caches, though it doesn’t offer as much control as OnyX. Download and install the app, then click Analyze to let CCleaner find as much potential free space as possible (caches included). You can then hit Run Cleaner to tidy up the selected items.

Finally, CleanMyMac 3 is a $40/year premium one-click cleaner. The only reason I routinely use it is because it’s included in the app subscription service SetApp. It’ll blitz your caches, and find other redundant macOS data, outdated backups, and huge files you’d forgotten about in a few clicks.
I’ve never had any trouble clearing caches using any of these apps, but it’s still worth running regular backups for peace of mind.
Reminder: You Don’t Normally Need to Do This
Unless you’re incredibly tight on space or looking to target a specific application by deleting its cache, you should probably leave your Mac’s caches well alone. There are plenty of ways to create free space on macOS without ever touching your caches.
You can move your libraries and device backups elsewhere, delete unnecessary large files, or even add more storage space to your MacBook to give you more room to breathe.
Image Credit: Wavebreakmedia/Depositphotos
Read Full Article
Zoosk relaunches dating app Lively as a way to meet new people while playing trivia games
Hoping to capitalize on the popularity of trivia applications like HQ Trivia, dating app maker Zoosk has just released an experimental app that combines trivia with the potential for meeting someone new. The app is a relaunch and complete makeover of Zoosk’s Lively, which first debuted in July 2016 as a dating app that used video to tell stories, instead of static profile images.
The new version of Lively is nothing like its former namesake.
As Zoosk explains, the previous version of Lively’s group video chat app was fun, but people didn’t know how to connect and relate to one another using the video format. It felt awkward to start conversations, with no reason to be there besides wanting to date.
The company went back to the drawing board, so to speak, to think about what sort of experiences could bring people together. Trivia, naturally, came to mind.
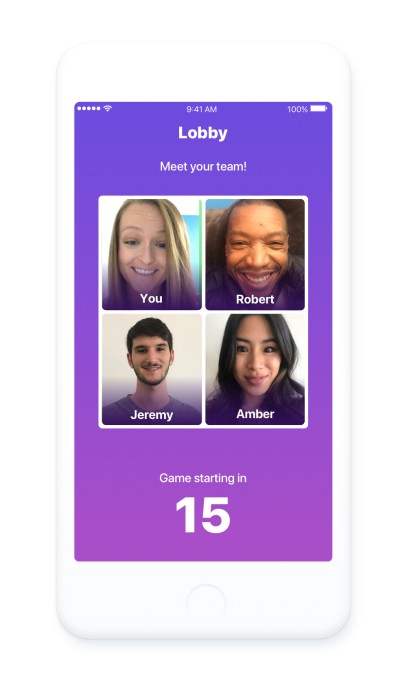
Lively aims to reproduce the feeling that comes with competing at a bar trivia night. When you join, you’re placed in a group video chat team of two to four people. Together, the team works to answer a series of 12 questions while discussing the answers over video in real-time. When they finish the questions, they’ll be able to see how their scores compared with other teams.

The “dating” component to the app isn’t quite what you would expect. In fact, it’s less of a way to find a date for a night out, than it is to just make new friends. After the game wraps, you’ll have the option to continue chatting with the other players, if you choose. You can also add people as a friend, if you hit it off.
And when trivia isn’t in session – the games run twice daily at 3 PM and 7 PM PST – you can group video chat with others on Lively.
Because you’re not added to a team with nearby players, your ability to make friends who are also possible real-life dating prospects is decidedly limited. That’s something that Lively could change to support in time, if it’s able to grow its user base. But for now, it needs to match users with any live players in order to fill out its teams.
It’s understandable why it went this route, but it doesn’t lend itself well to meeting someone special – unless you’re open to meeting people anywhere (which some are), or are fine with just making new friends and seeing where that leads.
Unlike HQ Trivia, which features live streams with a host, Lively is just group video chat with a trivia component. That means it won’t be as challenging for Zoosk to operate, as it doesn’t have to worry with bandwidth issues and other costs of putting on a live game show. Also, because there are no prizes or payouts, you can join anytime during the 30-minute gaming session to be placed into a team and play along.
Lively is not the first app to support a group video chat interface where gameplay is an option. A number of video chat apps over the years have integrated games into their experience, including older apps like Tango or Google+ Hangouts, Line, and more recently, Facebook Messenger. But none have integrated games for the purpose of facilitating new relationships.
Zoosk today has 38 million members, but wanted to find a way to reach a younger demographic, which is why it originally launched Lively. The app was the first product to emerge from Zoosk’s in-house incubator, Zoosk Labs, where the company experiments with new ideas to expand its core business.
Whether or not Zoosk can turn trivia players into love connections remains to be seen, but it’s interesting how HQ Trivia’s success has led to this wider market full of knock-offs (e.g. Genius, Joyride, Cash Show, The Q, TopBuzz, Live Quiz, Live.me, Halftime Live!, Jam Music, etc.) and other tweaks that follow its idea of live trivia games.
Lively is available on iOS only for now.
Read Full Article
Zoosk relaunches dating app Lively as a way to meet new people while playing trivia games
Hoping to capitalize on the popularity of trivia applications like HQ Trivia, dating app maker Zoosk has just released an experimental app that combines trivia with the potential for meeting someone new. The app is a relaunch and complete makeover of Zoosk’s Lively, which first debuted in July 2016 as a dating app that used video to tell stories, instead of static profile images.
The new version of Lively is nothing like its former namesake.
As Zoosk explains, the previous version of Lively’s group video chat app was fun, but people didn’t know how to connect and relate to one another using the video format. It felt awkward to start conversations, with no reason to be there besides wanting to date.
The company went back to the drawing board, so to speak, to think about what sort of experiences could bring people together. Trivia, naturally, came to mind.
Lively aims to reproduce the feeling that comes with competing at a bar trivia night. When you join, you’re placed in a group video chat team of two to four people. Together, the team works to answer a series of 12 questions while discussing the answers over video in real-time. When they finish the questions, they’ll be able to see how their scores compared with other teams.
The “dating” component to the app isn’t quite what you would expect. In fact, it’s less of a way to find a date for a night out, than it is to just make new friends. After the game wraps, you’ll have the option to continue chatting with the other players, if you choose. You can also add people as a friend, if you hit it off.
And when trivia isn’t in session – the games run twice daily at 3 PM and 7 PM PST – you can group video chat with others on Lively.
Because you’re not added to a team with nearby players, your ability to make friends who are also possible real-life dating prospects is decidedly limited. That’s something that Lively could change to support in time, if it’s able to grow its user base. But for now, it needs to match users with any live players in order to fill out its teams.
It’s understandable why it went this route, but it doesn’t lend itself well to meeting someone special – unless you’re open to meeting people anywhere (which some are), or are fine with just making new friends and seeing where that leads.
Unlike HQ Trivia, which features live streams with a host, Lively is just group video chat with a trivia component. That means it won’t be as challenging for Zoosk to operate, as it doesn’t have to worry with bandwidth issues and other costs of putting on a live game show. Also, because there are no prizes or payouts, you can join anytime during the 30-minute gaming session to be placed into a team and play along.
Lively is not the first app to support a group video chat interface where gameplay is an option. A number of video chat apps over the years have integrated games into their experience, including older apps like Tango or Google+ Hangouts, Line, and more recently, Facebook Messenger. But none have integrated games for the purpose of facilitating new relationships.
Zoosk today has 38 million members, but wanted to find a way to reach a younger demographic, which is why it originally launched Lively. The app was the first product to emerge from Zoosk’s in-house incubator, Zoosk Labs, where the company experiments with new ideas to expand its core business.
Whether or not Zoosk can turn trivia players into love connections remains to be seen, but it’s interesting how HQ Trivia’s success has led to this wider market full of knock-offs (e.g. Genius, Joyride, Cash Show, The Q, TopBuzz, Live Quiz, Live.me, Halftime Live!, Jam Music, etc.) and other tweaks that follow its idea of live trivia games.
Lively is available on iOS only for now.
Read Full Article
Tokyoflash has created a radar watch that scans the skies (or your wrist)
Tokyoflashis one of my favorite watchmakers. Unabashedly analog, the watches pay homage giant robots and old tech, looking like a cross between something that you could find in the hatch in Lost and a Shinjuku fever dream.
Now the company has launched the Radar LED watch, a clever piece that shows the time with sweeping beams of light that flash across the watch face. The watch features a USB-rechargable movement and a mineral crystal with silk-screen cross hairs and markers. Behind the glass are a set of LEDs that either blink when you raise the watch to look at the time or tap a side button.
No step counters or notifications mar the stark simplicity of this strange watch. The time flashes up on the face and disappears just as quickly.
Like most Tokyoflash watches this thing is hard to read at first I suspect it becomes an acquired skill. While you won’t be able to scan for bogeys for real on this decidedly unsmart watch, it makes for an interesting – if bold – conversation starter. It’s shipping now for $189.
[gallery ids="1607585,1607584,1607583,1607582"]Read Full Article
Google expands its Cloud Platform region in the Netherlands
Google today announced that it has expanded its recently launched Cloud Platform region in the Netherlands with an additional zone. The investment, which is worth a reported 500 million euros, expands the existing Netherlands region from two to three regions. With this, all the four central European Google Cloud Platform zones now feature three zones (which are akin to what AWS would call “availability zones”) that allow developers to build highly available services across multiple data centers.
Google typically aims to have a least three zones in every region, so today’s announcement to expand its region in the Dutch province of Groningen doesn’t come as a major surprise.

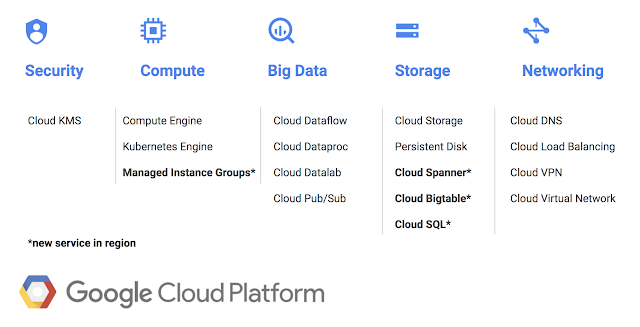
With this move, Google is also making Cloud Spanner, Cloud Bigtable, Managed Instance Groups, and Cloud SQL available in the region.
Over the course of the last two years, Google has worked hard to expand its global data center footprint. While it still can’t compete with the likes of AWS and Azure, which currently offers more regions than any of its competitors, the company now has enough of a presence to be competitive in most markets.
In the near future, Google also plans to open regions in Los Angeles, Finland, Osaka and Hong Kong. The major blank spots on its current map remain Africa, China (for rather obvious reasons) and Eastern Europe, including Russia.
Read Full Article
How to File Taxes Online With TurboTax
When it comes to filing your taxes online, there are few names bigger than TurboTax. The app has become synonymous with do-it-yourself taxes. But is it any good? How much does it cost? And how do you use it?
We dove into TurboTax to find out.
How Much Does TurboTax Cost?
If you’re looking to file your taxes online with TurboTax, you’re probably curious as to how much it costs. There are a number of different levels of service you can use, each with their own price and features. Here’s what you’ll pay:
- Free Edition lets you do simple tax returns (1040A or 1040EZ forms) and state returns for free.
- Deluxe Edition ($59.99 + $39.99 per state) searches over 350 deductions to help you minimize your tax burden, maximizes mortgage and property tax deductions, and itemizes your charitable contributions.
- Premier Edition ($79.99 + $39.99 per state) includes investment income and rental property information, and also covers refinancing.
- Self-Employed Edition ($119.99 + $39.99 per state) provides guidance for independent contractors and self-employed businesspeople. It also integrates with Quickbooks Self-Employed to help you maximize your deductions.
- TurboTax Live ($179.99 + $39.99 per state) includes a one-on-one review with and professional advice from a CPA or EA before you file.
It’s worth pointing out that you don’t have to pay when you start your return with TurboTax. You only pay when you file.
Which TurboTax Edition Do I Need?
With all these options, choosing the best one for you can be difficult. How do you choose?
In general, if your taxes are more complicated than the simplest 1040 forms, it’s not a bad idea to pay for a higher level of TurboTax. If you itemize your deductions, for example, stepping up to the Deluxe edition is a good idea. If you have a lot of investments, the Premier level is worth paying for.
This is especially true if you’re self-employed. Self-employment comes with a lot of complicated tax forms, and getting help on them will help you pay the correct amount. You also get a free copy of Quickbooks Self-Employed if you pay for the self-employed option.

And if you want to be absolutely sure you get your taxes right the first time, TurboTax Live is a great way to go. It’s often cheaper than hiring an in-person tax professional, but you still get a CPA or EA’s expertise.
If you’re still not sure, you can use TurboTax’s recommendations. Just head to their online taxes page, select which items apply to you, and you’ll get a suggestion.
It’s worth noting that you can also get downloadable or CD-based tax software from TurboTax. But when you can do it all online, why would you?
How to File Your Taxes Online With TurboTax
After you’ve chosen which level of TurboTax you need, you’ll want to gather the tax documents you need. The exact documents will depend on your situation, but here are a few things you’ll want to make sure you have:
- W-2 or 1099 (for income reporting)
- 1095 for health insurance coverage
- Previous year’s returns
- Records of business income
- Records of investment income
Once you’ve collected your documents, head to the TurboTax website, go to Products & Pricing at the top of the screen, and select Online products.

Choose the option that best fits your situation, and click the Start for Free (or File for $0) button in the corresponding column.
Once you’ve signed in, you’ll jump right into your tax return. You’ll need to create an account if you don’t have one already.
To get started, you can upload a PDF copy of your previous year’s return to pull in information like your address and adjusted gross income:

Whether you upload a PDF or enter your information manually, TurboTax will ask you a few questions next. You’ll be given choices, like which of a list of things apply to you:

You’ll then enter personal information, like your name, occupation, and address. Once this section is completed, you get down to the core of your tax return: income information.
Fortunately, the app walks you through the process and makes it very clear when you need specific forms and which information you’ll need to enter.

TurboTax will walk you through each step and tell you where to find the information you need.
It also tells you whether you’ve chosen a common option on some confusing choices, like this one:

After you enter your income, TurboTax will take you through specific areas that may qualify you for deductions:

As you go through your return, the app will ask you to upgrade or pay for additional services. Some of them might be useful to you, while others will just be overkill. Decide as you see fit.
At any point, you can exit your return and TurboTax will save it. You can always come back later to add information or finish it. Just use the sidebar to jump to the section you need:

When you reach the end of your return, you’ll have the chance to review it before submitting. TurboTax will automatically review your return and let you know if there are any issues that you should address before submitting it:

Finally, confirm that your return is accurate, enter your payment information, and send it off!
Tracking Your Return With TurboTax
It can be nerve-wracking waiting to hear back from the IRS after you’ve sent your return. TurboTax makes the process a little less painful by helping you track the status of your return.
Here are some general guidelines on how long it takes for your tax return to get to various stages:

If you want to try to get more detailed information on your exact return, TurboTax’s Where’s My Refund? tool can help. Just enter as much information as you can and you’ll get an estimate.
Is TurboTax Good?
After going through the process myself, I can tell you that TurboTax is great. I’ve used a lot of different online tax-filing apps, and TurboTax was very simple and never confusing. The tooltips and sidebars are a huge help.

That’s especially true if you need more than just the basics. My own taxes cover two self-employed individuals, so I need all the help I can get.
The potential cost is a disadvantage… but you can always choose the free option. There are many other free online tax return options available, but the TurboTax interface is the easiest and nicest that I’ve used.
TurboTax comes with companion apps for Android and iOS. The apps are free and you need to pay only when you file your tax. They can save you some time. For instance, you can snap a photo of your W-2, verify your data and your information is entered into all the right tax forms.
Download: TurboTax for Android | iOS (Free)
How Long Does TurboTax Take?
If you have very complicated taxes, you could be looking at a long time. I was able to complete mine in a couple hours, and that included chasing down some forms that I hadn’t yet received in the mail and coordinating with my wife to get her business’s information.
If you have a simple return with a one or two W-2s and not much else, you’re probably looking at less than 30 minutes to complete it.
And the advantage of using an online filing app is that your return is sent to the IRS immediately, so they can start processing it. TurboTax can’t speed up this process, but the electronic filing does help it move along.
File Taxes Online With TurboTax to Minimize Hassle
Filing your taxes is a pain. Filing them online makes it a little better. And using TurboTax is a great way to make it easy. There are still some difficulties like finding all of the forms, dealing with the frequent upsells, and so on. But overall, it’s remarkably easy.
And now that TurboTax offers free federal and state returns, they’re not going to get beat on price. The app’s ease of use is what makes it really stand out, though. The interface is great, the process is easy, and the instructions are clear. It doesn’t get much better than that.
You have better things to do than waste your time, so avoid the hassle of tax returns by filing your taxes online using TurboTax.
Read Full Article
Google Lens arrives on iOS
On the heels of last week’s rollout on Android, Google’s new AI-powered technology, Google Lens, is now arriving on iOS. The feature is available within the Google Photos iOS application, where it can do things like identify objects, buildings, and landmarks, and tell you more information about them, including helpful details like their phone number, address, or open hours. It can also identify things like books, paintings in museums, plants, and animals. In the case of some objects, it can also take actions.
For example, you can add an event to your calendar from a photo of a flyer or event billboard, or you can snap a photo of a business card to store the person’s phone number or address to your Contacts. (Turning photos into Contacts is something that Microsoft just added to its Pix app, too, with the option of also locating the person on LinkedIn.)
Google Lens was first announced last year at Google’s I/O developer conference, and is made possible by the recent advancements in machine learning and image recognition technologies. The eventual goal is to allow smartphone cameras to understand what it is they’re seeing across any type of photo, then helping you take action on that information, if need be – whether that’s calling a business, saving contact information, or just learning about the world on the other side of the camera.
During the demo at I/O, Google showed off how Google Lens could do other things, too. It could be used to help you configure your Wi-Fi, for instance. That is, if you took a photo of the sticker on your router, it could help you to paste that information in your Wi-Fi settings to get you connected. The company also demonstrated a translation feature that converted signs in a foreign language to English.
It doesn’t seem we’re quite there yet with all these promised features, but they could become possible in the future as Google Lens matures.
According to a tweet from the Google Photos’ Twitter account, Google Lens in Google Photos on iOS began rolling out on Thursday to those who have the latest version (3.15) of the app installed.
The rollout will complete over the course of the week ahead.
Read Full Article
7 Ways to Make Your Video Footage More Cinematic
We’ve all been there. You watch a film or TV show and see a simply amazing shot. You think to yourself “that can’t be too difficult to reproduce”. You set up your camera and start shooting, but when you’re finished the result looks nothing like a “real” movie. What can you do?
In this article we’ll show you some tips and tricks you can use to make your video footage look more cinematic. While none of these tricks will be the magic bullet that takes you from an unknown director to Quentin Tarantino overnight, little tricks combined can add up to make a big difference.
1. Think Before You Shoot
One of the easiest things you can do before filming is thinking about your shot. If you just grab your camera and press the record button, things aren’t going to work out as well as if you plan a little first.
Before you even begin shooting you can think about your shot. Do you want to shoot at a really shallow depth of field, or will you be filming in bright sunlight in the middle of the day? In that case, you’ll need an ND filter. Our guides to depth of field and photographic filters may come in handy here.
Will you be using a tripod or will you be holding your camera? What about sound: do you have a microphone or are you going to be filming in a really noisy area?
Film productions spend a lot of time planning everything. They don’t just start filming and hope for the best. Instead, production teams do everything possible to eliminate any uncertainty. The actors know where to stand, the camera operators know where the action will take place, and all of the other departments work together perfectly.
Even if you’re just starting out, or are just filming silly stunts for YouTube, you can make your shots better by planning them beforehand. Big YouTubers such as Casey Neistat and other engaging vloggers may appear to be spontaneous, but everything they do is carefully considered and intricately planned, even if it doesn’t come across as such.
2. Edit at 24 FPS
“Nonsense,” I hear you say. “My camera can shoot at 240 FPS, why would I shoot at a measly 24?”
The vast majority of films and movies are shot at 24 FPS. Not only does this closely resemble the “frame rate” your eyes see in, but it’s what viewers expect films to be shot in. If you’re delivering in 48, 60, or any frame rate other than 24, your film won’t look the same as “proper” films.
Our eyes and brains have been trained to expect 24 FPS, by hundreds or even thousands of movies throughout the years. YouTubers or gamers may say that 60 FPS is the best, but trust me, 24 FPS is where it’s at.
In this video, YouTube channel Filmmaker IQ provides a comprehensive overview of film frame rates:
3. Shoot With a 180-Degree Shutter Angle
This may sound confusing, but perhaps you know “shutter angle” as “shutter speed”. A shutter angle of 180 degrees means that your shutter speed (SS) is double your frame rate. When shooting at 24 FPS, your SS should be 1/48. This is another area where your brain has been trained by the cinema that this looks the best.
If you shoot with a faster shutter speed, there won’t be enough motion blur. Images will look far too sharp, and have a “freeze-frame” effect. This means that if you’re shooting slow-motion, you’ll need to increase your shutter speed.
This video from YouTube channel Precision Camera & Video provides more information about shutter speed versus shutter angle:
4. Add a Cinematic Crop
Adding a cinematic crop is one of the easiest things you can do in the edit suite. Suddenly, you’ll be a “real filmmaker”. Viewers will faint at how cinematic your film is, and your fifth-grade girlfriend will wonder why she ever left you.
I’m joking, of course, but adding a cinematic crop does make a bigger difference than you’d think.
It once again comes down to “real movies”. Bigscreen films are shot at an aspect ratio of 2.35:1. Your widescreen computer monitor is 16:9, maybe 16:10. Converting your film from a “standard” widescreen to the ultra-wide ratio of the big screen makes a big difference—even if you have to fake it with a crop.
This video from camera support manufacturers RhinoCameraGear shows just how easy it is to add a cinematic crop to your films:
5. Choose the Right Music
Music can make a massive difference to the feeling of your film. After all, music is used in films all the time to manipulate your emotions. Classical music in a sad scene, dance music in a party scene. Think about (or better yet, try it in your edit) how certain scenes would sound if they had clown music playing in the background.
Using classic Disney films as an example, in The Lion King, during the scene when Mufasa dies, listen to how epic that music is. Haunting strings and quires really set it apart. How different would that be if something like the Benny Hill theme was playing?
As another example, in Disney’s Bambi, when Bambi’s mother dies, the music jumps around between energetic orchestral pieces, and slower, sadder strings. How would that scene look if “Jump Around” was playing?
If you’re a bit stuck on your music choice, then worry not, as YouTube legend Peter McKinnon has you covered with his guide to finding music for video:
6. Slow Things Down
Movement can transform your shots from static and boring to lively and exciting. Jumping around all over the place, however, will make your viewers want to throw up.
Film productions spend large sums of money on all manor of dollys, tripods, jibs, cranes, and gimbals. You don’t need to spend money you haven’t got, and it doesn’t mean you can’t make a film on a budget, it simply comes back again to thinking before shooting.
Slow, smooth, and deliberate movements are the key here. A nice slow pan on a tripod, or smooth movements with a budget gimbal such as the Zhiyun Crane 2.
In this video, YouTube creator Matti Haapoja shares his cinematic movement tricks:
7. Use Color Grading
Our final tip here is to color grade and color correct your footage. Color is also capable of messing with our emotions. Ever noticed how films like The Matrix lean more towards the color green, or how old wild west films have a more yellowish brown tint to them?
While color grading and correction are entire industries in their own right, you can do something about it, even if you’re not experienced in the edit suite.
Getting your shots correct in-camera will make the biggest difference. If you start your scene with a really yellow shot, because your white balance was off, it’s totally possible to fix this in post production, but if you get it right while filming, it will save you a lot of time later on.
In this video, YouTuber Kyler Holland provides a quick overview of the differences between color grading and color correction:
Learning From Professional Filmmakers
In this article we’ve shown you just some of the many ways to make your films look more cinematic. From pre-planning to color grading and more, there’s plenty you can do right now to match the professionals.
And if you need an extra hand making this all work, maybe some of these simple DIY filmmaking hacks will come in useful.
Read Full Article
Alexa’s new ‘Brief Mode’ replaces verbal confirmations with chimes
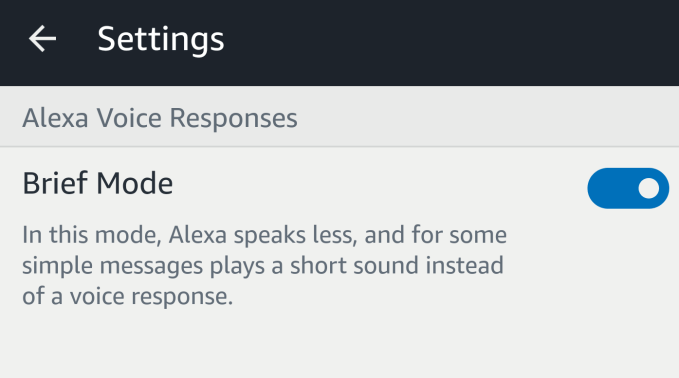
Alexa is rolling out an optional “Brief Mode” that lets users configure their Echo devices to use chimes and sounds for confirmations, instead of having Alexa respond with her voice. For example, if you ask Alexa to turn on your lights today, she will respond “okay” as she does so. But with Brief Mode enabled, Alexa will instead emit a small chime as she performs the task.
The mode would be beneficial to someone who appreciates being able to control their smart home via voice, but doesn’t necessarily need to have Alexa verbally confirming that she took action with each command. This is especially helpful for those who have voice-enabled a range of smart home accessories, and have gotten a little tired of hearing Alexa answer back.
The addition of Brief Mode comes at a time when voice assistants are finding their way into ever more smart home devices, beyond the doorbells, camera, lightbulbs, thermostats, and others we’ve grown used to. At CES 2018 this January, for example, Alexa was found in a number of new devices, like smart faucets, light switches, car dashboard cameras, projectors, and several more home appliances like dishwashers, washers, dryers, and fridges.
The launch of Brief Mode was first spotted by users on Reddit (via AFTVNews), with many saying they had received the option just a few days ago. Others in the thread noted they had it as well, but then it went away – something that seems to indicate a test on Amazon’s part, or perhaps bugs with a phased rollout. In some cases, users also noticed a new toggle switch in the Alexa app, which allows you to turn Brief Mode on or off.
The explanation provided here doesn’t seem like Brief Mode would be limited to smart home commands, but anytime when Alexa could play a sound instead of a verbal confirmation. It also seems like it may cut down on Alexa’s overall chattiness in other ways, though we haven’t yet noticed any changes on other fronts.
I received the option to enable Brief Mode yesterday. When giving Alexa a command to turn off the bedroom light, she responded by explaining what Brief Mode does and giving me the option to enable it. (I said yes.)
Now when Alexa is commanded to do things with smart home devices, she just chimes.
We asked Amazon yesterday to confirm if Brief Mode is rolling out to all users, or if it’s still considered a limited test. We’ll update if the company chooses to respond.
Read Full Article
Equity podcast: Theranos’s reckoning, BroadQualm’s stunning conclusion and Lyft’s platform ambitions
Hello and welcome back to Equity, TechCrunch’s venture capital-focused podcast where we unpack the numbers behind the headlines.
This week Katie Roof and I were joined by Mayfield Fund’s Navin Chaddha, an investor with early connections with Lyft to talk about, well, Lyft — as well as two bombshell news events in the form of an SEC fine for Theranos and Broadcom’s hostile takeover efforts for Qualcomm hitting the brakes. Alex Wilhelm was not present this week but will join us again soon (we assume he was tending to his Slayer shirt collection).
Starting off with Lyft, there was quite a bit of activity for Uber’s biggest competitor in North America. The ride-sharing startup (can we still call it a startup?) said it would be partnering with Magna to “co-develop” an autonomous driving system. Chaddha talks a bit about how Lyft’s ambitions aren’t to be a vertical business like Uber, but serve as a platform for anyone to plug into. We’ve definitely seen this play out before — just look at what happened with Apple (the closed platform) and Android (the open platform). We dive in to see if Lyft’s ambitions are actually going to pan out as planned. Also, it got $200 million out of the deal.
Next up is Theranos, where the SEC investigation finally came to a head with founder Elizabeth Holmes and former president Ramesh “Sunny” Balwani were formally charged by the SEC for fraud. The SEC says the two raised more than $700 million from investors through an “elaborate, years-long fraud in which they exaggerated or made false statements about the company’s technology, business, and financial performance.” You can find the full story by TechCrunch’s Connie Loizos here, and we got a chance to dig into the implications of what it might mean for how investors scope out potential founders going forward. (Hint: Chaddha says they need to be more careful.)
Finally, BroadQualm is over. After months of hand-wringing over whether or not Broadcom would buy — and then commit a hostile takeover — of the U.S. semiconductor giant, the Trump administration blocked the deal. A cascading series of events associated with the CFIUS, a government body, got it to the point where Broadcom’s aggressive dealmaker Hock Tan dropped plans to go after Qualcomm altogether. The largest deal of all time in tech will, indeed, not be happening (for now), and it has potentially pretty big implications for M&A going forward.
That’s all for this week, we’ll catch you guys next week. Happy March Madness, and may fortune favor* your brackets.
Equity drops every Friday at 6:00 am PT, so subscribe to us on Apple Podcasts, Overcast, Pocketcast, Downcast and all the casts.
* assuming you have Duke losing before the elite 8.
Read Full Article
The 5 Best Microsoft Office Password Recovery Tools That Actually Work
Protecting your zombie romance whodunnit novel draft with a super strong password was a great idea. That is until you cannot remember the password to unlock the Microsoft Office document. And now there is no way in.
Luckily, several really useful programs remove Microsoft Office password protection. Here are five of the best.
Microsoft Office and Password Protection
Before we begin, let’s get one thing straight. You should only use these tools to remove passwords from your own documents. When you use one of these tools on any other documents, there is a chance you’re committing a crime. We want nothing to do with that.
It is also useful to understand just what the password recovery program is doing. Microsoft Office password recovery programs fall into two categories: tools that remove and tools that recover. Both are useful but serve slightly different purposes. Furthermore, understand what the password does.
Microsoft Office from 2007 onwards uses 128-bit AES encryption. Cracking a 128-bit AES key is an extremely time-consuming process. With a sufficiently strong password, the file will remain secure, even using known AES-128 breaks.
Finally, we consider password strength in relation to the Microsoft Office version:
- Microsoft Office 95: Weak encryption converts the password to a 16-bit key; instant decryption available
- Office 97 and 2000: Encryption key length raises to 40-bits; instant decryption available
- Office XP and 2003: Key length remains at 40-bits, but Microsoft adds a custom encryption algorithm protection option; fast decryption available depending on the custom algorithm
- Office 2007: AES is available, with the addition of the SHA-1 hashing function; password recovery is difficult
- Office 2013: Still uses AES-128, but hash algorithm updates to SHA-2 class, using SHA-512 as default; password recovery is extremely difficult
We see that using even an extremely long password while using Microsoft Office 95 has minimal effect as the encryption algorithm is vulnerable. Conversely, Office 2013 offers more protection to files with weaker passwords due to stronger encryption and hashing algorithms.
The 5 Best Microsoft Office Password Recovery Tools
If you have a file from an old Microsoft Office version, there is an extremely good chance of removing or extracting the password. Unfortunately, those seeking to crack passwords on newer Microsoft Office versions are almost certainly out of luck.
1. Free Word and Excel Password Recovery Wizard

Supports: Microsoft Word and Excel 95-2003
The Free Word and Excel Password Recovery Wizard is one of the first options to consider. The program attempts to unlock files using either a dictionary or brute force attack (as do most of the other tools on this list). Attempting to put a modern Microsoft Office file results in an error.
There are options to configure both attack types. The dictionary attack uses different case sizes with the option of a custom word list, while the brute force attack uses variable password length as well as the option of a custom character set.
2. Word Password Recovery Master

Supports: Microsoft Word and Excel 95, 97, 2000, XP, 2003, 2007, claims also to support 2010, 2013
The Word Password Recovery Master is another useful free option to consider for password removal and recovery. It supports a wide range of Microsoft Office versions, making it useful in solving a wide number of issues.
The claims of support, however, aren’t completely truthful. During my tests, the program couldn’t recover or remove basic passwords created using Office 2010, so I have further doubts about its ability to remove encryption on later versions.
However, Microsoft Office 2003 passwords were easy to remove. The program also notes that it does not support custom encryption types, only default Microsoft Office encryption.
3. Elcomsoft Advanced Office Password Recovery

Supports: All Microsoft Office versions
Elcomsoft’s Advanced Office Password Recovery (AOPR) is our first professional tool. As such, it comes with a price tag. In this case, you get what you pay for.
At $49, the Home Edition is the cheapest option. However, it doesn’t allow GPU use for cracking or removing passwords and relies solely on CPU power (and the Home Edition is limited to a single CPU, too).
GPUs are more efficient password crackers so if you’re serious about removing that password; I would suggest upgrading to the $99 Standard Edition.
Aside from price, AOPR has a wide range of features, allowing for custom dictionaries, custom character sets, and variable password lengths, as well as running short pre-brute force dictionary attacks just in case. Also, if you know anything about the password you can “mask” information to streamline the process.
AOPR is guaranteed to work on older Microsoft Office versions. The program also successfully unlocked several test documents I ran, though the passwords weren’t particularly difficult. Given enough time, AOPR seems like a great choice (albeit costly if you are only unlocking one file).
4. CrackIt!

Supports: Microsoft Word and Excel 97, 2000, 2003
CrackIt! is a slightly older password cracker, developed originally for Windows 95. However, it still works with Windows 10 and better still, requires no installation, running as a simple executable. It is basic, only offering a brute force attack, with limited dictionaries too. But it will work for those basic passwords, on older Microsoft Word and Excel files.
5. SmartKey Office Password Recovery

Supports: All Microsoft Office versions
SmartKey’s Office Password Recovery program is another worthwhile paid-for tool if you’re in a password protection pickle. Like Elcomsoft’s AOPR, if given enough time this program will crack an AES-128 key (so long as the key isn’t that difficult). Furthermore, the user interface is one of the nicest amongst the password cracking tools and is certainly one of the easiest to use.
The Standard version will set you back $24.95 but doesn’t allow GPU acceleration. With that in mind, I’d pay the $34.95 for the Professional version that allows up to 32 CPUs and eight GPUs.
These Password Recovery Tools Aren’t Flawless
Sure, there are more Microsoft Office document password cracking programs out there. The majority offer the same functionality as the above programs; other paid options cost more but offer the same range of features.
You must understand that you will not crack every password, especially those using the latest Microsoft Office encryption, especially in combination with a sufficiently strong password. Throw in a multi-word passphrase and you’re looking at thousands of hours to decrypt a single file, if it is even possible (hint: it isn’t).
Image Credit: Amaviael/Depositphotos
Read Full Article