19 July 2019

Building SMILY, a Human-Centric, Similar-Image Search Tool for Pathology


Advances in machine learning (ML) have shown great promise for assisting in the work of healthcare professionals, such as aiding the detection of diabetic eye disease and metastatic breast cancer. Though high-performing algorithms are necessary to gain the trust and adoption of clinicians, they are not always sufficient—what information is presented to doctors and how doctors interact with that information can be crucial determinants in the utility that ML technology ultimately has for users.

The medical specialty of anatomic pathology, which is the gold standard for the diagnosis of cancer and many other diseases through microscopic analysis of tissue samples, can greatly benefit from applications of ML. Though diagnosis through pathology is traditionally done on physical microscopes, there has been a growing adoption of “digital pathology,” where high-resolution images of pathology samples can be examined on a computer. With this movement comes the potential to much more easily look up information, as is needed when pathologists tackle the diagnosis of difficult cases or rare diseases, when “general” pathologists approach specialist cases, and when trainee pathologists are learning. In these situations, a common question arises, “What is this feature that I’m seeing?” The traditional solution is for doctors to ask colleagues, or to laboriously browse reference textbooks or online resources, hoping to find an image with similar visual characteristics. The general computer vision solution to problems like this is termed content-based image retrieval (CBIR), one example of which is the “reverse image search” feature in Google Images, in which users can search for similar images by using another image as input.

Today, we are excited to share two research papers describing further progress in human-computer interaction research for similar image search in medicine. In “Similar Image Search for Histopathology: SMILY” published in Nature Partner Journal (npj) Digital Medicine, we report on our ML-based tool for reverse image search for pathology. In our second paper, Human-Centered Tools for Coping with Imperfect Algorithms During Medical Decision-Making (preprint available here), which received an honorable mention at the 2019 ACM CHI Conference on Human Factors in Computing Systems, we explored different modes of refinement for image-based search, and evaluated their effects on doctor interaction with SMILY.

SMILY Design
The first step in developing SMILY was to apply a deep learning model, trained using 5 billion natural, non-pathology images (e.g., dogs, trees, man-made objects, etc.), to compress images into a “summary” numerical vector, called an embedding. The network learned during the training process to distinguish similar images from dissimilar ones by computing and comparing their embeddings. This model is then used to create a database of image patches and their associated embeddings using a corpus of de-identified slides from The Cancer Genome Atlas. When a query image patch is selected in the SMILY tool, the query patch’s embedding is similarly computed and compared with the database to retrieve the image patches with the most similar embeddings.
Schematic of the steps in building the SMILY database and the process by which input image patches are used to perform the similar image search.
The tool allows a user to select a region of interest, and obtain visually-similar matches. We tested SMILY’s ability to retrieve images along a pre-specified axis of similarity (e.g. histologic feature or tumor grade), using images of tissue from the breast, colon, and prostate (3 of the most common cancer sites). We found that SMILY demonstrated promising results despite not being trained specifically on pathology images or using any labeled examples of histologic features or tumor grades.
Example of selecting a small region in a slide and using SMILY to retrieve similar images. SMILY efficiently searches a database of billions of cropped images in a few seconds. Because pathology images can be viewed at different magnifications (zoom levels), SMILY automatically searches images at the same magnification as the input image.
Second example of using SMILY, this time searching for a lobular carcinoma, a specific subtype of breast cancer.
Refinement tools for SMILY
However, a problem emerged when we observed how pathologists interacted with SMILY. Specifically, users were trying to answer the nebulous question of “What looks similar to this image?” so that they could learn from past cases containing similar images. Yet, there was no way for the tool to understand the intent of the search: Was the user trying to find images that have a similar histologic feature, glandular morphology, overall architecture, or something else? In other words, users needed the ability to guide and refine the search results on a case-by-case basis in order to actually find what they were looking for. Furthermore, we observed that this need for iterative search refinement was rooted in how doctors often perform “iterative diagnosis”—by generating hypotheses, collecting data to test these hypotheses, exploring alternative hypotheses, and revisiting or retesting previous hypotheses in an iterative fashion. It became clear that, for SMILY to meet real user needs, it would need to support a different approach to user interaction.

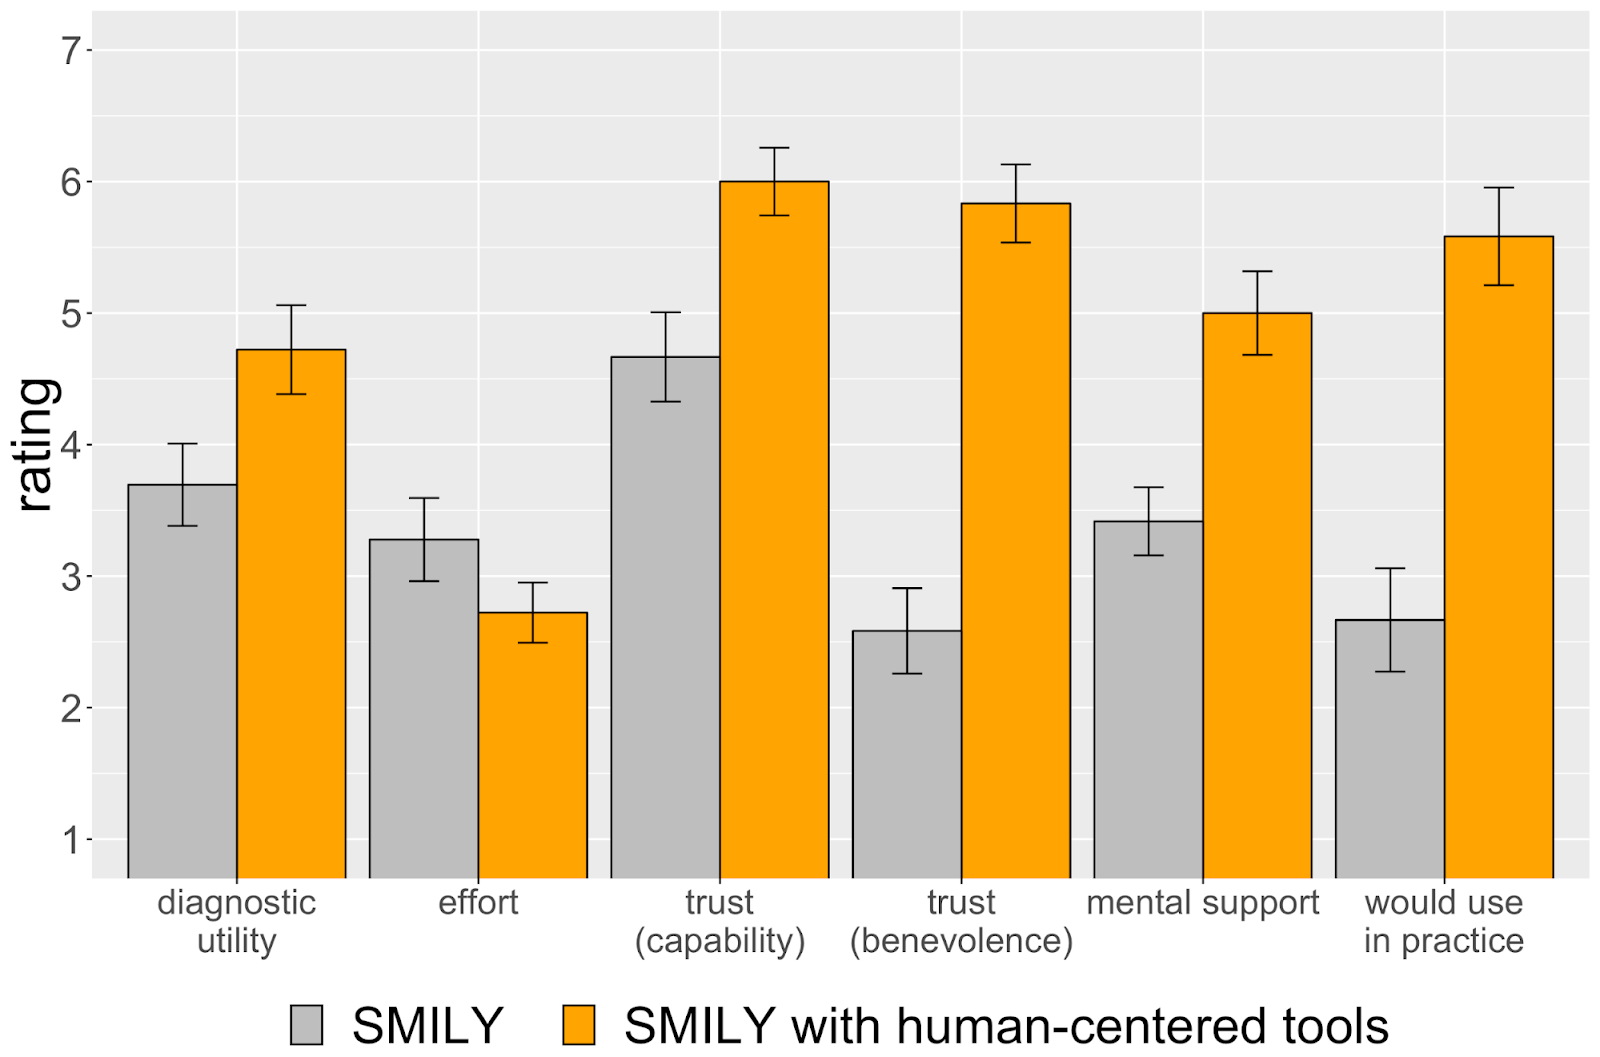
Through careful human-centered research described in our second paper, we designed and augmented SMILY with a suite of interactive refinement tools that enable end-users to express what similarity means on-the-fly: 1) refine-by-region allows pathologists to crop a region of interest within the image, limiting the search to just that region; 2) refine-by-example gives users the ability to pick a subset of the search results and retrieve more results like those; and 3) refine-by-concept sliders can be used to specify that more or less of a clinical concept be present in the search results (e.g., fused glands). Rather than requiring that these concepts be built into the machine learning model, we instead developed a method that enables end-users to create new concepts post-hoc, customizing the search algorithm towards concepts they find important for each specific use case. This enables new explorations via post-hoc tools after a machine learning model has already been trained, without needing to re-train the original model for each concept or application of interest.
Through our user study with pathologists, we found that the tool-based SMILY not only increased the clinical usefulness of search results, but also significantly increased users’ trust and likelihood of adoption, compared to a conventional version of SMILY without these tools. Interestingly, these refinement tools appeared to have supported pathologists’ decision-making process in ways beyond simply performing better on similarity searches. For example, pathologists used the observed changes to their results from iterative searches as a means of progressively tracking the likelihood of a hypothesis. When search results were surprising, many re-purposed the tools to test and understand the underlying algorithm, for example, by cropping out regions they thought were interfering with the search or by adjusting the concept sliders to increase the presence of concepts they suspected were being ignored. Beyond being passive recipients of ML results, doctors were empowered with the agency to actively test hypotheses and apply their expert domain knowledge, while simultaneously leveraging the benefits of automation.
With these interactive tools enabling users to tailor each search experience to their desired intent, we are excited for SMILY’s potential to assist with searching large databases of digitized pathology images. One potential application of this technology is to index textbooks of pathology images with descriptive captions, and enable medical students or pathologists in training to search these textbooks using visual search, speeding up the educational process. Another application is for cancer researchers interested in studying the correlation of tumor morphologies with patient outcomes, to accelerate the search for similar cases. Finally, pathologists may be able to leverage tools like SMILY to locate all occurrences of a feature (e.g. signs of active cell division, or mitosis) in the same patient’s tissue sample to better understand the severity of the disease to inform cancer therapy decisions. Importantly, our findings add to the body of evidence that sophisticated machine learning algorithms need to be paired with human-centered design and interactive tooling in order to be most useful.

Acknowledgements
This work would not have been possible without Jason D. Hipp, Yun Liu, Emily Reif, Daniel Smilkov, Michael Terry, Craig H. Mermel, Martin C. Stumpe and members of Google Health and PAIR. Preprints of the two papers are available here and here.

Twitter tests a new way to label replies


Twitter is testing a new way to make conversation threads easier to follow, with the launch of a new test that labels notable replies with special icons. If the original poster replies somewhere in the thread, their tweet will have a small microphone icon next to their profile picture. Other tweets may be labeled, as well — including those from users who were mentioned in the original tweet and replies from people you’re already following on Twitter.

These will be labeled with the at symbol (@) and a small person icon with a checkmark by it, respectively.

The new test is the latest in a series of experiments Twitter has been running focused on making its product easier to use, particularly when conversations around a tweet become lengthy.

At the beginning of this year, the company first began a test where it labeled the original poster in a conversation thread as the “Original Tweeter.” That may have been a bit too confusing for some, because a few months later, Twitter changed it to “Author.” It then also added two other labels, for people who were mentioned in the original tweet, and those replies from people you’re following.

These, however, were text labels — meaning they took up valuable screen space on small mobile devices. They also cluttered up the already text-heavy interface with more distracting text to read.

The new icons don’t have that problem. But they’re also small and light gray and white in color, which makes them hard to see. In addition, their meaning isn’t necessarily clear to anyone who doesn’t hang around online forums like Reddit, for example, where it’s common to use a microphone to showcase the original poster’s follow-up comments.

It’s also unclear why Twitter thinks users are clamoring to see this information. Highlighting the original poster is fine, I guess, but the other labels seem extraneous.

While this is a minor change, it’s one of many things Twitter is tweaking in the hopes of making its service simpler and more approachable. It’s also running an experimental prototype app called twttr where it’s trying out new ideas around threaded conversations, like using color-coded replies or branching lines to connect tweets and their responses.

A lot of these changes feel a little unnecessary. Twitter isn’t as difficult to understand as the company believes it is.

At the end of the day, it’s a way to publish a public status update and reply to those others have posted. That’s its core value proposition — not live streaming video, not its clickable newsreels it calls “Moments,” and not its article bookmarking tools. Those are useful and fun additions, sure, but optional.

Instead, Twitter’s challenges around user growth aren’t because the service is overly complex, but because a public platform like this is rife for issues around online bullying and abuse, disinformation and propaganda, hate speech, spambots, and everything else that an unmoderated forum would face.

Twitter tests are live now, but not be showing for all users.


Read Full Article

Twitter to attempt to address conversation gaps caused by hidden tweets


Twitter’s self-service tools when it comes to blocking content you don’t want to see, as well as a growing tendency for users to delete a lot of the content they post, is making some of the conversations on the platform look like Swiss cheese. The company says it will introduce added “context” on content that’s unavailable in conversations in the next few weeks, however, to help make these gaps at least less mystifying.

There are any number of reasons why tweets in a conversation you stumble upon might not be viewable, including that a poster has a private account, that the tweet was taken down due to a policy violation, that it was deleted after the fact or that specific keywords are muted by a user and present in those posts.

Twitter’s support account notes that the fix will involve providing “more context” alongside the notice that tweets in the conversation are “unavailable,” which, especially when presented in high volume, doesn’t really offer much help to a confused user.

Last year, Twitter introduced a new process for adding additional context and transparency to why an individual tweet was deleted, and it generally seems interested in making sure that conversations on the platform are both easy to follow, and easy to access and understand for users who may not be as familiar with Twitter’s behind-the-scenes machinations.


Read Full Article

Huawei’s new OS is for industrial use, not Android replacement


Seems Hongmeng isn’t the Android replacement it’s been pitched as, after all. The initial story certainly tracked, as Huawei has been preparing for the very real possibility of life after Google, but the Chinese hardware giant says the operating system is primarily focused on industrial use.

The latest report arrives courtesy of Chinese state news agency, Xinhua, which notes that the OS has been in development for far longer than the Trump-led Huawei ban has been in effect. Hongmeng is a relatively simple operating system compared to the likes of Android, according to SVP, Catherine Chen. The news echoes another recent report that Huawei had initially developed the software for use on IoT devices.

None of this means that Huawei isn’t working on a full mobile operating system, of course. Or that the sees of this new OS couldn’t be adapted to do more.

And given the recent news, such a move would be a pretty good use of the company’s vast resources. After all, it’s no doubt seen the writing on the wall for some time. While no one anticipated that such a ban would arrive so suddenly, questions about the company have been floated in security circles for years now.

New restrictions from the Trump administration barred Huawei from working with American companies like Google, but temporary reprieves have allowed the smartphone maker to employ Android services — at least temporarily. Questions about the company’s health are still very much up in the air, however, as the ban ramps back up.


Read Full Article

Huawei 5G indecision is hitting UK’s relations abroad, warns committee


The UK’s next prime minister must prioritize a decision on whether or not to allow Chinese tech giant Huawei to be a 5G supplier, a parliamentary committee has urged — warning that the country’s international relations are being “seriously damaged” by ongoing delay.

In a statement on 5G suppliers, the Intelligence and Security committee (ISC) writes that the government must take a decision “as a matter of urgency”.

Earlier this week another parliamentary committee, which focuses on science and technology, concluded there is no technical reason to exclude Huawei as a 5G supplier, despite security concerns attached to the company’s ties to the Chinese state, though it did recommend it be excluded from core 5G supply.

The delay in the UK settling on a 5G supplier policy can be linked not only to the complexities of trying to weight and balance security considers with geopolitical pressures but also ongoing turmoil in domestic politics, following the 2016 EU referendum Brexit vote — which continues to suck most of the political oxygen out of Westminster. (And will very soon have despatched two UK prime ministers in three years.)

Outgoing PM Theresa May, whose successor is due to be selected by a vote by Conservative Party members next week, appeared to be leaning towards giving Huawei an amber light earlier this year.

A leak to the press from a National Security Council meeting back in April suggested Huawei would be allowed to provide kit but only for non-core parts of 5G networks — raising questions about how core and non-core are delineated in the next-gen networks.

The leak led to the sacking by May of the then defense minister, Gavin Williamson, after an investigation into confidential information being passed to the media in which she said she had lost confidence in him.

The publication of a government Telecoms Supply Chain Review, whose terms of reference were published last fall, has also been delayed — leading to carriers to press the government for greater clarity last month.

But with May herself now on the way out, having agreed to step down as PM back in May, the decision on 5G supply is on hold.

It will be down to either Boris Johnson or Jeremy Hunt, the two remaining contenders to take over as PM, to choose whether or not to let the Chinese tech giant supply UK 5G networks.

Whichever of the men wins the vote they will arrive in the top job needing to give their full attention to finding a way out of the Brexit morass — with a mere three months til a October 31 Brexit extension deadline looming. So there’s a risk 5G may not seem as urgent an issue and a decision again be kicked back.

In its statement on 5G supply, the ISC backs the view expressed by the public-facing branch of the UK’s intelligence service that network security is not dependent on any one supplier being excluded from building it — writing that: “The National Cyber Security Centre… has been clear that the security of the UK’s telecommunications network is not about one company or one country: the ‘flag of origin’ for telecommunications equipment is not the critical element in determining cyber security.”

The committee argues that “some parts of the network will require greater protection” — writing that “critical functions cannot be put at risk” but also that there are “less sensitive functions where more risk can be carried”, albeit without specifying what those latter functions might be.

“It is this distinction — between the sensitivity of the functions — that must determine security, rather than where in the network those functions are located: notions of ‘core’ and ‘edge’ ate therefore misleading in this context,” it adds. “We should therefore be thinking of different levels of security, rather than a one size fits all approach, within a network that has been built to be resilient to attack, such that no single action could disable the system.”

The committee’s statement also backs the view that the best way to achieve network resilience is to support diversity in the supply chain — i.e. by supporting more competition.

But at the same time it emphasizes that the 5G supply decision “cannot be viewed solely through a technical lens — because it is not simply a decision about telecommunications equipment”.

“This is a geostrategic decision, the ramifications of which may be felt for decades to come,” it warns, raising concerns about the perceptions of UK intelligence sharing partners by emphasizing the need for those allies to trust the decisions the government makes.

It also couches a UK decision to give Huawei access a risk by suggesting it could be viewed externally as an endorsement of the company, thereby encouraging other countries to follow suit — without paying the full (and it asserts vitally) necessary attention to the security piece.

“The UK is a world leader in cyber security: therefore if we allow Huawei into our 5G network we must be careful that that is not seen as an endorsement for others to follow. Such a decision can only happen where the network itself will be constructed securely and with stringent regulation,” it writes.

The committee’s statement goes on to raise as a matter of concern the UK’s general reliance on China as a technology supplier.

“One of the lessons the UK Government must learn from the current debate over 5G is that with the technology sector now monopolised by such a few key players, we are over-reliant on Chinese technology — and we are not alone in this, this is a global issue. We need to consider how we can create greater diversity in the market. This will require us to take a long term view — but we need to start now,” it warns.

It ends by reiterating that the debate about 5G supply has been “unnecessarily protracted” — pressing the next UK prime minister to get on and take a decision “so that all concerned can move forward”.


Read Full Article

How to Manage Windows 10 Reserved Storage for Reliable Updates


windows10-reserved-storage

The Windows 10 version 1903 update rolled out in May 2019. It brought with it a host of tweaks and fixes, such as a new light theme, performance improvements, and the all-new Windows Sandbox. However, it added something to Windows 10 that many users are unhappy with—the Reserved Storage.

Windows 10 1903 introduces Reserved Storage, a 7 GB portion of your storage that Windows 10 will keep locked down to make sure updates install quickly and without fault.

Here’s how you manage Windows 10 Reserved Storage, how to turn it off, and why you might want to.

What Is Windows 10 Reserved Storage?

Microsoft recognized that many systems with smaller storage were failing to update. When a device fills up with apps, music, pictures, and so on, it leaves little space for the operating system to download and install an update.

While some users find updates irritating, they deliver important security and performance fixes. Furthermore, once you approach the storage capacity of your device, some regular apps have difficulty functioning, unable to write extra data to disk or take advantage of temporary file storage.

“Our goal is to improve the day-to-day function of your PC by ensuring critical OS functions always have access to disk space. Without reserved storage, if a user almost fills up her or his storage, several Windows and application scenarios become unreliable. Windows and application scenarios may not work as expected if they need free space to function. With reserved storage, updates, apps, temporary files, and caches are less likely to take away from valuable free space and should continue to operate as expected.”

The first version of Reserved Storage will use around 7GB storage. The amount of space Reserved Storage takes up will vary over time, depending on how you use your device.

How to Check If Your PC Is Using Reserved Storage

Check if your system is using it. Then you can decide if you want to enable or disable it.

Head to Settings > System > Storage. Select Show More Categories > System & Reserved. If your system is using Reserved Storage, you’ll spot a specific section. Otherwise, your system is not using Reserved Storage.

windows 10 reserved storage

If your system is using Reserved Storage and you want to know how to disable it, continue reading. If you do not see Reserved Storage, your system might not have updated to Windows 10 version 1903 yet.

Reserved Storage will come enabled automatically on new Windows 10 PCs and laptops. It will not automatically enable when you update from a previous version of Windows 10.

How to Disable Windows 10 Reserved Storage

Windows 10 Reserved Storage is a feature you can disable using the Registry Editor. Once you disable Reserved Storage, it doesn’t disappear automatically. The Reserved Storage will go away after the next update installs. Your system won’t wait for a major feature update. The next cumulative update will do.

Type regedit in your Start Menu search bar and select the Best Match. When the Registry Editor opens, navigate to the following Registry Key:

Computer\HKEY_LOCAL_MACHINE\SOFTWARE\Microsoft\Windows\CurrentVersion\ReserveManager

In the right panel, double-click the ShippedWithReserves DWORD, set the value to 0, and hit OK.

windows registry value for reserved storage

Reboot your system. The Reserved Storage won’t disappear instantly, but it will after the next update.

How to Enable Reserved Storage on Windows 10

Want to turn Windows 10 Reserved Storage back on? Head back to the same Registry Key DWORD as the previous section, set the value to 1, and hit OK.

As with disabling Reserved Storage, you need to wait for the next Windows update for the storage to allocate.

The Pros and Cons of Windows 10 Reserved Storage

Whether you disable Windows 10 Reserved Storage lies in the device you are using. Microsoft used the Windows 10 1903 update to increase the Windows 10 installation size from 16GB for 32-bit, and 20GB for 64-bit, to 32GB. That size increase includes the Reserved Storage as well as other new Windows 10 features.

The size increase causes a significant headache for users with small storage.

If your device has 32GB storage or less, you will remain on Windows 10 version 1809 for the remainder of its supported life. That support ends on May 12, 2020. There is also a long-term servicing branch for 1809, delivering bug fixes and security updates until January 2024, and then security fixes only until January 2029.

That’s especially bad news given May 2020 is already less than a year away. Given users purchased devices running Windows 10 in good faith, no matter the size, Microsoft should offer extended support for a longer period.

Should You Disable Windows 10 Reserved Storage?

I’m inclined to say no if you have space. Windows 10 updates are important, introducing new features, security patches, and other useful things. If you’re using a device with hundreds of gigabytes of storage, definitely enable Reserved Storage.

It should help make your updates a little smoother. As Windows 10 Reserved Storage almost guarantees a safe update—something many users and systems struggle with—any help from Microsoft is worthwhile.

If you’re using a device with less storage, say 64GB, you might consider removing Reserved Storage—but you still need to reserve your own space for Windows to update in the future.

At the very least, you can now toggle it off for an update cycle and see how it affects your device. If your updates complete successfully, you might not need Reserved Storage anyway. Conversely, if your device struggles to create space for an update, Reserved Storage could help your device.

Other Ways to Reduce the Size of Windows 10

The fact that Microsoft is increasing the Windows 10 installation size is disconcerting for users with devices with small storage. All is not lost though. You do have other options to reduce the size of your Windows 10 installation, other than removing Reserved Storage.

Check out our step-by-step guide to cleaning Windows 10 for removing useless files and other bloatware. There is also the option to save more disk space using Compact OS. We also have tips to help you reclaim your Windows 10 disk space.

Read the full article: How to Manage Windows 10 Reserved Storage for Reliable Updates


Read Full Article

How to Create the Perfect Professional Presentation in Canva


canva-presentation

These days there’s a lot of options for creating workplace presentations, ranging from old-school classics like Microsoft PowerPoint to relative newcomers like Google Slides. Another platform that you can use to create a presentation is Canva.

As a template design site where you can craft beautiful documents, Canva makes the act of creating presentations as simple as Google Slides—perhaps even simpler. Here’s how to design a workplace presentation in Canva.

Step 1: Launch Canva

How to Create a Presentation in Canva Start Screen

If you don’t have an account with Canva yet, check out our rundown on what the site is and what it’s good for. If you already have an account, log in and go to your homepage.

Under Create a design, click Presentation.

You can also look for Presentation in the search bar, under the sign that says Design anything.

How to Create a Presentation in Canva Workspace

After you click on Presentation, you’ll be taken to a blank workspace. Like all Canva’s workspaces, you’ll see a collection of pre-made templates along the left-hand side.

If you want to create a presentation from the ground up, you can. We’ve already got a great tutorial on how to create a resume from scratch using Canva, and it uses very similar principals.

If you’re creating this presentation for work, however—and you’re short on time—then it’s probably best to go with a template.

Canva divides these templates based upon their stated purpose, ranging from creative applications to pitch decks. For this tutorial, let’s go to the Professional Presentation section, as it has templates that are well suited for our purpose. Pick one that you like.

Canva Presentation Page Templates

Once you click on a design, you’ll see a bunch of different pages displayed along your sidebar. Each of these pages has a slightly different layout, but they all use similar elements and color schemes.

Step 2: Pick a Page Design, Change Your Text

Change Text in the Canva Template

The great thing about Canva is that there’s no order in which these individual pages have to be arranged. You can use one or several designs multiple times, back-to-back, or never use them at all.

To apply a design to your first page, simply click on your blank workspace so the page is active. Then click on one of the premade designs sitting to the left. Canva will automatically load it into the page and you can begin modifying.

For this tutorial, I’ve decided to pick a design that would work well as a title page. By clicking on the individual text boxes within this page, I can erase the placeholder text and put down my own.

If you want to further adjust the size, color, weight, and spacing, you can do so in the Text editing box, seen here highlighted in red.

Step 3: Adjust Your Visual Elements

Adjust Visual Elements in a Canva Presentation Template

Having the right text—but not too much text—is one of the most important things you can consider when you’re putting together your presentation. Making sure the visual elements match up is really important too.

In Canva, you can keep or delete however many graphic elements you want. You can also move them around.

To Delete an element, click on it so its bounding box shows up. Press Delete.

To Move an element, click and drag it around the page.

If you want to change the color of an element, go to the color swatch icon at the top of the screen. You can pick a color swatch from the premade palette, or you can choose a custom color with the color picker by clicking on the +.

Step 4: Add Page Notes

Add Page Notes to a Canva Presentation Template

One of the last things that you’ll want to add to your page is your presentation notes. Notes are not required, of course, but they can help you remember what you’re going to say, especially if you’re presenting in front of a group.

To add notes in Canva, go to the top right-hand corner of your page and click on the Add notes icon, seen here in red. When you do, another pop-up box will emerge.

Start typing your notes into the box. There’s a word limit, of course, but we doubt you’ll run over it. When you’re done, click Save.

Step 5: Add a New Page

How to Create a Presentation in Canva Add a New Page

The whole point of slideshows is that you’re showing off a series of pages. If you just had one page, for example, it would technically be a poster, so chances are high you’ll want to add more.

After you finish your first page, go to the bottom of your workspace and click on +Add a new page. Canva will add another page to your presentation.

Canva New Page Design

If you want to switch this page to a different style, go to the page designs on the left-hand side of your screen. Click on the one that you want.

Canva Change Page Name

Once you create more than one page, you might want to label them to keep your workspace organized.

To label your pages, go to the top left-hand corner of your active page where you see the dotted line. Click on it and start typing. From there you’ll be able to enter a new title.

Delete Page in Canva

If you’re not happy with this new page at all, you can delete the whole thing. At the top right-hand corner of the page, you’ll see a trash can icon. Click on it.

Did you hit delete by accident, or have you changed your mind? No worries: just use the Undo button in the top left-hand corner of your workspace.

Step 6: Add a Graph

How to Create a Presentation in Canva Insert a Graph

One of the best features about Canva is its ability to easily insert graphs into your presentation. It then allows you to customize those graphs to your needs.

To add a graph, find a page design that has a graph in it. Once that page is applied to your presentation, double-click on the graph inside that page so its bounding box lights up.

In the left-hand toolbar, you’ll see your graph controls emerge. At the top of those controls is a dropdown menu showing you what type of graph you’re using. Beneath that is a list of items, along with their values.

To change the name of these items, click on each individual box and start typing. To change the values, click on the box and insert the appropriate number.

Every time you change these values, Canva will automatically update your graph in real time, so you can see how it looks.

Canva Chart Styles

If you want to change the style of the graph you’re using, click on the dropdown menu and choose another. Canva will automatically change the appearance of your graph while keeping your values intact.

Add Charts to a Canva Presentation

Finally, you can also adjust the color of your graph.

Make sure your graph’s bounding box is active, then go to your Edit controls in the top left-hand corner of your screen, seen here in red. Start experimenting with them to get the right effect.

Step 7: Check Your Presentation and Add Transitions

As you wrap things up, you’ll want to check your presentation for errors. You might also want to add transitions between your pages.

To add transitions, go to the Present button at the top right-hand corner of your screen. Click on the icon.

How to Create a Presentation in Canva Transitions

When you click on that icon, Canva will open up a dropdown menu where you can pick the Transition style that you want.

After you choose your Transition style, you can also choose your Type. Type allows you to control the speed at which your presentation plays.

When you have all these things squared away, click on the blue Present button to watch your slideshow play out. It will take you to a full-screen version of it, where you can scan for errors.

When you’re done checking your presentation for errors, press the Escape key to exit out of the window. Make any changes that you need to—if applicable—then finalize the design.

Step 8: Download Your Presentation for Work

Canva Download Options

Once your presentation is finished, you’re ready to download. To download your presentation—or use it in another format—click on the dropdown menu beside the Present button.

Most of these options are free-to-use with a basic account, but for those that aren’t, you’ll see a gold “crown” symbol beside it. There’s also a ton of options, ranging from downloading the file, emailing it to your coworkers, or embedding the file on another platform.

And that’s it. You’re done.

Ace That Slideshow Presentation

Now that you’ve seen how to put together a workplace presentation in Canva, you can start exploring. There’s a lot of customization options, so it’s best if you fiddle with those settings yourself.

Looking for other things you can design? Here’s how to create a cover letter with Canva.

Read the full article: How to Create the Perfect Professional Presentation in Canva


Read Full Article

Tiny UK startup takes on Google’s Wing in the race to a drone traffic control system


A future where drones can easily and cheaply do many useful things such as deliver packages, undertake search and rescue missions, deliver urgent medical supplies, not to mention unclogging our roads with flying taxis seems like a future worth shooting for. But before all this can happen, we need to make sure the thousands of drones in the sky are operating safely. A drone needs to be able to automatically detect when entering into the flight path of another drone, manned aircraft or restricted area and to alter its course accordingly to safely continue its journey. The alternative is the chaos and danger of the recent incidences of drones buzzing major airports, for instance.

There is a race on to produce just such a system. Wing LLC, an offshoot of the Alphabet / Google-owned X company, has announced a platform it calls OpenSky that it hopes will become the basis for a full-fledged air-traffic control system for drones. So far, it’s only been approved to manage drone flights in Australia, although it is also working on demonstration programs with the US Federal Aviation Administration.

But this week Altitude Angel a UK-based startup backed by Seraphim Capital and with $4.9M in funding has launched it’s own UTM (Unmanned Traffic Management) system.

Its ‘Conflict Resolution System’ (anti-collision) system is basically an automatic collision avoidance technology. This means that any drone flying beyond the line of sight, will remain safe in the sky and not cross existing flight plans or into restricted areas. By being automated, Altitude Angel says this technology will prevent any mid-air collisions, simply because by knowing where everything else is in the sky, there’ll be no surprises.

Altitude Angel’s CRS has both ‘Strategic’ and ‘Tactical’ aspects.

The Strategic part happens during the planning stages of a flight, i.e. when someone is submitting flight plans and requesting airspace permission. The system analyses the proposed route and cross-references it with any other flight plans that have been submitted, along with any restricted areas on the ground, to then propose a reroute to eliminate any flight plan conflicts. Eventually, what happens is that a drone operator does this from an app on their phone, and the approval to flight is automated.

The next stage is Tactical. This happens while the drone is actually in-flight. The dynamic system continuously monitors the airspace around the aircraft both for other aircraft or for changes in the airspace (such as a temporary flight restriction around police incident) and automatically adjusts the route.

The key aspect of this CRS is that drones and drone pilots can store flight plans with a globally-distributed service without needing to exchange private or potentially sensitive data with each other while benefiting from an immediate pre-flight conflict resolution advice.

Richard Parker, Altitude Angel, CEO and founder says: “The ability for drones and automated aircraft to strategically plan flights, be made aware of potential conflict, and alter their route accordingly is critical in ensuring safety in our skies. This first step is all about pre-flight coordination, between drone pilots, fleet operators and other UTM companies. Being able to predict and resolve conflict mid-flight by providing appropriate and timely guidance will revolutionize automated flight. CRS is one of the critical building blocks on which the drone and automated flight industries will grow.”

Altitude Angel wone be the last to unveil a CRS of this type, but it’s instructive that there are startups confident of taking on the mighty Google and Amazon – which also has similar drone delivery plans – to achieve this type of platform.


Read Full Article

Expiration Date High Score


Expiration Date High Score

3 Apple Watch Security Tips: Everything You Need to Know


apple-watch-security

With each generation since its debut in 2015, the Apple Watch continues to become more powerful. It can accomplish a growing number of tasks without the help of an iPhone.

Apple’s wearable can control a smart home, pay for purchases, track exercise, and much more. But while the many security measures Apple uses to protect your information on iOS devices is well-known, the issue is not always so clear when using the Apple Watch.

Here are some key Apple Watch security tips and how to protect your important data.

What You Need to Protect

Apple Watch Apple Pay

Starting with the Series 3, there are currently two types of Apple Watch. The GPS + Cellular version can do basic operations—like stream Apple Music—without needing an iPhone nearby. The GPS version still needs an iPhone in range for anything that requires an internet connection.

Both versions also store important information when disconnected from an iPhone.

Easily the biggest is your credit card information for Apple Pay. Your watch can pay for purchases without the need for an iPhone, which is a very useful feature—until it falls into the wrong hands, of course.

Also accessible are any email or text messages, fitness and health information, contact information, as well as app data. If your Apple Watch disappears, it could easily become a big problem.

That’s why we recommend configuring these three essential Apple Watch security features.

1. How to Lock Your Apple Watch: Passcode Lock

The best way to secure your Apple Watch and its data is by locking it with a passcode. Fortunately, if you use the watch for Apple Pay, you have to set a passcode during setup.

If you don’t select a passcode during setup and want to add one later, just head to the companion Watch iPhone app and select My Watch > Passcode. You can either enter a simple four-digit code, or a more complicated version with 5-10 digits.

You can also set a passcode on the Apple Watch. Select Settings > Passcode, then choose Turn Passcode On and enter a custom code.

Apple Watch Passcode Lock

For an additional layer of security, make sure to select a different passcode than what your iPhone uses.

Unlike Passcode Lock on your iOS device, there’s no need to enter a code every time you unlock the Apple Watch. With the Wrist Detection feature active, sensors will automatically lock the watch when you’re not wearing it. So you’ll have to enter the passcode only when you put the wearable device on. Entering the passcode is also required when restarting the watch.

Another nice feature that you can enable in the same menu in the Watch app is Unlock with iPhone. When the setting is active, unlocking your iPhone will automatically unlock the Apple Watch as well, provided you’re actually wearing the device.

Putting a Lock on Your Apple Watch

If the worst happens, and you lose your Apple Watch, Passcode Lock provides other fail-safes.

After someone enters an incorrect passcode six times, an automatic one-minute delay comes into effect before trying again. After 10 incorrect attempts, two different actions can occur depending on the chosen setting.

If Erase Data is enabled in the Passcode menu on the Watch app or the watch itself, 10 incorrect passcode entries will automatically erase the watch completely. It’s not exactly secret-agent level, but definitely a big deterrent to any would-be bad guy.

On the other hand, if you’re forgetful and don’t have a backup of your Apple Watch, this can be a real inconvenience. You should think about using a password manager to store your codes after turning this setting on. Take a look at some of the best password managers for your iPhone.

Without that setting enabled, there is a bit of hope if you forgot your Apple Watch passcode. You can completely erase the Apple Watch and re-pair it with your iPhone. Erase the watch by heading to General > Reset > Erase Apple Watch Content in the Watch app, or Settings > General > Reset > Erase All Content and Settings on the Watch.

2. Be Aware of Activation Lock

Apple Watch Activation Lock

Another vital security feature is Apple Watch Activation Lock. It’s a simple and effective way to make any lost or stolen watch completely useless.

With the feature active, anyone who finds or steals an Apple Watch will have to provide the associated Apple ID and password before they can erase and use it with a new iPhone. It also kicks in when someone attempts to unpair your watch from your iPhone or disable the location feature.

Anyone without the right information can’t get any use out of the device. The good news is that if you’ve already set up Find My iPhone, Activation Lock is active and running.

You can double-check by opening up the Watch app on your iPhone. Select the My Watch tab and then choose your Watch’s name on the screen. After hitting the i icon look for Find My Apple Watch. If you see that, the feature is active.

Thankfully, Activation Lock doesn’t need any kind of internet connection. It protects the wearable device and its data anywhere.

3. How to Use Find My iPhone With an Apple Watch

Find My Apple Watch

There are also additional layers of protection for your watch in the Find My iPhone app.

Using the app, you can view a map that will show the last known location of your Apple Watch. A GPS-only model will use the location of the last known Wi-Fi connection. On the other hand, a cellular-enabled model can show a more precise location using cell towers.

Even without an iOS device, you can also use the same Find My iPhone feature on icloud.com.

Launch the app online or an iOS device and enter your Apple ID and password. Click on the watch name to view it on a map, if it can connect using an iPhone, Wi-Fi network, or cell tower. If you don’t see a location on the map, the watch is unable to connect.

To locate a nearby watch, select the Play Sound button. That will automatically make the watch play a loud noise, even if it’s on silent.

Lost Mode is another option you can select using the Find My iPhone app or website. Along with providing a phone number, you can write a short customized message that will appear on the watch screen. Use this to leave a phone number or email address that anyone who finds your device can use to contact you.

Apple Watch Lost Mode

The final step, if you’re sure you aren’t going to get your watch back, is to Erase Watch. That will remotely erase all information stored on the watch. Apple Watch Activation Lock still persists, so anyone who finds or attempts to use the watch is out of luck.

A Safe and Secure Apple Watch

The combination of Passcode Lock, Activation Lock, and Find My iPhone does a great job protecting any Apple Watch and the important data inside. If you’re looking to further customize the wearable device and make it your own, make sure to look at these custom Apple Watch faces with great visuals.

Read the full article: 3 Apple Watch Security Tips: Everything You Need to Know


Read Full Article

A Quick and Dirty Guide to RAM: What You Need to Know


ram-guide

RAM is the short-term memory of your computer. It’s where your computer keeps track of the programs and data you’re using right now. You probably already know that more RAM is better, but maybe you’re looking to install more RAM now.

Shopping for RAM can be confusing, though. What’s the difference between DDR3 and DDR4? DIMM and SO-DIMM? Is there a difference between DRR3-1600 and PC3-12800? Is RAM latency and timing important?

Read on for explanations on the different kinds of RAM, how to read RAM specifications, and exactly how RAM works.

What Is RAM?

RAM stands for Random Access Memory. It acts as a middle ground between the small, super-fast cache in your CPU and the large, super-slow storage of your hard drive or solid-state drive (SSD). Your system uses RAM to store working parts of the operating system temporarily, and the data your applications are using actively. RAM is not a form of permanent storage.

Think of your computer as an office. The hard drive is the filing cabinet in the corner. The RAM is like an entire office workstation, while the CPU cache is like the actual working area where you actively work on a document.

The more RAM you have, the more things you can have quick access to at any one time. Just as having a bigger desk can hold more bits of paper on it without becoming messy and unwieldy (as well as requiring more trips back to the filing cabinet to reorganize).

Unlike an office desk, however, RAM cannot act as permanent storage. The contents of your system RAM are lost as soon as you turn the power off. Losing power is like wiping your desk clean of every document.

RAM Usually Means SDRAM

When people talk about RAM, they’re usually talking about Synchronous Dynamic RAM (SDRAM). SDRAM is what this article discusses, too. For most desktops and laptops, RAM appears as a stick that you can insert in the motherboard.

Unfortunately, there is a rising trend for super thin and light laptops to have the RAM soldered to the motherboard directly in the interest of saving space. However, this sacrifices upgradability and repairability.

Do not confuse SDRAM with SRAM, which stands for Static RAM. Static RAM is the memory used for CPU caches, among other things. It is much faster but also limited in its capacity, making it unsuitable as a replacement for SDRAM. It is highly unlikely you will encounter SRAM in general usage, so it is not something you should worry about.

The Form Factors of RAM

For the most part, RAM comes in two sizes: DIMM (Dual In-Line Memory Module), which is found in desktops and servers, and SO-DIMM (Small Outline DIMM), which is found in laptops and other small form factor computers.

dimm-sodimm

Though the two RAM form factors use the same technology and functionally work in exactly the same way, you cannot mix them. You can’t just jam a DIMM stick into a SO-DIMM slot, and vice versa (the pins and slots don’t line up!).

When you are buying RAM, the first thing to figure out is its form factor. Nothing else matters if the stick won’t fit!

What Does DDR Mean?

The RAM you use in your computer operates using Double Data Rate (DDR). DDR RAM means that two transfers happen per clock cycle. Newer types of RAM are updated versions of the same technology, hence why RAM modules carry the label of DDR, DDR2, DDR3, and so on.

While all RAM generations are exactly the same physical size and shape, they still aren’t compatible. You cannot use DDR3 RAM in a motherboard that only supports DDR2. Likewise, DDR3 doesn’t fit in a DDR4 slot. To stop any confusion, each RAM generation has a notch cut in the pins at different locations. That means you cannot accidentally mix your RAM modules up or damage your motherboard, even if you buy the wrong type.

crucial-generations

DDR2

DDR2 is the oldest kind of RAM you’re likely to come across today. It has 240 pins (200 for SO-DIMM). DDR2 has been well and truly superseded, but you can still buy it in limited quantities to upgrade older machines. Otherwise, DDR2 is obsolete.

DDR3

DDR3 was released way back in 2007. Although it was officially superseded by DDR4 in 2014, you will still find a lot of systems using the older RAM standard. Why? Because it wasn’t until 2016 (two years after DDR4 launched) that DDR4 capable systems really picked up steam. Furthermore, DDR3 RAM covers a huge range of CPU generations, stretching from Intel’s LGA1366 socket through to LGA1151, as well as AMD’s AM3/AM3+ and FM1/2/2+. (For Intel, that’s from the introduction of the Intel Core i7 line in 2008 through to 7th generation Kaby Lake!)

DDR3 RAM has the same number of pins as DDR2. However, it runs a lower voltage and has higher timings (more on RAM timings in a moment), so aren’t compatible. Also, DDR3 SO-DIMMs have 204 pins versus DDR2’s 200 pins.

DDR4

DDR4 hit the market in 2014, yet still hasn’t taken complete control of the RAM market. A prolonged period of exceptionally high RAM prices put a pause on many people upgrading. But as prices decrease, more people make the switch, especially as the latest AMD and Intel CPU generations all use DDR4 RAM exclusively. That means if you want to upgrade to a more powerful CPU, you need a new motherboard and new RAM, too.

DDR4 drops the RAM voltage even further, from 1.5V to 1.2V, while increasing the number of pins to 288.

DDR5

DDR5 is set to hit consumer markets in 2019. But given how long the proliferation of a new RAM generation usually takes, expect to hear more about it in 2020. RAM manufacturer, SK Hynix, expect DDR5 to make up 25% of the market in 2020, and 44% in 2021.

DDR5 will continue with a 288-pin design, although the RAM voltage will drop to 1.1V. DDR5 RAM performance is expected to double the fastest standard of the previous DDR4 generation. For example, SK Hynix revealed the technical details of a DDR5-6400 RAM module, the fastest possible allowed under the DDR5 standard.

But, as with any new computer hardware, expect an extremely high price at launch. Also, if you’re considering buying a new motherboard, don’t focus on DDR5. It isn’t available yet, and despite what SK Hynix says, it will take Intel and AMD a while to prepare

RAM Jargon: Speed, Latency, Timing, and More

You’ve wrapped your head around SDRAM, DIMMs, and DDR generations. But what about the other long strings of numbers in the RAM model? What do they mean? What is RAM measured in? And what about ECC and Swap? Here are the other RAM specification terms you need to know.

Clock Speed, Transfers, Bandwidth

You may have seen RAM referred to by two sets of numbers, like DDR3-1600 and PC3-12800. These both reference and allude to the generation of the RAM and its transfer speed. The number after DDR/PC and before the hyphen refers to the generation: DDR2 is PC2, DDR3 is PC3, DDR4 is PC4.

The number paired after DDR refers to the number of megatransfers per second (MT/s). For example, DDR3-1600 RAM operates at 1,600MT/s. The DDR5-6400 RAM mentioned above will operate at 6,400MT/s—much faster! The number paired after PC refers to the theoretical bandwidth in megabytes per second. For example, PC3-12800 operates at 12,800MB/s.

It is possible to overclock RAM, just like you can overclock a CPU or graphics card. Overclocking increases the RAM’s bandwidth. Manufacturers sometimes sell pre-overclocked RAM, but you can overclock it yourself. Just make sure your motherboard supports the higher RAM clock speed!

You might be wondering if you can mix RAM modules of different clock speeds. The answer is that yes, you can, but they’ll all run at the clock speed of the slowest module. If you want to use faster RAM, don’t mix it with your older, slower modules. You can, in theory, mix RAM brands, but it isn’t advisable. You run a greater chance of encountering a blue screen of death or other random crashes when you mix RAM brands or different RAM clock speeds.

Timing and Latency

You will sometimes see RAM modules with a series of numbers, like 9-10-9-27. These numbers are referred to as timings. A RAM timing is a measurement of the performance of the RAM module in nanoseconds. The lower the numbers, the quicker the RAM reacts to requests.

The first number (9, in the example) is the CAS latency. The CAS latency refers to the number of clock cycles it takes for data requested by the memory controller to become available to a data pin.

You might notice that DDR3 RAM generally has higher timing numbers than DDR2, and DDR4 generally has higher timing numbers than DDR3. Yet, DDR4 is faster than DDR3, which is faster than DDR2. Weird, right?

8gb ddr4 2133 ram crucial

We can explain this using DDR3 and DDR4 as examples.

The lowest speed DDR3 RAM runs is 533MHz, which means a clock cycle of 1/533000000, or 1.87 ns. With a CAS latency of 7 cycles, total latency is 1.87 x 7 = 13.09 ns. (“ns” stands for nanoseconds.)

Whereas the lowest speed DDR4 RAM runs at is 800MHz, which means a clock cycle of 1/800000000, or 1.25 ns. Even if it has a higher CAS of 9 cycles, total latency is 1.25 x 9 = 11.25 ns. That’s why it’s faster!

For most people, capacity trumps clock speed and latency every time. You will get much more benefit from 16GB of DDR4-1600 RAM than you get from 8GB of DDR4-2400 RAM. In most cases, timing and latency are the last points of consideration.

ECC

Error Correcting Code (ECC) RAM is a special kind of memory module that aims to detect and correct data corruption. ECC ram is used in servers where errors in mission-critical data could be disastrous. For example, personal or financial information stored in RAM while manipulating a linked database.

Consumer motherboards and processors don’t usually support ECC-compatible RAM. Unless you are building a server that specifically requires ECC RAM, you should stay away from it.

How Much RAM Do You Need?

Long past are the days where “640K ought to be enough for anybody.” In a world where smartphones regularly ship with 4GB RAM or more, and browsers like Google Chrome play fast and loose with their memory allocations, RAM frugality is a thing of the past. The average amount of installed RAM is increasing across all hardware types, too.

pitstop research average ram use

For most people, 4GB is the bare minimum amount of RAM you need for a general usage computer. Operating systems have different specifications, too. For instance, you can run Windows 10 on just 1GB RAM, but you will find your user experience sluggish. Conversely, numerous Linux distributions work extremely well with smaller amounts of RAM.

If you find yourself with six Word documents open at any one time, can’t bring yourself to close those 60 tabs in Google Chrome, you will probably want at least 8GB RAM. The same goes if you want to use a virtual machine.

16GB RAM should exceed the needs of most. But if you keep utilities running in the background, with a mountain of browser tabs and everything else, you’ll appreciate the extra RAM capacity. Very few people need 32GB RAM, but as they say, more is more.

A RAM upgrade is definitely one of the easiest ways to get an instant performance boost.

Understanding Everything About RAM

You now know the difference between DDR2, DDR3, and DDR4 RAM. You can tell a DIMM from a SO-DIMM, and you know how to spot RAM with faster transfer rates and higher bandwidth. At this point, you’re essentially a RAM expert, so it shouldn’t feel overwhelming next time you attempt to buy more RAM or an entirely new system.

Really, if you have the correct form factor and the corresponding RAM generation, you cannot go wrong. Timing and latency do play a role, but capacity is king. And when in doubt, more RAM is better than faster RAM.

Read the full article: A Quick and Dirty Guide to RAM: What You Need to Know


Read Full Article

Chinese space station Tiangong-2 is about to burn up over the Pacific


The final hours for China’s Tiangong-2 space station are at hand, as the 8-ton piece of hardware will fall to earth, or rather sea, some time in the next 20 hours or so in a controlled deorbit manuever.  But unlike with its predecessor, it isn’t a mystery where this particular piece of space debris is going to fall.

Tiangong-2 is a small space station that was put into orbit in 2016 to test a number of China’s orbital technologies; it was originally planned to stay up there for two years, but as many a well-engineered piece of space kit has done, it greatly exceeded its expected lifespan and has been operational for more than a thousand days now.

Chinese Taikonauts have visited the station to perform experiments, test tools, orbital refueling, and all that sort of thing. But it’s not nearly as well equipped as the International Space Station, nor as spacious — and that’s saying something — so they only stayed a month, and even that must have been pretty grueling.

The time has come, however, for Tiangong-2 to be deorbited and, naturally, destroyed in the process. The China National Space Administration indicated that the 18-meter-wide station and solar panels will mostly burn up during reentry, but that a small amount of debris may fall “in a safe area in the South Pacific,” specifying a rather large area that does technically include quite a bit of New Zealand. (160-190°W long by 30-45°S lat)

They did not specify when exactly it would be coming down, except that it would be during July 19 Beijing time (it’s already morning there at the time of publishing). It should produce a visible streak but not anything you’ll see if you aren’t looking for it. This visualization from The Aerospace Company shows how the previous, very similar station would break up:

It’ll be different this time around but you get a general idea.

That’s much better than Tiangong-1, which stopped responding to its operators after several years and as such could not be deliberately guided into a safe reentry path. Instead it just slowly drifted down until people were pretty sure it would be reentering sometime in the following few days — and it did.

There was never any real danger that the bus-sized station would land on anyone, but it’s just fundamentally a little unnerving not knowing where the thing would be coming down.

This isn’t the last Tiangong; Tiangong-3 is planned for a 2020 launch, and will further inform the Chinese engineers and astronauts in their development of a more full-featured space station planned for a couple years down the line.

Controlled deorbit is the responsible thing to do, not to mention just plain polite, and the CNSA is doing the right thing here. All the same, Kiwis should probably carry umbrellas tomorrow.


Read Full Article