Twitterannounced today its Twitter Lite app is expanding to 21 more countries, which makes the data-saving app available to more than 45 countries in total. The app was introduced last year with the goal of bringing in more users from emerging markets to Twitter. Similar to other data-saving apps, like Facebook Lite or YouTube Go, Twitter Lite is designed to load faster on slower network connections, like 2G and 3G, and also has a smaller footprint, so it takes up less space on the phone.
Twitter’s hope is that by addressing the needs of those low-bandwith users in international markets, the company could help increase its overall user base, which has remained fairly stagnant.
Today, the company is making the app available to 21 countries, including: Argentina, Belarus, Dominican Republic, Ghana, Guatemala, Honduras, India, Indonesia, Jordan, Kenya, Lebanon, Morocco, Nicaragua, Paraguay, Romania, Turkey, Uganda, Ukraine, Uruguay, Yemen, and Zimbabwe.
These join the other markets where Twitter Lite has been available, such as: Algeria, Bangladesh, Bolivia, Brazil, Chile, Colombia, Costa Rica, Ecuador, Egypt, Israel, Kazakhstan, Mexico, Malaysia, Nigeria, Nepal, Panama, Peru, Serbia, El Salvador, South Africa, Thailand, Tunisia, Tanzania and Venezuela, in addition to the Philippines.
The app offers a variety of features for those on slower or unreliable networks. For example, Lite users can turn on a Data saver mode that allows them to control which images or video load when browsing the network. Once enabled, you can load this content by tapping “Load Image” or “Load video,” as needed.
The app is also under 3MB in size, so it will load more quickly on slower networks.
And like Twitter, the app includes features like Bookmarks, a darker “Night mode” theme, threads, and starting today, push notifications.
The company in November claimed Twitter Lite led to a greater than 50% increase in tweets, and noted that 80% of its then 330 million monthly users were outside the U.S. That percentage remains roughly the same – as of July, Twitter had a total of 335 million users, with 68 million of those in the U.S.
However, the company isn’t growing that quickly outside the U.S., despite Twitter Lite. Also as of July 2018, we noted the company’s international audience had only grown by a modest 3.5% over the past year.
An expansion of the Twitter Lite app will certainly open up Twitter to more people, but it’s not clear there’s much demand.
The app is available as a free download on Google Play.
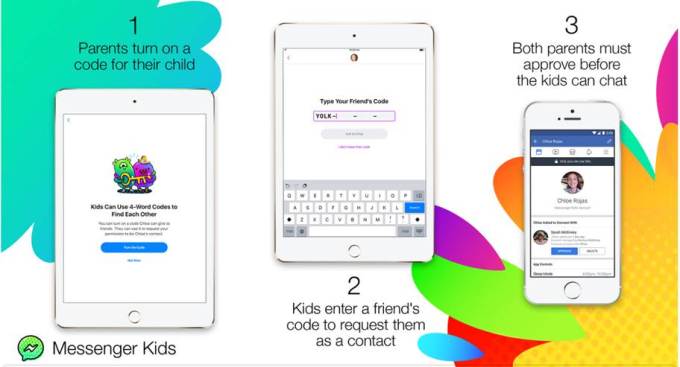
Facebook is making it easier for kids to add their friends on its under-13 chat app, Messenger Kids. Starting today, the company is rolling out a new feature that will allow kids to request parents’ approval of new contacts. To use the feature, parents will turn on a setting that creates a four-word passphrase that’s used generate these contact requests, the company says.
Parents can opt to use this feature, which is not on by default.
Once enabled, Facebook will randomly generate a four-word phrase that’s uniquely assigned to each child. When the child wants to add a friend to their app’s contacts list in the future, they will show this phrase to the friend to enter in their own app.
Both parents will then receive a contact request from their child – and both have to approve the request before the kids can start chatting. In other words, this doesn’t represent a loosening of the rules around parental approvals – all contact requests still require parents’ explicit attention and confirmation, as before.
However, it does make it easier for kids to friend one another when their parents aren’t Facebook friends themselves. That’s been an issue with the app for some time, and one Facebook first started to address in May when it made a change that finally no longer required parents to be friends, too.
While most parents will at least want to know who their child is texting with, there are plenty of times when parents are friendly with someone on a more casual basis – like through the child’s school or their extracurricular activities. But just because two people are neighbors or fellow soccer moms and dads, that doesn’t necessarily mean they’re also Facebook friends.
The change introduced in May allowed parents to do a search for the child’s friend’s parents, then invite them to the app so the kids could connect. But this still required parents to take the initial steps (at the urging of the child, of course). It was also confusing at times, we found when we tried it for ourselves – some parents we connected with couldn’t figure out how the approval process worked, for example.
That being said, it may have helped to give the app’s install base a big boost, along with its expansion outside the U.S. According to data from Sensor Tower, Messenger Kids saw a sizable increase in installs in the beginning of early June and it has just now passed 1.4 million downloads across both iOS and Android. In addition, its daily downloads are around 3x what they were at the end of May.
The passphrase solution will make things a bit easier on parents, because contact requests will be initiated by the kids. Parents will only have to tap a big “Approve” button to confirm the request (or deny it, if the request is inappropriate for some reason.)
The four-word passphrase will only be visible to the child in the Messenger Kids app, and to the parent in their Parent’s Portal.
It’s worth noting that Facebook opted for a passphrase instead of a scannable QR code, as is common in other messaging apps including Facebook Messenger, Snapchat and Twitter, for instance. Facebook says this is so kids can exchange the passphrase without the device being present.
Messenger Kids is a controversial app, but its adoption is growing, the data indicates. Parents have been starved for an app like this – one allowing for conversation monitoring (you just install your own copy) and contact approvals. Whether this will actually indoctrinate a new generation of Facebook or Messenger users is more questionable. It’s likely that when kids outgrow Messenger Kids, they’ll still be switching over to Facebook’s Instagram and Snapchat instead.
The passphrase feature is rolling out starting today on the Messenger Kids mobile app.
Random Access Memory (RAM) is a vital component of any computer. When you launch an app on your Mac, it requires a portion of your available memory to run. Serious problems can arise if there are problems with your computer’s memory.
Today we’ll look at how to find out how much memory you have, what’s using it, and how you can perform thorough testing to ensure it’s working correctly. If you recently installed a new stick of RAM and you’re encountering problems, testing is a vital part of troubleshooting your issue.
Find Out How Much Memory You Have
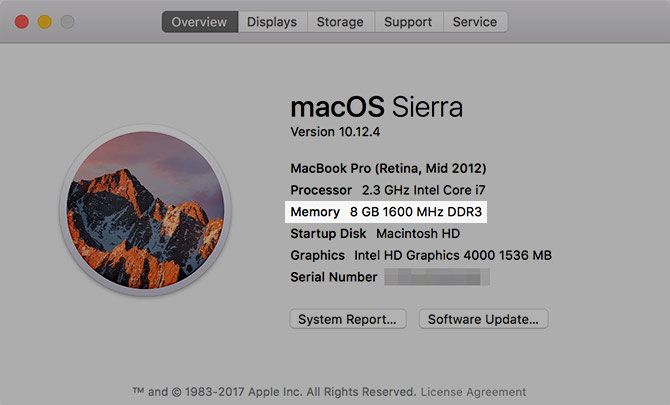
To find out how much memory your Mac has, click on the Apple logo in the top-left corner of your screen and select About This Mac. On the Overview tab, the Memory line lists the amount of RAM in GB, the speed of the RAM in MHz, and the generation of double data rate (DDR) you’re currently using.
This is important if you intend to add more RAM to your machine, since you’ll want to match your existing RAM with any you install. This is mostly advice for owners of iMacs and older MacBooks, since the RAM on Apple’s newer laptops is soldered to the logic board.
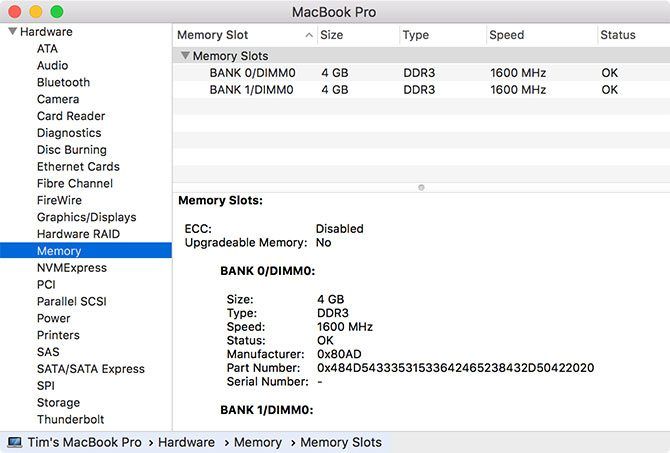
Click System Report and navigate to the Memory section to find out even more information. Here you can see how many sticks of RAM you have installed, which is another important piece of information to keep in mind if you want to upgrade. macOS will also give you a status report of your memory’s current condition (though you’ll need further testing to isolate problems).
Find Out What’s Using Your Memory
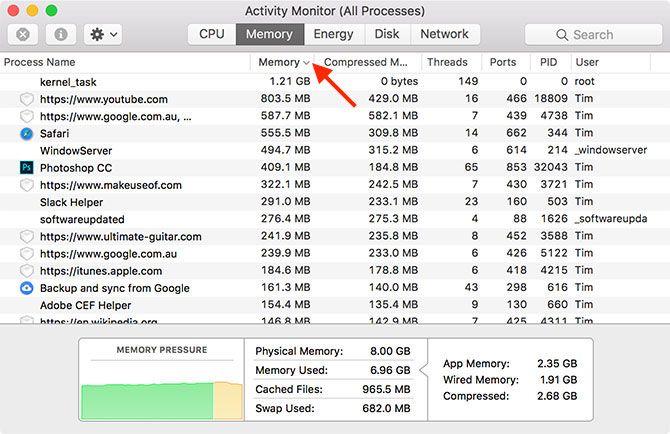
Activity Monitor is a small app that lives in your Applications > Utilities folder (launch it with Spotlight) that provides information about what’s currently running on your machine. You can also use it to find out which apps are using your available memory, and how much they’re using.
Launch Activity Monitor, then click on the Memory tab. Sort the Memory column by descending order (it will show a downwards pointing arrow) to see processes that are using the most memory at the top. If you see “kernel_task” using a lot of memory, that’s the operating system ticking along in the background.
You can kill any processes by selecting it, then clicking on the X at the top of the window. Keep in mind this will close the corresponding app or browser tab. To avoid data loss, quit the application as you normally would, or by selecting it and using the Cmd + Q shortcut.
At the bottom of this screen, you’ll see a summary of your total memory, the amount you’re currently using, and a graph showing memory “pressure” over time. Try opening a few apps to see how they affect performance.
The best way to check your Mac’s memory for problems is to perform memory testing while using as little of it as possible. Since the operating system uses quite a bit of RAM in the background, testing memory by booting into a lightweight testing environment is recommended.
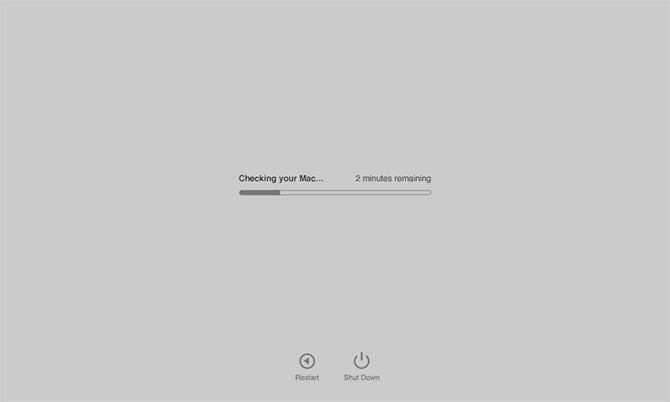
Testing your RAM with Apple’s user diagnostics tools is easy. Simply restart your Mac, then hold down D as soon as it restarts. If you did it correctly, your computer will either boot into Apple Diagnostics or Apple Hardware Test, depending on the age of your machine.
Follow the prompts and let the test complete. It can take a while, particularly on older computers. When you’re done, you should see a report giving you a brief overview of any detected issues. Unfortunately, the test will only tell you whether or not problems were detected. You won’t be able to tell which stick of RAM is faulty.
Problems running the test? Holding down Option + D at startup will run this test from the internet. It will take longer to gather the required files, but it should work just as well once the download completes.
Check Your Memory Using MemTest86
If you want to learn more about any problems Apple’s diagnostics detected, or you want to run another test for peace of mind, MemTest86 is one of the best tools for the job. There are a few memory testing tools that use similar names, but MemTest86 is still regularly maintained and updated.
In order to test your machine, you’re going to need to make a bootable USB drive from which to run the test. The first step is to find a suitable USB drive and make sure there are no important files on there, since the whole drive will be erased. Insert the USB drive into a free port.
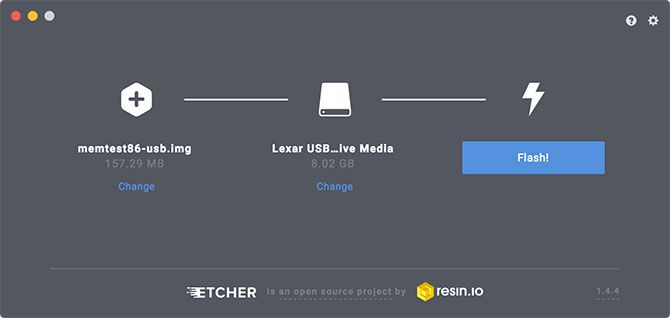
Now download free drive creation tool Etcher, mount the DMG, and install it to your Applications folder. Head to the MemTest86 Downloads page and grab the Image for creating bootable USB Drive under Linux/Mac Downloads.
Once MemTest86 has downloaded, extract the archive and launch Etcher. Click Select image, navigate to the extracted archive you previously downloaded, and choose the memtest-usb.img file. Now click Select drive and choose the USB drive you want to use. When you’re ready, click Flash! and wait for the process to complete.
Next, shut down the Mac you want to test and insert the USB drive you just created. Press and hold the Option key and power on your Mac. When prompted, select the external drive you created (it may show up as EFI Boot) by clicking the arrow to boot into MemTest. Don’t select Macintosh HD, since this is your internal drive.
Wait for MemTest86 to initialize. Testing should begin after a short pause, but if it doesn’t, select Config then Start Test. Allow time for the test to complete; it took around 40 minutes on our test machine. At the end you’ll be given a summary, and an option to save a report to the USB drive in HTML format.
Some people use “memory” as a catch-all term for free space, but macOS specifically refers to this as “storage.” You can find more information about this by clicking the Apple logo, selecting About This Mac, then clicking on the Storage tab.
Color correction and color grading can have a dramatic impact on the quality of your videos. From white balance correction to contrast, saturation, mid tones, and more, there’s a lot to learn.
Fortunately for our sanity, Adobe Premiere Pro has an automatic color match tool built in. And in this article we’ll explain how to use this tool to color grade your video footage.
What You’ll Need to Get Started
Before you can begin working with Premiere Pro’s color match tool, you need to ensure you’re able to use it.
To start with, you need the Premiere Pro CC April 2018 12.1 release. This update added the color match tool, so you won’t be able to use it on older versions such as CS6.
Once you have the correct version of Premiere Pro and a suitably powerful computer, import your footage, and get your initial edit ready to go.
Prepare Your References
The color match tool works by studying a reference image or video and applying changes to the source footage. In order to use it, you will need to import a reference image or video, and put it on your timeline. You can delete it once your color matching is complete.
You can use your own videos or images for reference. One way to get started quickly with color grading is by using images from a Hollywood movie. If you find a scene you would like to replicate, then take a screenshot and import it.
Using the Color Match Tool
Once you’re ready to go, using the color match tool is a simple process. Get started by opening the Lumetri Color panel from the Window > Lumetri Color menu.
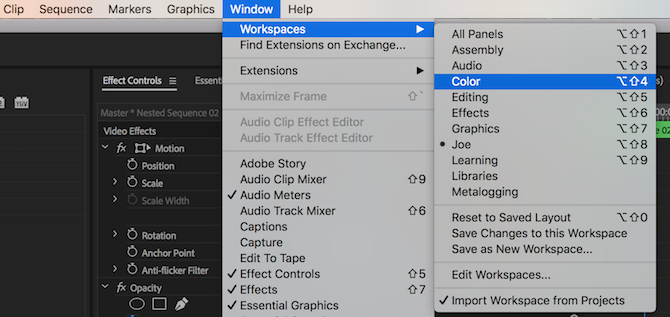
Alternatively, open the Color workspace, by going to Window > Workspaces > Color.
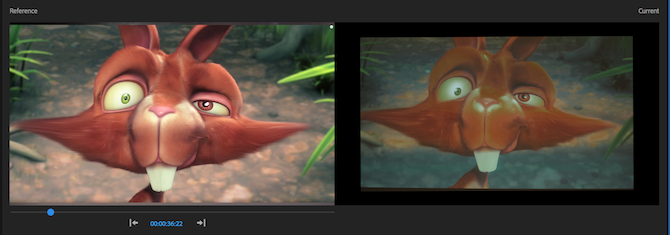
Here’s the footage I’m starting with:
This is a shot from our BenQ TK800 4K projector review. While it’s OK, the colors are a bit dull, and it’s lacking in contrast.
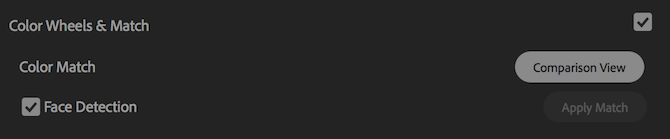
From inside the Lumetri Color panel, scroll down to and expand Color Wheels & Match.
Choose the Comparison View button. This will change your program monitor into a split screen. The right half shows your current clip and timeline position. The left half shows your reference image. Underneath this is a mini timeline. Here you can scrub left or right to locate your reference material in the timeline.
Position this mini timeline playhead at your reference material. As this clip is from Big Buck Bunny, a screenshot of the original source material is a good choice for the reference. As you can see, the original is a much better image. The colors are better, the image is brighter, and there’s more contrast:
Once you’ve lined up your source material, press the Apply Match button. Premiere may take a few seconds to show any changes (depending on your computer), but it will eventually update.
Providing you’re happy with the match, select Comparison View again, to exit the comparison view.
Here’s the result. While it does not look exactly like the reference, it’s a lot better than it was:
Color Match Tool: Additional Options
Once you’re comfortable with color matching shots, there are some additional options available.
At the bottom of the program monitor (with the comparison view on), there are five buttons. From left to right, these are:
Shot or Frame Comparison. This will toggle the left image between your reference material, and a “before” preview—what your footage looked like before color matching:
After pressing:
The Side by Side button shows the source and reference views next to each other. This is the default view:
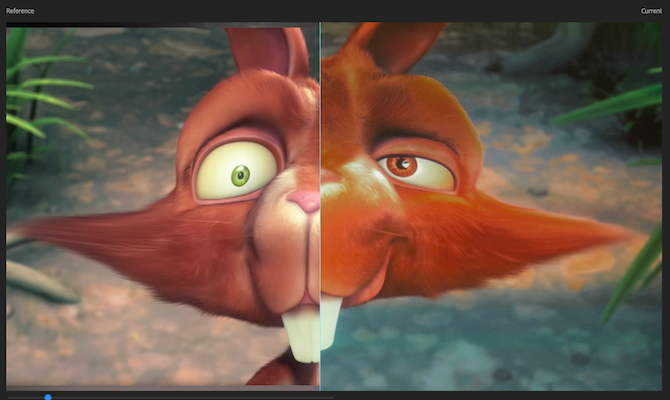
The Vertical Split button will change from side by side view, to an amalgamated view, with both the reference and source footage combining to make one image. You can click and drag on the vertical line to see more or less of the source or reference material.
Here’s what it looks like:
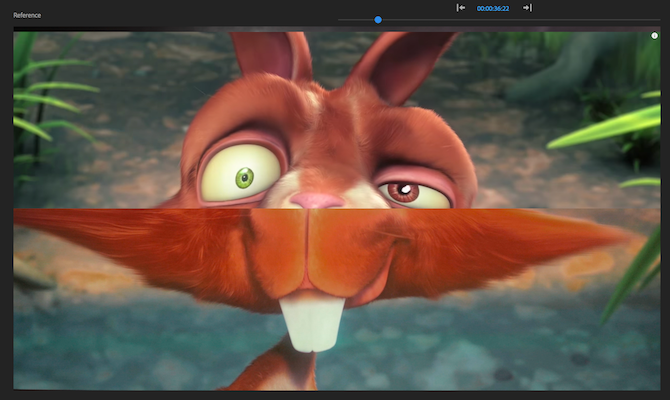
The Horizontal Split is similar to the vertical split, only this time the view is split horizontally:
Here’s what it looks like:
Finally, the Swap Sides button simply swaps the source and reference views:
Here’s what it looks like:
All of these buttons exist to make things easier for you as a filmmaker. By exactly lining up your before and after shots, and closely comparing your source and reference material, you can be confident that your new image looks how you imagined it in your source material.
Adobe Premiere Color Matching in 5 Easy Steps
The color match tool isn’t perfect. It doesn’t always get things right, and it’s not a substitute for true color grading and correction. Simple changes to exposure, contrast, and white balance can make a big difference. However, the color matching tool is an excellent way to start color grading your footage, especially if you have never color graded before.
In summary, here are the steps required to use the Adobe Premiere Pro color match tool:
Choose your source material: Anything will do for source material, even shots from big budget productions.
Enter the Color Wheels & Match area: This is inside the Lumetri Color panel.
Select Comparison View: This shows the differences between your reference and source material.
Scroll to your source material: Use the playhead underneath the reference view.
Apply Match: Premiere will adjust the colors to match with one click.
YouTube, Facebook, Spotify, Apple, Pinterest and now Vimeo have removed Infowars content from their services. The video streaming platform is the latest in a growing wave of tech companies pull videos from embattled right wing conspiracy theorist, Alex Jones.
Jones has been under fire for years over conspiracy driven output, surrounding events like the Sandy Hook shooting and 9/11. In spite of what are largely regarded as fringe views, however, he’s amassed a massive viewership, and even scored an interview with Donald Trump in the lead up to the 2016 election.
Vimeo suddenly found itself at the center of the on-going Infowars debate after the show was barred from a number of competing sites. Earlier in the week, it was host to a handful of Jones-produced videos, but that number jumped suddenly when north of 50 more were uploaded to the service on Thursday and Friday.
Vimeo pulled the content over the weekend, citing a Terms of Service violation. The move, which was reported by Business Insider, has since been confirmed by TechCrunch.
“We can confirm that Vimeo removed InfoWars’ account on Sunday, August 12 following the uploading of videos on Thursday and Friday that violated our Terms of Service prohibitions on discriminatory and hateful content. Vimeo has notified the account owner and issued a refund,” a spokesperson told TechCrunch.
Infowars is moving quickly from one platform to the next, as more sites remove content over TOS violations. Twitter remains steadfast in its decision not to remove Jones, however, instead holding journalists accountable for debunking his content. Jones has also apparently found some solace in the social ghost town that is Google+.
Hackers at DefCon have exposed new security concerns around smart speakers. Tencent’s Wu HuiYu and Qian Wenxiang spoke at the security conference with a presentation called Breaking Smart Speakers: We are Listening to You, explaining how they hacked into an Amazon Echo speaker and turned it into a spy bug.
The hack involved a modified Amazon Echo, which had had parts swapped out, including some that had been soldered on. The modified Echo was then used to hack into other, non-modified Echos by connecting both the hackers’ Echo and a regular Echo to the same LAN.
This allowed the hackers to turn their own, modified Echo into a listening bug, relaying audio from the other Echo speakers without those speakers indicating that they were transmitting.
This method was very difficult to execute, but represents an early step in exploiting Amazon’s increasingly popular smart speaker.
The researchers notified Amazon of the exploit before the presentation, and Amazon has already pushed a patch, according to Wired.
Still, the presentation demonstrates how one Echo, with malicious firmware, could potentially alter a group of speakers when connected to the same network, posing concerns with the idea of Echos in hotels.
Wired explained how the networking feature of the Echo allowed for the hack:
If they can then get that doctored Echo onto the same Wi-Fi network as a target device, the hackers can take advantage of a software component of Amazon’s speakers, known as Whole Home Audio Daemon, that the devices use to communicate with other Echoes in the same network. That daemon contained a vulnerability that the hackers found they could exploit via their hacked Echo to gain full control over the target speaker, including the ability to make the Echo play any sound they chose, or more worryingly, silently record and transmit audio to a faraway spy.
An Amazon spokesperson told Wired that “customers do not need to take any action as their devices have been automatically updated with security fixes,” adding that “this issue would have required a malicious actor to have physical access to a device and the ability to modify the device hardware.”
To be clear, the actor would only need physical access to their own Echo to execute the hack.
While Amazon has dismissed concerns that its voice activated devices are monitoring you, hackers at this year’s DefCon proved that they can.
You don’t need to go to college to learn nowadays. Online resources let you study any subject you can imagine, whether you want to get a certified education or just enjoy learning about something new.
Coursera is one of the most well-respected online learning sites. With over 2,400 courses, you’re sure to find something enjoyable and useful for you.
Here are 10 courses on Coursera you should check out if you’re interested in serious learning.
Many of today’s jobs don’t involve a lot of physical activity, meaning that you’re probably inactive for most of the day. This can take a toll on your health if you aren’t careful. With this course, you’ll learn the best ways to add more physical activity to your life, how to set goals, and more.
While the course is available for free, you can purchase full access for $49 to earn a certificate. Once you complete it, you can add this certificate to your Coursera page and even add it to your LinkedIn profile.
It’s no secret that music is a powerful force. The right music can help you focus, bring out emotions as you watch a movie, or bring back powerful memories. But have you ever wondered how this really works?
You’ll find out in this course. It explains six principles about how music influences us, and how it can be a force for social good. You’ll learn how music affects both individuals and communities. It’s perfect for anyone who loves music, well-being, and sociology/psychology.
Like the above, you can take the course for free, but a $49 purchase will earn you a certificate.
Getting stuck in a rut isn’t good, so most people probably change up various aspects of their lives at times. But how do these experiments affect us overall, and what’s the best way to try new ways of thinking or doing?
This course covers those questions. It teaches you how to plan efficient experiments and works to help you make changes to yourself or your community. Even if you aren’t a statistics person, learning how to make better changes can really improve your daily life.
Enjoy this course for free, or pay $29 to earn a certificate of completion.
Everyone negotiates to some degree. Whether it’s trying to compromise with your spouse, haggling when shopping, or working on a business deal, knowing how to negotiate is a vital skill.
This course walks through four steps to a successful negotiation with a section dedicated to practice at the end. If you struggle in this area, this course could be just the way to sharpen your skills.
A fee of $49 will earn you the certificate for this one.
Economics drives modern nations, so it’s wise to have at least a basic understanding of how markets work. Instead of a simple overview, this course provides a comparison of four different economic theories. These are Social economics, Institutional economics, Post-Keynesian economics, and Neoclassical economics.
Not only will you pick up standard economic calculations and ideas, you’ll also understand various viewpoints. It’s a great combination for newcomers to the field.
If you choose to audit this course for free, you’ll have access to everything except graded materials. You can get full access for $49.
Applying for #jobs? When emailing or otherwise digitally submitting documents, make your file name specific to you. Instead of 25 files named <resume.doc> in hiring manager's downloads, yours could stand out with <[initials]_resume.doc> as someone who thinks ahead.
It’s vital that your resume stand out, since employers don’t usually take more than a few seconds to look it over. If you’re in college or a recent graduate, or just need some help polishing your resume, this course is essential.
You’ll learn the best practices for a resume, look at current trends, and exchange feedback with others. This is a project-centered course, which means that you complete a project (your resume, in this case) as you work through it.
Purchase the course for $49 to earn a certificate, or audit it to receive everything except for graded items.
Maybe you didn’t want to pursue philosophy in college, but have an interest in the subject. If so, you’ll definitely want to look into this course. In it, you’ll learn about the building blocks of philosophy from a variety of instructors.
Topics include philosophy of politics, morals, and even metaphysics. It’s a great introduction for newcomers and you’re bound to discover new ways of thinking.
Access the course for free, or purchase access to a certificate for $49.
Big Data is a prevalent topic due to companies like Google and Facebook collecting loads of data about their users. If this interests you, this course will teach you a lot more about data science.
You’ll learn the basics behind Big Data and how it’s applied. It’s a great fit for business workers who want to capitalize on data to make better decisions.
As the first part of the Big Data Specialization on Coursera, you can gain full access to this course and the five following it by subscribing to the Unlimited plan. You can also audit the course to receive the materials for free.
Do you struggle with critical thinking? Take this course to learn how to recognize, deconstruct, and respond to arguments.
This is the first of four parts in the Think Again: How to Reason and Argue series. If you’re interested, check out How to Reason Deductively, How to Reason Inductively, and How to Avoid Fallacies. Each costs $30 if you choose to pursue a certificate, with all materials available for free.
Do you aspire to become a leader? Crafting a lifestyle of leadership is an important way to build up to this. Taking this course will teach you about decision making, motivation, and how to be an effective leader.
It’s amazing how much educational content is available online. The ten courses we’ve shared above will provide dozens of hours of interesting material and introduce you to new skills and disciplines. Adding these certificates to your LinkedIn profile can show that you’ve taken the time to learn and make you more attractive to potential employers.
Chrome OS has come a long way in the past few years. Even so, it’s still not the full-fledged operating system many of us required on our desktop machines. Google is reportedly looking to address that, in part, by adding the ability for users to dual-boot in Windows 10.
According to XDA-Developers, the company is actively courting Microsoft hardware certification for its flagship Chromebook, the Pixelbook. The “alt OS mode” codenamed “Campfire,” is said to be coming to the Pixelbook in the not-too-distant future, with more Chromebook support down the line.
Which devices would actually be able to support Microsoft’s once ubiquitous operating system is dependent on, among other things, system specs. Microsoft’s worked to make Windows compatible with low-end systems, but even by those standards, some super cheap Chromebooks don’t boast the built-in storage required to run both Chrome OS and Windows 10. For all of its faults, maybe Windows 10S would be a decent secondary platform.
Windows 10 on the Pixelbook is a compelling proposition. The high-end Chromebook is a lovely piece of hardware, but even with the addition of Android apps, there are still some software gaps. I took the device on a recent trip to China and was disappointed by some of the limitations I ran into on an otherwise fine device.
It’s suggested that all of this could come as soon as Google’s upcoming Pixel 3 event. Given a number of recent leaks, it does appear that the company’s got something big planned for the near term.
Typing skills are essential for everyone from kids to adults. Whether you have a child who is just learning or want to brush up on your own typing skills, we have the tools for you.
Before you invest in a paid app, take a look at these seven free typing apps for Mac first. While some contain in-app purchases, you can use the try-before-you-buy option to make sure they suit you before shelling out your cash.
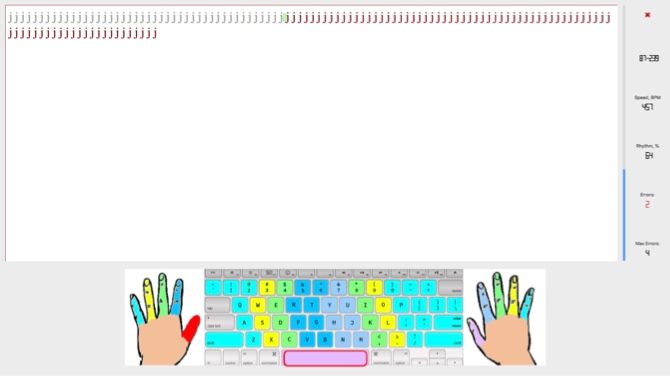
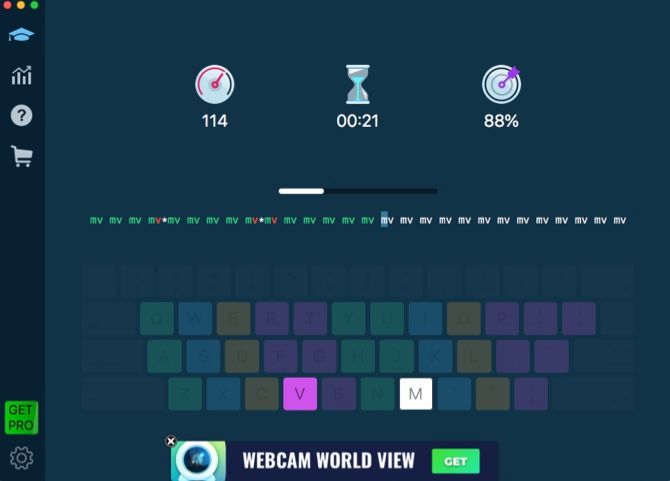
1. Keyboard Virtuoso
For beginners who want a good way to progress in their skills.
Keyboard Virtuoso starts you off with the very basics using 20 warm-ups you must complete to move on. Then go through each of the lessons and finish successfully to keep unlocking more. Before you begin each lesson, you’ll see a helpful prompt and the number of errors allowed.
You can enjoy the warm-ups and first 10 lessons for free. This gives you a lot of usage before you decide if you want to buy the full version.
For those who want detailed stats on speed and accuracy over time.
With Master of Typing, you start honing your skills using simple letter combinations. Then you’ll work your way to typing difficult words.
Detailed statistics let you check out your speed and accuracy from when you started using the app to today’s date. You can also view your averages and bests.
The app gives you several practice lessons for free. You can then take a look at the pro version, which provides different packages per your skill level and removes the ads. And if you’re a programmer looking for more ways to enhance your keyboarding skills, look at these tools to help boost your typing speed.
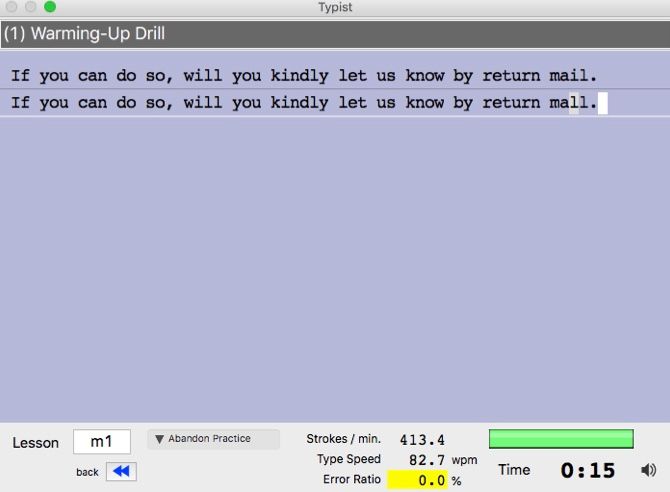
For beginners through advanced typists to learn and practice.
The Typist app is ideal for every level of proficiency. You can begin learning letter locations with the Standard Courses, check out the Typing Review, and then move onto a variety of drills. Each lesson contains several exercises.
The app displays your stats right on the bottom for viewing when you finish an exercise. Review your strokes per minute, typing speed, error ratio, and total time for the exercise. You can also take a look at the lessons offered for the calculator and Dvorak keyboards.
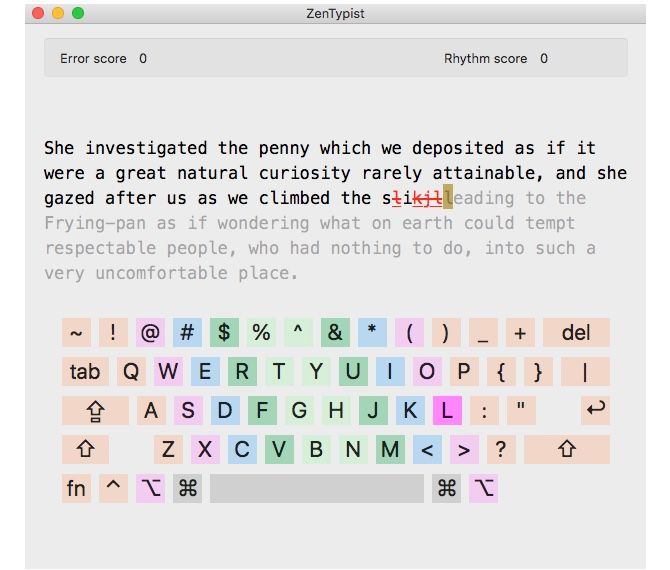
For those who need to practice accuracy more than speed.
As great as it is to type quickly, accuracy is really more important. And the ZenTypist app concentrates on your accuracy. You score only for how well you do. So if you make a mistake, hit your Delete key and fix it.
As you type the paragraphs you see, the letters turn from gray to black. Your errors are marked in red. Once you complete the paragraph with no mistakes remaining, you can move onto the next paragraph. What’s nice about ZenTypist is that you type words in sentences, sort of like a mini-story. This is helpful for mirroring a real-world typing scenario.
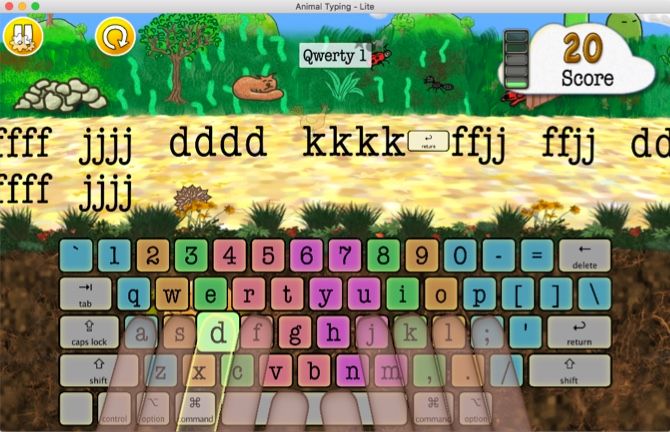
For children learning to type who like cute animal-themed apps.
Animal Typing Lite is a super cute way for kids to learn how to type. The screen is colorful, with animated fingers on a keyboard for your child to follow. The app rewards your little one for accuracy and speed as correct keystrokes help the animals along their way.
With each lesson, you start as a slower animal, like a snail. But if you do well with accuracy and speed, you’ll finish with a faster creature, like a gazelle. The app has four free lessons so your child can try it out. You can then buy more with an in-app purchase.
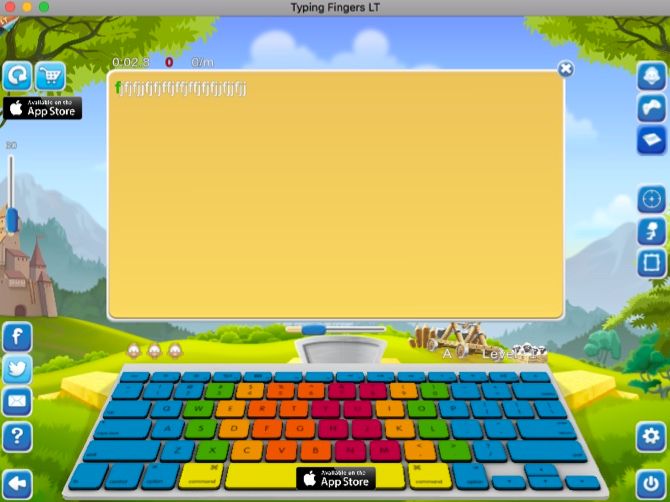
For children learning to type who like fun sounds and colorful themes.
Typing Fingers LT is another great typing teacher for kids, but works for adults just the same. You start the first four lessons learning the letter positions on the keyboard. The app also includes a neat section for the proper way to sit while typing, with ergonomic measurements and all.
Your little one will enjoy the colorful imagery, fun sounds, nifty themes, a cartoon guide, and helpful animations. You can try before you buy with the first few lessons for free, then obtain more with an in-app purchase.
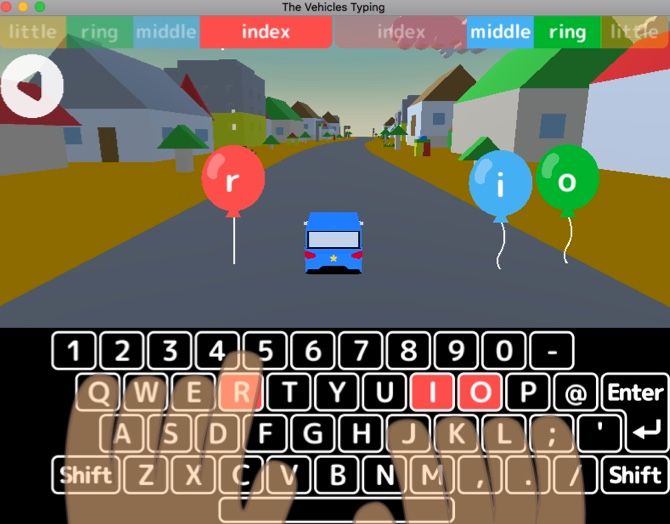
For children learning to type who like cool car-themed apps.
The Vehicles Typing is one more typing app for Mac that your child might like. As the vehicle travels down the road, type the letters you see in the balloons to keep the car moving and achieve the goal. The balloons holding the letters are colored with corresponding hints at the top for which keys to press.
The app includes three separate save slots. So if you have more than one beginning typist, this feature keeps the progress for each separate. Like with the other children’s typing apps here, you can try the first couple of lessons for free and get the rest with an in-app purchase.
Your Mac can be a helpful learning tool, especially when it comes to handy apps like these. Start a new typing adventure with your child or practice and hone your own skills for a new job. Whatever the case, these typing apps for Mac should get you off to a great start.
Samsung today is announcing an updated version of its Wifi product line. The company partnered with Palo Alto-based Plume Design to provide software that powers the devices. According to Samsung, Plume’s platform uses artificial intelligence to allocate bandwidth across connected devices while delivering the best possible wifi coverage throughout a home. Plus, by using Plume, Samsung gets to say its Wifi system uses AI, which is a big marketing win.
The system also includes a SmartThings Hub like the previous generation allowing owners to build a connected IoT home without having to buy another box.
“Integrating our adaptive home Wi-Fi technology and a rich set of consumer features into SmartThings’ large, open ecosystem truly elevates the smart home experience,” said Fahri Diner, co-founder and CEO, Plume, said in a released statement. “Samsung gives you myriad devices to consume content and connect, and Plume ensures that your Wi-Fi network delivers a superior user experience to all of those devices.”
Plume Design was founded in 2014 and was one of the first to offer a consumer-facing mesh network product line. Since then, though, nearly every home networking company has followed suit and Plume has been forced to find new ways to make use of its technology. In June 2017, Comcast invested in Plume and later launched xFi using Plume technology to power the mesh networking product. According to Comcast at the time of xFi’s nationwide launch, Comcast licensed the Plume technology, then reconfigured some aspects of it to integrate xFi. It also designed its own pods in-house — which sounds similar to what Samsung is doing here too.
Plume Design has to date raised $42.2M over three rounds of funding.
Samsung’s new SmartThings WiFi Mesh Router is priced competitively with comparable products. A three pack of the units cost $279 while a single unit is $119.
I was wrong. Several years ago I reviewed the first Garmin Fenix 3 smartwatch. This was before the release of the Apple Watch. That’s key to this story. I declared Garmin would have a hard time selling the Fenix 3. The Apple Watch would be better in every way, I pointed out. Therefore, there would be little reason to buy the Fenix 3.
But here I am, in the middle of the woods, wearing the fifth generation of the Garmin Fenix while my Apple Watch sits at home on my desk.
In some ways I was right. The Apple Watch is better by most measurable attributes: there are more apps, the screen is superior, there’s a vibrant accessory market, and it’s thinner, faster and cheaper.
The Garmin Fenix is big, clunky and the screen looks like it’s from a Kindle. It’s not a touchscreen nor does it have the number of apps or band options of the Apple Watch. I like it. To me, the Garmin Fenix is akin to a modern Casio G-Shock, and that’s what I want to wear right now.
Smartwatches are often reviewed like phones or vacuums. Specs are compared, and conclusions are drawn. Wearability is talked about, and functions are tested. If the watch has a swimming option, take it in a pool never mind the fact the reviewer hasn’t done a lap since high school.
I started out doing the same thing with this Garmin. I took it kayaking. I had kayaked twice in my life, and dear reader, I’m here to report the watch performed well on this kayak trip. The watch has topography maps that novel though not useful since the river. It has a cadence beat to help keep strokes consistent. I tried it all. I ended up drinking a lot of Michigan beer instead of tracking the performance of the watch. Sorry.
Still, performance matters to a point.
Here’s my OG review of the Garmin Fenix 5: The watch is significant even on my wrist. The screen is underwhelming though it’s always on and visibility improves in sunlight. The buttons have great tactical feedback. The watch is waterproof to the extent it survived a flipped kayak and hours in Lake Michigan. The battery lasts nearly a week. The watch does not know when it’s on or off the wrist, so notifications will cause it to buzz while it’s on your nightstand.
But most of that doesn’t matter. The Garmin Fenix 5 is exceptional, and I love wearing it.
Smartwatches need to be reviewed like ordinary watches. I need to explain more about how the watch feels rather than what it does or how it works. At this point, several years into smartwatches, it’s not notable if the smartwatch with a smartwatch. Of course, it tracks steps and heart rate and displays select notifications from my phone. If those items work then, they’re not important in a review.
Take a Citizen Skyhawk line. It packs a highly sophisticated complication that’s designed, so the maker says, for pilots. Ball makes a lovely line intended to provide accurate timekeeping for train conductors. There are watches for high magnetic fields, tactical operators, racer car drivers and, of course, countless for divers. Here’s my point: The vast majority of these watches are not used by divers or train conductors or fighter pilots.
This Garmin Fenix watch, much like the Apple Watch or Rolex diver, can be an aspirational item. It’s like the juicer in my kitchen or rowing machine in my basement. I got it because I wanted to be a person who woke up and juiced some veggies before my workout. I haven’t used either in months.
Smartwatches are different from smartphones and need to be reviewed as such. This Garmin Fenix watch has many modes I would never use, yet I love the watch. There’s a base jumping mode. I’m not jumping off a cliff. There’s a tactical mode and a golf mode and an open water mode, and I have no desire to be in situations where I need to track such activities. But I like the thought of having them available if I ever wanted to monitor my heartbeat while shooting targets.
The smartwatch industry is approaching a point where features are secondary to design. It’s expected that the watch will track steps and heartbeat while providing access to various features. It’s like the time and date of a regular watch. Past that, the watch needs to fit in a person’s aspirations.
Everyone is different, but to me, this is how it is laid out: The Apple Watch is for those looking for the top-tier experience regardless of the downsides of constant charging and delicate exterior. Android Watches are those looking for something similar but in a counter-culture way. The Samsung’s smartwatch is interesting and with the new Galaxy Watch, finally reaching maturity.
There are fashion smartwatches with fewer features but designs that make a statement. That’s where this Garmin watch lives and I’m okay with it. Fossil and Timex watches live here too. Using the Apple Watch as a standard, some of these fashion watches cost more, and some cost less, but they all say something an Apple Watch does not.
I’m bored with the Apple Watch, and right now I’m into thinking I live the type of life that needs a smartwatch that tracks every aspect of a triathlon. I don’t need all these features, but I like to think I do. I also don’t need to have a GMT watch with a third timezone, and I don’t need a watch with a hacking movement hand as if I need to synchronize my watch with other members of my special forces squad. But I have those watches along with dive watches and anti-magnetic watches. I’m not alone. The watch industry has long existed on selling lifestyles.
I was wrong before. The Apple Watch isn’t better than this Garmin or most other smartwatches— at least it’s not better for me right now. Maybe two weeks from now I’ll want to wear an Apple Watch and not because it’s better, but because it makes a different statement.