Translation is an everyday smartphone task for millions of people, but outside a few minor features, Apple has generally ceded the capability to its rivals. That changes today with a new first-party iOS app called, naturally, Translate, which works with 11 languages, no internet connection required.
The app is intended for use with speech or short written sentences, not to translate whole web pages or documents. The interface is simple, with a language selector, text field and record button as well as a few extra widgets like favorites and a dictionary.
At launch Translate will support English, Mandarin Chinese, French, German, Spanish, Italian, Japanese, korean, Arabic, Portuguese, and Russian, with others to come. You simply select a pair of languages and paste or record a snippet of text or audio. The translation should show up immediately.
There’s also a landscape mode that further simplifies the interface:
The best part is that unlike many translation apps out there, Apple’s is entirely offline, meaning you can use it whether you have good or bad signal, if you’re out in the middle of nowhere in a country where you don’t get service, or if you’re just trying to save data.
There were no specific release details so the app will probably appear when you upgrade to iOS 14.
During the virtual keynote of WWDC, Apple shares the first details about iOS 14, the next major version of iOS that is going to be released later this year. The most visual change is that the home screen is getting widgets.
“This year, we spent time rethinking the iconic experience of the iPhone,” SVP of Software Engineering Craig Federighi said. “We’ve rethought some of the core elements of iOS.”
As you know, iOS already comes with widgets in the Today view — swipe left on the home screen to access widgets. Widgets have been completely redesigned. Some of them take the full width of the device, others can be limited to a small square. You can now have two columns of widgets.
But widgets are no longer limited to the Today view. You can drag them out of the Today view and drop them on your home screen. There’s also a new widget gallery that lets you add widgets when you’re moving icons around on the home screen.
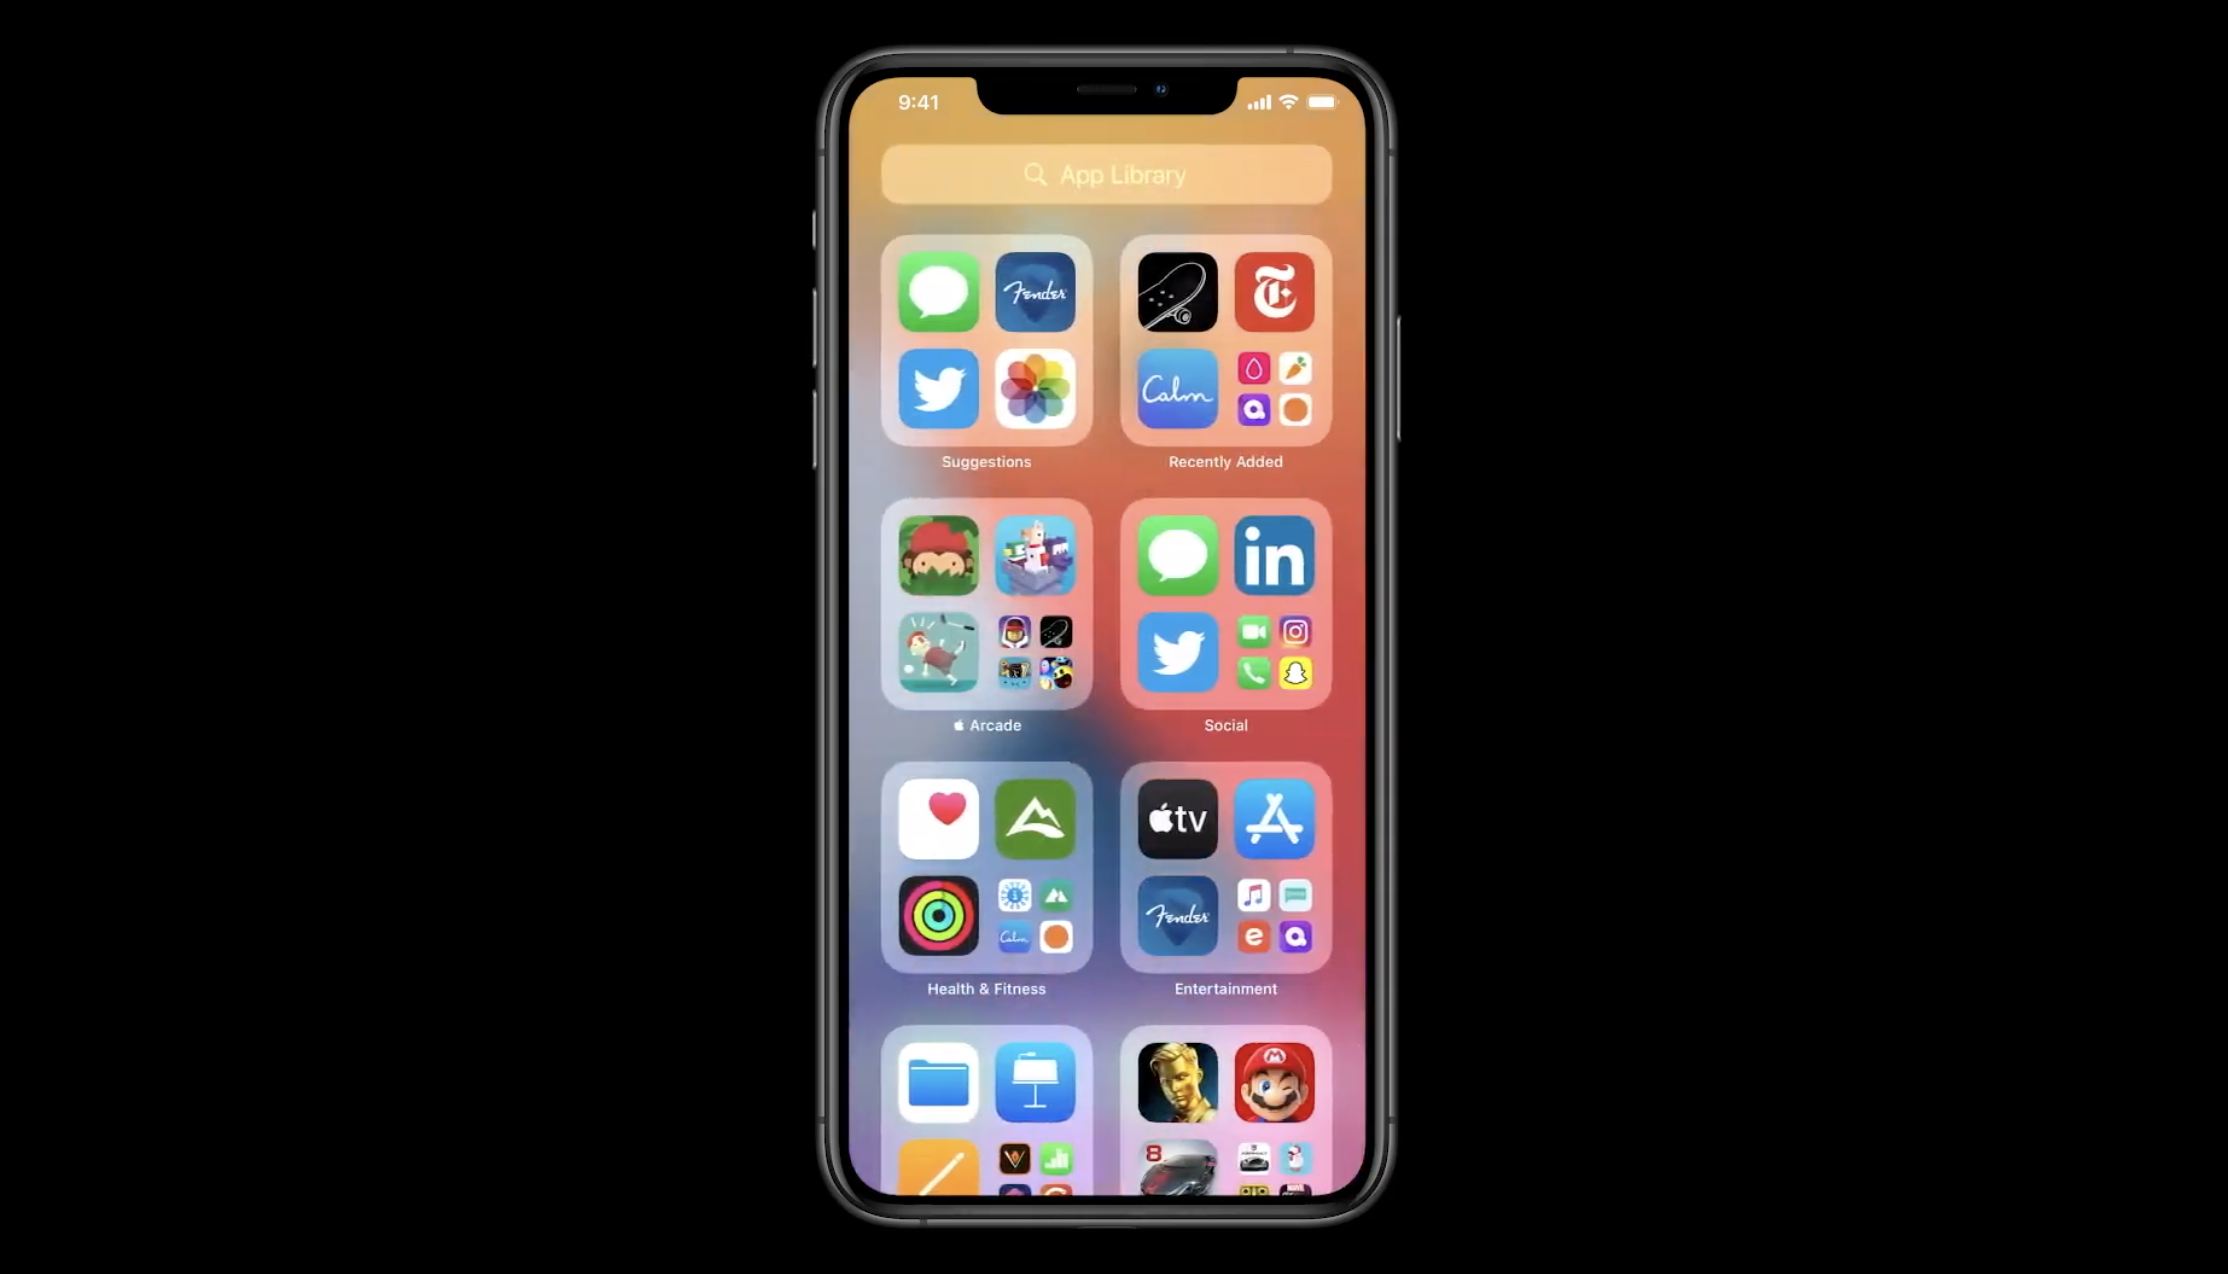
As for home screen organization, Apple knows that a lot of people have an endless list of icons, making the home screen harder to use. Apple is adding some smart organization features.
“Today’s home screen is great but as we get more apps we end up with this — lots and lots of pages,” Federighi said
At the end of the home screen pages, there’s a new page called the App Library. All the apps that aren’t on your home screen are sorted in automatic categories, such as Apple Arcade.
The other feature that is going to have an impact on multitasking and the home screen is that you can use picture in picture on the iPhone just like on the iPad. You can keep a video in a corner of the screen and do something else on your phone.
Better group conversations in Messages
Messages is getting a much-needed update to compete with WhatsApp, Telegram and other popular messaging app. You can now pin conversations at the top to access them more easily.
Conversations themselves are getting an upgrade as you can reply to individual messages. You can then tap on the reply to see the conversation as a separate thread. People can mention you and you can filter your notifications to mentions only.
Each conversation is now more customizable. You can set a photo or an emoji for a conversation. Apple also shows the icons of your contacts in a specific conversation. The most active people get a bigger icon.
Memoji is getting some new options, such as new hair options, new age options and face covers. There are new Memoji stickers as well, such as a hug sticker, a fist bump sticker, a blushing sticker.
Other apps
Apple is also adding new feature to Maps. While the U.S. has received updated data, Apple is going to roll out better maps in other countries, based on its own data set. Up next, the U.K., Ireland and Canada will get much more detailed maps. And this is just the first step as the new data set opens up more possibilities.
“In iOS 14, the Maps team will be working with some of the most trusted brands to bring you guides,” Meg Frost, Director Product Design of Apple Maps, said. You’ll soon be able to browse information from AllTrails, Zagat and more sources.
In some cities, Apple is going to roll out cycling as a transportation mode. It’ll take into consideration elevation. Cycling will be available in New York City, Los Angeles, San Francisco, Shanghai and Beijing at first. For walking directions, you can now say to avoid steps and steep hills.
For drivers, there will be more features as well, such as EV routing and more information about restricted city centers. And if your car supports CarPlay, there will be more types of apps in the future, such as parking apps, EV charging apps and food ordering apps.
Car manufacturers will also be able to let you use your iPhone as a car key. It leverages the U1 chip on the most recent iPhone models. Interestingly, you’ll be able to share your key with a friend by sending it over iMessage.
Redesigned Siri and new Translate app
While Siri can be a hit or miss, Apple is still iterating on the voice assistant. Siri will no longer take over the entire screen when you trigger it. It’ll be a small bubble at the bottom of the screen, which doesn’t obstruct the rest of the screen. Results appear at the top of the screen and appear like a notification.
You can now ask Siri to send audio messages using iMessage. And if you hate audio messages like me, keyboard dictation has been improved. Your voice is now processed on device, which should help when it comes to speed.
Siri lets you translate words already, but Apple is going one step further by releasing a Translate app. Like Google Translate, you can have a conversation in two different languages. You can translate from voice-to-text-to-voice. If you rotate your iPhone in landscape mode, each person has one side of the screen.
App fatigue
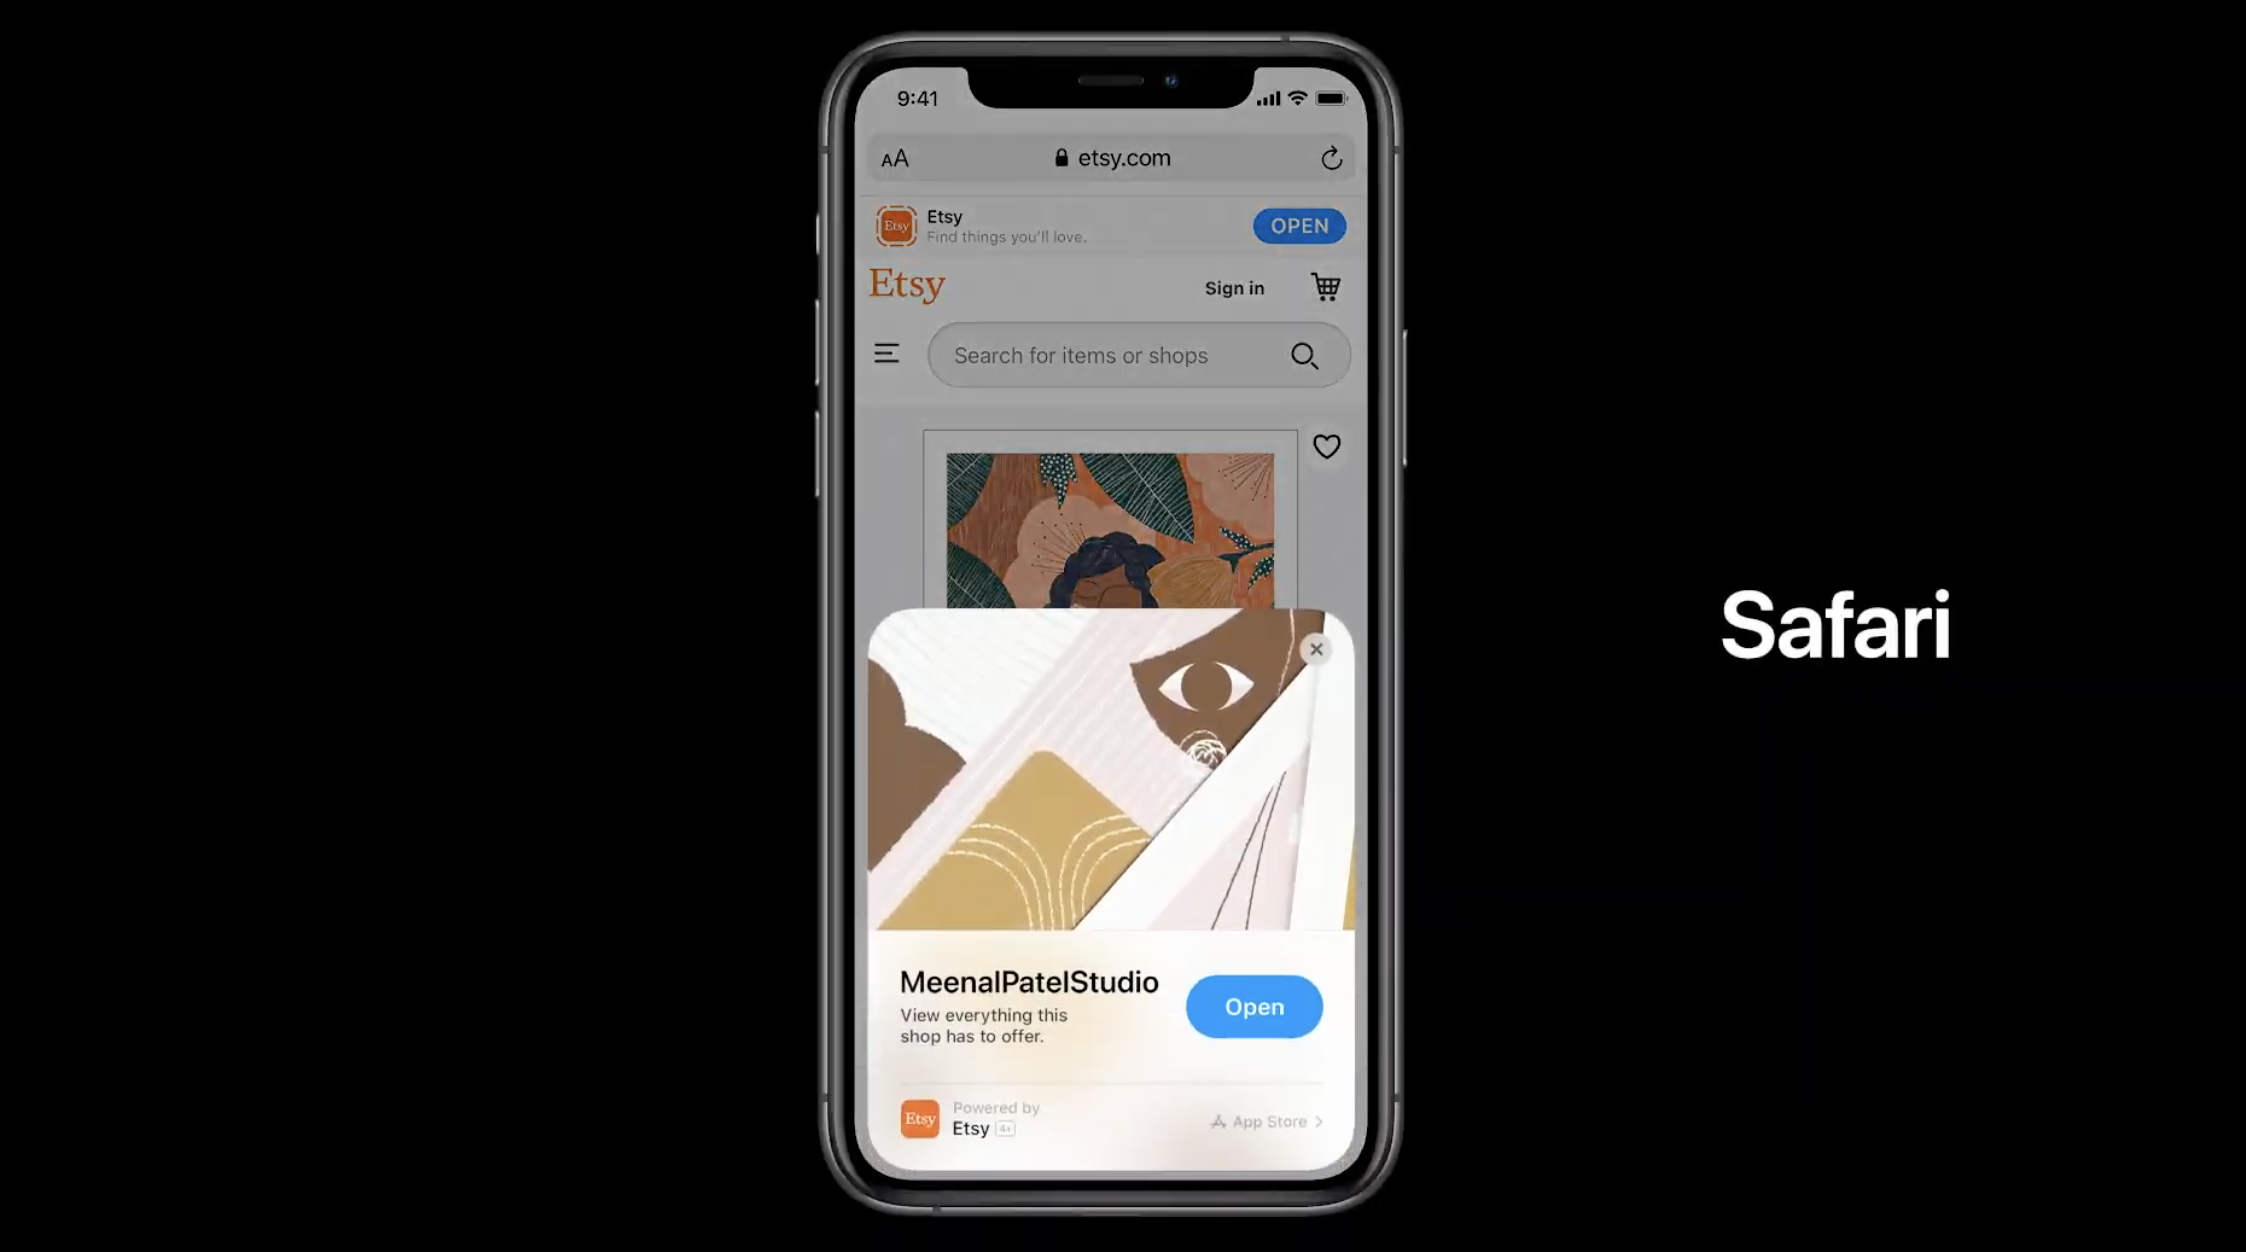
You know that feeling. When your friends ask you to download another app, you don’t want to open the App Store. That’s why Apple is launching App Clips. They are sort of mini apps that you can launch without installing an app. It’s a small part of an app that you can easily share.
There are many ways to share App Clips. You can launch those apps from the web, from Messages, from Maps, from NFC tags or from QR codes. Get ready to see stickers at cafés, on scooters or in museums. Scan a code or tap your phone on it and you get an app-like experience. If you want to dive deeper, you can download the full app from the App Library.
More focus on privacy
Apple is adding a slew of new privacy-centric features. For instance, there’ll be a new dot in the top right corner to indicate that an app is using or has recently used your microphone or camera. There will be new privacy cards in the App Store description pages to tell you how your data is used before you download an app. Apps will also have to ask before they track you across other apps and websites.
As always, iOS 14 will be tested over the summer and should be available to everyone in September.
If you need to improve your website’s visibility and conversion rate, an SEO analysis tool is vital. Various solutions are available—so why should you choose SEMrush?
Designed for marketers requiring SEO, PPC, keyword research, web marketing, and all related insights, SEMrush regularly adds new tools. Backlink reports are one the most vital features, enabling you to deal with Google Penalties and Toxic Scores. Let’s take a look at what they offer.
How SEMrush Can Contribute to Your Online Success
As a Software as a Service (SaaS) utility, you’ll access SEMrush via the web.
SEMrush delivers information that you wouldn’t otherwise have access to. With this data, you can make informed decisions about the next steps for your website. Make promotional decisions, develop content strategies—you can even compare keywords with competitor sites.
After conceiving and initiating proper strategies, you’re not done with SEMrush. Reporting tools continue to provide feedback on your decisions and new information that contributes to your evolving strategies.
Single websites can use SEMrush; alternatively, SEO specialists can employ it, working exclusively or contractually with online clients.
Free Trial and Subscription Options for SEMrush
SEMrush is a subscription service with a seven-day free trial. You need to provide payment information at signup, but there’s plenty of opportunity to cancel. Two subscription plans are available: Pro for $99.95 a month, and Guru for $199.95 a month.
With a Pro subscription to SEMrush you get the key tools, along with support for three projects. Meanwhile, SEMrush tracks up to 500 keywords, crawls 100,000 pages, and can export reports as PDFs.
The Guru plan supercharges this, with support for 15 projects, 1,500 keywords, and 300,000 pages. PDF reports are branded, and SEMrush’s content marketing platform is added. Guru also includes multitargeting and historical data tools.
Which SEMrush package should you choose? It’s a question of suitability and scalability. For those overseeing just one or two sites, the Pro subscription is clearly more suitable. For everything else, SEMrush’s Guru plan is ideal, with a price to match the scale of tools on offer.
Creating a Project in SEMrush Is Easy
After signing up for SEMrush, starting a project is simple. A project consists of your website domain name, as well as an identifier.
Sharing options are available if you need to bring colleagues into your project. Meanwhile, you can also view other open projects, along with search filter and tagging tools to save time. There’s also a Client Manager tool for SEO specialists working with multiple clients.
SEMrush Features Let You Develop Perfect Content
An SEMrush subscription includes everything you could possibly need to analyze and improve your website.
The service offers six toolkits, with tools for:
SEO
Advertising
Social Media
Content Marketing (Guru subscription only)
Competitive Research
Management
Each toolkit features several tools. For example, the SEO Toolkit features 19 different tools and reports, with access to the biggest keyword database around. As SEO is complicated for beginners, SEMrush offers an SEO dashboard along with a set of curated SEO tools. It also provides a detailed, easy-to-use knowledge base.
The SEO dashboard boasts several useful tools, such as Position Tracking to monitor progress on Google Search, and a Site Audit that detects issues on your site which prevent you from achieving a better Google ranking.
Another key feature is the group of backlink reports, which you can use to resolve issues with how your site ranks. This is vital, as one of the key points for ranking is your site’s backlink profile.
What You Can Gain From a Backlink Audit Report
Backlinks are incoming links from other sites. Some of these might be good, such as reputable locations linking to your site as a source.
However, others might come from trashy blogs, or turnkey sites using keyword stuffing techniques to falsely accelerate their popularity. In short, having a lot of toxic backlinks may lead Google to penalize your site. To avoid that, you must clear out toxic backlinks via backlink audits.
To avoid such penalties and toxic scores, the Backlink Audit feature from SEMrush can analyze your site and produce reports. The results of the reports are usually encouraging, but almost always require some action on your part.
As with any of the tools on the SEMrush SEO Dashboard, simply click the Backlink Audit button to begin analysis.
Deal With Toxic Scores and Avoid Google Penalties
The results of a Backlink Audit will almost certainly be of some concern. There is, simply, no way to judge what other sites are linking to yours without the audit. As such, you’ll likely be in for a few surprises.
The Backlink Audit report features six key tabs: Overview, Audit, Remove, Disavow, Lost & Found, and Target Pages.
Via Overview, you can gain a quick appreciation of the main issues. It lets you check URLs used by toxic domains, with the number of referring domains over the past 30 days listed.
The Audit itself is a detailed list of incoming links to your site, each rated by toxicity. Each backlink receives a “toxic score;” the higher the score, the greater the toxicity. Selecting an inbound link here presents you with two options: Remove and Disavow. When you choose Remove, those links are added to a list on the corresponding tab used to communicate with the site owners. You might request they remove the links to your site.
Alternatively, the Disavow option compiles inbound links into the Disavow list. This creates a file that you can upload to Google’s Disavow Tool. Google’s crawler will then consider these links when assessing your site, reducing the impact of Google penalties.
Another useful tool in the Backlink Audit is the Lost & Found tab, which analyzes links from new sites as well as lost and broken links. The Target Pages tab lists the most popular destinations for incoming links.
Every Website Needs SEMrush
SEMrush’s Backlink Audit should be the first destination for any new subscriber to the service. Dealing with Google Penalties and Toxic Scores is a vital step in recovering or improving your site’s position. Only then should you consider elevating the performance of content with some keyword research.
With traffic insights, keyword tools, social media scheduler, an SEO checker, ad builder, and much more, SEMrush is like having a full team of digital marketers working for you. It’s a must-have for any website manager.
The Game bar is software that comes with Windows 10 to help support and improve your video game experience. Its first purpose was for screenshots and recording videos, but Microsoft has continued to expand on its features through updates.
Now, the Game bar can do a lot more and it isn’t just limited to video games. We’re going to show you some novel ways to use the Windows 10 Game bar.
How to Enable and Activate the Game Bar
Before you can use the Game bar, you first need to activate it.
To do this, press Windows key + I to open Settings. Click Gaming and slide Record game clips, screenshots, and broadcast using Game bar to On.
You might also want to tick Open the Game bar using this button on a controller if you want the Game bar to open when you press the logo button on your Xbox controller.
Beneath these options is the Keyboard shortcuts section, where you can remap specific functions of the Game bar. For the purpose of this guide, we’ll refer to the default keyboard shortcuts.
Begin by pressing Windows key + G to open the Game bar. You can toggle it off with the same key combinations.
1. Check System Performance
It can be useful to see how your different computer components are performing, especially when under the stress of an intensive game.
The Performance panel shows you how much of your processor (CPU), graphics card (GPU), and memory (RAM) are being used.
It also displays frames per second (FPS), though this will only apply in games and not for other programs.
The panel also displays the information on a time chart so you can witness the spikes and drops at specific moments.
If you want this information in a more detailed format without additional tools, open the Task Manager with Ctrl + Shift + Esc and go to the Performance tab.
2. Chat With Friends
You can use the Game bar to chat with your friends via Xbox Social.
This will show any friend that you have on your Xbox account, which means that you can chat with those on PC and Xbox One.
Simply double click your friend’s name on the list to begin chatting with them. You can also switch to the Chat tap to see your chat history, if you want to rewind to a previous conversation.
You can use the search bar at the top to search for people to add to your friend’s list.
It isn’t the most advanced chat in the world, but it does the job. If you need something with more features, check out our comparison of Discord and Steam Chat.
3. Control System Volume
The Audio panel lets you control the different volume mixes of the applications you have open by using the sliders.
You can control the overall volume of the system or you can control an individual application. This is useful if, for example, you want to play some music at a low level while in a game. Alternatively, click the application’s speaker icon to mute it entirely.
You can switch between your speaker output (like moving between your speakers and headphones) using the dropdown at the top.
Also, go to the Voice tab and you can choose which device you want to use for voice input.
4. Take Screenshots and Record Videos
One of the Game bar’s greatest utilities is its Capture panel. This not only lets you take screenshots but also record whatever is on your screen.
Click the camera icon to take a screenshot or press the record icon to begin capturing video that saves as an MP4.
When you’ve recorded a video, you can click Show all captures to see all of them in one place.
The microphone icon also lets you enable your microphone so that you can capture your voice over any video you record.
You can share your captures with friends on social media using the integrations that are built into the Game bar. Hop into Settings > Accounts and here you can link up your Twitter account. Click Sign in and follow the prompts. Once you’ve signed in, you shouldn’t need to do it again in the future.
Beneath this, you will find the Xbox Live section, which lets you link accounts from services like Steam and Facebook so you can connect with friends you have there who also use Xbox Live.
6. Play and Control Spotify
Depending on the game, it can be nice to have some music playing in the background. Handily, the Game bar has integration with Spotify to make this a breeze.
You can use the panel to control Spotify on the fly—pause, skip, repeat, and so on—and pop on curated gaming playlists. If you want the full Spotify functionality then you’ll need to open the app itself, but the controls here should give you more than enough when multi-tasking.
It’s great fun to hop online and play a multiplayer game, but if none of your friends play the same game it can be hard to find a reliable or consistent group.
That’s where the Looking for Group feature of the Game bar comes in handy. You can browse Xbox games and see if anyone is looking for companions in the game you want to play.
If not, you can Create a post and set your preferences for things like if voice chat is required, desired language, players needed, and so on. It’s a great way to connect with fellow gamers.
Troubleshoot Game Bar Problems
These are some of the great features that Game bar offers and how you can use them to improve your Windows experience.
Hopefully, you should be able to use them smoothly. However, if you do encounter any issues, we’ve got your back with our Game bar troubleshooting tips.
Ever wondered how social media companies make money? The likes of Facebook, Twitter, and Reddit all let you sign up and use the website for free—which billions of users have done. How do these platforms generate income and stay profitable?
Most social media networks make money through advertising to you. There are other methods, like raising finance through investment or premium membership schemes. We’re going to look at all the ways that social media companies make money.
Venture capital is a form of private financing and it’s how a lot of social media companies got their start.
Venture capital is when an investor, such as a wealthy individual or investment bank, believes that a start-up business has potential. They then invest money (or sometimes their time and expertise), usually in return for a share of the business. The larger their share in the business, the more influence they have over its decisions. The hope for the investors is that they make their money back and more when the business is larger and becomes profitable.
Sites like Facebook and Twitter have received hundreds of millions of dollars in venture capital. Nowadays, with hindsight, we can say that those investors made very smart choices, but venture capital is a risky game and investments don’t always pay off. Would you have invested in Facebook when it was called “Thefacebook” and only available to Harvard students?
2. Advertising
The biggest way that social networks make money is through advertising. There’s a reason why the sites are designed to be addicting. The more you look, the more advertising you’re exposed to.
You can see it everywhere you go. Promoted posts on Reddit’s front page, videos within Instagram’s Stories, sponsored tweets on Twitter’s timeline, and so on.
Consider that Facebook alone has 2.6 billion monthly active users. Those are a lot of eyeballs ready to be exposed to the latest goods and services that companies want you to buy (here’s how to change your Facebook ad preferences).
Social media platforms charge companies money so they can advertise on their site. The exact cost of that depends on many factors. For example, companies can pay more for their advert to be seen by more people or promoted for a longer period of time.
Advertising is a fine line to tread. If social media companies flood their sites with too many adverts, users will be turned off or use ad-blockers. Just the right amount and users will be more likely to see things that interest them, click through, and potentially make a purchase.
3. User Data
Another big source of income for social media platforms, and a controversial one, is through collecting and selling user data.
It’s important to understand what this means. Facebook, Twitter, Instagram, and the like aren’t selling identifiable information like your phone number, email address, or other private details to companies.
However, what many of them do sell is aggregated and anonymized usage patterns.
For example, Twitter sells advanced access to its API, which companies can use to view all historical tweets and filter, sample, and batch them. This makes up around 13.5% of Twitter’s revenue.
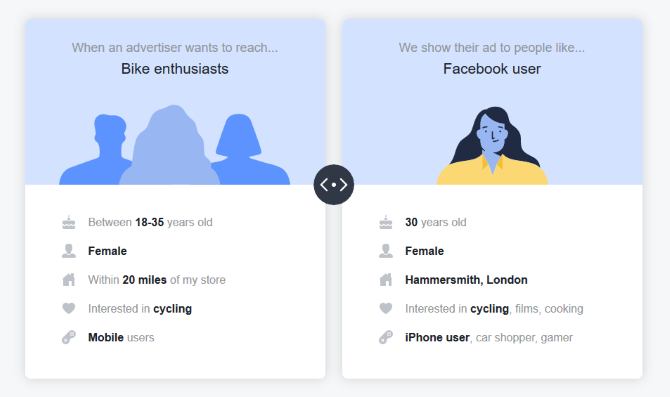
Another example is Facebook, which has often been under the spotlight thanks to things like the Cambridge Analytica scandal. Despite the uproar, Facebook isn’t purposely giving other companies your data—they want to keep it for themselves. However, Facebook monitors your usage, such as the pages you like, and uses this to put you in a category so that advertisers can pay to target that group.
4. Premium Memberships
All the popular social media sites let you make your account for free. However, some of them lock additional features behind a paywall in the hopes that you will pay for these premium memberships.
One example is Reddit’s Premium subscription, which gives you an ad-free experience, access to an exclusive subreddit, a profile badge, and more. Reddit also sells Coins, which you can buy to give other users badges in reward for good contributions.
Another example is LinkedIn Premium. This gives access to LinkedIn learning courses, greater insight into who is viewing your profile, the ability to send InMail to recruiters, and more.
The majority of users won’t pay for these premium memberships, which is one of the reasons that the base account is free. However, for those people who are willing to pay, it makes for a good income stream for the social networks.
5. Transaction Fees and Virtual Products
Some social networks offer services for other people to sell or raise money through them. The social network will collect a transaction fee on this.
For example, on Facebook you can raise money for charity. Facebook used to charge a transaction fee for this, but no longer do. However, they do still charge for personal fundraisers, which they claim is to “cover payment processing” and “taxes”.
Also, if you buy something through a game or service within Facebook, the social network will take a cut of that purchase before it reaches the developer.
Another way of making money is through virtual products. This can be seen in something like Tumblr, which charges for some blog themes. Elsewhere, Facebook used to sell “Gifts” (amusing icons that you can put on someone’s profile), but they’ve since retired this.
6. Diversifying
Once a social network grows large enough, they look to diversify. For those with enough capital, buying other companies is a quick way to do this.
It’s why Facebook own WhatsApp, Instagram, and Oculus. It’s also why Twitter has acquired companies like Gnip, MoPub, and Periscope. Not only do they get the technologies and user data that these companies possess, but they can also use them as an additional revenue source to fund their social media platform.
Diversifying goes beyond just buying other companies. For example, take the Portal. This is Facebook’s video chat camera. They want you to buy this not only to make a profit on the physical device, but also to hook you in to their ecosystem—soon you’ll be using Messenger to chat to friends or Workplace to collaborate within your business. Though note there are concerns with Facebook Portal privacy.
How You Can Make Money on Social Media
There’s a saying that “if something is free, you are the product.” That’s especially true in the case of social media. It’s not necessarily a bad thing, but it’s good to be aware.
Phone-based navigation has made it easier than ever to stay safe while on your bike. That’s not to mention that your smartphone can help keep you entertained on your journey, talk on the phone, and be ready for when you reach your destination.
However, these features require power. If you need to keep your smartphone charged while out on a cycle, you do have options. Here are the best ways to charge your phone while riding a bike.
Cycling is often praised for its health benefits. Not only do you exercise while riding, but you get some time outdoors, too. So, why not make use of that outdoor time and opt for a solar charger? The GoerTech Solar Charger is one of the best solar chargers available today and an excellent way to charge your phone while riding your bike. This 25,000mAh portable charger can store enough energy to recharge an iPhone XS more than seven times.
So, even when partially depleted, it should be more than enough to get your phone back to full health. Usefully, it can charge up to three devices simultaneously. The power bank can be recharged either by sunlight or via USB. By cable, the GoerTech Solar Charger takes 13 hours to recharge fully. Depending on the weather, charging the unit by sunlight can take between three and seven days. It also features 35 LEDs so that the unit can double as an emergency light source.
If you like the idea of a solar charger, but want something more portable, consider the XTPower Xplorer Hiker 8. You may have come across the CamelBak hydration bladders in the past, and the Xplorer Hiker 8 is a similar backpack with water storage. These products are ideal for cycling, as you only have to reach for the straw rather than hold a water bottle in your hand as you ride.
What makes this option from XTPower unique is that it integrates a waterproof 7W solar panel on the outside of the bag. The panel has a 5V USB output, which charges a battery inside the bag. This allows you to charge your devices while on the go using only renewable power. The bag’s interior even has multiple pockets to keep your gadgets organized. Alongside the 1.8L hydration bladder, there’s also a 6L main storage compartment.
In many places around the world, there’s a requirement that cyclists have lights on their bike during low-light hours. The BurningSun Solar Bike Light is an excellent choice, as it stays charged throughout the day thanks to the integrated solar panel. There are four headlight modes and the lights reach a maximum 350 lumens. Additionally, there’s a horn included here to save space on your handlebars by only attaching a single unit.
However, you’re here for bike chargers for mobile phones. Fortunately, this unit also comes with a 2,000mAh internal power bank. This can be charged using the solar panel or via USB. You can choose one of five sounds for the horn, which will reach 140dB. The unit is IPX5-rated for water resistance, making it a genuinely multi-purpose all-day cycling companion.
If you rely on your phone for navigation, then the ROMOSS Bicycle Handlebar Power Bank is an ideal option. The product combines a bike phone holder with a power bank so that you only have to attach one unit to your handlebar. The phone holder fits phones up to 5.5-inches due to its stretchable mounts. The silicone buckle is adjustable, so it should fit all handlebars and even onto the grips of a baby stroller.
The portable charger is encased in a silicone cover. However, as your phone is always exposed, this item is not suitable for use in the rain. The 10,000mAh battery can recharge most phones up to five times on a single charge. There are two USB ports so you can power up to two devices simultaneously. You even have options here, as the power bank supports both micro-USB and USB-C connections.
If you’ve been considering a bike upgrade alongside phone charging, then you may want to take a look at the IZIP E3 ProTour. This electric bike—or e-bike— is equipped with an electric motor that supports you while you ride. Riding uphill or over long distances become more achievable with an e-bike and make cycling an attractive transport option.
Although there are many e-bikes out there, integration with COBI, the smart connected biking system, makes the E3 ProTour notable. The handlebar-based unit is a bike phone charger, can control your bike’s lights, and protect your bike when not in use. When connected to your smartphone via the COBI app, you can adjust your e-bike’s settings, monitor your cycling performance, and utilize turn-by-turn navigation.
Of course, the bike itself is also a consideration here. The E3 ProTour is equipped with a high torque 500W Currie Electro-Drive system coupled with a 48V battery. This makes it ideal for cycling long distances at high speeds. This is a multi-use bike, just as suited for fitness as commuting. There are integrated fenders, a rack, kickstand, and lock as well. This e-bike can assist you up to a maximum speed of 28mph and has a range of up to 35 miles on a single charge.
The Best Bike Phone Charger for Your Ride
Although you get to enjoy the outside world, our digital one continues and can be essential before, during, and after your journey. These options should charge your phone while riding your bike, so you’re always connected. However, cycling isn’t accessible to everyone.
The physical movement of bike riding can be a challenge for some, and it isn’t always practical for commuting long distances. That said, there is an alternative. If you want to get out on a ride, e-bikes are a great option. If you haven’t come across them before, check out everything you need to know about e-bikes.
If you need to improve your website’s visibility and conversion rate, an SEO analysis tool is vital. Various solutions are available—so why should you choose SEMrush?
Designed for marketers requiring SEO, PPC, keyword research, web marketing, and all related insights, SEMrush regularly adds new tools. Backlink reports are one the most vital features, enabling you to deal with Google Penalties and Toxic Scores. Let’s take a look at what they offer.
How SEMrush Can Contribute to Your Online Success
As a Software as a Service (SaaS) utility, you’ll access SEMrush via the web.
SEMrush delivers information that you wouldn’t otherwise have access to. With this data, you can make informed decisions about the next steps for your website. Make promotional decisions, develop content strategies—you can even compare keywords with competitor sites.
After conceiving and initiating proper strategies, you’re not done with SEMrush. Reporting tools continue to provide feedback on your decisions and new information that contributes to your evolving strategies.
Single websites can use SEMrush; alternatively, SEO specialists can employ it, working exclusively or contractually with online clients.
Free Trial and Subscription Options for SEMrush
SEMrush is a subscription service with a seven-day free trial. You need to provide payment information at signup, but there’s plenty of opportunity to cancel. Two subscription plans are available: Pro for $99.95 a month, and Guru for $199.95 a month.
With a Pro subscription to SEMrush you get the key tools, along with support for three projects. Meanwhile, SEMrush tracks up to 500 keywords, crawls 100,000 pages, and can export reports as PDFs.
The Guru plan supercharges this, with support for 15 projects, 1,500 keywords, and 300,000 pages. PDF reports are branded, and SEMrush’s content marketing platform is added. Guru also includes multitargeting and historical data tools.
Which SEMrush package should you choose? It’s a question of suitability and scalability. For those overseeing just one or two sites, the Pro subscription is clearly more suitable. For everything else, SEMrush’s Guru plan is ideal, with a price to match the scale of tools on offer.
Creating a Project in SEMrush Is Easy
After signing up for SEMrush, starting a project is simple. A project consists of your website domain name, as well as an identifier.
Sharing options are available if you need to bring colleagues into your project. Meanwhile, you can also view other open projects, along with search filter and tagging tools to save time. There’s also a Client Manager tool for SEO specialists working with multiple clients.
SEMrush Features Let You Develop Perfect Content
An SEMrush subscription includes everything you could possibly need to analyze and improve your website.
The service offers six toolkits, with tools for:
SEO
Advertising
Social Media
Content Marketing (Guru subscription only)
Competitive Research
Management
Each toolkit features several tools. For example, the SEO Toolkit features 19 different tools and reports, with access to the biggest keyword database around. As SEO is complicated for beginners, SEMrush offers an SEO dashboard along with a set of curated SEO tools. It also provides a detailed, easy-to-use knowledge base.
The SEO dashboard boasts several useful tools, such as Position Tracking to monitor progress on Google Search, and a Site Audit that detects issues on your site which prevent you from achieving a better Google ranking.
Another key feature is the group of backlink reports, which you can use to resolve issues with how your site ranks. This is vital, as one of the key points for ranking is your site’s backlink profile.
What You Can Gain From a Backlink Audit Report
Backlinks are incoming links from other sites. Some of these might be good, such as reputable locations linking to your site as a source.
However, others might come from trashy blogs, or turnkey sites using keyword stuffing techniques to falsely accelerate their popularity. In short, having a lot of toxic backlinks may lead Google to penalize your site. To avoid that, you must clear out toxic backlinks via backlink audits.
To avoid such penalties and toxic scores, the Backlink Audit feature from SEMrush can analyze your site and produce reports. The results of the reports are usually encouraging, but almost always require some action on your part.
As with any of the tools on the SEMrush SEO Dashboard, simply click the Backlink Audit button to begin analysis.
Deal With Toxic Scores and Avoid Google Penalties
The results of a Backlink Audit will almost certainly be of some concern. There is, simply, no way to judge what other sites are linking to yours without the audit. As such, you’ll likely be in for a few surprises.
The Backlink Audit report features six key tabs: Overview, Audit, Remove, Disavow, Lost & Found, and Target Pages.
Via Overview, you can gain a quick appreciation of the main issues. It lets you check URLs used by toxic domains, with the number of referring domains over the past 30 days listed.
The Audit itself is a detailed list of incoming links to your site, each rated by toxicity. Each backlink receives a “toxic score;” the higher the score, the greater the toxicity. Selecting an inbound link here presents you with two options: Remove and Disavow. When you choose Remove, those links are added to a list on the corresponding tab used to communicate with the site owners. You might request they remove the links to your site.
Alternatively, the Disavow option compiles inbound links into the Disavow list. This creates a file that you can upload to Google’s Disavow Tool. Google’s crawler will then consider these links when assessing your site, reducing the impact of Google penalties.
Another useful tool in the Backlink Audit is the Lost & Found tab, which analyzes links from new sites as well as lost and broken links. The Target Pages tab lists the most popular destinations for incoming links.
Every Website Needs SEMrush
SEMrush’s Backlink Audit should be the first destination for any new subscriber to the service. Dealing with Google Penalties and Toxic Scores is a vital step in recovering or improving your site’s position. Only then should you consider elevating the performance of content with some keyword research.
With traffic insights, keyword tools, social media scheduler, an SEO checker, ad builder, and much more, SEMrush is like having a full team of digital marketers working for you. It’s a must-have for any website manager.
You probably know a little about Airplane Mode—it cuts off all signals from your phone. But what’s the point of that? As it turns out, this is actually a handy feature you may consider using more often.
So what does Airplane Mode do, and how do you turn it on and off? Do you really need to use it while flying? And which apps remain functional while Airplane Mode is activated? Here’s what you need to know.
What Does Airplane Mode on iPhone and iPad Do?
You can find Airplane Mode on most devices, including smartphones, tablets, and laptops. Airplane Mode suspends signals on radio frequencies in an effort to stop interference. That means you won’t be able to send text messages, receive or make calls, or use Wi-Fi.
In addition, iMessage and other messaging services like WhatsApp, Telegram, Signal, and Facebook Messenger stop working.
While you’re not technically prohibited from getting calls, answering them requires signal transmission, so it won’t work. Airplane Mode also stops you from using any cellular data.
How to Toggle Airplane Mode on iPhone and iPad
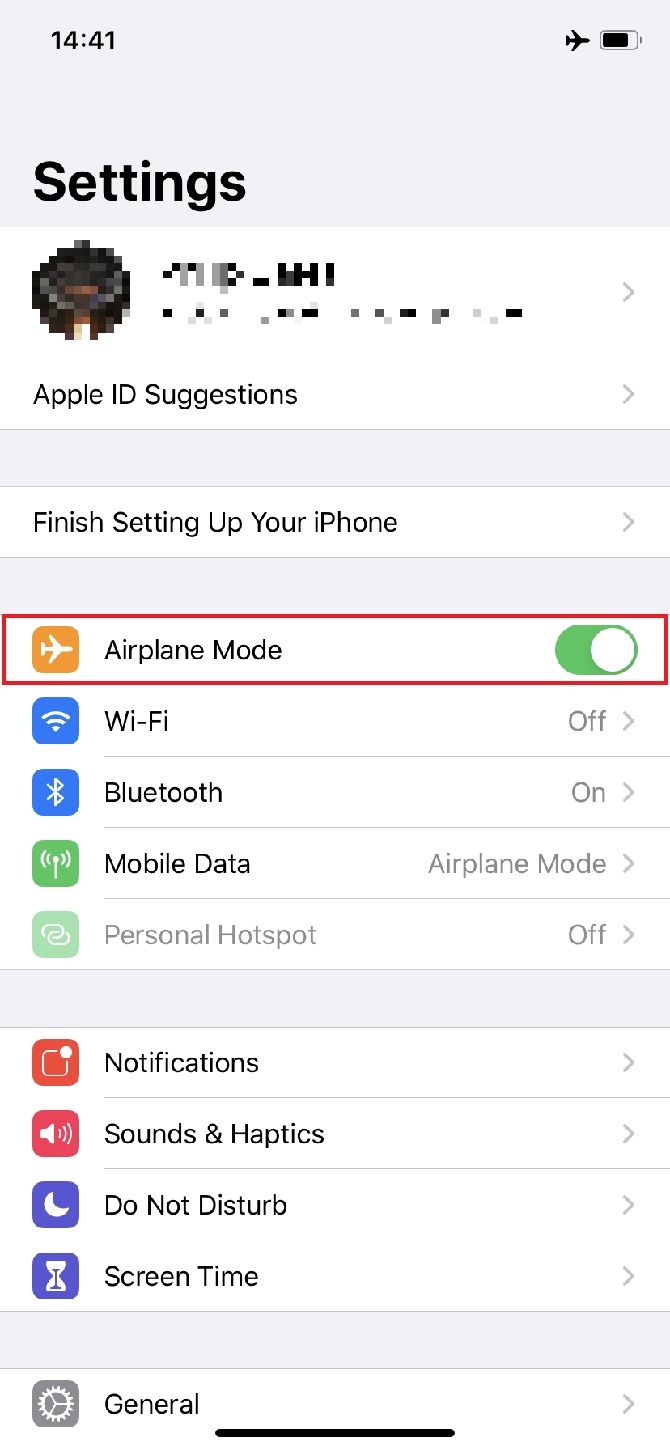
You can access Airplane Mode via Settings or the Control Center. You’ll find Airplane Mode near the top of Settings, but it’s more convenient to use the Control Center toggle in most cases.
To open Control Center on an iPhone with Face ID, swipe down from the top-right of your screen. If your iPhone has a physical Home button, swipe up from the bottom of the screen instead. Once it’s open, tap the button with an airplane symbol.
You’ll immediately see carrier settings disappear, along with internet signal and reception. These will be replaced by a small silhouette of an airplane in your status bar.
Do Smartphones Really Affect Aircraft?
Why is Airplane Mode necessary?
In 1991, the Federal Communications Commission banned any calls made by passengers while in the air. This was due to fears that these could interfere with electronic equipment on the airplane and towers on the ground. In 2013, the Federal Aviation Administration to recommended that travelers use their smartphones in Airplane Mode, but can use Wi-Fi and Bluetooth at a certain height if the aircraft supports it.
Many questioned the decision since, but prevailing logic has erred on the side of caution, especially when lives could be at stake. It at least puts others’ minds at rest, and stops any ongoing calls annoying other passengers.
Nonetheless, there’s no evidence that signals from a portable device have ever caused a crash.
The biggest reason not to use your phone when in the air is that it can cause interference with radio signals. This would risk annoying pilots and air traffic controllers, or even making them miss a crucial message. One or two passengers using their phones might be fine; when many do, you generate too much radio pollution. According to The Points Guy, one pilot explained:
“You’ve probably heard this interference yourself when a phone is set near a speaker. It sounds like a “dit-dit-dit-dit” tone and it’s pretty annoying. Anyone who has had to track down audio interference in a sound system understands.”
That’s rare, but shows even sending an SMS can affect a craft.
If you’re interested, here’s a handy NASA report about in-flight issues caused by phones, including fire, instrument anomalies, and headset interference. In short: Airplane Mode is still vital.
Can You Still Use Wi-Fi With Airplane Mode Activated?
Turning on Airplane Mode will disable Wi-Fi. However, you can manually re-enable Wi-Fi while keeping the other effects of Airplane Mode active. Go to Settings, turn on Airplane Mode, then tap Wi-Fi and toggle it on.
If you’re on a plane, make sure you ask an attendant before doing this. Some planes offer their own Wi-Fi, while you should avoid using it on others. While not on a plane, this is an easy way to cut off all communication except Wi-Fi access.
GPS in Airplane Mode is a little different. It doesn’t transmit signals, but only receives them. Thus, turning on Airplane Mode does not disable GPS functionality. However, your phone won’t be able to use nearby Wi-Fi networks to help figure out where you are.
Can You Use Bluetooth While Airplane Mode Is Activated?
Like Wi-Fi, you can use Bluetooth with Airplane Mode turned on. Head into Settings > Bluetooth to enable it after turning Airplane Mode on.
For safety, you should check with airline employees, as some don’t want you to use Bluetooth during take-off and landing. Your iPhone has a short Bluetooth range of roughly 30 feet, which shouldn’t affect the plane’s systems.
What Is the Purpose Of Airplane Mode on iPhone?
This feature isn’t just useful when you’re flying to your next vacation. Airplane Mode has all sorts of uses.
It’s notably useful if you’re trying to concentrate on something important. Airplane Mode quickly stops notifications from disrupting you.
Does Airplane Mode Charge Your iPhone Faster?
Yes, your phone charges faster in Airplane Mode!
It’s your battery’s friend, whether you’re trying to charge quickly or keep it running a little longer. Searching for cell signals, refreshing apps in the background, and other activities all use power. With those functions disabled, the energy you would use stays in the battery.
Plus, it stops you from using battery-draining apps and you probably won’t have the screen on for long since you can’t use most apps.
Does Airplane Mode Aid Your iPhone’s Performance?
Airplane Mode doesn’t have an effect on software performance. However, it can help if you’re having trouble getting a signal or are experiencing connection issues.
Switching Airplane Mode on and off again can sometimes help you fix carrier settings. Think of it like restarting your smartphone’s network connection.
How Does Airplane Mode Affect Freemium Apps?
We’re all familiar with “free apps” that are loaded with in-app purchases. While you might not mistakenly purchase them yourself, handing your device to children can unintentionally lead to huge charges. Before you give kids your device, switching to Airplane Mode will prevent any additional purchases or downloads.
Airplane Mode will also often prevent ads from showing in free apps, because most of them need a network connection. However, you’ll be out of luck if the game is online-only.
Which Apps Work and Don’t Work in Airplane Mode?
Turning off all transmission can feel like a big step. Let’s see which apps specifically work in Airplane Mode.
Do Alarms Still Work in Airplane Mode?
Yes, all functions in the Clock app will still work. You can rely on your iPhone to wake you up in the morning. Alternatively, Do Not Disturb is a good way to suppress notifications without going offline.
Do Reminders Work in Airplane Mode?
Yes. Reminders rely on your device’s own clock, so they don’t need any signals. Reminders you added from other devices (like a Mac) won’t come to your device as long as it’s in Airplane Mode, however.
Can I Still Send Emails in Airplane Mode?
After activating Airplane Mode, your Mail app will tell you to either turn the mode off or use Wi-Fi.
You might still be able to read messages in your inbox, and in some cases, can compose an email. It won’t actually send, however, until you deactivate Airplane Mode or connect to Wi-Fi. You’ll find pending messages in your outbox.
Remember to check this if someone claims you never replied to their message.
Do Emergency Service Numbers Work in Airplane Mode?
You can’t make any calls while in Airplane Mode, including to emergency numbers. Make sure to disable it before placing a call. When you try to call any number in Airplane Mode, you’ll see a message reminding you about this.
No. Because weather updates rely on an internet connection, you’ll see outdated information in your weather app. Try looking out the window to get the latest weather.
Can I Check Stocks in Airplane Mode?
The Stocks app is useless for the same reason as Weather. You may still be able to see data downloaded before you used Airplane Mode, though. News won’t work either.
Can I Check Notes in Airplane Mode?
Yes. These are all stored on your phone, so don’t require any network connection. You can’t AirDrop, iMessage, email, or share notes on social media unless you’re back online, though.
You can still create new notes, but they won’t automatically sync with your other devices until you disable Airplane Mode.
Can I Check Photos in Airplane Mode?
Your camera will work normally in Airplane Mode, and you can still browse photos that are stored on your device. These won’t sync with iCloud until you access Wi-Fi again, and you can’t view photos saved in online storage like Google Photos.
Can I Browse iTunes or the App Store in Airplane Mode?
No, because they both require a network connection.
Can I Watch Videos or Listen to Music in Airplane Mode?
If you’ve already downloaded media, you can watch or listen in that particular app. Otherwise, no. You can’t use YouTube, Spotify, and similar services to stream anything you haven’t saved offline.
Will Siri Work in Airplane Mode?
Like all voice assistants, Siri relies on the internet for information, so you won’t be able to use it. You can, however, still record Voice Memos.
Can I Play Games in Airplane Mode?
It depends on the game. If your game is fully downloaded and works offline, you can play it. Games that require an internet connection will fail to work, though. Download some of the best offline iPhone games before your next trip so you always have something to play.
Airplane Mode Is a Handy Addition to Your Phone
Airplane Mode is a really great feature in iOS and other mobile operating systems. It can save you time, money, and hassle when you don’t want to go online or be bothered.
When you’re stuck in the middle of a Wi-Fi deadzone, you may feel tempted to begin drilling holes in your home to get an Ethernet cable through. However, a Wi-Fi extender is an excellent way of expanding the range of your network with very little effort.
Let’s explore Wi-Fi extenders, what they do, and how to use one.
What Is a Wi-Fi Extender?
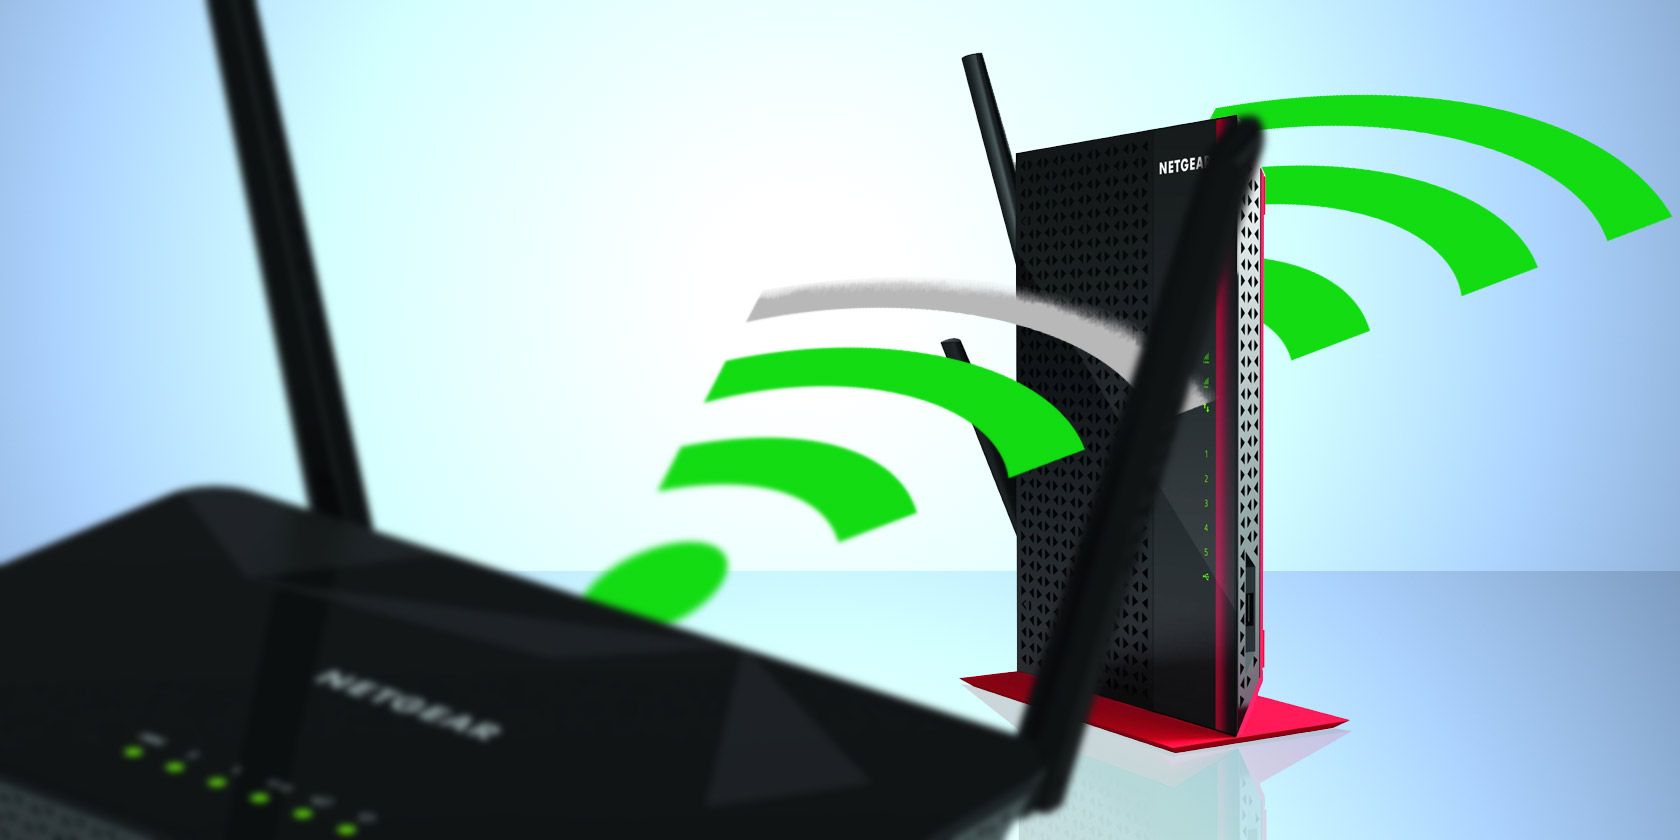
Wi-Fi extenders are also sometimes called “repeaters” or “boosters,” but the end goal is usually the same. A Wi-Fi extender sits between your router and your computer and relays messages between the two.
Of course, how the Wi-Fi extender does it job depends on the model. They generally work by first pairing up the extender with your router, so the extender knows where to connect to. Then, you plug the extender into a free power socket in-between your router and the PC.
Now that the extender is set up, it creates its own Wi-Fi network for others to connect to. When you connect a device to it, all your traffic goes to the extender. When it receives this information, the extender passes the data along to the router which it was paired to at the start.
Using Wi-Fi Extenders to Span Large Distances
At its most basic level, a repeater acts as a middle-man to your computer. For instance, if your PC is too far away from your router, it will receive a poor signal—let’s say, one bar on the Wi-Fi indicator. However, the middle-point of the home receives an average signal; about two or three bars.
By putting a Wi-Fi extender in this middle spot, both the router and your PC can connect to it with an average signal strength. The extender can then pass packets of data between your router and PC with a better quality signal than without it. This, in turn, improves overall performance and reduces the number of internet drop-outs.
Using Wi-Fi Extenders to Avoid Obstacles
However, Wi-Fi extenders can do more than just cover distance. For example, did you know that some building materials, furniture, and devices can create what’s called a Wi-Fi dead zone? If something is blocking your signal, trying to “brute-force” your way through by sticking an extender in the middle may not work out.
However, you can place the extender in a strategic spot that avoids the obstacle altogether. If the extender is in a position where it can “see” both the router and your PC without needing to go through the obstacle, you can clear up the signal between yourself and the router.
Do I Need a Wi-Fi Extender?
Wi-Fi extenders are a great way to break down Wi-Fi dead zones. As such, you only really need one if your Wi-Fi connection is spotty. If you already have a decent connection, getting an extender to eke out those last few bars may not be worth it.
Before you buy an extender, however, there are a few things you can try. Your Wi-Fi woes may be due to poor router positioning. As such, be sure to move your router around a little bit to see if that fixes the issue.
You can also modify the router itself to see if that solves your problem. One free method is to pick the best channel for your router to see if that makes the signal better. You can also replace your router’s antennae with stronger ones, if you can.
If nothing seems to solve the problem, an extender may do the trick. However, before you put down hard-earned cash for a brand new one, have a dig through your old electronics box for a router.
Some routers can be turned into an extender, which is a great way to recycle old hardware instead of buying new gadgets. In fact, there are many useful ways to reuse an old router, so it’s a good idea to keep outdated routers around.
If all of the above fails, then buying a new Wi-Fi extender is worth a try. It’s worth noting, however, that an extender isn’t a magic bullet for your network issues. Some extenders and setups will work well, while others will make things even worse.
As such, it’s best to only purchase quality Wi-Fi extenders to ensure that, if problems do arise, it’s more an infrastructure problem than a product one. We covered the best Wi-Fi extenders before, so be sure to check it out if you need pointers on what brands are best.
What Are Dual-Band Wi-Fi Extenders?
If you look into the Wi-Fi extender market, you may find some that are labeled “dual-band.” What this means is that they cover both the 2.4Ghz and 5Ghz band.
This is important because they both excel at different things. A 5Ghz band will provide a faster download speed than 2.4Ghz, but 2.4Ghz travels further.
As such, a dual band extender will use whichever is best at the time. If your device is close enough for the 5.0Ghz band’s improved download speed, it will use it; likewise, if distance is of utmost importance, it will use the 2.4Ghz band instead.
Dual-band extenders are also useful for covering compatibility issues. Some devices will only work on one band; for example, a budget smartphone may only be capable of connecting on the 2.4Ghz band. Using a dual-band network removes any headaches that may arise from devices liking one band over another.
What Do the Numbers Mean in Wi-Fi Extender Names?
Sometimes you’ll find an extender or router has a number within its name. For example, you have the Netgear N300 vs N600; what do these numbers mean?
The short and sweet answer is that this number represents the total combined bandwidth that the extender or router can handle. For example, a Netgear N300 has 300Mbps of bandwidth, and the N600 has 600Mbps. As such, the higher the number, the more traffic the extender can handle.
The long answer involves further analyzing what “total combined bandwidth” means. Each network band has its own bandwidth, so the number is the result you get when you add up the bandwidths of every band the extender supports.
If the extender supports only one band, there’s little to be confused over. When you take a look at the Netgear N300 extender, it only supports the 2.4Ghz band. That means you’ll get 300Mbps bandwidth when you use it—full stop.
If the extender supports two bands, however, you can usually work out each band’s bandwidth by dividing the number by two. However, sometimes the 5Ghz band has slightly more bandwidth than the 2.4Ghz band.
If we take a look at the Netgear article on the topic, the dual band devices typically split the bandwidth equally. The exception is the N750, which has 300Mbps on the 2.4Ghz band, and 400Mbps on the 5Ghz band.
As such, if you’re confused by the numbers on your router, try to find official documentation on what it means. Some will be single band, some will have two, and some will divide their bandwidth unevenly between the bands.
Wi-Fi Extenders or Powerline Adapters?
Wi-Fi extenders are just one of many ways you can improve your network quality. If all the free and easy fixes don’t work, it’s worth trying one to see if it helps you out.
Apple’s Game Center allows you to connect with friends to play games, compare scores, and compete for achievements. We’ll show you how to get Game Center on your iPhone or Mac, as well as how to use Game Center.
That means how to add friends, changing your Game Center name, and choosing what notifications you receive. You can do it all from the Settings or System Preferences app on your device.
What Is Game Center?
Game Center is a social gaming service included in macOS and iOS that allows you to play games with people all over the world. You can find people to play games with, post scores to the leaderboard, track your achievements, and challenge friends to multiplayer games.
Game Center is useful for games you play against other people, which is why it’s available on most of the best multiplayer mobile games. But you can also use Game Center with single-player games to save your scores so other people can try to beat them.
How to Get Game Center on Your iPhone or Mac
Game Center was once available as a standalone app on iPhone and Mac, but Apple discontinued it in 2017. It might look like the Game Center app is missing, but these days it’s actually built into iOS and macOS.
Thus, you don’t need to download a separate app to get Game Center on your device. You can access your Game Center friends, change your nickname, and edit your account details through Settings or System Preferences on your device.
Without a dedicated Game Center app, the only way to view leaderboards or invite friends to play a game is using in-app settings. If your app supports Game Center, look around inside the game to find the Leaderboard or Achievements page.
To check if an app supports Game Center, find it in the App Store and scroll down to the Supports section. If you’ve already downloaded the app, launch it on your device and look for a Game Center notification that appears at the top of the screen as it logs in.
How to Sign Into Game Center
You can manage Game Center from Settings on your iPhone or System Preferences on your Mac. But first, you need to sign in using your Apple ID account.
If you choose to sync content between devices using iCloud, Game Center syncs your scores, saved games, and friends list to all other devices using the same Apple ID.
Sign In on an iPhone, iPad, or iPod touch
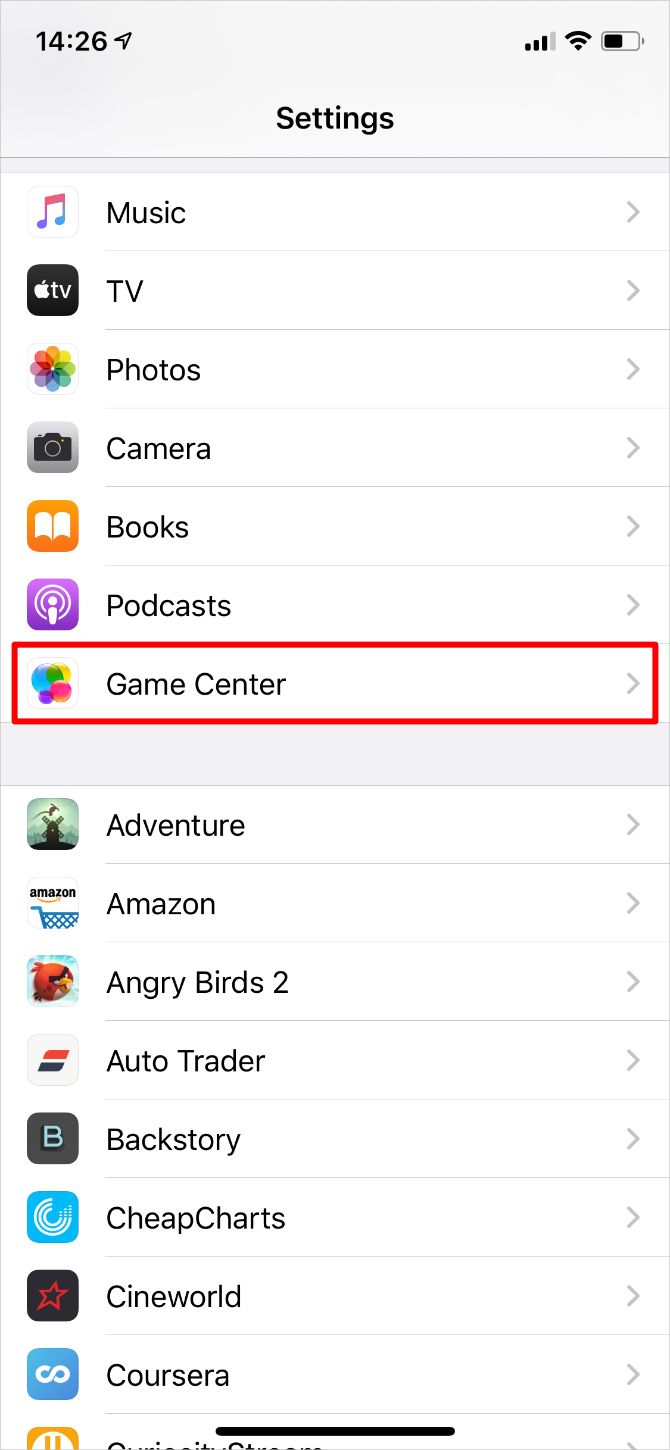
Open the Settings app and scroll down to the Game Center option. Turn on Game Center, then sign in using your Apple ID details.
Sign In on a Mac
Open System Preferences and click Internet Accounts. If you don’t see a Game Center option in the sidebar, click the Add (+) button and choose to Add Other Account. Then select Game Center account and sign in to your Apple ID account.
After signing in, select your Game Center account from the sidebar.
How to Change Your Name in Game Center
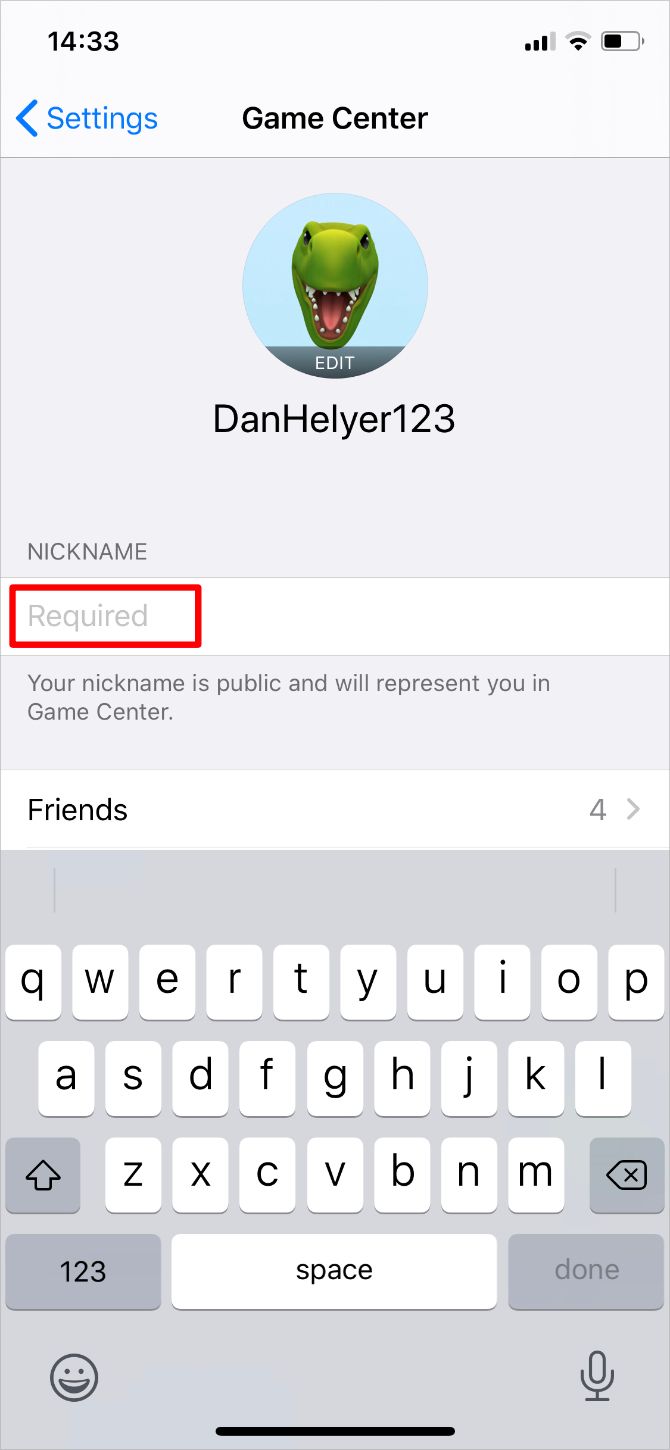
Your Game Center Nickname is the public username that other people see when they play games with you. Game Center won’t let you use the same name as anybody else, so make sure it’s unique.
You can also create an avatar or profile picture using your Nickname initials or an Animoji. However, it’s only possible to create this using an iPhone, iPad, or iPod touch.
Change Your Name and Picture on an iPhone, iPad, or iPod touch
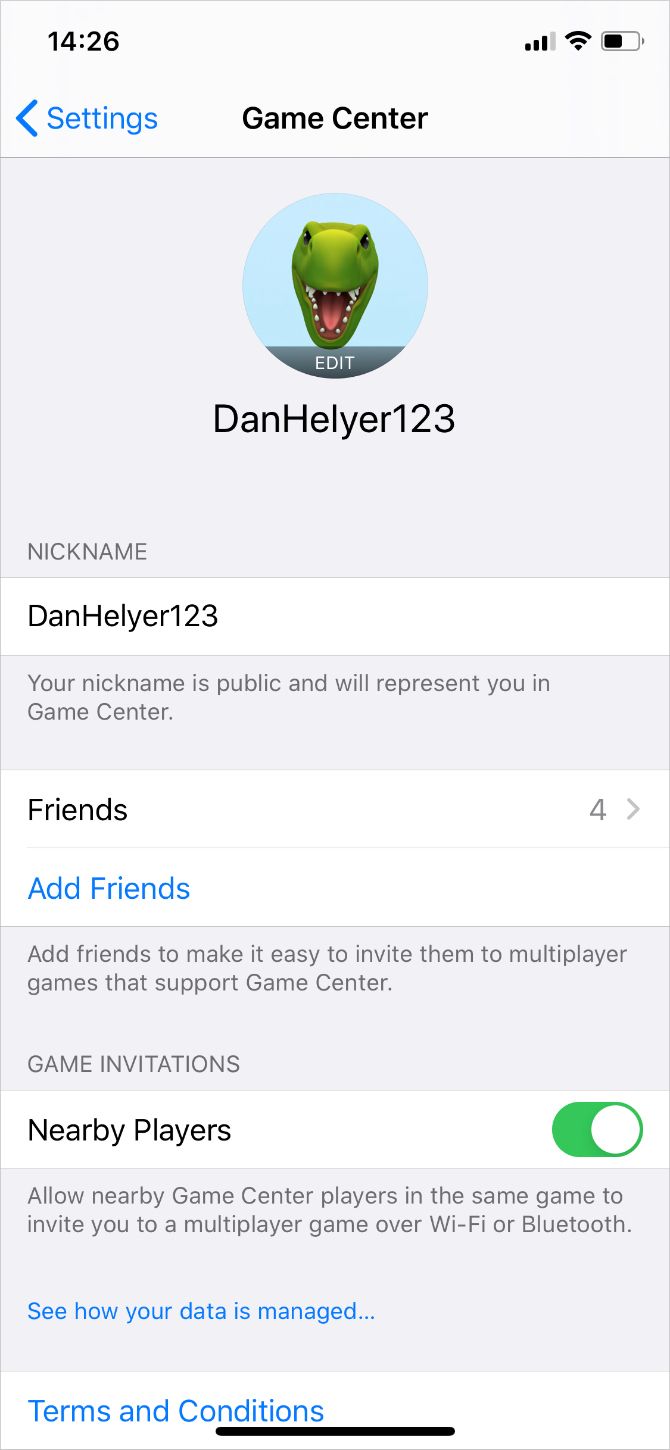
From the Game Center settings, tap in the Nickname field to type out a new name. It can be anything you like, as long as no one else is already using that name.
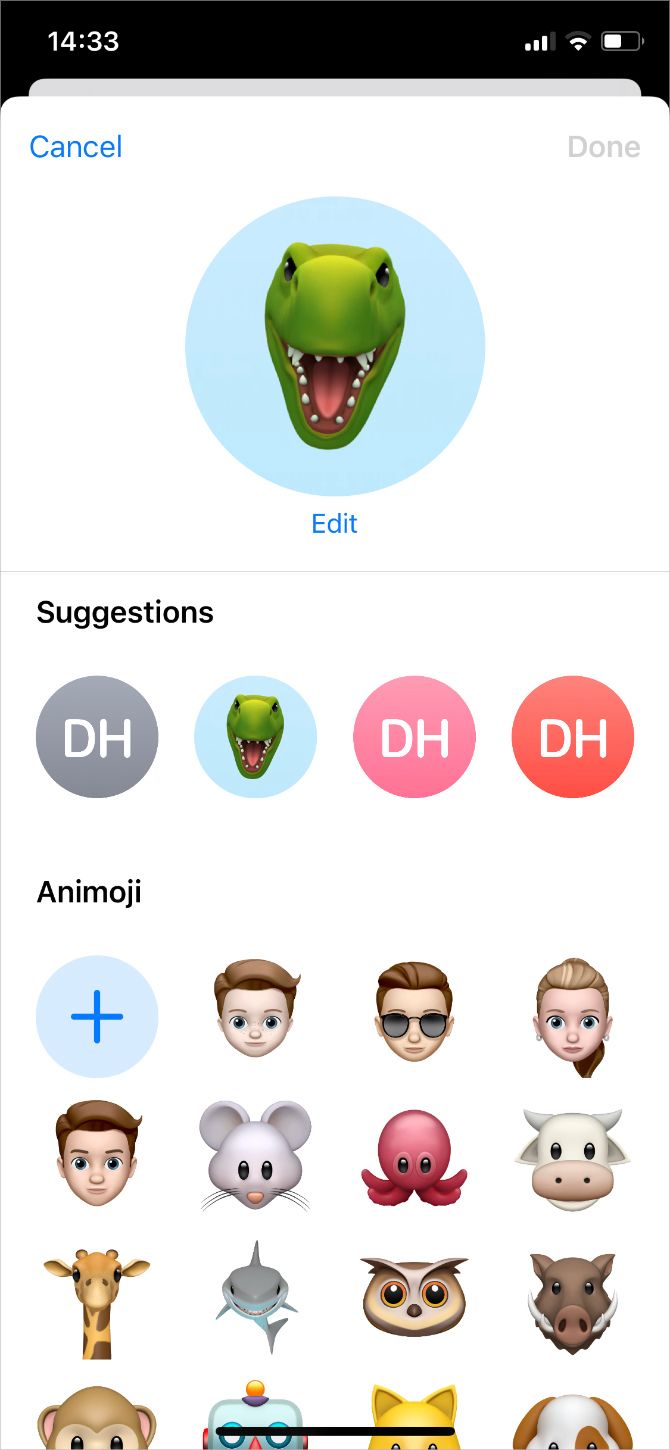
Tap the Edit button above your Nickname at the top of the screen to change your profile picture. You can choose to use the initials from your Nickname or pick an Animoji. If your iPhone has a Face ID sensor, you can even strike a pose for the Animoji to mimic.
Change Your Name and Picture on a Mac
Select your Game Center account from System Preferences > Internet Accounts, then click Details next to your Nickname in the top-right corner. Type out a new Nickname and click OK.
You can’t create a new profile picture, but you can delete your existing one. To do so, hover the cursor over it and click Delete.
How to Add and Manage Friends in Game Center
Game Center keeps track of all your friends, along with the 25 people you most recently played games with. When you play the same game as one of your friends, you can view their scores in the Leaderboard or invite them to play multiplayer games.
To add friends in Game Center, you need to send a link to them using Messages. This means you can only add people in Game Center when you know the email address or phone number they use with Messages.
Add Friends on an iPhone, iPad, or iPod touch
Tap the Friends option from the Game Center settings to view all your friends, along with people you’ve recently played with. Swipe left on a friend to delete them. Tap the Add Friends button to send a text message to someone with a link to add you as a friend.
You can also turn on the Nearby Players option in the Game Center settings to play with friends who are close by. This allows players using the same game to invite you to multiplayer matches over Wi-Fi or Bluetooth.
Manage Friends on a Mac
Select your Game Center account from System Preferences >Internet Accounts to view your friends. To delete a friend, select them and click the Remove button at the bottom of the window. Unfortunately, it’s not possible to add Game Center friends in macOS.
If you want to allow nearby people to invite you to multiplayer games, you need to click the Details button and enable the Allow Nearby Multiplayer option.
How to Manage Game Center Notifications
After signing into Game Center, you can manage your iPhone notifications to reduce the number of annoying alerts that mobile games send you. Or if you don’t want to miss anything, you might want to edit your preferences to make notifications more obvious.
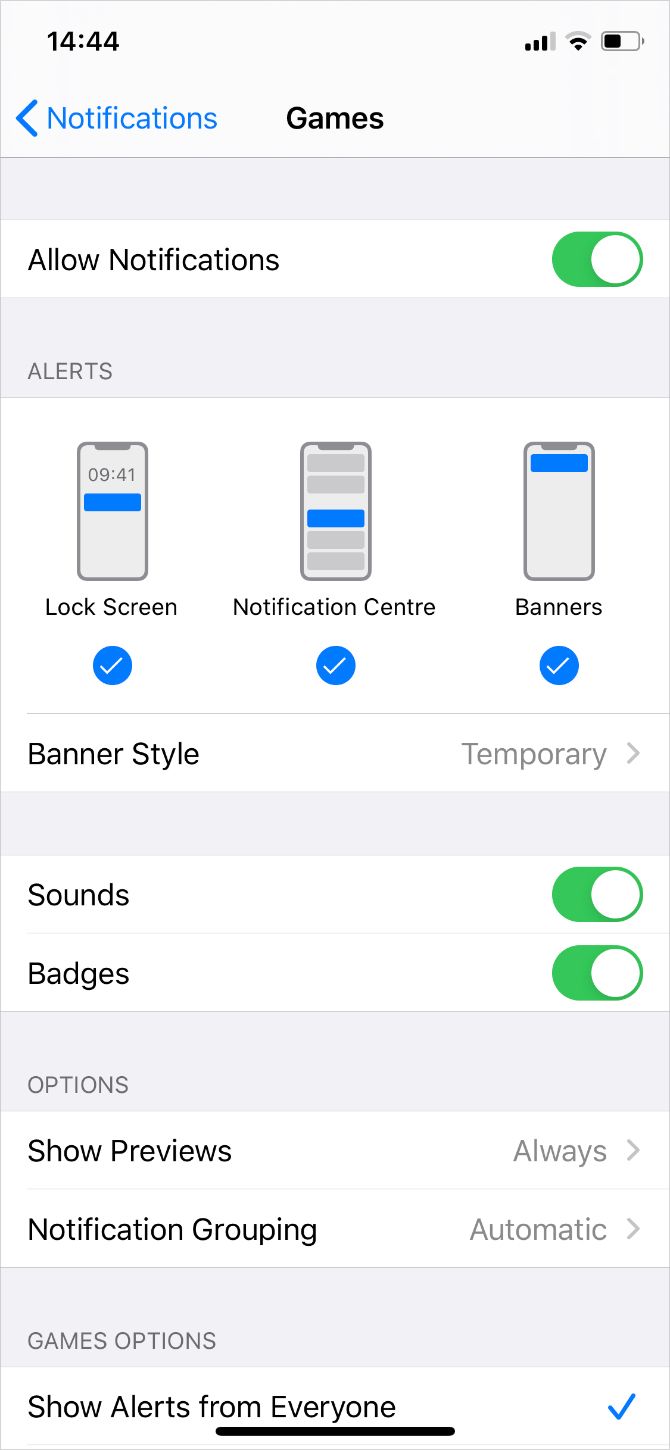
Manage Notifications on an iPhone, iPad, or iPod touch
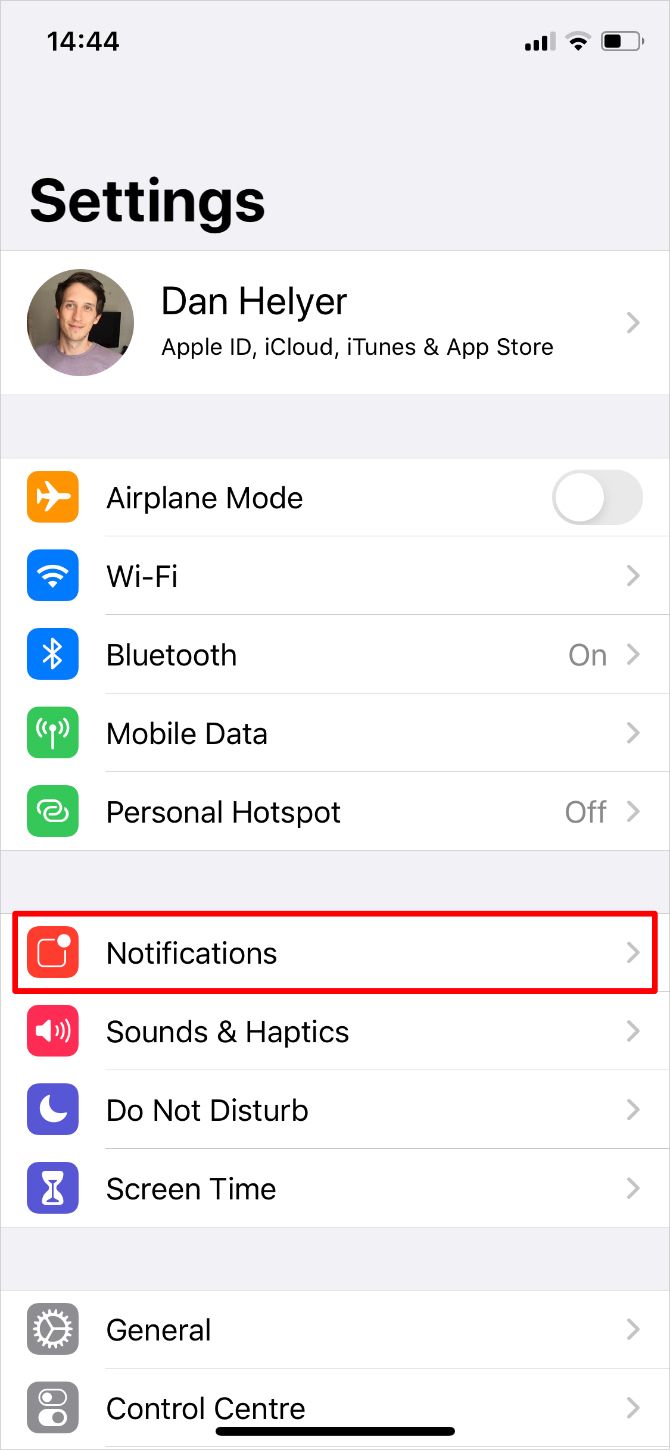
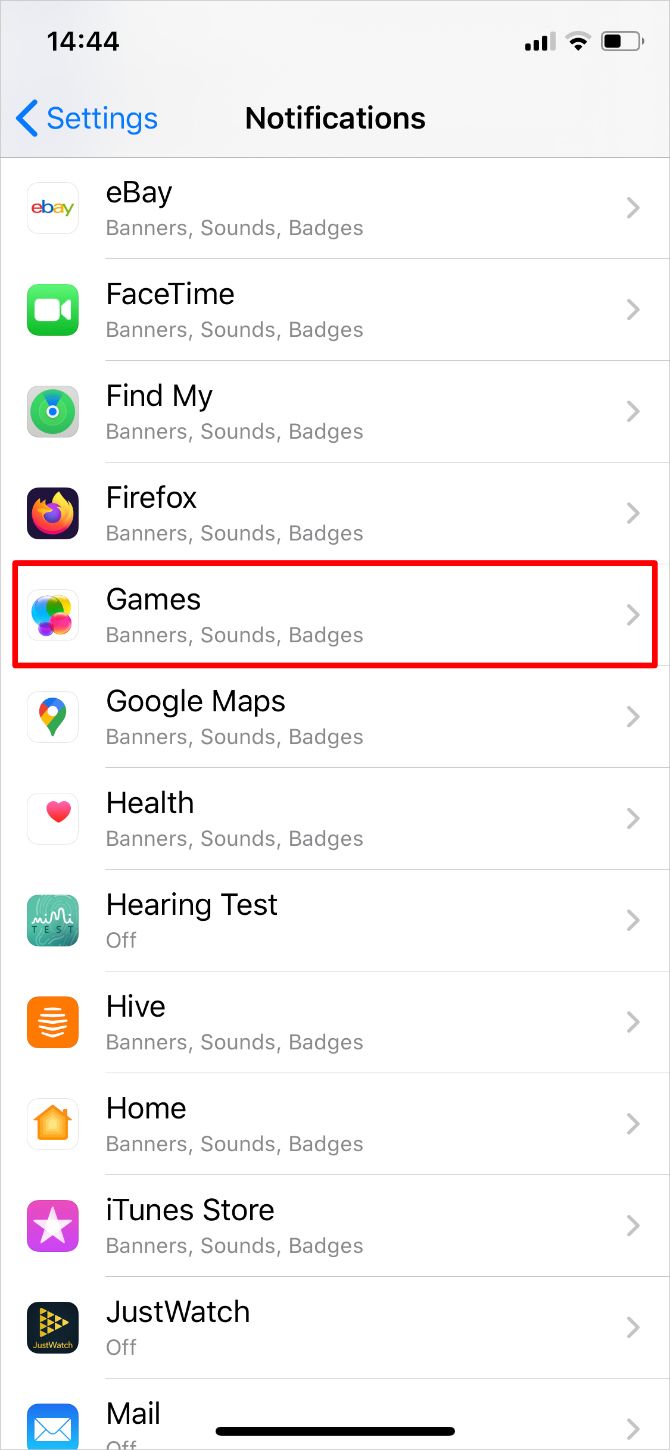
Go to Settings > Notifications and tap Games from the list of apps. Use the Allow Notifications toggle at the top of the screen to turn notifications on or off. Then adjust the Notification settings using the options below.
Manage Notifications on a Mac
Open System Preferences and click on Notifications. Select Games from the list of apps, then choose to Allow Notifications at the top of the window. You can edit the alert style and other details beneath this toggle.
How to Sign Out of Game Center
Game Center is built into the operating system on your iPhone or Mac, so you can’t delete or remove it. But if you don’t want to use Game Center on your device anymore, you can sign out and turn the feature off.
This doesn’t delete your Game Center account, so you can sign in again at any time to recover your saved games. Unfortunately, there’s no way to delete your Game Center account without deleting your Apple ID.
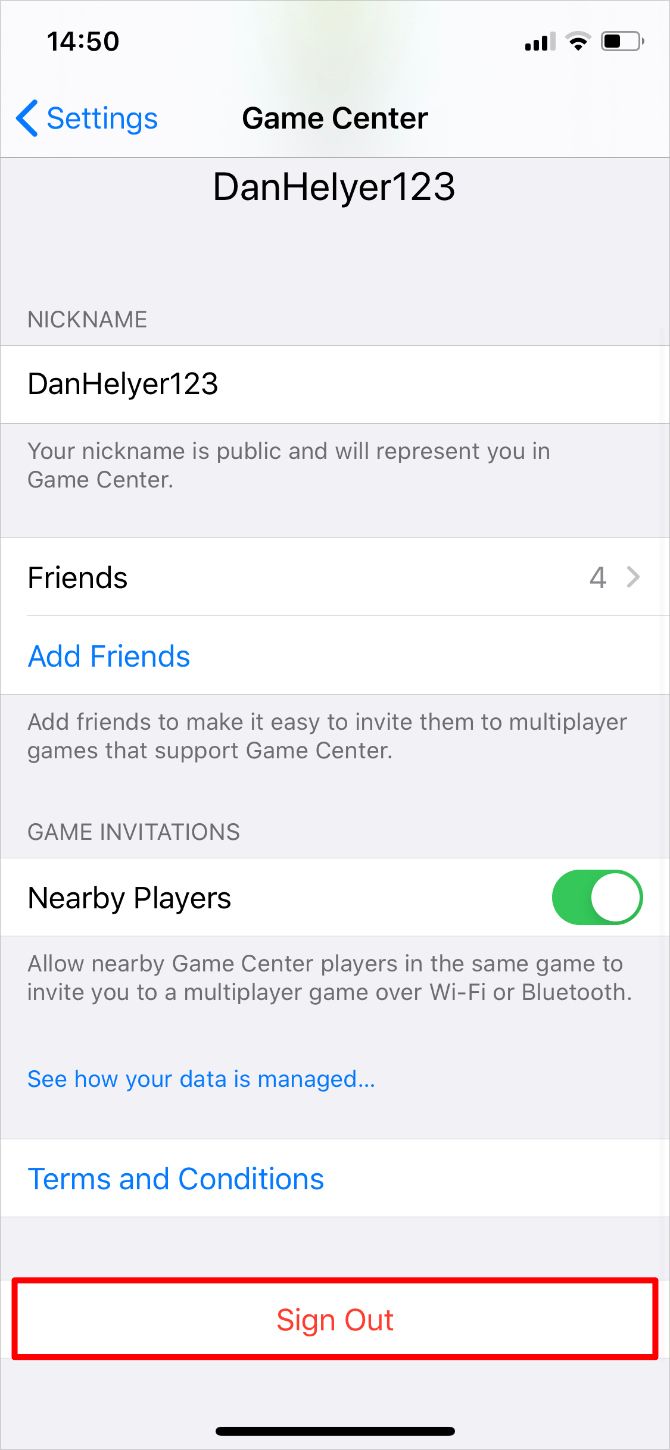
Sign Out on an iPhone, iPad, or iPod touch
Open the Game Center settings again, then scroll down and tap the Sign Out button. This automatically signs you out of Game Center and disables the feature.
Sign Out on a Mac
Select your Game Center account from System Preferences >Internet Accounts, then click the Minus (–) button to remove it. Click OK to confirm you want to delete the account from your Mac.
Take Advantage of Game Center With Apple Arcade
There’s no shortage of excellent games to play on your iPhone or Mac, most of which support Game Center. But for the best experience, you should sign up for a free trial of Apple Arcade and enjoy a selection of premium games designed specifically for Apple devices.
Every game on Apple Arcade works across iPhone, Mac, and Apple TV devices. And all of them sync with your Game Center account. Check out how to get started with Apple Arcade, and if you aren’t sure what game to play first, we’ve broken down the best games to play on Apple Arcade.