Our verdict of the Razer Wolverine Ultimate:
The Razer Wolverine Ultimate is a solid wired controller for Xbox One and PC, but it has some problems. It falls just short of the Elite controller is almost every aspect.
25 September 2018
The 7 Best Video Editors for Creating Social Media Posts

There’s no shortage of great video editors for Windows and free video editors for Mac. It doesn’t matter whether you’re a beginner or an expert, you’ll find something that meets your requirements.
But what about making videos specifically for social media? The features you will need from your video editor are considerably different from those you might want if you’re making a YouTube video.
So, which are the video editors that specialize in making fun videos for Facebook, Twitter, Instagram, and the rest?
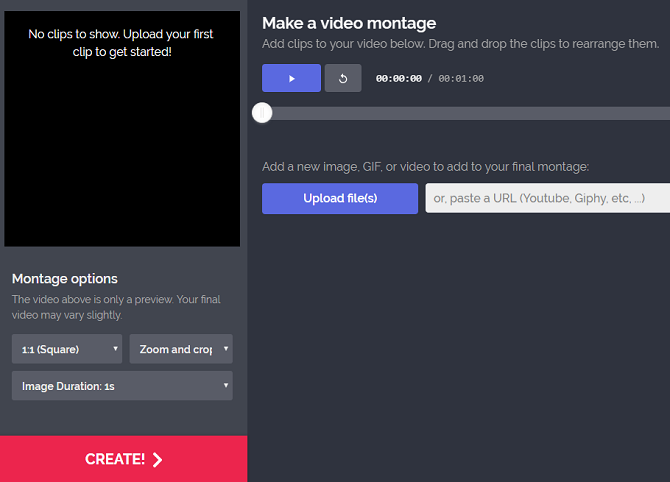
1. Kapwing
If you’re making personal social media videos (rather than trying to create a viral marketing campaign for a brand), the types of content that your family and friends will love are well tested.
Collages, memes, silly stickers, GIFs, and slideshows all work well, depending on what exactly you’re trying to convey.
Kapwing caters to people who want to make those types of videos with its splendid range of free tools. You’ll find a meme maker, montage maker, slideshow maker, and more. You can even add text captions to your videos, reverse your video, and convert your video into a more social media-friendly file type.
The app also provides other useful tools that’ll let you add a dash of professionalism to your creations. They include ways to crop and trim your video, add enhancements, and adjust the speed.
2. Wave
Kapwing offers tools to make the type of videos that are popular on social media, but Wave’s editor includes features that are social media-specific.
The app lets you customize videos for viewing on desktop and mobile and has a tool that allows you to pick the correct ratio for the network you’re planning to upload it on. There are 30 ratios to choose from.
Other features include a library of 300,000 royalty-free music tracks and 200 million stock videos, customizable fonts, support for watermarks, and several templates.
3. Horizon
Most of us record videos on our phone in the portrait orientation. However, in the world of video editing, that’s a serious faux pas. Portrait videos miss a lot of the action, waste a lot of space, and are awkward on the eye.
Horizon solves the problem by recording videos in landscape, even when you’re holding your phone upright.
And for people who want to post a lot of live action content to their networks, there’s even better news. By using your phone’s gyroscope, Horizon will automatically adjust your video so it’s always parallel to the ground.
When it comes to editing, Horizon offers 60 and 120 FPS slow motion support, eight filters, three video-leveling options, and a way to reduce your resolution to make the file smaller for uploading.
Download: Horizon for Android | iOS
4. Foodie
Another type of video that’s hugely popular on social media is footage of your food. Don’t ask us why, it just is.
If you’re the type of person who likes to record a video of your latest kitchen creation (or kitchen nightmare), then you should install Foodie on your smartphone.
Foodie has features that’ll appeal to both photographers and videographers. There are 30 filters, each of which is designed for a specific type of food. It also offers seasonal theming and a suite of tools that specifically created with top-down videos in mind.
Download: Foodie for Android | iOS
5. Cidade Video Editor

The four apps we’ve looked at so far all focus on creating high-quality output. Yes, they are all social media-specific in some way, but they’re still aimed at serious users.
So, what about the other end of the scale? Where should you turn if you just want to quickly create something that’s silly and fun? Well, if you’re a Windows user, we recommend Cidade’s Video Editor.
The app offers a vast repository of stickers, bubbles, and other animations that you can add to your video. You’ll even find some animated emoticons. You can also add text, easily adjust how long visuals are on-screen for, and make use of the app’s various effects.
But don’t worry. Despite the app’s light-hearted nature, you’ll still find a storyboard-based video editor and the usual suite of editing tools.
Download: Cidade Video Editor for Windows
6. Lapse It
Spend a few minutes browsing the various social networks, and it won’t be long until you stumble across a timelapse video.
Timelapse videos are quite easy to make on a desktop computer. You can even convert a standard video into a timelapse video without too much trouble. However, on mobile, your options are limited.
Lapse It is probably the best solution. If you like recording sunsets, nightscapes, blooming flowers, and other long-term events, you should give it a try.
The app’s rendering engine can create 1080p videos, you can edit current videos to turn them into the slow motion or timelapse format, and the timelapse editing tool lets you set the precise speed of the video (up to 240x).
Lapse It’s post-capture options include a huge number of filters and support for trimming videos, adding timestamps, converting into a square ratio (for Instagram), and reverse playback.
You can export your creations into the H264, MP4, MOV, and FLV formats.
Download: Lapse It for Android | iOS
7. Kizoa
Kizoa is a social media video editor that’s only available on the web and iOS.
The app boasts several features that make it ideal for creating fun videos for social media, including a library of freely available video intros and video outros, the ability to overlay music and audio, a collage maker, and a slideshow maker.
The mobile version of Kizoa is straightforward to use. You can perfect your videos using simple swipe gestures, while tasks such as adding text and enhancing colors are as simple as using a dropdown menu.
The app is ad-free, and you do not need to sign up to use it.
Download: Kizoa for iOS
Other Ways to Stand Out on Social Media
Of course, making interesting, funny, or quirky videos isn’t the only way to stand out on social media.
If you’d like to distinguish yourself from the crowd and grow your followers, check out our articles explaining how to gain followers on Instagram and why you might be losing Twitter followers.
Read the full article: The 7 Best Video Editors for Creating Social Media Posts
Read Full Article
The Horological Machine 9 puts a rocket on your wrist
If you’ve been keeping up with watchmaker MB&F you’ll be familiar with their Horological Machine series, watches that are similar in construction but wildly differ when it comes to design. This watch, the HM9, is called the Flow and hearkens back to roadsters, jets, and 1950s space ships.
[gallery ids="1719823,1719822,1719821"]The watch, limited to a run of 33 pieces, shows the time on a small forward-facing face in one of the cones. The other two cones contain dual balance wheels. The balance wheel is what causes the watch to tick and controls the energy released by the main spring. Interestingly, MB&F added two to this watch in an effort to ensure accuracy. “The twin balance wheels of the HM9 engine feed two sets of chronometric data to a central differential for an averaged reading,” they wrote. “The balances are individually impulsed and spatially separated to ensure that they beat at their own independent cadences of 2.5Hz (18,000bph) each. This is important to ensure a meaningful average, just as how a statistically robust mathematical average should be derived from discrete points of information.”
There are two versions called the Road and Air and they cost a mere $182,000 (tax not included.) Considering nearly every piece of this is made by hand – from the case to the curved crystal to the intricate movement – you’re essentially paying a team of craftsman a yearly wage just to build your watch.
While it’s no Apple Watch, the MB&F HM9 is a unique and weird little timepiece. While it’s obviously not for everyone, with enough cash and a little luck you can easily join a fairly exclusive club of HM9 owners.
Read Full Article
Google’s blanket ban of cryptocurrency ads ends next month
Google is rolling back its ban on cryptocurrency advertisements – following a similar move made by Facebook earlier this summer, CNBC reports. Google in March was among the first of the major platforms to announce it would no longer run ban cryptocurrency ads, due to an abundance of caution around an industry where there’s so much potential for consumer harm.
Facebook, Twitter, and even Snapchat had also banned cryptocurrency ads, for similar reasons.
But Facebook moved away from its blanket ban this June, when it said it would no longer ban all cryptocurrency ads, but would rather allow those from “pre-approved advertisers” instead. It excluded ads that promoted binary options and initial coin offerings (ICOs), however.
Google is now following suit with its own policy change, it appears.
Google’s policy still bans ICOs, wallets and trading advice, CNBC reports, citing Google’s updated policy page which points to a list of banned products.

But the October 2018 policy update says that “regulated cryptocurrency exchanges” will be allowed to advertise in the U.S. and Japan.
To do so, advertisers will have to be certified with Google for the specific country where their ads will run, a process that begins in October. The policy will apply to all accounts that advertise these types of financial products, Google says.

Banning cryptocurrency ads on the part of the major platforms was a good step in terms of consumer protection, due to the amount of fraud and spam in the industry. According to the FTC, consumers lost $532 million to cryptocurrency-related scams in the first two months of 2018. An agency official also warned that consumers could lose more than $3 billion by the end of the year, because of these problems.
But for ad-dependent platforms like Facebook and Google, there’s so much money to be made here. It’s clear they wanted to find a way to let some of these advertisers back in. Google parent Alphabet makes around 86% of its total revenue from ads, CNBC noted, and booked over $54 billion in ad revenue in the first half of the year.
Google has not yet responded to a request for comment.
Read Full Article
How to Check the Health of Your Windows 10 PC (And Keep It in Shape)

Just like you look after your own well-being, it’s important to take care of your Windows 10 computer. The best way to determine your computer’s health is by running different reports, such as the ones generated by Windows Defender and Performance Monitor.
Here’s how you can use these reports to know how your hardware is performing, along with some tips and resolutions for specific issues that may need fixing. Have additional advice of your own? Share it with us in the comments!
How to Check PC Health Using Windows Defender
If you want a quick, user-friendly overview of your system health, Windows Defender can provide it. To launch the program, do a system search for Windows Defender Security Center and click the relevant result.
Once opened, click Device performance & health from the options. The Health report section is split into different areas, flagging any issues and what the resolution is. Windows Defender scans periodically in the background, as shown by the Last scan date, so there’s no need to manually run this.
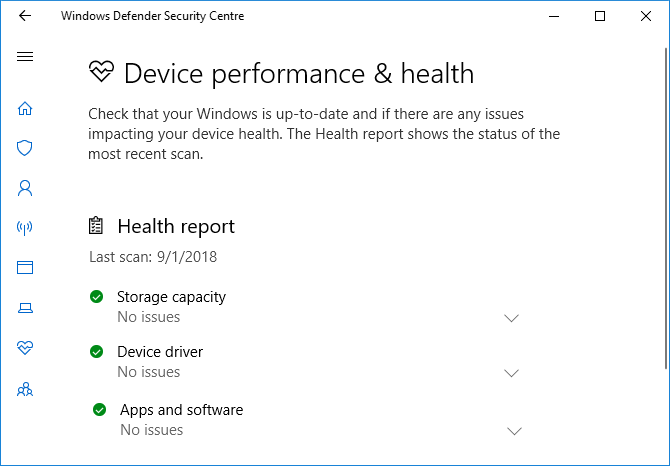
Windows Update lets you know if your operating system is up to date, which it usually will be thanks to automatic updates. If it isn’t, you’ll be alerted to specific issues that might be causing it.
Storage capacity checks if your system has enough space to update Windows, and how to clear it out if not.
Device driver analyses your drivers to see if they’re performing correctly and if there are any recommended updates.
Battery life analyses your brightness level and sleep settings and will recommend action to enhance battery life.
How to Check PC Health Using Performance Monitor
The Performance Monitor utility comes with Windows 10 and is a great way to view system performance and find out how to resolve issues.
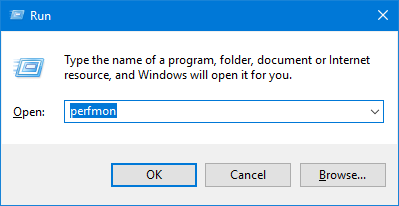
To get started, press Windows key + R to open Run, input perfmon, and Performance Monitor will open.
The reports are split into Diagnostics and Performance. First ,you’ll need to generate these. To do so, from the left-hand pane, expand Data Collector Sets > System and in turn, double click both System Diagnostics and System Performance.
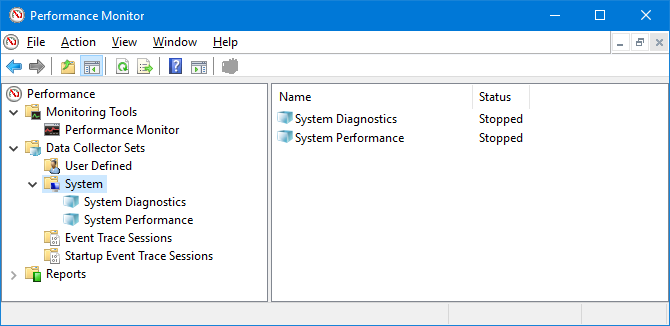
Each report will take around a minute to complete. Once ready, find them in the left-hand pane by expanding System and both System Diagnostics and System Performance. The report names contain the date they were generated.
Perhaps the most useful report is System Diagnostics. This has a Basic System Checks table, which combines the reports on areas like your disk and hardware, and says whether your system passed or failed.
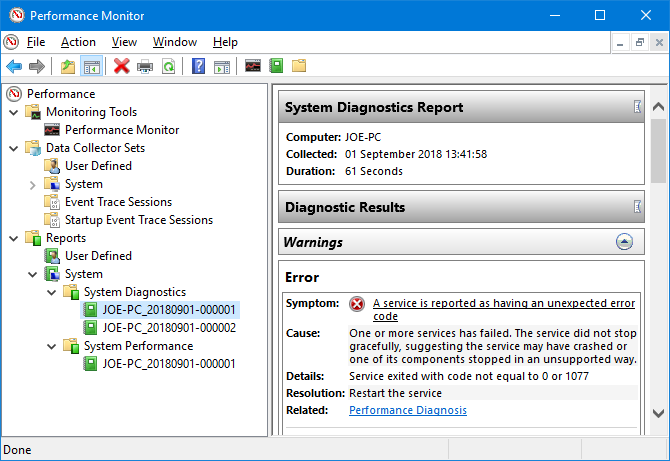
If any have failed, look for the Error table which will detail the symptom, cause, detail, and most importantly how to resolve it.
The System Performance report displays similar information, but is more focused on showing how efficiently your hardware is running. Here you can check how much of your CPU is being used, the disk read/write speeds, network port connections, and more.
For some advanced tips on using the other features of this utility, check out our guide on using Performance Monitor like a power user.
How to Check PC Health With a Sleep Study
If your system supports the Sleep state, you can run a report to assess your battery’s health and understand how it is being used. This is helpful to identify apps or devices that are using lots of power, perhaps unnecessarily. It can also be useful to know how many cycles your battery has been through, which means how many times the battery has gone from dead to a full charge.
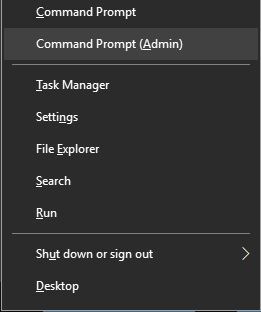
To begin, you need to open an elevated Command Prompt. Press Windows key + X and click Command Prompt (Admin).
The Sleep Study doesn’t exist as an accessible utility on your computer, so we can use a command to generate an HTML file of the report. To do so, input this into Command Prompt:
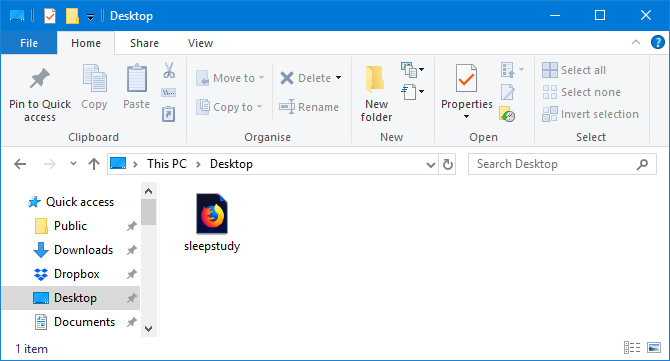
powercfg /SleepStudy /output %USERPROFILE%\Desktop\sleepstudy.html
This will output a file to your Desktop called sleepstudy.html. Feel free to adjust the command to a different file path or file name.
By default, the Sleep Study will cover the last three days. To specify the number of days, input the following command, switching DAYS for a figure up to 28:
powercfg /SleepStudy /output %USERPROFILE%\Desktop\sleepstudy.html /Duration DAYS
Navigate to your Desktop and open the file to view your Sleep Report in your web browser.
The report gives you information about your machine and battery, a battery drain chart, and details on each standby session. You can see how long each session lasted, the energy consumed, and how much time was spent in a low power state.
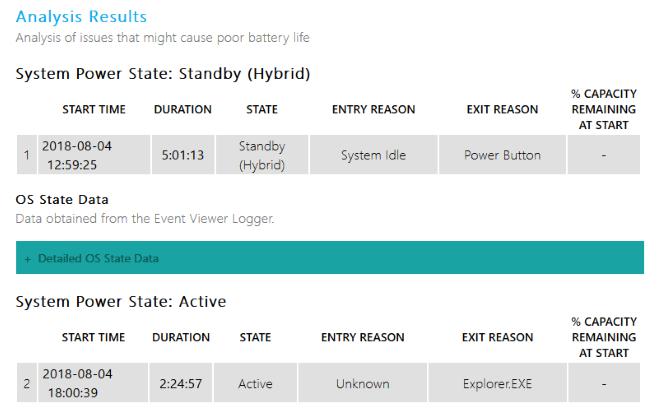
The session details of the report will list the top five offenders for battery drain, but interpret this carefully. High usage is not necessarily a problem because it depends on what you were doing in that session. For example, if you install Windows updates, play music, or have Bluetooth devices connected, this will all require ample battery.
How to Check Your Wireless Network’s Health
You can generate a Wireless Network Report on Windows 10 to see the wireless connection history for your system from the last three days. This is a good way to find out how your connection is being used and where problems might be arising from.
Press Windows key + X and click Command Prompt (Admin).
Input the following into Command Prompt:
netsh wlan show wlanreport
This will output an HTML file. To view it, press Windows key + R to open Run, input the following and click OK:
%ProgramData%\Microsoft\Windows\WlanReport\wlan-report-latest.html
This will open the report in your web browser.
The chart at the top gives a summary of the connection sessions available in the report. You can click a letter to jump to that specific section. The most pertinent ones are those in red, which indicate an error.
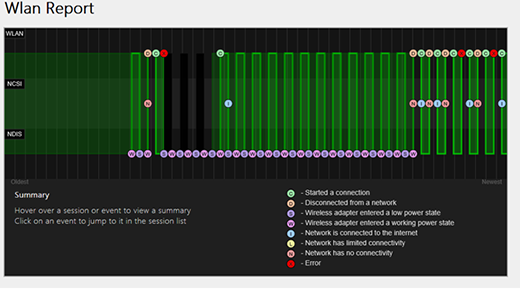
Also, look at the Disconnect Reasons table to understand why your network dropped out. It might be because you disconnected it, which is fine, but other problems can be listed here like if the driver failed or the network was unavailable.
For full details on what each section of the report represent, read Microsoft’s support article for analyzing the wireless network report.
How to Diagnose Other Windows 10 Issues
You don’t need to run these health reports all the time. If you encounter consistent errors or notice your computer slowing down, it might be because your hardware is failing, so it can be useful to run these reports to determine the problem. Remember, Windows Defender will actively notify you if there are general health problems.
Want more information on checking your computer’s health? Be sure to check out our recommendations for the top Windows diagnostics tools.
Image Credit: scanrail/Depositphotos
Read the full article: How to Check the Health of Your Windows 10 PC (And Keep It in Shape)
Read Full Article
Tinder in India launches ‘My Move,’ a Bumble-like feature where women chat first
Tinder in India is now rolling out a new feature that allows women to make the first move. The setting, called “My Move,” is similar to the core feature in rival dating app Bumble, which is currently enmeshed in multiple lawsuits with Tinder parent Match Group. Match sued Bumble for patent violations following failed acquisition attempts that would have made Bumble another Match Group brand along with Tinder, Plenty of Fish, OKCupid, Match.com, and others.
In February this year, Tinder confirmed it would later begin to test a new option that would allow women to choose when to start a conversation, but said this would not the default setting, as it is in Bumble. Instead, Tinder would allow women to decide whether or not they wanted this feature toggled on, it explained then.
The company hadn’t yet rolled out the option at the time, but said it would come in a future update as a test, ahead of a public debut.
According a report from Reuters out this morning, which TechCrunch has also confirmed, Tinder has been quietly testing “My Move” in India for several months, and intends to roll out it out worldwide if all goes well.
The company says it’s formally announcing the feature’s arrival in India today. It’s first available to users in India on iOS, Tinder tells us.
To use the feature, women go into the app’s settings to enable it with a toggle switch. Once turned on, only they can start a conversation with their matches. Previously, anyone could start the chat after a match.
“At Tinder, we are constantly evolving our platform to help create a low-pressure environment where our users feel in charge of the connections they make,” said Tinder India GM, Taru Kapoor, in a statement provided by Tinder. “By giving our female users the ability to exclusively send the first message if and when they want to, My Move provides women the autonomy to choose how to engage with their matches and empowers them to control their experiences. We believe that true choice is letting women be who they are and empowering their choice to shape their own identity and experiences,” Kapoor added.
Tinder also notes that in India, conversations about dating are still “relatively nascent” but ideals are evolving quickly.
“Women, in particular, are seeking out ways to take charge of their romantic and social experiences – a phenomenon we see both across India’s cities and towns,” Kapoor said.
Bumble has grown to prominence by branding itself as a more female-friendly dating app, but the “women go first” feature has always felt a little bit of a gimmick.
What women tend to care about more is not who starts the chat, but how pleasant or awful that chat then becomes. In terms of dealing with straight up harassment, Bumble tends to take a public stance on banning online jerks – even going so far as to publicly shame and ban those who send nasty messages. (That is, if you believe that “Connor” was a real dude and not, say, a clever marketing stunt, which seems more likely.)
These moves – even if artificially crafted – help to set Bumble’s tone. Meanwhile, Tinder still has to deal with its “hookup app” reputation of days past. And present, if we’re being honest. Tinder is still the go-to place for on-demand sex, as HBO’s new Tinder-shaming dating app documentary Swiped points out.
In other words, Tinder simply adding in a Bumble-like feature alone won’t be that much of a threat to its rival, as the latter has positioned itself over the years to attract a different type of user. But it does go to show the extent of the bad blood between these two rivals, as Match Group has effectively taken the position that if it can’t have Bumble for itself, it will directly copy it.
Read Full Article
New tech uses Wi-Fi to count people through walls
Whether you’re trying to figure out how many students are attending your lectures or how many evil aliens have taken your Space Force brethren hostage, Wi-Fi can now be used to count them all.
The system, created by researchers at UC Santa Barbara, uses a single Wi-Fi router outside of the room to measure attenuation and signal drops. From the release:
The transmitter sends a wireless signal whose received signal strength (RSSI) is measured by the receiver. Using only such received signal power measurements, the receiver estimates how many people are inside the room — an estimate that closely matches the actual number. It is noteworthy that the researchers do not do any prior measurements or calibration in the area of interest; their approach has only a very short calibration phase that need not be done in the same area.
This means that you could simply walk up to a wall and press a button to count, with a high degree of accuracy, how many people are walking around. The system can measure up to 20 people in its current form.
The system uses a mathematical model to “see” people in the room based on signal strength and attenuation. The system uses off-the-shelf components and they’ve tested it in multiple locations and found that their total accuracy is two people or less with only one Wi-Fi device nearby.
Bodies and objects essentially absorb Wi-Fi as they move around in rooms, allowing the system to find discrete things in the space. Sadly it can’t yet map their position in the room, a feature that could be even more helpful in the future.
Read Full Article
Twitter says it will now ask everyone for feedback about its policy changes, starting today
Twitter says it’s going to change the way it creates rules regarding the use of its service to also now include community feedback. Previously, the company followed its own policy development process, including taking input from its Trust and Safety Council and various experts. Now, it says it’s going to try something new: it’s going to ask its users.
According to announcement published this morning, Twitter says it will ask everyone for feedback on a new policy before it becomes a part of Twitter’s official Rules.
It’s kicking off this change by asking for feedback on its new policy around dehumanizing language on Twitter, it says.
Over the past three months, Twitter has been working to create a policy that addresses language that “makes someone feel less than human” – something that can have real-world repercussions, including “normalizing serious violence,” the company explains.
To some extent, dehumanizing language is covered under Twitter’s existing hateful conduct policy, which addresses hate speech that includes the promotion of violence, or direct attacks or threats against people based on factors like their race, ethnicity, national origin, sexual orientation, gender, gender identity, religious affiliation, age, disability, or serious disease.
However, there are still ways to be abusive on Twitter outside of those guidelines, and dehumanizing language is one of them.
The new policy is meant to expand the hateful conduct policy to also prohibit language that dehumanizes others based on ” their membership in an identifiable group, even when the material does not include a direct target,” says Twitter.
The company isn’t soliciting user feedback over email or Twitter, however.
Instead, it has launched a survey.
Available until October 9 at 6:00 AM PT, the survey asks only a few questions after presenting the new policy’s language for you to read through.
For example, it asks users to rate the clarity of the policy itself on a scale of one to five. It then gives you 280 characters max – just like on Twitter – to suggest how the policy could be improved. Similarly, you have 280 characters to offer examples of speech that contribute to a healthy conversation, but may violate this policy – Twitter’s attempt at finding any loopholes or exceptions.
And it gives you another 280 characters to offer additional feedback or thoughts.
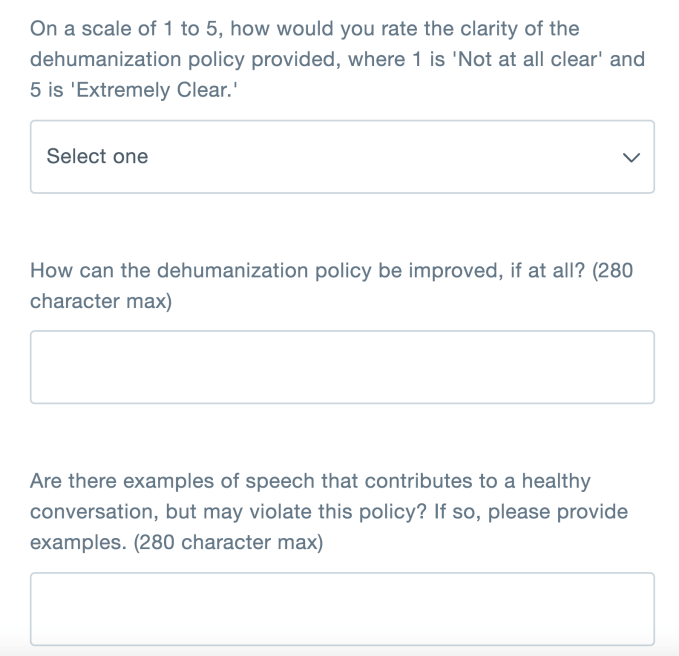
You also have to provide your age, gender, (optionally) your username, and say if you’re willing to receive an email follow-up if Twitter has more questions about your responses.
Twitter doesn’t say how much community feedback will guide its decision-making, though. It simply says that after the feedback, it will then continue with its regular process, which passes the policy through a cross-functional working group, including members of its policy development, user research, engineering, and enforcement teams.
The idea to involve the community in policy-making is a notable change, and one that could make people feel more involved with the definition of the rules, and therefore – perhaps! – more likely to respect them.
But Twitter’s issues around abuse and hate speech on its network don’t really stem from poor policies – its policies actually spell things out fairly well, in many cases, about what should be allowed and what should not.
Twitter’s problems tend to stem from lax enforcement. The company has far too often declined to penalize or ban users whose content is clearly hateful in its nature, in an effort to remain an open platform for “all voices” – including those with extreme ideologies. Case in point: it was effectively the last of the large social platforms to ban the abusive content posted by Alex Jones and his website Infowars.
Users also regularly complain that they have been subject to tweets that violate Twitter guidelines and rules, but no action is taken.
It’s interesting, at times, to consider how differently Twitter could have evolved if community moderation – similar to the moderation on Reddit or even the moderation that takes place on open source Twitter clone Mastodon – had been a part of Twitter’s service from day one. Or how things would look if marginalized groups and those who are often victims of harassment and hate speech had been involved directly with building the platform in the early days. Would Twitter be a different place?
But that’s not where we are.
The new dehumanization policy Twitter is asking about is below:
Twitter’s Dehumanization Policy
You may not dehumanize anyone based on membership in an identifiable group, as this speech can lead to offline harm.
Definitions:
Dehumanization: Language that treats others as less than human. Dehumanization can occur when others are denied of human qualities (animalistic dehumanization) or when others are denied of human nature (mechanistic dehumanization). Examples can include comparing groups to animals and viruses (animalistic), or reducing groups to their genitalia (mechanistic).
Identifiable group: Any group of people that can be distinguished by their shared characteristics such as their race, ethnicity, national origin, sexual orientation, gender, gender identity, religious affiliation, age, disability, serious disease, occupation, political beliefs, location, or social practices.
Read Full Article
Snapchat’s users are surprisingly old and it’s telling them to vote
Snapchat is a college favorite more than high school phenomenon. Only 20 percent of Snapchat’s US users are under 18, down from 22 percent in 2016 as some of its early adopters have now aged up and headed to college. Appealing to older users was a big motive for its otherwise-disastrous redesign that do a better job of labeling navigation buttons to stop confusing adults.
Now Snapchat is fully embracing the responsibility of getting the vote out to its core of 18 to 24 year olds which sadly saw low voter turnout of just 17.1% in the 2014 midterms. As part of Voter Registration Day today, it’s partnering with non-profit TurboVote to put links to register across its app in both English and Spanish.
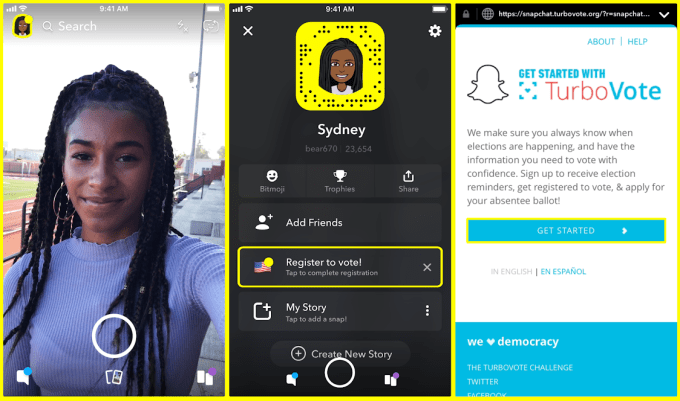
 Today, all 18+ US users will see a TurboVote link to register in the profile portion of their Snapchat app. That spot is a little buried compared to the camera and messages/Stories tabs, so Team Snapchat is also sending them all a video message full of people noting common activities like “opening your locker” that take longer than voting which lets them swipe up to register.
Meanwhile, publishers including Washington Post, NowThis, Mic, Vice, Refinery29, Mitu, Cheddar, and Good Luck America will put swipe-up-to-register options in their relevant election coverage. Snapchat’s own news team of curators will be compiling Our Stories about election issues and voting, and like last year, Snapchat will offer themed creative tools including an “I’m Registered To Vote” filter. They all offer the swipe-up registration option that can be completed inside Snapchat’s app.
With 100 million monthly and 80 million daily users in the US and Canada, Snap has the potential to get more of the youngest voters to the polls. A Harvard University’s Institute of Politics Youth Poll is optimistic, finding that 37% of Americans under 30 say they’ll ‘definitely be voting’ versus 23% who said so in 2014. This demographic sees “corruption” as a defining characteristic of the US government and could seek to further disrupt the political establishment.
TurboVote has become the defacto partner in this industry-wide initiative, as it also powers registration signups through Facebook and Instagram. While those competitors put a bigger notice atop their apps, they’re then mostly running ads to promote voter registration wheras Snapchat is integrating the initiative organically across its product.
After a year of tech companies trying to defend against foreign interference in elections, they all seem comfortable getting involved in voter registration drives. The question is whether these will become talking points at some future congressional hearing about how they skewed elections by driving voting disproportionately amongst younger citizens. Getting more people involved in democracy clearly seems positive on its face, but politicians looking for issues to drum up with have made a whipping boy out of the social networks.
Read Full Article
LinkedIn steps into business intelligence with the launch of Talent Insights
LinkedIn may be best known as a place where people and organizations keep public pages of their professional profiles, using that as a starting point for networking, recruitment and more — a service that today that has racked up more than 575 million users, 20 million companies and 15 million active job listings. But now under the ownership of Microsoft, the company has increasingly started to build a number of other services; today sees the latest of these, the launch of a new feature called Talent Insights.
Talent Insights is significant in part because it is LinkedIn’s first foray into business intelligence, that branch of enterprise analytics aimed at helping execs and other corporate end users make more informed business decisions.
Talent Insights is also notable because it’s part of a trend, where LinkedIn has been launching a number of other services that take it beyond being a straight social network, and more of an IT productivity tool. They have included a way for users to look at and plan commutes to potential jobs (or other businesses); several integrations with Microsoft software including resume building in Word and Outlook integrations; and adding in more CRM tools to its Sales Navigator product.
Interestingly, it has been nearly a year between LinkedIn first announcing Talent Insights and actually launching it today. The company says part of the reason for the gap is because it has been tinkering with it to get the product right: it’s been testing it with a number of customers — there are now 100 using Talent Insights — with employees in departments like human resources, recruitment and marketing using it.
The product that’s launching today is largely similar to what the company previewed a year ago: there are two parts to it, one focused on people at a company, called “Talent Pool,” and another focused on data about a company, “Company Report.”
[gallery ids="1719596,1719598,1719600,1719601"]The first of these will let businesses run searches across the LinkedIn database to discover talent with characteristics similar to those what a business might already be hiring, and figure out where they are at the moment (in terms of location and company affiliation), and where they are moving, what skills they might have in common, and how to better spot those who might be on the way up based on all of this.
The second set of data tools (Company Report) provides a similar analytics profile but about your organisation and those that you would like to compare against it in areas like relative education levels and schools of the respective workforces; which skills employees have or don’t have; and so on.
Dan Francis, a senior product manager running Talent Insights, said in an interview that for now the majority of the data that’s being used to power Talent Insights is primarily coming from LinkedIn itself, although there are other data sources also added into it, such as material from the Bureau of Labor Statistics. (And indeed, even some of LinkedIn’s other data troves, for example in its recruitment listings, or even in its news/content play, the material that populates both comes from third parties.)
He also added that letting companies feed in their own data to use that in number crunching — either for their own reports or those of other companies — “is on our roadmap,” an indication that LinkedIn sees some mileage in this product.
Adding in more data sources could also help the company appear more impartial and accurate: although LinkedIn is huge and the biggest repository of information of its kind when it comes to professional profiles, it’s not always accurate and in some cases can be completely out of date or intentionally misleading.
(Related: LinkedIn has yet to launch any “verified”-style profiles for people, such as you get on Facebook or Twitter, to prove they are who they say they are, that they work where they claim to work, and that their backgrounds are what they claim them to be. My guess as to why that has not been rolled out is that it would be very hard, if not impossible, to verify everything in a clear way, and so LinkedIn relies on the power of public scrutiny to keep people mostly honest.)
“We’re pretty transparent about this,” said Francis. “We don’t position this as a product as comprehensive, but as a representative sample. Ensuring data quality is good is something that we are careful about. We know sometimes data is not perfect. In some cases it is directional.”
Read Full Article
Razer Wolverine Ultimate Review: Not Quite Elite

When it comes to video game peripherals, few names grab your attention quite like Razer. Whether you’re looking at mice, keyboards, headsets, or controllers, Razer makes them all and then some.
For Xbox One and PC gamers, Razer has the Wolverine Ultimate, which is its attempt to compete with Microsoft’s Elite controller. Both controllers come with hefty price tags–the Elite retails for $150 and the Wolverine Ultimate goes for an even more expensive $160. But does Razer justify its higher cost than the Elite? Is it the controller to own for your Xbox One? Let’s dig in and take a look, and at the end of this review, we’re giving one away to one lucky reader!
Razer Wolverine Specs and Features
Before I give you any of my opinions on the actual controller, let’s just run down the core specifications and features of the Ultimate so you can see where your hard-earned money is actually going.
- Wired controller
- 2 extra buttons & 4 triggers
- Razer Chroma colored lighting
- Trigger stops for short trigger throw
- Swappable D-Pad and joysticks
- Quick control panel for on-the-fly mode switching and mic control
- Rubber grip (comes already installed unlike the Wildcat)
- Switch-feel face buttons
- Razer Synapse app on Xbox One for customization
- 5mm audio port for standard headphones
- 10-foot USB cable
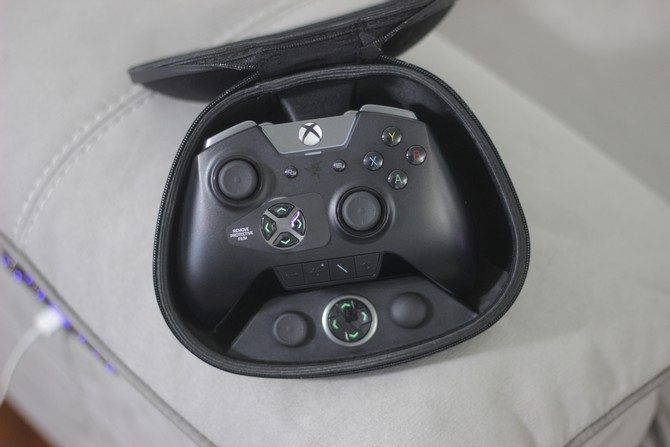
- Carrying case
Getting Started
You wouldn’t think we’d need to have a section dedicated to setting up a controller, but the Wolverine isn’t your run-of-the-mill controller. Its extra features and options means you’ll have to spend a few minutes getting things up and running (thankfully, the process isn’t as painful as Razer’s previous high-end controller which required manually sticking grips on).
To really take advantage of what this controller can do, you’ll want to download the Razer Synapse for Xbox One application. You’ll use this to customize the functionality of the additional buttons, adjust the 16.8 million color pallete featured within the Chroma settings, and tweak the controller functions. It’s a fairly robust application, and it’s where a lot of the customization for the device comes from.
In the box you’ll find the controller, extra buttons, carrying case, instructions, annoyingly-shaped USB cable (the shape prevents you from using most other cables you have kicking around) and all the other goodies you’ll need to get things up and running.
Extra Buttons and Features
When it comes to a controller like the Wolverine Ultimate, it’s all about the extra features and buttons. You’re spending money on a premium controller because you want extra performance, and Wolverine Ultimate is packed with extra stuff that you won’t find on a standard Xbox One controller (and even some you won’t find on the Elite).
For extra buttons, there are four on the back of the controller and two extra shoulder buttons on top, bringing the count up to six.

The extra buttons are all attached to the controller, so if you don’t like the way they feel, you’re stuck with them. The Wildcat offered rear triggers that could fold inside of the controller, and the Elite lets you remove them completely. This feels like a step backward, as the other thing that really makes these premium controllers stand out is customization.
There’s also switches that allow you to enable a shorter throw for the triggers, which is fantastic in shooters where the faster speed is optimal. It’s a standard feature on most of these sorts of devices, but it’s still nice to see here.
The face buttons are actually different than a standard controller, and they offer a more mechanical, clicky feel. It’s a change from the squishier face buttons on other Xbox One controllers, and it’s something you’ll know immediately whether you love or hate it.
Wait, There Are How Many Sticks?
The Wolverine Ultimate comes with two additional joysticks and one additional d-pad. The joysticks are a real letdown, as there’s only one long stick, one convex stick, and two standard concave sticks. If you want to use two long sticks or two convex sticks (something you can have with the Elite), you’re going to be disappointed.

The options for d-pads are better than the joysticks, as the two types you’d want are both included. While both directional-pad options are okay, neither feels amazing, but we’ll get to that in a bit.
But It Feels Nice in Your Hand
Another feature you find with most premium controllers is the grip, and the Wolverine Ultimate is no exception. It offers a more subtle grip texture than most other controllers on the market, but it still has more grip than a standard controller that’s coated only in plastic.

This is one place where I prefer the Ultimate over the Elite. The slightly less textured grip feels fantastic.
Chatting With Friends
One place where the Wolverine Ultimate does shine is down by the headphone port. There are four buttons there, two of which are used for customizing the extra buttons on the fly. The others are used for voice chat — one controls volume and the other lets you quickly mute your mic without digging into the Xbox Settings app. These offer a nice convenience that you won’t find elsewhere.

It seems like Razer packed as many extra features as it could into this controller to make it worth the money, but sometimes less is more and it really comes down to…
The Feel
You can throw as many extra features as you want on a controller, but if it doesn’t feel good, none of that matters. To put it simply: the Wolverine Ultimate doesn’t feel bad, but it isn’t amazing either.
Let’s start with the additional buttons, as that’s a big part of why you’re spending the $160 on this controller. As I said before, these buttons aren’t removable, and for me, that’s a deal breaker.
I love the Elite controller, but I only use one of the rear buttons on mine and I remove the rest. I just don’t need them for the way I play. Being stuck with them on forces me to change the way I hold the controller, and that’s never pleasant.

If you like leaving the rear buttons attached, they do feel pretty good, and I actually like their position better than the Elite controller. They’re more like buttons than the paddles on the Elite controller, and like most things with these two devices, which you prefer will largely come down to preference.
My complaints don’t apply to the extra buttons on top of the controller, as they don’t get in the way. These are perfectly positioned to grant access without changing anything about the way you use the controller. They’re setup so that you can just reach a little past the trigger and press them comfortably. It seems like such a no-brainer and it’s surprising that these buttons haven’t been used in other controllers.
I’m not in love with the way to d-pad functions, regardless of which of the two are installed. First of all, if you push too hard on either of the d-pads, they lift up from their hole. Even without pressing too hard, neither d-pad feels great for games where you’ll need to use them regularly (like fighting games).

The Size
One thing I love about the Elite controller is weight — it’s a beefy controller. The Wolverine Ultimate is actually lighter than a standard Xbox One controller. If you’re looking for a lightweight controller, it’s the one to go with.
Here are the weights of the three controllers:
- Razer Wolverine Ultimate: 260g
- Xbox One controller: 280g
- Xbox One Elite: 348g
This is all a matter of preference. Some people prefer a lighter device in their hands and some prefer the extra weight. There’s no right or wrong, but I like the heavier option.

Moving onto the grip, I actually quite like the feel of the Ultimate. It’s less textured than the Elite, but it offers enough that it feels stable in your hand. The grip on the back is definitely my favorite thing about the controller, and while I wasn’t able to use it for months to test it, it feels durable (my Elite controller’s grips are starting to come unglued).
The Good and The Bad
I see you out there: person who doesn’t want to read my in-depth thoughts on the Razer Wolverine Ultimate controller. Here’s a quick breakdown of what’s good and bad with this high-end gaming accessory.

The Good Stuff
- Controller is comfortable to hold
- Rubber grips feel amazing
- Feels extremely well built
- Easy to remap and customize buttons
- Extra shoulder buttons
- Lighter than the Elite (could be a negative, depending on your preferences)
- Nice carrying case
The Bad Stuff
- Doesn’t support wireless play
- Shape of USB port on controller won’t fit most standard cables
- Only comes with two additional joysticks and they’re different sizes
- D-pad pops up when pushed too hard
- Can’t remove rear triggers
- Cost more than the Elite controller
Should You Buy The Razer Wolverine Ultimate?

In a vacuum, I could easily recommend the Wolverine Ultimate, as it’s actually a pretty solid controller in spite of not being wireless.
However, we live in a world where the Elite controller exists, and it’s just a little bit better in just about every way. It’s wireless, it feels better, and it’s cheaper. It remains the best controller currently available, and Razer doesn’t offer enough to knock it off the top of the mountain.
If you’re in the market for a premium controller, you should really snag an Elite, as you’ll end up getting more controller for less money and you won’t have to deal with wires.
Enter the Competition!
Razer Wolverine Ultimate GiveawayRead the full article: Razer Wolverine Ultimate Review: Not Quite Elite
Read Full Article
5 Quick Ways to Play Audio on Mac Without Installing Anything

If you want to play a single audio file without installing anything new on your Mac, there are several ways to do so using default apps that come with your Mac.
Maybe someone sent you an audio file or you downloaded a podcast you want to listen to on your Mac. Today we’ll show you the options you have for playing an audio file without installing any extra or third-party software.
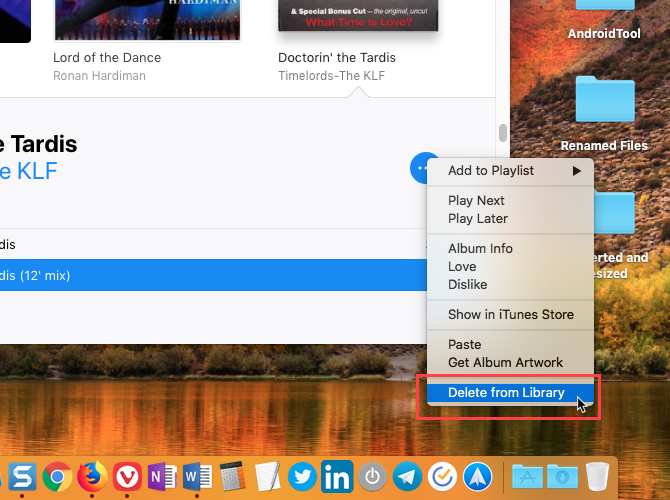
1. Play Audio Using iTunes
Whether you use iTunes or not to manage your music, you can use it to quickly play an audio file without adding the file to the iTunes media library.
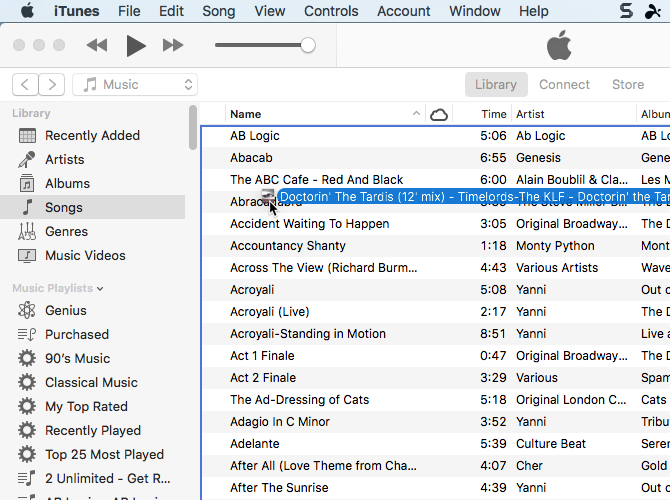
Launch iTunes and then open a Finder window and navigate to the audio file you want to play.
Hold down the Alt/Option key while dragging the audio file onto the iTunes window. The audio file is added to iTunes, but not copied to the media library folder on your Mac (~/Music/iTunes/iTunes\ Media/), even if the Copy files to iTunes Media folder when adding to library option is on in iTunes > Preferences > Advanced.
You can minimize the iTunes window while your audio file plays, so you can do other things on your Mac.
If you don’t want to leave the audio file in iTunes after listening to it, you can delete it when you’re done. If you leave the file in iTunes, it will be backed up if you manually back up your iTunes library, even though the file is not in your media library.
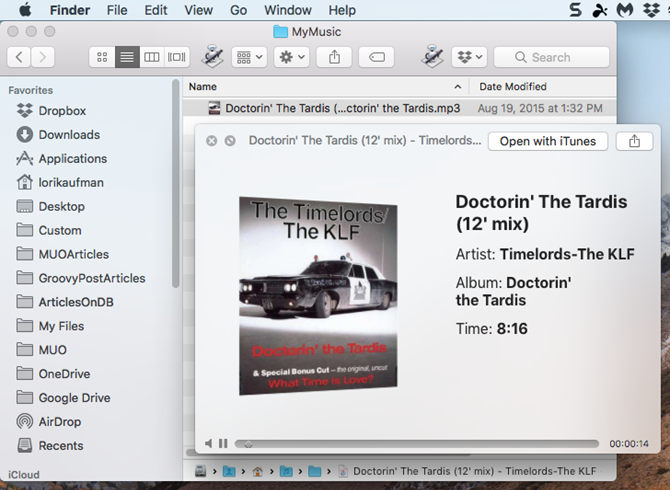
2. Play Audio Using Get Info in Finder
An easy way to play an audio file is to use Get Info in Finder.
Select the file you want to play and press Command + I. In the Preview section on the Get Info pane, move your mouse over the album cover and click the Play button.
The audio file plays while the Get Info window is open, and it continues to play when you minimize the Get Info window. When you close the Get Info window, the audio file stops playing.

3. Play Audio Using Quick Look in Finder
Quick Look in Finder provides an even quicker way to play an audio file.
Select the audio file you want to play in Finder and then press the space bar. The Quick Look dialog box displays, and the audio file starts playing automatically.
The disadvantage of this method is that the Quick Look window needs to stay open and in focus for the audio to keep playing. If you minimize or close the window, the audio file will not keep playing in the background.
4. Play Audio Using QuickTime
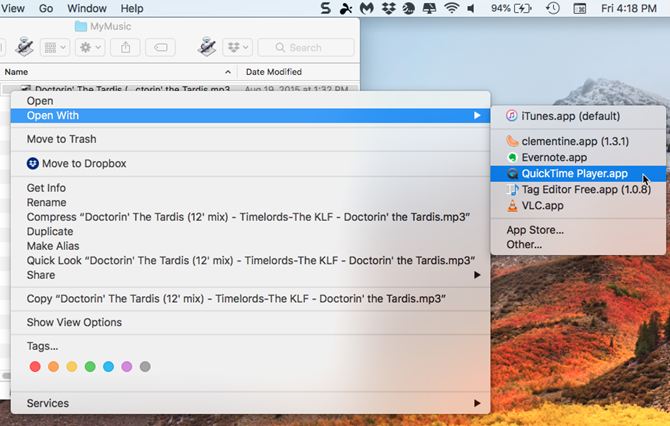
If you want to play an audio file in the background, but you don’t want to use iTunes at all, QuickTime is a quick and easy solution.
In Finder, right-click on the audio file you want to play and go to Open With > QuickTime Player.app.
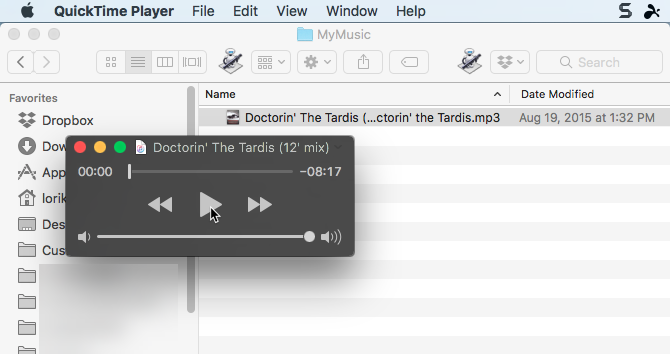
The QuickTime window opens, but the audio file does not play automatically. Click the Play button to begin playing the audio file. You can minimize the window and the audio file continues to play while you do other things on your Mac.
You can also drag and drop an audio file onto the QuickTime window to play it.
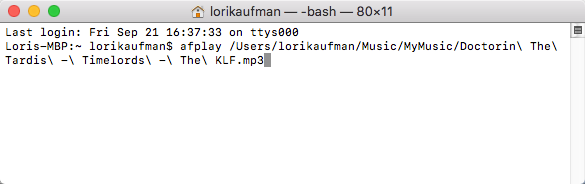
5. Play Audio Using the Command Line
If you like using the command line, you can use the afplay command to play an audio file, including playing it in the background. We’re going to play an MP3 file in our example, but you can play many other audio formats using afplay.
Open Terminal from Applications > Utilities. Then, run the following command, replacing audiofile.mp3 with the full path to the audio file you want to play:
afplay audiofile.mp3
For example, our command looks like the following:
afplay /Users/lorikaufman/Music/MyMusic/Doctorin\ The\ Tardis\ -\ Timelords\ -\ The\ KLF.mp3
If there are spaces in your path or file name, put a backslash in front of each space.
To play an audio file from your iTunes library, use the following folder path in the afplay command:
~/Music/iTunes/iTunes\ Media/Music/.
If the Keep iTunes Media folder organized option is enabled in iTunes > Preferences > Advanced, you can use tab completion to navigate to the artist, album, and then song. Songs start with the track number when this option is on.
To use the afplay command to play an audio file in the background, add a space and then an ampersand (&) to the end of the command. For example, our command to play an audio file in the background looks like the following:
afplay /Users/lorikaufman/Music/MyMusic/Doctorin\ The\ Tardis\ -\ Timelords\ -\ The\ KLF.mp3 &
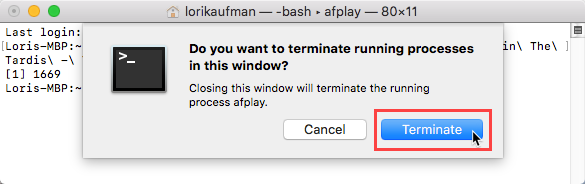
You do not have to leave the Terminal window in focus or even leave the window open. You can close the Terminal window and the audio file keeps playing.
When you close the Terminal window, you’ll be asked if you want to terminate the afplay process. It may seem strange but click Terminate. Your audio file continues to play.
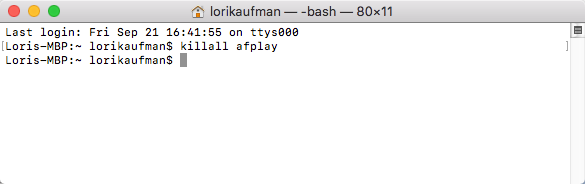
To stop an audio file you’re playing in the background using the afplay command, open a Terminal window again and type the following command:
killall afplay
The audio file stops playing instantly.
Other Ways to Play Audio Files on Mac
The options we discussed here are all available using tools included in the Mac system. But there are other music player apps out there that can play audio files (and other types of media files) if you want an app to play your music but don’t want to use iTunes.
Also, if you have an old iPod that has music you want to get off of it, you can transfer those audio files to your computer.
Read the full article: 5 Quick Ways to Play Audio on Mac Without Installing Anything
Read Full Article
Subscribe to:
Posts (Atom)