29 May 2019

This robot learns its two-handed moves from human dexterity


If robots are really to help us out around the house or care for our injured and elderly, they’re going to want two hands… at least. But using two hands is harder than we make it look — so this robotic control system learns from humans before attempting to do the same.

The idea behind the research, from the University of Wisconsin-Madison, isn’t to build a two-handed robot from scratch, but simply to create a system that understands and executes the same type of manipulations that we humans do without thinking about them.

For instance, when you need to open a jar, you grip it with one hand and move it into position, then tighten that grip as the other hand takes hold of the lid and twists or pops it off. There’s so much going on in this elementary two-handed action that it would be hopeless to ask a robot to do it autonomously right now. But that robot could still have a general idea of why this type of manipulation is done on this occasion, and do what it can to pursue it.

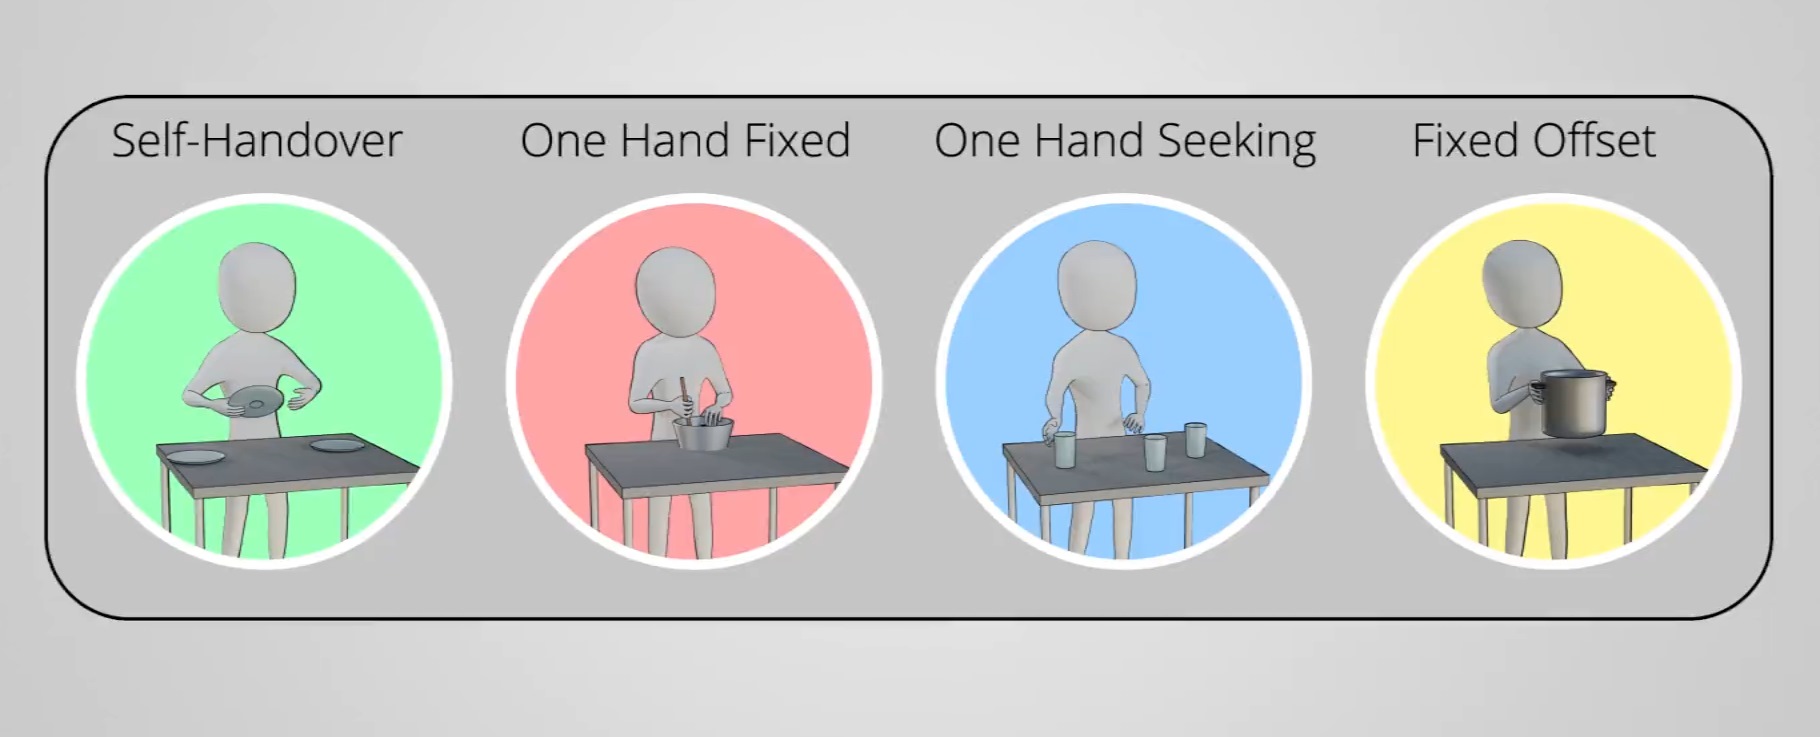
The researchers first had humans wearing a motion capture equipment perform a variety of simulated everyday tasks, like stacking cups, opening containers and pouring out the contents, and picking up items with other things balanced on top. All this data — where the hands go, how they interact, and so on — was chewed up and ruminated on by a machine learning system, which found that people tended to do one of four things with their hands:

  • Self-handover: This is where you pick up an object and put it in the other hand so it’s easier to put it where it’s going, or to free up the first hand to do something else.
  • One hand fixed: An object is held steady by one hand providing a strong, rigid grip, while the other performs an operation on it like removing a lid or stirring the contents.
  • Fixed offset: Both hands work together to pick something up and rotate or move it.
  • One hand seeking: Not actually a two-handed action, but the principle of deliberately keeping one hand out of action while the other finds the object required or performs its own task.

The robot put this knowledge to work not in doing the actions itself — again, these are extremely complex motions that current AIs are incapable of executing — but in its interpretations of movements made by a human controller.

You would think that when a person is remotely controlling a robot, it would just mirror the person’s movements exactly. And in the tests, the robot does so to provide a baseline of how without knowledge about these “bimanual actions,” many of them are simply impossible.

Think of the jar-opening example. We know that when we’re opening the jar, we have to hold one side steady with a stronger grip and may even have to push back with the jar hand against the movement of the opening hand. If you tried to do this remotely with robotic arms, that information is not present any more, and the one hand will likely knock the jar out of the grip of the other, or fail to grip it properly because the other isn’t helping out.

The system created by the researchers recognizes when one of the four actions above is happening, and takes measures to make sure that they’re a success. That means, for instance, being aware of the pressures exerted on each arm by the other when they pick up a bucket together. Or providing extra rigidity to the arm holding an object while the other interacts with the lid. Even when only one hand is being used (“seeking”), the system knows that it can deprioritize the movements of the unused hand and dedicate more resources (be it body movements or computational power) to the working hand.

In videos of demonstrations, it seems clear that this knowledge greatly improves the success rate of the attempts by remote operators to perform a set of tasks meant to simulate preparing a breakfast: cracking (fake) eggs, stirring and shifting things, picking up a tray with glasses on it and keeping it level.

Of course this is all still being done by a human, more or less — but the human’s actions are being augmented and re-interpreted into something more than simple mechanical reproduction.

Doing these tasks autonomously is a long ways off, but research like this forms the foundation for that work. Before a robot can attempt to move like a human, it has to understand not just how humans move, but why they do certain things in certain circumstances, and furthermore what important processes may be hidden from obvious observation — things like planning the hand’s route, choosing a grip location, and so on.

The Madison team was led by Daniel Rakita; their paper describing the system is published in the journal Science Robotics.


Read Full Article

The 14 Most Profitable Places to Sell Your Photos Online


sell-photos-online

If you believe you have taken some photos people would be willing to pay for, you need to know the most profitable places to sell photos online.

Thankfully, there are some reputable websites that can help you turn those photos into cash, and selling your photos online can help diversify your income.

1. Alamy

Alamy Sell Photos Online

There’s a reason why Alamy has over 160 million videos and photos for sale on its website. It offers photographers a huge 50 percent royalty payment on each photo sold. The site also allows photographers to sell their photos elsewhere, but you’ll only get 40 percent commission for those.

This has enabled Alamy to become the world’s largest marketplace for stock photos, with a huge number of monthly visitors—all of whom are potential customers for your photos.

2. Shutterstock

Shutterstock Sell Photos Online

Since launch, Shutterstock has paid out over $500 million to its contributors. When you upload a photo to the marketplace, you still keep the copyright. And you can earn up to 30 percent of the sale price of your photos depending on the size of your image. Currently, the payout starts at $0.25 and can go up to $120 for custom images.

3. iStock Photo

iStock Photo Sell Photos Online

If you’re interested in learning about the best types of photos to sell online, take a look at iStock Photo. Its popular forums and resources will help you to find your feet, and understand how to sell photos online.

You have to apply before you start selling your photos. The application process consists of submitting a few samples of your work through the Contributor by Getty Images app. Since iStock Photos and Getty Images are partners, you may get accepted into either platform.

The site doesn’t provide any specifics about how much you can get paid, but states that you’ll earn a percentage off of every photo that you sell.

4. PhotoShelter

PhotoShelter Sell Photos Online

If you want to sell your photos online, but would rather make those sales through your own site, PhotoShelter is a fantastic tool for this.

At its core, it’s a photography-oriented eCommerce platform that you can integrate into almost any website. This includes cloud storage for your photos, a built-in shopping cart, drag-and-drop website templates, an intuitive interface, decent SEO (search engine optimization), and several social media integrations.

The benefits of this option include retaining full control over how your photos are displayed, not having your competitors photos displayed alongside your own, and the ability to earn much more of the sale price.

Unfortunately, you will have to pay a subscription fee for this service. The basic plan starts at $10/month and comes with the minimum amount of features.

5. Adobe Stock

Adobe Stock Sell Photos Online

Adobe Stock is a beautiful site that offers a royalty of 33 percent for photos and 35 percent for vector art. You can deposit these royalties into your bank account after you’ve reached a threshold of $25. Adobe Stock is integrated into Adobe’s apps, making it more likely your photo will get noticed.

Adobe has simplified the way you upload your photos. Instead of going through the painstakingly slow process of tagging all of your images, Adobe’s smart tagging system does it for you. To make your life even easier, Adobe allows you to upload your photos through Adobe Lightroom CC, Adobe Bridge CC, or its website.

6. SmugMug

SmugMug Sell Photos Online

The SmugMug Pro package is an alternative to PhotoShelter. The platform enables you to showcase your work on a massively customizable storefront, and to manage your orders for a yearly subscription fee.

The main distinguishing feature is the ability to use SmugMug’s printing service create prints, books, and greetings cards from your snapshots. There are also some additional features such as the ability to create coupons, photo packages, and built-in analytics. You’ll also get to keep up to 85 percent of your revenue.

7. Can Stock Photo

Can Stock Sell Photos Online

If you’re looking for an easy way to sell your photos online, Can Stock Photo is a viable option. After you submit three images to the site’s editors, you’ll need to wait 24 hours for approval to start selling.

When uploading photos onto the site, Can Stock Photo will also post your work to one of the largest stock image databases, Fotosearch. You can earn up to 50 percent in royalties on the site, and can withdraw your money into PayPal once your balance reaches $50. If you want a mailed check, you’ll have to wait until you have earned $100.

8. 123RF

123 RF Sell Photos Online

This site has over 110 million files on offer, with almost 100,000 more added every day. The royalties payable vary between 30 percent and 60 percent depending on your level of contribution. This means that the more photos you upload, the higher your payout.

If you upload less than 999 images to the site, you’ll earn 30 percent, which equates to $0.216 per download. If you upload over 1 million images, you’ll receive 60 percent, which equates to $0.432 per download.

9. Dreamstime

Dreamstime Sell Photos Online

In the stock photography world, Dreamstime is a reputable player. It achieved this status by ensuring that all uploads are reviewed to check they meet their high standards, thereby guaranteeing quality.

Once your photos are approved, you’ll receive royalties of 25-50 percent. However, this could increase to 60 percent on all images if you sign an exclusivity contract. If you do sign that exclusivity deal, you’ll also receive an additional bonus of $0.20 for your first 100 approved submissions.

10. FineArtAmerica

FineArtAmerica Sell Photos Online

FineArtAmerica is the perfect place to set up an alluring portfolio, and to sell physical prints of your shots. You can sell each photo as a canvas print, poster, framed print, metal print, acrylic print, greeting card, phone case, and more.

When you make a sale, the order (including the printing) can be fulfilled by the company’s own printing service. You’ll have to pay the base price for the production, but you can make a profit by raising the price of the final product.

In other words, if a canvas print costs $50 for FineArtAmerica to produce, you can increase the price to $75—that way, you’ll earn $25 from an order.

If you’re able to print your own digital photos online, you might want to sell pictures on a craft site like Etsy instead.

11. Snapped4U

Snapped4U Sell Photos Online

If you’re a photographer who takes photos at events—parties, gigs, festivals, weddings—you should know that Snapped4U allows you to easily sell these pictures online. You can also use the sale of your photos as a way to raise money for a good cause.

By uploading and selling your photos here, you don’t need to deal with the nightmare of order processing, printing, and postage. Snapped4U deals with all of that on your behalf. For each photo sold that costs $5 or less, you’ll have to pay a $0.50 fee. If the photo is sold at more than $5, Snapped4U will charge a 10 percent commission.

12. Fotomoto

Fotomoto Sell Photos Online

For photographers who already have a website, but want to sell physical prints, Fotomoto is the way to go. This site handles all the printing, packing, and shipping, so you can concentrate on taking pictures. All you have to do is copy and paste Fotomoto’s code into your website, and you can instantly start to sell your photography online.

The most basic subscription plan is free, but you’ll have to pay 22 percent in transactions fees.

13. Stocksy

Stocksy Sell Photos Online

Stocksy pays out some of the highest royalties for contributors, making it one of the best sites to sell photos online. To apply, you’ll need to submit at least 25 photos, along with some information about yourself. If you manage to get accepted, expect to see royalties ranging from 50-75 percent.

Stocksy recruits top-notch photographers who take high-resolution images, so make sure that you have all of the essential photography gear you need to snap amazing photos. You should also keep in mind that Stocksy requires that all of your photos are exclusive.

14. EyeEm

EyeEm Sell Photos Online

EyeEm is a creative community app that lets you upload and sell photography online, while allowing you to retain your own copyrights. Better yet, you’ll earn 50 percent in royalties every time someone buys one of your photos.

This site pairs up with other image marketplaces as well, giving your pictures a ton of exposure. The more exposure, the more money you can earn. If you’re starting to run dry on ideas, visit EyeEm’s community page on the app to gain some inspiration from other professional photographers.

Sell Photos Online to Earn Some Extra Cash

Photography is such a fun hobby, so making money doing what you love is a bonus. These photo selling websites can finally give your photography the recognition that it deserves.

Hopefully, as you improve your photography skills, you’ll start figuring out the photos that sell well (and those that don’t)—leading to more sales and bigger profits!

Read the full article: The 14 Most Profitable Places to Sell Your Photos Online


Read Full Article

How to Force Rotate Into Landscape Mode on iPhone

Should You Use a Fingerprint or a PIN to Lock Your Phone?

RoadWayve Uses LED Messages to Communicate with Other Drivers


When it comes to communicating with fellow drivers, we’re generally limited to a few hand gestures, signal lights, and horns. Of course, some of these hand gestures are friendlier than others…

RoadWayve aims to change the way drivers communicate with one another through an LED light display and a connected remote/app that lets users send specific messages out to fellow drivers. This could really change the way we’re able to communicate with others on the road, as hand gestures and signal lights only provide so much information.

RoadWayve Features

RoadWayve is a pretty simple device in theory—it’s an LED sign that mounts in your car and allows you to send pre-written messages to fellow drivers. The 13-inch LED display will let other drivers read messages from up to 50-feet away at a viewing angle of 120-degrees.

The device supports Bluetooth, which means messages can be sent to the screen via its remote or through voice controls with the application. The remote has a bunch of the most common message on it, and it has large buttons that make it easy to press them without taking your eyes off the road. For the app, users can either press large buttons on their phone’s screen or use voice commands to send messages. The app can also be used to create and send out custom messages.

As far as battery life goes, the creators say they’re hoping to achieve three to four weeks of life under ideal conditions, so you shouldn’t need to unmount your display and charge it too frequently.

Another key thing to note is that the creators of RoadWayve promise that the device will work with either right or left side driving countries.

Some examples of the preprogrammed messages are as follows:

  • Thank you
  • I’m sorry
  • Let me merge
  • Go around me
  • Turn off high beams

This device could definitely be quite useful, especially for people in densely populated areas where they frequently need to work with other drivers.

RoadWayve Availability

RoadWayve is currently on Kickstarter, which means it’s not officially released yet. However, it has exceeded its funding goal, which means the creators will receive the funds and be able to deliver the product to backers. Anyone interested in backing the project and ordering a RoadWayve will need to put up $129 while the early special lasts. After that, the price jumps to $179.

The team behind the device plans to ship it in July 2020, which is a bit further away than we normally see for Kickstarter projects, but it’s better to let backers know that it will be a while for the final devices to release than to deceive them and be forced to delay the launch date later.

Before backing any Kickstarter, make sure you’re aware of the risks and you understand that there’s no guarantee that the device will actually release.

Read the full article: RoadWayve Uses LED Messages to Communicate with Other Drivers


Read Full Article

Optimize Your PC for Gaming With These 4 Vital Tweaks

5 Ways to Make Your PC Glow With Programmable LEDs


make-pc-glow

LED strips are a great way to brighten up your PC and personalize it to suit your style. But if you want to use LED strips for lighting in your PC then you’ll need special software to control then.

Different manufacturers have their own software options for controlling LEDs, so here we’ll walk you through five of the most popular so you can choose the right components for your needs.

1. ASUS Aura Sync

LED strips can be used for everything from ambient lighting to illuminated dog collars, and plenty of PC components these days are RGB-enabled too.

Asus’s Aura Sync software works with a big range of Asus products as well as the ROG addressable LED strips. This includes motherboards with RGB features, peripherals like keyboards, mice, and headphones, ROG all-in-one coolers, and pre-built laptops and desktops.

The software is fairly basic but it does the job. In terms of LED control, you can choose the static colors for your LED strips and also try out a range of other color options:

  • Breathing, where the colors fade slowly in and out
  • Color cycle, where colors fade from one to the next
  • The rainbow mode, if you want something brighter, is as colorful as it sounds
  • The comet, flashes, and wave modes have each LED lighting up in turn to give the impression of movement along the LED strips
  • The starry night mode is a unique feature in which the LED twinkle like the stars at night

For more functional modes, the smart mode changes color based on the temperature of your CPU or GPU, and the music mode pulses to the beat of the music you are playing on your system.

2. NZXT CAM

If you use NZXT RGB LED products like the Hue, Hue+, or Hue 2, then you can control your LEDs with the CAM software. CAM is a PC monitoring suite as well as a LED controller that works with other NZXT products like the Kraken all-in-one cooler or the Aer RBG fans.

The CAM software has many features, but unfortunately it has a reputation for being kind of buggy. Sometimes you’ll need to restart the software to get it to work correctly. But once you get it working you can use it for all sorts of functions.

It has the basic modes you would expect:

  • Static color
  • Breathing
  • Fade in/fade out

It also allows you to individually address every single LED, which means you can customize to your exact specifications.

The smart modes are fun too, with a mode which changes color based on the temperature of your CPU or GPU. A nice feature of this mode is that you can choose the color scheme yourself, so for example you can have cool temperatures represented by pink and warm temperatures represented by purple instead of the usual blue to red.

A music mode is also included to change illumination based on volume or gain of system sounds, but it’s a little buggy.

3. CORSAIR Link

The Link software from Corsair is the way to control your Corsair Link Lighting Node or Corsair Link RGB Lighting Kit LEDs. In addition it can control the LEDs on other hardware like Vengeance RAM or the Corsair RBG series fans. And, like CAM, it’s also designed to monitor and control your PC.

The software has many options so it may take a while to familiarize yourself with it. To control your RGB hardware, you’ll want to look in the Configure tab. Here you’ll find a Configure LED option to program the colors and modes of your LEDs.

The options for colors are more limited than other software featured here. You can choose from:

  • Single color
  • A rotation of two to four colors
  • Steady or pulsing lights
  • Color change based on the temperature of your CPU or GPU

Alternatively, if you want to individually address each LED in your strips, the software makes this easy to do and instantly visible from the dashboard.

4. Cooler Master RBG LED Controller

This software is designed to work with the Cooler Master RGB LED controller, into which you plug your RGB strips. It also supports Cooler Master’s LED fans.

In the Main Control panel you can set the color of your LEDs using a color picker, and change the speed and brightness of the effects.

The effects available include:

  • A static mode, a customize mode where you can have a different color for each strip or fan
  • A stars mode which makes your LEDs twinkle between a base color and a star color
  • Color cycle mode which changes between colors
  • A breathing mode in which the color fades gently in and out
  • A multilayer mode which lets you have different modes for different components
  • Mirage mode where you can pick the colors of individual LEDs.

That’s pretty much it. The software is fairly minimal and only controls RGB components, and it doesn’t offer a hardware overview or PC controls like some of the other software does.

5. Aqua Computer Aquasuite

More advanced users who want greater customization options can try the Aqua Computer Farbwerk RGB controller. This is controlled using the Aquasuite software which has the greatest number of options of any of the programs shown in this article. It’s a bit more technical than the others but it gives you the best customization choices.

Aquasuite is also a PC monitoring program, letting you see data about your CPU core usage, CPU core temperatures, and fans as well. To control your RGB components, you’ll want to head to the RGBpx menu. Here you can pick the color of your LEDs from a color wheel or choose from preset colors. You can also adjust the brightness of the LEDs and address each strip individually.

The number of LED preset options is where Aquasuite really shines. There are modes for:

  • Rotating rainbow
  • A bar graph to show various sensor inputs such as temperature
  • Sound bar mode which reacts to sounds from your system
  • A swiping rainbow
  • Basics like breathing, fading, and wave modes, plus lots more

In addition, the AmbientPX mode is particularly nice for those who have backlighting behind their monitor. The software detects which colors are on the edges of your screen and uses those colors for the backlights, giving the illusion that your monitor is spilling light onto the wall behind it.

One challenge with using this software is that Aqua Computer is a German company, so a lot of the information about the software is in German. However, you can find information about using the software in English on the Aqua Computer forums.

Light Up Your PC With RGB LED Software

Depending on which RGB components you buy, you can use one of these pieces of software to control your LEDs and light up your PC in the color scheme of your choosing. Remember that most LED controllers are proprietary so you’ll have to either stick with one brand to coordinate every component, or else install multiple different pieces of software to control different components.

If you’d rather DIY your own solution using non-proprietary LED strips then that it possible too. Check out our guide on how to add wi-fi controlled lighting to your PC to learn more.

Read the full article: 5 Ways to Make Your PC Glow With Programmable LEDs


Read Full Article

Don’t Buy a Raspberry Pi Until You’ve Seen CrowPi All-in-One Kit (Review and Giveaway!)

6 Ways to Check Which Versions of .NET Framework Are Installed


check-netframework-version

The Microsoft .NET Framework is an important feature of the modern Windows operating system. It provides developers with a ready-made collection of code that Microsoft maintains. Most of the time, you have no direct dealings with .NET Framework. However, that’s not always the case. At times, you need to know the specific version of the .NET Framework installed on your system.

Here are six ways you can find out which versions of .NET Framework are installed on your version of Windows.

Find Newer .NET Framework Versions: 4.5 and Later

There are three methods you can use to find out your .NET Framework version for versions 4.5 and later. “But Gavin,” I hear you say, “I’m doing this to find out which version I have, I don’t know if it is version 4.5 or not.”

You are exactly right. Checking for the .NET Framework version only takes a moment. You can quickly establish if you have .NET Framework version 4.5 or later. If you don’t, you can safely assume that you have an earlier version installed, or no .NET Framework version at all (which is highly unlikely).

1. Use the Registry Editor to Find the .NET Framework Version

regedit net framework dword value

You can find the .NET Framework versions installed on your system in the registry. (What is the Windows Registry, anyway?)

  1. Press Ctrl + R to open Run, then input regedit.
  2. When the Registry Editor opens, find the following entry:
    HKEY_LOCAL_MACHINE\SOFTWARE\Microsoft\NET Framework Setup\NDP\v4
  3. Under v4, check for the Full If it is there, you have .NET Framework version 4.5 or later.
  4. In the right-hand panel, check for a DWORD entry named Release. If the Release DWORD exists, you have .NET Framework 4.5 or a later version.
  5. The Release DWORD data contains a value relating to the specific .NET Framework version. For instance, in the image below, the Release DWORD has a value of 461814. That means my system has .NET Framework 4.7.2 installed. Check the table below for your Release DWORD value.

.net frame work dword versions

You can cross-check the DWORD value against the value table below to find out the exact .NET Framework version on your system.

2. Use the Command Prompt to Find the .NET Framework Version

Type command into your Start Menu search bar, right-click the Best Match and select Run as Administrator.

Now, copy and paste the following command into the Command Prompt:

reg query "HKLM\SOFTWARE\Microsoft\Net Framework Setup\NDP\v4" /s

The command lists the installed .NET Frameworks for version 4. .NET Framework version 4 and later display as “v4.x.xxxxx.”

3. Use PowerShell to Find the .Net Framework Version

net framework powershell command

Type powershell into your Start Menu search bar, right-click the Best Match and select Run as Administrator.

Now, you can use the following command to check the value of the .NET Framework Release DWORD:

Get-ChildItem 'HKLM:\SOFTWARE\Microsoft\NET Framework Setup\NDP\v4\Full\' |  Get-ItemPropertyValue -Name Release | Foreach-Object { $_ -ge 394802 }

The command above returns True if the .NET Framework version is 4.6.2 or higher. Otherwise, it returns False. You can use the .NET Framework DWORD value table above to swap out the last six digits of the command for a different version. Check out my example:

The first command confirms that version 4.6.2 is present. The second confirms that version 4.7.2 is present. However, the third command checks for version 4.8, which I don’t have installed yet as the Windows 10 May Update hasn’t arrived on my system. Still, you get the gist of how the PowerShell command works with the DWORD value table.

Find an Older .NET Framework Version

regedit net framework older version

You can find out which old .NET Framework versions are installed on your system using the registry. The Registry Editor holds all the answers.

  1. Press Ctrl + R to open Run, then input regedit.
  2. When the Registry Editor opens, find the following entry:
    HKEY_LOCAL_MACHINE\SOFTWARE\Microsoft\NET Framework Setup\NDP
  3. Check the NDP file in the registry for each .NET Framework version.

Check Your .NET Framework Version Using a Third-Party Tool

There are a couple of tools you can use to find the .NET Framework version on your system automatically. However, they’re not updated frequently, which is why knowing the manual method is handy, too.

1. Raymondcc .NET Detector

raymondcc net framework detector

The Raymondcc .NET Detector is one of the fastest and easiest detection tools to use. You download the folder, extract it, then run the executable. When the program runs, it shows a list of .NET Framework versions. The versions in black are installed on your system, while the gray versions are not. If you click on a grayed-out .NET Framework version, the program takes you to the installer.

Download: Raymondcc .NET Detector for Windows (Free)

The archive password is raymondcc

2. ASoft .NET Version Detector

asoft net framework version detectors

The ASoft .NET Version Detector works very similarly to the Raymondcc .NET Detector. Once you download and extract the program, run the executable. The program shows a list of currently installed .NET Framework versions. It also provides download links for those versions you do not have.

Download: ASoft .NET Version Detector for Windows (Free)

Simple Methods to Check Your .NET Framework Version

You now know several simple methods to check your .NET Framework version.

It isn’t always necessary to check your .NET Framework version. Many programs will check the version before installing and tell you if there is a program. Others will install the necessary version before commencing the installation, saving you the job of finding out the correct version and the hassle of downloading.

Still, it is always handy to know how to find the .NET Framework version manually. Want to find out more about the .NET Framework? Here’s why you need it and how you install it on Windows 10.

Read the full article: 6 Ways to Check Which Versions of .NET Framework Are Installed


Read Full Article

6 Android ADB Apps for Powerful Features Without Root

5 Easy Ways to Import Playlists Into Spotify


import-playlists-spotify

If you have ever maintained your own collection of music you’ve probably created playlists to help you organize that collection. But how do you import playlists into Spotify?

Unfortunately, there’s no native way to import playlists into Spotify. It’s one of the service’s many drawbacks. However, there are plenty of other ways to import playlists into Spotify.

Here’s how to import playlists into Spotify, including M3U playlists and iTunes playlists.

1. Soundiiz

Available on: Web

If you want to import playlists from other music streaming apps into Spotify, Soundiiz should be your first port of call.

Soundiiz works with an impressive array of services, including all the big names like Google Play Music, Apple Music, YouTube, Last.fm, and Deezer. The app also supports many smaller apps, such as Telmore Musik, JOOX, Anghami, and KKBox.

In addition to importing playlists, you can use Soundiiz to import your liked artists, albums, and tracks—though not all of the categories are available on all of the platforms.

Soundiiz supports the ability to import your M3U playlists in Spotify. Open the web app, go to Playlists > Import Playlist and select From File.

The big drawback of using Soundiiz to import playlists into Spotify is the lack of custom track matching. Given that one track can have so many versions, this can be a problem.

The free version of Soundiiz only lets you import one playlist at a time. However, the $3/month premium version removes this limitation.

2. Playlist Converter

import playlists into Spotify - playlist converter windows app

Available on: Windows

If you would prefer to use a local app to import playlists into Spotify (and you’re running the Windows operating system), check out Playlist Converter.

This app only lets you sync your playlists with four services: Spotify, YouTube, Deezer, and Napster. However, unlike Soundiiz, you can override Playlist Convertor’s default track match with your own selection.

To begin converting, open the app, and follow the on-screen instructions to connect to Spotify. Then, click on Import > M3U > Convert.

If you’re using the free version the screen is blocked with an ad while the conversion takes place, but you can pay a small amount to remove it.

When the app eventually displays its list of results, click on a song title to see a list of all the matching songs on Spotify and select which version you want to use in your playlist.

Note that lots of users—including myself—have reported issues when trying to get the app to recognize an M3U playlist file. To avoid the problem, export your playlist as a PLS file from your local music player, and select PLS from the Import menu instead of M3U.

3. Stamp

Available on: Windows, Mac, Linux, Android, and iOS

For anyone who wants to convert iTunes playlists into Spotify playlists, Stamp is one of the best tools available.

Stamp supports lots of music streaming services. In addition to Spotify, you can also send your playlists to Google Play Music, Apple Music, Tidal, Amazon Music, Pandora, Deezer, and YouTube.

The app lets you export track lists from Rdio and YouTube, but you cannot use the app to import playlists into those services.

Lastly, the app supports CSV playlists that you’ve saved on a spreadsheet. Most desktop music apps let you export your playlists in a CSV format.

Like the other apps on this list, there are free and a premium versions available. The free version restricts you to one playlist per session, whereas the premium version—available for a one-time fee of $9.99—removes the limit.

4. Playlist Converter

import playlists into Spotify - playlist converter web app

Available on: Web

Despite having the same name as an earlier entry on our list, Playlist Converter is a standalone web app that has no connection to its namesake.

Only three music streaming apps are supported: Spotify, Deezer, and SoundCloud.

Playlist Converter specializes in working with text-based playlists. You can import your tracks in the M3U, PLS, CVS, and plain text formats.

The developer is planning to support other mainstream music services and other file types—including MP3 and MP4—in future releases.

Unfortunately, Playlist Converter is another app which does not allow custom track matching. The severity of this problem will depend on how obscure the music is in your playlist. You can see from the image above that the initial matches are not always accurate. You might need to do some manual cleaning up after the conversion process has finished.

5. TuneMyMusic

import playlists into Spotify - tunemymusic

Available on: Web

The completely free-to-use TuneMyMusic web app is one of the most polished apps on the list. It looks impressive, and the in-app navigation is intuitive.

You can use TuneMyMusic to import playlists into Spotify from Apple Music, Deezer, Tidal, YouTube, Google Play Music, Amazon Music, SoundCloud, iTunes, KKBox, Last.fm, and Napster.

In addition to the music services, you can also sync TXT, CSV, M3U, M3U8, PLS, WPL, XSPF, and XML playlists with Spotify and others.

To use TuneMyMusic to import playlists into Spotify, follow these steps:

  1. Click on Let’s Start.
  2. Choose your source from the list of options.
  3. Either connect your source account or upload the correct file from your desktop.
  4. Select the songs in the playlist that you want to import.
  5. Click on Select Destination.
  6. Choose Spotify and give TuneMyMusic permission to access your account.
  7. Click on Start Moving My Music.

When the conversion process has finished, you will be able to access your playlist in the Spotify app.

How to Import Playlists Into Spotify: One Final Tip

As we touched on earlier, one of the most significant issues with importing playlists into Spotify is a lack of accuracy in the matches.

To mitigate the problem and make the manual correction process more manageable, it’s wise to sync your playlists in small chunks and then merge them within Spotify itself. If you import a playlist with 500 songs and 100 of them need editing, you’ll quickly get lost and/or frustrated. So, break them down into smaller batches to make your life easier.

If you would like to learn more about getting the most out of Spotify, check out our article explaining how to scrobble your Spotify music with Last.fm and our countdown of the best podcasts on Spotify.

Read the full article: 5 Easy Ways to Import Playlists Into Spotify


Read Full Article

Daily Crunch: Uber will deactivate low-rated riders


The Daily Crunch is TechCrunch’s roundup of our biggest and most important stories. If you’d like to get this delivered to your inbox every day at around 9am Pacific, you can subscribe here.

1. Uber will start deactivating riders with low ratings

Uber drivers have been able to rate their passengers before this, but those passengers were never really at risk of deactivation — until now. In a blog post, Uber’s Kate Parker said that while only “a small number of riders” should be affected, “it’s the right thing to do.”

The company isn’t announcing a specific rating cutoff. Instead, it says it will deactivate users who fall significantly below a city’s average, after “several notifications and opportunities to improve his or her rating.”

2. Huawei files motion to challenge sweeping US ban, calling it ‘not normal’

The Chinese hardware giant has filed a motion for summary judgement that questions the constitutionality of the section of the National Defense Authorization Act that the Trump administration used to halt imports.

3. Flipboard hacks prompt password resets for millions of users

Hackers stole usernames, email addresses, passwords and account tokens for third-party services. According to Flipboard, “not all” users’ account data were involved in the breaches, but the company declined to say how many users were affected.

4. Amazon just launched a $90, 5.5-inch Echo Show

The Echo Show 5 (that’s “five” for inches) doesn’t replace any existing Amazon smart screen, even though the price point will no doubt make many think twice about the $130 Spot.

5. Talkspace picks up $50 million Series D

Talkspace launched back in 2012 with a mission to make therapy accessible to as many people as possible. The platform allows users to pay a subscription fee for unlimited messaging with one of the company’s 5,000 healthcare professionals.

6. NYC subway riders will be able to swipe in with Apple Pay starting Friday

Apple Pay is hitting select subway stations this Friday, May 31. New Yorkers will then be able to swipe their iPhones or Apple Watches to catch a ride.

7. Q&A with J Crowley, Head of Product at Airbnb Lux, on what makes a great PM

Crowley has run product at three big-name companies: Foursquare/Swarm, Blue Apron and now Airbnb. (Extra Crunch membership required.)


Read Full Article

UK’s first 5G network taster goes live in six cities tomorrow


The UK’s first 5G consumer mobile network is launching tomorrow in six cities.

Mobile network operator EE will switch on the next-gen cellular connectivity in select locations in London, Cardiff, Edinburgh, Belfast, Birmingham and Manchester — promising “increased speeds, reliability and connectivity”. Though of course consumers will also need to have a 5G handset and 5G price plan, as well as being in the right location, to see any of the touted benefits.

EE says it expects customers to experience an increase in speeds of around 100-150Mbps when using the 5G network — “even in the busiest areas” where network coverage extends.

“Some customers will break the one gigabit-per-second milestone on their 5G smartphones,” it adds.

Ten other UK cities are set to get a taste of EE’s 5G later by the end of this year, also in select, busier parts — namely Glasgow, Newcastle, Liverpool, Leeds, Hull, Sheffield, Nottingham, Leicester, Coventry and Bristol — with more cities planned to come on stream in 2020.

While rival mobile operator Vodafone has said it will began its own rollout of a 5G network in July.

Among the advantages for 5G that EE is pushing on its website to try to persuade users to upgrade are better connections in busy places (such as festivals or stadiums); faster download speeds to support movie downloads and higher quality video streaming; and a gamer-friendly lack of lag — which it bills as “almost instant Internet connection”.

Whether those additions will convince masses of mobile users to shell out for an EE 5G device plan — which start at £53 per month — remains to be seen.

Earlier this month the network operator, which is owned by BT, launched its first 5G Sim-only handset plans, and began ranging 5G handsets — from the likes of Samsung, LG, OnePlus and Oppo.

Though not from Huawei. Last week it told the BBC it would pause on offering any 5G smartphones made by Chinese device maker Huawei — saying it wanted to “make sure we can carry out the right level of testing and quality assurance” for its customers.

Huawei remains subject to a US executive order intended to dissuade US companies from doing business with it on national security grounds. And Google has been reported to have taken a decision to withdrawn some Android-related services from Huawei — raising question-marks about the future quality of its smartphones. (The Chinese company’s involvement in building out core UK 5G networks is also subject to restriction, with the government reportedly intending to impose limits.)

EE says the 5G network it’s launching tomorrow is an additional layer on top of its existing 4G network — dubbing it “phase 1”. So this switch on is really a toe in the water. Or, well, a marketing opportunity to claim a 5G first.

It describes it as a “non-standalone” deployment, saying it’s combining 4G and 5G to “give customers the fastest, most reliable mobile broadband experience they’ve ever had” — planning to upgrade more than 100 cell sites to 5G per month, as it builds out 5G coverage. It will also expand its 4G coverage into rural areas and add more capacity to 4G sites — as 4G will remain the fall-back option for years to come (if not indefinitely).

Phase 2 of EE’s 5G rollout, from 2022, will introduce the “full next generation 5G core network, enhanced device chipset capabilities, and increased availability of 5G-ready spectrum”.

“Higher bandwidth and lower latency, coupled with expansive and growing 5G coverage, will enable a more responsive network, enabling truly immersive mobile augmented reality, real-time health monitoring, and mobile cloud gaming,” EE adds.

A third phase of the 5G rollout, from 2023, is slated to bring Ultra-Reliable Low Latency Communications, Network Slicing and multi-gigabit-per-second speeds.

“This phase of 5G will enable critical applications like real-time traffic management of fleets of autonomous vehicles, massive sensor networks with millions of devices measuring air quality across the entire country, and the ‘tactile internet’, where a sense of touch can be added to remote real-time interactions,” EE suggests.

As we’ve said before, there’s little call for consumers to rush to upgrade to a 5G handset, with network coverage the exception not the rule, even as building out the touted benefits will be a work of years.


Read Full Article

Following FTC complaint, Google rolls out new policies around kids’ apps on Google Play


Google announced this morning a new set of developer policies aimed at providing additional protections for children and families seeking out kid-friendly apps on Google Play. The new policies require that developers ensure their apps are meeting all the necessary policy and regulatory requirements for apps that target children in terms of their content, ads, and how they handle personally identifiable information.

For starters, developers are being asked to consider whether children are a part of their target audience — and, if they’re not, developers must ensure their app doesn’t unintentionally appeal to them. Google says it will now also double-check an app’s marketing to confirm this is the case and ask for changes, as needed.

Apps that do target children have to meet the policy requirements concerning content and handling of personally identifiable information. This shouldn’t be new to developers playing by the rules, as Google has had policies around “kid-safe” apps for years as part of its “Designed for Families” program, and countries have their own regulations to follow when it comes to collecting children’s data.

In addition, developers whose apps are targeting children must only serve ads from an ads network that has certified compliance with Google’s families policies.


To enforce these policies at scale, Google is now requiring all developers to complete the new target audience and content section of the Google Play Console. Here, they will have to specify more details about their app. If they say that children are targeted, they’ll be directed to the appropriate policies.

Google will use this information, alongside its review of the app’s marketing materials, in order to categorize apps and apply policies across three target groups: children, children and older users, and older users. (And because the definition of “children” may vary by country, developers will need to determine what age-based restrictions apply in the countries where their app is listed.)

Developers have to comply with the process of filling out the information on Google Play and come into compliance with the updated policies by September 1, 2019.

The company says it’s committed to providing “a safe, positive environment” for kids and families, which is why it’s announcing these changes.

However, the changes are more likely inspired by an FTC complaint filed in December, in which a coalition of 22 consumer and public health advocacy groups, led by Campaign for a Commercial-Free Childhood (CCFC) and Center for Digital Democracy (CDD), asked for an investigation of kids’ apps on Google Play.

The organizations claimed that Google was not verifying apps and games featured in the Family section of Google Play for compliance with U.S. children’s privacy law COPPA.

They also said many so-called “kids” apps exhibited bad behaviors — like showing ads that are difficult to exit or showing those that require viewing in order to continue the current game. Some apps pressured kids into making in-app purchases, and others were found serving ads for alcohol and gambling. And others, still, were found to model harmful behavior or contain graphic, sexualized images, the groups warned regulators.

The time when violations like these can slip through the cracks is long past, thanks to increased regulatory oversight across the online industry by way of laws like the EU’s GDPR, which focuses on data protection and privacy. The FTC is also more keen to act, as needed — it even recently doled out a record fine for TikTok for violating COPPA. 

The target audience and content section are live today in the Google Play Console, along with documentation on the new policies, a developer guide, and online training. In addition, Google says it has also increased its staffing and improved its communications for the Google Play app review and appeals processes in order to help developers get timely decisions and understand any changes they’re directed to make.


Read Full Article

InWin’s Alice is a mid-tower PC case you can match to your cosplay


There’s a huge amount of crossover between the gaming and cosplay communities and InWin’s Alice computer chassis will appeal to many in the middle of that Venn diagram. The company is currently showing off Alice and its other PC cases at Computex in Taipei.

The interior of InWin's Alice chassis

Named after the Lewis Carroll character, the mid tower case comes in several colors of lightweight ABS plastic, but its real draw are its easily removable fabric covers. InWin sells a large array of covers, so you can switch them up, but of course you can also make them. InWin’s Alice covers are designed to be dust-proof, but the concept also has the bonus of allowing for plenty of airflow and making it easy to clean the inside of your PC or change components.

Some of InWin's fabric covers for its Alice PC case

The Alice will be compatible with 12-inch by 9.6 inch ATX, Micro-ATX and Mini-ITX motherboards and is just little over 24-inches tall, with a width of 11.6 inches and a depth of 17.5 inches.


Read Full Article

Ufo


Ufo

Ducky’s new limited-edition mechanical keyboard pays tribute to Taiwan’s Paiwan community


Ducky, known for its popular mechanical keyboards, is based in Taiwan and today at Computex it showed off its tribute to the country’s culture: the limited-edition “Year of the Pig” 65 percent keyboard. The latest of Ducky’s yearly Zodiac releases, the keyboard was created in collaboration with metalwork artist Kulele Ruladen, the keyboard pays tribute to the Paiwan, one of Taiwan’s indigenous tribes.

Symbols inspired by Paiwan culture on Ducky's limited edition Year of the Pig mechanical keyboard

Ruladen’s design draws on several aspects of Paiwan culture, including a metal cut-out at the front of the keyboard inspired by a wild boar, a symbol of bravery for Paiwan people, and a golden backplate with images of Paiwan warriors battling the boars.

The keycaps are bronze red, a reference to the importance of bronze as a medium in Paiwan art. Instead of the alphabet, each key has a pictogram that draws on other symbols that are meaningful for the Paiwan community. For example, the space bar has a hawk feather representing “the aristocracy of men and women.” There are also four keys inspired by Paiwan glass beads that represent different values: agility (kaluazung), courage (mananigai), nobility (mulimulitan-maca) and kurakurau-liling (love).

Details from Ducky Keyboard's Year of the Pig limited edition mechanical keyboard

The Year of the Pig keyboard is limited to 2019 pieces, in reference to the year, and designed to last. Each one has adopted aluminum casing with nano coating, a zinc alloy keyobard stand and dye-subliminated keycaps, as well as a Type-C USB port and RGB backlighting.


Read Full Article