27 April 2018

Facebook’s Messenger Kids’ app gains a ‘sleep mode’


Facebook’s Messenger Kids, the social network’s new chat app for the under-13 crowd, has been designed to give parents more control over their kids’ contact list. Today, the app is gaining a new feature, “sleep mode,” aimed at giving parents the ability to turn the app off at designated times. The idea is that parents and children will talk about when it’s appropriate to send messages to friends and family, and when it’s time for other activities – like homework or bedtime, for example.

The app, which launched last December, has not been without controversy.

Some see it as a gateway drug for Facebook proper. Others whine that “kids should be playing outside!” – as if kids don’t engage in all sorts of activities, including device usage, at times. And of course, amid Facebook’s numerous scandals around data privacy, it’s hard for some parents to fathom installing a Facebook-operated anything on their child’s phone or tablet.

But the reality, from down here in the parenting trenches, is that kids are messaging anyway and we’re desperately short on tools.

Instead of apps built with children’s and parents’ needs in mind, our kids are fumbling around on their own, making mistakes, then having their devices taken away in punishment.

The truth is, with the kids, it’s too late to put the toothpaste back in the tube. Our children are FaceTime’ing their way through Roblox playdates, they’re texting grandma and grandpa, they’re watching YouTube instead of TV, and they’re begging for too-adult apps like Snapchat – so they can play with the face filters – and Musical.ly, which has a lot of inappropriate content. (Seriously, can someone launch kid-safe versions?)

Until Messenger Kids, parents haven’t been offered any social or messaging apps built with monitoring and education in mind.

I decided to install it on my own child’s device, and I’ll admit being conflicted. But I’m using it with my child as a learning tool. We talk about how to use the app’s features, but also about appropriate messaging behavior – what to chat about, why not to send a dozen stickers at once, and how to politely end a conversation, for example.

Unlike child predator playgrounds like Kik, popularity-focused social apps like Instagram, or apps where messages simply vanish like Snapchat, Messenger Kids lets parents choose the contact list and control the experience. And, as a backup, I have a copy of the app on my own phone, so I can spot check messages sent when I’m not around.

With the new sleep mode feature, I can now turn Messenger Kids off at certain times. That means no more 8 AM video calls to the BFF. (Yes, we’ve discussed this – after the fact. Sorry, BFF’s parents.) And no more messaging right at bedtime, either.

To configure sleep mode, parents access the Messenger Kids controls from the main Facebook app, and tap on the child’s name. You can create different settings for weekdays and weekends. If the child tries to use the app during these times, they’ll instead see a message that says the app is in sleep mode and to come back later.

The control panel is also where parents can add and remove contacts, delete the child’s account, or create a new account.

Facebook suggests that parents have a discussion with kids about the boundaries they’re creating when turning on sleep mode.

[gallery ids="1629819,1629820,1629821,1629822"]

That may seem obvious, but it’s surprisingly not. I’ve actually heard some parents scoff at parental control features because they think it’s about offloading the job of parenting to technology. It’s not. It’s about using tools and parenting techniques together – whether that’s internet off times, device or app “bedtimes,” internet filtering, or whatever other mechanisms parents employ.

I understand if you can’t get past the fact that the app is from Facebook, of all places. Or you have a philosophical point of view on using Facebook products. But Facebook integration means this app could scale. In the few months it’s been live, the app has been download around 325,000 times, according to data from Sensor Tower.

Messenger Kids is a free download on iOS and Android.


Read Full Article

Facebook drops fundraising fees for personal causes


Despite Facebook being under fire for everything pertaining to Cambridge Analytica, the company still hopes to be able to do some good. Today, Facebook is dropping its platform fees pertaining to fundraisers for personal causes.

That means Facebook is getting rid of the 4.3 percent platform fee in the u.S. and the 6.2 percent fee in Canada. Those fees were charged to cover a review process for and vetting for each fundraiser. Now, Facebook says it will absorb the costs associated with those safety and protection measures.

“We’re continuously learning and this was something we wanted to do to help people maximize the benefits,” Facebook Head of Product for Social Good Asha Sharma told me over the phone.

To be clear, there will, however, still be fees for payment processing and taxes. In the U.S. and Canada, payment processing fees are 2.6 percent plus $0.30.Facebook is also unveiling two new features for its fundraising tool.

The first is the ability for people to match donations for non-profit fundraisers and the second is the expansion of categories for personal causes. Now, in addition to raising money for things like vet bills, personal emergencies and whatnot, people can also raise money for travel (community trips or for medical needs), family-related causes (adoption, etc), religious events and volunteer supplies.


Facebook isn’t yet sharing specific dollar amounts raised pertaining to fundraisers, but says its tool has helped over 750,000 non-profits collect donations. All Sharma would say about personal causes is that “we’re seeing activity across all of these categories, which is why we have them.”


Read Full Article

MIST paints your walls so you don’t have to


If you’ve ever painted a room you know that getting every nook and cranny is pretty difficult and Tim Allen help you if you have hardwood or carpet. The tarp alone costs more than the paint. Now, thanks to MIST, your robot can manage the entire job, slapping paint up like a robotic Jackson Pollock.

The robot uses mapping technology and a sort of elevator-like neck to spray up and down walls. The team, which hails from the University of Waterloo, has finished their prototype and it’s called Maverick. The team has experience working at multiple big names including Apple and Facebook. It includes Shubham Aggarwal, Utkarsh Saini, Baraa Hamodi, Hammad Mirza, and Dhruv Sharma.

This is just the beginning for Maverick. The team plans on adding other features that make it easier to use.

“We actually plan on mounting a camera behind the sprayer so that it follows the sprayer up and down, and hence can use image processing to make decisions about whether to actuate the spray or not. We’ve already implemented this logic in software and even have a paint quality detection algorithm. That being said, we haven’t mounted the camera just yet as seen in this video,” the team said.

As you can see below the project involves a platform, arm, and spray system. The robot maps the room and then rolls around, hitting spots that are supposed to be painted and avoiding spots that aren’t. Obviously you’re going to want to tape up some spots but for the most part Maverick will blast your walls with a few layers of paint in the time it would take you to go down to the paint store.

I’ve reached out to the team for more information on their project but until then enjoy their jaunty video below. I, for one, welcome our robotic spraying overlords.


Read Full Article

Nintendo is releasing a mobile RPG this summer


The maker of Shadowverse and Granblue Fantasy is teaming up with Nintendo for a new mobile RPG. Called Dragalia Lost, the Japanese-style action RPG will be a free-to-play game though likely loaded with Loot Box-style mechanics that will result in a financial windfall for Nintendo and developer Cygames.

The trailer doesn’t reveal many details about the game’s story. I assume from the title that someone called Dragalia is lost and a team of unlikely heros will have to fight monsters along their journey to find this Dragalia. I guess.

Nintendo turned to Cygames to make this new title instead of retooling Zelda or Xenoblade for the mobile screen. The game reportedly use Cygame’s system that randomly unlocks characters and upgrades. It’s like loot boxes but not called loot boxes. This is how the game will make money as players are encouraged to pay to buy more unlocks.

As part of the deal, Nintendo is acquiring 5-percent of Cygrames. Nintendo also has a stake in mobile phone platform maker DeNA, which also holds 25-percent of Cygrames showing how Nintendo is slowing spreading throughout the mobile game world.


Read Full Article

How to Merge and Unmerge Cells in Excel: Tips and Tricks to Know


When you want to combine two cells into one in Excel, you have a few options. Merging cells is one of the best ways to do it. But it has a few drawbacks, too. Even so, you might find that it’s useful for working with text in Excel.

We’ll take a look at how to merge cells in Excel, how to unmerge them, and another method for combining two cells into one without losing the data in the cells.

How to Merge Cells in Excel

Before we get into how to merge cells, let’s talk about exactly what happens when you merge in Excel. In this example, we’ll look at two columns, one for first name and one for last name:

how to merge cells in excel - Two Excel columns before merging

When we merge two of these cells, we end up with the contents of those cells in a single cell, like this:

how to merge cells in excel - A single merged cell in Excel

The two cells have been combined, leaving a single cell that’s twice as wide and only contains one value. Excel only keeps the upper-left value of any merged cells. That’s one drawback to merging in Excel. We’ll talk about how to get around that in a moment.

To merge cells in Excel, select the cells you want to merge. You can select any number of cells; in our example, we’ll select just two. Once you’ve selected the cells, head to the Home tab and click Merge & Center in the Alignment section:

how to merge cells in excel - Excel Merge & Center button

If you’ve selected more than one with text in it, you’ll get a warning:

how to merge cells in excel - Excel merge cells warning

If you want to continue, just hit OK. You’ll then have your merged cell as in the screenshot below. That’s all there is to it.

how to merge cells in excel - Excel merged cell

Merging Columns in Excel

In some cases, you’ll want to merge entire columns instead of just a few cells. Merging columns in Excel is easy; just select both columns and use the same steps.

First, highlight the two columns you want to merge:

Selecting columns to merge in Excel

If you hit the Merge & Center button right now, you’ll end up with one huge cell that has a single value in it. Instead, click the dropdown arrow next to Merge & Center and select Merge Across:

Excel Merge Across button

After clicking Merge Across, you’ll receive another warning from Excel. But instead of a single warning, you’ll get one warning for each row in your selection. Which is a lot. After clicking OK for each row, you’ll have a newly combined column:

Excel merged columns

You might be wondering why you wouldn’t just delete the second column in this case. Well, you probably would. Merging columns doesn’t do a whole lot for you.

Let’s talk about a better way to merge cells in Excel.

Combining Cells With CONCATENATE

The fact that combining cells makes you lose data is a big disadvantage of using Excel’s merging function. However, you can get around that by using a formula. Here’s the syntax of the CONCATENATE function, one of Excel’s most useful text functions:

=CONCATENATE(text 1, [text 2],...)

The function takes multiple text inputs and creates a new cell that combines all of them. This lets you merge cells without losing any data. Let’s use the same spreadsheet as before, with the list of first and last names. Instead of merging the cells and losing the last names, we’ll create a new column and use CONCATENATE to bring in both the first and last names.

Here’s the formula we’ll use in the new columns:

=CONCATENATE(B2, " ", C2)

Notice that between B2 and C2 we have a space between two quotes. This is important because it inserts a space between the contents of the cells being merged. If you forget it, you’ll get the first and last names mashed together.

Here’s what it looks like in Excel:

Using CONCATENATE to merge cells in Excel

When I hit Enter, here’s what we get:

Merged cells using CONCATENATE

Much better than our first attempt, isn’t it?

You also have the advantage of being able to modify the combination later, whereas you cannot do that when you merge cells the regular way.

How to Unmerge Cells in Excel

If you decide to merge cells, you’ll also want to know how to unmerge them.

Unfortunately, unmerging doesn’t bring any of your lost data back. When you merge cells in Excel, you’re going to lose some information, and it’s gone forever. Merged cells can create weird spaces in your spreadsheet, though, and unmerging them solves the problem.

To unmerge cells, just select the merged cell, click the dropdown arrow next to Merge & Center, and click on Unmerge Cells:

how to unmerge cells in excel - Unmerge Cells button in Excel

The cells will go back to their original count and size. You’ll still only have the data from the upper-left corner of your selection, though. This is one reason why it’s a good idea to work on a copy of your spreadsheet (or use the CONCATENATE function).

Merging Cells Can Still Be Useful

While you’ll need to use CONCATENATE to merge cells without losing data, there are still some uses of merging in Excel. It’s often used for formatting to clean up a table, for example, which may help you get a better print of your spreadsheet:

Using Merge in Excel for formatting

In general, though, it’s better to use CONCATENATE if you’re looking to merge cells without losing data.

That being said, you may find that you come across a situation where you need to merge cells in Excel. Even an Excel beginner will need to use them every day. So, when you find one of those situations now, you’ll know exactly how to do it.

And don’t forget that you can merge Excel files and sheets too!


Read Full Article

Maverick, a social network for young women, launches with $2.7M in funding


While Bumble BFF and Hey! Vina help adult women find new friends, there isn’t a social network dedicated to young women.

But Brooke Chaffin and Catherine Connors are looking to change that with the introduction of Maverick, a social network that connects young girls with female mentors to express their creativity in a safe space.

Here’s how it works:

When a new user signs up, they can browse through various challenges set forth by Catalysts, inspiring role models selected specifically by the founders to inspire the younger demographic on the network. These challenges include things like making their own super hero, creating their own dance number or choosing a mantra.

Users, usually between the ages of 10 and 20, can post their response to a challenge via photo or a 30-second video and browse the responses of others. Interestingly, Maverick has done away with ‘likes’ and instead offers points for various types of engagement, like posting a response to a challenge, posting a comment, or giving someone a badge.

For now, there are four badges on the platform (unique, creative, unstoppable, and daring) and the company has plans to add more badges as it grows.

But Maverick isn’t just an app. The company also plans on holding a series of one-day live events across the country, highlighting young women emerging on the platform in categories like STEAM, entrepreneurship, comedy and music.

In fact, the first live event goes down tomorrow in Los Angeles, featuring “Founding Mavericks” or role models such as Chloe & Halle Baily, Brooklyn and Bailey McKnight, Daunnette Reyome, Laurie Hernandez and Ruby Karp.

For now, Maverick is a free app focused on growing its user base. But the founders see an opportunity to turn Maverick into a utility, not unlike LinkedIn, offering a subscription for premium features. And it makes sense that LinkedIn would serve as inspiration for Chaffin and Connors, as LinkedIn CEO Jeff Weiner is one of Maverick’s investors.

The company has raised $2.7 million in seed funding led by Matt Robinson of Heroic Ventures, with participatino from Susan Lyne and Nisha Dua of BBG Ventures as well as Jeff Weiner.

Here’s what co-founder and Chief Content Officer Catherine Connors had to say:

The research on girls’ social development has shown us the same thing for decades. During early adolescence, the majority of girls stop raising their hands, participating in sports and extra-curricular activities, taking risks, and stepping into leadership roles. In short, they stop believing in themselves. And it’s not because we don’t tell them that they should believe in themselves — it’s that they don’t get enough real opportunity to prove to themselves that they can.

Founders Chaffin and Connors met during their tenure at the Walt Disney Company and kept coming back to the idea of empowering girls through a new social network, and so Maverick was born.

The network is designed with a progression loop not unlike that of a game, where Mavericks can progress toward becoming a Catalyst and inspiring other young women.

The app launches out of beta today.


Read Full Article

How to Easily Switch Between Multiple DNS Servers in Windows


If you’ve looked into your boosting your internet speed or getting around blocked content, you’ve probably come across DNS servers, which are used to translate website domain names into IP addresses.

While using your ISP’s default DNS works fine, customizing your DNS has lots of advantages. But digging into your computer settings to change your DNS provider is a hassle, and keeping all those DNS server IP addresses straight isn’t always easy. Thankfully, a small utility can help solve both these issues.

Easily Switching Between Multiple DNS Servers

Public-DNS-Server-Tool

  1. Download the free Public DNS Server Tool (the link is in step 1 under Setting up public DNS servers).
  2. Extract the downloaded ZIP and run the PublicDNS.exe file inside.
  3. Confirm administrator access for the app. You’ll see the tool’s main interface once it launches.
  4. First, you should create a backup of your current DNS settings for easy restoration. Select Backup > Backup from the menu bar and choose a location to save the backup.
  5. Once that’s done, select your wireless card from the top dropdown menu or choose Select all to apply changes to all of them (if applicable). You might see multiple options if you have both an Ethernet and wireless connection available.
  6. Next, select the DNS server you’d like to use from the list. This tool currently supports 16 options, including Cloudflare’s new DNS, Google’s Public DNS, OpenDNS, and more.
  7. With the server you want to use highlighted, click Change.
  8. You’ve successfully changed your DNS options!

To restore your original settings, just visit Backup > Restore and import your backup file. For further reading, check out why third-party DNS is more secure.


Read Full Article

How to Set Specific Download Folders for File Types in Chrome and Firefox


Keeping your downloads folder organized can be a hassle, but there are a few automated ways to keep the mess under control. You can automatically delete files older than 30 days, and you can save files to specific folders based on file type. We’ll show you how to do the latter in this article.

How to Auto-Save File Types to Specific Folders

The Chrome extension RegExp Download Organizer allows you to create rules for downloaded file types. For example, every time you download a PDF, it will be automatically saved to a folder of your choice in the downloads folder.

You can also filter down to specific file types. For example, you can save all images to one folder, or you can create a separate folder for JPEGs, another for PNGs, etc. The Chrome extension comes with a couple of rules already created: one for images and one for torrents.

Let’s say you want to create a new rule for PDFs, enter the following:

  1. For MIME (Filetype), enter application/pdf.
  2. For Destination Path, select pdf/ (or the folder name of your choice).

The extension includes a list of rules you can use for various file types, including compressed files (ZIP), Windows executable files (EXE), audio files, and video files.

As you can see from the screenshot above, you can also create rules based on specific URLs and file names.

How to Add “Save In” Folders to the Right-Click Menu

If you would rather add specific locations you can choose from as you save the file, there is an extension available that does that.

The Save In extension (ChromeFirefox) requires extensive permissions when installing, including the ability to read and change all data on websites you visit. By way of contrast, the aforementioned RegExp Download Organizer extension only requires permission to manage your downloads.

If you decide Save In is right for you, once you’ve installed the extension, when you right-click a link or file in your browser, you’ll now see Save in in your context menu, with two folder options already listed: images and video. If you save a file to these locations, your browser will automatically create those subfolders in your Downloads folder if they don’t exist.

To add or modify the locations on that list, open the extension options in your browser and just add them to the existing list:

When you right-click a file, those locations will now be available in your context menu:

If you want to select a folder that isn’t in the downloads folder, it gets a little more complicated and will require you to create a symbolic link. If that seems too complicated for you and you really want to save your files to folders that aren’t in the downloads folder, there is one more option to consider:

Mac users can automatically move files to and from specific folders using automated rules with Hazel or Mac’s Automator, while Windows users can give QuickMove a try.


Read Full Article

How to Deactivate Facebook Messenger


Most people are aware of the difference between deleting and deactivating a Facebook account. In short, deactivating is akin to a temporary deletion where you can reactivate your account at any time, whereas deleting your account is a permanent removal of data.

But you might not realize that deactivating your Facebook account does NOT deactivate your Facebook Messenger account. People will still see be able to see you and can attempt to contact you. Indeed, the process for deactivating Facebook Messenger is entirely separate.

How to Deactivate Facebook Messenger

Before you can deactivate Facebook Messenger, you need to deactivate your Facebook account. We’ve previously explained how to deactivate your account, so if you’ve not yet deactivated Facebook, you need to go and do it before continuing.

Next, to deactivate Facebook Messenger, just follow the simple instructions below:

  1. Open Messenger on a mobile device.
  2. Tap on your profile picture in the upper right-hand corner.
  3. Scroll down and select Privacy and Terms.
  4. On the next screen, choose Deactivate Messenger.
  5. Enter your password.
  6. Tap on Deactivate.

To reactivate Facebook Messenger, just log back into the Messenger app using your username and password.

Note: Reactivating Messenger will also reactivate your main Facebook account. If you only want to keep the Messenger service, you will need to deactivate your Facebook account for a second time.

Remember, you can still appear invisible on Messenger and Facebook Chat without taking the drastic step of deactivating your account. Lastly, keep in mind that if you delete your Facebook account completely, you will lose access to Messenger as well. There is no way to keep Messenger without maintaining a Facebook profile.


Read Full Article

Snap Launches Spectacles 2.0 for Snapchat Addicts


In 2016, Snap Inc. launched Spectacles. These Spectacles from Snap, formerly known as Snapchat, were sunglasses capable of shooting video. Snap hoped Spectacles would take off in a big way, but in the end the company only sold 150,000 pairs.

However, undeterred, Snap Inc. has launched Spectacles 2.0. This new and improved version of Spectacles has a better design, better specs (excuse the pun), and some new features to boot. Unfortunately, Snap has increased the asking price accordingly.

Snap Spectacles Version 2.0

Snap’s new Spectacles are smaller, slimmer, and slightly more aesthetically pleasing. However, they still look like cheap sunglasses, even in Ruby, Onyx, and Sapphire. Unfortunately, they’re not cheap, as Snap has upped the price from $129 to $150.

Addressing one of the biggest complaints about the originals, the new Spectacles feature improved transfer speeds for uploading your photos and videos. That’s right, Spectacles 2.0 can now take photos as well as shoot videos. And both are in high-definition.

Snap Inc. has also made the new and improved Spectacles water-resistant, meaning they can stand trips into swimming pools and the sea. Spectacles 2.0 also feature a second microphone to help pick up conversations between the wearer and those in the shot.

The new Spectacles are available exclusively from Spectacles.com. They’re currently available to customers in the U.S., Canada, and the U.K., with other parts of Europe having to wait until May 3rd to get their hands on them. So please form an orderly queue.

Are They Still Just a Novelty?

Snap’s Spectacles 2.0 are clearly an improvement over the original. However, they still look like a novelty you would only wear occasionally. They’re also more expensive, and don’t offer anything mind blowing over the original. So it’s difficult to see them selling well.

If this is the first you’re hearing about Snap’s hardware—which is entirely possible given the lack of sales—then be sure to check out our overview of the original Spectacles. And if you can pick some up cheap they may even be worth owning.


Read Full Article

6 Ways to Make Vacations More Fun Using Technology

8 Adobe Illustrator Tips to Help You Design Faster


Adobe Illustrator is the best program for graphic design work; for pros and amateurs alike. But it’s so powerful it can be a pretty overwhelming experience. There’s so many things to do, and so many ways to do them, it’s hard to know where to begin.

The good news is that Illustrator has plenty of ways to simplify—or even automate—tasks that could otherwise be quite complex.

Here are several essential Adobe Illustrator tips and tricks that will help you design faster than ever.

1. Apply Multiple Strokes to an Object

Adobe Illustrator is a program that is built around vector objects that have a stroke (the outline) and a fill (the central color). If you’re relatively new to Illustrator, you might not realize that objects can have multiple strokes and fills.

illustrator strokes

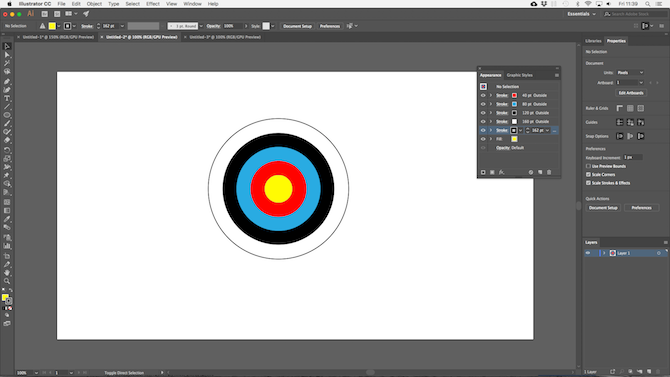
This target board image might look like it’s made from lots of different objects combined. In fact, it’s one object. A circle with a yellow fill, and red, blue, black, white, and black strokes.

Here’s how it was done:

illustrator strokes outside

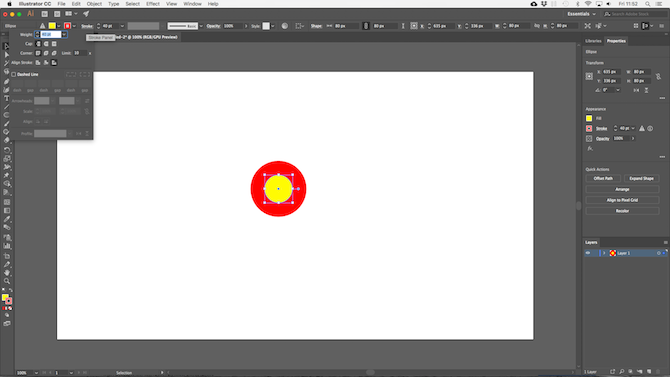
Draw the circle, 80px across. Set the fill to yellow, and the stroke to red with a 40pt width. Click the dotted line under the Stroke option and set Align Stroke to Align Stroke to Outside.

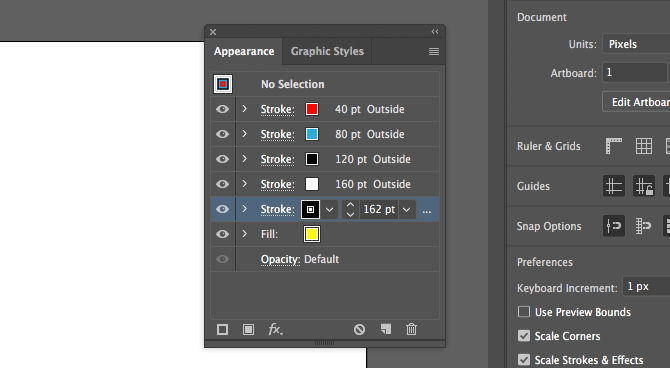
Now open the Appearance panel through the Window menu, or hit Shift + F6. Select the stroke and click Duplicate Selected Item. This creates a copy above the existing stroke.

Select the one below (we want the original stroke to be above) and set the color to blue and the size to 80pt. Then duplicate that.

illustrator repeat stroke

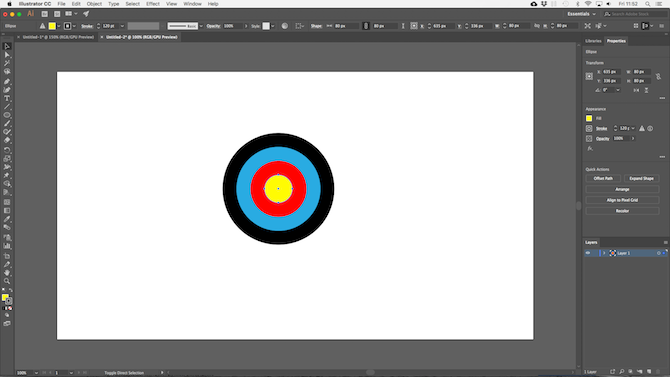
Repeat the process, changing the color and adding 40pt to the size of the stroke each time. For the final stroke, add just 2pt extra.

illustrator appearance

There are lots of other options. You can combine gradient and texture fills, add effects, change the opacity of elements, and more. You can also play with the order the strokes are placed on the image, to see the effect that has. Just drag and drop them into position.

Once you get used to the feature it becomes a whole lot easier than combining lots of elements to make relatively simple objects.

2. Make Patterns and Textures the Easy Way

Creating patterns and textures can be time consuming if you try to do it manually. The same job can be achieved in seconds if you learn how to use the Blend Tool.

With the Blend Tool you can repeat objects a set number of times, morph one shape into another, or create smooth gradients between different colors. And it’s really simple to master.

illustrator blend tools

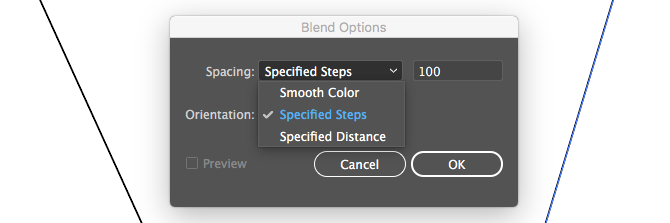
To get started, draw two objects on your canvas. Now double click the Blend Tool to open the options dialog box. Set Spacing to Specified Steps and enter the number of times you want the object to be duplicated.

The other options are Specified Distance, which sets the distance between each repeated object in pixels, and Smooth Color for smoothly blending between two colors.

illustrator simple blend

Click OK. Then, with the Blend Tool selected, click the first object on your canvas followed by the second. The gaps fill in automatically.

types of illustrator blend

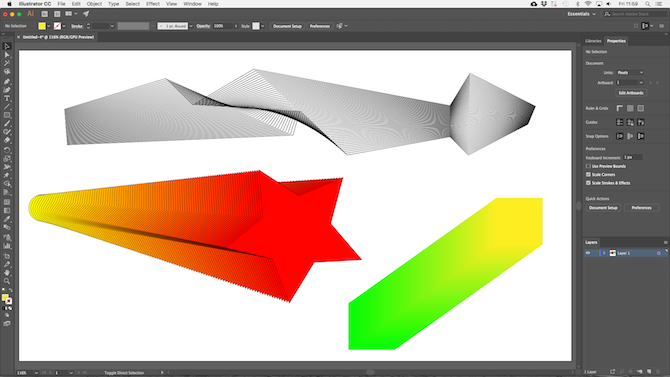
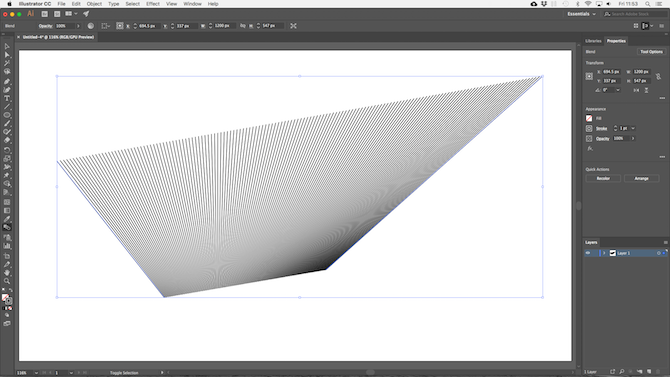
The Blend Tool works with almost any object, including text, with only a few exceptions. Try experimenting to see what you can achieve.

3. Hide Parts of Objects With Masks

Learning how to use masks can be a massive time saver. A clipping mask, as it’s called in Illustrator, is a shape that masks the object below it. Only the content that is positioned directly below the mask is visible. Everything else is hidden.

Masks let you combine patterns, textures, and gradients with shapes and text very quickly, and in a non-destructive way.

create illustrator mask

Start with the object you want to be masked, open on your canvas. Now draw a new shape on top of it. Make sure it’s on the same layer.

masked item illustrator

Use the Selection Tool to select both objects. In the Quick Actions panel on the right, click Make Clipping Mask.

You can reposition either the mask or the object being masked at any time.

illustrator compound path

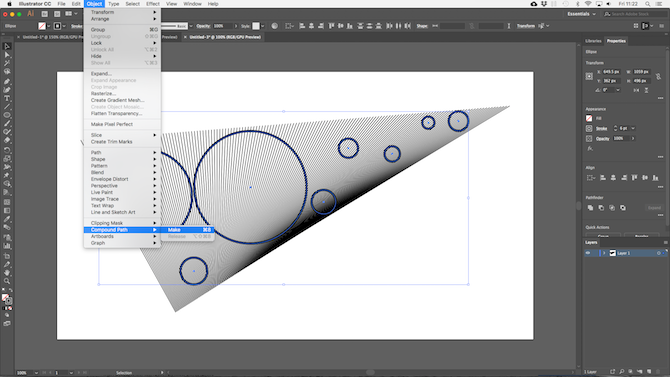
To create a mask from multiple objects you need to combine them first. Select all the objects you want to include then go to Object > Compound Path > Make. This turns them into a single shape.

multi mask illustrator

Select your new compound path plus the object below it. From the Quick Actions panel choose Make Clipping Mask to finish the job.

4. How to Create Complex Shapes

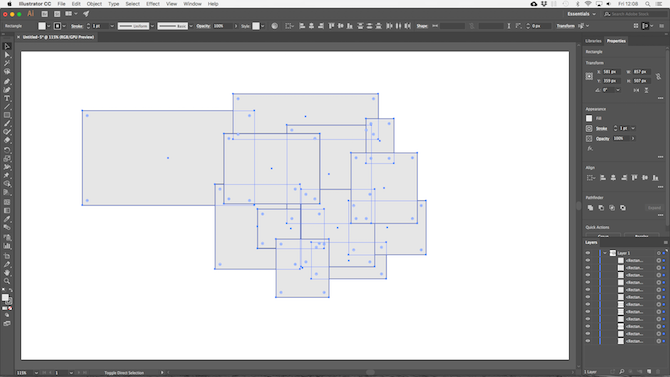
Shapes are an integral part of the Illustrator experience, but creating complex shapes has always been quite tricky. The problem has now been solved by the best of Illustrator’s more recent additions, the Shape Builder Tool.

The Shape Builder Tool works by dividing a group of selected objects into segments, wherever their lines cross. All you need to do is select which of those segments you want to include in your shape, and which you want to exclude.

Here’s simple example to explain.

build shapes illustrator

Draw a few shapes, then use the Selection Tool to select all of them.

Click the Shape Builder Tool.

shape builder tool

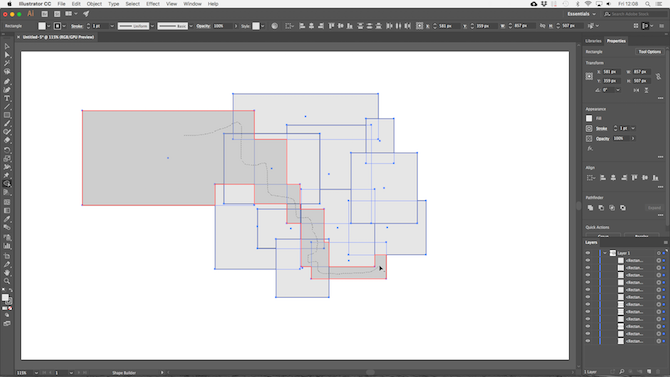
When you move your mouse pointer over the selected objects you’ll see each individual “segment” become shaded. Simply click and drag through all the ones you want to add to your shape.

You can create more than one complex shape from any group. Just click and drag as often as you need.

custom shape illustrator

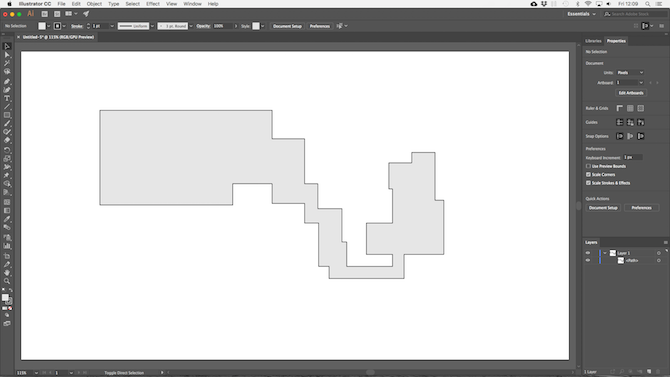
To discard segments you no longer need, hold Alt and click inside them.

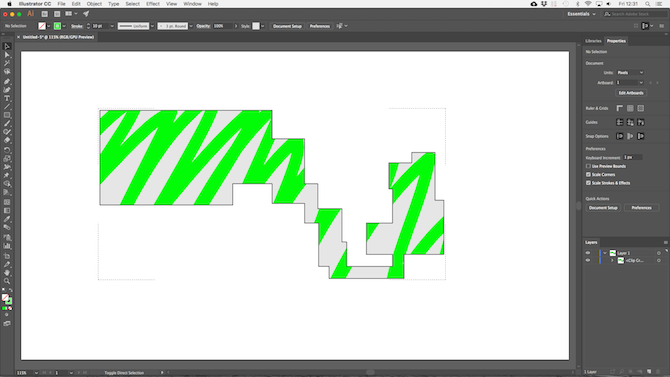
5. Draw Shapes Freehand

An even quicker way to build shapes or objects is to draw them freehand.

illustrator shaper tool

The Shaper Tool recognizes certain gestures. Draw a rough circle, rectangle, triangle, and so on, with your mouse or pen and Illustrator will convert them into perfect shapes.

But that’s not all. You can use the Shaper Tool to combine shapes using an additional “scribble” gesture:

  • You can scribble inside a shape to remove its fill.
  • Scribble inside, then cross over the stroke to delete the shape completely.
  • Or scribble inside then draw a continuous line through connected shapes to combine them into a single shape.

scribble gesture

Although less precise than the other options available to you, the Shaper Tool is an effective way to get quality sketches down quickly. It’s particularly useful if you’re using a graphics tablet.

6. Draw Inside Shapes

Illustrator has three Draw modes that control where and how your tools can draw on the canvas. They’re found through a tiny button below the toolbar on the left edge of the screen.

The default setting is Draw Normal. This means you can draw anywhere on the canvas.

paint inside only

Select an object and set the Draw mode to Draw Inside. Now, anything you add to your image will only be visible if it’s within the bounds of that object. This is effectively a masking shortcut, and is very useful when working on icons, buttons, or small details.

The Draw Outside option has the opposite effect, and lets you isolate and protect certain parts of your image without needing to worry about re-ordering your layers.

7. Select Objects With the Same Properties

Say you want to drop the stroke on certain objects down by half a point, or change that shade of blue to something just slightly different. You grab the Selection tool, select all objects you want to edit, then make the changes, right?

Except when you’re working on large or complex documents, actually finding all instances of the same color, stroke weight, or whatever else, can be a challenge in itself.

select same illustrator

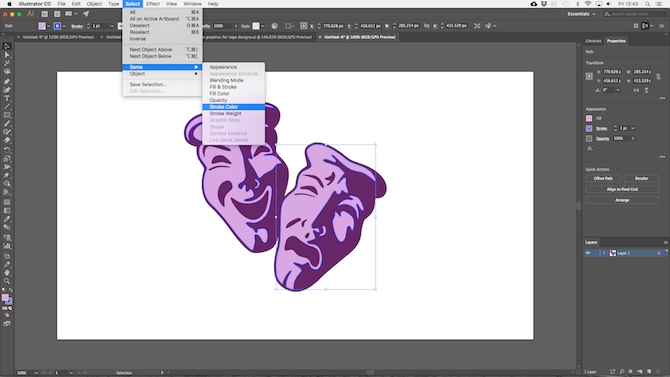
Fortunately, you don’t need to do it manually. The Same option will do it for you.

Select an object with the properties you’re looking for. Now go to Select > Same and choose the property you’re searching. It could be the Fill Color, Stroke Weight, Blending Mode, or several other options.

Once you click, all the objects that share those same properties will be selected.

8. Switch Colors Quickly

When you’re experimenting with colors or color schemes you will often find you need to change all instances of a single color within your image. You can do this quickly using the Recolor Artwork option.

First up, select the object whose color you want to change. It may be a single object. Or, use the Same option outlined in Step 8 to select all the objects containing the same fill or stroke color. Alternatively, hit Ctrl + A or Cmd + A to select everything on the page.

recolor artwork illustrator

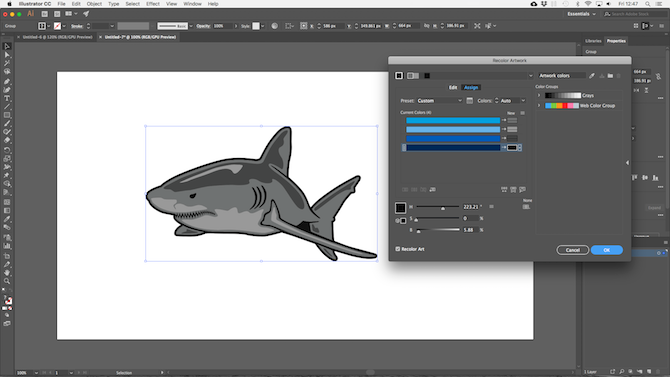
Next, click the Recolor Artwork button in the Options Bar at the top of the screen.

The color of your selected objects will be shown under Current Colors. Double click the box under New to select a new color to change them to.

preset colors illustrator

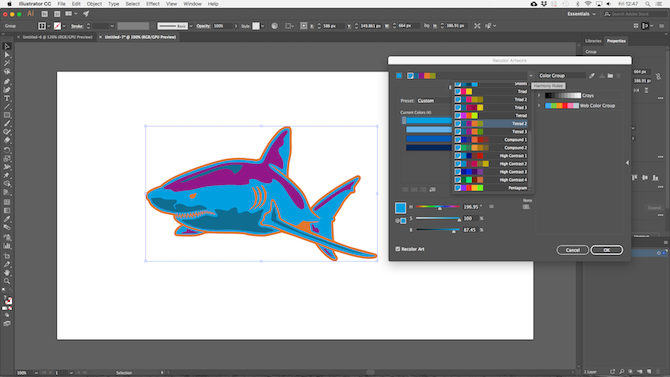
If you’re working with logos, web artwork, or the like, hit the Harmony Rules dropdown at the top of the window to see a range of preset color schemes based on your existing choices. The colors update in real time, so keep clicking through until you find a combination you like.

Now You Can Work Faster in Illustrator

As daunting as it may be at first, the more you know about Illustrator, the faster you’ll become at working in it.

These Adobe Illustrator tips and tricks should help you become a whole lot more efficient with the app, and you can then start using it for all your design projects. From creating logos to designing business cards, and much more.

And if you still feel like you need to get up to speed on what the program has to offer, check out our beginner’s guide to Adobe Illustrator.


Read Full Article

Pro-Trump social media duo accuses Facebook of anti-conservative censorship


Following up on a recurring thread from Mark Zuckerberg’s congressional appearance earlier this month, the House held a hearing today on perceived bias against conservatives on Facebook and other social platforms. The hearing, ostensibly about “how social media companies filter content on their platforms,” focused on the anecdotal accounts of social media stars Diamond and Silk (Lynnette Hardaway and Rochelle Richardson), a pro-Trump viral web duo that rose to prominence during Trump’s presidential campaign.

“Facebook used one mechanism at a time to diminish reach by restricting our page so that our 1.2 million followers would not see our content, thus silencing our conservative voices,” Diamond and Silk said in their testimony.

“It’s not fair for these Giant Techs [sic] like Facebook and YouTube get to pull the rug from underneath our platform and our feet and put their foot on our neck to silence our voices; it’s not fair for them to put a strong hold on our finances.”

During the course of their testimony, Diamond and Silk repeated their unfounded assertions that Facebook targeted their content as a deliberate act of political censorship.

What followed was mostly a partisan back-and-forth. Republicans who supported the hearing’s mission asked the duo to elaborate on their claims and Democrats pointed out their lack of substantiating evidence and their willingness to denounce documented facts as “fake news.”

Controversially, they also denied that they had accepted payment from the Trump campaign, in spite of public evidence to the contrary. On November 22, 2016, the pair received $1,274.94 for “field consulting,” as documented by the FEC.

Earlier in April, Zuckerberg faced a question about the pair’s Facebook page from Republican Rep. Joe Barton:

Why is Facebook censoring conservative bloggers such as Diamond and Silk? Facebook called them “unsafe” to the community. That is ludicrous. They hold conservative views. That isn’t unsafe.

At the time, Zuckerberg replied that the perceived censorship was an “enforcement error” and had been in contact with Diamond and Silk to reverse its mistake. Senator Ted Cruz also asked Zuckerberg about what he deemed a “pervasive pattern of bias and political censorship” against conservative voices on the platform.

Today’s hearing, which California Rep. Ted Lieu dismissed as “stupid and ridiculous,” was little more than an exercise in idle hyper-partisanship, but it’s notable for a few reasons. For one, Diamond and Silk are two high-profile creators who managed to take their monetization grievances with tech companies, however misguided, all the way to Capitol Hill. Beyond that, and the day’s strange role-reversal of regulatory stances, the hearing was the natural escalation of censorship claims made by some Republicans during the Zuckerberg hearings. Remarkably, those accusations only comprised a sliver of the two days’ worth of testimony; in a rare display of bipartisanship, Democrats and Republicans mostly cooperated in grilling the Facebook CEO on his company’s myriad failures.

Congressional hearing or not, the truth of Facebook’s platform screw-ups is far more universal than political claims on the right or left might suggest. As Zuckerberg’s testimony made clear, Facebook’s moderation tools don’t exactly work as intended and the company doesn’t even really know the half of it. Facebook users have been manipulating the platform’s content reporting tools for years, and unfortunately that phenomenon coupled with Facebook’s algorithmic and moderation blind spots punishes voices on both sides of the U.S. political spectrum — and everyone in between.


Read Full Article