15 January 2020

Google’s new feature makes it easier to shop from search results


Following the big revamp of Google Shopping last fall, Google today is updating the shopping experience on Google Search, on mobile. Now, when you do a web search for clothing and accessories, you won’t just get a set of links to different products and stores. Instead, Google will present a new section where it features the most popular products from stores around the web, which you can filter and browse.

For example, you could search for things like “running shoes” or “women’s leather belt” or “wide-leg pants,” Google explains, then be presented with a selection of items in a new, visual guide. You can then further narrow down what you’re looking for by style, department or size type, and view images. Underneath each item, Google will also display how many stores carry that product and the lowest price. (e.g. “$199+”)

This change will help in particular when you’re trying to find all the stores that carry one particular item — something that hasn’t been easy to do in the past.

And as you view the item in question, you can scroll down to read aggregated customer reviews. When you’re ready to buy, you’ll just click on the link to the store you want to shop.

The feature is powered by Google’s search index, which has organized products from over a million online stores and is regularly refreshed. The new shopping feature isn’t a paid advertisement for retailers either, Google notes. Participating retailers can include their eligible products within this section for free.

The changes are part of a large focus on how the shopping experience can be improved for online retailers as Google revamps to become the go-to platform for finding everything that’s not on Amazon. On that front, Google this week acquired a startup, Pointy, for $163 million to help physical retailers track their in-store inventory.

The company also recently updated the Google Shopping homepage to become a personalized destination based on your habits and purchases, with additions like a price tracker and new ways to shop from both local and online retailers. But many online searchers’ first stop when looking for clothing and accessories isn’t the Google Shopping destination — it’s a simple Google Search. That’s where the new features come in.

Google says the updated experience will begin rolling out starting today and through this week, on mobile devices only.


Read Full Article

Mobile payment app Lydia raises $45 million round led by Tencent


French startup Lydia is raising a $45 million Series B round (€40 million). Tencent is leading the round with existing investors CNP Assurances, XAnge and New Alpha also participating.

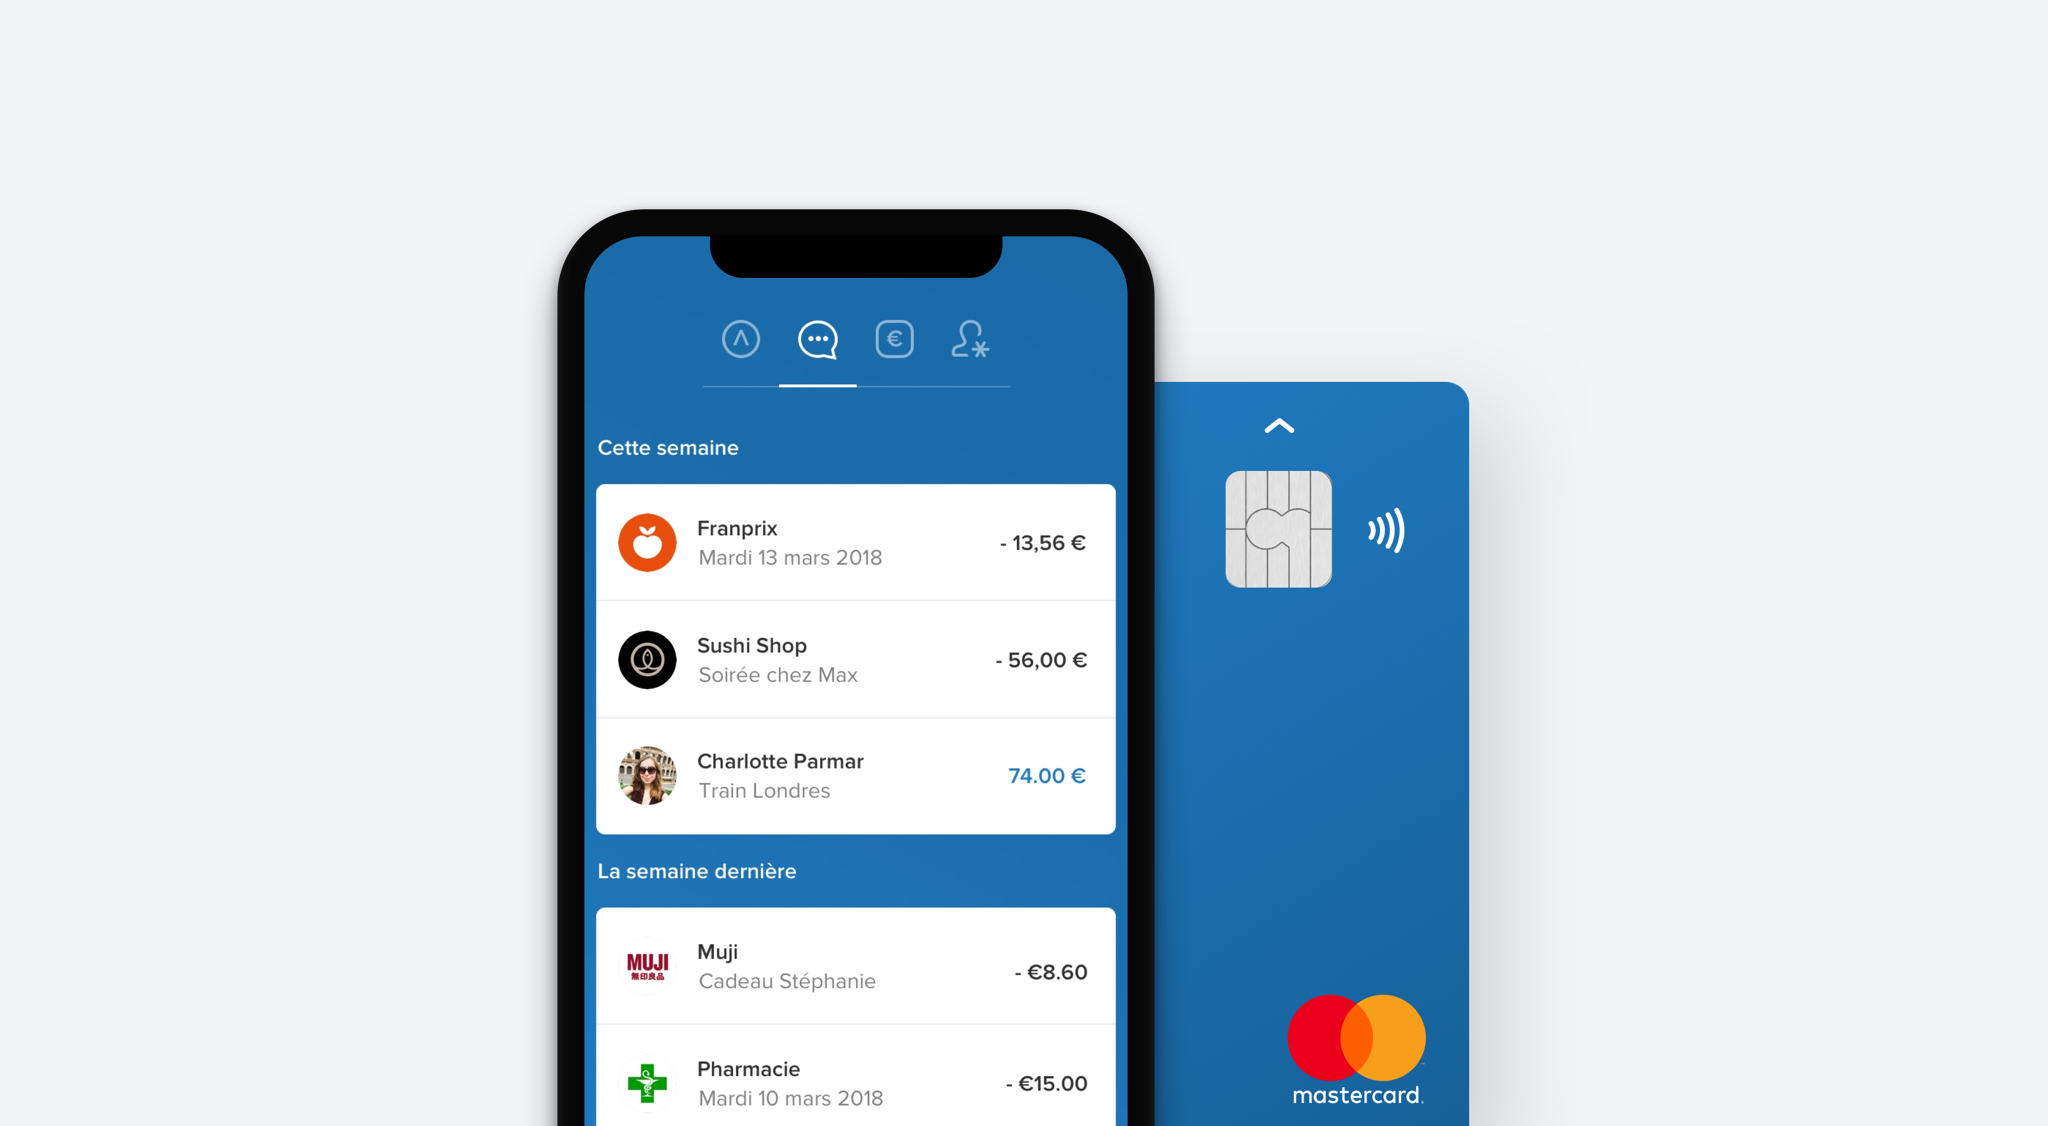
If you live in France, chances are you already know Lydia quite well. The company has become a ubiquitous mobile payment app, especially for people under 30 years old. Think about it as a sort of Square Cash or Venmo, but for France.

“At first, we wanted to raise less but we ended up raising more,” Lydia co-founder and CEO Cyril Chiche told me in a phone interview.

The company has managed to attract 3 million users in France. More impressive, 25% of French people between 18 and 30 years old have a Lydia account — and 5,000 people sign up every day. Lydia currently has 90 employees.

More recently, the company has expanded beyond peer-to-peer payment. First, the company wants to help you manage your money in many different ways with an important value — everything should happen in real time.

You can create multiple Lydia accounts to put some money aside or use money in that sub-account for a specific purpose. That feature alone turns the app into a versatile money management app.

For instance, you can associate a Lydia payment card with a Lydia account and a virtual card with another Lydia account — that virtual card works with Apple Pay, Google Pay, Samsung Pay and more. You can change those settings in real time.

You can share accounts with other Lydia users. And shared accounts are truly shared — everyone can top up and withdraw money from that account. You can spend directly from that account or withdraw money to another account.

You can also turn any Lydia account into a money pot account. In just a few taps, you can generate a link and share it with your friends so that they can add money using their regular payment card or a Lydia account.

More recently, the company has introduced “the market”, a marketplace of other financial products. From the Lydia app, you can borrow up to €1,000 in just a few seconds. You can also insure your phone and other mobile devices. You can get some free credit when you open a bank account, insure your home with Luko, switch to another electricity and gas provider, compare mobile phone and internet providers and more.

And that strategy is going to be key in the future. “We have an ambitious goal, which is turning Lydia into a mobile financial service app,” Chiche said.

He also pointed out that the company that has been the most successful when it comes to creating a mobile marketplace of financial products is Tencent with WeChat.

“Tencent is also the number one player in the video game industry, and there’s no industry with as much user engagement,” Chiche said. Tencent acquired Supercell, bought 40% of Epic Games, acquired Riot Games (League of Legends), invested in Ubisoft, Activision Blizzard, Discord, etc. Lydia hopes that it can learn from Tencent on the user engagement front.

Compared to many fintech startups, Lydia doesn’t want to replace banks altogether — the company says it wants to build a meta-banking app. Peer-to-peer payments represent the top of the funnel and a great user acquisition strategy thanks to networking effects.

You can then connect your Lydia account with your bank account and your debit card. This way, you can send money back and forth between your Lydia accounts and your bank account. As a user, that strategy slowly pays off over time. After a while, you end up spending money directly from your Lydia account and relying more heavily on Lydia’s native payment features, with your bank account acting as a money back end.

At the bottom of the funnel, Lydia hopes that it can turn active Lydia users into paid customers with a handful of in-house and third-party financial products. In other words, Lydia doesn’t want to become a credit institution like a traditional bank, it wants to become a financial hub. Expanding the marketplace will be a big focus for the company going forward.

While Lydia is available in other European countries, Lydia is still massively used in its home market with other markets lagging behind. With today’s funding round, growth in foreign countries is going to be the second key topic.


Read Full Article

How supply chain transparency can help the planet | Markus Mutz

How supply chain transparency can help the planet | Markus Mutz

Given the option, few would choose to buy products that harm the earth -- yet it's nearly impossible to know how most consumer goods are made or where they're sourced from. That's about to change, says supply chain innovator Markus Mutz. He shares how he used blockchain technology to track Patagonian toothfish on their journey from ocean to dinner plate -- and proved it's possible to offer consumers a product they can trust.

Click the above link to download the TED talk.

App stores saw record 204 billion app downloads in 2019, consumer spend of $120 billion


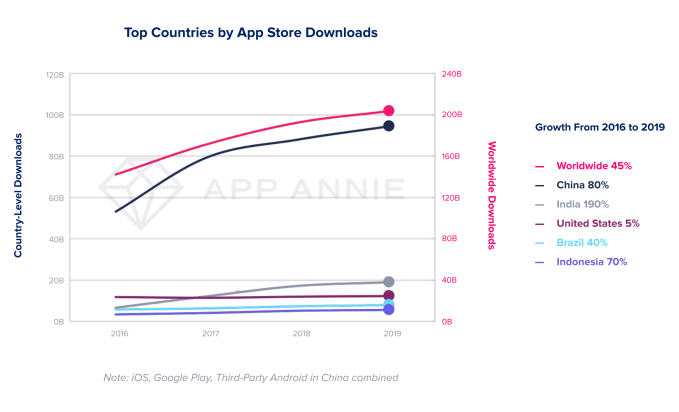
Consumers downloaded a record 204 billion apps in 2019, up 6% from 2018 and up 45% since 2016, and spent $120 billion on apps, subscriptions and other in-app spending in the past year. The average mobile user, meanwhile, is spending 3.7 hours per day using apps. This data and more comes from App Annie’s annual report, “State of Mobile,” which highlights the biggest app trends for the past year, and sets forecasts for the years ahead.

According to App Annie, the record growth in mobile downloads in 2019 can be attributed to the growth taking place in emerging markets like India, Brazil and Indonesia, which have seen downloads soar 190%, 40% and 70%, respectively, since 2016. Meanwhile, download growth in the U.S. has slowed to just 5% during that same time, while China saw 80% growth.

That doesn’t mean users in mature markets aren’t downloading apps, only that the growth in year-over-year download numbers is starting to level off. Still, these more mature markets continue to see large numbers of installs, with more than 12.3 billion downloads in the U.S. in 2019, 2.5 billion in Japan and 2 billion in South Korea.

The record numbers are notable also, given that App Annie’s analysis excludes re-installs and app updates.

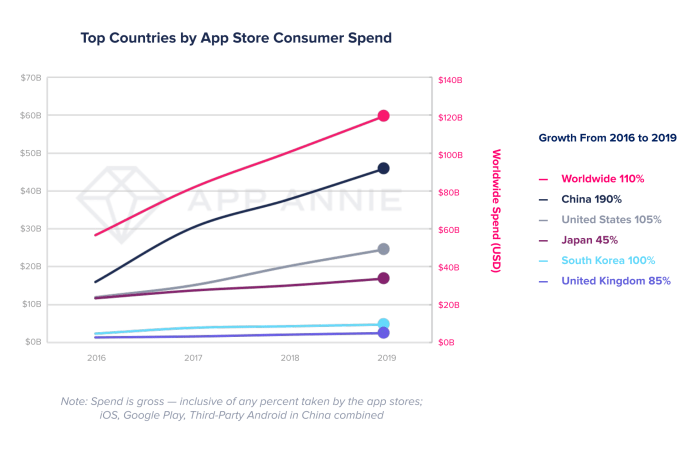
App store consumer spending was on the rise in 2019, as well, with $120 billion spent on apps — a figure that’s up 2.1x from 2016. Games continue to account for the majority (72%) of that spending, but the shift toward subscriptions has played a role, too. Last year, subscriptions in non-gaming apps accounted for 28% of consumer spending, up from 18% in 2016.

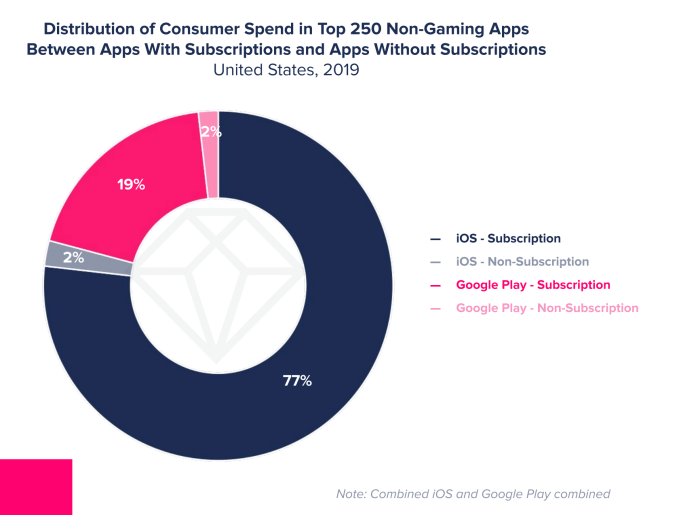
Subscriptions are now the primary way many non-gaming apps generate revenue. For example, 97% of consumer spending in the top 250 U.S. iOS apps was driven by subscriptions, and 94% of the apps used subscriptions. On Google Play, 91% of the consumer spending was subscription-based, while 79% of the top 250 apps used subscriptions.

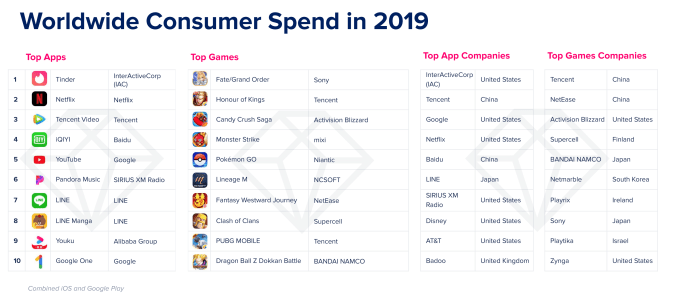
In particular, dating apps like Tinder and video apps like Netflix and Tencent Video topped 2019’s consumer spend charts, thanks to subscription revenue.

Mature markets, including the U.S., Japan, South Korea and the U.K. are helping to fuel consumer spending across both games and subscriptions, App Annie found. But China remains the largest market by far, accounting for 40% of global spend.

App Annie also forecast that the mobile industry will contribute $4.8 trillion to the global GDP by 2023.

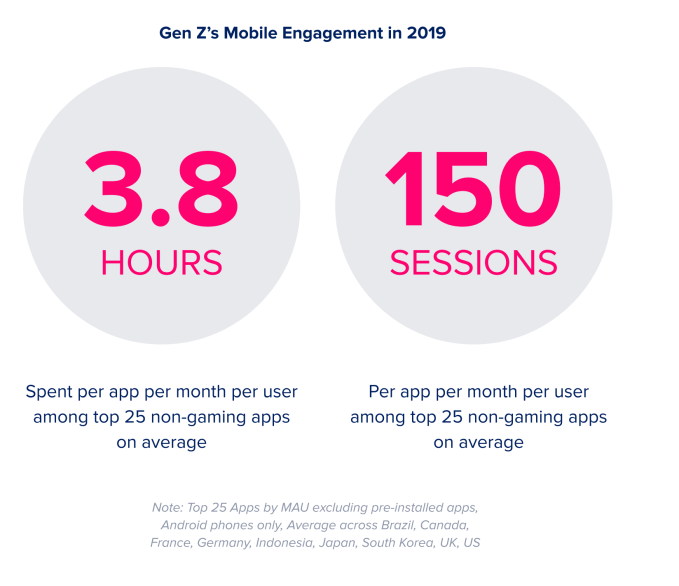
The report additionally identified several mobile trends from 2019, including the mobile app connection to the Internet of Things and smart home devices (106 million downloads for the top 20 IoT apps last year); the huge mobile engagement by Gen Z (3.8 hours per app per month, among the top 25 non-game apps, on avgerage); and mobile ad spend’s growth ($190 billion in 2019 to $240 bilion in 2020).

Ad spending combined with consumer spending is expected to reach $380 billion worldwide by 2020, App Annie forecast.

Gaming was given a big breakout section, given its contribution to consumer spending.

Consumer spending in mobile gaming was 2.4x that of Mac/PC gaming, and 2.9x more than game consoles. In 2019, mobile gaming saw 25% more spending than all other gaming, and is on track to surpass $100 billion across all app stores by next year.

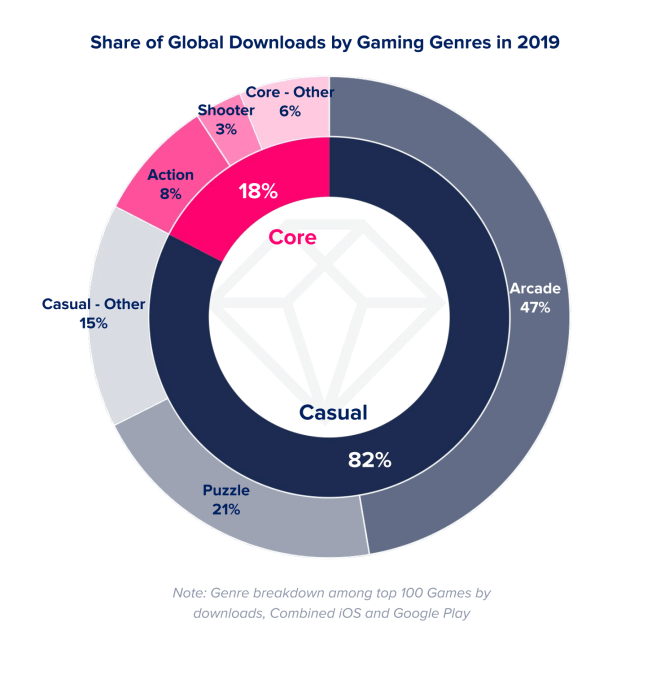
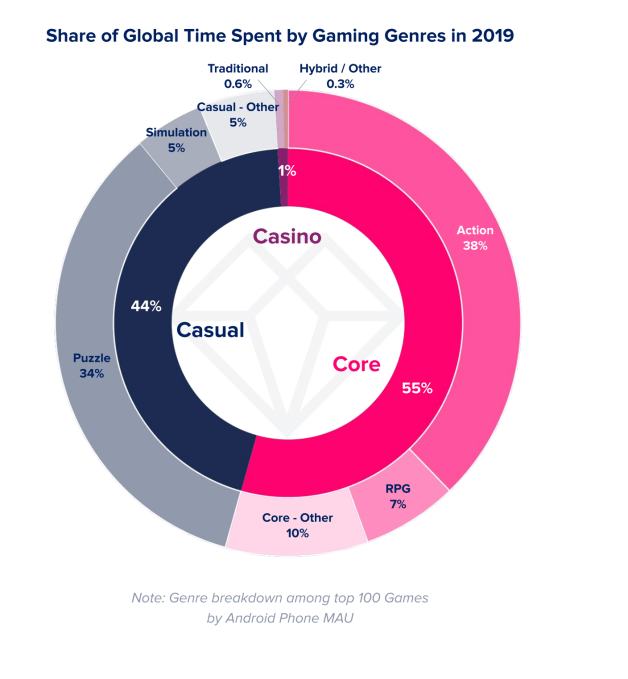
Casual gaming (led by Puzzle and Arcade) was the most downloaded type of games in 2019. Meanwhile, core games (e.g. Action, RPG, etc.) — which were only 18% of downloads — accounted for 55% of time spent in top games. PUBG Mobile was the No. 1 core game (action) on Android in 2019, in terms of time spent, while Anipop (puzzle) was the top casual game.

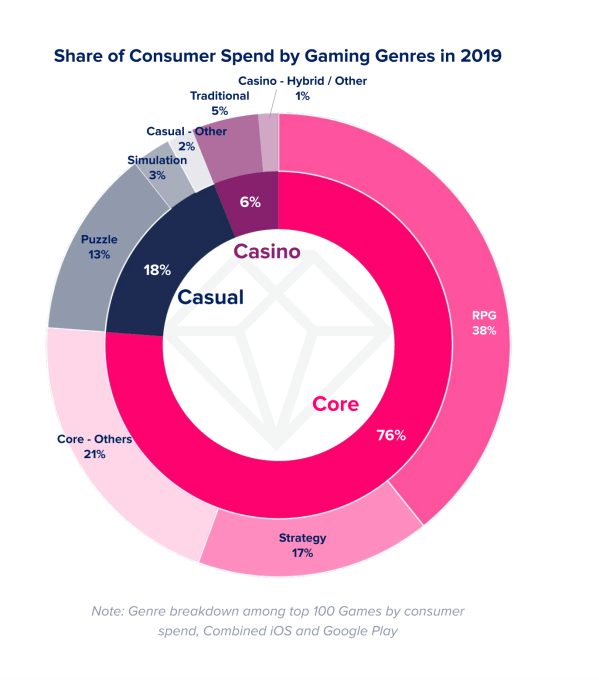
Core games also accounted for the majority (76%) of game spending, followed by casual (18%), then casino (6%).

In 2019, 17% more games surpassed $5 million in consumer spending versus 2017. And the number of games to top $100 million grew 59% compared to two years prior. Despite the sizable growth in revenues, App Annie also pointed to new models in mobile gaming, like Apple Arcade, which is giving other types of games a chance to thrive. Unfortunately, no third-party firm is able to track Arcade revenues, which will become a glaring blind spot for App Annie in the years ahead.

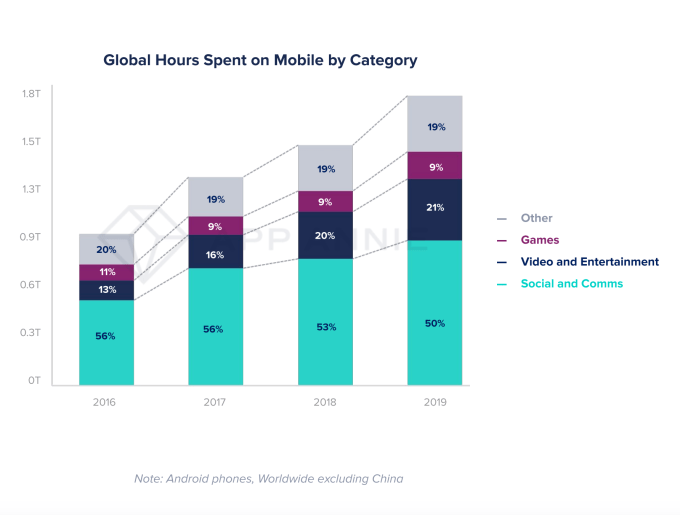
App Annie also examined other sizable segments of the mobile market for trends, including fintech, retail, streaming and social. Some of the more significant findings included: the fintech app user base growth topping that of traditional banking apps; shopping app downloads saw 20% year-over-year growth to reach 5.4 billion downloads; streaming growth that included 50% sessions in 2019 compared to 2017; and 50% of time spent on mobile was spent in social networking and communication apps.

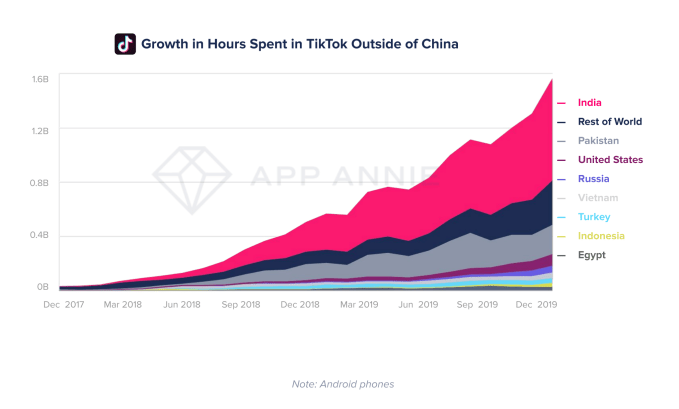
TikTok was given special attention, given its rapid growth last year. Time spent in the short-form video app grew 210% year-over-year in 2019 globally. Even though eight out of every 10 minutes spent in TikTok were by users in China, the app’s usage skyrocketed in other markets as well, App Annie said.

Industries App Annie identified as being transformed by mobile in 2019 included ridesharing, fast food/food delivery, dating, sports streaming, plus health and fitness. The full report offers a few more details and mobile trends for each of these.

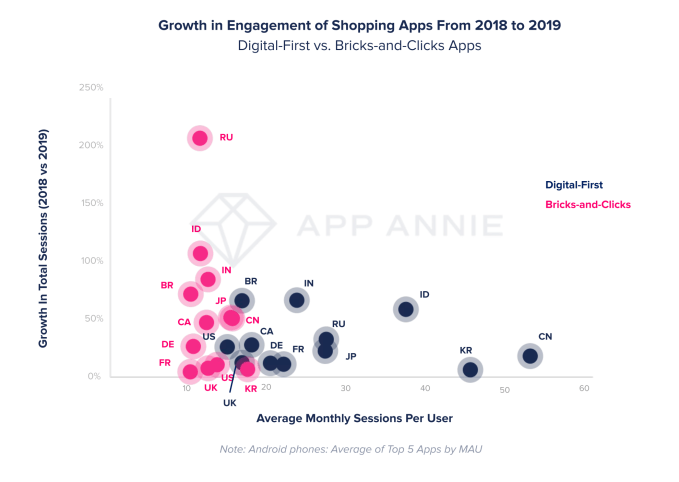
One bigger highlight was that digital-first shopping apps still had 3.2x more average monthly sessions per user compared with apps from traditional brick-and-mortar retailers (dubbed “bricks-and-clicks” apps in the report).

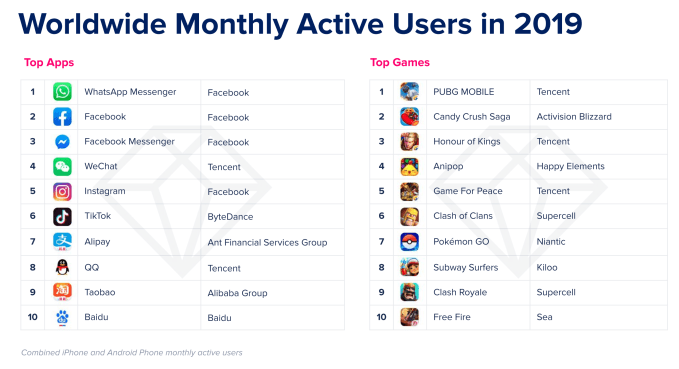
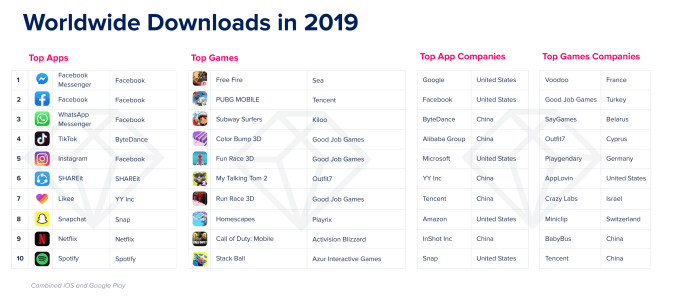
App Annie also compiled its own list of the top apps of 2019 by active users, downloads and revenue. Facebook apps still led by engagement, with WhatsApp, Facebook and Messenger in the top three spots and Instagram as No. 5. And they maintained similar positions by downloads, only swapping places with one another.

Consumer spending was a different story, with Tinder generating the most revenue in 2019, followed by entertainment and streaming apps like Netflix, Tencent Video, iQIYI, YouTube and others.


Read Full Article

5 Reasons You Should Get An Unlocked Phone


buy-unlocked-phone

While unlocked phones dominate the market in developing countries, many people in the US and UK are used to buying carrier-locked devices. But this results in them missing out on the benefits of unlocked phones.

So what exactly are unlocked phones and what benefits do they provide? Here’s all you need to know about the devices, including five reasons why you should choose an unlocked phone for your next smartphone purchase.

What Is an Unlocked Phone?

unlocked phone product listing samsung

Simply put, an unlocked phone doesn’t carry software limiting it to a single mobile carrier. This means that users are able to switch carriers or SIM cards on their smartphone without the device blocking access.

A locked phone, on the other hand, only works with the network of the carrier that you bought the device from. For example, a locked AT&T phone only works on the AT&T network. Meanwhile, a locked Verizon phone will only work with the Verizon network. The phone will block access to other carrier plans, even if you insert a different SIM card.

If you want to use your locked phone with another carrier, you need to remove this software. It’s not as simple as a factory reset of the device. Even rooting your phone isn’t necessarily enough.

Unlocked phones either never had this software installed in the first place or the software has been removed.

When it comes to compatibility, unlocked phones are not only CDMA or GSM-specific—you can get unlocked phones that are compatible with either (or both) of these standards. The central defining feature of unlocked phones is their ability to be used across different networks without carrier-imposed limitations.

Unlocked Vs Locked Phones: Reasons to Buy Unlocked

The restrictions imposed by locked phones mean that many people prefer unlocked devices instead. There are a variety of benefits to choosing an unlocked device, from increasing consumer choice to providing travel convenience.

1. Freedom of Choice

unlocked phones for sale

Buying an unlocked phone opens up a world of choice for consumers. Firstly, you aren’t limited to the phones that your carrier is stocking or selling. You can choose to import a phone, buy discounted phones from resellers, or get a phone that your carrier simply doesn’t provide for some reason. Just make sure the phone supports the right frequency bands and you’re good to go.

Secondly, you also have more choice regarding who you buy your phone from. This means that you can compare prices to find the lowest or choose a vendor that’s the most convenient for you.

Unlocked devices also mean that you don’t have to base your carrier choice on your phone preference either. You can choose whichever carrier you want. This means you aren’t forced to stick with a carrier simply because they have the device you want. Most manufacturers provide unlocked versions of their smartphones on their online stores or Amazon.

Furthermore, an unlocked phone doesn’t mean a lack of manufacturer warranty or customer support. You can still enjoy the same perks of a locked phone—as long as you buy it from a vendor that provides a warranty.

2. Use Dual-Sim Functionality

One of the biggest benefits of having an unlocked phone is the ability to use dual-SIM functionality on devices that support the feature. With dual SIM phones, you can connect to two different carriers at the same time. This allows you to shop for different voice and data plans for the best price, as well as providing a few other benefits.

However, if you have a locked phone, the only real benefit you can get from dual-SIM functionality is having two numbers from the same carrier on a single device. You miss out on the cost-saving benefits and outage avoidance that unlocked dual SIM phones can provide.

3. The Ability to Easily Sell Old Devices

smartphone selling at store

Since 2019, many premium smartphones have been priced over the $1,000 threshold on release. As a result, more people are showing interest in buying and selling used devices. However, if you have a carrier-locked phone, this poses a major barrier to finding a buyer.

With unlocked phones, you don’t have to worry about whether a potential buyer is with the same carrier as you. You could technically request your carrier unlock your phone for you. But this is an extra step of inconvenience and delays that unlocked phones avoid.

4. Switch Providers Without Changing Your Phone

With unlocked phones, you aren’t tethered to your mobile carrier when your contract expires or if you’re unhappy with their service. Switching carriers doesn’t require you to buy a new phone or ask your old carrier to unlock your device.

Rather, you have more freedom to change plans or switch providers when a contract expires while also keeping your old device. You can choose the best mobile carrier for you without worrying about needing to get a new device too.

Unlocked phones also make switching to a cost-effective prepaid plan or SIM-only plan much simpler. You can shop around for cheap plans or the best prepaid rates without worrying about carrier compatibility with your device.

5. Switching SIM Cards When Travelling

using phone travelling

Locked phones prevent you from using a local SIM card when traveling internationally, since they are incompatible with other carriers. This forces you to either enable roaming with your carrier (which is costly) or buy a temporary device when abroad.

With an unlocked phone, you can just switch to a prepaid SIM card from a local carrier. This saves you from having to port messages and apps to a temporary phone or relying solely on free Wi-Fi networks.

Even when traveling within your own country, you may find a destination has poor signal for your particular carrier. If you have an unlocked phone, you can switch out your SIM temporarily to use a carrier that has better signal in the area.

Unlock Your Carrier-Locked Phone

If you already have a carrier-locked phone, don’t fret. You can turn it into an unlocked device to reap these benefits.

From contacting your carrier to unlocking your phone yourself, check out our guide on how to unlock a carrier-locked phone.

Read the full article: 5 Reasons You Should Get An Unlocked Phone


Read Full Article

Roborock S6: Smartest, Most Powerful Robovac Yet


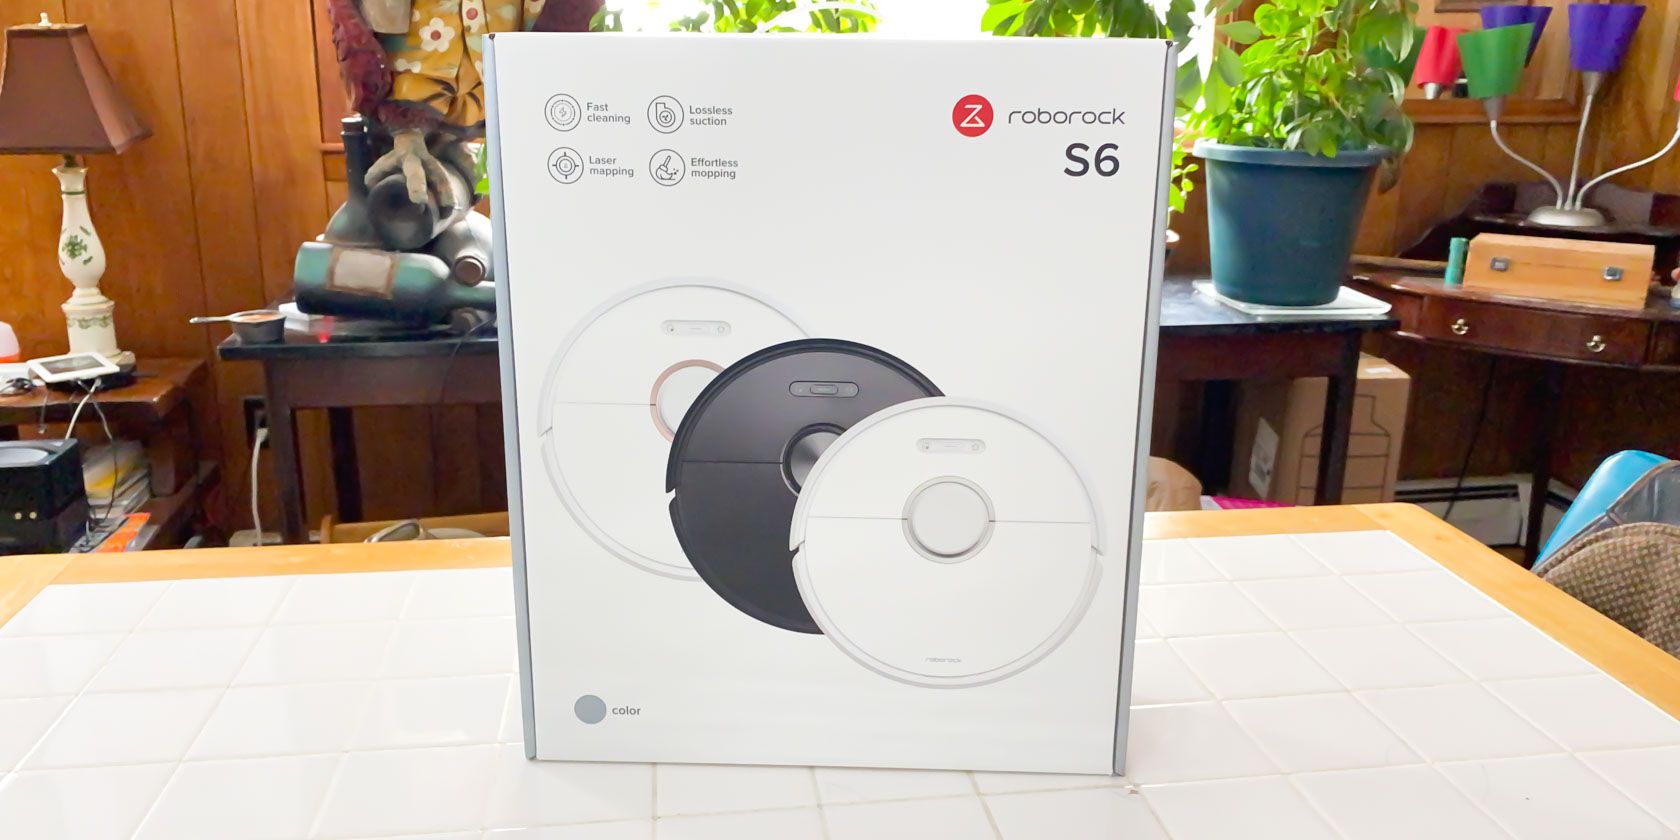
roborock s6 robot vacuum box
Our verdict of the Roborock S6:
It's not perfect, but the combination of power and smart features makes the Roborock S6 an easy recommendation. Just don't count on it to mop up spills.
810

Keeping your home clean isn’t easy. Even if you’re the tidiest person in the world, you can’t stop the inevitability of dust. What you can do is make sure that the dust doesn’t have time to accumulate.

Not all that long ago this would mean a portable vacuum and a rigorous daily maintenance routine. Now we can just have a robot vacuum take care of it for us. The Roborock S6 can do this and a whole lot more, but is it worth the extra money compared to the company’s more affordable models?


What’s in the Box?

The vacuum and the charging dock are the largest items inside the box, but they’re far from all that is included. You also get the power cable for the dock, a mopping attachment that we’ll look at later, and the manual. You also get a fair number of accessories.

One reusable mop cloth is included along with several disposable mop cloths and a mop cloth plate for use with these cloths. You also get a damp-proof mat to place under the dock for if you’re using it on hardwood flooring. Finally, you get a replacement air filter and water filter.

Specifications

On paper, the Roborock S6 looks similar to its siblings, the Roborock S4 and S5. That said, there is more than meets the eye here. While the specs may be similar, the S6 outperforms both of those models. We’ll look at why a little later on in the article.

When we looked at the Roborock S4, we remarked that the dustbin on that model was larger than the S6, but that is in fact not the case. The dustbin on the S6 is notably larger.

Battery capacity: 5,200mAh

Charging time: 3 hours

Cleaning time: 3 hours

Max suction: 2,000Pa

Dimensions: 13.8 x 13.7 x 3.79 inches

Weight: 7.9 Pounds

Build Quality and Design

The Roborock S6 is lighter than the S4, but it’s no less solidly built. While you should obviously be careful, this feels like it could take a few solid knocks with no issues. This applies to both the body as well as the undercarriage and various moving parts. The 14 sensors used in the vacuum include a cliff sensor to keep it from tumbling down the stairs, but the vacuum feels like a drop or two won’t kill it.

Front view of the Roborock S6

The overall design and aesthetic are similar to the S4 and S5, though this does have a few different touches. First, the white finish is striking, especially when paired with the orange-red sensor array on top of the vacuum. The downside is that the white does make any dust gathered while cleaning stand out more, so you may be tempted to wipe this down more often. Fortunately, it’s also available in black.

Setup and Getting Started

When I reviewed the Roborock S4 I noted that it was strange that the manual mentioned Roborock parent company Xiaomi’s Mi Home app instead of the bespoke Roborock app. That is the case with the Roborock S6 as well. You can use the Mi Home app, but the Roborock app gets you access to more advanced features as well as control from multiple devices.

Roborock logo

While you could technically use the vacuum without the app, you’re missing out on a lot of functionality that way. To get started, all you need to do is download the Roborock app on the device of your choice, then either sign in or create an account. From here the app will guide you through the setup process.

You start by resetting the Wi-Fi on the Roborock S6, then choosing the wireless network you wish it to connect to in the Roborock app. Then you connect to the S6’s internal Wi-Fi and the app transfers your settings over. Once this process is complete, you’re ready to start using the vacuum.

Using the App

Once the vacuum is set up, you’ll see it on the main screen of the Roborock app when you log in. The simplest way to start using the vacuum is to select it, then hit the large button labeled “clean” at the bottom of the app. That’s all you need to do, as the vacuum will take it from here.

The app also helps you to maintain your vacuum. Tap the three dots at the top right of the screen to open settings, then tap the “Maintenance” option. Here you’ll get a handy overview of the air filter, side brush, main brush, sensors, and water tank filters. This keeps you from having to guess when to change filters.

You can also use the settings to tell the vacuum to travel to any location in your home, as long as it has mapped there. This is handy if you want to use the vacuum to clean a specific spot. On the main screen, you can choose from four cleaning modes: silence, turbo, max, and balanced. These let you opt for a more powerful clean or a less disruptive one.

Finally, there are a few options here you might want to enable. Carpet mode is turned off by default, but turn it on and the vacuum will automatically increase suction when it detects carpet.

Mapping and Smart Features

As with the Roborock S4 and S5, the main appeal of the S6 is just how smart it is. In the case of the S6, these smarts actually have an impact on its overall performance. Thanks to an improved processor, the Roborock S6 can clean more and for longer on the same 5,200mAh battery packed into the other vacuums.

Roborock S6 sensors and buttons

This model also has a higher sensor count than the other models, which lets it more smartly navigate around your home. When I first started the vacuum, it navigated its way around the walls of the room, cleaning as it went. After it had mapped these out, it zig-zagged its way across the carpet, much as you would if you were vacuuming manually.

Using map saving mode, which is still in beta, you can edit maps once the vacuum has saved them. This lets you create virtual no-go zones. You can use these to keep the vacuum from roaming too far or from staying away from furniture that is particularly fragile or easily knocked over.

Roborock S6 in dock

Once noticeable upgrade from the S4 was that the Roborock S6 seems to have an easier time finding and settling into its dock. Thanks to the medium-pile carpet in my home, I had to prop up the back of the S4’s dock to let it slot itself in. With the S6 that hasn’t been the case, as it has made its way into the proper charging position without assistance every time.

Performance

Suction is the same across Roborock’s S-series vacuums, and that’s not a bad thing. The vacuum does a good job cleaning, even where other vacuums might struggle. Roborock advertises that the S6 has enough strength to lift AA batteries, but I put the vacuum to a more real-world test.

I recently adopted three kittens who are quickly growing. They’re house trained but tend to track litter around in the area of the litter box, which is near my office. This means that a not-insignificant amount of litter makes its way on to two area rugs in my office. The Roborock S6 did a great job cleaning up, which makes my life much easier.

Top shot of the S6

This was also a great way to test the sensors. As you’ll see in the video accompanying this article, the cats were fascinated by the vacuum and surrounded it while it did its work. Instead of blindly charging at them, the vacuum would slow down noticeably as it approached them, which makes me feel better about letting it do its job without supervision.

When it comes to spills or other messes, you don’t need to wait for the vacuum to make its rounds. Simply pick the vacuum up, put it down in the vicinity of the area you want to be cleaned, and press the “spot cleaning” button. This cleans a roughly 16 square foot area around the vacuum. This is handier than it sounds.

Mopping

While robot vacuums have gotten good to the point that you could at least theoretically use one for all your vacuuming needs, mopping hasn’t quite got there. The ideal way to use the mopping functionality of the Roborock S6 is to start with a clean floor, then use the S6 to keep it looking clean. This will prevent dust buildup, but it’s not too effective at cleaning spills.

S6 mopping module

It’s also not the easiest to use. You need to manually attach the mop to the vacuum, then tell the vacuum to do its work. Then once it has finished its job, you need to remove the attachment so it doesn’t get in the way of vacuuming. That said, if you want to mop the kitchen while you’re prepping dinner, this will help you save a little time.

The mopping module has a small water tank that you fill by opening the seal at one corner. You can adjust how much water is used with an adjustment switch that sits underneath the mopping cloth.

Should You Buy the Roborock S6

The Roborock S6 offers a nice combination of powerful cleaning, smart features, and ease of use. It also happens to look quite nice, at least as far as vacuums go, which means you won’t be embarrassed by it sitting in your home. Add the mopping attachment and it gets even better.

The advanced processor in the S6 means that while it doesn’t look all that different from its cheaper brethren on paper, it performs much better. This is definitely worth the price difference as long as you can afford it. This isn’t just a great upgrade, it’s yet another argument for why you should be cleaning your home with a robot vacuum.

Enter the Competition!

Roborock S6 Robot Vacuum Giveaway

Read the full article: Roborock S6: Smartest, Most Powerful Robovac Yet


Read Full Article

How to Delete Multiple Contacts on an iPhone


delete-multiple-contacts-iphone

Your iPhone contacts often fall into the same disorder that your social media circles do. From a few choice people, it eventually turns into a country of its own. And there comes a day when you go searching for ways to delete multiple contacts on your iPhone.

Unlock the free "iPhone and iPad Shortcuts" cheat sheet now!

This will sign you up to our newsletter

Enter your Email

It’s a no-brainer to delete a single contact on iPhone:

  1. Open Contacts and then tap the name of the contact you want to delete.
  2. Tap Edit at the top-right of the screen.
  3. Scroll down and tap Delete Contact, then tap Delete Contact again to confirm.

But unlike Android, iOS doesn’t have any similar quick-tap feature that enables you to batch-delete contacts you don’t want to keep. So let’s work around that limitation with these methods.

How to Delete Multiple Contacts on an iPhone

If you are someone who’s in the Apple ecosystem, then whip out your trusty MacBook or iMac. Your Mac’s keyboard helps you select more than one entry in the Contacts app.

Whatever you delete on your Mac is synced to your iPhone via iCloud. So make sure both your iPhone (or iPad) and your Mac are signed in to the same iCloud account. Also, you’ll need to make sure that you’re syncing contacts across your iCloud account.

Sign into iCloud:

  1. Go to the Apple menu and click on System Preferences > iCloud.
  2. Sign in with your Apple ID and check Contacts so that they will sync across your devices.

Follow these steps after you have checked your sign-in:

  1. Open the Contacts app on your Mac.
  2. Select All Contacts. Hold down the Command button on your keyboard and select all the contacts you want to delete.
  3. Right-click and click Delete Cards to erase all their info. Confirm by clicking on Delete.

Delete multiple contacts from the Contacts app on the Mac

These multiple contacts will delete from your iPhone as the device syncs with iCloud.

Use iCloud to Delete Multiple Contacts on an iPhone

You may not be carrying your Mac right now, or perhaps you’re a Windows user. In that case, it’s simple to log into your iCloud account from any web browser and delete multiple contacts in one go.

To do so:

1. Log in to iCloud.com with your Apple ID.

2. Click on the Contacts icon. Go down the list and selectively highlight the contacts you’d like to delete by holding the Control key on your Windows keyboard.

3. Click on the Settings (gear) icon at the bottom-left of the screen. Select Delete from the popup menu.

Delete multiple contacts with iCloud

4. A confirmation will pop up. Choose Delete again to confirm the deletion of the contacts.

After this, all your contacts will again sync to all your devices that share this iCloud account.

Use an App to Delete Multiple Contacts

The above two methods make you jump through a few hoops. If you find it cumbersome, then take the help of a third-party app to delete contacts in bulk on your iPhone.

Here are two contact management apps you can download from the App Store.

1. Groups

Groups is a well-recommended app that can do the job of bulk deleting contacts. One of the free features is a fast way to delete contacts, while the other advanced features are unlocked through in-app purchases. This limitation isn’t a problem when you only want to mass delete your way to a cleaner contact list.

Do note that Groups is ad-supported in the free version.

To mass-delete contacts with the Groups app:

  1. Install and open the Groups app on your iPhone.
  2. Skip the intro screen and allow Groups access to your contacts when prompted.
  3. Select All Contacts from the Groups list.
  4. Scroll through your contacts and mark the ones you’d like to delete by tapping on the circle to the left of their name.
  5. Tap Choose Action at the top and tap on Delete Contacts from the menu.
  6. Confirm again with a tap on Remove from my iPhone! to remove your selected contacts.

Download: Groups for iOS (Free, in-app purchases available)

2. Cleanup Duplicate Contacts

Cleanup Duplicate Contacts is another address book cleaner app you can use for one of its several functions. It analyzes your contacts and removes or merges any duplicate contacts. But it also comes with a simple way to select contacts and delete them in one go.

To quickly delete contacts with the Cleanup Duplicate Contacts app:

  1. Install and open the Cleanup Duplicate Contacts app. Allow the app to access your contacts.
  2. Tap on Contacts. Next, tap on the Pencil icon to edit the list. Then scroll down the list and select the contacts to remove.
  3. Tap on the Delete icon at the bottom of the list. Confirm the deletion.

Download: Cleanup Duplicate Contacts for iOS (Free, in-app purchases available)

These two, of course, aren’t the only third-party iPhone apps that do the job. Any capable contact manager should be able to handle this missing feature in the iPhone.

After this quick exercise, you should now go into your Contacts list and verify that all your unwanted contacts have been removed. If anything has gone wrong, you should retrieve your deleted iPhone contacts immediately.

When Should You Bulk Delete All Your Contacts?

Address book management is another digital habit that can either help or mar your productivity. Yes, it’s easy to find a number with a search on your device, but why keep unnecessary numbers and get confused by them? They could even bring up bad memories.

Good management of your contacts is easier with a leaner list.

Mass-deleting your contacts is also a simple privacy step. You should delete sensitive numbers before you loan your device to someone or pass it down to a family member. In any case, it’s always wise to go for the nuclear option when you pass on, donate, or sell your old phone.

Thus, you should protect your privacy by erasing all your data (which includes all your contacts) from your iPhone or iPad. Signing out of iCloud prevents others from accessing data you’ve saved there. And if you get a new phone, why not start off with these steps for a clutter-free and minimal phone.

Read the full article: How to Delete Multiple Contacts on an iPhone


Read Full Article

How to Remove Comments and Accept All Changes in Word


remove-comments-word

Comments are a great way to leave notes to yourself or other editors in Microsoft Word. You can suggest edits on the text, point out a phrase you like, or just leave a friendly message.

Unlock the "Essential Microsoft Office Shortcuts" cheat sheet now!

This will sign you up to our newsletter

Enter your Email

We’re going to show you how to insert comments in Word. Then, we’ll show you how to remove comments in Word, plus how comments left by tracked changes can also be deleted.

How to Insert Comments in Microsoft Word

Before we cover how to delete comments in Word, let’s quickly go over how to insert comments.

First, highlight the text that you want to comment on. Alternatively, leave your text cursor where you want the comment to appear.

Next, right click and choose New Comment. You can also go to the Review tab in the ribbon and click New Comment (or click Ink Comment, if you want to handwrite it.)

Comment on Microsoft Word

This will create a call-out at the side of your document where you can leave a note to yourself or others—perhaps flagging that a sentence is poorly phrased or information needs fact checking. The comment will automatically attach your name and the time.

You can easily edit a previous comment or click Reply on it to leave a response.

Tips on Using Comments in Microsoft Word

You can format the text in comments like you would with regular text in Word, though not everything will work. For example, you can bold or italicize the text, or change its font or color. You can’t change its size or alignment.

You can also insert images through Insert > Pictures, though the sidebar size is fixed so you will need to resize larger images for all of it to be visible.

Changing user name in Microsoft Word

Also, you can change the name and initials that appear on the comment. To do this, go to File > Options and make the adjustments underneath the Personalize your copy of Microsoft Word section.

How to Remove Comments in Microsoft Word

When a comment is finished with, you can hide it, resolve it, or delete it:

  1. Hiding comments will remove all the comments from view, though they still technically exist on the document.
  2. Resolving comments will fade them out, but they’re still immediately visible.
  3. Deleting comments will remove them entirely.

The former two options are best for when you want to preserve a record, while the latter is best when you want to delete unimportant notes or if the document is being shared in a final form.

A quick way to move between comments can be found on the Review ribbon tab. In the Comments section, click Previous and Next to cycle through.

1. How to Hide Comments in Microsoft Word

You can hide all comments, which in turn will hide the review sidebar (providing it contains nothing else like tracked changes, which we discuss later.)

Hide comments markup in Microsoft Word

To do so, go to the Review tab of the ribbon, click Show Markup and untick Comments.

You can make comments visible again by repeating this action.

Bear in mind that this doesn’t delete the comments, even if you save the document when they’re not visible. It’s simply a way of temporarily tidying up the document when you don’t need to see the comments.

2. How to Resolve Comments in Microsoft Word

Click the comment that you wish to resolve and click Resolve. This will then fade the entire comment out. Click Reopen to reverse that.

Resolve a comment in Microsoft Word

You can also resolve individual replies. To do this, right click the reply and click Resolve Comment. Note that resolving the highest comment in the hierarchy will also resolve everything beneath it.

To reverse this action, right click the reply and click Reopen comment.

3. How to Delete Comments in Microsoft Word

Right click the comment that you wish to delete and click Delete Comment.

You can also delete individual replies with the same method, but be aware that deleting the highest comment in the hierarchy will also delete everything beneath it.

Delete comments in Microsoft Word

An alternate deletion method is to click the comment, go to Review on the ribbon, then click Delete within the Comments section.

If you want to delete every single comment in the Word file, click the dropdown arrow on the Delete button and click Delete All Comments in Document.

Once a comment is deleted, it’s removed from the document permanently. The only way to bring it back is by pressing Ctrl + Z for Undo, if you haven’t closed the document.

How to Manage Tracked Changes in Microsoft Word

Track Changes is a great Microsoft Word feature that allows editors to easily see what has been chopped and changed between revisions.

If your document is using Track Changes, you might see notes automatically appearing at the side when the formatting of the text is adjusted. Confusingly, despite similar appearance, these are not the same as comments and you can’t remove track changes the same way.

If you want to temporarily hide these notes, click Review on the ribbon and change the Display for Review dropdown to Simple Markup or No Markup.

Managing tracked changes in Microsoft Word

Alternatively, you can approve the change that the note is referring to. This will simultaneously remove the note. To do this, right click the note—you will see by the dotted line and the highlight what text is being referred to—and click Accept Format Change (or reject, if you want to reverse it.)

You can also manage this from the Review ribbon. On the Changes section, use the Accept dropdown and click Accept All Changes.

At any time you can click Track Changes on the same ribbon tab to enable or disable the tracking.

Word Features for an Easy Life

Now you know all about the comment feature and how to remove comments in Word with ease. It’s only a few clicks but it makes a lot of difference to team productivity when you know how to work with comments.

With that mastered, why not learn even more about Word? We’ve got you covered with hidden Word features to make your life easier.

Read the full article: How to Remove Comments and Accept All Changes in Word


Read Full Article

7 “No Internet Secured” Fixes for Windows 10


no-internet-secured-windows

Wireless networking issues in Windows 10 are usually straightforward to fix. But occasionally you might run into the “No Internet, secured” message. Appearing as a pop-up from the system tray, this error refers to a problem with the wireless configuration or connection.

It’s frustrating, but this error is relatively simple to deal with. It shouldn’t take long to get back online—if you know what you’re doing.

We’ve prepared seven solutions for you to work through, in order, to fix the “No Internet, secured” Windows 10 error.

What Does “No Internet, Secured” Mean?

You may have seen the error message pop up in the System Tray area of the Windows 10 taskbar. Or perhaps as a notification. But what does “No Internet, Secured” actually mean?

An unusually vague message for Windows 10, the error generally means that your internet connection is down. However, it can also appear when you have an active connection.

Confused?

That’s not surprising. The error is, it seems, intentionally vague. After all, if your computer no longer has an internet connection, whether it is secured or not is irrelevant.

While it can appear on any Windows 10 device, it is particularly common with Microsoft Surface devices. If your computer relies on the same network card or driver, you might see it occur regardless. Other conditions can cause the appearance of the “No Internet, secured” error, too.

Fixing the “No Internet, Secured” Error

Several fixes are available for this error. These depend on your computer setup and network adaptor. As such, not all these fixes will work. However, we’ve listed them in order of likelihood—just work through the tips in order.

This list will give you an idea of what’s required to fix the “No Internet, secured” error:

  1. Disable your VPN
  2. Refresh the IP configuration
  3. Reset Windsock
  4. Check your PC’s connection properties
  5. Disable IPv6
  6. Update the network device driver
  7. Run Network troubleshooter

Take the time to read the steps carefully before attempting to fix the error.

1. Disable Your VPN

Reckon your PC has connected to the local Wi-Fi network, only to be surprised by the “No Internet, secured” error?

Don’t worry. If you’re using a VPN, the VPN client’s built-in security features can cause this problem. Specifically, it can be the kill-switch that is designed to disconnect you from the internet when the VPN server goes down.

To check if this is the problem, disable your VPN (using the disconnect function) or even exit it entirely. Then take a moment to reconnect to the internet and try a regularly updated website—perhaps a news site.

If everything connects, then the problem was with the VPN server. Update your VPN client if possible, then connect to a new VPN server. If everything connects okay, you’ve fixed the error!

2. Refresh the Windows 10 IP Configuration

Not using a VPN, or experiencing continued incidence of the “No Internet, secured” message?

Some commands are available to help you deal with it. Right-click Start, then select Windows PowerShell. Here, enter the following commands in order:

ipconfig /release

ipconfig /renew

This will force your computer to request a new IP address from your local router. In many cases, this will resolve the error.

3. Reset Winsock

Another command line solution to the “No Internet, secured” error is to reset Winsock.

Rather than a feature of your local airfield, Winsock is the Windows Sockets API. This is a specification for your PC’s communication with network services, specifically the widely used TCP/IP.

To reset Winsock, use

netsh winsock reset catalog

Wait a moment; if the network doesn’t automatically reconnect, do so manually.

4. Check Your PC’s Connection Properties

Still no joy? It’s time to check your PC’s network adaptor. Open the settings screen by clicking the Wi-Fi connection icon in the system tray, then Network & Internet Settings.

Access network settings to fix the "No internet, secured" error

Here, click Change adaptor options, right-click the connection concerned, and click Properties. Confirm the following are checked:

  • Client for Microsoft Networks
  • File and Printer Sharing for Microsoft Networks
  • Internet Protocol Version 4 (TCP/IPv4)
  • Internet Protocol Version 6 (TCP/IPv6)
  • Link-layer Topology Discovery Responder

Click OK to confirm. If you made any changes, restart Windows when prompted.

5. Disable IPv6

IPv6 is a networking protocol designed to replace IPv4, due to the latter running out of IP addresses. However, while IPv6 should run on most hardware, it is susceptible to errors.

You can disable IPv6 by repeating the previous step. Simply uncheck Internet Protocol Version 6 (TCP/IPv6) then click OK to confirm the choice. Restart your Windows 10 PC when prompted.

6. Update Your Network Device Driver

As there is a chance that the device driver for your network card is at fault, it’s worth updating it.

Right-click Start and select Device Manager. Here, expand Network Adapters, select your network device, then right-click and select Update driver.

Update the driver to fix the "No internet, secured" error

Wait while the device driver is updated, then reboot Windows. If successful, Windows 10 should automatically connect to the network as usual.

If this doesn’t work, try Disable device, reboot the computer, then Enable Device.

7. Run Network Troubleshooter in Windows 10

Finally, if you’re still receiving the “No Internet, secured” error message and the computer remains offline, try this.

Windows 10 features several troubleshooting tools, software toolkits that automatically check for errors and make (or suggest) repairs.

To launch the Network Troubleshooter, press Win + I to open Settings, then Network & internet > Network troubleshooter.

Fix the Windows 10 "No internet, secured" error with the network troubeshooter

Follow the steps provided in the tool to repair your network connection.

Easily Fix “No Internet, Secured” Errors in Windows 10

By now you should have resolved your problem and got your Windows 10 PC reconnected. If not, there’s a small possibility that the issue is with the network itself. You might, therefore, try connecting to a different network and comparing the results.

If the issue is with your network, try restarting the router before reconnecting.

Running into other errors? Check for solutions in our guide to the most common Windows 10 errors.

Read the full article: 7 “No Internet Secured” Fixes for Windows 10


Read Full Article

Amazon to invest $1 billion to help digitize small businesses in India


India welcomed Jeff Bezos this week with an antitrust probe. On top of that, thousands of small merchants who typically compete with one another are beginning to gather across the country to hold a protest against the alleged predatory practices by the e-commerce giant. But Amazon founder and chief executive’s love for one of the company’s most important overseas markets remains untainted.

At a conference in New Delhi on Wednesday, Bezos and Amit Agarwal, the head of Amazon India, announced that the American giant is pumping $1 billion into India to help small and medium-sized businesses in the country come online. Amazon has previously invested about $5.5 billion in India.

Bezos said the company is also eyeing making exports of locally produced goods from India — in line with New Delhi’s Make in India program — to be of $10 billion in size on Amazon platform by 2025.

“Over the next five years, Amazon will invest an incremental $1 billion to digitize micro and small businesses in cities, towns, and villages across India, helping them reach more customers than ever before,” said Bezos in a statement.

Agarwal and Bezos at a conference in New Delhi (Image: Manish Singh / TechCrunch)

“This initiative will use Amazon’s global footprint to create $10 billion in India exports by 2025. Our hope is that this investment will bring millions more people into the future prosperity of India and at the same time expose the world to the ‘Make in India’ products that represent India’s rich, diverse culture,” he added.

Nearly half a billion people in India came online for the first time in the last decade. But most small businesses such as mom-and-pop stores that dot tens of thousands of cities, towns, and villages of India are still offline. Google, Facebook, and Microsoft have also launched tools in recent years to help these businesses build presence on the web and accept digital payments.

Amazon opened its conference, titled Amazon SMBhav (Hindi for possible), with videos of poor merchants and craftsmen in India who have expanded their businesses after signing up on the e-commerce platform.

An Amazon executive said the company has amassed over 500,000 sellers in India and thousands of merchants have boosted their businesses by beginning to sell on 12 Amazon marketplaces across the globe.

But just 10 miles from the conference venue, dozens of merchants had a different Amazon story to tell.

Confederation of All India Traders (CAIT), a trade group that represents more than 60 million merchants in the country, said it was organizing protests in 300 cities in India. A representative of the trade group said they want to publicize the alleged predatory pricing and other anti-competitive practices employed by Amazon and Flipkart.

Bezos and Agarwal did not address the protests or the antitrust probe.

Dozens of merchants gathered in New Delhi on Wednesday to protest against alleged predatory practices by Amazon. (Image: Manish Singh / TechCrunch)

At stake is one of the world’s largest untapped markets. India’s e-commerce market is projected to grow to $150 billion in the next three years, according to a report by Nasscom and PwC India.

On Monday, India’s Competition Commission opened an antitrust probe into Amazon and Walmart-owned Flipkart to find whether the two e-commerce giants have exclusive arrangements with smartphone vendors and are giving preferential treatment to some sellers.

A CAIT spokesperson told TechCrunch that its member merchants were pleased with India’s antitrust watchdog’s move. The new round of protests today are one of several the trade group has organized in recent years. Last month, thousands of protestors expressed similar concerns against the e-commerce players.

“Amazon, Jeff Bezos, Flipkart go back!” some protesters chanted today. Sumit Agarwal, National Secretary of CAIT, told TechCrunch in an interview that “deep discounting” on products on Amazon is impeding the growth of small merchants and a government intervention is urgently needed.

According to industry estimates, e-commerce accounts for about 3% of retail sales in the country.


Read Full Article

Convert a Google Document into an EPUB File


function _extends() { _extends = Object.assign || function (target) { for (var i = 1; i < arguments.length; i++) { var source = arguments[i]; for (var key in source) { if (Object.prototype.hasOwnProperty.call(source, key)) { target[key] = source[key]; } } } return target; }; return _extends.apply(this, arguments); } function _objectWithoutProperties(source, excluded) { if (source == null) return {}; var target = _objectWithoutPropertiesLoose(source, excluded); var key, i; if (Object.getOwnPropertySymbols) { var sourceSymbolKeys = Object.getOwnPropertySymbols(source); for (i = 0; i < sourceSymbolKeys.length; i++) { key = sourceSymbolKeys[i]; if (excluded.indexOf(key) >= 0) continue; if (!Object.prototype.propertyIsEnumerable.call(source, key)) continue; target[key] = source[key]; } } return target; } function _objectWithoutPropertiesLoose(source, excluded) { if (source == null) return {}; var target = {}; var sourceKeys = Object.keys(source); var key, i; for (i = 0; i < sourceKeys.length; i++) { key = sourceKeys[i]; if (excluded.indexOf(key) >= 0) continue; target[key] = source[key]; } return target; } /* @jsx mdx */ var _frontmatter = { "title": "Convert a Google Document into an EPUB File", "date": "2020-01-14", "slug": "/code/convert-google-doc-epub-200114", "template": "post", "category": "Code", "tags": ["Google Apps Script", "Google Docs", "epub"] }; var makeShortcode = function makeShortcode(name) { return function MDXDefaultShortcode(props) { console.warn("Component " + name + " was not imported, exported, or provided by MDXProvider as global scope"); return mdx("div", props); }; }; var layoutProps = { _frontmatter: _frontmatter }; var MDXLayout = "wrapper"; return function MDXContent(_ref) { var components = _ref.components, props = _objectWithoutProperties(_ref, ["components"]); return mdx(MDXLayout, _extends({}, layoutProps, props, { components: components, mdxType: "MDXLayout" }), mdx("p", null, "With Google Documents, you can easily ", mdx("a", _extends({ parentName: "p" }, { "href": "/internet/convert-docs-to-epub-ebooks/29103/" }), "save any document"), " into an ePub file in the browser. Just open any document inside the Google Documents web editor and choose ", mdx("code", _extends({ parentName: "p" }, { "className": "language-text" }), "File > Download > EPUB"), " from the menu to convert the file."), mdx("p", null, "If you have bunch of documents in your Google Drive, converting them to EPUB format manually would be a tedious task and that\u2019s where Apps Script can help."), mdx("div", { "className": "gatsby-highlight", "data-language": "javascript" }, mdx("pre", _extends({ parentName: "div" }, { "className": "language-javascript" }), mdx("code", _extends({ parentName: "pre" }, { "className": "language-javascript" }), mdx("span", _extends({ parentName: "code" }, { "className": "token keyword" }), "function"), " ", mdx("span", _extends({ parentName: "code" }, { "className": "token function" }), "convertDocToEPUB"), mdx("span", _extends({ parentName: "code" }, { "className": "token punctuation" }), "("), mdx("span", _extends({ parentName: "code" }, { "className": "token punctuation" }), ")"), " ", mdx("span", _extends({ parentName: "code" }, { "className": "token punctuation" }), "{"), "\n ", mdx("span", _extends({ parentName: "code" }, { "className": "token comment" }), "// Get the currently opened document"), "\n ", mdx("span", _extends({ parentName: "code" }, { "className": "token keyword" }), "var"), " document ", mdx("span", _extends({ parentName: "code" }, { "className": "token operator" }), "="), " DocumentApp", mdx("span", _extends({ parentName: "code" }, { "className": "token punctuation" }), "."), mdx("span", _extends({ parentName: "code" }, { "className": "token function" }), "getActiveDocument"), mdx("span", _extends({ parentName: "code" }, { "className": "token punctuation" }), "("), mdx("span", _extends({ parentName: "code" }, { "className": "token punctuation" }), ")"), mdx("span", _extends({ parentName: "code" }, { "className": "token punctuation" }), ";"), "\n\n ", mdx("span", _extends({ parentName: "code" }, { "className": "token comment" }), "// Get the EPUB export link"), "\n ", mdx("span", _extends({ parentName: "code" }, { "className": "token keyword" }), "var"), " mimeType ", mdx("span", _extends({ parentName: "code" }, { "className": "token operator" }), "="), " ", mdx("span", _extends({ parentName: "code" }, { "className": "token string" }), "\"application/epub+zip\""), mdx("span", _extends({ parentName: "code" }, { "className": "token punctuation" }), ";"), "\n ", mdx("span", _extends({ parentName: "code" }, { "className": "token keyword" }), "var"), " exportLink ", mdx("span", _extends({ parentName: "code" }, { "className": "token operator" }), "="), " Drive", mdx("span", _extends({ parentName: "code" }, { "className": "token punctuation" }), "."), "Files", mdx("span", _extends({ parentName: "code" }, { "className": "token punctuation" }), "."), mdx("span", _extends({ parentName: "code" }, { "className": "token function" }), "get"), mdx("span", _extends({ parentName: "code" }, { "className": "token punctuation" }), "("), "document", mdx("span", _extends({ parentName: "code" }, { "className": "token punctuation" }), "."), mdx("span", _extends({ parentName: "code" }, { "className": "token function" }), "getId"), mdx("span", _extends({ parentName: "code" }, { "className": "token punctuation" }), "("), mdx("span", _extends({ parentName: "code" }, { "className": "token punctuation" }), ")"), mdx("span", _extends({ parentName: "code" }, { "className": "token punctuation" }), ")"), mdx("span", _extends({ parentName: "code" }, { "className": "token punctuation" }), "."), "exportLinks", mdx("span", _extends({ parentName: "code" }, { "className": "token punctuation" }), "["), "mimeType", mdx("span", _extends({ parentName: "code" }, { "className": "token punctuation" }), "]"), mdx("span", _extends({ parentName: "code" }, { "className": "token punctuation" }), ";"), "\n\n ", mdx("span", _extends({ parentName: "code" }, { "className": "token comment" }), "// Get the blob of the epub exported file"), "\n ", mdx("span", _extends({ parentName: "code" }, { "className": "token keyword" }), "var"), " response ", mdx("span", _extends({ parentName: "code" }, { "className": "token operator" }), "="), " UrlFetchApp", mdx("span", _extends({ parentName: "code" }, { "className": "token punctuation" }), "."), mdx("span", _extends({ parentName: "code" }, { "className": "token function" }), "fetch"), mdx("span", _extends({ parentName: "code" }, { "className": "token punctuation" }), "("), "exportLink", mdx("span", _extends({ parentName: "code" }, { "className": "token punctuation" }), ","), " ", mdx("span", _extends({ parentName: "code" }, { "className": "token punctuation" }), "{"), "\n headers", mdx("span", _extends({ parentName: "code" }, { "className": "token operator" }), ":"), " ", mdx("span", _extends({ parentName: "code" }, { "className": "token punctuation" }), "{"), "\n Authorization", mdx("span", _extends({ parentName: "code" }, { "className": "token operator" }), ":"), " ", mdx("span", _extends({ parentName: "code" }, { "className": "token string" }), "\"Bearer \""), " ", mdx("span", _extends({ parentName: "code" }, { "className": "token operator" }), "+"), " ScriptApp", mdx("span", _extends({ parentName: "code" }, { "className": "token punctuation" }), "."), mdx("span", _extends({ parentName: "code" }, { "className": "token function" }), "getOAuthToken"), mdx("span", _extends({ parentName: "code" }, { "className": "token punctuation" }), "("), mdx("span", _extends({ parentName: "code" }, { "className": "token punctuation" }), ")"), "\n ", mdx("span", _extends({ parentName: "code" }, { "className": "token punctuation" }), "}"), "\n ", mdx("span", _extends({ parentName: "code" }, { "className": "token punctuation" }), "}"), mdx("span", _extends({ parentName: "code" }, { "className": "token punctuation" }), ")"), mdx("span", _extends({ parentName: "code" }, { "className": "token punctuation" }), ";"), "\n\n ", mdx("span", _extends({ parentName: "code" }, { "className": "token comment" }), "// Save the EPUB file in the Google Drive root folder"), "\n ", mdx("span", _extends({ parentName: "code" }, { "className": "token keyword" }), "var"), " file ", mdx("span", _extends({ parentName: "code" }, { "className": "token operator" }), "="), " DriveApp", mdx("span", _extends({ parentName: "code" }, { "className": "token punctuation" }), "."), mdx("span", _extends({ parentName: "code" }, { "className": "token function" }), "createFile"), mdx("span", _extends({ parentName: "code" }, { "className": "token punctuation" }), "("), "response", mdx("span", _extends({ parentName: "code" }, { "className": "token punctuation" }), "."), mdx("span", _extends({ parentName: "code" }, { "className": "token function" }), "getBlob"), mdx("span", _extends({ parentName: "code" }, { "className": "token punctuation" }), "("), mdx("span", _extends({ parentName: "code" }, { "className": "token punctuation" }), ")"), mdx("span", _extends({ parentName: "code" }, { "className": "token punctuation" }), ")"), mdx("span", _extends({ parentName: "code" }, { "className": "token punctuation" }), ";"), "\n ", mdx("span", _extends({ parentName: "code" }, { "className": "token comment" }), "// Set the file name same as the document name"), "\n file", mdx("span", _extends({ parentName: "code" }, { "className": "token punctuation" }), "."), mdx("span", _extends({ parentName: "code" }, { "className": "token function" }), "setName"), mdx("span", _extends({ parentName: "code" }, { "className": "token punctuation" }), "("), "document", mdx("span", _extends({ parentName: "code" }, { "className": "token punctuation" }), "."), mdx("span", _extends({ parentName: "code" }, { "className": "token function" }), "getName"), mdx("span", _extends({ parentName: "code" }, { "className": "token punctuation" }), "("), mdx("span", _extends({ parentName: "code" }, { "className": "token punctuation" }), ")"), " ", mdx("span", _extends({ parentName: "code" }, { "className": "token operator" }), "+"), " ", mdx("span", _extends({ parentName: "code" }, { "className": "token string" }), "\".epub\""), mdx("span", _extends({ parentName: "code" }, { "className": "token punctuation" }), ")"), mdx("span", _extends({ parentName: "code" }, { "className": "token punctuation" }), ";"), "\n\n ", mdx("span", _extends({ parentName: "code" }, { "className": "token comment" }), "// Return the file URL from Drive"), "\n ", mdx("span", _extends({ parentName: "code" }, { "className": "token keyword" }), "return"), " file", mdx("span", _extends({ parentName: "code" }, { "className": "token punctuation" }), "."), mdx("span", _extends({ parentName: "code" }, { "className": "token function" }), "getUrl"), mdx("span", _extends({ parentName: "code" }, { "className": "token punctuation" }), "("), mdx("span", _extends({ parentName: "code" }, { "className": "token punctuation" }), ")"), mdx("span", _extends({ parentName: "code" }, { "className": "token punctuation" }), ";"), "\n", mdx("span", _extends({ parentName: "code" }, { "className": "token punctuation" }), "}")))), mdx("p", null, "We use the Google Drive Advanced Service of Apps Script to get get the export link for the EPUB MIME Type. Next, the ", mdx("code", _extends({ parentName: "p" }, { "className": "language-text" }), "URLFetchApp"), " service exports the Google Doc to the requested MIME type and returns the exported content as a blob."), mdx("p", null, "The blog is saved to Google Drive and the file URL is returned."), mdx("p", null, "A similar technique is used by ", mdx("a", _extends({ parentName: "p" }, { "href": "/topic/document-studio" }), "Document Studio"), " to convert merged documents into EPUB ebooks.")); } ; MDXContent.isMDXComponent = true;