As far as word processors go, Microsoft Word is still the king. Even today, we keep discovering hidden Word features that make our lives easier. And just as surprising, we keep discovering new ways to get Microsoft Word for free.
Here are all the ways to access Microsoft Word and almost all of them are free.
Word Mobile
Platforms: Windows 8, 10 Price: Free
For a long time, Microsoft offered a free program called Word Viewer to open any DOCX file without paying for the full version of Office. But, this was retired a few years back. What you have instead is the new Word Mobile.
Word Mobile can be installed on any Windows laptop, desktop, tablet, or phone. But if you install it on a desktop, laptop, or a large tablet, you can’t create nor edit files with the app. You can only open documents and read them.
To grab the app, head to the Microsoft Store and search for Word Mobile. Otherwise, click the link below to open it in a browser tab, and then the Download button to open it in Microsoft Store on your Windows computer. Proceed to download it like any app.
Microsoft is making great apps for Android. The Redmond giant has separated its Office suite into individual apps on mobile operating systems, so you can actually download a full-fledged version of Microsoft Word without needing to get Excel, PowerPoint, and the others. And yes, it’s a completely free version of Microsoft Word.
Perhaps the best part about Microsoft Word on mobile is how well it represents documents filled with charts and graphics. This has historically been a problem on most mobile office suites, but such files show up perfectly on Word Mobile, scroll through smoothly without lagging, and are smartly optimized for mobile screens. Indeed, the new Word Mobile apps show why Microsoft is king of the office suites and not Google Docs.
This is also the best method to get Microsoft Word on Chrome OS. As long as you have a Chromebook that runs Android apps, go to the Play Store and download the same Microsoft Word for Android. It will work as if you were using a tablet. The app works fine with a keyboard, and you can keep using the regular keyboard shortcuts you are accustomed to.
But in the end, that’s a mobile version of Word, not the proper desktop one. For something closer to the desktop Word experience on a Chromebook, you’re better off using Office Online.
The first thing you need to know is that you don’t have to pay for Microsoft Word. If you have an active internet connection, you can use the free Office Online instead.
We can think of a few reasons why you should use free Office Online instead of paying Microsoft to use Word. For starters, you can access documents through a web browser on any computer. It also accurately retains Microsoft Word formatting, unlike other apps. It’s an easy step to cloud computing for anyone who is already hooked into the Microsoft Office ecosystem.
However, you can’t use Office Online without an internet connection. When you need an offline office suite, fully installed on your own PC, then good old Office is still your best bet.
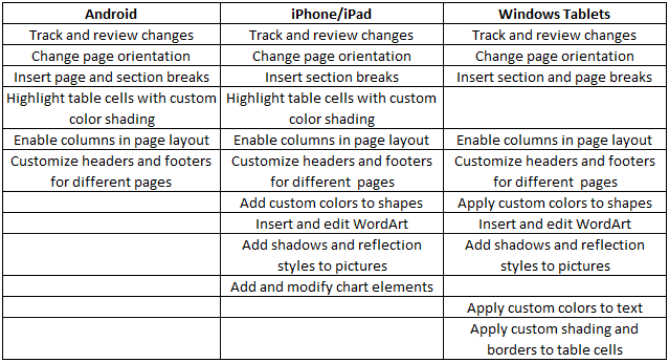
Platforms: Windows, Mac, Android, iOS, Windows tablets Price: Free trial and paid Subscriptions (starting at $6.99 per month)
If you temporarily need the full version of Word installed on your PC or Mac, you should go with an Office 365 subscription. Until a few years ago, buying Microsoft Office was a one-time cost, but a hefty one. Now, Microsoft has embraced the subscription model, which actually increases the price but makes a lot of sense if you are using Office on multiple computers for your whole family. Plus, there are some cool freebies packaged with it.
So why should you be willing to pay more? The new Office 365 subscription model not only gets you Word, PowerPoint, Excel, OneNote, Outlook, Access, and Publisher, but it also adds 1TB of OneDrive storage and 60 Skype world minutes.
The Office 365 Home package is available for $9.99 per month or $99.99 per year. If you plan on sharing your Office with members of your family, this is the best value-for-money deal you can get. It basically applies to five users; so you can install Office offline on five computers (PC or Mac), five tablets, five phones, and get the aforementioned 1TB storage and 60 Skype minutes for five users each. And you also get some additional features for Word Mobile on your smartphone:
The cheaper Office 365 Personal package costs $6.99 per month or $69.99 per year but supports only one user for the storage and Skype minutes, and offline installation on one computer, one tablet, and one phone.
If you don’t like the new subscription model, you can purchase Office at a one-time cost varying from $139.99 to $399.99. Here’s the difference between the Office packages.
Students can get Office 365 for free, if your school supports it. You can check out eligibility on the official site. However, be warned that the 1TB of OneDrive storage is associated with your school’s account, which means a school administrator can change permissions and access.
Microsoft Word has always been a fantastic word processor. Maybe you have moved away from it because of its price. Though these alternatives aren’t the full-fledged Office suite that you expect to grab for free, you can still rely on these methods and use them for your productivity.
Also, you might want to consider these fresh alternatives to Microsoft Office. You never know which of those free or cheap alternatives will work out for you.
Life is full of five-minute gaps. Maybe you’re waiting in line for a cup of coffee or you’re 10 minutes early for an appointment. Your first instinct is to open Facebook or Instagram, or to start reading the news. But that’s actually all rather dull.
There’s a better, more productive way to spend those five minutes.
Instead of mindlessly scrolling through your social media feeds, or obsessing over yet another clickbait headline, you can play a quick game on your smartphone. Whether it’s one of these relaxing iOS puzzle games or one of these games you control in crazy ways.
In this article we recommend the best mobile games to play when you have five minutes to spare.
1. Threes!
If you’ve got five minutes to spare and you want to do something to use your mind instead of numbing it, Threes! is the game for you. It involves sliding numbered tiles around a four-by-four grid to combine additions or multiples of, you guessed it, threes. The quirky yet refreshing background score just makes the game more enjoyable.
The game ends when there’s no empty space left on the grid to slide around. The game should take between 3 to 7 minutes to finish up and that’s the beauty of it!
Threes! requires quick thinking and agility of the mind to make speedy moves so that you can score maximum points.
Desert Golfing is a golf game like none other. You’re playing golf in the desert, with sand dunes and the ever-shining sun beating down on you. The game just keeps going, level after level.
In theory, every level is quite simple. You’ve got a hole at one end, your golf ball at the other and you can swipe to take aim. The aim of the game? Get the golf ball into the hole in the fewest shots possible. You know, like real golf.
After each target is accomplished, a new course is generated, and the game continues. New courses will keep on generating. Desert Golfing is an endless game. And no, you can’t reset a level, or go back a couple of moves.
The graphics are simple, and so is the gameplay. But it’s a satisfying and soothing experience.
Download: Desert Golfing for Android | iOS ($1.99)
3. Alto’s Adventure
Alto’s Adventure takes the snowboarding games we’ve all played for years and adds a whole lot of beauty to them. It is hands down one of the best looking games on the iPhone. And the gameplay isn’t too shabby either.
Alto is an endless sprinter/snowboarder, who is always ready to march his way along the snow-clad mountains in search of his escaped llamas.
The game is all about running through the obstacles and jumping off heights to collect coins to unlock levels, characters, and snowboards. It’s a simple game but it keeps you focused and interested without paying much attention to the controls.
Download: Alto’s Adventure for Android (Free) | iOS ($4.99)
In Pokemon GO, players have to keep discovering new places in the real world, in order to play it. That’s the only way to advance in the game.
The Augmented Reality mode uses the camera and gyroscope to show a real-life image of a Pokémon on your screen. Throw a Poké Ball towards it to catch it!
You can play this game with your friends easily and trade Pokémon with them too. And there’s a lot more to Pokémon GO, including gyms, arenas, and Pokemon fights. Next time you’re waiting someplace for a couple of minutes, fire up Pokémon GO and walk around a bit. Who knows, you might just capture a rare Pokémon.
Another one of your favorite childhood memories, Super Mario is now on your smartphone. This new version of Mario has the touch of the old Mario combined and the new technologies of the smartphone.
All you need to do to control Mario is tap or swipe on the screen as he keeps moving forward. Time your taps just right to pull off high jumps, mid-air spins, and wall jumps to collect coins and achieve the goal.
On the surface, it might seem like a clone of an endless runner like Subway Surfers, but Super Mario Run is much more than that. Once you pay to unlock the complete game, you get access to four new modes. You can complete the campaign mode, or you can even create your own kingdom!
Download: Super Mario Run for Android | iOS (Free)
6.Candy Crush Saga
There’s a reason why everyone on the subway is playing Candy Crush Saga. It’s one of the best ways to beat your boredom.
It’s a very simple game that only involves matching and switching colors. But it is doubly addictive, as every new level brings on a new obstacle to overcome with an increased level of difficulty.
Take part in challenges to earn boosters and level up. Plus there are new surprises unveiled if you achieve your targets. There’s a store full of special candies, color bombs, and other addictive boosters to help overcome those arduous levels.
Download: Candy Crush Saga for Android | iOS (Free)
7. Crossy Road
Crossy Road is an arcade game inspired by the classic Frogger. It is sweet, simple and invites the player to guide a cute animal along the hustle-bustle of the city street that involves obstacles like cars, truck, buses, streams, and more.
All you have to do is tap on the screen to make your animal jump ahead or swipe your finger sideways to change directions.
Dots is all about connecting the dots vertically, horizontally or in the shape of a square to win more points.
There are different game modes to suit all types of players. There is a Time mode, in which the player has to connect all the dots in a given time to get more points. In the Moves mode, it’s all about strategy and making calculated moves. In the Endless Mode, you can relax and take as much time as you need.
Asphalt 9 is of the best racing games available on a smartphone. And Asphalt 9: Legends takes the arcade part of it to a whole new level. So much so that acceleration in the game is automatic. All you have to do is to make the decisions of which lane to take, when to use a booster, when to drift, and when you crash into an opponent to throw him off the road.
This new version has a world of its own with new supercars from Porsche, Lamborghini, Mercedes, Ferrari and more. The graphics are amazing and it has a multiplayer option too, so you and your friends can totally beat up the competition.
Download: Asphalt 9: Legends for Android | iOS (Free)
10.Subway Surfers
You can say that Subway Surfers is where the endless runner genre started. And it’s still just as much fun to play. In Subway Surfers, you’re Jake and you need to escape a rowdy police officer through the subway tracks. You need to dodge obstacles and trains while collecting as many coins as possible.
To help you out, the game provides you with power boosts and power-ups like hoverboard surfing and paint powered jetpacks. With the coins, you can unlock new costumes, characters or buy extra jetpacks and hoverboards.
Now that you’ve got your quick fix, how about something that keeps you entertained for hours on end? If you’re heading out on a long road trip or flight and have a couple of hours to kill, check out our list of the best free mobile games for long journeys.
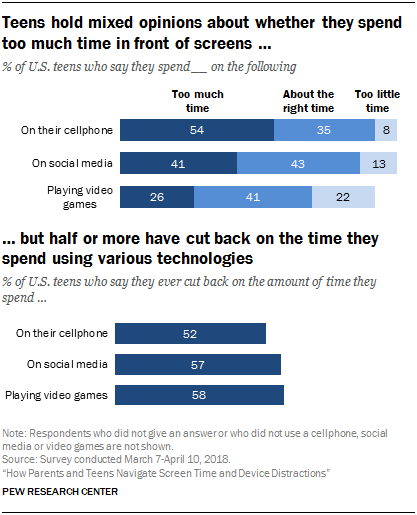
It’s not just parents who are worrying about their children’s device usage. According to a new study released by Pew Research Center this week, U.S. teens are now taking steps to limit themselves from overuse of their phone and its addictive apps, like social media. A majority, 54% of teens, said they spend too much time on their phone, and nearly that many – 52% – said they are trying to limit their phone use in various ways.
In addition, 57% say they’re trying to limit social media usage and 58% are trying to limit video games.
The fact that older children haven’t gotten a good handle on balanced smartphone usage points to a failure on both parents’ parts and the responsibilities of technology companies to address the addictive nature of our devices.
For years, instead of encouraging more moderate use of smartphones, as the tools they’re meant to be, app makers took full advantage of smartphones’ always-on nature to continually send streams of interruptive notifications that pushed users to constantly check in. Tech companies even leveraged psychological tricks to reward us each time we launched their app, with dopamine hits that keep users engaged.
Device makers loved this addiction because they financially benefited from app sales and in-app purchases, in addition to device sales. So they built ever more tools to give apps access to users’ attention, instead of lessening it.
For addicted teens, parents were of little help as they themselves were often victims of this system, too.
Today, tech companies are finally waking up to the problem. Google and Apple have now both built in screen time monitoring and control tools into their mobile operating systems, and even dopamine drug dealers like Facebook, Instagram and YouTube have begun to add screen time reminders and other “time well spent” features.
But these tools have come too late to prevent U.S. children from developing bad habits with potentially harmful side effects.
Pew says that 72% of teens are reaching for their phones as soon as they wake up; four-in-ten feel anxious without their phone; 56% report that not have their phone with them can make them feel lonely, upset or anxious; 51% feel their parents are distracted by phones during conversations (72% of parents say this is true, too, when trying to talk to teens); and 31% say phones distract them in class.
The problems are compounded by the fact that smartphones aren’t a luxury any longer – they’re in the hands of nearly all U.S. teens, 45% of whom are almost constantly online.
The only good news is that today’s teens seem to be more aware of the problem, even if their parents failed to teach balanced use of devices in their own home.
Nine-in-ten teens believe that spending too much time online is a problem, and 60% say it’s a major problem. 41% say they spend too much time on social media.
In addition, some parents are starting to take aim at the problem, as well, with 57% reporting they’ve set some screen time restrictions for their teens.
Today’s internet can be a toxic place, and not one where people should spend large amounts of time.
But many of these networks were built by young men who couldn’t conceive of all the ways things could go wrong. They failed to build in robust controls from day one to prevent things like bullying, harassment, threats, misinformation, and other issues.
Instead, these protections have been added on after the fact – after the problems became severe. And, some could argue, that was too late. Social media is something that’s now associated with online abuse and disinformation, with comment thread fights and trolling, and with consequences that range from teen suicides to genocide.
If we are unable to give up our smartphones and social media for the benefits they do offer, at the very least we should be monitoring and moderating our use of them at this point.
Thankfully, as this study shows, there’s growing awareness of this among younger users, and maybe, some of them will even do something about it in the future – when they’re the bosses, the parents, and the engineers, they can craft new work/life policies, make new house rules, and write better code.
Interested in a magic wand that can transform your Mac workflow? You need BetterTouchTool ($7), a powerful automation app that gives you precise control over your input devices. (Most likely, you won’t need all 45 days of the free trial period to convince you to buy the app.)
BetterTouchTool lets you assign a custom trigger for various tasks on your Mac. But it does a lot more than that. Let’s see a few ways the app can save you some serious time and effort.
Note: We’ll refer to BetterTouchTool as BTT going forward.
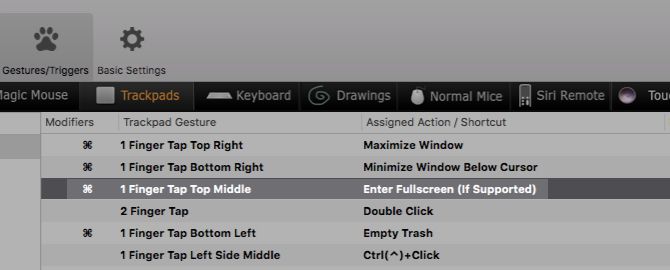
1. Custom Keyboard Shortcuts and Trackpad Gestures
Let’s say you’re using the trackpad and want to switch to full screen mode quickly. You’ll have to reach for:
The View > Enter Full Screen menu option, or
The green Zoom button in the top-left section of the active window, or
The keyboard shortcut Control + Cmd + F.
But if you have set up a BTT gesture, toggling full screen mode can be as simple as:
A one-finger tap of, say, the top middle part of the trackpad, or
Pressing a single key like F11 on your keyboard.
Likewise, you can maximize and minimize windows, bring up context menus, and launch apps with a gesture or a keyboard shortcut of your choice. You can also choose to toggle Night Shift and Do Not Disturb, empty the trash, switch desktops, and look up words.
Mapping function keys to useful tools like a calendar app, a to-do app, or the emoji viewer is also a good idea. And if you’re worried about triggering functions accidentally with the trackpad, you can combine gestures with a modifier key to prevent that.
You might wonder why BTT is worthwhile when you can set up custom hotkeys using the built -in macOS settings under System Preferences > Keyboard > Shortcuts. You can also make a few trackpad tweaks under System Preferences > Trackpad.
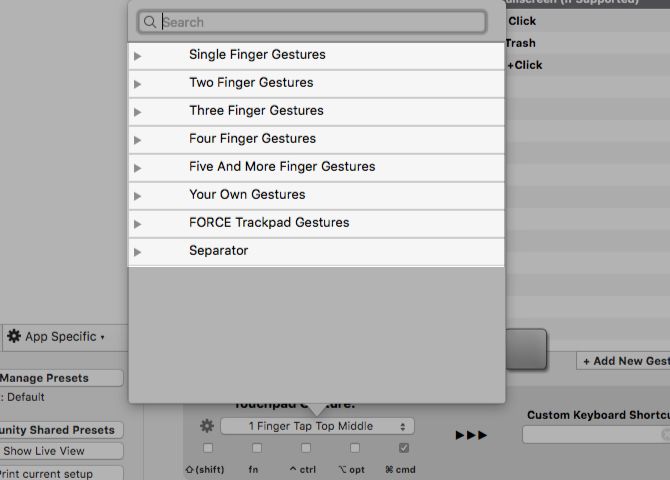
But with BTT, you get way more options to match input devices with actions. For example, you can pick from one, two, three, four, and five-finger gestures to trigger actions.
You also get to use many different input types to create shortcuts. Magic Mice, normal mice, Magic Trackpads, normal trackpads, the Siri Remote—they all work! Plus, BTT allows you to remap/bind mouse buttons.
You probably don’t use certain keys on your Mac’s keyboard all that much. Or maybe your muscle memory has trouble with the placement of some keys. Perhaps you often have to switch between different Macs, one with a numeric keypad and the other without.
In such cases, you can remap keys with BTT to your liking to avoid confusion. For example, you can remap the Tilde key (above the Tab key) to function as a second Delete key, or the Backslash (\) key as another Play/Pause key.
Unfortunately, behavior such as remapping Caps Lock to Enter isn’t possible even with BTT. But as a workaround, you can try something else.
From System Preferences > Keyboard > Modifier Keys, remap Caps Lock to work as the Esc key. Then remap Esc to trigger the Enter key with BTT. As long as you don’t have an item selected (like a file or dropdown menu), you won’t lose the original functionality of the Esc key.
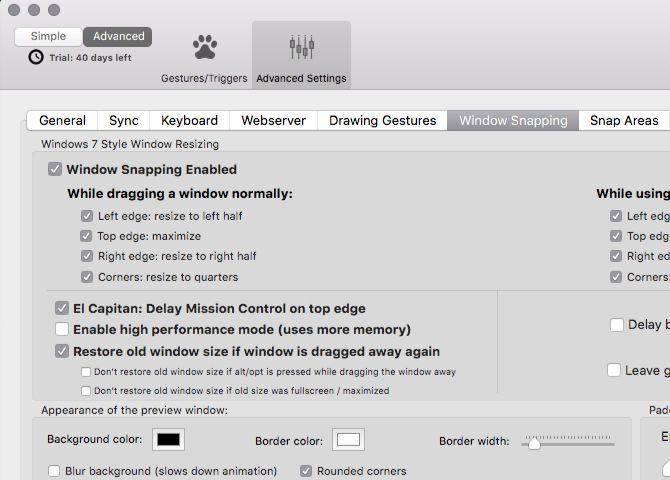
3. Window Management
BTT lets you move windows around to arrange them perfectly. You can maximize them, snap them to any of the screen corners, and scale them to various sizes. You also get the option to create custom snap areas and set up split views.
Of course, since this is BTT we’re talking about, you can use various input types (including gestures) to customize window behavior.
BTT might tempt you to get rid of your screenshot tool, text expander app, and clipboard manager. The app comes with in-built options for all three utilities.
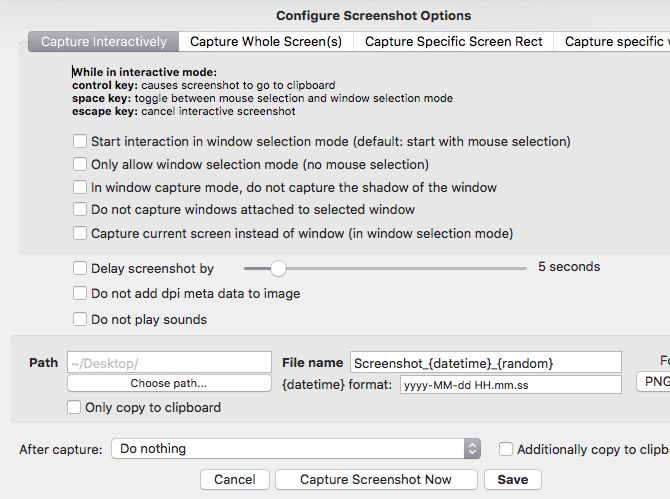
The screenshot capture tool is quite customizable, as you can see in the screenshot below. You get to specify whether you want to capture the whole screen, a specific window, or a custom area. You can also set a delay, trigger a few preset follow-up actions, and configure the format for file name and type.
The text expansion utility is easy to use. All you have to do is assign a shortcut to insert or paste text snippets into any app of your choice.
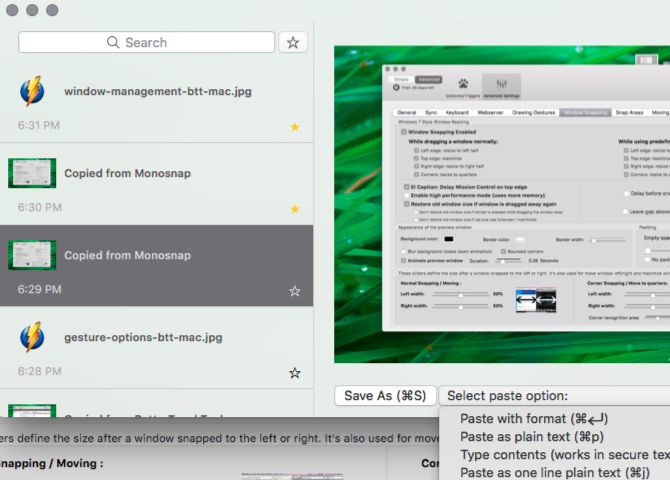
The clipboard manager can save text, links, and images for you and paste them anywhere (with or without formatting) using a shortcut. You can even paste items as a file and edit copied content right from the clipboard.
How to Get Started With BetterTouchTool
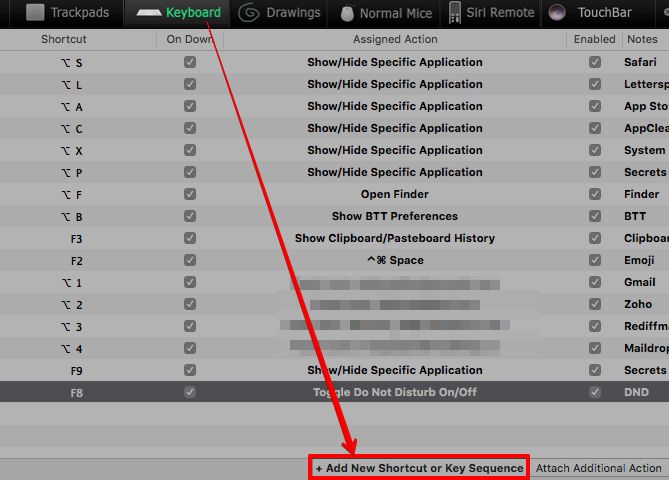
You might feel intimidated by all the options staring at you when you open BTT for the first time. If that happens, focus only on the Keyboard section in the black end-to-end navigation bar.
After you set up a few custom shortcuts, you’re sure to get more comfortable with BTT. The app has numbered arrows to point you in the right direction.
Now let’s see how to set up a custom keyboard shortcut from the Keyboard section:
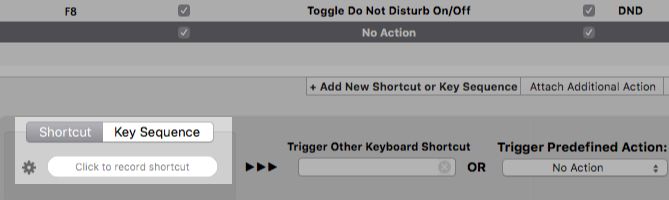
1. Click on the Add New Shortcut or Key Sequence button.
2. Click on Click to record shortcut in the bottom panel and press the key combination you want to use.
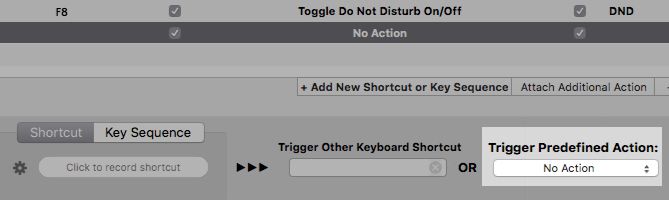
3. Open the Trigger Predefined Action dropdown menu on the right.
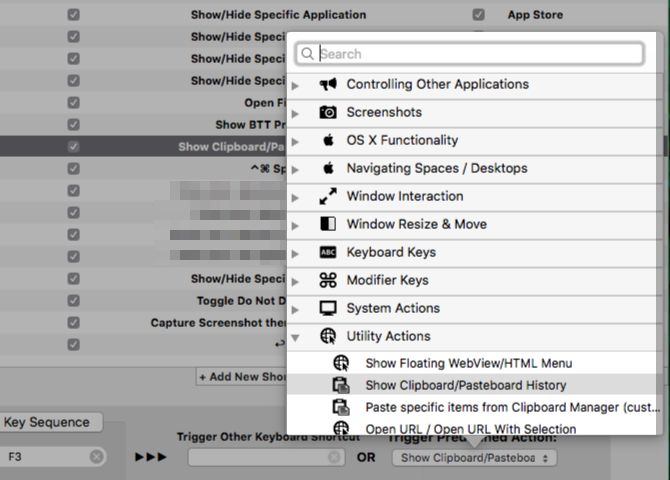
4. Select the action you want to trigger with the keyboard shortcut you recorded in the first step. For example, to take screenshots, pick the Capture Screenshot or Capture Screenshot then edit in BTT action. If it’s the clipboard you’re looking for, select the Show Clipboard/Pasteboard History action.
The Trigger Predefined Action dropdown menu is where all BTT’s power rests. Take one look at its contents and you’ll see right away how versatile BTT really is.
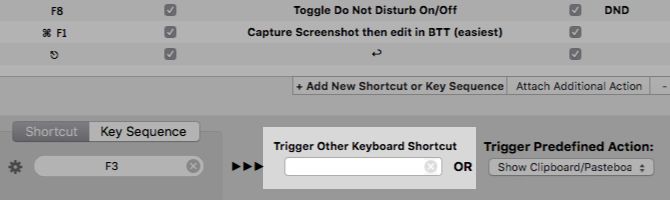
See the Trigger Other Keyboard Shortcut to the left of this dropdown menu? It lets you trigger another key or key combination using your original choice of shortcut. This feature comes in handy when you want to remap keys as we discussed above.
You’ll find that the interface for each input type follows a similar pattern. So once you learn to create custom keyboard shortcuts, setting up shortcuts for other forms of input is easy.
By default, BTT shortcuts apply across macOS, which is why you’ll see that the sidebar shows the option Global as selected. If you would like to create shortcuts for a specific app, you’ll first have to add/select it from the sidebar.
BetterTouchTool Is Mac Productivity at Its Best
Thanks to BTT, you don’t need to switch between your Mac’s trackpad, keyboard, and other input devices as often as you do now. Also, with gestures and shortcuts of your choice, you’re less likely to forget them.
PayPal is revamping its mobile app. Again. In an effort to keep pace with newcomers like the bank-owned Zelle, PayPal says its new app will focus on making it easier to use its core features – that is, sending and requesting money. That means many of the app’s homescreen buttons – like Offers, Donate, Order Ahead and others are being tucked away underneath a new “More” menu to eliminate some of the clutter.
The PayPal homescreen had gotten a little too busy with all the extra features it has been promoting, which aren’t central to the PayPal experience. For example, it threw in a button suggesting “Invest with Acorns,” after taking a stake in the mobile investing app that rounds up purchases and automatically invests the extra change on your behalf. It has been pushing its Order Ahead functionality for years, even though no one thinks to launch a payments app when they’re hungry. Now these buttons no longer get top billing and valuable homescreen space.
Above: PayPal’s app today, before the update
However, even though PayPal is removing a lot of these extras from the homescreen, it’s not actually giving its “Send” and “Request” buttons more room. In fact, they’re getting a little less.
Today, those buttons are in the center of the homescreen, hosted in a big, greenish-blue banner. The updated app relocates them to a bottom bar.
However, it reverts the app’s color scheme to PayPals’ more familiar dark blue-and-white branding, so the relocated buttons are actually easier to see.
The homescreen instead dedicates most of its room to a new personalized notifications section.
Here, users will see alerts about money they’ve received or payment requests from others in big, blue cards you can swipe through horizontally. Below this, is a strip of profile icons and names of those you’ve recently paid – the theory being that PayPal is often used among the same set of family, friends or businesses. This makes it easier to make your next payment to one of your “regulars.”
Beneath this strip, your PayPal balance is displayed, while other notifications and settings are accessed through small buttons at the top of the screen, as before.
The overall design feels more in tune with PayPal’s brand than the last update. Though the prior big revamp, which was over two years ago, modernized things up a bit, it did so with too-light icons, small fonts and odd, off-brand color choices.
PayPal says the new app is rolling out now on Android to select markets, including Australia and Italy. It will then roll out to the U.S. and other markets worldwide, followed by a release on iOS.
From product reviews on YouTube to tutorial videos and Hollywood films, voiceovers are a common video production technique. If you want to record voiceovers in Adobe Premiere Pro, but don’t know where to start, here’s everything you need to know.
Configuring Your Microphone
Before recording your voiceover, you need to connect your microphone to your computer and then configure Premiere Pro.
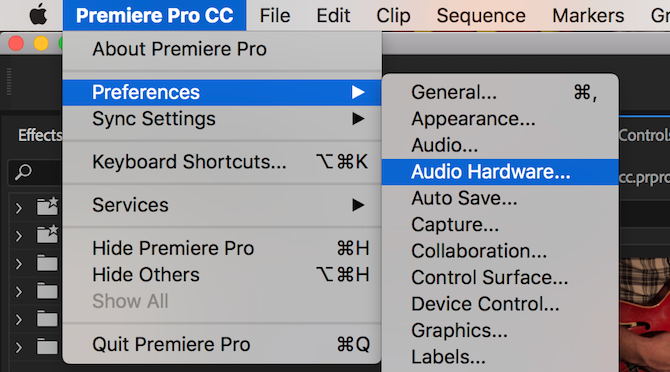
Open the Audio Hardware options by going to Premiere Pro > Preferences > Audio Hardware.
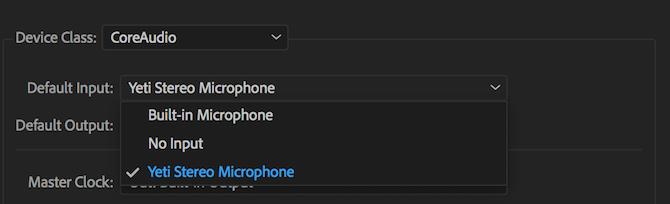
This menu allows you to configure all things audio hardware related. It may look confusing, but there’s only one setting to change. Underneath Default Input, use the drop-down menu to select your microphone.
There may be other options here such as “Built-in Microphone”, or “No input”. As I’m using a “Blue Yeti” microphone, this shows up in the list as “Yeti Stereo Microphone”.
Once you’ve chosen a default input, press OK to exit the Audio Hardware preferences panel.
Recording Your Voiceover
On your timeline, you should now see the Voice-Over Record button. This is a small microphone, which is to the right of the Mute and Solo buttons on your audio tracks.
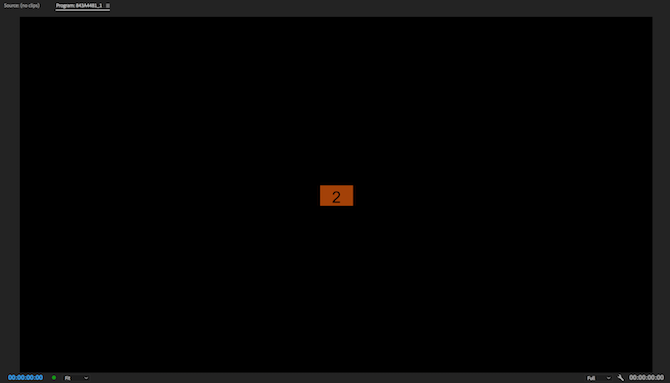
Once you press the voice-over record button, you won’t be able to talk immediately. Premiere Pro will count down from three, and then begin recording at zero. This gives you a little time to prepare after pressing record.
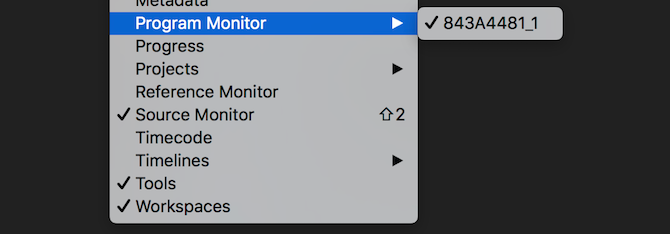
You can see this countdown inside your Program Monitor, accessible through the Window > Program Monitor > Sequence Name menu.
Once recording, Premiere Pro will show the words “Recording”, underneath the program monitor.
When recording, take note of your Audio Meters. These are found in the Window > Audio Meters menu.
When playing back an edit, or recording a voiceover, these audio meters show the status of your audio. Measured in Decibels (dB), they start at minus 60, and peak at zero. When recording, you should ensure that your audio does not “clip”. Clipping happens when the audio source is too loud for your microphone. The sound will distort, and generally sound bad.
By using the audio meters, you can ensure clipping does not occur. Any signal which starts clipping will turn red at the top of your audio meters. Yellow on the audio meters means the signal is not clipping yet but is close to doing so.
You should aim to have your voice reach -9 to -12 dB on the meters. This should be green and will provide a good balance. It’s not too quiet, but it’s not clipping. It gives you a little room to get louder before you encounter any problems with clipping.
If you hover your mouse over the edge of the audio meters, you can click and drag to enlarge them. If you enlarge too far, the meters will switch from vertical (loudest sounds at the top) to horizontal (loudest sounds at the right).
If you’d like to listen to yourself speaking, connect a pair of headphones. You can use speakers, but the sound being recording will get picked up by your microphone, and cause feedback.
When you’ve finished speaking, press the spacebar to stop recording. Your new recording will then appear in the timeline, ready for editing.
Editing Your Voiceover
Once you’re finished recording, you can begin editing. Use the Ripple Edit tool (covered in these Premiere Pro speed tips) to save yourself a lot of time when cutting and removing any unnecessary “umms”, background noises, or unwanted sounds.
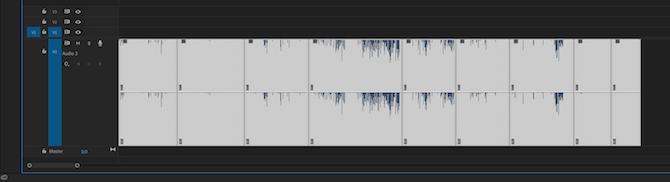
When you’ve finished editing, you may find that your whole voiceover is now split into hundreds of smaller clips. This isn’t a big problem, but it may be inconvenient when adjusting the volume or adding effects later on.
To remedy this, select all of your clips in the timeline. Once selected, they will turn light gray:
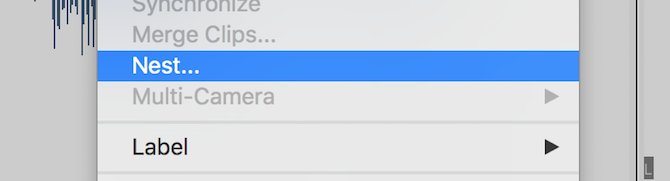
Right-click, and choose Nest. Enter a suitable name and then choose OK.
Premiere Pro has now nested your voiceover. Instead of multiple individual clips, you have one larger clip. If you want to access the original clips again, double-click on the master clip in your timeline or Project Browser.
If you need to increase or reduce the volume of your voiceover (providing it’s not clipping), you can do so in the Effect Controls section. Accessed through the Window > Effect Controls menu.
Under the Audio Effects > Volume > Level control, you can increase or decrease the volume. You will only be able to increase a maximum of 6dB, but you can reduce the volume by an almost unlimited amount.
Using Audio Effects in Premiere Pro
After recording, performing a basic edit, and adjusting the volume (if required), you can move on to applying effects. Here are two easy effects, which you can start using immediately.
Get started by opening the Effects panel, found in the Window > Effects menu.
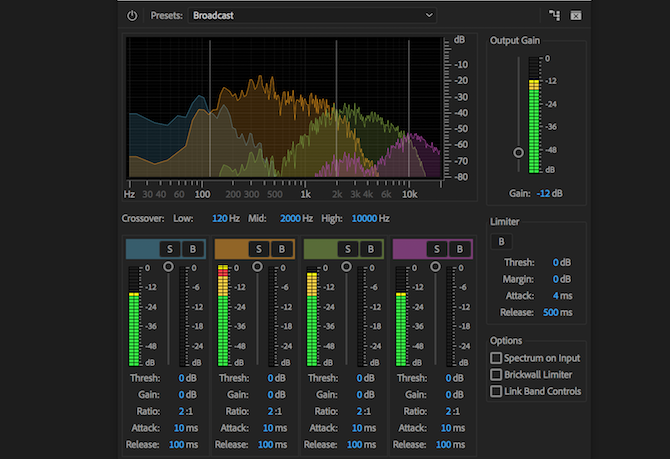
Search for Multiband Compressor, and drag it into your voiceover. The Effect Controls section will now show the multiband compressor effect. Choose the Edit button next to Custom Setup, and the multiband compressor will appear. You can increase or reduce the volume here, but a compressor serves to even out your voice. It will reduce the volume of louder phrases, and increase the volume of quieter phrases. The default preset of Broadcast is suitable for most applications.
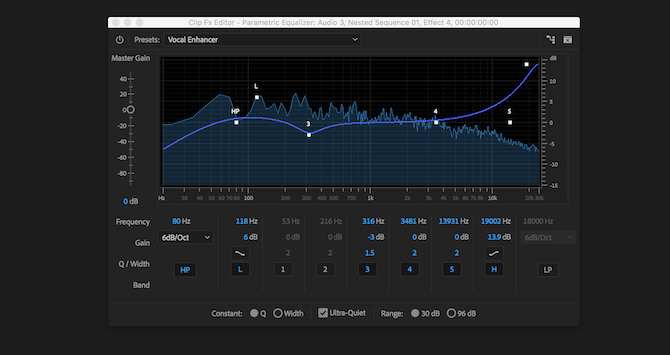
The second effect to use is the Parametric Equalizer. This alters the sound of certain frequencies. Search for it in the effects panel, and then drag it onto your voiceover. Press the Edit button, and change the preset to Vocal Enhancer. This preset will increase the high end, and reduce the low end. This will help to reduce any low rumblings from passing traffic, or excessive sibilance from your voice.
Once you’re confident, you may wish to play around with audio effects. See what happens if you push sliders to their maximum.
If you’ve played around to find some good effects for your voice, then you can save them into a custom Premiere Pro preset by following our guide to Premiere Pro presets.
More Tips for Recording Voiceovers
If you’re recording your own voiceovers, it’s worth understanding how microphones work, and learning the differences between condenser vs. dynamic mics. Knowing how microphones work is something which can help to further improve your recording quality.
And when you feel confident that you’re up to speed with everything involved, why not use the tricks learnt here to start your own podcast?
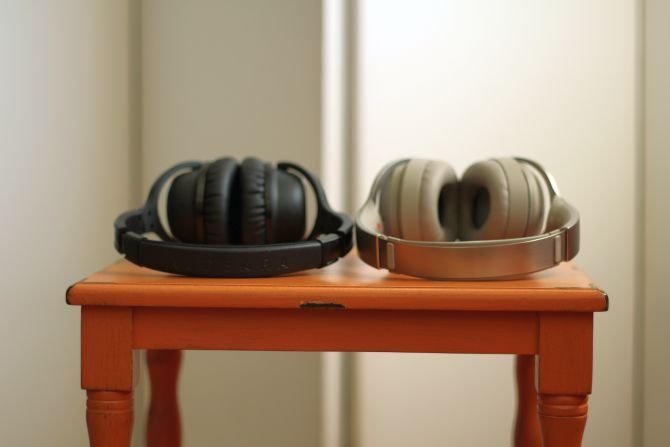
Our verdict of the Audeara A-01 Bluetooth Headphones:
Buy it if you demand absolute audio accuracy and are over 30 years old810
Sensorineural hearing loss afflicts around 20-million Americans. The $400 Audeara (pronounced as “AUD-EAR-AH”) A-01 headphones fine-tune audio to compensate for hearing loss. But does it work as advertised?
And for the same money, can you find a better headphone? Read on to find out.
Read on to see what we think of these sound-enhancing Bluetooth headphones, and at the end of the review, we’ve got a pair to giveaway to one lucky reader.
My Experience With Hearing Loss and Testing Method
Aside from being over 30-years old and suffering from normal age-related hearing loss, I “speak” basic sign language with my mother and know a little about cochlear implants, and how audiologists tune hearing aids. But that doesn’t make me an expert; I’m only familiar with hearing loss. And while I’ve reviewed many wearables, this is the first that has the ability to assist those with hearing loss.
My method for testing the A-01 headphones focuses on determining whether they can help with hearing loss. After that, I examine the standard measures of what makes a wireless Bluetooth headphone any good, such as battery life, connectivity range, audio fidelity, warranty analysis, and build quality.
What Is Sensorineural Hearing Loss and Can the Audeara Headphones Help?
Hearing loss occurs unevenly across the spectrum of audible air vibrations, or audio frequencies, that your ears interpret as sound. The causes for hearing loss range from biological to environmental. For example, those with age-related hearing often can’t hear higher frequencies. Work-related hearing loss, on the other hand, can grind away the ability to hear low, medium, or high frequencies. In short, everyone’s hearing loss is different.
Of the different kinds of hearing damage, the most common type is sensorineural hearing loss. It hits music lovers hardest because it distorts how songs sound. That’s where the A-01 headphones come in. Because everyone’s hearing loss tends to be slightly different, a headphone that can customize the listening experience to each’s user’s needs makes sense. It works on the same basis as a hearing aid, except it doesn’t require a trained professional to tune it.
The A-01 is the first consumer device, to my knowledge, that brings pro-level sound tuning to the consumer level.
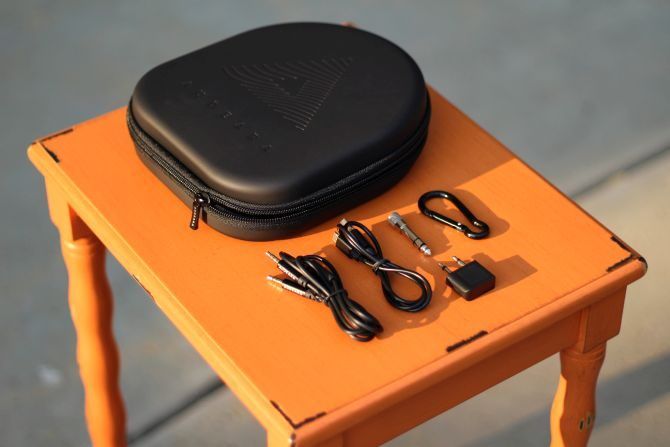
What’s Inside the Box?
Along with the headphones, there is an instruction manual, micro USB charging cable, 3.5mm-to-3.5mm cable, 3.5mm-to-1/4″ adapter, a dual 3.5mm to single 3.5mm stereo adapter, and a carrying case.
Other than the lack of a USB-C adapter, nothing of importance has been left out.
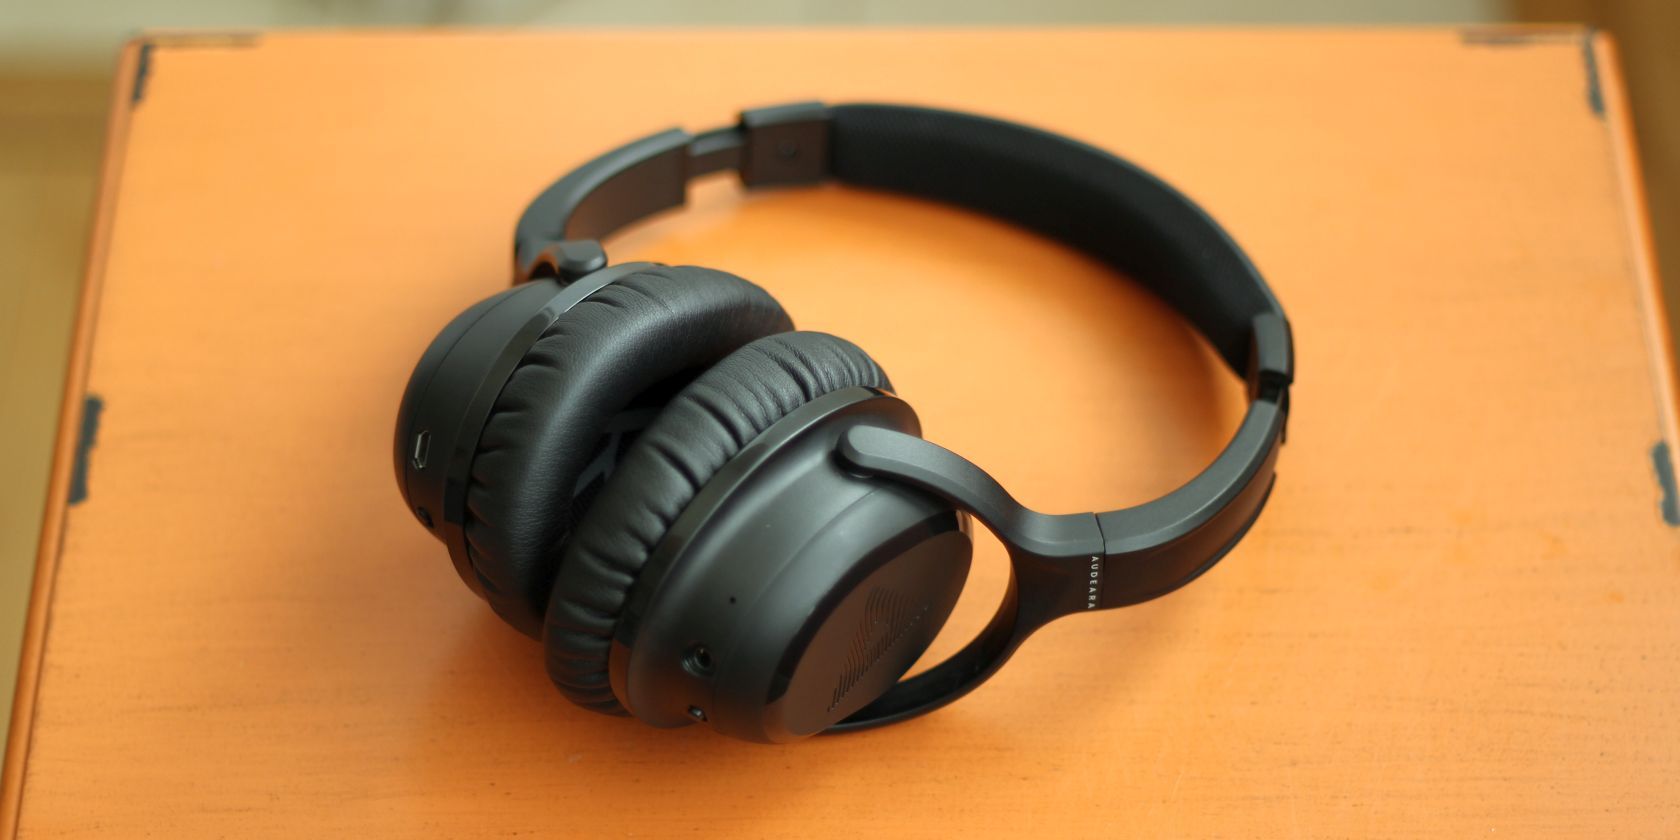
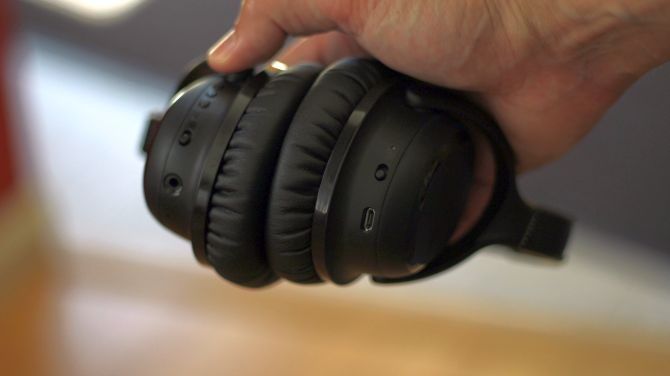
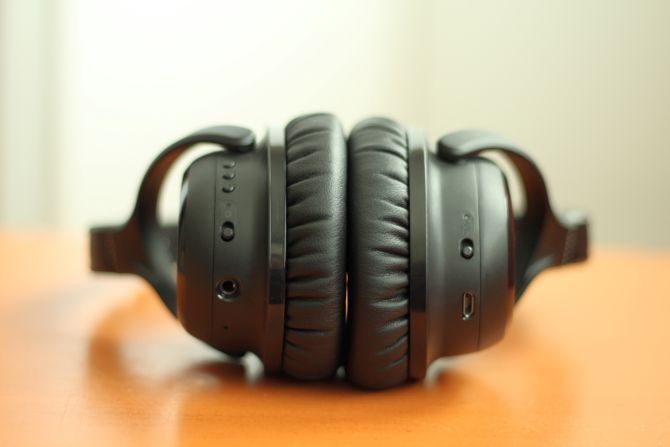
Audeara A-01 Build Quality and Feel
The A-01’s build quality is solid and rugged. They’re lightweight, thanks to a combination metal and plastic. While lighter materials generally are desirable, having less material usually means weaker passive noise-canceling abilities.
The exact weight of the A-01 headphones is approximately 235 grams. That’s 10.42% lighter than the 274 gram Sony WH-1000XM2 headphones. If weight is what you’re looking for, though, wireless earbuds (our pick of the best wireless earbuds) might be in your future.
In overall build quality, the A-01 ranks high, although it’s not on par with some of the more expensive devices on the market. Compared to its closest competitors, like the Sony’s XM2 headphones, the A-01s come out ahead. The XM2 creaks when manipulated thanks to its mostly plastic construction. And it uses plastic around its joints. The A-01, on the other hand, uses aluminum for its moving parts and plastic in its immobile components. The result is a headphone that doesn’t squeak when adjusted.
The adjustable, swiveling earcups are attached to an aluminum fork, which has visible screws. While visible screws won’t impress anyone obsessed with aesthetics, they make for easy repairs and a longer service life. Unfortunately, I cannot tell from looking at the exterior whether or not the battery can be replaced. I reached out to Audeara’s customer service and am still waiting for a reply.
On another note, the Audeara A-01’s battery shouldn’t decay (why batteries break) very rapidly. In general, small-capacity lithium-ion batteries that receive regular charge-discharge cycles suffer from shorter life expectancies (how to manage your battery). Fortunately, the A01 headphones pack in a whopping 1,000mAh battery that needs less frequent charging, particularly if you use it in wired mode with the customized sound profile turned on.
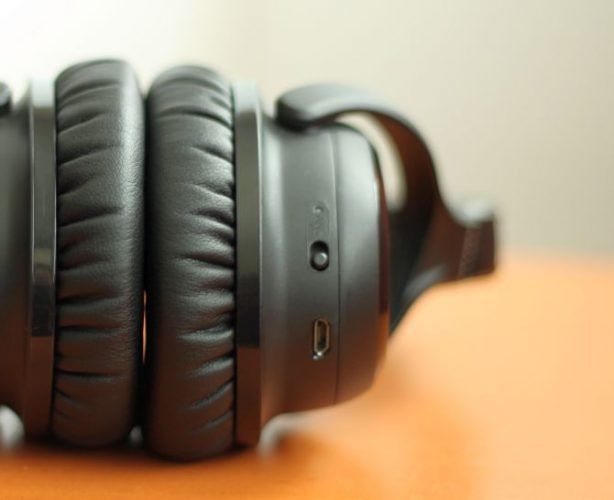
A Quick Overview of the Audeara A-01 Headphones
On the surface, the Audeara headphones are simple and easy to use. On the right earcup, there’s a noise-canceling switch, which functions independently of the headphone’s power status. Also on the right cup, there’s a microUSB charging port.
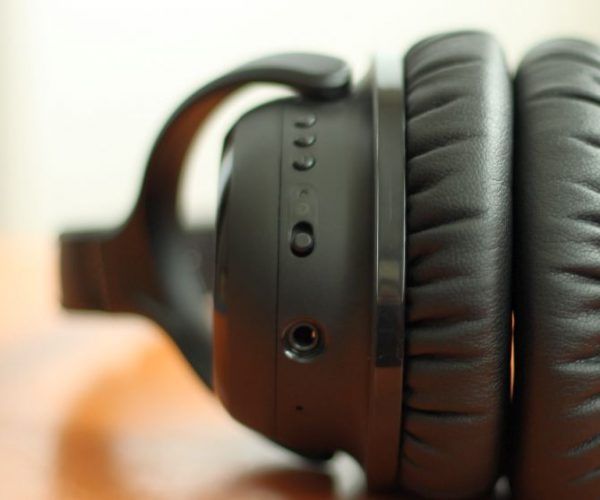
On the left earcup, there is a power switch, 3.5mm jack, and three buttons: volume up, volume down, and a middle multifunctional button. The multifunction button also handles answering calls, pausing music, and Bluetooth pairing.
Like most Bluetooth headphones, turning on the power switch enables wireless connectivity. Unlike other devices, turning the power switch on also enables Audeara’s secret weapon: a listening experience that’s customized to meet the individual preferences of each user.
You first need to configure the headphones through a mobile app, though.
How Do You Use the Audera A-01 Headphones?
Audeara created an app that handles the hearing test for Android and iOS. The app requires iOS 9.3 and newer for Apple smart devices or Android 4.0.3 and newer.
Calibrating the Audeara A-01 Headphones Using the App
In order to pair your smartphone with the Audeara headphones, you must first install the application. Then you need to launch the app and initiate the setup process. The setup process should pair the two devices together.
However, I’ve found that not all Android devices will pair right away. On some devices, I had to initiate the setup process multiple times before it finally connected the headphones with the mobile devices. Overall, though, despite some hiccups, every device I tested on successfully connected to the Audeara A-01 headphones.
The Audeara Hearing Test
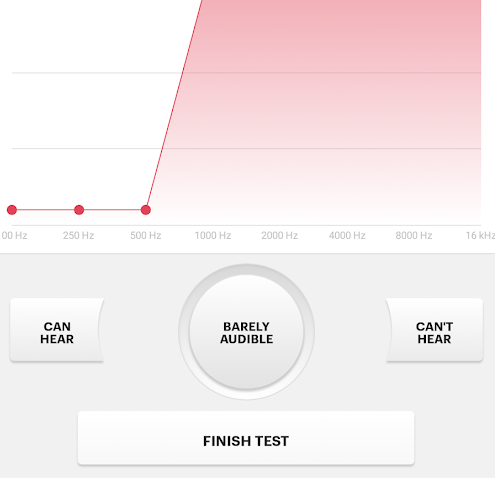
It works like this: first, find an area that’s completely silent. Then run the hearing test from the app. The Audeara app will play a series of repeating beeping frequencies. At each frequency step, you press one of three buttons: Can’t Hear, Can Hear, or Barely Audible.
If you hear nothing, press the Can’t Hear button and the volume on the beep will increase. Continuing pressing the Can’t Hear button until you can hear the beep, then tap the Can Hear button. Continue pressing the Can Hear button until the sound becomes inaudible. Once you’ve reached the tipping point where you barely perceive the noise, press Barely Audible. Pressing Barely Audible moves to a new frequency. Repeat the process until you’ve reached the end of the test.
There are three basic test types: Quick, Standard, and Ultimate. I opted to perform the “10-minute Ultimate” hearing test (which took more like 20-minutes to complete). Once the hearing test is completed, you can choose to apply anywhere from 0% to 100% of the frequency tuning to your headphones.
I found that 100% tuning had the biggest impact on higher pitched songs. The 50% setting, recommended by Audeara, allows for songs to sound less alien and more familiar. Though, in all honesty, the 50% setting seemed to have little impact on the way songs sounded. I can’t help but feel that the 100% setting is the way to go because it is a truer audio experience.
Yanny or Laurel Test
A quick summary of what the Yanny versus Laurel test is: Older ears lose their ability to hear higher pitched sounds, regardless of the volume intensity.
For those of you unfamiliar with the Yanny or Laurel Test, check out this YouTube video that explains the mystery behind the debate:
In short, those with age-related hearing loss hear “Laurel”. If you’re younger, you’ll probably hear “Yanny”.
Using desktop speakers, the test clearly sounds like “Laurel”. Using the WH-1000XM2 headphones, the sound is also very clearly “Laurel”.
I ran the test multiple times with the A-01’s tuning turned up to 100% and heard—very distinctly—the word “Laurel”.
Does that mean the headphones don’t work? Not at all. It does mean, though, that it’s likely my ears have completely lost the ability to hear higher frequencies. It also means that the A-01 will not help those with very significant hearing loss.
Results: Do the Audeara A-01 Help with Hearing Loss?
According to Audeara’s hearing test, I can’t hear any frequency above 16KHz. A healthy human teenager should be able to perceive all frequencies up to 20KHz. That I can’t hear anything at and above 16KHz is perfectly normal, though it’s still a sign of hearing loss. Unfortunately, even audio tuning can’t help once you completely lose the ability to hear a particular frequency.
The Audeara A-01 works as advertised. There are musical instruments that aren’t perceptible using other headphones that I could hear using the A-01. However, keep in mind that for the highest frequencies ranging from 16KHz to 20KHz, you won’t hear anything at all, even with sound amplification, unless you’re under 30 years old.
The A-01’s main advantage is that it amplifies frequencies that you’re starting to lose. For most people, that means that the higher frequencies receive a boost, customized to fit your individual hearing loss needs. For others with a decline in the ability to perceive lower frequencies, the same is also true. But the Audeara headphones aren’t a solution for complete hearing loss.
To make sure that the headphones aren’t just boosting all frequencies, I set up several completely fake audio tuning profiles and listened to several songs. The intentionally misconfigured tuning profile had one ear set to only hear high frequencies and the other set to only hear low frequencies.
And indeed, the Audeara works exactly as promised. The left earcup emits bass-heavy sounds whereas higher pitched sounds emit from the right earcup. So we know conclusively that the headphones do in fact tune specific frequencies according to the user’s individual needs, and isn’t just snake oil.
Audeara A-01 Battery Life
As far as battery life goes, the Audeara advertises three battery statistics, depending on which functions it uses.
The Audeara A-01 sports a massive (for headphones) 1,000mAh battery. It has three advertised battery lives:
65 hours with active noise cancellation turned on, and plugged in through a 3.5mm cable
35 hours with active noise cancellation turned on, audio tuning enabled, and connected over Bluetooth
45 hours with audio tuning turned on and connected over Bluetooth (no noise cancellation)
It’s worth noting that Audeara’s official numbers are based on an 80% volume level. A dirty trick that many manufacturers play on us is that they overpromise on battery life—usually by using volume levels that are almost completely inaudible. Audeara is the first company that I’ve reviewed that uses real-world battery life estimates. They actually use an extremely conservative estimate.
I tested the most battery-intensive mode, with active noise canceling and audio tuning enabled, while connected over Bluetooth. My test platform is a Windows 10 computer with an Intel 7260 802.11ac wireless adapter, which has Bluetooth 4.0. I set a music file to play on continuous loop test at approximately 1.5 meters from the Bluetooth antenna. Audeara’s volume level is much higher than what I consider to be a comfortable volume level so I reduced the volume to 33%.
I checked to see whether the battery had expired every hour, so my battery estimate has a potential error as high as 59 minutes.
The total playtime came out to around 51 hours and 11 minutes, which is the best battery life I’ve ever seen on a wireless headphone.
Audeara A-01 Portability
The Audeara A-01 isn’t foldable, unlike a few other higher end headphones. On the other hand, their lightweight and durable construction should allow for greater resilience to drops and other mishaps on the road.
Regarding comfort, the headphones rank above Sony’s models—mostly owing to its light weight.
They’re headband expands, so even those with large heads, like me, can adjust them to fit perfectly. And they don’t hurt my head, even after a long usage session, owing mostly to its lightweight construction and padded lining along its interior surfaces.
Warranty Policy and Customer Service
The A-01 headphones come with a standard one-year warranty along with solid customer service. The headphones also include a 60-day return period where, if you aren’t satisfied, you can return the unit for your money back.
I contacted Audeara’s customer support with a bogus support question. While they didn’t respond to the first request, they did respond to the second. I can only surmise that the first request was dropped either by accident or through a glitch because they responded to the second request very rapidly and with the appropriate support response.
Audeara A-01 Headphones Weaknesses
The Audeara headphones aren’t the be-all and end-all of headphones. They come up short in three ways: first, their Bluetooth connection range is a little short. Second, they have weak noise-canceling. Third, the A-01 headphones should have had Bluetooth 5.0.
Limited Bluetooth Range
Compared to the Sony WH-1000XM2, the Audeara A-01 offers about half the range and wall penetration. The audio quality becomes choppy at around five meters distance, with a plaster wall between, from the Bluetooth antenna.
Weak wireless connectivity is a common audio issue on Bluetooth headphones (what is Bluetooth?). However, in the $400 price range, you should expect a greater degree of quality.
I’m not sure why the Audeara A-01 suffers from poor Bluetooth range. It could have to do with the significant amounts of aluminum used in its construction. Metal, in general, blocks wireless frequencies. The better a metal conducts electricity, the stronger its blocking effect. Aluminum is among the best electrical conductors, which makes it a significant blocker of radio frequencies.
Weak Noise Canceling
The majority of a headphone’s noise-canceling ability comes from passive noise blocking. In other words, the reduction in external sound comes from its physical ability to block out external sound. Passive noise canceling (or noise isolation) comes from thicker construction, heavier weight, and the earcup design. Active noise-canceling, on the other hand, reduces how your ear perceives ambient sound originating from outside of your headphones. (How noise canceling works.)
The Audeara A-01 headphones also suffer from a bug in its ANC. I heard a very faint and regular clicking when not playing any audio (with ANC turned on). I’ve heard similar audio distortion before on low-cost headphones with active noise canceling. This defect is not significant by any means—however, this isn’t something you’d expect on a nearly $400 device.
Keep in mind that the A-01 isn’t primarily a noise-canceling headphone. The intended audience of the A-01 are those who value audio fidelity. Because ANC slightly reduces audio quality, they’re not desirable on a device that focuses on audio quality. If you are looking for noise-canceling headphones, the best options are either the Sony WH-1000XM2 or the Bose QuietComfort 35 II or their wired equivalents. (Our list of the best noise-canceling headphones and earphones.)
Compared to the XM2’s noise canceling, the Audeara A-01 comes up flat. However, that’s a tough bar for comparison. The XM2 offers perhaps the strongest degree of noise canceling out of all headphones on the market. The A-01’s ANC, on the other hand, is about equal to a $100 headphone.
The Audeara A-01 Should Have Had Bluetooth 5.0
The most serious issue with a wireless Bluetooth connection is a loss of audio fidelity. Bluetooth standards older than version 5.0 suffer from a technical limitation; there is a measurable level of audio quality loss in wirelessly transmitted audio streams.
Unfortunately, the Audeara A-01 headphones come with Bluetooth 4.2, which is the previous generation of Bluetooth. Normally, I wouldn’t point this out because almost all major headphone manufacturers haven’t yet implemented Bluetooth 5.0 in their headphones. For example, the Sony WH-1000XM2 comes with the obsolete standard Bluetooth 4.1. However, you would just assume that a headphone dedicated to audio fidelity would use a lossless wireless standard like Bluetooth 5.0. Unfortunately, this is not the case.
Audeara has an excuse, though. Bluetooth 5.0 was announced in December of 2016 and there almost certainly wasn’t enough time for Audeara to adopt the technology in time for its first prototype unit, which came out in January of 2016 (according to its Kickstarter page). So while Bluetooth 5.0 would have been an amazing addition, it probably wasn’t feasible. But there’s hope for an Audeara A-02.
More or less, if you want absolute audio accuracy, you’re going to be using these with a 3.5mm audio jack.
The Good, The Bad, The Ugly
The Good
Top-of-class audio accuracy
Lightweight and comfortable design
At 33% volume, approximately 51+ hours of battery life near the Bluetooth antenna
Noise-canceling runs independently of its Bluetooth connection
The Bad
Average Bluetooth connectivity range
Weak active noise canceling
No Windows, Linux, or ChromeOS tuning application
Bluetooth pairing process won’t work seamlessly for all devices
The Ugly
Should have had Bluetooth 5.0
Should You Buy the Audeara A-01 Bluetooth Headphones?
I normally wouldn’t recommend an MSRP ~$400 headphone with any shortcomings to anyone. The A-01 makes me break that rule. But they’re not for just anyone. Audeara’s headphones cater to two very specific groups: audiophiles with some degree of hearing loss, or audio professionals who need absolute accuracy in discriminating between different kinds of sound—think of musicians, audio engineers, and producers.
Overall, the headphones compromise on a lot of non-essential features, like noise-canceling, but absolutely nail it in the one category that matters: audio fidelity. Because the A-01 is a unique product with no competitors in its specific niche, I have no choice but to recommend them. However, thanks to a recent law, “Over-the-Counter Hearing Aid Act of 2017“, over-the-counter hearing aids are now less regulated, which may open the floodgates to devices with similar functionality as the Audeara A-01 headphones. I’ve heard of a few crowdfunded projects that may provide competition in 2019 and beyond.