Project Include CEO Ellen Pao, who has been working to foster diversity, inclusion and ethics in the tech industry, called out Twitter’s “public square” model as flawed — and a decision that indicates a lack of ethical consideration, on Twitter’s part.
The topic of Twitter came up on a panel at TechCrunch Disrupt SF 2019 this morning, when Pao was asked her opinion as to whether Twitter should make exceptions to its platform rules for public figures — like President Trump, for example.
She said doesn’t believe that it should. And not just because the decision in and of itself raises ethical questions, but because of how these decisions can ultimately shape the direction of Twitter’s platform as a whole.
“I think it’s a question of ethics to break these exceptions — because you want to drive this growth that you want to use to fuel your stock price and to fuel recruiting, and to fuel this capitalism — that’s driving all sorts of decisions without thinking about the long-term direction of where your platform is going,” Pao explained.
She also questioned whether Twitter has been successful in creating an online version of the public town square, which is how Twitter CEO Jack Dorsey has repeatedly described the social media platform.
“Jack talks about this public square, where you have this digital version of the public square. But people aren’t screaming at you on the public square, they’re not calling you racist things, they’re not throwing pictures of like horrible things…I don’t want to be in a public square like that,” Pao said. “And I don’t want to have a public square that’s digital create these horrible events in real life,” she added.
On Twitter (or really, on social media in general) the hateful words and sentiments can often spill over into real-world action.
“I don’t think that’s an ethical decision. I don’t think that’s a values-driven decision. I don’t think that’s creating a good public square, I don’t think that’s doing a service for your users who are from the groups that are being hated on,” Pao said. “I think you really have to think about your whole community. You have to think about the types of conversations you want to have.”
She clarified that it’s not about censoring speech, but the challenges in creating a place where people can actually engage in conversations — even those in which they disagree, and even those where there may be conflict.
Twitter’s failure has been not understanding where free speech ends and moderation begins. And this is not a problem unique to its platform. All of social media is struggling with this same issue.
In Pao’s mind, it’s a question of where meaningful conversation ends and outright harassment begins.
“Using the F word, and the C word, and the N word? That’s not a conversation, right? That’s not an exchange of ideas,” she said. “I don’t think people think enough about what they want their platforms to be, what they want the platforms to encourage.”
In what will hopefully turn out to be just a mistake, the Amazon Prime Video app has disappeared from the Apple App Store, making it unavailable for new downloads or updates to users both on iOS and Apple TV. Twitter users began to tweet to Amazon for help about the problem on Friday morning, to which Amazon’s support channels have yet to reply.
The app’s disappearance was earlier reported by AppleInsider, iMore, and others.
The most likely reason for the app’s removal is a technical one — an issue with the update could have caused it to be temporarily pulled, perhaps.
What’s not likely is that Amazon Prime Video is gone for good.
The company just released an X-Ray upgrade to the app across platforms, including iOS, allowing users to get more information about what they’re streaming, including Amazon’s run of Thursday Night Football games.
Nor is it likely that Apple has for some reason booted out Prime Video, given the anti-competitive nature of such a move (Apple TV+ is soon to launch), at a time when the tech giants are under increasedregulatoryscrutiny.
The issue isn’t only impacting users in the U.S., nor is it limited to iPhone, as Apple TV is also affected.
According to data from app store intelligence firm Sensor Tower, the app was removed today in all regions except for Australia, Guatemala, Hong Kong, Hungary, Israel, India, Kenya, Kuwait, Lithuania, Luxembourg, Madagascar, and Saudi Arabia.
Amazon has not responded publicly to users asking for help.
TechCrunch has also reached out to Amazon for comment and will update when we hear back.
Visual artist, cellist and TED Fellow Paul Rucker performs a disarming rendition of "Criminalization of Survival," a piece he created to explore the fragile journey of life in light of the brutality of the immigration crisis.
Innovation is the antidote to corruption | Efosa Ojomo
Traditional thinking on corruption goes like this: if you put good laws in place and enforce them well, then economic development increases and corruption falls. In reality, we have the equation backwards, says innovation researcher Efosa Ojomo. In this compelling talk, he offers new thinking on how we could potentially eliminate corruption worldwide by focusing on one thing: scarcity. "Societies don't develop because they've reduced corruption," he says. "They're able to reduce corruption because they've developed."
You just adopted a new dog, but you don’t know how to go about training it. Maybe you even considered hiring a dog trainer for your unruly pup. Fortunately, you don’t have to turn to a professional to do the training when you can do it yourself.
If you have no idea where to begin, that’s okay. These free online dog training courses will help you teach your dog some new tricks without breaking the bank.
Leerburg University is an online school dedicated to dog training. While most of its courses cost money, it offers one class for beginners: “How We Manage Dogs in Our Home.”
The course is taught by Ed Frawley, owner of Leerburg University. He’s a seasoned dog trainer with decades of experience. In other words, you can expect to learn a lot from his lectures.
The course centers around the best ways to integrate a puppy into your household. When you first bring a dog into your home, you’ll almost always encounter behavior problems. Whether your puppy chews shoes, nips, or is out of control on the leash, you can always work with your dog to solve these problems.
Frawley goes over solutions for almost every dog training issue you might come across. It’s broken up into a series of 69 videos for a total of about three hours.
Wagfield Academy offers three free courses that you can take advantage of. The goal of the academy is to provide affordable dog training, and that’s exactly what it does. You have to sign up to the site to start taking the courses, but it’s well worth it.
If you have a new puppy, you should begin by taking Puppy 101. Here, you can find information on everything from crate training, house training, leash walking, and much more. Each segment is accompanied by a video, written instructions, as well as helpful hints. You can also take a quiz that tests your knowledge of what you’ve learned.
Once your dog reaches adulthood, you should tune into Wagfield Academy’s course titled The Basics. It starts by helping you teach your dog to listen and ends with the best ways to socialize your dog. If your dog has the bad habit of running away, you might want to think about getting a GPS tracker for your dog, and honing in on teaching it those listening skills. Although some of these segments come with articles only, it’s still a very helpful course.
Wagfield Academy also offers Resue Refresher, which is specifically for untrained dogs you’ve just rescued. However, these courses are identical to the ones in the Puppy 101 course.
The AKC is a registry of purebred dog pedigrees and is most known for its extravagant dog shows. Even if you don’t want to show your dog, you can benefit from reading through the Training section on their site.
Most of the content of this section is in the form of in-depth articles. However, you can choose to filter the content by videos only. Just note that there are only a handful of training videos, and most of them have to do with training your dog for shows and agility competitions.
Despite the lack of videos, the AKC still gives you plenty of helpful training advice. Most articles offer detailed instructions on how to handle certain situations with your dog.
For example, the article titled “Alone Time for Dogs: How Much Is Too Much?” informs you of the proper amount of socialization for your dog, and the signs of separation anxiety. Whether your dog is a puppy or an adult, you can find articles suitable for your needs.
The UK’s Blue Cross has an entire section on its website dedicated to dog advice. This section doesn’t only include training tips—it also houses dozens of articles related to dog care, health, pet hacks, and more. It’s a great resource for first-time dog owners, or for anyone struggling to resolve their pet’s behavioral issues.
The Training and games subcategory has the tools you need to train your dog. Each article provides easy-to-follow solutions for common training issues.
You can learn anything from the basics of playing with your dog, toilet training your puppy or adult dog, the best ways to train your puppy, and how to stop your dog from pulling on the leash.
You’ll notice that some articles are also accompanied by videos. These short videos give you a more thorough understanding of what’s written, so make sure you watch them!
You can find thousands of helpful courses on Udemy, including some that pertain to dog training. This specific course is completely free, and comes with several lectures to help you better understand dogs and training in general.
As you might notice from its title, “Puppy Raiser Course for Retrieving Independence,” the course has been specifically made for a nonprofit organization called Retrieving Independence.
Although the course is meant to help volunteers train and raise service dogs, it’s still beneficial to anyone raising a puppy.
Since you’re not a volunteer in the organization, you can skip the first introductory segment of the course. Start at the segment titled “Understanding Dog Behavior.” Knowing why your dog has certain instinctual habits can help you in the training process.
From there, you can proceed to watch the actual training videos. It addresses everything from common puppy problems to the fundamentals of socialization. The last segment of the course has to do with your dog’s everyday behavior, including feeding and leash manners.
Simple and Cheap Dog Training
After taking all these free dog training courses, you’ll soon become an amateur dog trainer. These courses cover almost everything you need to know about your pup and they provide a solid foundation for you to start the training. Remember that you don’t need to have a puppy in order to start training either—older dogs still have hope!
If you use Numbers on your Mac for tracking, analyzing, and manipulating your data, it can be very handy to use the built-in controls. These include things like checkboxes, sliders, steppers, star ratings, and popup menus.
For various purposes, at least one of these controls might be exactly what you need. Here’s how to add those kinds of controls to your spreadsheets in Numbers along with some examples of how they can be helpful.
Add Checkboxes in Numbers
We see checkboxes everywhere. From forms to surveys, this makes it easy for the person to complete the document without typing anything. Whether you’re creating a spreadsheet for others to fill or want to use checkboxes to create lists for yourself, here’s how to add them in Numbers.
For this example, we’re going to create a helpful checklist for our own use. We have our list of tasks on the left and are going to add checkboxes on the right. This way, we can mark our to-dos off the list quickly.
Open your spreadsheet in Numbers and then select the cells where you want the checkboxes to appear. You can select a range easily by clicking the first cell and then dragging through the rest. Alternatively, select the first cell, hold down the Shift key, and select the last cell.
Click the Format button on the top right to open the formatting sidebar.
Choose the Cell
In the Data Format dropdown box, pick Checkbox.
You’ll then see empty boxes pop into your selected cells that are just waiting for checkmarks!
Add Star Ratings in Numbers
Another cool control you can use in Numbers is star ratings. You can use star ratings for creating customer surveys and client forms. You can also use them as a handy way to prioritize your own data, as in the checklist we just created. And that’s the example we’ll show here.
Open your spreadsheet in Numbers and then select the cells where you want the star ratings to appear.
Click the Format button on the top right to open the formatting sidebar.
Choose the Cell
In the Data Format dropdown box, pick Star Rating.
Now you will see five dots in each of your selected cells representing the number of stars you can have per item. Click a dot, from one to five, to apply that number of stars.
Add Sliders or Steppers in Numbers
Sliders and steppers in spreadsheets allow you to make incremental adjustments to specified cells and then quickly see how those changes affect your data. You can use sliders or steppers to adjust numbers, currencies, and percentages or use them to change values for charts and graphs you use.
The difference between a slider and a stepper is that with a slider, you use a button to slide the scale you set up and down but with a stepper, you use arrows to move up and down in increments.
For this example, we have a household budget with our monthly spending. Our goal is to lower our expenses. By using sliders, we can increase or decrease the amounts for each expense to see how we can meet our goal.
Open your spreadsheet in Numbers and then select the cells where you want the slider or stepper to appear.
Click the Format button on the top right to open the formatting sidebar.
Choose the Cell
In the Data Format dropdown box, pick Slider or Stepper, per your preference.
Once you add the control, you can configure the amounts, increments, and format directly below the Data Format dropdown box.
Minimum, maximum, and increments: Set the lowest and highest amounts for the control along with the increments to use for stopping points. Keep in mind that the minimum must be at least one.
Format: Choose from number, currency, percentage, fraction, scientific, or numeric system for your data type.
Decimals and negative numbers: If applicable to your Format, you can select the number of decimal points to use. And next to that, select how you want negative numbers to display.
Add Popup Menus in Numbers
Like checkboxes, popup menus can give you or the person completing the document a simple way to enter data. You can use these for lists of products, months of the year, color attributes, and many other types of data where you must select just one item from a list of specific options.
The nice thing about the popup menu feature in Numbers is that you can use cells that already contain data and have the menu populate automatically or you can insert a placeholder and enter the options later when you have them.
Add a Popup Menu With Existing Data
To add a popup menu with existing data, we’re going to use the months of the year.
Open your spreadsheet in Numbers and then select the cells with your existing data where you want the popup menu(s) to appear.
Click the Format button on the top right to open the formatting sidebar.
Choose the Cell
In the Data Format dropdown box, pick Pop-Up Menu.
Once you do this, you’ll see the items included in your popup menu in the sidebar below the Data Format dropdown.
To reorder an item, select one and drag it to its new location in the list. And to have the popup menu start with a blank cell or the first item on your list, pick an option from the dropdown menu directly below the item list.
Add a Popup Menu Without Data
To add a popup menu placeholder so that you can add the menu items later, just follow the same steps as above. In the cells, you’ll see “Item 1” appear and in the list in the sidebar, you’ll see “Item 1,” “Item 2,” and “Item 3.”
When you’re ready to add your own menu items, double-click “Items 1, 2, and 3” in the sidebar and type your own items. To add more to the list, click the plus sign beneath the list and enter the next item.
And as mentioned above, you can start with a blank in the cell or with the first item on the list by making your selection in that dropdown menu to the right.
Choose the Right Control for Your Spreadsheet
Each of these controls can come in handy for the types of examples we used for this tutorial. They can make data entry easier, reduce errors, and create a visually pleasing document.
Your antivirus or antimalware suite keeps your system clean. At least, it does most of the time. Security programs are better than ever, but some malware still squeezes through the gaps. There is also the other common issue: the human touch. Where there is a human, there is a chance for malware to slip through.
When that happens, you can reach for a bootable antivirus disk. A bootable antivirus disk is a malware removal environment that works like a Linux Live CD or USB. Here are seven free bootable antivirus disks you should check out.
1. Kaspersky Rescue Disk
The Kaspersky Rescue Disk is one of the best bootable antivirus disks, allowing you to scan an infected machine with ease. The Kaspersky Rescue Disk scanner has a reasonable range of antivirus scanning options, including individual folder scanning, startup objects, system drive, and fileless objects. You can also scan your system boot sectors, which is a nice option to find stubbornly hidden malware.
That said, the Kaspersky Rescue Disk does come with a smattering of additional tools, such as Firefox, a file manager, and more.
Another handy Kaspersky Rescue Disk feature is the graphic or text-based interface. For most users, the GUI is the best option, but the text-only mode is available for low power machines or otherwise.
Kaspersky consistently achieves high scores in antivirus testing, and the Kaspersky Rescue Disk brings that to you in a bootable format. Kaspersky also features in our list of the best antivirus suites for Windows 10.
Bitdefender Rescue CD is of the same ilk as Kaspersky’s offering. It is a large download, has a simple to use UI, and comes with several antivirus scan options to help you figure out what’s wrong with your system.
The scanning interface is easy to navigate, allowing you to exclude certain file types, scan archive files (such as a .ZIP or .7z), scan files below a particular size, or just drag and drop individual files into the scanner. For the most part, however, the standard scan is fine as you want to make sure your system is free of malware.
Also included in the Bitdefender Rescue CD is Firefox, a file browser, disk recovery tool, and a few other utilities.
The major downside to Bitdefender Rescue CD is that it is no longer updated; therefore, the virus signatures are outdated. Still, it is a decent rescue disk.
Avira Rescue System is an Ubuntu-based bootable antivirus rescue disc. The Avira Rescue Disc is one of the best bootable antivirus environments for beginners, as it includes a handy guide to walk you through scanning your drives. Moreover, Avira offers very little in the way of scan customization. Again, this might suit a beginner, as there is less chance of turning part of a scan off and missing a malicious file.
The Avira Rescue System environment is easy to navigate, with a streamlined interface of labeled boxes. Like the other options, the Avira Rescue System includes a web browser and a disk partitioning tool amongst others.
As Avira is an Ubuntu-based rescue disk, it also works well with Linux-based systems.
From three of the largest bootable antivirus rescue disks to the smallest. The Trend Micro Rescue Disk may well be the smallest bootable antivirus disk on this list, but it packs a handy punch that will help you regain control of your system.
Given its size (around 70MB at the time of writing), you can forgive that the Trend Micro Rescue Disk has no graphical user interface. Instead, you use the rescue disk exclusively through plain text menus. It sounds a little daunting. But in practice, the text menus are simple to navigate, and you will find your way through.
Download: Trend Micro Rescue Disk for Windows (Free)
5. Dr.Web Live Disk
Despite the slightly suspect name (Dr.Web sounds like a phony internet firm, to me at least), Dr.Web Live Disk offers a wide range of antivirus scanning options in its bootable antivirus environment. In comparison with the alternatives, Dr.Web’s range of scanning options is extensive.
For instance, you can configure the types and sizes of files for inclusion and exclusion. You can set individual actions for specific types of malware, such as a bootkit, dialer, adware, and so on. You can also limit the amount of time the virus scan spends on individual files, handy if you have multiple large media file types.
Dr.Web Live Disk has another string in its bow, too: you can use it to scan Linux systems.
AVG is one of the most recognizable names in security. The AVG Rescue disk has a very basic, text-only interface, but it does allow for customizable scanning.
For instance, you can mount a specific Windows volume and scan only that, or scan specific files within that volume. Alternatively, you can scan Windows Startup objects or even just the Windows Registry to seek out specific malware types. (Should you clean the Windows Registry, anyway?) In addition, AVG Rescue comes with a few diagnostic and analytical tools to help you fix drive specific issues, rather than just straight-up malware.
The very basic text interface won’t be everyone’s cup of tea. Having to navigate back and forth through the interface using the arrow keys is infuriating at times. But, given the range of options available and the accuracy of the AVG Rescue disk scanner, you might overlook the arrow keys.
The final bootable antivirus disk for your consideration is ESET SysRescue Live, an advanced antivirus rescue disk with lots of features.
ESET SysRescue Live comes with extensive antivirus scan control. You can scan archives, email folders, symbolic links, boot sectors, and more, or use the ESET scan profiles. The ESET SysRescue Live disk also packs in a disk analysis tool to check for defects and other failures, plus a memory test tool to check your system RAM for errors.
The rescue environment also comes with the Chromium browser, partition manager GParted, TeamViewer for remote system access, and a smattering of other handy utilities.
For me, the best free bootable antivirus disk is a toss-up between Kaspersky Rescue Disk and Dr.Web Live Disk.
The Kaspersky Rescue Disk is cumbersome but effective, updating regularly and backed with Kaspersky’s excellence in the field of security. But it doesn’t have the same extensive functionality as the Dr.Web Live Disk. While the latter cannot truly compete with Kaspersky on scanning terms alone, the scanning options available in the Dr.Web Live Disk make it a handy tool.
Regarding the other tools, all are strong and will clean your system. Depending on the severity of the malware, you could download two bootable antivirus disks and run them one after the other to make sure nothing slips through the net.
Have you ever wanted to control your iPhone or iPad with only your voice? Well, the powerful new Voice Control feature introduced in iOS 13 lets you do just that, and you can use it even if you don’t have Siri enabled.
While it is primarily intended as an accessibility feature, Voice Control can also be a very useful option for those of us who frequently find ourselves unable to physically touch our phones, whether we’re holding a baby, playing games, or washing the dishes.
Sounds cool, right? And it’s easy! Here’s everything you need to know on how to set up true hands-free operation of your iPhone using Voice Control in iOS 13.
How to Set Up Voice Control in iOS 13
Setting up this awesome accessibility feature in iOS 13 is quite an easy process to do. We’ll show you just how to get it working in no time:
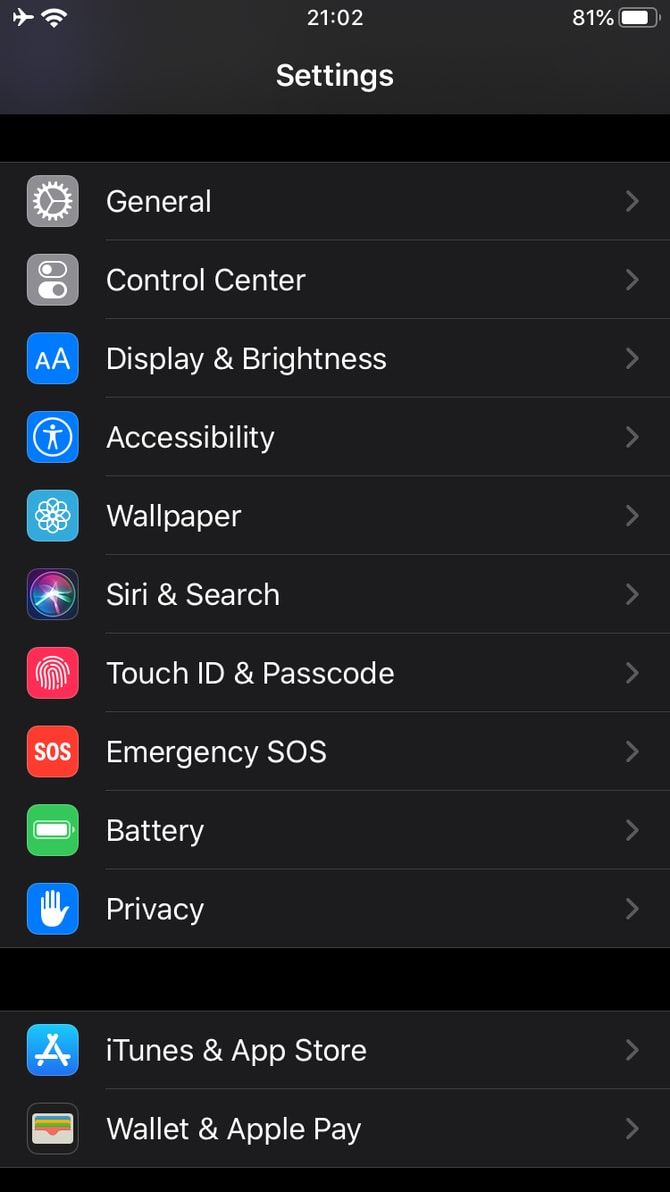
First, open the Settings app.
Locate and open the Accessibility section.
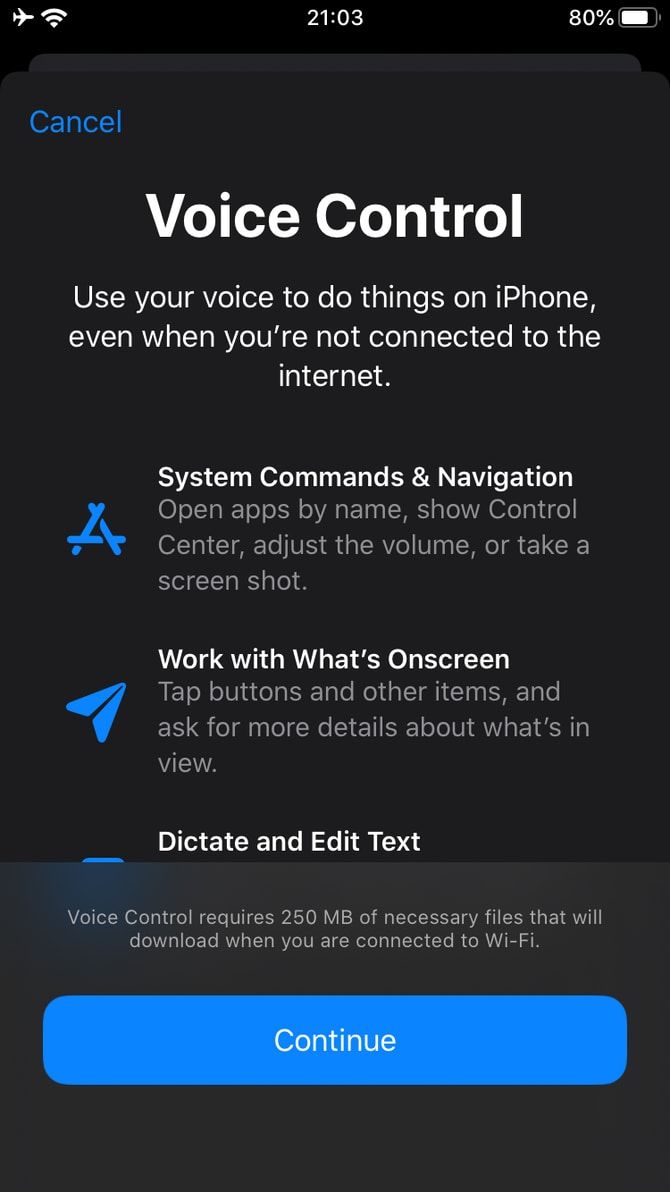
Scroll down until you see Voice Control. Tap on it.
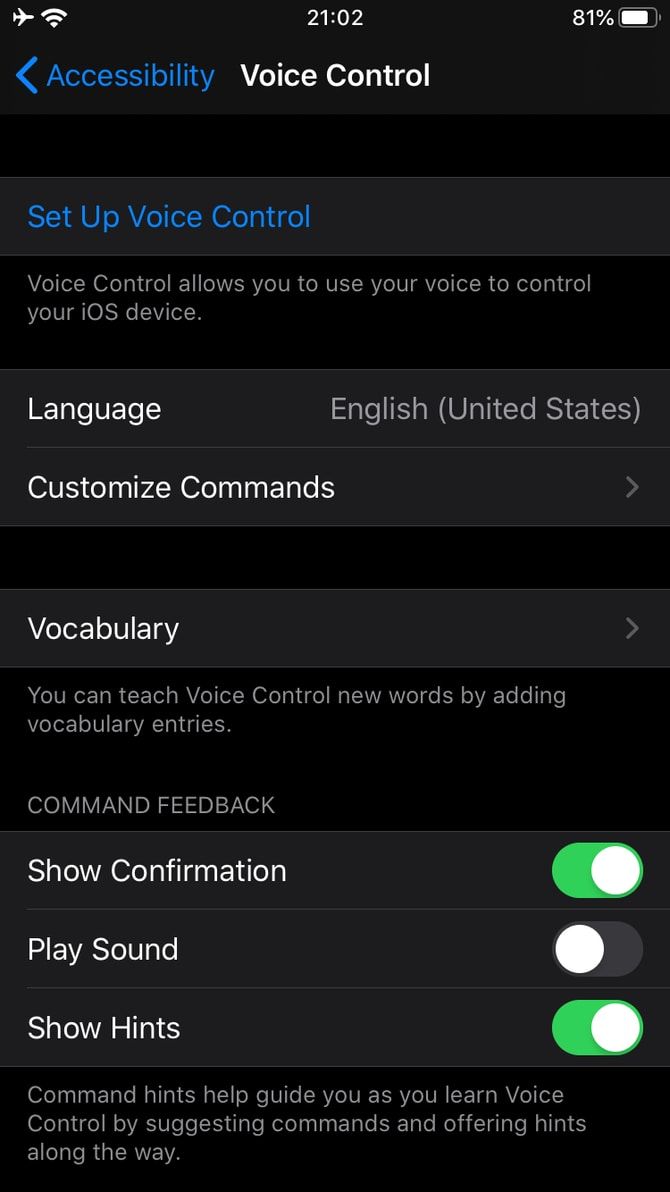
Select Set Up Voice Control.
And you’re all set! You now have Voice Control enabled on your iPhone or iPad. While it is on, you’ll see a blue microphone icon at the top left of your screen.
Within the Voice Control menu in settings, there are a couple of ways you can tailor this feature to your needs, such as customizing commands with Customize Commands and teaching your device new words with Vocabulary.
You can also customize the way command feedback works for you. To play a sound after Voice Control recognizes your command, simply toggle Play Sound Upon Recognition. This will give you aural confirmation that your command was followed just in case you aren’t looking at your phone. And to show hints so as to help you maneuver your phone faster, just turn on Show Hints.
How to Voice Control on the iPhone Home Screen
Now that we’ve set up Voice Control, it’s time to start using it in a practical and productive manner.
There are a couple of commands essential for navigation. Let’s begin with the home screen. Here are the essential voice commands to know when you want hands-free interaction with your iPhone’s home screen:
To swipe right, say “Swipe right.”
To swipe left, say “Swipe left.”
To open Notification Center, say “Open Notification Center.”
To open the Control Center, say “Open Control Center.”
To open a specific app, say “Open [app name].” (e.g. “Open Instagram.”)
To go back to the home screen from an app, say “Go back.”
And there you have it! These are the basic commands you can use to control the iPhone home screen with your voice. Again, you can set up custom voice commands for all of these options if there’s something that you find easier and faster to say.
How to Voice Control Within an iPhone App
To show how Voice Control can be used for navigation within an app, here’s an example of Voice Control being used for Instagram. Instagram is a complex app in which there are lots of different options, controls, and menus to choose from, so it’ll teach you quite a bit about how to master Voice Control.
Let’s start with the “Show Numbers” command. Show Numbers is an integral part of Voice Control: wherever you are on your phone, it will provide you with different numbers all over the screen, each corresponding to a certain on-screen action. Then you can say a number out loud and Voice Control will execute the on-screen action corresponding to the number.
Let’s try it out:
In Instagram, say “Show numbers continuously.” Various numbers, starting from one, will appear on your screen. These numbers are attached to specific on-screen actions. As you can see in the screenshot above, 21 designates the search button.
Say “Twenty-four” to open the Search section.
Repeat the process and choose your desired number option.
These are the basics of controlling your favorite apps using only your voice, thanks to Voice Control. Easy as pie.
How to Type and Edit Text With Voice Control
What if you’re too busy re-arranging your furniture, but you need to jot down stray thoughts in the Notes app, such as items for your grocery list this week?
On the home screen, say “Tap Notes” to open the Notes app.
Create a Note by saying “New Note.”
On your new note, say “Single tap.” This will simulate a single tap and launch the keyboard.
Speak what you want to write down.
Easy!
To change words and fix typos, just say “Change [word] to [new word].” If there are multiple versions of the same word, you’ll see each one represented by a number, so just choose the word you want to change by saying its corresponding number.
You can also select, delete, cut, copy, and paste words:
Say “Select [word]” or “Select this [item]” to select it. You can also select all content by saying “Select all.”
To delete what you have selected, you can say “Delete that.”
Say “Cut that” to cut or “Copy that” to copy. To paste, just say “Paste.”
To capitalize or lowercase a selected letter, say “Capitalize that” or “Lowercase that.”
You’re now one step closer to mastering Voice Control!
More Ways to Use Voice Control
There are various other ways to make use of Voice Control. Here’s a really quick list of other commands you can say:
“Take screenshot” to take a screenshot.
“Turn up volume” or “Turn down volume” to raise and lower volume, respectively.
“Search web for [phrase]” to open Google on Safari and search what was said.
“Go to sleep” to disable Voice Control temporarily.
“Wake up” to re-enable Voice Control.
“Long press” or “3D Touch” to simulate a long press or 3D Touch on an item, depending on your device’s capabilities.
“Lock device” to lock your iPhone or iPad.
And that’s about it!
You are now a master at maneuvering your iPhone with only your voice! Just be careful to keep the Voice Control feature asleep while you’re out and about—unlike Siri, Voice Control will listen to and obey any voice it hears, not just yours.
Want to take it further? Start using Siri! We’ve got a master list of Siri commands to get you started. And if you enjoy speaking to your tech to get things done, check out our best HomePod features.
When a new macOS update comes, there are plenty of positives to look forward to: bug fixes, security improvements, and design tweaks. Sadly, updates aren’t always flawless—users may run into sluggish slowdowns and system performance hits.
Maybe that’s you with the new macOS Catalina update. Instead of sagging your head in dismay, why not try these simple fixes to boost your newly updated macOS Catalina system’s performance for optimal speed?
1. Make Sure Your Hardware Is Compatible
Before beginning any expedition into potential problems concerning performance, it’s best to make sure that your respective computer model falls under the list of compatible devices for macOS Catalina:
Laptop Line
MacBook Air (2012 and beyond)
MacBook (2015 and beyond)
MacBook Pro (2012 and beyond)
Desktop Line
iMac (2012 and beyond)
iMac Pro (2017 and beyond)
Mac Mini (2012 and beyond)
Mac Pro (2013 and beyond)
In the upgrade from Mojave to Catalina, the requirements list hasn’t shifted much. The only new exclusion to the list is that Mac Pros from 2010 to 2012 no longer meet the standards to run Catalina. If you’re already familiar with this list from your last OS update, we can move onto more direct changes.
2. Clean Out the macOS System Junk
Have you ever felt compelled to clean up a mess because it has gotten too dirty for the space to be livable? The data written on your computer’s disk can be much the same. When upgrading your system to a new macOS update, there’s a lot of data written in the process—and it’s soon obsolete when the update is done.
There are also day-to-day installations, removals, and files written to the system as you use it. If the residual mess left behind by these processes aren’t cleaned up on a regular basis, they can easily add up and slow the system down.
To clean your system of junk, you’ll need a third-party app. I recommend CCleaner for day-to-day cleaning. For easy day-to-day cleaning and vast removal of system junk, I recommend CCleaner. It features a clean interface and intuitive controls, along with a sharp distinction between macOS-specific files and files for third-party apps downloaded you’ve downloaded.
By simply checking your preferred areas under each category, you can custom tailor your cleaning job each time. The changes that you make to your selections are saved upon each opening and closing of the app. Most of the design choices are simple, but CCleaner makes junk management much more manageable.
Sometimes the easiest solutions just so happen to be the most overlooked: another reason why your system might be slow is if you have a bunch of apps launching at startup. Let’s look at some ways to disable these applications from opening at boot.
Removing the Non-Hidden Startup Items
The process of removing common startup programs isn’t too hard to tackle. When installing new programs, these types can sneak their way into your launch process. If you’re not the type to read every word of the installation process nor dig through a program’s preferences, then you’ve already probably fallen prey to a few.
Rather than annoyingly closing them at every startup, you can disable them from launching at startup altogether:
Opene System Preferences. If bound to your dock, simply click System Preferences. If not, access it by clicking the Apple menu icon in the upper left-hand corner then navigating down to System Preferences.
Look for Users & Groups and click it.
On the left-hand side of the window, a list of users will pop up. If you’re the only active user, you can simply click on yourself as the current user.
In the right of this window, there will be two tabs: Password and Login Items. Switch to the Login Items tab.
You’ll see a list of applications that appear at startup. You now have the option to remove programs (minus sign), add programs (plus sign), or just use the checkbox to delay programs at startup. We want to remove, so we’ll use the minus sign. If you’re interested in learning more about the other options, check out our article on adding and removing startup items on macOS.
Click on the applications individually to highlight them (or shift-click to select multiple) and press the minus sign once more to remove them.
You can now close out of Users & Groups.
Removing Hidden Startup Items
In addition to the programs vying to startup at the launch of your computer, there are hidden processes that may be silently draining system performance. For the most part, they tend to be upgrade agents that check on launch whether you have the newest version of their respective software.
In order to gain access to these, there are free third-party programs that you can use. CCleaner makes the process very simple and eliminates the need for another program:
After launching CCleaner, navigate to the Tools section.
Click Startup from the four options.
From this point, any remaining startup programs will appear in a list. By highlighting each program with a click, the user can remove or disable any unnecessary programs.
For any clear annoyances, choose to remove the programs, and they’ll disappear from the startup process.
With these three simple measures, your newest macOS should be in the best of shape. If these techniques haven’t met the bar, your Mac may need to experience a more drastic measure such as an SMC and PRAM/NVRAM reset. Getting your system in shape can take a little effort on the first go, but you’ll be onto a healthier and more stable experience going forward.
An Indian startup that is increasingly posing a threat to established food and grocery delivery businesses and e-commerce giants just closed a new financing round to expand its business in the nation.
Bangalore-based Dunzo said today it has raised $45 million from Google, Lightbox, STIC Ventures, and 3L Capital in a new financing round. The round, dubbed Series D, valued the startup at about $200 million, three people familiar with the matter told TechCrunch. The startup has raised $81 million to date.
Dunzo, a four-year-old startup, operates an eponymous hyper-local delivery service. Users get access to a wide-range of items across several categories including grocery, perishables, pet supplies, medicines to dinner from their neighborhood stores and restaurants.
But that’s not all. You can have Dunzo pick up and deliver anything within a city. Forgot your laptop charger at home? Dunzo will bring it to your office. Part of the service’s charm is that its delivery is fast (most of its deliveries take under 25 minutes) and as long as the store is not very far away, it’s not going to cost you more than a $1.
Dunzo is currently operational in eight Indian cities: Bangalore, Delhi, Noida, Pune, Gurgaon, Powai, Hyderabad, and Chennai. The startup said it will use the fresh capital to expand its technology infrastructure and develop partnerships with small and medium businesses to “give them a fighting chance” to compete with major giants.
“We are on course to building the largest commerce platform in the country with the most efficient logistics solution for each city,” said Kabeer Biswas, co-founder and CEO of Dunzo, said.
Dunzo founders told TechCrunch that food category already accounts for a quarter of all deliveries the service processes. As the service scales, it is increasingly becoming a competitor to food delivery startups such as BigBasket,Swiggy, and Zomato.
In recent months, Dunzo has also started to test delivery of smartphones and other products. The startup recently quietly began to deliver Xiaomi smartphones to users in select parts of India. Unlike Amazon or Flipkart, that take a day or two to deliver an item, Dunzo was getting the new phones to users in 30 minutes. Dunzo has tested a similar partnership with Puma, executives told TechCrunch.
The startup today processes more than 2 million orders a month, up from about 50,000 early last year.
In an interesting turn of events, last month Swiggy announced Go, a service that allows users in select cities in India to deliver any kind of product — not just food, thereby entering Dunzo’s territory.
There is so much more to Google Maps than merely getting from A to B. It can provide you with public transportation routes and times, and customize your journey depending on your method of travel. It also lets you drop a pin in a location and either save it to your profile or share it with friends.
Dropping a pin is useful if the place you’re looking for doesn’t have an address or is off the road network. It’s also helpful on the odd occasion when Google gets a location wrong. Here’s how to drop a pin on Google Maps on both Android and iOS.
How to Drop a Pin on Google Maps Mobile (Android)
To drop a pin on Google Maps when using an Android device:
Open the Google Maps app.
Either search for an address or scroll around the map until you find the location you want.
Long-press on the screen to drop a pin.
The address or location will pop up at the bottom of the screen.
Tap on the location to share it, save it, add a label to it, or get directions.
How to Drop a Pin on Google Maps Mobile (iPhone)
The process for how to drop a pin in Google Maps on iOS is broadly the same as the process for Android.
Open the Google Maps app.
Search for an address or scroll around the map until you find the ideal pin location.
To drop the pin, long-press on the screen in the desired location.
The address or coordinates will pop up at the bottom of the screen.
Tap on the location to see more details, get directions, add labels, etc.
How to Drop a Pin on Google Maps on Desktop
Many people don’t realize that it’s also possible to drop a pin on Google Maps from any desktop operating system.
The process is straightforward:
Head to the Google Maps homepage.
Find the location where you want to place the dropped pin, then left-click on the exact spot.
A small grey pin icon will appear on the map, and you’ll see an information box pop up at the bottom of the screen.
If you click on the information box, a new panel will appear on the left-hand side of the screen containing more information and providing you will some additional options.
How to Make the Most of a Dropped Pin
Let’s now look at some of the things you can do once you’ve dropped the pin and you’re happy with the pin’s location.
The exact options vary slightly depending on whether you’re using a mobile or desktop operating system. We’ll look at each feature in turn.
Use a Dropped Pin for Directions
Available on: Mobile and Desktop
As we said at the start, Google Maps’ most useful feature is arguably its ability to provide directions. If you’re not sure about the address of a particular location, then dropped pins become an essential part of the process.
You can choose to use your dropped pin as a start point or as an endpoint. Sadly, there is no way to place two dropped pins and find directions between them. Instead, you’ll need to place one pin, make a note of the address or coordinates, then drop a second pin to use as your start point/destination.
Save a Pin Location
Available on: Mobile and Desktop
You can save a pin’s location to a list that’s connected to your Google account. You can then access it on all your devices.
By default, three pre-made lists are available: Favourites, Want to go, and Starred places. You can add more lists (and delete the defaults) by going to Your Places in the app’s main menu. Each list can be public or private, or shared with specific other users. You can also make groups lists that anyone can add pins to— they’re useful for vacations and day trips.
Send a Desktop Pin to Your Phone
Available on: Desktop
If you drop a pin on Google Maps via the desktop version of the app, you can share it with your Google Maps mobile app, email it to the Gmail address that’s connected to your account, or share it via text with the phone number that you have associated with your Google account.
Just click on Send to your phone to get started.
Share a Dropped Pin Location
Available on: Mobile and Desktop
The Google Maps desktop app provides four ways to share a dropped pin with other users (not including the lists feature as discussed above).
On the desktop, you can either:
Copy and paste the automatically generated short link to share it with other people.
Click on the Facebook icon to share a location directly with the network.
Post your link in Twitter by selecting the Twitter icon.
Grab the HTML code to embed the map into a webpage.
If you’re sharing a dropped pin location from an Android or iOS device, you are forced to use your operating system’s native Share menu. The embed option will not be available.
Add a Label to a Dropped Pin
Available on: Mobile and Desktop
You can label your dropped pins with a custom word or phrase. The labels will sync across your entire Google account, and they will appear on all Google Maps versions.
The feature does have a trade-off, however. As per Google’s own message:
“Personal places will be used across Google products, for personalized recommendations, and for more useful ads.”
Only you can decide whether you are comfortable with the situation from a privacy standpoint.
How to Remove Dropped Pins
Now you know how to drop a pin. But what about deleting a dropped pin? How do you remove one from your map?
To remove a pin location on Android and iOS, tap the X icon in the text box at the top of the page. If you want to delete a dropped pin on desktop, either click anywhere else on the map or press the X icon on the information box at the bottom of the screen.
Facebook plans to challenge Europe’s top court, which today ruled that EU countries can order Facebook to globally remove content that violates local laws. Facebook currently complies with proper legal requests to remove content that breaks a nation’s laws, but can leave it up for global viewers if the post doesn’t violate its Community Standards.
But today during a livestreamed Q&A with Facebook employees, CEO Mark Zuckerberg said that “This is something I expect us and other companies will be litigating.”
Zuckerberg explained that Facebook had “successfully fought” overly broad takedown requests in the past. He also noted that “a lot fo the details about exactly how [the ruling gets] implemented will depend on national courts across Europe.”
Facebook told TechCrunch in a statement today that:
“This judgement raises critical questions around freedom of expression and the role that internet companies should play in monitoring, interpreting and removing speech that might be illegal in any particular country.
At Facebook, we already have Community Standards which outline what people can and cannot share on our platform, and we have a process in place to restrict content if and when it violates local laws. This ruling goes much further.
It undermines the long-standing principle that one country does not have the right to impose its laws on speech on another country. It also opens the door to obligations being imposed on internet companies to proactively monitor content and then interpret if it is “equivalent” to content that has been found to be illegal.
In order to get this right national courts will have to set out very clear definitions on what “identical” and “equivalent” means in practice. We hope the courts take a proportionate and measured approach, to avoid having a chilling effect on freedom of expression.”
Zuckerberg hadn’t done a livestreamed Q&A recently, but holds them weekly inside Facebook. Yet after The Verge’s Casey Newton published two-hours of leaked audio from Facebook internal all-hands meetings, Zuckerberg is trying to show he has nothing to hide.
During pre-question remarks, Zuckerberg also discussed the US Attorney General Bill Bar’s open letter from the US, UK, and Australia demanding that Facebook halt the expansion of encryption across all its messaging apps. “We get that there are real concerns with doing that ” Zuckerberg said. “There are these different equities we try to balance”, specifically safety needs like catching child abusers and terrorists versus privacy and protecting political dissidents as well as normal citizens.
The CEO argued Facebook could still police encrypted apps, noting the “There’s a lot we can do with detecting patterns” including linking accounts together so it can shut down the WhatsApp accounts of bad actors on Facebook, and that Facebook can “find it upstream” by analyzing suspicious activity outside of the messages threads themselves. He also mentioned that iMessage is the top US messaging app and it’s encrypted too, showing Facebook isn’t the only one pushing private messaging and clearly users want it.
Queried about Bernie Sanders’ statement that “billionaires shouldn’t exist”, Zuckerberg said “no one deserves to have that much money”. That’s despite having a fortune north of $60 billion, though much of it is dedicated to the Chan Zuckerberg Foundation that works on social and science causes.
Zuckerberg was asked about concerns that his comments regarding Facebook would likely sue to stop an attempt by regulators to break it up. He’d discussed how Presidential candidate Elizabeth Warren had made the break-up a core piece of her policy slate, which led to questions about whether Facebook might try to minimize the reach of her statements or avoid voter registration that could aid.
Zuckerberg crystallized the question, saying “If Facebook is worried about Elizabeth Warren becoming president because of that thing, …how can we be trusted to be impartial and make sure she and other people get a voice?” He said that “Even when people disagree with what I think would be good…I still want to give them a voice . . . We need to be able to put what people want to express…above our preferences all the time.”
Today’s session certainly felt more guarded than the leaked Q&As. At one point Zuckerberg noted he wouldn’t share stats on Facebook Dating because it wasn’t a private discussion. Yet the talk still helped clarify critical Facebook policy positions are a tumultuous time for the company.
Zuckerberg joked at the beginning of the Q&A that he’s making this one publicly available because “I do such a bad job in interviews that it’s like, what do we have to lose?”
Facebook plans to challenge Europe’s top court, which today ruled that EU countries can order Facebook to globally remove content that violates local laws. Facebook currently complies with proper legal requests to remove content that breaks a nation’s laws, but can leave it up for global viewers if the post doesn’t violate its Community Standards.
But today during a livestreamed Q&A with Facebook employees, CEO Mark Zuckerberg said that “This is something I expect us and other companies will be litigating.”
Zuckerberg explained that Facebook had “successfully fought” overly broad takedown requests in the past. He also noted that “a lot fo the details about exactly how [the ruling gets] implemented will depend on national courts across Europe.”
Facebook told TechCrunch in a statement today that:
“This judgement raises critical questions around freedom of expression and the role that internet companies should play in monitoring, interpreting and removing speech that might be illegal in any particular country.
At Facebook, we already have Community Standards which outline what people can and cannot share on our platform, and we have a process in place to restrict content if and when it violates local laws. This ruling goes much further.
It undermines the long-standing principle that one country does not have the right to impose its laws on speech on another country. It also opens the door to obligations being imposed on internet companies to proactively monitor content and then interpret if it is “equivalent” to content that has been found to be illegal.
In order to get this right national courts will have to set out very clear definitions on what “identical” and “equivalent” means in practice. We hope the courts take a proportionate and measured approach, to avoid having a chilling effect on freedom of expression.”
Zuckerberg hadn’t done a livestreamed Q&A recently, but holds them weekly inside Facebook. Yet after The Verge’s Casey Newton published two-hours of leaked audio from Facebook internal all-hands meetings, Zuckerberg is trying to show he has nothing to hide.
During pre-question remarks, Zuckerberg also discussed the US Attorney General Bill Bar’s open letter from the US, UK, and Australia demanding that Facebook halt the expansion of encryption across all its messaging apps. “We get that there are real concerns with doing that ” Zuckerberg said. “There are these different equities we try to balance”, specifically safety needs like catching child abusers and terrorists versus privacy and protecting political dissidents as well as normal citizens.
The CEO argued Facebook could still police encrypted apps, noting the “There’s a lot we can do with detecting patterns” including linking accounts together so it can shut down the WhatsApp accounts of bad actors on Facebook, and that Facebook can “find it upstream” by analyzing suspicious activity outside of the messages threads themselves.
Zuckerberg was asked about concerns that his comments regarding Facebook would likely sue to stop an attempt by regulators to break it up. He’d discussed how Presidential candidate Elizabeth Warren had made the break-up a core piece of her policy slate, which led to questions about whether Facebook might try to minimize the reach of her statements or avoid voter registration that could aid.
Zuckerberg crystallized the question, saying “If Facebook is worried about Elizabeth Warren becoming president because of that thing, …how can we be trusted to be impartial and make sure she and other people get a voice?” He said that “Even when people disagree with what I think would be good…I still want to give them a voice . . . We need to be able to put what people want to express…above our preferences all the time.”
Today’s session certainly felt more guarded than the leaked Q&As. At one point Zuckerberg noted he wouldn’t share stats on Facebook Dating because it wasn’t a private discussion. Yet the talk still helped clarify critical Facebook policy positions are a tumultuous time for the company.
Zuckerberg joked at the beginning of the Q&A that he’s making this one publicly available because “I do such a bad job in interviews that it’s like, what do we have to lose?”
Posted by Murphy Yuezhen Niu and Sergio Boixo, Research Scientists
One of the primary challenges for the realization of near-term quantum computers has to do with their most basic constituent: the qubit. Qubits can interact with anything in close proximity that carries energy close to their own—stray photons (i.e., unwanted electromagnetic fields), phonons (mechanical oscillations of the quantum device), or quantum defects (irregularities in the substrate of the chip formed during manufacturing)—which can unpredictably change the state of the qubits themselves.
Further complicating matters, there are numerous challenges posed by the tools used to control qubits. Manipulating and reading out qubits is performed via classical controls: analog signals in the form of electromagnetic fields coupled to a physical substrate in which the qubit is embedded, e.g., superconducting circuits. Imperfections in these control electronics (giving rise to white noise), interference from external sources of radiation, and fluctuations in digital-to-analog converters, introduce even more stochastic errors that degrade the performance of quantum circuits. These practical issues impact the fidelity of the computation and thus limit the applications of near-term quantum devices.
To improve the computational capacity of quantum computers, and to pave the road towards large-scale quantum computation, it is necessary to first build physical models that accurately describe these experimental problems.
In “Universal Quantum Control through Deep Reinforcement Learning”, published in Nature Partner Journal (npj) Quantum Information, we present a new quantum control framework generated using deep reinforcement learning, where various practical concerns in quantum control optimization can be encapsulated by a single control cost function. Our framework provides a reduction in the average quantum logic gate error of up to two orders-of-magnitude over standard stochastic gradient descent solutions and a significant decrease in gate time from optimal gate synthesis counterparts. Our results open a venue for wider applications in quantum simulation, quantum chemistry and quantum supremacy tests using near-term quantum devices.
The novelty of this new quantum control paradigm hinges upon the development of a quantum control function and an efficient optimization method based on deep reinforcement learning. To develop a comprehensive cost function, we first need to develop a physical model for the realistic quantum control process, one where we are able to reliably predict the amount of error. One of the most detrimental errors to the accuracy of quantum computation is leakage: the amount of quantum information lost during the computation. Such information leakage usually occurs when the quantum state of a qubit gets excited to a higher energy state, or decays to a lower energy state through spontaneous emission. Leakage errors not only lose useful quantum information, they also degrade the “quantumness” and eventually reduce the performance of a quantum computer to that of a classical one.
A common practice to accurately evaluate the leaked information during the quantum computation is to simulate the whole computation first. However, this defeats the purpose of building large-scale quantum computers, since their advantage is that they are able to perform calculations infeasible for classical systems. With improved physical modeling, our generic cost function enables a joint optimization over the accumulated leakage errors, violations of control boundary conditions, total gate time, and gate fidelity.
With the new quantum control cost function in hand, the next step is to apply an efficient optimization tool to minimize it. Existing optimization methods turn out to be unsatisfactory in finding high fidelity solutions that are also robust to control fluctuations. Instead, we apply an on-policy deep reinforcement learning (RL) method, trusted-region RL, since this method exhibits good performance in all benchmark problems, is inherently robust to sample noise, and has the capability to optimize hard control problems with hundreds of millions of control parameters. The salient difference between this on-policy RL from previously studied off-policy RL methods is that the control policy is represented independently from the control cost. Off-policy RL, such as Q-learning, on the other hand, uses a single neural network (NN) to represent both the control trajectory, and the associated reward, where the control trajectory specifies the control signals to be coupled to qubits at different time steps, and the associated award evaluates how good the current step of the quantum control is.
On-policy RL is well known for its ability to leverage non-local features in control trajectories, which becomes crucial when the control landscape is high-dimensional and packed with a combinatorially large number of non-global solutions, as is often the case for quantum systems.
We encode the control trajectory into a three-layer, fully connected NN—the policy NN—and the control cost function into a second NN—the value NN—which encodes the discounted future reward. Robust control solutions were obtained by reinforcement learning agents, which trains both NNs under a stochastic environment that mimics a realistic noisy control actuation. We provide control solutions to a set of continuously parameterized two-qubit quantum gates that are important for quantum chemistry applications but are costly to implement using the conventional universal gate set.
Under this new framework, our numerical simulations show a 100x reduction in quantum gate errors and reduced gate times for a family of continuously parameterized simulation gates by an average of one order-of-magnitude over traditional approaches using a universal gate set.
This work highlights the importance of using novel machine learning techniques and near-term quantum algorithms that leverage the flexibility and additional computational capacity of a universal quantum control scheme. More experiments are needed to integrate machine learning techniques, such as the one developed in this work, into practical quantum computation procedures to fully improve its computational capacity through machine learning.