31 May 2020

Maxoak Bluetti AC100 Keeps You Powered Up, No Matter What


maxoak bluetti ac100
Our verdict of the Maxoak Bluetti AC100:
It doesn't have the power of its larger siblings, but the Maxoak Bluetti AC100 has more than enough to keep your most vital electronics running when you need them.
910

The world is an unpredictable place, so you never know when you might need a solid source of portable power. You may have a power outage in your area or you could have a downed wire from a storm. Maybe you’re just going on a camping trip but can’t do without a specific modern convenience.

We’ve previously looked at portable power supplies from Maxoak’s Bluetti line and were impressed with what they had to offer. That said, not everyone needs a big ultra-powerful pseudo-generator. When you just need to power a few household electronics, the Maxoak Bluetti AC100 will get the job done, and it’s just light enough to make it luggable.

Join us as we take a closer look at the Maxoak Bluetti AC100, and scroll down for an exclusive coupon code!

Specifications

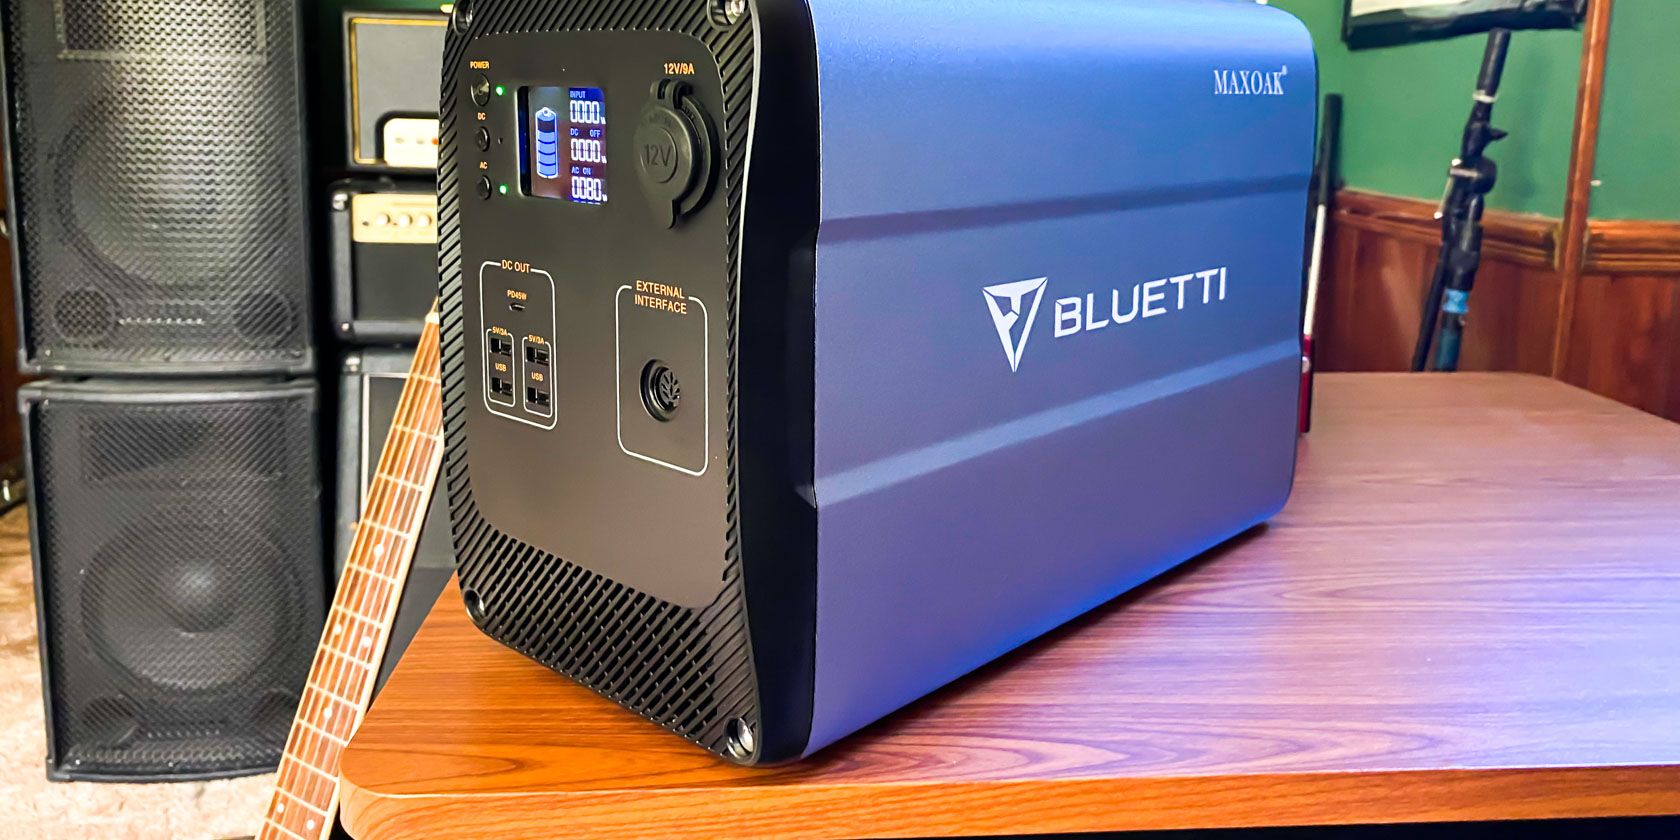
  • Inputs: AC adapter or solar panel (16V-40V 10A)
  • Outputs: 2x AC sockets, 4x 5V USB 2.1A ports, 1 x 45W PD USB-C, 1 x 12V 9A car port
  • Total capacity: 1000Wh
  • Maximum continuous power: 600W
  • Battery technology: Lithium-Ion
  • AC Charge time: 10 hours
  • Solar charge time: Variable (higher power panels mean shorter recharge times); panels not included
Maxoak Bluetti AC100 Maxoak Bluetti AC100 Buy Now On Amazon $899.99

Build & Design

DC ports on the AC100

The Maxoak Bluetti AC100 might be smaller than some others in the Bluetti line, but it isn’t exactly tiny, nor is it light. The size is slightly bigger than a car battery and weighs in at 34.4 pounds (15.6 kg).

While most of that weight comes from the internal lithium-ion battery, a significant portion of it comes from the build. This is a sturdy power source, with a handle for easy carrying. It feels like it could handle a drop from a few feet, but I wouldn’t want to find out the hard way.

The battery may be tough, but it does have its weak points. The biggest of these is that it isn’t waterproof. This isn’t a problem if you’re keeping the AC100 around for power outages, but it means you’ll need to be careful if you bring it on a camping trip.

Features

Built-in light on Bluetti AC100

Functionality is simple: just press the power button on the front, then tap the AC or DC buttons on the front to enable power to the ports. You can use both at the same time, but the individual switches make it easy to route power only to where you need it. You’ll be using both switches often, because aside from the two AC sockets on one side, every other port provides DC power.

One extra bit of functionality comes from the built-in light. Turn on the battery, then tap the light button and you’ve got an extremely heavy, largely unwieldy light source. That said, this may be handy when it comes to plugging devices into the Bluetti AC100 during a power outage.

The built-in display is easy to read, both inside and outside. As with the Maxoak Bluetti 1500Wh, the five-segment battery indicator doesn’t give you a good idea of how much power is left. That said, this is the only poor aspect of the display. Being able to see exactly how much power is discharging at any given time is useful.

Charging the Battery

Charging the Bluetti AC100

The Maxoak Bluetti AC100 arrived mostly charged, so I had quite a lot of work to do before I could charge it to see how long it took. Given the capacity of the battery, this took longer than I’d initially planned.

There are two ways to charge the Bluetti AC100, one of which is standard AC power from a wall outlet. An AC adapter is included in the box, which makes this easy.

As this is such a large battery, you’ll need a while to charge it — roughly 10 to 11 hours, in fact. In my case, charging took around nine hours, but this is because I didn’t entirely run out the battery before plugging it in to charge over the course of a day.

Input for charging the AC100

The other option for charging the Bluetti AC100, and largely one of the more novel reasons for opting for this power source over others, is using a solar panel. You can use plenty of solar panels, as long as it provides a working voltage of between 16V and 40V at a max of 10A. A DC to MC4 charging cable is included in the box.

I had hoped to have a solar panel on hand to test this feature, but that was not to be the case. If you’re interested in charging via solar panel, see our review of the Maxoak Bluetti 1500Wh Backup Solar Generator, which has a 50% larger capacity than Bluetti AC100.

Solar power is great, but not exactly known for being predictable, as so much is reliant on the weather. How fast the AC100 charges depends partly on your solar panel and partly on how the weather is while you’re charging.

Powering Up Your Home

Dual AC outlets

You can power anything with the AC100, as long as it doesn’t draw more than 600 watts. This means that it easily powers TVs, computers, coffee grinders, and more. Maxoak even advertises using the Bluetti AC100 to power a car fridge or mini-fridge.

That said, the AC100 won’t power every home appliance. Microwaves, toaster ovens, kettles, or even a slow cooker, typically all draw more than 600 watts.

Fortunately, you don’t need to worry about accidentally plugging in something with too big of a draw. The AC100 has built-in protection against overcharge, overcurrent, overvoltage, and overheating.

I wasn’t it to provide much fo a challenge, but for initial testing, I plugged a Marshall guitar amplifier from the mid-1980s into the Bluetti AC100, which draws around 50-watt. As expected the AC100 had no problem powering the amp, but there was a strange noise in the background. I’m going to blame this on the amp being a solid-state amp that is around 35 years old rather than the Bluetti.

Just to make sure that the AC100 didn’t have any significant issues with noise, I next decided to power my home audio setup. This includes an Audio-Technica turntable, a hybrid tube integrated amplifier, cassette deck, and input switcher. The Bluetti AC100 easily powered everything, and I noticed no noise. Everything sounded exactly as it was plugged into the wall outlet.

How Long Does the Battery Last?

Reporting the current power load

Unlike laptop power banks, which Maxoak also makes, it can be hard to predict how long the battery will last unless you know how much power you’re drawing. Fortunately, the readouts on the built-in display make this part easy.

Once you know how much power you’re drawing, you can figure out how long the battery will last. This model has 1,000 Wh (watt-hours) of capacity, which simply means that drawing 1 watt continuously would get you roughly 1,000 hours of power. If you’re drawing a total of around 100 watts at a given time, you can expect roughly 10 hours.

This formula works, but you won’t always be working with neat units of 10 or 100. Still, the Maxoak Bluetti AC100 performed as expected, delivering power for roughly as long as I expected. It’s important to note that power usage will fluctuate in most cases, so you’ll want to keep your eye on usage for a while. If you want to be safe, just base your estimate on the highest number you see.

I tested the Bluetti AC100 with my home theater setup that included an LCD TV, 5.1-channel receiver, powered subwoofer, and Ultra HD Blu-ray player. All of this only displayed a load of around 100 watts, even during playback, so I could have expected around 10 hours of playtime. I didn’t feel like watching TV for 10 hours, but after finishing a roughly 2.5 hour movie, the AC100 had drained at the rate I had expected.

Should You Buy the Maxoak Bluetti AC100?

The Maxoak Bluetti AC100 is a great example of a product that clearly describes what it aims to do and then does just that. While it’s not as powerful as other products in the Bluetti line, it’s still powerful enough to keep a fair amount of electronics running. The occasional slightly gimmicky feature like the built-in light don’t do anything to take away from that.

The more important thing to consider when looking at the Bluetti AC100 is whether it does what you need. It’s handy how powerful this power bank is, but that doesn’t mean much if you’re aiming to power your toaster and this won’t handle it. While the AC100 will handle most things you throw at it, its portability does come with a slight tradeoff of sheer power.

Maxoak Bluetti AC100 Maxoak Bluetti AC100 Buy Now On Amazon $899.99

If you need just slightly more than what the Bluetti AC100 can provide, you might be interested in one of the more powerful models in the Bluetti line. On the other hand, if you’re looking to power your entire home or even a portion of it, no product like this will meet your demands. Instead, you’re probably in the market for a diesel-powered generator or Tesla Powerwall.

This level power and portability doesn’t come cheap, but you aren’t necessarily stuck paying the Bluetti’s $900 MSRP. Using the coupon code bluetti108, you can get a further $108 off the purchase price (and there’s an Amazon coupon for $50 on the sales page this can be combined with), which may be a large enough difference in price to make this a worthwhile investment.

Enter the Competition!

Maxoak Bluetti AC100 Battery Backup

Read the full article: Maxoak Bluetti AC100 Keeps You Powered Up, No Matter What


Read Full Article

You Can Now Break YouTube Videos Into Chapters


YouTube creators can now add chapters to videos, making it easier for viewers to navigate them. This is especially useful with longer videos, with the content broken up into smaller chunks. Chapters are entirely optional, but should start appearing on more videos.

YouTube started experimenting with chapters in April, and thanks to positive feedback, is now rolling the feature out to all users. Chapters are optional, and won’t be applied by default, but if a YouTuber adds timestamps to a video, YouTube will do the rest.

How to Add Chapters to YouTube Videos

To add chapters to one of your YouTube videos, simply add timestamps to your description. The first timestamp needs to start at 0.00, a video needs to have at least three timestamps, and each timestamp needs to be at least 10 seconds apart.

YouTube will use your timestamps to break the video into chapters. Viewers will then see the chapters at the bottom of the video, with the timeline broken up with black lines in between each one. Making it easier to navigate to an exact point.

Chapters work on desktop, Android, and iOS. On desktop, you can hover over a chapter to see the title, and click the one you want. On mobile, you need to keep your finger on the screen and scroll across the timeline until you find the chapter you want to watch.

There are no limits on who can add chapters to their YouTube videos, so you’re likely to see them cropping up a lot from now on. However, it IS optional, and YouTubers can disable chapters by adjusting the first timestamp to something other than 0.00.

Making It Easier to Navigate YouTube Videos

Chapters have the capacity to help both YouTube creators and viewers. Creators can break videos up into smaller chunks, helping direct viewers to specific parts of their uploads. And viewers will be able to find what they’re looking for quickly and easily.

If you’re a budding YouTuber keen to start making videos, read our beginner’s guide to making YouTube videos. And if you’re a viewer keen to get more out of YouTube, be sure to check out our article explaining ways to make YouTube even better.

Image Credit: Ivan Radic/Flickr

Read the full article: You Can Now Break YouTube Videos Into Chapters


Essential Keyboard Shortcuts for Visual Studio Code


Laptop displaying text editor

Microsoft Visual Studio Code debuted only a few years ago, but it has quickly become one of the most popular text editors available. Its combination of a simple user interface with powerful IDE-like features makes it especially popular with programmers, but it’s just as useful for writers and anyone who manipulates text files.

Visual Studio Code supports nearly every programming language that exists. If support isn’t built-in, you can add it through the app’s extension browser. VS Code even has native features to support collaborative programming. Plus, it has plenty of keyboard shortcuts to help you navigate the app interface effortlessly.

And what’s more, you can discover the most useful VS Code keyboard shortcuts with this cheat sheet!

Because of the sheer number of users on Windows, that OS is the main focus of this cheat sheet. Don’t worry if you’re a Mac user though, as all of these keyboard shortcuts work on macOS as well. Simply use the Command key instead of the Ctrl key and the Option key instead of Alt. If any shortcuts vary more than that, we’ll mention both.

FREE DOWNLOAD: This cheat sheet is available as a downloadable PDF from our distribution partner, TradePub. You will have to complete a short form to access it for the first time only. Download The Visual Studio Code Keyboard Shortcuts Cheat Sheet.

The Visual Studio Code Keyboard Shortcuts Cheat Sheet

On a Mac keyboard, replace Ctrl with Cmd and Alt with Option in the shortcuts.

Shortcut Action
Basic Functionality
Ctrl + Shift + P Open Command Palette
Ctrl + , Open app settings
Ctrl + K, Ctrl + S Display keyboard shortcuts
Ctrl + Shift + X Switch to Extensions pane
Ctrl + N New file
Ctrl + Shift + N New window
¹Ctrl + F4 Close file
Ctrl + Shift + W Close window
¹F11 Toggle Full Screen mode
Ctrl + B Toggle sidebar visibility
File Management
Ctrl + O Open file
Ctrl + S Save file
Ctrl + Shift + S Save as…
Ctrl + K, S Save all files
Ctrl + K, Ctrl + W Close all
Ctrl + Shift + T Reopen last closed
Editing Commands
Ctrl + C Copy selection or current line
Ctrl + X Cut selection or current line
Ctrl + V Paste
Ctrl + Shift + K Delete line
Home Go to beginning of line
End Go to end of line
Ctrl + Home Go to beginning of file
Ctrl + End Go to end of file
Alt + Up / Down Move line up or down
Ctrl + ] Indent line
Ctrl + [ Outdent line
Ctrl + / Comment out line
Shift + Alt + A Comment out region
Folding
Ctrl + Shift + [ Fold region
Ctrl + Shift + ] Unfold region
Ctrl + K, Ctrl + [ Fold all subregions
Ctrl + K, Ctrl + ] Unfold all subregions
Ctrl + K, Ctrl + 0 Fold all regions
Ctrl + K, Ctrl + J Unfold all regions
Editor Navigation
Ctrl + P Go to file
Ctrl + G Go to line
Ctrl + T Show all symbols
Ctrl + Shift + O Go to symbol
F8 Go to next error or warning
Shift + F8 Go to previous error or warning
Ctrl + Shift + M Show Problems panel
¹Alt + Left Go back
¹Alt + Right Go forward
Find and Replace
Ctrl + F Open Find dialog
Ctrl + H Open Replace dialog
Ctrl + Shift + H Replace in files
¹F3 Find next
¹Shift + F3 Find previous
Alt + Enter Select all matches for search term
Ctrl + D Add current selection to Find match
Ctrl + K, Ctrl + D Move previous selection to next Find match
Selection and Multiple Cursors
Ctrl + L Select current line
Ctrl + Shift + L Select all instances of current selection
Ctrl + F2 Select all matches of current word
¹Shift + Alt + Right Arrow Expand selection
¹Shift + Alt + Left Arrow Shrink selection
Alt + Click Insert cursor
Ctrl + Alt + Up Arrow / Down Arrow Insert cursor above or below current line
Ctrl + U Undo last cursor
Shift + Alt + I Insert cursor at the end of each selected line
Split Editor Management
Ctrl + \ Split editor
Ctrl + 1 / 2 / 3 Focus on editor pane 1, 2, or 3
Ctrl + K, Ctrl + Right Arrow / Left Arrow Focus on next / previous editor pane
¹Ctrl + Shift + PgUp Move editor left
¹Ctrl + Shift + PgDown Move editor right
Integrated Terminal
¹Ctrl + ` Show integrated terminal
¹Ctrl + Shift + ` Create new terminal instance
Ctrl + Up Arrow / Down Arrow Scroll up / down
Ctrl + Home / End Scroll to top / bottom
macOS-Specific Shortcuts
Cmd + W Close file
Cmd + Ctrl + F Toggle full screen
Cmd + - Go back
Cmd + Shift + - Go forward
Cmd + G Find next
Cmd + Shift + G Find previous
Cmd + Control + Shift + Right Arrow Expand selection
Cmd + Control + Shift + Left Arrow Shrink selection
Cmd + K, Cmd + Shift + Left Move editor left
Cmd + K, Cmd + Shift + Right Move editor right
Control + ` Show integrated terminal
Control + Shift + ` Create new terminal instance
¹The corresponding macOS shortcut is listed under the macOS-Specific Shortcuts section at the end of the cheat sheet.

Looking for More Ways to Make the Most of VS Code?

The keyboard shortcuts here will have you well on your way to becoming a Visual Studio Code power user. That said, there are many more ways that you can make the software even better-suited to your workflow.

For example, you can add countless features to the editor with extensions. If you’re looking for a starting point, take a look at our list of extensions to help make programming in VS Code even easier.

Image Credit: UserName on Unsplash

Read the full article: Essential Keyboard Shortcuts for Visual Studio Code


Read Full Article

You Can Now Break YouTube Videos Into Chapters


YouTube creators can now add chapters to videos, making it easier for viewers to navigate them. This is especially useful with longer videos, with the content broken up into smaller chunks. Chapters are entirely optional, but should start appearing on more videos.

YouTube started experimenting with chapters in April, and thanks to positive feedback, is now rolling the feature out to all users. Chapters are optional, and won’t be applied by default, but if a YouTuber adds timestamps to a video, YouTube will do the rest.

How to Add Chapters to YouTube Videos

To add chapters to one of your YouTube videos, simply add timestamps to your description. The first timestamp needs to start at 0.00, a video needs to have at least three timestamps, and each timestamp needs to be at least 10 seconds apart.

YouTube will use your timestamps to break the video into chapters. Viewers will then see the chapters at the bottom of the video, with the timeline broken up with black lines in between each one. Making it easier to navigate to an exact point.

Chapters work on desktop, Android, and iOS. On desktop, you can hover over a chapter to see the title, and click the one you want. On mobile, you need to keep your finger on the screen and scroll across the timeline until you find the chapter you want to watch.

There are no limits on who can add chapters to their YouTube videos, so you’re likely to see them cropping up a lot from now on. However, it IS optional, and YouTubers can disable chapters by adjusting the first timestamp to something other than 0.00.

Making It Easier to Navigate YouTube Videos

Chapters have the capacity to help both YouTube creators and viewers. Creators can break videos up into smaller chunks, helping direct viewers to specific parts of their uploads. And viewers will be able to find what they’re looking for quickly and easily.

If you’re a budding YouTuber keen to start making videos, read our beginner’s guide to making YouTube videos. And if you’re a viewer keen to get more out of YouTube, be sure to check out our article explaining ways to make YouTube even better.

Image Credit: Ivan Radic/Flickr

Read the full article: You Can Now Break YouTube Videos Into Chapters


Read Full Article