19 February 2020

How to Fix Common CD, DVD, and Blu-Ray Drive Errors


It can happen that your CD, DVD, or Blu-ray drive or player will go on the fritz. Perhaps it won’t read the disc, stop skipping, or the drive won’t eject.

We’re going to show you how to fix your CD, DVD, or Blu-ray player that won’t read and help you determine whether the problem is with the drive or the disc.

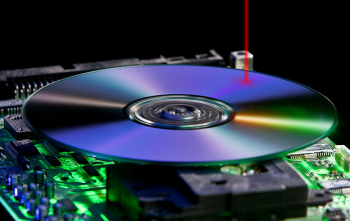
How to Clean Dust Inside a Drive

A CD, DVD or Blu-ray drive is enclosed, but dust still has an opportunity to invade through small openings and also while the drive is open. This depends heavily on how dusty the environment is, but it can really wreak havoc on a drive.

The type of error you’ll experience with a dusty drive can vary, but often a disc will either take a long time to read or it will experience random slowdowns.

A drive’s laser reads the disc. If enough dust gets into the drive, specifically around that laser, it can block or refract light and cause errors.

If you want to clean the drive you could take it apart and use lint-free buds and an alcohol-based solution to dab the lens clean. This is tricky, though, and might void the warranty, so here are some other solutions that don’t involve taking the drive apart.

As we are on the subject of cleaning your gadgets, you might also be interested in how to clean the dust from your PS4.

Use an Air Bulb or Compressed Air

You can buy an air bulb or compressed air inexpensively. The former is the better choice if available since the latter uses excessive force and could spray liquid into your drive.

Air Bulb Air Bulb Buy Now On Amazon $7.99

Open the drive, turn your computer off, and use the bulb or compressed can to carefully blow air in the drive.

Use a Cleaning Disc

There is debate over how effective cleaning discs are. These are discs that have small brushes on them which will clean the lens when rotated. They do risk just pushing the dust around or scratching the lens. But good quality cleaning discs can prove effective too, so give it a shot.

Cleaning Disc Cleaning Disc Buy Now On Amazon $8.60

How to Fix a Drive That Won’t Eject

It can be very annoying when the drive won’t eject your disc—especially when your car CD player won’t eject. If pushing the eject button does nothing or you can hear that the drive is jammed, there are a couple of ways to fix the problem.

Use File Explorer

Close all open programs, especially any disc playback software.

  1. Press Windows key + E to open File Explorer.
  2. Click This PC from the left-hand navigation.
  3. Right click your disc drive and click Eject.

Use a Paperclip

Many disc drives, including car CD players or the drives on games consoles, have a small pinhole that acts as an emergency eject.

First, turn your system off. Then unfold a paperclip and gently push it into the hole. You may need to repeat this a few times for the mechanism to catch. The drive bay should eject enough for you to grab it with your fingernails.

Slowly pull the drive out, but don’t force it and risk physically damaging the drive.

How to Repair a Disc With Scratches

It might not be the drive that has the problem. Discs become scratched fairly easily and this can cause a lot of reading problems on the drive. The quickest way to check is:

  1. Visually inspect the disc to see if there are any scratches.
  2. Check the drive with another disc, alternatively try the disc in another drive.

Once you have confirmed the disc is scratched you can try a few things to fix the problem.

Scratched disc
Image Credit: belchonock/Depositphotos

One method is to use a wet or dry cloth to clean the disc. Use circular motions to clean it, or wipe from out-to-inside or inside-to-out. Never wipe in the direction around the tracks, as this can cause track skippage and actually make the problem worse.

Another method is to use some sort of abrasive compound, such as toothpaste (not gel) to grind out scratches.

These tips should help fix a CD player that won’t read. For more information on these methods, and some other ways to repair a disc, check out our guide on how to repair damaged CDs or DVDs.

How to Update Your Drive’s Firmware

The problem might be caused by a bug in the firmware of the drive. The firmware tells the drive how to work, when to spin, which laser to use, how fast to rotate discs, what the eject button does, and so on.

You could try updating the firmware to see if this fixes the problem. This should help fix a CD player that won’t spin.

Check the manufacturer’s website to see if there are any updates available. The process will vary depending on the manufacturer, and they should provide specific instructions, but it might involve burning a CD with the firmware and rebooting the computer with the disc.

How to Resolve a Drive Hardware Problem

If all else fails, you might have a hardware problem. This is especially likely if you’ve recently opened up or moved your system. It could be that a cable has been unseated, the motherboard connection has failed, or the drive itself is bad.

Don’t open up your computer if you’re not confident. You need to be careful not to tamper with any other components, so don’t be afraid to call on professional help if you are not sure.

Repair a disc drive
Image Credit: m.ilias1987/Depositphotos

The first step is to try a new cable and connection port on the motherboard. If it doesn’t work, try another drive that you know works—this will determine whether the problem is the drive itself or the motherboard.

If the drive is broken then you could send it for warranty repair, depending on its age, but it’s likely to be more time and cost effective to buy a new drive. Depending on how old your drive is, the new one could have faster read and write times anyway.

Replace Your Laptop’s Disc Drive for Storage

Hopefully, the advice here has helped you fix your CD, DVD or Blu-ray drive or disc. The solutions can be used for most troubleshooting efforts, whether it’s for your computer, games console, car, or something else.

If you have a laptop with a disc drive that you no longer use, why not find out how to upgrade your laptop drive for storage space instead.

Read the full article: How to Fix Common CD, DVD, and Blu-Ray Drive Errors


Read Full Article

Microsoft Launches a New Office App for Android and iOS


Microsoft has released a new, unified Office app for Android and iOS. Office brings together the core Microsoft Office apps of Word, Excel, and PowerPoint into one unified mobile app. And it’s now available for everyone to use on both Android and iOS.

Unlock the FREE "Essential Excel Formulas" cheat sheet now!

This will sign you up to our newsletter

Enter your Email

Microsoft Finally Takes Mobile Seriously

Microsoft is synonymous with PCs. This is because Windows (developed by the genius of Bill Gates) is by far the most popular desktop operating system. And Microsoft’s failure to compete with Android and iOS in the mobile sector only solidified that connection.

However, in recent years, Microsoft has made an effort to become more mobile-friendly. The company now happily releases apps for Android and iOS, including mobile versions of Word, Excel, and PowerPoint. And now it has combined all three into one unified app.

Microsoft Office Now Lives on Your Smartphone

In November 2019, Microsoft launched the Office mobile app in a public preview. The iOS app quickly hit the maximum 10,000 users, but the Android app remained up in public preview. Now, however, Microsoft Office for Android and iOS is available to everyone.

In a post on the Office Apps Blog, published at the time the public preview was launched, Microsoft billed Office as “a new vision for how people get work done on a phone” and “a new app that’s ambitious enough to simply be called Office.” Brave words indeed.

Office for mobile has been built with mobile users in mind at all times. So it’s optimized for use on mobile devices, with Microsoft “combining the existing Word, Excel, and PowerPoint mobile apps into a single app.” Which can do more than you may think.

Anyone who has already used any of these Office apps will recognize them immediately. It’s just that Microsoft has squeezed them into a single app. This means you get to enjoy an integrated experience, while also gaining some mobile-centric features.

Combining its existing apps into one “brings all of your Office documents together in one place, reduces the need to switch between multiple apps, and significantly reduces the amount of space used on your phone compared to multiple installed apps.”

How to Use Microsoft Office on Your Smartphone

Microsoft has now launched Office for mobile out of public preview. Which means the app is now available on the Google Play Store and the Apple App Store, respectively. It’s free to download and use, with in-app purchases available for Office 365.

In a new post on the Microsoft 365 Blog, Microsoft describes the new Office app as “a powerful tool that is intuitive and familiar yet still uniquely different.” The company also claims to have “made several enhancements since the public preview”.

Download: Microsoft Office for Android | iOS (Free, with in-app purchases available)

The Best Free Microsoft Office Alternatives

The new Office app is looking good, and is only likely to get better. Unfortunately, while it works well on smartphones, the app only offers limited support for tablets. However, Microsoft has committed to optimizing Office for iPads and Android tablets.

As good as Office is, because it’s Microsoft, and Microsoft is regarded as the enemy in some quarters, many people still prefer to use an alternative to Microsoft Office. So, with that in mind, here are the best free Microsoft Office alternatives.

Read the full article: Microsoft Launches a New Office App for Android and iOS


Read Full Article

The 6 Best Budget Graphics Cards for Cheap Gaming


cheap-gaming-graphics-cards

The latest and greatest games are demanding on both your wallet and your system. As specifications rise, it is difficult for gamers on a budget to keep up to date.

However, budget gaming GPUs don’t force you into a low-resolution, blurry-pixel past. Far from it, in fact. A budget graphics card is no longer a barrier to enjoying some of the best games on offer.

The Best Budget Graphics Cards

The best budget graphics cards come from a range of GPU manufacturing generations. Some of the best bang for your buck comes from the slightly older but still super powerful cards. Of course, your definition of a budget GPU depends on—wait for it—your budget.

Furthermore, it depends on what you want to play and how you want to play it. Some of the best budget graphics cards will still max out the settings on some of the latest games, while others are better suited to slightly older games. Though you won’t have to reach in your ancient back catalog of games, that’s for sure. (Though I highly encourage such activity.)

Without further ado, and in no particular order, here are the six best budget graphics cards for cheap gaming.

1. Nvidia GTX 1650 Super Overclocked-4GB

Nvidia GTX 1650 Super Overclocked Nvidia GTX 1650 Super Overclocked Buy Now On Amazon $164.99

The Nvidia GTX 1650 Super Overclocked is a 4GB GPU and an excellent budget graphics card. It features the latest Turing architecture powering the newest generation of Nvidia GPUs and has 4GB GDDR6 to help you enjoy the latest games with using the upper selection of settings.

The fantastic users over at UserBenchmark provide expedient insight into the estimated number of frames per second (FPS) the GTX 1650 Super Overclocked achieves in a range of games. Depending on the system hardware, the GTX 1650 Super Overclocked delivers an average of 111 FPS across games, including Fortnite, Overwatch, GTA V, and PUBG. (Though this figure is skewed by the extremely high FPS achieved in older games like CSGO.)

Another plus point for the Nvidia GTX 1650 Super Overclocked is its size. The GTX 1650 Super Overclocked is a single-fan design, meaning it fits into almost every system layout and case size. Furthermore, its overall power use is low, saving you some extra pennies in the long run.

2. AMD RX 580-8GB

AMD RX 580-8GB AMD RX 580-8GB Buy Now On Amazon $189.99

Fluctuations in the top-end of the GPU market means the impressive AMD RX 580-8GB video card is now a steal. It comes with two HDMI ports, one DVI-D port, and two DisplayPorts, along with the 8GB of GDDR5 RAM. While the RX 580 is an 8GB card, it is outperformed by its Nvidia equivalent, the GTX 1070.

However, the AMD RX 580 can handle most of the latest games on high to ultra-settings and should enable some 1440p gaming, too. The AMD RX 580 8GB version is well-reviewed, receiving glowing reports from users and critics alike.

It performs well in many of the most taxing games. According to UserBenchmark testing (and depending on your system hardware), the RX 580 achieves over 60 FPS in GTA V, Fortnite, PUBG, and Overwatch.

3. Nvidia GTX 1050 Ti

Nvidia GTX 1050 Ti Nvidia GTX 1050 Ti Buy Now On Amazon $145.57

The Nvidia GTX 1050 Ti is the successor to the GTX 1050, which itself is superseded by the Nvidia GTX 1650. Still, the GTX 1050 Ti is a powerful single fan GPU that competes with the similarly specced AMD RX 580-4GB (not the 8GB version above!). Despite the GTX 1050 Ti hitting the market six months after the RX 580-4GB, it is the latter that retains the edge, offering faster overall memory and memory bandwidth.

The UserBenchmark FPS estimates that the GTX 1050 Ti will achieve an average of 72 FPS, depending on the game and the hardware. Although it is a 4GB card, the 1050 Ti will struggle to play the latest games on the highest settings at a solid 60 FPS. However, 30 FPS and above should be achievable—again, depending on the rest of the system hardware.

Another plus for the Nvidia GTX 1050 Ti is the single fan design. You can fit the GTX 1050 Ti into any case and design, perfect for small builds. The GTX 1050 Ti has another advantage over the RX 580-4GB—it uses half of the power; 75W vs. 150W. You’ll save some money on your power supply unit purchase and long-term power use, too.

4. Nvidia GeForce GT 1030-2GB

Nvidia GeForce GT 1030 Nvidia GeForce GT 1030 Buy Now On Amazon $86.83

The Nvidia GeForce GT 1030-2GB is one of the cheapest GPUs around. Never heard of it? It is regularly outshined by other slightly more powerful—but more expensive—graphics cards. However, the single-fan 2GB GT 1030 will still help you power through some excellent games. You won’t max out The Witcher 3, but with the right hardware, you can certainly play your way through it.

The GT 1030-2GB has a small profile. But that’s for a good reason. The GT 1030 only draws around 30W, making it extremely efficient for low-power gaming rigs.

Word to the wise: don’t accidentally buy the Low Profile GT 1030. It comes with even less power than the full-size version, and instead of GDDR5 memory uses regular DDR4 RAM. Which means that the Low Profile version will struggle to run your favorite games.

5. Nvidia GTX 1660-6GB

Nvidia GTX 1660 Nvidia GTX 1660 Buy Now On Amazon $229.99

The Nvidia GTX 1660-6GB isn’t one of the cheapest budget GPUs. I would say it is borderline as to whether it fits into that category. However, as the next generation on from the popular Nvidia GTX 1060, the GTX 1660-6GB worth considering if you can stretch your budget a little further (or find savings elsewhere).

The UserBenchmark FPS estimates for GTX 1660-6GB version average around 111 FPS per game, depending on the rest of your hardware. You’ll find performance gains from the GTX 1660’s superfast GDDR6 RAM, and the Turing architecture that powers Nvidia’s latest generations of GPUs.

The 1660-6GB is one of the most popular Nvidia GPUs of any type. Given the FPS estimates and prospective performance, you can understand why.

6. AMD RX 570-8GB

AMD RX 570 AMD RX 570 Buy Now On Amazon

The AMD RX 570-8GB is another 8GB GPU that you can pick up for snip thanks to movements at the very top-end of the GPU marketplace. The RX 570 8GB uses AMD’s Polaris architecture, which provides a decent boost over the now-aging AMD RX 400 series GPUs but cannot really hold a candle to the vastly more powerful (and more expensive!) AMD Vega architecture.

That’s not to say the 8GB RX 570 is a slouch. It packs in 8GB GDDR5 RAM, and still provides excellent performance in games like Overwatch, Fortnite, and so on. Being an 8GB card, you should manage some 1440p gaming, too, though your frame rates might suffer depending on the rest of your hardware.

Should You Buy a Second-Hand Graphics Card?

The other option for gamers on a budget is buying a top-end card from a previous GPU generation. Within a couple of years, this will be a way to get features like real-time ray tracing or the super-powerful 12GB GPUs (and rumored 16GB GPUs) for a reasonable price.

At the time of writing, the Nvidia GTX 980 and 980 Ti, and the AMD RX 480 8GB and R9 Fury X are powerful gaming GPUs that will play most games on very high settings. The 980 Ti still outscores some of the modern GPUs on this list.

Picking up a second-hand GPU seems like a great idea. However, there are some things to consider before making your purchase. For instance, can the seller verify the GPU works, or how they used the GPU?

The other consideration is that with a new purchase, you have the guarantee of a warranty. If anything goes wrong with your new GPU, you can return it. Whereas, no such protection exists for a second-hand GPU, unless you’re buying a refurbished model.

Cryptocurrency Mining GPUs

The cryptocurrency boom of 2017 saw GPU prices skyrocket. Cryptocurrency miners rushed to buy the best graphics cards for the Bitcoin era, creating a graphics card price bubble.

Then, the cryptocurrency bubble burst. The GPU market was suddenly awash with second-hand GPUs that had been in use at full speed, 24/7, for months on end. The constant demand on the internal parts, the heat this generates, plus the heat and often poor ventilation of a crypto-mining rig can severely damage the GPU.

Luckily, the demand for crypto-mining has decreased, and GPU prices are now stable (albeit higher than before the cryptocurrency bubble). For a while, after the crypto-price bubble burst, the second-hand GPU market was awash with these ex-crypto mining GPUs, though this trend seems to have slowed for now.

What Is the Best Budget GPU?

There is always a budget gaming graphics card out there for you, even if you want to play all of the latest games on ultra settings. Figuring out what makes sense for your budget is the tricky bit, but you can check out the options on this list and take it from there.

Furthermore, it depends on the games you want to play. I didn’t buy a dedicated GPU until I was 20 years old, and I spent tens of thousands of hours playing lower resolution games (OpenTTD, anyone?).

There’s an amazing number of fun PC games that use integrated graphics, such as these indie city base builders. So, if you’re really strapped for cash, play older or less graphically intensive titles.

Read the full article: The 6 Best Budget Graphics Cards for Cheap Gaming


Read Full Article

How to Get Started With Windows 10 Sticky Notes: Tips and Tricks


sticky-notes-windows

Next time you need to take a quick note on your computer, forget the pen and paper. You can use the Windows 10 Sticky Notes app to jot down information easily.

Unlock the FREE "Ultimate Windows Keyboard Shortcuts" cheat sheet now!

This will sign you up to our newsletter

Enter your Email

Here’s how to use Sticky Notes in Windows 10 to record your thoughts for later use.

How to Get Sticky Notes on Windows 10

Sticky Notes is a built-in app for Windows 10 users. To launch it, click the Start button or press the Windows key to open the Start menu. There, type “sticky notes” and select the Sticky Notes entry that appears. This will open the program with one blank sticky note.

Windows 10 First Sticky Note

If you can’t find Sticky Notes on your computer, you can install the Microsoft Sticky Notes app free from the Microsoft Store.

Once it’s open, you may want to right-click the icon on your taskbar and select Pin to taskbar for easier access in the future.

Creating Desktop Sticky Notes in Windows 10

To create a new note using your newly pinned icon, right-click the Sticky Notes icon in your taskbar and select Add Note. You can also create a new note by clicking the Plus (+) icon at the top-left of any note. The keyboard shortcut Ctrl + N also works, as long as you have the Sticky Notes app in focus.

At the time of writing, the Sticky Notes app creates a separate window for each note you create. If you like to have a clean desktop, we recommend creating a separate virtual desktop for sticky notes.

To do this, press Win + Tab to open the Windows 10 Task View. At the top, click on the New desktop option.

Sticky Notes Move Desktop Windows 10

Now you can use the Ctrl + Win + Left/Right keyboard shortcut to easily switch between desktops. With your sticky notes on a second desktop, they won’t clutter up your primary workspace.

You can move existing notes by opening Task View, then dragging the Sticky Notes window(s) to the new desktop at the top.

Using Sticky Notes on Windows 10

While its simple interface may imply a barebones feature set, Sticky Notes actually has a few handy features to discover.

Formatting Sticky Notes and Keyboard Shortcuts

When not in focus, the menu bar on your note will collapse. Click a note to show a bar at the top with some options, plus formatting tools at the bottom. These include standard text options, such as bold and bullet points. You can also use the Images button to add a photo to your notes.

Instead of using the mouse, Sticky Notes offers several familiar keyboard shortcuts to access these options faster. Below are the basic text formatting shortcuts that Sticky Notes supports:

  • Bold: Ctrl + B
  • Underline: Ctrl + U
  • Italics: Ctrl + I
  • Strikethrough: Ctrl + T
  • Bullet: Ctrl + Shift + L

Windows 10 Sticky Note Formatting

Sticky Notes also supports other common Windows keyboard shortcuts for ease of use, like copy, paste, undo, and redo. Some of these include:

  • Ctrl + W to close the current note
  • Ctrl + D to delete the current note
  • Ctrl + H to open the Notes list

Sticky Note Movement and Customization

When the Sticky Notes app is in focus, you’ll also see a bar along the top with a few controls. You can click and drag on this to reposition your sticky notes. Stacking them, for example, will save space on your desktop.

Like most other app windows, you can click and drag from an edge to resize them.

Windows Sticky Note Sizing

Click the X at the top-right of a note to close it, which does not erase it. Select the three-dot options button, then click on the menu icon (three dots) to choose from several colors for your note. From this menu, you can also delete the note for good or access the Notes list, which we’ll cover shortly.

Windows 10 Sticky Notes Menu

If you have a touch-compatible interface, you can use your finger or stylus to write on Sticky Notes. Feel free to draw or sketch on your note using your touchscreen or tablet as you would on regular paper.

Windows 10 Handwritten sticky note

Using the Sticky Notes List

The final item on the Menu, which you can also access with the Ctrl + H shortcut, is the Sticky Notes list page. This is a hub for all your current Windows sticky notes, including ones you’ve closed.

Double-click one to open it, or right-click to delete a note you no longer need. You can also use the Search box at the top to scan the content of all your sticky notes.

Meanwhile, click the Settings gear at the top to open the few options that Sticky Notes offers. Choose Enable insights to turn on useful content recognition in Sticky Notes. You can also change your theme and disable the deletion prompt.

Windows 10 Sticky Note List Options

As the top, you can make sure you’re logged into your Microsoft account for syncing notes to other devices, which we’ll examine shortly.

Using Insights in Windows Sticky Notes

With insights enabled as mentioned above, you can enable enhanced functionality in your sticky notes. Let’s see how this works.

Note: In our testing, some of the insight features worked (phone numbers, addresses), while others didn’t (stock symbols, reminders, flights). We include a full explanation of them here, but keep in mind that these features may not work properly depending on your Cortana settings.

Integrate Sticky Notes and Reminders

Below is a simple reminder typed into a note with insights enabled:

Windows 10 Insights reminder

When you type (or write) a date like this, it will become a link automatically. Click this link text to activate the insight; you’ll see a prompt to Add Reminder at the bottom of your note.

Hit this to set up your reminder with Cortana. Once you’ve entered the date and time, choose Remind and you’re all set.

Cortana reminder from Sticky Note Windows 10

Other Sticky Notes Insights

Sticky Notes on Windows 10 offers other insights to access information directly from your notes. Here are several options:

Windows 10 Sticky Notes Integrations

From top-left to bottom-right, these are:

  • Check flight numbers, such as an upcoming flight. They begin with two letters, followed by a sequence of numbers.
  • Send to an email address using your default email app.
  • View a location by pasting the address into your note. Click on the following prompt to get directions to the location in Maps.
  • Paste a phone number into your note to call the number from your desktop via Skype or other compatible apps.
  • Paste a link into your note to save it for later.
  • Enter stock symbols using the $STOCK format to check prices.

To view the available options for each of these, click the link text and then follow the prompt at the bottom of the note.

Windows 10 Sticky Notes Insight Prompt

Access Windows Sticky Notes on Mobile or Web

Need to work with your Windows sticky notes on other devices? Thanks to free mobile apps and a web interface, your sticky notes aren’t locked into Windows 10.

Head to the OneNote Sticky Notes page to access them online from any browser, even on a Mac or Linux system. Sign in with the same Microsoft account you use for Windows 10, and you’re all set.

Here you’ll find a simple interface that lets you read, edit, and create new notes. Any changes you make here will sync to Sticky Notes on Windows 10.

Windows Sticky Notes Web Interface

To access your notes on the go, you’ll need to install the free OneNote app for Android or iOS. Sign in with your Microsoft account, then tap the Sticky Notes tab to access your notes.

Just like the web and desktop, you can create new notes and make changes to existing ones. You’ll also notice the Camera icon at the bottom-left of a note, which lets you add images to them.

Transferring Sticky Notes to a New Computer

Using the above method, you can access your sticky notes on various devices. In case you want to move them manually or keep your own backup, you can copy and transfer the file they’re saved to.

First, head to the following directory:

 %LocalAppData%\Packages\Microsoft.MicrosoftStickyNotes_8wekyb3d8bbwe\LocalState

There, locate the file labeled plum.sqlite and copy it to a safe place. To move your notes to a new PC, place (or replace) this copied file into the same folder on that computer.

Windows 10 Sticky Notes storage file

If you want to create a duplicate copy of your sticky notes, simply duplicate the file and change its name. For example, you can copy and paste the plum.sqlite file and name it plum1.sqlite. Then if your notes disappear or become corrupted, just rename the backup file to plum.sqlite again to restore it.

Need Something More Advanced? Try OneNote!

You might not know about all the useful functionality hiding in Sticky Notes for Windows 10. While it’s not the most full-featured program, it’s great for jotting down a quick thought or important bit of information.

If you need a more robust note-taking experience, Microsoft OneNote is a great free option. Check out our full OneNote guide for an overview. If that doesn’t click, follow our checklist to finding the perfect note-taking app.

Read the full article: How to Get Started With Windows 10 Sticky Notes: Tips and Tricks


Read Full Article

1500+ Free Lightroom Presets for Any Occasion


lightroom-presets

Adobe Lightroom is a fantastic program for processing your photos. It’s easy to use, but getting the exact look for your images takes both time and skill. Fortunately, there’s a shortcut in the form of Lightroom presets.

In this guide, we’ll explain what Lightroom presets are, how they can help you, and guide you towards the very best ones. And there are more than 1500 free Lightroom presets suitable for any occasion on offer here…

What Are Lightroom Presets?

Lightroom presets are saved collections of settings that you can re-use time and again with a single click. You can use them for the Export Settings, or to apply keywords to a group of images. But for most people presets mean develop presets.

A Lightroom develop preset is like a supercharged Instagram filter (how Instagram filters work). They transform your images with beautiful, distinct styles, giving you professional looking results with minimal effort.

lightroom presets

You can use presets for one-click processing, or as a starting point for creating your own look through further tweaks. They can also be used for basic, repetitive tasks, from applying lens corrections to removing haze from your photos.

Why Use Lightroom Presets?

Lightroom presets are mostly useful for three things:

  • Saving time editing your photos. Editing your favorite handful of shots is a fun creative exercise; coming back from vacation with several hundred photos to process isn’t quite so enjoyable. Presets enable you to cut through the tedium by applying a very high standard of processing very quickly.
  • Creating a consistent look across a collection of shots. Consistency in how you process your photos is important. It can help you develop a signature look, build your brand and get noticed. It also transforms a group of images shot at an event (wedding, party etc.) from a bunch of random snapshots to a proper collection.
  • Achieving a specific look. Everyone has seen photos and wondered, “How did they achieve that look?” Well, you can get almost any look with a free Lightroom preset. They are the shortcut to professional level photo editing.

Lightroom comes with a collection of its own free black and white presets, plus those for tweaking the colors, adding grain, or removing noise. With hundreds more available to download, you’ll always be able to find the style you’re after.

mastin presets pack

Not all presets are free. Companies like Mastin Labs create expensive Lightroom presets that faithfully recreate the look of different types of old film stock. Others design large bundles of premium presets for specific types of photography.

However, you don’t have to shell out for quality. Many sites offer a few free presets as a sampler for their paid options, and there are hundreds of additional presets created and shared for free by individual photographers.

Here’s our pick of the very best free Lightroom presets.

1. Nate Photographic

This site offers 10 Lightroom presets inspired by the filters in the popular mobile app VSCO Cam.

nate photographic presets

They all recall the matte look of vintage film stocks from the likes of Fuji and Kodak, complete with crushed blacks and added grain. There are presets for all occasions, from portraits to gritty street photography.

2. Photon Collective

The Quantum Collection is arguably the best set of free presets you can currently get. There are 16 styles—14 color, two monochrome—with six variations for each offering different levels of intensity. That’s 96 in total.

photon collective presets

Mostly film inspired again, the collection includes a lovely cyan/orange option for a modern cinematic look. They’re available under a pay-what-you-want system so you can grab them for free, although they’re definitely worth paying for.

3. Lonely Speck

From the same team behind the Quantum Collection, Film Speck One contains 102 presets, also available as a pay-what-you-want download.

lonely speck presets

Pretty much all styles are catered for, both modern and vintage. With so many to choose from it may take you a while to find the ones you really like, but there should be something here for everyone.

4. LookFilter

This set of 12 presets has racked up millions of downloads to date, and it’s easy to see why.

lookfilter lightroom presets

The colors are styled after film stock, like so many other presets. But with a few high contrast options, you can achieve a far punchier look than you’ll get with many similarly designed collections.

5. Shutter Pulse

By signing up with Shutter Pulse you get 20 free presets for Lightroom along with 20 Photoshop actions that will process your shots in the same way.

shutter pulse presets

The set ranges from a very vintage film look—complete with fake light leaks—to a very modern dramatic HDR style, and many points in between.

6. CreativeTacos

CreativeTacos has a massive collection of over 700 Lightroom presets for both desktop and mobile. Many share the bright and airy look so popular among Instagram influencers, but there are also some more technical tools, such as for retouching skin.

creative tacos free lightroom presets

The collection is a tad unwieldy to browse through. Persevere, though, and you’ll be sure to find the look you’re after.

7. Contrastly

Contrastly’s sampler of 25 free presets is a mixed bag of assorted styles, film sims, and tweaks.

contrastly presets

With such a random selection the quality also varies. Some are a tad overdone for our taste. Others, including the very nice Desaturated Cinematic – 7 (in action above), are a more-than-worthy addition to anyone’s preset library.

8. ON1

ON1 created one of the best alternatives to Lightroom in the form of ON1 Raw. But the company’s website also offers a collection of 60 presets that work with Lightroom.

on1 presets

They’re a varied bunch. Some are designed to be stacked with other presets, adding vignettes or softening skin etc. Others completely change the look of the image and includes a small set of movie inspired styles.

9. Rock Shutter

You can get a set of 15 presets influenced by various modern cinematic styles from Rock Shutter.

rock shutter presets

You need to pick the right shots to use them on. We found they worked really well on landscapes and cityscapes, though they are less effective on portraits.

10. Presetpro

With more than 120 presets to choose from, Presetpro has something suitable for almost every conceivable need.

Whether you shoot weddings or astrophotography, want to add some 1940s Hollywood glamor to your portraits, or need to recover detail from a cloudy sky, you’ll find the solution right here.

11. Lightroom Zen

There’s only a small number of free presets on Lightroom Zen, and you have to search through the Blog pages to find them. But it’s worth it, since the quality is good, and they tend to be designed for very specific purposes.

lightroom zen presets

If you’re shooting the night sky, for instance, or fireworks, or need to fix the skin tones in a portrait, then these presets will help make your images shine.

12. Fix the Photo

Fix the Photo offers over 500 presets with more than 10 million downloads between them. They cover every type of photography you can think of, from food and product photography to cityscapes and night shots.

fix the photo 500 free lightroom presets

There are over 100 more that you can use with Lightroom Mobile on your phone or tablet, along with a further 2000+ high quality (and pricey) premium presets.

13. Presets Galore

Offering 159 free presets across 12 collections, Presets Galore has something for all tastes.
presets galore

Whether you want a vintage film look, to produce classy black and white portraits, or to add punch and vivid color to your landscapes, you’ll find it here. And if that isn’t enough, the site has got hundreds of extra presets for Lightroom Mobile users, too.

14. Cole’s Classroom

With names like Bitchin’ Summer and Cole’s Bangin’ B&W, you might expect the 15 free presets from Cole’s Classroom to be a little wilder than they are.

cole's classroom presets

In fact, they’re classy and understated. They lend themselves to a wide range of shots, and never leave your images looking over-processed. The styles are mostly film-like, but there are some more contrasty and saturated options too.

15. Preset Love

Finally, another huge collection, totaling—at last count—313 presets. The quality can vary because most of them are submitted by the site’s users. The variety is unrivaled.

preset love

Naturally, most are designed to achieve a certain look. Arguably the best are those that help with the difficult parts of photo processing, such as fixing skin tones or sharpening.

How to Get Started With Lightroom Presets

It’s easy to install Lightroom presets, but the process is different depending on which version you have.

In Lightroom CC:

  1. Open the Presets section in the Edit panel
  2. Click Presets, then select Import Presets
  3. Find the presets on your desktop to complete installation

In Lightroom Classic CC:

  1. Open Lightroom’s Settings or Preferences and select the Presets tab
  2. Click Show Lightroom Presets Folder, then navigate your way to the Develop Presets subfolder
  3. Copy and paste your downloaded presets into this folder

You can use presets from two locations in Classic. In the Browse module, you can apply a preset from the Quick Develop panel on the right. For more controlled use, apply them from the Preset panel on the left of the Develop module.

quick develop

In Lightroom CC, just apply them through the Presets section of the Edit panel.

How to Make Your Own Lightroom Presets

Presets make Lightroom so much quicker and easier to use. Which means you can get great results with the least amount of know-how. However, what makes Lightroom presets even more useful is the ease with which you can make your own.

See our guide on how to create Lightroom presets for everything you need to know.

Read the full article: 1500+ Free Lightroom Presets for Any Occasion


Read Full Article

The 6 Best Meeting Scheduling Tools and Apps


meeting-scheduling-tools

Scheduling a meeting time with multiple people is a bit like herding cats. Everyone has different commitments that they need to keep, along with different time slots that they want to commit to. By the time you figure out when to meet, you may be so frustrated by everyone’s conflicting availability that you’ll have the urge to cancel.

While scheduling a meeting can feel near-impossible, having a scheduling app can make the process less painful. Here are the best meeting time planners that you can use.

How we ranked them: There are a lot of meeting schedulers out there. Because of this, we picked the options that scored the highest in the following three categories:

  • Integration: How easy is it to use the scheduling tool in combination with other apps?
  • Ease of use: How easy is it to use the app itself?
  • Features: How much can the app do?

Each category is scored from 1 to 5, with 1 being the lowest and 5 being the highest. Let’s explore these options now.

1. Google Calendar (Free)

Google Meeting Scheduler

Google Calendar is the first free scheduling app we’re including on this list. It scores high in all three of our categories: integration, ease of use, and features.

As part of a wider collection of tools, Calendar has an incredible ability to integrate with the rest of Google’s apps, including Gmail. It also offers a lot of flexibility when it comes to its features.

If you want to schedule a meeting, you need to create a Group Calendar within the app. To create one:

  1. Go to your Calendar app, then click on Other Calendars + > Create New Calendar.
  2. Once it’s created, click on the three dots next to the calendar’s name and click Settings and sharing.
  3. Choose a sharing option to share this calendar with your team.

Once you create a group Google Calendar, you can use it to:

  • Track everyone’s availability.
  • See who’s out of office.
  • Coordinate deadlines.

If you need an all-purpose meeting app that is easy to use, the Google Meeting scheduler is definitely the way to go.

Integration: 5
Ease of use: 4
Features: 3

Note: If you want to read more on this subject, here’s how to make another calendar in Google Calendar.

2. Rallly (Free)

Rallly Scheduling App

Next on the list? Rallly, an open-source scheduling tool. It’s completely free to use.

Simple and pared down compared to the other meeting apps on this list, Rallly allows you to create pages for new meetings or events. By sharing a link to that event, you and other recipients can discuss the details on the meeting page itself.

The big downside to Rallly is that you cannot create polls to vote on meeting time slots, so it’s not as flexible as some of the other free online scheduling tools.

Because of this, Rallly is better for small, casual groups of friends who are organizing one-off, simple get-togethers.

Integration: 2
Ease of use: 5
Features: 3

3. Assistant.to (Free)

Assistant.to Scheduling Assistant

Along with Google Calendar and Rallly, we wanted to recommend Assistant.to, which is another free scheduling app.

The idea behind Assistant.to? To integrate a scheduling assistant into your Gmail inbox.

When you compose an email in your inbox, Assistant.to pops up as a small, circular button in the bottom right-hand corner. After you click on that button, it will take you to a calendar scheduling app and attach the suggested time slots.

The major downside to this program? Assistant.to can only schedule a meeting between you and one other person. However, the app can also:

  • Automatically detect time zones.
  • Keep a record of when your most common meeting times are, to offer recommendations in the future.
  • Integrate with Google Hangouts, GoToMeeting, UberConference, and ReadyTalk.

Assistant.to is good for freelancers and business professionals looking to schedule one-on-one interviews. It is not good for teams at this time.

Integration: 4
Ease of use: 5
Features: 4

4. Doodle (Free, Subscription Available)

Doodle Poll Free

Doodle is another work schedule app we’re going to include on this list. Like Google Calendar, we’re including it because it scores high in all three of our categories.

Doodle has free and subscription options available. The free option is simple and is basically used for one-off events. To create a Doodle poll free of charge, just make a poll through the website, then send out the link.

For the subscription options, you can also try out Doodle’s free 14-day trial.

Doodle can also:

  • Auto-detect time zones.
  • Sync with Google Calendar and Office 365.
  • Send out proposed meeting times and have recipients vote on them.
  • Allow guests to indicate the dates they can make the meeting, along with the dates that they can make if there are no other options available.

If you sign up for a subscription to Doodle Premium, there are four different payment plans: Starter, Pro, Team, and Enterprise. Through the Doodle options Pro, Team, and Enterprise, you can also customize your Doodle app by adding your company logo or brand colors.

Doodle is the best schedule app out there if you want to set up a meeting. It’s also a relatively inexpensive option for business owners looking to take their team’s communication skills to the next level.

Integration: 5
Ease of use: 5
Features: 5

5. Calendly (Free, Subscription Available)

Calendly Meeting Scheduler

Calendly is another great option when it comes to doodle poll alternatives. Like Doodle, it has free and premium subscription options available.

When you’re setting up a schedule, Calendly will ask you for your time slot preferences. It’ll then calculate your availability from there. Through email, the recipient can pick a time to meet with you. Once a time has been decided it will be added to your calendar.

Calendly can also:

  • Integrate with Google Calendar, Office 365 or iCloud Calendar.
  • Set up buffers between meetings, to account for overtime.
  • Automatically figure out everyone’s availability by timezone.
  • Schedule one-on-one meetings.
  • Track the no-show rates to each meeting.

While Calendly can use used for one-on-one meetings, its true power comes from its ability to organize and monitor large-scale events.

Integration: 3
Ease of use: 3
Features: 5

6. YouCanBook.me (Subscription)

YouCanBook.me When to Meet

Lastly, we want to recommend the meeting scheduler app YouCanBook.me. It’s a paid subscription service that allows business professionals to book meetings with clients.

As YouCanBook.me is geared towards business-to-client relations, it’s not the best tool for in-house meetings. However, like the other options on this list, YouCanBook.me offers a ton of flexibility when it comes to its features.

You can:

  • Automatically detect time zones when scheduling a meeting.
  • Customize reminders for your meeting.
  • Display team member availability for your meeting.
  • Set prices for your bookings, if you are offering a paid consultation service.
  • Take payments for bookings through Stripe integration.

While YouCanBook.me is predominantly a subscription based service, you can explore the free trial prior to signing up.

YouCanBook.me is a good tool for businesses and independent contractors offering paid services to customers.

Integration: 3
Ease of use: 3
Features: 5

Use a Meeting Scheduler, Hassle-Free

Scheduling a meeting with multiple people has never been an easy task. With the help of these apps, however, you’ll be able to make the most of it.

Looking for other tips on team management? Here are some online project management tools for small teams.

Read the full article: The 6 Best Meeting Scheduling Tools and Apps


Read Full Article

How to Fix a Windows 10 Kernel Power Error in 5 Easy Steps


windows10-kernel-power-error

Does your Windows computer shut down without warning? Or does it crash every time you attempt to wake it from Sleep? Your computer might have a power supply fault that is causing it to crash without warning.

Unlock the FREE "Ultimate Windows Keyboard Shortcuts" cheat sheet now!

This will sign you up to our newsletter

Enter your Email

The issue, known as a Kernel-Power error, seemingly appears for no reason, yet is a critical system issue.

Here’s how you can fix Kernel-Power Event ID 41 and stop your computer from crashing.

What Is a Kernel-Power Critical Error?

The Kernel-Power critical error is a system error that causes your system to crash. The error can trigger under a range of circumstances, though all relate to a power issue.

However, the Kernel-Power issue doesn’t always indicate a power supply issue, rather an issue with your system hardware causing a power fault, and in turn, your system to crash.

windows 10 kernel-power critical error event id 41

The Kernel-Power critical error associates with Event ID 41. Furthermore, Kernel-Power Event ID 41 is accompanied by the keywords (70368744177664),(2), which you can use to pinpoint your bug troubleshooting.

So, what causes Kernel-Power error 41?

While it is a common shutdown error code, there are several common causes, with easy fixes:

  1. Update Windows 10
  2. Disable Windows 10 fast startup
  3. Reseat your RAM and graphics card
  4. Run CHKDSK and SFC
  5. Test for a faulty PSU

Let’s take these fixes step by step and solve the Windows 10 Kernel-Power error.

1. Update Windows 10

Check if Windows 10 is up to date. Microsoft releases updates for Windows 10 frequently, fixing bugs and other issues. Your Kernel-Power critical error could stem from a bug that there is a fix ready for in an update.

Press Windows Key + I, type update in the search box, and select Check for updates. If there is an update waiting, download and install it, then restart your system.

2. Disable Windows 10 Fast Startup

Windows 10 fast startup is a hybrid sleep mode that enables your computer to boot extremely quickly. Windows 10 enables fast startup as a default setting during installation. If you enable fast startup, your computer doesn’t completely shut down.

It enters a middle ground that combines a full shutdown with hibernation mode, saving the last machine state to enable you to start working straight away.

However, unlike full hibernation mode, when you return to Windows 10, it is like starting the machine from scratch. There are no windows open, and your previous applications are not open, and so on.

windows 10 power settings disable fast startup

To disable Fast Startup, type power set in your Start Menu search bar, then select Choose a power plan.

Now, select Choose what the power buttons do, followed by Change settings that are currently unavailable.

Uncheck Turn on fast start-up and hit Save changes.

3. Reseat Your RAM and Graphics Card

Some users report their Kernel-Power 41 error resolving after reseating their RAM and graphics card (GPU).

You’ll need to get inside the case of your PC or laptop to reseat the hardware. Please be aware that this will void your manufacturer’s warranty in certain cases, so proceed with caution.

4. Run CHKDSK and SFC

CHKDSK is a Windows system tool you can use to verify your Windows 10 file system. You can add specific options to find and fix faults as the tool runs. Run it from the Command Prompt, and use the CHKDSK scan to find the problem and fix your machine.

  1. Type command prompt in your Start menu search bar, then right-click the best match and select Run as administrator. (Alternatively, press Windows key + X, then select Command Prompt (Admin) from the menu.)
  2. Next, type chkdsk /r and press Enter. The command will scan your system for errors and fix any issues along the way.

If CHKDSK doesn’t find any faults, you can run the Windows System File Check (SFC). System File Check is another Windows system tool you can use to check for missing or corrupt Windows system files.

In case you’re wondering, the difference between CHKDSK and SFC is the scope of the scan. CHKDSK scans your entire drive for errors, whereas SFC scans your Windows system files specifically.

However, before running the SFC command, it is best to check that it is completely functional.

DISM stands for Deployment Image Servicing and Management. DISM is an integrated Windows utility with a vast range of functions. In this case, the DISM Restorehealth command ensures that our next fix will work properly.

Work through the following steps.

  1. Type Command Prompt (Admin)in the Start menu search bar, then right-click and select Run as administrator to open an elevated Command Prompt.
  2. Type the following command and press Enter: DISM /online /cleanup-image /restorehealth
  3. Wait for the command to complete. The process can take up to 20 minutes, depending on your system health. The process seems stuck at certain times, but wait for it to complete.
  4. When the process completes, type sfc /scannow and press Enter.

5. Test for Faulty PSU With OCCT

Testing for hardware faults with your power supply unit isn’t easy unless you have the correct hardware to hand. You can check your PSU using a multimeter or a dedicated PSU testing tool.

The majority of software-based PSU checking tools cannot deliver an accurate reading on whether your PSU is working correctly.

That said, if you do want to attempt a PSU software test, I would suggest using OCCT, a free CPU/GPU/PSU stress testing tool. OCCT stress tests your CPU, GPU, and motherboard, and in the process can discover any faults with your power supply unit.

occt power supply stress test software

Open OCCT. Under Test Configuration, select Power. Select your graphics card, then set the resolution to 1920×1080. Save any work and close any other open programs on your system. When ready, hit the big red play icon in OCCT to begin the stress test.

The OCCT developer states that “Most errors are detected within the first 5 minutes. However, I recommend doing at least a 1-hour long test just to be sure.”

Once the test completes, OCCT produces a log that highlights any potential PSU errors (or with other hardware!).

Download: OCCT for Windows (Free)

Fixing Kernel-Power Critical Error 41

One of these five fixes will bring your Windows 10 computer back to full health. You might need to try a combination of fixes to stop the Kernel-Power critical error. For me, reseating my hardware and updating Windows 10 cured the issue.

Are you still experiencing random crashes? You need to check out these tips, tricks, and fixes to fix Windows blue screen errors.

Read the full article: How to Fix a Windows 10 Kernel Power Error in 5 Easy Steps


Read Full Article