28 June 2018

How to Encrypt and Protect Your Data and Files Using VeraCrypt


veracrypt-protection

VeraCrypt is a free, open-source encryption tool available for all versions of Windows. Here’s how to create and use an encrypted VeraCrypt volume in Windows to encrypt and protect your files on any static or removable drive.

What Is VeraCrypt?

A fork of the now defunct TrueCrypt, VeraCrypt plugs all known security holes in TrueCrypt and improves upon TrueCrypt’s weak encryption methods. VeraCrypt is also backwards compatible with TrueCrypt volumes.

VeraCrypt creates encrypted volumes for securely storing files. It also allows you to encrypt entire system drives or partitions.

We’re looking at the Windows version here, but if you use macOS or Linux, there’s a version of VeraCrypt for you too. To get started with this free tool, head to veracrypt.fr to download and install VeraCrypt. Be sure to accept the default settings during installation.

How to Create a VeraCrypt Volume (File Container)

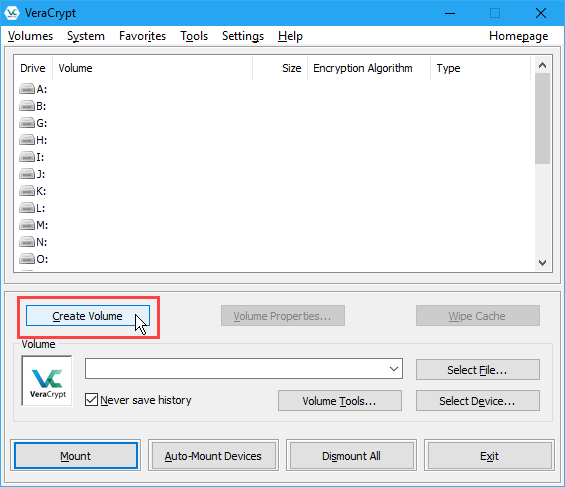
To create a VeraCrypt Volume, open VeraCrypt and click Create Volume.

Click Create Volume

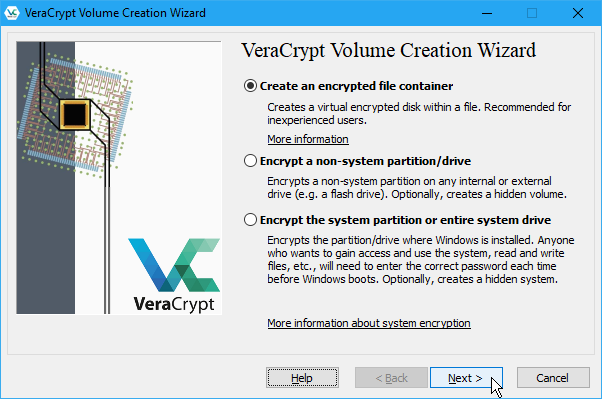
On the VeraCrypt Volume Creation Wizard, select the type of volume you want to create. We’re going to create an encrypted volume to store private files, so we accept the default option, Create an encrypted file container.

You can also encrypt a non-system drive or partition, or encrypt the system partition, or entire system drive. To learn about these options, click the More information about system encryption link.

Click Next to proceed.

Create an encrypted file container

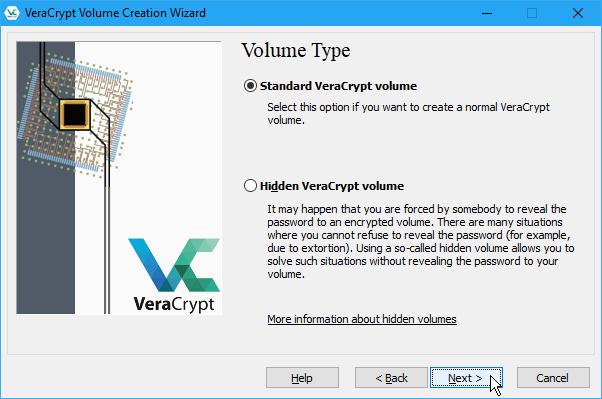
The default Volume Type is a Standard VeraCrypt volume, which we are going to use for our example.

If you’re concerned that you might be forced by someone to reveal your password, you can also choose to create a Hidden VeraCrypt volume. Learn more about hidden volumes by clicking the More information about hidden volumes link.

Click Next.

Select the Volume Type

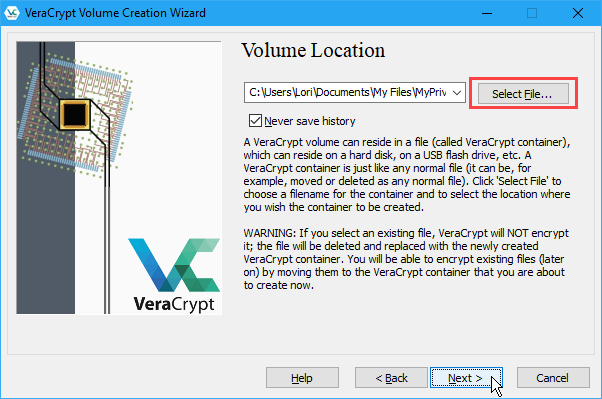
On the Volume Location screen, click Select File. Then, use the Specify Path and File Name dialog box to enter a name and choose a location for the VeraCrypt volume file.

When you installed VeraCrypt, one of the default settings was to associate .hc files with VeraCrypt so you can double-click on a volume file to load it in VeraCrypt. To take advantage of this feature, be sure to add “.hc” to the end of your file name.

If you want the Volume Location dropdown list to contain a history of VeraCrypt volumes you attempted to mount, uncheck the Never save history box. This allows you to select a volume from the list instead of using the Select File button. But this also provides easy access to your volumes and shows their locations to others who might get access to your computer.

Once again, click Next.

Select the Volume Location and volume file name

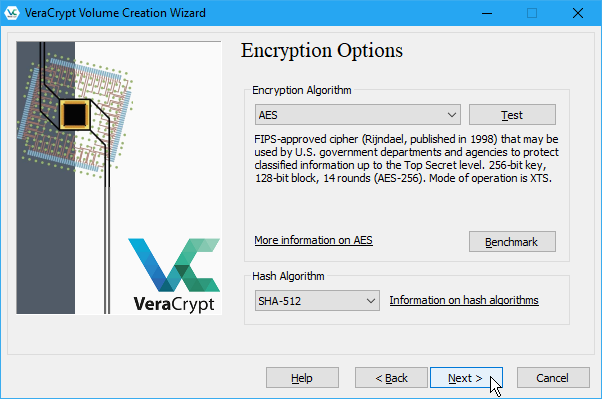
On the Encryption Options screen, choose an Encryption Algorithm and Hash Algorithm. The default algorithms for both are secure options, if you’re not sure what to use.

Click Next.

Select Encryption Options

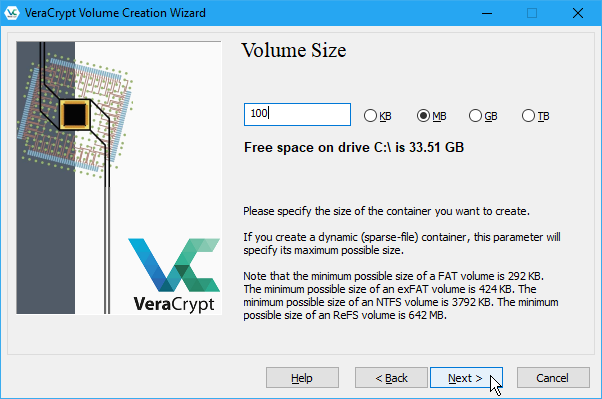
Enter the size you want for the VeraCrypt volume in the edit box and select whether that size is in KB, MB, GB, or TB.

Move onto the next screen with Next.

Specify Volume Size

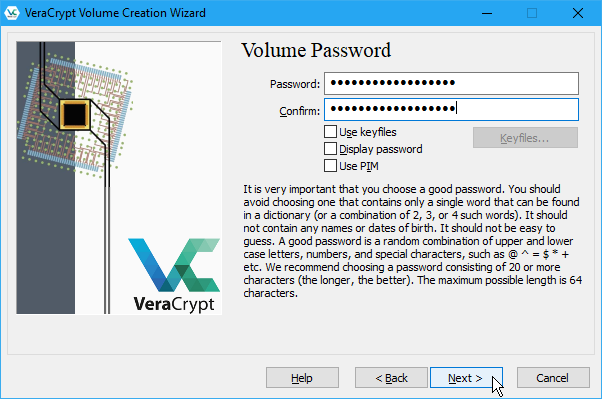
Choose a strong password for your volume and enter it in the Password box, and again in the Confirm box.

Keyfiles add extra protection to your volume. For our example, we’re not going to use keyfiles, but you can read more about them in VeraCrypt’s help if you decide to use them.

If you enter 20 characters or less for your password, you’ll see a warning dialog telling you short passwords are easy to crack using brute force. Click No to return to the Volume Password screen and enter a longer, more secure password.

The Next button is only available once you’ve entered the same password in both boxes.

Enter a Volume Password

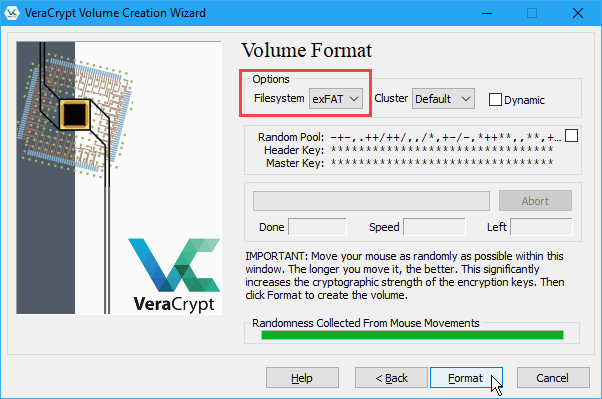
On the Volume Format screen, select the type of Filesystem you want to use. If you’re going to access the volume on macOS or Linux, in addition to Windows, you should select either FAT or exFAT.

Leave Cluster as Default and Dynamic unchecked.

Move your mouse randomly over the Volume Format screen until the progress bar under Randomness Collected From Mouse Movements at least turns green. But the more you move the mouse, the stronger the encryption on the volume.

Then, click Format.

If the User Account Control dialog box displays, click Yes to continue.

Select the Volume Format

VeraCrypt creates the volume file in the location you specified. This may take a while, depending on the size of your volume.

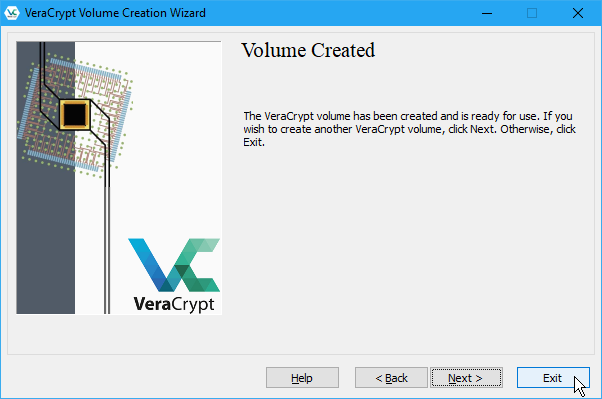
Click OK on the dialog box that displays when the VeraCrypt volume has been successfully created.

On the VeraCrypt Volume Creation Wizard dialog box, click Next if you want to create another volume. Or click Exit to close the wizard.

Close the VeraCrypt Volume Creation Wizard

How to Mount a VeraCrypt Volume

Now that we’ve created our VeraCrypt volume, we need to mount it to use it.

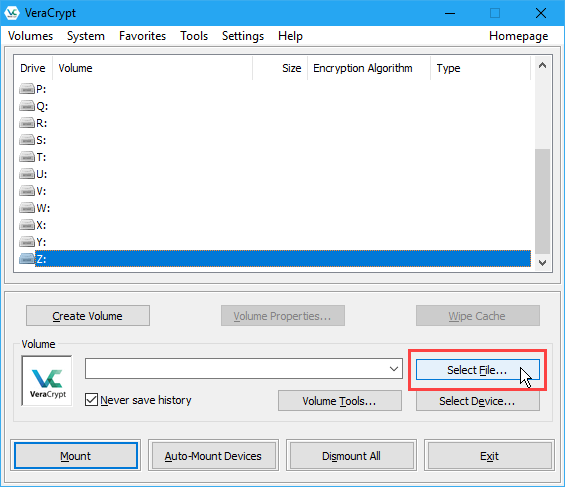
On the main VeraCrypt window, select an unused drive letter you want to use for your volume. Check File Explorer to see which drive letters are currently being used, and avoid using them.

Then, click Select File. Use the Select a VeraCrypt Volume dialog box to navigate to and select a VeraCrypt volume file.

If you accepted the default setting during installation that associated .hc files with VeraCrypt, you can also use File Explorer to load the VeraCrypt volume. Go to where you saved the VeraCrypt volume file and double-click the file.

Click Select File to mount a volume

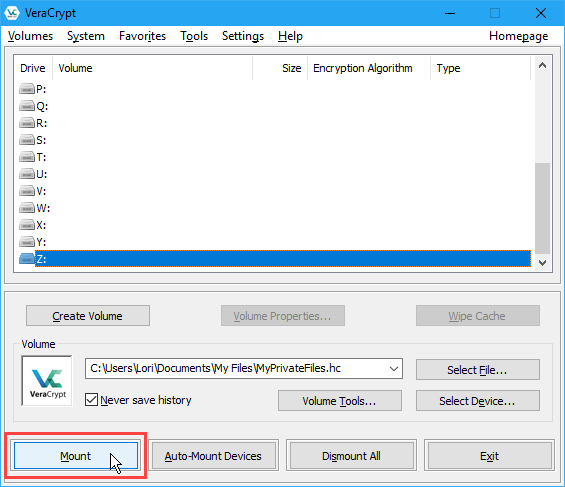
The path to the VeraCrypt volume file displays in the dropdown list box.

Click Mount.

Click Mount

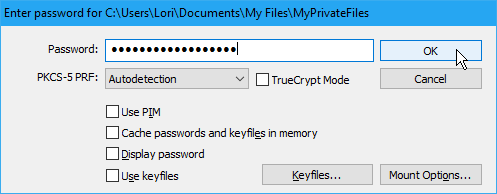
Enter your Password. If you remember the Hash Algorithm you selected when you created the volume, select it from the PKCS-5 PRF dropdown list. If not, don’t worry. You can use the default of Autodetection. It just might take a bit longer for the volume to decrypt and mount.

If you used one or more keyfiles when you set up your volume, make sure you check the Use keyfiles box. Then, click Keyfiles and select the same file(s) you used when creating the volume.

Click OK.

A progress dialog box displays while the VeraCrypt volume is decrypted. Depending on how big your VeraCrypt volume is, this may take a while.

Enter password to mount volume

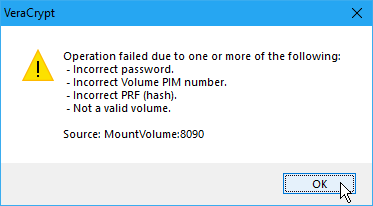
If you entered a wrong password or forgot to select your keyfiles (if you used them when creating the volume), you’ll see the following error dialog box. Click OK to go back to the Enter Password dialog box and enter the correct password and select the correct keyfiles, if you used them.

Mount operation failed

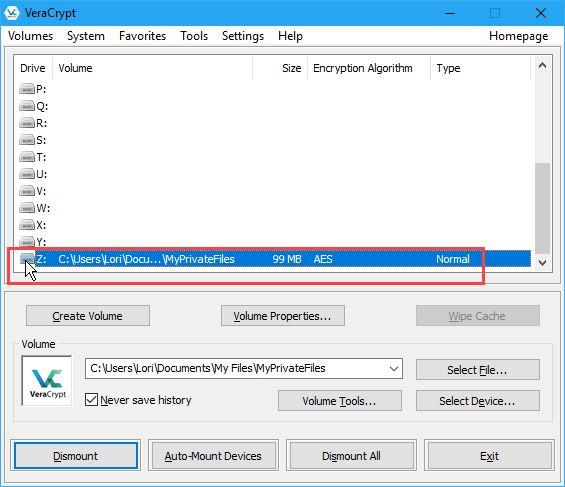
Once the volume is successfully mounted, you’ll see it next to the drive letter you selected, as a virtual disk assigned that drive letter.

To access the volume, double-click on the drive letter in VeraCrypt.

Volume mounted in VeraCrypt

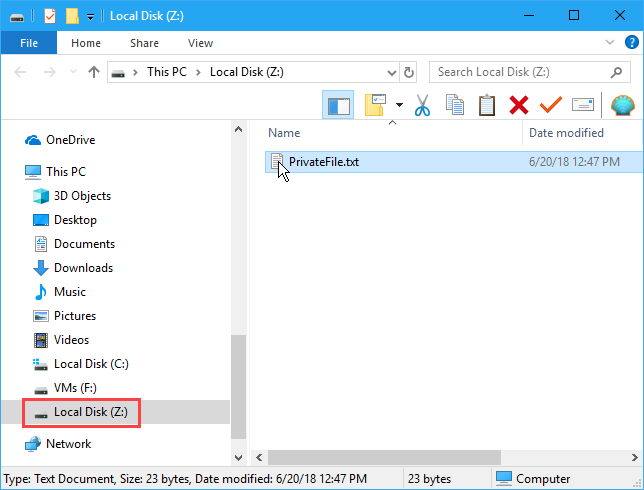
You can also browse to the mounted volume in File Explorer the way you normally browse to any other type of drive. For example, we mounted our VeraCrypt volume using the drive letter Z: and it shows up with that drive letter in File Explorer.

VeraCrypt never saves any decrypted data to disk—only in memory. Data is encrypted in the volume even when mounted. As you work with your files, they are decrypted and encrypted on the fly.

VeraCrypt volume in File Explorer

How to Dismount a VeraCrypt Volume

When you’re done working with the files in your VeraCrypt volume, you can close, or dismount, the volume.

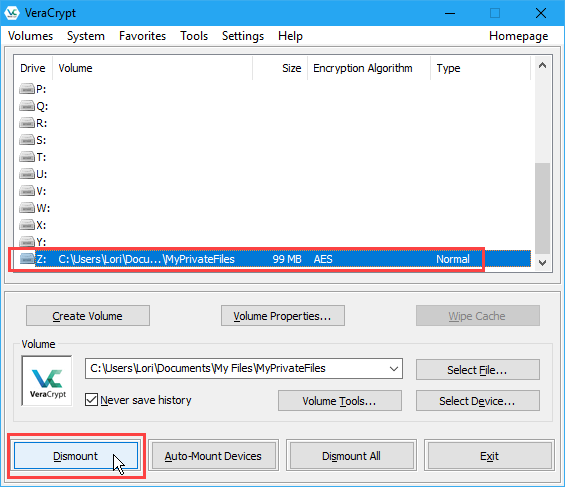
Select the volume you want to dismount in the list of drive letters. Then, click Dismount.

VeraCrypt removes the volume from the drive letter list. When a volume is dismounted, you can move the .hc file anywhere you want. You can back it up to an external drive. Or you can store it in a cloud service like Dropbox, Google Drive, or OneDrive so you can easily access it on another computer.

Click Dismount

Start Using VeraCrypt to Encrypt Your Private Data

Computers play an integral part of daily life and any sensitive data stored on them (and in the cloud and on external media) must be secured.

VeraCrypt is an easy and reliable way to secure and encrypt your most sensitive data.

Image Credit: AleksVF/Depositphotos

Read the full article: How to Encrypt and Protect Your Data and Files Using VeraCrypt


Read Full Article

Amazon Wants to Turn Your Fire Tablet Into an Echo Show

Bird has officially raised a whopping $300M as the scooter wars heat up


And there we have it: Bird, one of the emerging massively-hyped Scooter startups, has roped in its next pile of funding by picking up another $300 million in a round led by Sequoia Capital.

The company announced the long-anticipated round this morning, with Sequoia’s Roelof Botha joining the company’s board of directors. This is the second round of funding that Bird has raised over just the span of a few months, sending it from a reported $1 billion valuation in May to a $2 billion valuation by the end of June. In March, the company had a $300 million valuation, but the Scooter hype train has officially hit a pretty impressive inflection point as investors pile on to get money into what many consider to be the next iteration of resolving transportation at an even more granular level than cars or bikes. New investors in the round include Accel, B Capital, CRV, Sound Ventures, Greycroft and e.ventures, and previous investors Craft Ventures, Index Ventures, Valor, Goldcrest, Tusk Ventures, and Upfront Ventures are also in the round. (So, basically everyone else who isn’t in competitor Lime.)

Scooter mania has captured the hearts of Silicon Valley and investors in general — including Paige Craig, who actually jumped from VC to join Bird as its VP of business —with a large amount of capital flowing into the area about as quickly as it possibly can. These sort of revolving-door fundraising processes are not entirely uncommon, especially for very hot areas of investment, though the scooter scene has exploded considerably faster than most. Bird’s round comes amid reports of a mega-round for Lime, one of its competitors, with the company reportedly raising another $250 million led by GV, and Skip also raising $25 million.

“We have met with over 20 companies focused on the last mile problem over the years and feel this is a multi-billion dollar opportunity that can have a big impact in the world,” CRV’s Saar Gur, who did the deal for the firm, said. “We have a ton of conviction that this team has original product thought (they created the space) and the execution chops to build something extremely valuable here. And we have been long term focused, not short term focused, in making the investment. The “hype” in our decision (the non-zero answer) is that Bird has built the best product in the market and while we kept meeting with more startups wanting to invest in the space – we kept coming back to Bird as the best company.  So in that sense, the hype from consumers is real and was a part of the decision. On unit economics: We view the first product as an MVP (as the company is less than a year old) – and while the unit economics are encouraging, they played a part of the investment decision but we know it is not even the first inning in this market.”

There’s certainly an argument to be made for Bird, whose scooters you’ll see pretty much all over the place in cities like Los Angeles. For trips that are just a few miles down wide roads or sidewalks, where you aren’t likely to run into anyone, a quick scan of a code and a hop on a Bird may be worth the few bucks in order to save a few minutes crossing those considerably long blocks. Users can grab a bird that they see and starting going right away if they are running late, and it does potentially alleviate the pressure of calling a car for short distances in traffic, where a scooter may actually make more sense physically to get from point A to point B than a car.

There are some considerable hurdles going forward, both theoretical and in effect. In San Francisco, though just a small slice of the United States metropolitan area population, the company is facing significant pushback from the government and scooters for the time being have been kicked off the sidewalks. There’s also the looming shadow of what may happen regarding changes in tariffs, though Gur said that it likely wouldn’t be an issue and “the unit economics appear to be viable even if tariffs were to be added to the cost of the scooters.” (Xiaomi is one of the suppliers for Bird, for example.)


Read Full Article

Bird has officially raised a whopping $300M as the scooter wars heat up


And there we have it: Bird, one of the emerging massively hyped Scooter startups, has roped in its next pile of funding by picking up another $300 million in a round led by Sequoia Capital.

The company announced the long-anticipated round this morning, with Sequoia’s Roelof Botha joining the company’s board of directors. This is the second round of funding that Bird has raised over the span of a few months, sending it from a reported $1 billion valuation in May to a $2 billion valuation by the end of June. In March, the company had a $300 million valuation, but the Scooter hype train has officially hit a pretty impressive inflection point as investors pile on to get money into what many consider to be the next iteration of resolving transportation at an even more granular level than cars or bikes. New investors in the round include Accel, B Capital, CRV, Sound Ventures, Greycroft and e.ventures; previous investors Craft Ventures, Index Ventures, Valor, Goldcrest, Tusk Ventures and Upfront Ventures are also in the round. (So, basically everyone else who isn’t in competitor Lime.)

Scooter mania has captured the hearts of Silicon Valley and investors in general — including Paige Craig, who actually jumped from VC to join Bird as its VP of business — with a large amount of capital flowing into the area about as quickly as it possibly can. These sort of revolving-door fundraising processes are not entirely uncommon, especially for very hot areas of investment, though the scooter scene has exploded considerably faster than most. Bird’s round comes amid reports of a mega-round for Lime, one of its competitors, with the company reportedly raising another $250 million led by GV, and Skip also raising $25 million.

“We have met with over 20 companies focused on the last-mile problem over the years and feel this is a multi-billion dollar opportunity that can have a big impact in the world,” CRV’s Saar Gur, who did the deal for the firm, said. “We have a ton of conviction that this team has original product thought (they created the space) and the execution chops to build something extremely valuable here. And we have been long-term focused, not short-term focused, in making the investment. The ‘hype’ in our decision (the non-zero answer) is that Bird has built the best product in the market and while we kept meeting with more startups wanting to invest in the space — we kept coming back to Bird as the best company. So in that sense, the hype from consumers is real and was a part of the decision. On unit economics: We view the first product as an MVP (as the company is less than a year old) — and while the unit economics are encouraging, they played a part of the investment decision but we know it is not even the first inning in this market.”

There’s certainly an argument to be made for Bird, whose scooters you’ll see pretty much all over the place in cities like Los Angeles. For trips that are just a few miles down wide roads or sidewalks, where you aren’t likely to run into anyone, a quick scan of a code and a hop on a Bird may be worth the few bucks in order to save a few minutes crossing those considerably long blocks. Users can grab a bird that they see and start going right away if they are running late, and it does potentially alleviate the pressure of calling a car for short distances in traffic, where a scooter may actually make more sense physically to get from point A to point B than a car.

There are some considerable hurdles going forward, both theoretical and in effect. In San Francisco, though just a small slice of the United States metropolitan area population, the company is facing significant pushback from the local government, and scooters for the time being have been kicked off the sidewalks. There’s also the looming shadow of what may happen regarding changes in tariffs, though Gur said that it likely wouldn’t be an issue and “the unit economics appear to be viable even if tariffs were to be added to the cost of the scooters.” (Xiaomi is one of the suppliers for Bird, for example.)


Read Full Article

Twitter launches its Ads Transparency Center, where you can see ads bought by any account


Twitter is unveiling the Ads Transparency Center that it announced back in October.

This comes as Twitter and other online platforms have faced growing political scrutiny around the role they may have played in spreading misinformation, particularly in the 2016 U.S. presidential election.

For example, House Democrats recently released thousands of of Russian-funded political Facebook ads, and Facebook will reportedly release its own ad transparency tool this week. (In fact, as this story publishes, I’m at a Facebook press event focused on ad transparency.)

Twitter says that with this tool, you should be able to search for any Twitter handle and bring up all the ad campaigns from that account that have run for the past seven days. For political advertisers in the U.S., there will be additional data, including information around billing, ad spend, impressions per tweet and demographic targeting.

Everyone should be able to access the Ads Transparency Center, no login required.

Twitter political ads

As part of  the political ad guidelines that Twitter announced last month, the company says it will be visually identifying ads that are tied to federal elections in the United States. Over time, it plans to develop a policy specifically around “issue ads” (i.e., political ads that aren’t explicitly promoting a candidate) and looking for ways to expand these policies internationally.

“We are doing our due diligence to get this right and will have more updates to come,” writes Twitter’s Bruce Falck in a blog post. “We stay committed to iterating and improving our work in this space, and doing what’s right for our community.”


Read Full Article

LinkedIn adds Microsoft-powered translations and QR codes to connect more of its users faster


LinkedIn — the social network with more than 560 million members who connect around work-related topics and job-seeking — continues to add more features, integrating technology from its new owner Microsoft, both to improve engagement on LinkedIn as well as to create deeper data ties between the two businesses.

Today, the company announced two more: users can now instantly view translations of content on the site when it appears in a language that is not the one set as a default; and they can now use QR codes to quickly swap contact details with other LinkedIn members.

In both cases, the features are likely overdue. The lingua franca of LinkedIn seems to be English, but the platform has a large global reach, and as it continues to try to expand to a wider range of later adopters and different categories of users, having a translation feature seems to be a no-brainer. It would also put it in closer line with the likes of Twitter and Facebook, which have had translation options for years.

The QR code generator, meanwhile, has become a key way for people to swap their details when they are not already connected on a network. And with LinkedIn this makes a lot of sense: there are so many people with the same name and it can be a challenge figuring out which “Mark Smith” you might want to connect with after coming across him at an event. And given that LinkedIn has been looking for more ways of making its app useful in in-person situations, this is an obvious way to enable that.

Translations are coming by way of the Microsoft Text Analytics API, the same Azure Cognitive Service  that powers translations on Bing, Skype and Office (as well as third-party services like Twitter). It will be available in more than 60 languages, with more coming soon, LinkedIn says, to a “majority” of members using either the desktop or mobile web versions of LinkedIn.

The company says that it will be coming to LinkedIn’s iOS and Android apps in due course, as well. Users will get the “see translation” link based on a number of signals you’re providing to LinkedIn that include your language setting on the platform, the country where you are accessing content and the language you have used in your profile.

Content covered by the option to translate will include the main feed, the activity section on a person’s profile and posts if you click on them in the feed or share it.

Meanwhile, with QR codes, you trigger the ability to capture one by clicking in the search box on the iOS or Android app. Through that window, you can also pick up your own code to share with others.

LinkedIn suggests that the QR code can effectively become the replacement for the business card for people when they are at in-person events. But another option is that you can use this now in any place where you might want to provide a shortcut to your profile.


Read Full Article

Why the iPhone Clock App Is the Only Alarm Clock App You Need

Scalable Deep Reinforcement Learning for Robotic Manipulation


How can robots acquire skills that generalize effectively to diverse, real-world objects and situations? While designing robotic systems that effectively perform repetitive tasks in controlled environments, like building products on an assembly line, is fairly routine, designing robots that can observe their surroundings and decide the best course of action while reacting to unexpected outcomes is exceptionally difficult. However, there are two tools that can help robots acquire such skills from experience: deep learning, which is excellent at handling unstructured real-world scenarios, and reinforcement learning, which enables longer-term reasoning while exhibiting more complex and robust sequential decision making. Combining these two techniques has the potential to enable robots to learn continuously from their experience, allowing them to master basic sensorimotor skills using data rather than manual engineering.

Designing reinforcement learning algorithms for robot learning introduces its own set of challenges: real-world objects span a wide variety of visual and physical properties, subtle differences in contact forces can make predicting object motion difficult and objects of interest can be obstructed from view. Furthermore, robotic sensors are inherently noisy, adding to the complexity. All of these factors makes it incredibly difficult to learn a general solution, unless there is enough variety in the training data, which takes time to collect. This motivates exploring learning algorithms that can effectively reuse past experience, similar to our previous work on grasping which benefited from large datasets. However, this previous work could not reason about the long-term consequences of its actions, which is important for learning how to grasp. For example, if multiple objects are clumped together, pushing one of them apart (called “singulation”) will make the grasp easier, even if doing so does not directly result in a successful grasp.
Examples of singulation.

To be more efficient, we need to use off-policy reinforcement learning, which can learn from data that was collected hours, days, or weeks ago. To design such an off-policy reinforcement learning algorithm that can benefit from large amounts of diverse experience from past interactions, we combined large-scale distributed optimization with a new fitted deep Q-learning algorithm that we call QT-Opt. An early preprint is available here.

QT-Opt is a distributed Q-learning algorithm that supports continuous action spaces, making it well-suited to robotics problems. To use QT-Opt, we first train a model entirely offline, using whatever data we’ve already collected. This doesn’t require running the real robot, making it easier to scale. We then deploy and finetune that model on the real robot, further training it on newly collected data. As we run QT-Opt, we accumulate more offline data, letting us train better models, which lets us collect better data, and so on.

To apply this approach to robotic grasping, we used 7 real-world robots, which ran for 800 total robot hours over the course of 4 months. To bootstrap collection, we started with a hand-designed policy that succeeded 15-30% of the time. Data collection switched to the learned model when it started performing better. The policy takes a camera image and returns how the arm and gripper should move. The offline data contained grasps on over 1000 different objects.
Some of the training objects used.
In the past, we’ve seen that sharing experience across robots can accelerate learning. We scaled this training and data gathering process to ten GPUs, seven robots, and many CPUs, allowing us to collect and process a large dataset of over 580,000 grasp attempts. At the end of this process, we successfully trained a grasping policy that runs on a real world robot and generalizes to a diverse set of challenging objects that were not seen at training time.
Seven robots collecting grasp data.
Quantitatively, the QT-Opt approach succeeded in 96% of the grasp attempts across 700 trial grasps on previously unseen objects. Compared to our previous supervised-learning based grasping approach, which had a 78% success rate, our method reduced the error rate by more than a factor of five.
The objects used at evaluation time. To make the task challenging, we aimed for a large variety of object sizes, textures, and shapes.

Notably, the policy exhibits a variety of closed-loop, reactive behaviors that are often not found in standard robotic grasping systems:
  • When presented with a set of interlocking blocks that cannot be picked up together, the policy separates one of the blocks from the rest before picking it up.
  • When presented with a difficult-to-grasp object, the policy figures out it should reposition the gripper and regrasp it until it has a firm hold.
  • When grasping in clutter, the policy probes different objects until the fingers hold one of them firmly, before lifting.
  • When we perturbed the robot by intentionally swatting the object out of the gripper -- something it had not seen during training -- it automatically repositioned the gripper for another attempt.
Crucially, none of these behaviors were engineered manually. They emerged automatically from self-supervised training with QT-Opt, because they improve the model’s long-term grasp success.
Examples of the learned behaviors. In the left GIF, the policy corrects for the moved ball. In the right GIF, the policy tries several grasps until it succeeds at picking up the tricky object.

Additionally, we’ve found that QT-Opt reaches this higher success rate using less training data, albeit with taking longer to converge. This is especially exciting for robotics, where the bottleneck is usually collecting real robot data, rather than training time. Combining this with other data efficiency techniques (such as our prior work on domain adaptation for grasping) could open several interesting avenues in robotics. We’re also interested in combining QT-Opt with recent work on learning how to self-calibrate, which could further improve the generality.

Overall, the QT-Opt algorithm is a general reinforcement learning approach that’s giving us good results on real world robots. Besides the reward definition, nothing about QT-Opt is specific to robot grasping. We see this as a strong step towards more general robot learning algorithms, and are excited to see what other robotics tasks we can apply it to. You can learn more about this work in the short video below.
Acknowledgements
This research was conducted by Dmitry Kalashnikov, Alex Irpan, Peter Pastor, Julian Ibarz, Alexander Herzog, Eric Jang, Deirdre Quillen, Ethan Holly, Mrinal Kalakrishnan, Vincent Vanhoucke, and Sergey Levine. We’d also like to give special thanks to Iñaki Gonzalo and John-Michael Burke for overseeing the robot operations, Chelsea Finn, Timothy Lillicrap, and Arun Nair for valuable discussions, and other people at Google and X who’ve contributed their expertise and time towards this research.

How to Use Slack: Tips for Decluttering, Formatting, and Customization


slack-management

Whether you’re new to Slack or have been using it for years, there are some useful settings and tools that are worth using for customization and decluttering to ensure you get the most out of the communication platform.

Tips for Decluttering Slack

Keeping up with a busy Slack group can get pretty overwhelming pretty quickly. There are a few simple settings you can change to declutter Slack and make it more manageable.

Remove Link Previews

There are four main ways you can remove link previews in Slack:

  • The easiest way is to manually remove them after the fact by simply hovering over the preview and clicking the grey X that appears.
  • You can choose to disable preview links across the board for yourself by going to Preferences > Messages & Media > Inline Media & Links. Turn off Show images and files from linked websites and Show text previews of linked websites. This will affect only your personal Slack experience.
  • You can use some fancy text formatting so that when you paste in the link, the preview won’t be created. Do this by adding a single arrow bracket (>) directly before the link.
  • Administrators can disable link previews for specific domains by clicking the grey X in the link preview and disabling future attachments from the website.

Unfortunately, Slack doesn’t let you hyperlink words, which would be a great way to keep the look of your messages a little less cluttered.

Keep Unread Messages in One Place

It can become overwhelming try to keep up with multiple channels, particularly if you’re part of a large Slack group. If you want a more decluttered view of your messages, you can quickly scan all unread messages in one place.

If the feature isn’t already enabled, go to Preferences > Sidebar > Show All Unreads.

tips to declutter format customize slack

This will place a handy link to all Unread messages in all Slack channels in the sidebar directly beneath your name.

tips to declutter format customize slack

When you enable this, you’ll also get “Highlights“—what Slack thinks are the most important messages posted since you were last online.

Slack makes its selection of highlights based on your interactions with people, channels, files, and apps. Highlights can be viewed within their respective channels, while up to ten highlighted messages linked at the top of the Unreads tab.

Clean Up the Slack Sidebar

Slack’s Sidebar is key to easily navigating the platform. You can clean up and organize your sidebar, making it less messy and placing things that matter most to you within easy reach.

Go to Preferences > Sidebar to make your selections for what is displayed and in what order:

You can choose to display:

  • Everything: All your channels and recent direct messages in your sidebar, including read and unread.
  • Unreads and Starred Conversations: All starred channels and channels or private conversations with unread messages.
  • Unreads Only: All channels and private conversations with unread messages.

tips to declutter format customize slack

If you find that the noisier channels are a distraction, you can mute them by opening the channel, clicking the Settings > Mute [channel name].

Pin or Star Important Information

If there’s any important information shared on Slack, finding it days, let alone months, after it’s been shared can be a real challenge. To keep track of important messages in Slack, you can either pin or star them.

To keep track of important messages just for yourself, star them by clicking the star in the menu that appears when you hover over the message.

tips to declutter format customize slack

To view starred messages, click the Star in the menu in the top right corner from any channel or message.

tips to declutter format customize slack

If you want others to also be able to easily find the message, pin it by clicking More Actions > Pin to [Channel Name] or Pin to this conversation.

tips to declutter format customize slack

Note: Pinned items can be accessed by clicking the pin icon at the top of the screen.

tips to declutter format customize slack

Tips for Formatting in Slack

At the end of the day, Slack is all about communication. You can use basic and advanced formatting to add emphasis and clarity to your messages.

Basic Text Formatting

Slack gives users decent text formatting options.

  • Bold: Place the text between asterisks e.g. *This text is bold*
  • Italic: Place the text between underscores e.g. _This text is italic_
  • Strikethrough: Place the text between tildes e.g ~This text is crossed out~
  • Bullets/Lists: You can create a bulleted or numbered list by manually inserting a number or a bullet with the keyboard shortcut Option-8 on a Mac or Alt-7 on a Windows machine. When you want to go to the next item in the list, hit Shift-Enter to insert a line break.
  • Blockquotes: Use single angle brackets (>) to indent one paragraph, double angle brackets (>>) to indent two paragraphs, three angle brackets (>>>) to indent three paragraphs, and so forth.
  • Codeblocks: You can insert text as fixed-width code by placing your text between backticks. e.g. ‘this text is fixed-width.’ You can also create an entire block fixed-width text by placing it between three backticks.

Advanced Text Formatting

You can create a formatted Post by clicking the + button to the left of the text bar and selecting Post.

tips to declutter format customize slack

This will open up a new window with more advanced formatting options.

tips to declutter format customize slack

You get basic formatting like bold, italic, strikethrough, and bullet or numbered lists, but you can also hyperlink text unlike with basic formatting, and have three preformatted headers to choose from.

tips to declutter format customize slack

Once you’ve completed the post, click the Share button and you can then share it to a channel or in a direct message. You can also choose whether others can edit the post.

tips to declutter format customize slack

Using Emojis in Slack

If you want to get even more creative with your formatting, why not incorporate emojis into your text?

You can use emojis to bring attention to important information or announcements, to create a numbered list, to signify priority, or just to add some levity to your Slack interactions.

tips to declutter format customize slack

There’s no limit to how creative you can get with your use of emojis, and as you’ll see in the next item on this list, you can upload your own emojis.

Tips for Customizing Slack

Slack also gives you a certain degree of customization, from creating your own emojis to choosing a theme.

Custom Emojis

If you like the idea of using emojis in your text formatting, then you’ll love this. Slack actually allows you to upload custom emojis.

Click your name in the sidebar and click Customize Slack. This will open a new window, where you can upload your own emojis. These emojis will be viewable to your team members, and they can use them in their messages as well.

When uploading a custom emoji, you will first enter a name. Be sure to place the name between colons, and to either use one word, or to place underscores between each word. This is because the name can also be used to insert the emoji by typing it.

tips to declutter format customize slack

Some tips to keep in mind when uploading y0ur own emojis:

  • Use square images for best results.
  • The width of images should not exceed 128 pixels.
  • The size of the file should not exceed 64KB.
  • You can use JPG, PNG, and GIF files.

You can also delete any custom emojis you’ve uploaded to your Slack group.

Customized Loading Pages

When you first open up Slack, you’ll be greeted with a quote on the loading page. You can add custom loading messages by clicking your name in the sidebar and clicking Customize Slack. In the new window that opens, click the Loading Messages.

tips to declutter format customize slack

Your custom loading messages will be added to the the list and other team members will be able to see who added them.

Customized Slack Appearance

A personal way in which you can customize your Slack experience is with a theme. To select a theme, click your name in the sidebar and click Preferences > Sidebar.

Scroll down to the Theme section, where you can choose from eight themes, two of which cater to colorblind users.

tips to declutter format customize slack

Organizing Slack Channels

Slack allows you to organize your channels in two ways:

  • Alphabetically: Channels and direct messages are organized alphabetically
  • Scientifically: Channels and direct messages are organized by how you use Slack. The Channels and people you message most often will be at the top.

If you have a lot of private and public channels, you can keep them separate by checking List Private Channels separately, but this does interfere with Slack’s scientific sorting of channels.

tips to declutter format customize slack

Get Even More Out of Slack

In addition to using these decluttering, formatting, and customization tips, there are plenty of other Slack tips that can add to your online productivity such as pairing it with your favorite online services.

If you’re looking for more ways to master the platform, be sure to check out our in-depth strategy for managing Slack.

Read the full article: How to Use Slack: Tips for Decluttering, Formatting, and Customization


Read Full Article