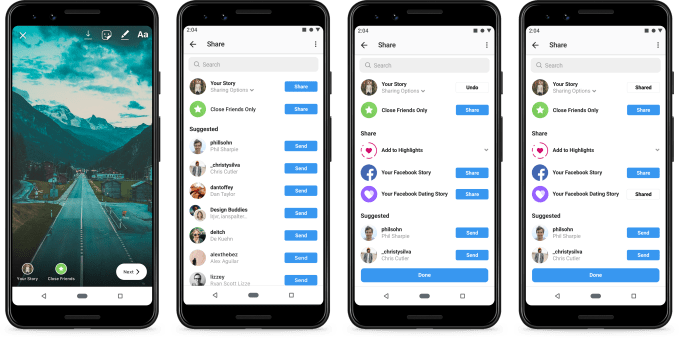
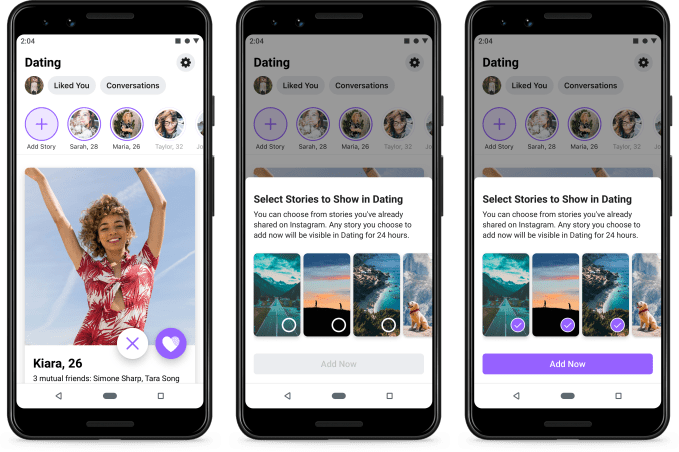
Facebook Dating, an opt-in feature of the main Facebook app, will begin to tap into the content users are already creating across both Facebook and Instagram to enhance its service. Today, Facebook Dating users will be able to add their Facebook or Instagram Stories to Facebook Dating, in order to share their everyday moments with daters.
As opposed to more polished profile photos, Stories can give someone better insight into what a person is like by showcasing what activities they like to engage in, their hobbies, their interests, their personality, and their humor, among other things. And if the daters themselves appear in a Story, it lets others see what they really look like, even if their online photos are out-of-date.
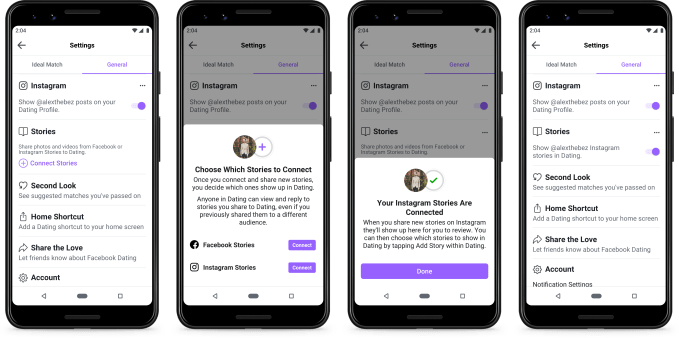
The way the feature is being implemented on Facebook Dating puts the user in control of what’s being shared. That is, your Facebook or Instagram Stories are not automatically copied over to Facebook Dating by default. Instead, users can select which of their Stories are shared and which are not.
In addition, people daters have blocked or passed on Facebook Dating won’t be able to see them.
If a Story is inappropriate, you can also block the user and report it, like you can with other content elsewhere on Facebook.
One thing to be aware of is that this feature is a way to share a Story to Facebook Dating, but the Story isn’t exclusively designed for Facebook Dating. That means, if you decide to use the Story feature as some sort of video dating intro, your Facebook and Instagram friends could see this, as well.
When browsing Facebook Dating, you’ll be able to view other people’s Stories along with their profiles. And if you match with someone, you can continue to view their Stories and then even use that to spark a conversation, which takes place in the app. This is similar to how you can respond to someone’s Facebook or Instagram Story today, which then appears in Messenger or Instagram’s Messages section, respectively.
The new Stories feature could be a potential competitive advantage for Facebook Dating, because it allows users a new way to express themselves without requiring them to create new content just for the dating service itself. Even if a rival dating app like Tinder or Bumble introduced their own version of Stories, many wouldn’t think to launch a dating app to capture their everyday moments.
Stories integration is rolling out starting today to Facebook Dating.
Dating, as a Facebook feature, is currently available in 20 countries, including Argentina, Bolivia, Brazil, Canada, Chile, Colombia, Ecuador, Guyana, Laos, Malaysia, Mexico, Paraguay, Peru, the Philippines, Singapore, Suriname, Thailand, United States, Uruguay, and Vietnam. It will be in Europe by early 2020, Facebook says.
The company has not disclosed how many people are using Facebook Dating at this time.
Twitter’s radical “Hide Replies” feature, one of the biggest changes to how Twitter works since the invention of the Retweet, is now available to Twitter’s global user base. The company says the feature will roll out to all Twitter users across platforms by today, with only one slight tweak since earlier tests.
Designed to balance the conversation on Twitter by putting the original poster back in control of which replies to their tweets remain visible, Hide Replies has been one of Twitter’s more controversial features to date. While no replies are actually deleted from Twitter when a user chooses to hide them, they are placed behind an extra click. That means the trolling, irrelevant, insulting, or otherwise disagreeable comments don’t get to dominate the conversation.
Twitter’s thinking is that if people know that hateful remarks and inappropriate behavior could be hidden from view, it will encourage more online civility.
However, the flip side is that people could use the “Hide Replies” feature to silence their critics or stifle dissent, even when warranted — like someone offering a fact check, for example.
Since its launch, Twitter found that most people hide the replies they find irrelevant, off-topic, or annoying. It also found people were using this instead of harsher noise reduction controls, like block or mute. In Canada, 27% of surveyed users who had their tweets hidden said they would reconsider how they interacted with others in the future, which is a somewhat promising metric.
The feature is, however, getting a slight change with its global debut. Twitter says some people wanted to take further action after hiding a reply, so now it will check to see if they want to block the replier, too. It also heard from some users that they were afraid of retaliation because the icon remains visible. It’s not making a change on that front at this time, but is still considering how to address this.
Another concern that was often mentioned on Twitter as the new feature first rolled out was the large pop-up notification that appears when users encountered a tweet with hidden replies.
Some people found the notification was so large and disruptive that it actually encouraged people to pay more attention to the hidden replies than they would otherwise.
What is the point of people hiding unwanted tweet replies if twitter fills the screen with a giant pop-up calling attention to the fact that there are replies they have hidden, which can still be clicked through to view anyway? pic.twitter.com/YBy47jdZcN
I wonder if this pop up makes people more likely to pay attention to hidden replies than if they were never hidden in the first place https://t.co/FCECR6Fi0C
I like the idea of @Twitter's new hidden replies feature, but this pop up actually draws way more attention to the messages an author has chosen to hide. pic.twitter.com/xOAkV9OtJU
Twitter says this screen only displays the first time a Twitter user encounters a tweet with hidden replies, however. Afterward, an icon will show people replies are hidden — and those are hidden on another page, not below the tweet.
But even though that’s a one-time notification, the attention it demands from the user outweighs the information it’s trying to convey — essentially, that twitter has launched a new feature and here’s where to find it. And if someone is engaged in trolling, being told that this particular Twitter user is hiding replies could enrage them even more.
In addition to the global rollout, Twitter also says it will soon be launching a new hide replies endpoint in its API so developers can build additional conversation management tools.
And Twitter notes it will be testing other changes to conversations, including more options around who can reply or even see specific conversations, as well as engagement changes designed to encourage healthier conversations.
“Everyone should feel safe and comfortable while talking on Twitter,” writes Suzanne Xie, Twitter’s Director of Product Management, who recently joined by way of an acquisition. “To make this happen, we need to change how conversations work on our service,” she says.
Twitter’s development in this area is interesting because it’s actively experimenting with ways to encourage civility on a platform that’s known for hot takes, sarcasm, snark, and outrage. It’s willing to change and evolve its features over time as it learns what works and scrap changes that don’t. It’s even been running a beta product (twttr) in parallel with Twitter, to try new ideas. If Twitter is ever able to turn things around by way of its feature set, it would be a marvel of product management.
The option to hide replies is rolling out globally on iOS, Android, Twitter Lite, and twitter.com, starting today.
How to save a language from extinction | Daniel Bögre Udell
As many as 3,000 languages could disappear within the next 80 years, all but silencing entire cultures. In this quick talk, language preserver Daniel Bögre Udell shows how people around the world are finding new ways to revive ancestral languages and rebuild their traditions -- and encourages us all to investigate the tongues of our ancestors. "Reclaiming your language and embracing your culture is a powerful way to be yourself," he says.
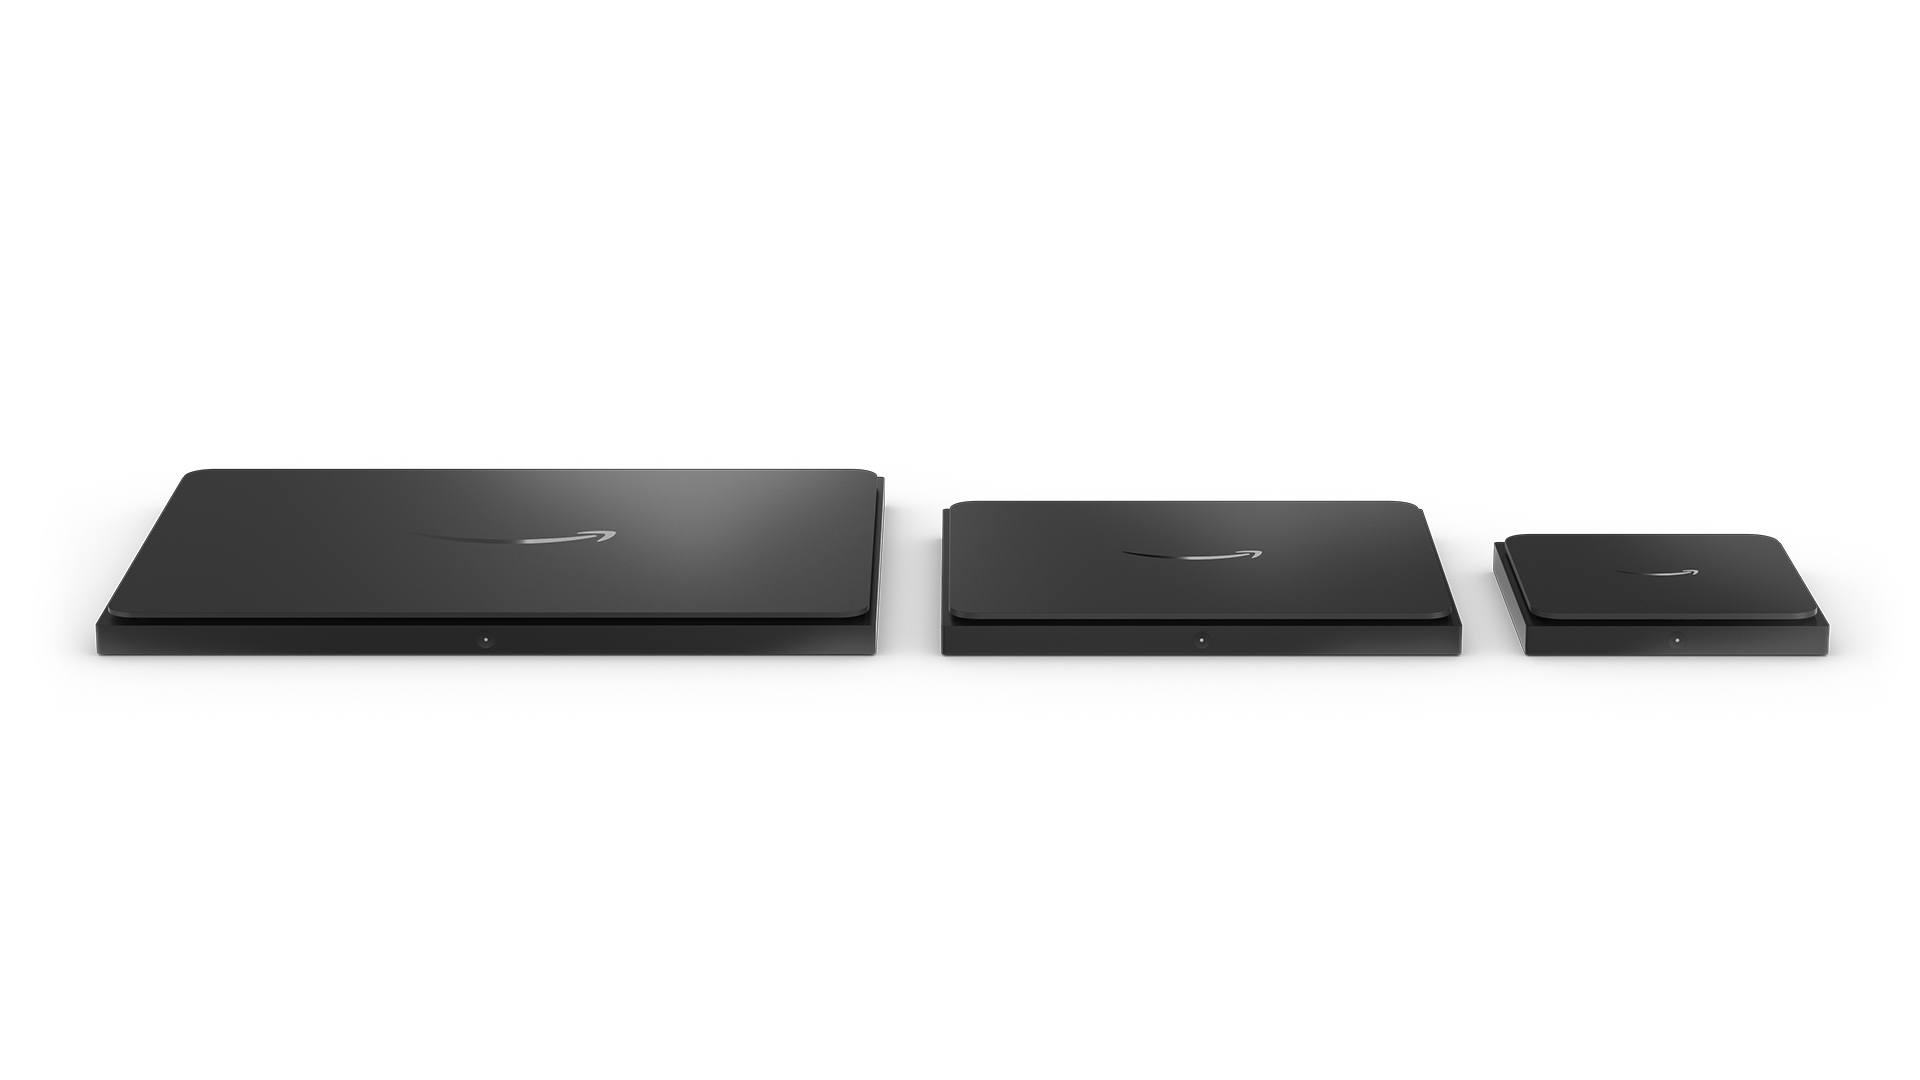
Amazon may have stopped selling its Dash buttons for consumers, but it’s not done with dedicated Dash hardware: The company is launching its new Amazon Dash Smart Shelf today. Aimed at small businesses rather than individuals, the Dash Smart Shelf is also even more automated than the Dash buttons, as it uses a built-in scale to automatically place an order for re-stocking supplies based on weight.
Available in three different sizes (7″x7″, 12″x10″ and 18″x13″), the Dash Smart Shelf is just 1″ tall and can basically be placed under a pile of whatever stock of supplies you commonly run through while operating a business. That could mean printer paper, coffee cups, pens, paper clips, toilet paper, coffee or just about anything, really – and Amazon’s replenishment system can either be set to automatically place an order when it detects that on-hand supply has fallen below a certain weight, or you can just have it send someone in your organization a notification if you’d rather not have the order happen automatically.
The Dash Smart Shelf connects via built-in Wi-Fi, and can be powered either connected by cable to a power outlet, or via four AAA batteries, providing flexibility as to where you want to put it. Using the web or the Amazon app, you then sign in with your Amazon Business account and just pick what product you’re using on the scale that you want to top up. And if you find that your staff doesn’t like the coffee selection, for instance, you can easily change up the brand or product your’e re-ordering from your account, too.
Dash Smart Shelf isn’t available immediately for anyone to purchase directly, but instead Amazon is going to be working with select small businesses in a trial pilot this month, with the plan being to open up general availability to any Amazon Business customers that have a registered U.S. business license beginning next year. If people are keen on getting Smart Shelf into their business, they can sign up directly with Amazon to be noticed about availability.
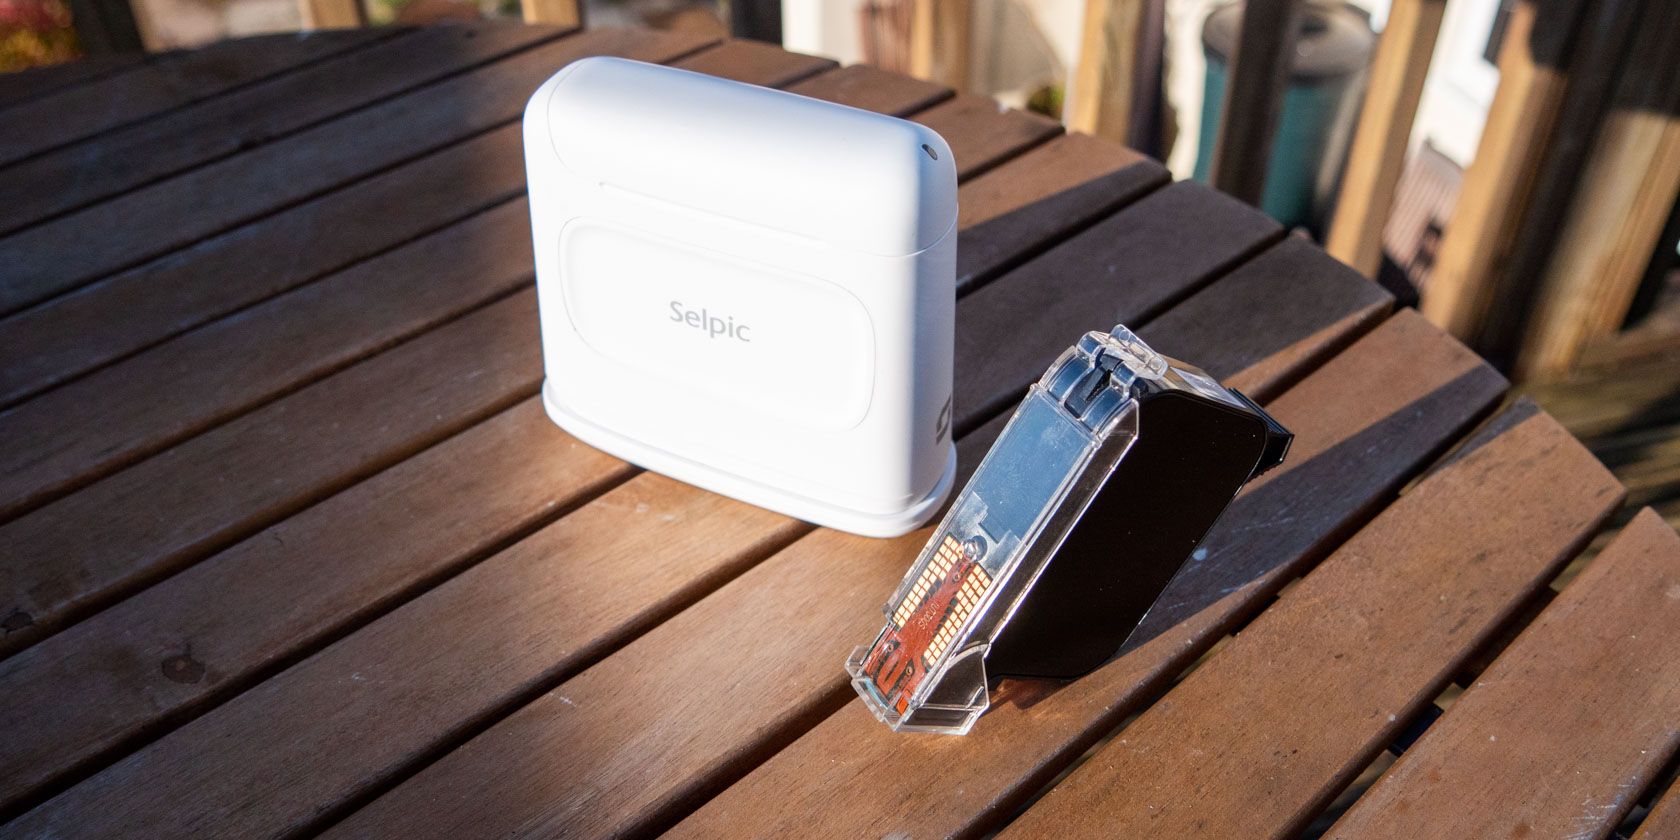
Our verdict of the Selpic S1 Portable Printer:
A handy printer that can really work on almost any surface and at any angle. It's a little pricey, but if you're quick, you can get the upgraded S1+ model with larger print head for $150 on the new Kickstarter.810
Selpic S1 is a portable quick-drying printer that can print on pretty much surface, even if it’s not flat. It’s great for craft projects, small businesses, or just labeling all the things.
The Selpic S1 is available to preorder now for $250 and shipping soon, but Selpic are also Kickstarting the larger S1+ model with shipping due by the end of the year, with early bird pricing from $149 (if you’re quick).
Design and Specs
The Selpic S1 measures 1.5 x 4.3 x 4.7 inches (4 x 11 x 12cm), and weighs a minuscule 13.6 ounces (386g), making it just about pocket-sized.
The S1 model squirts out ink from a half-inch print head, while the S1+ can print twice as high.
Inside the box you’ll find the Selpic S1 main body, a magnetic cover that attaches to the base to protect the print head, a starter ink cartridge, and a micro-USB charging cable. The internal battery should give you around 6 hours of printing, with 72 hours standby time.
To print whatever is currently loaded, you just press the P button on the side. The LED on top turns green to indicate it’s ready. Then swipe the printer across your surface. An optical sensor ensures the print comes out correctly, and can operate at up to 30mm/s, which is much faster than you can reasonably run it along a surface.
Like all printers, the real sting is in the price of the cartridges, at $80 each. Six colors are available, but you can only print in a single color at a time. Selpic claims the 40ml cartridges can print up to 900 A4 pages at 5% coverage, though this is a curious measurement since it can only print a half-inch line. Still, if you’re looking to compare like for like, 900 pages is the number you’ll want. As a small manufacturer, no official recycling program is available, though your local recycling center may accept them as generic inkjet cartridges.
Selpic App
Creating and uploading your prints is done using the Selpic app. You’ll need to connect over Wi-Fi to the ad-hoc network broadcast by the Selpic device (and initially use the password 12345678). This is annoying to do every time you turn it on, and we can’t help but feel Bluetooth would have been a better solution. That said, once connected it worked reliably, albeit somewhat slow to upload.
The ability to enter multilingual text is unique.
The app allows you to design a print using a number of key components:
Multilingual text. As long as you have the right input method and fonts on your phone, you can print any language you like.
Time and date stamp.
Weight display, designed to be used with industry-standard USB and Bluetooth scales, which act as input devices.
Auto-incrementing numerical counter, which adds one each time the label is printed (or any other increment you want).
Code128 numeric barcode.
QR code.
Custom image.
All design elements can be mirrored, for printing on the reverse of a clear object, or color inverted. Any number of the same element can be added, resized, or rotated.
Note: at the time of review, the iOS app was unable to upload custom images. We’ve been promised this should be fixed by next week with a new firmware update.
It’s clear from that feature list that the software has been designed with small businesses in mind, despite the Kickstarter being marketed with a more crafty angle.
The app is relatively easy to use but suffers a little on a small mobile screen, especially because it’s locked to landscape view. In order to accommodate all the design tools needed, a small toggle switch sits at the bottom of the screen. This toggle changes between component-specific settings, like font and font size, to the generic component controls like rotate and delete. And of course, tapping on a text entry form brings up the keyboard, which then obscures more than half of the total screen real estate. Hopefully, the app will improve in time. Switching to a vertical view to make use of a smaller keyboard would be a great start, even if it meant having to scale down the print preview.
Having said all that, it’s still infinitely more functional than your basic label printers.
The only thing you might expect it to be good for, but actually isn’t, is printing addresses. There’s no import or mail merge functionality, and even if there were, the print head is too small to print a full address at once.
While we have yet to hit a maximum printing width, we should note that longer labels take a long time to upload from the app as the file is rasterized. If you try to write a really long label, it can feel like the app has crashed.
What Can The Selpic S1 Print On?
We tried on a variety of surfaces, with overall great success.
Obviously, flat card and paper was easy. No issues there, and the QR code was successfully read by my phone.
On skin, we couldn’t get anything useable, just a large smudge.
On a wine glass, we managed a perfect print, despite the curved surface and optical difficulty. The quick-drying ink didn’t wash off under running water, and needed to be scrubbed off.
A bigger print on a mostly clear plastic box didn’t go as well but was still acceptable. Keeping the printer straight at this sort of angle was difficult, and some sort of optical sensor error left one of the letters skipping.
Printing inverted text on the inside of our polytunnel door was also mired by a small smudge, but still legible.
On rough but otherwise flat wood, the print was perfect. I can see gardeners making great use of this for plant labels.
One often forgets what one has planted in raised beds.
Overall, I’m really impressed with the “print anywhere” claim. Most of the printing hiccups we did experience would likely be perfected with repeated use. There’s a knack to printing well that you’ll learn.
Should You Buy the Selpic S1 (or Back the S1+)?
The Selpic S1 is the sort of gadget that you’re bound to find a use for around the home, but at around $250 for a starter pack plus $80 for additional cartridges, I expect you’ll want to know beforehand precisely what your use cases will be to justify the cost. If you find yourself writing the same message repeatedly on something that otherwise can’t be fed into a traditional printer, then this may be the perfect gadget for you.
If you’re a home user that just wants to put text labels on all the things–storage boxes, personal possessions and such–you might want to stick with traditional tape-based label printers (or a pen!). Changing the text often and uploading it to the Selpic each time gets tedious after a while. For English text anyway, the ease of typing on a physical keyboard and hitting the print button is faster. The results aren’t nearly as impressive, but those sorts of labels tend to be functional rather than attractive. The real power of the Selpic is repetitive printing and otherwise awkward surfaces.
There are also obvious benefits for small businesses and craft sellers, that need to print serial numbers, tickets, or barcodes onto packaging. It’s a handy little device.
We’d recommend backing the Kickstarter now to get early bird pricing on the S1+ model with one quick-drying cartridge for just $149 (but be quick, there’s a limited number available at that price!). As with all Kickstarters, there’s always a risk involved, but in this case we think it’s minimal. The technology works, it’s just question of whether Selpic can meet their shipping targets.
Thanks to Selpic, we have an S1 model to giveaway to one lucky reader. Just enter your details in the widget below to be in with a chance of winning. Good luck!
Google’s parent company, Alphabet Inc., has acquired fitness tracker giant, Fitbit, for $2.1 billion. Add this to a vast number of subsidiaries including YouTube, Android, and Nest. It’s led many to question whether Alphabet Inc. needs regulation.
But there’s another major concern: what happens now to Fitbit users’ private information? Can you trust Google with all that personal data? And exactly what does Fitbit know about you anyway?
Why Has Google Bought Fitbit?
Let’s tackle this first because it’s what will determine how personal details are used. Why exactly did Google want to purchase Fitbit?
Google, after all, already offers something similar. Google Fit is the firm’s answer to Apple Health, software intended to act as a fitness tracker for devices running Android using the Wear OS. Anyone using both Google Fit and a Fitbit will notice similarities between the two interfaces, with dashboards displaying active minutes, heart rate, calories burned, sleep patterns, and more.
However, while Google has an operating system, it didn’t have wearable technology. Until now.
That’s why this purchase was so important: Google assures users that it’s a chance to invest more in Wear OS, and push for wearable tech innovation. It says its principles—“to enhance [your] knowledge, success, health and happiness”—are aligned with the Fitbit brand.
Fitbit is the major rival to the Apple Watch. It makes sense for Google, Apple’s major rival, to acquire Fitbit.
But that doesn’t stop people worrying that Google only bought it because it wants to learn more about users. Google knows a lot about its audience already, including your interests, location, and when you’re online. The company’s revenue largely comes from selling information on, notably for advertising.
As a former member of one of Google's own privacy teams, Alphabet acquiring Fitbit is almost certainly motivated primarily by the data about users' lives that the product produces.
The more it knows about your everyday activities, the more valuable you are to Google.
Ironically, while researching this article, an ad about support socks appeared, a product I’d bought as a consequence of an exercise regime. It ably demonstrates how personal information can influence what’s displayed online.
What Does Fitbit Know About You?
If Google knows so much already, what other data does your Fitbit account contain?
You’ve surrendered a lot of private information to Fitbit; partly in setting up the smartwatch and app, and partly due to its functionality. Fitbit claims this is all to further the service, i.e. make it more personal and useful, while maintaining security. Every company says something similar.
Fitbit knows the name, email address, password, date of birth, gender, height, and weight of all its users. Those are necessary to sign up. Many of us also add in profile information to build up a more accurate picture of you, like your food and water intakes, sleep cycles, messages on discussion boards, and female health.
In addition to this, Fitbit also collects:
Number of steps
Active minutes
Calories
Heart rate
Operating system
IP address
Credit card information (for those paying for add-ons)
Distance travelled
Location
Fitbit may receive personal details if you connect to Facebook, your smartphone’s own Health app, or—get this—Google. This means a more well-rounded profile of you can be inferred. This is without considering a change of policy which could potentially allow Google to collate more information from Fitbit users (though this hasn’t been announced).
They also collect anything related to life coaching, like messages sent between the two parties, events in your calendar, and any notes your coach makes about you.
Wait, Does Fitbit Know Where I Live?
Many don’t realize this, but yes, Fitbit knows your location. That is, if you grant it permission and you’ve a device with the capability. And even if you don’t, the service can infer where you live by your IP address.
Android OS 6.0 (owned by Google) made it necessary to turn on location services to sync your Fitbit device with its apps. Fortunately, this data isn’t always collected: it’s only when you’re recording an activity with GPS. Your whereabouts can be ascertained from this signal, plus proximity to cell phone towers and Wi-Fi access ports.
To check if the service can access your location, go on Settings > Apps > Fitbit > Permissions (Android) or Settings > Privacy > Location Services (iOS).
That all sounds worrying, doesn’t it? And yet it’s what you’d expect from wearable fitness trackers.
Should You Be Worried About Google’s Acquisition?
Whenever a business holding a lot of data about its users is sold on, questions will naturally arise over privacy. This could be why Facebook pulled out of negotiations to buy Fitbit before Google’s bid; as it is, Facebook’s been plagued by too many scandals recently.
Who would be interested in information collected from Fitbit? Insurers would surely like to know how fit you are. Shops could advertise exercise equipment if you’re on a health drive. As physical fitness can affect mental well-being, your employer might be interested in your daily activities.
Fitbit nonetheless assures consumers that their intentions remain the same:
“Consumer trust is paramount to Fitbit. Strong privacy and security guidelines have been part of Fitbit’s DNA since day one, and this will not change. Fitbit will continue to put users in control of their data and will remain transparent about the data it collects and why. The company never sells personal information, and Fitbit health and wellness data will not be used for Google ads.”
How realistic is this? Google’s business revolves around selling private data. The affirmation that Fitbit doesn’t do that is reassuring (for now) and will come back to haunt them if this policy changes.
Fitbit carries a lot of private data, but Google already has more. This acquisition is a concern—and certainly something users need to keep an eye on—but these assurances should tide us over for a while.
Right now, the best thing you can do is limit what data Fitbit has about you. Don’t limit its functionality, but question which details are actually needed. To review who can see what information, sign into the app, then click Profile > Privacy and Manage Data.
Does This Dissuade You from Buying a Fitbit?
Fitbit has over 28 million active users. That’s a lot of data. The number of consumers normally rises around Black Friday and the festive period, when an influx of presents and deals means a lot of new users. People normally go on a health drive after Christmas too.
Will Fitbit remain one of the most popular health tracker brands after Google’s acquisition? The service has its problems, but still has a lot going for it—so we’ll just have to wait and see…
We often think of security as something we can buy. While some code and computers are more secure than others, staying safe has more to do with our behavior.
Here are some ways you can change the way you use your computer to reduce risk to your data, privacy, and personal life.
A password prevents other people from logging into your computer when you’re away, but this doesn’t offer as much protection as it seems. Someone who knows how to take your hard drive out of your computer can access all of the data that you’ve created. That’s why you also want to encrypt your drive, so that others can’t access your data in this way.
Device encryption is usually a built-in option now, including on Windows 10. There are also free tools available that can do the job for you. VeraCrypt is one option that’s available for Windows, macOS, and Linux alike. But if you find this too complicated a job, many newer computers already come encrypted.
Your easiest option might be buying ones that does.
Encrypting the data on your computer is important, but you almost defeat the purpose of the entire exercise if you backup your machine to an unencrypted portable hard drive or carry files around on an unencrypted flash drive. You want to encrypt these forms of external storage too, that way gaining access to these drives take as much effort as breaking into your encrypted PC.
You can sometimes encrypt external storage using the same method you use for your computer. Linux users can do this by reformatting their drives into the encrypted LUKS format, which you can usually do without having to install any additional software.
On Windows and macOS, you can again turn to programs like VeraCrypt. There are also some external drives that come with software to handle the encryption for you.
Encrypting our data provides us with more security, but this is easier to circumvent while our machines are on and running. There are ways to acquire or bypass your password and gain access to decrypted data while your laptop is asleep.
To maximize your defenses when you’re not at your computer, power it all the way down. When your machine is fully powered down, someone must go through the effort of breaking encryption or attempting to guess your (hopefully longer) encryption password. These things are possible, but they take more effort or resources than many people are willing to put in.
4. Keep Your Data Offline
At the rate data breaches occur, we have much to be anxious about today. Purchasing an electronic device often means facing pressure to create another account for another service, where we will give someone else our personal contact information, maybe share our credit card, and generate a lot of revealing data.
One way to reduce this anxiety is to actively choose to keep your data offline. Popular wisdom right now may be to backup all of your files online, but you have other options. Portable hard drives and USB flash drives are more affordable than ever (and it’s easier now to encrypt them).
You can also choose not to purchase devices that require online accounts. You don’t need to buy a smart thermostat when a programmable one and knowledge of your own behavior can achieve a similar end result.
You don’t have to avoid all online services, but you reduce your risk if you don’t allow yourself to fall into the habit of signing up for every account you’re prompted to.
5. Turn Off Wi-Fi and Bluetooth
We live in what is in what is increasingly called an always-connected world. But just because you can live your life with an ever-present connection to the internet already established, that doesn’t mean you have to. You have the option to turn off your Wi-Fi connection. Better yet, tell your computer or phone not to auto-connect.
Manually connect to the internet whenever you’re ready to get online.
By only going online when you want to be online, and disabling your connection otherwise, you reduce a company’s ability to monitor what you do on your device and make it more difficult for someone to remotely gain access to your computer (while also cutting down on distractions).
If you purchase a model with privacy switches, you can physically sever the networking component, preventing remote access until you flip the switch again.
Treat Bluetooth the same way you do Wi-Fi. If you don’t have any devices currently connected, then turn it off. In both cases, you may improve your battery life in the process.
6. Disable Your Webcam and Microphone
Now that our devices come with webcams and microphones, there are more ways to compromise our privacy. People can not only view what we’ve saved to our computers or the websites we visit, they can see our faces and the rooms we’re in. They can hear our voices and those of our loved ones.
By default, your webcam and mic aren’t always on, but they’re lying dormant waiting for an app or command that triggers them to wake up. If you disable them, they won’t wake up even if a command comes in.
You can disable these devices at the software level. If your computer has privacy switches (or you use a desktop where the camera and mic have to be plugged in), you can do so at the hardware level. If nothing else, you can put a sticker over the webcam
The more complicated a piece of software is, the more likely someone will find an exploit. That’s because there are so many components and lines of code for developers to write in a secure way. A single flaw in any aspect of the system is all it takes to break in.
Many times, the vulnerability someone exploits isn’t in the operating system itself but in a separate program that we chose to install. Think your web browser, office suite, or email client. Sometimes the risk comes via supposedly innocent apps like PDF readers.
If you install fewer apps, you not only reduce your likelihood of downloading malicious software, but you reduce your chances of being vulnerable to an exploit found in an otherwise legitimate app. You also protect yourself from being dependent on software that could go away once a developer or company loses interest.
8. Download Free and Open Source Apps
Everything that’s on your computer exists somewhere as a line of code. Whether we’re writing a document, watching video, or playing a game, we’re interacting with language. With most commercial software, we can’t view the code behind what we’re doing and we don’t have the freedom (or permission) to try.
We have to trust that nothing shady is going on.
Fortunately there are alternatives available in the form of free and open source apps like Mozilla Firefox, LibreOffice, and VLC. You can even purchase computers that come with open source operating systems from companies like System76, Purism, and ZaReason. Or you can replace the OS on a computer you already own.
Free software doesn’t restrict what we can see. You can keep this code on your computer, have it audited, modify your copy however you wish, and share it with others. This mitigates your risk of software going away overnight, as often happens with cloud services.
I’m not saying that free software is inherently more secure than proprietary software (there’s a lot to that debate). But using free software on your desktop is the only way I’m aware of to have true control over what’s on your computer, trust that a company isn’t monitoring what you do, and maintain access to the programs that you rely on.
What Steps Have You Taken?
Remember, absolute security is a myth. We put locks on our doors not to make our homes impenetrable but to make the job difficult enough to dissuade others from making the effort.
Often, improving your security isn’t about adding more, it’s about using less. Less time connected means fewer times your computer is accessible remotely. Using fewer online services means fewer sites that can leak your data. Creating less data means you have less information to safeguard in the first place.
Some companies will collect and leak your data without your control, but there’s still a lot of power that’s in your hands. And there are steps you can take to counter data breaches when they happen.
Whether you already have a LinkedIn Premium subscription or are considering signing up for a subscription, it’s important to know how to cancel LinkedIn Premium.
This is because while LinkedIn Premium is an useful tool, you may find it’s not for you. Especially if you have settled into a job and have no intention of changing companies.
So, in this article, we’ll show you how to cancel LinkedIn Premium.
What Is LinkedIn Premium?
LinkedIn Premium is a tiered subscription service that allows you to access different levels of networking depending on which subscription tier you sign up for.
The most commonly known tier—Career—allows you to use LinkedIn Learning exclusives and advanced employment metrics to see how you perform against other candidates. LinkedIn Premium Career also gives you a monthly allowance of InMail credits, which you can use to contact hiring managers.
At the other end of the subscription tier, LinkedIn Premium Business gives you company insights and unlimited browsing.
As someone who’s tried out the “Career” tier more than once, I can definitively say that all of these features are very useful when searching for a job. If you’ve got the cash to pay for it, there are plenty of reasons to try LinkedIn Premium.
Unfortunately, LinkedIn Premium is expensive. And if you’re working full-time, the chances of you being able to make full use of the LinkedIn Learning catalogue are also pretty slim.
In which case, you may decide you want to cancel your LinkedIn Premium subscription. So here’s how to cancel LinkedIn Premium.
Note: We used a Premium Career account for this tutorial. However, cancelling a Recruiter Lite or a Sales Navigator account is done in a slightly different manner. As these account types are not the same thing as Premium Career or Premium Business, they will not be covered here.
How to Cancel LinkedIn Premium
While cancelling LinkedIn Premium is simple, it’s important to note that Premium can only be cancelled through a web browser. The only exception to this rule is if you signed up for LinkedIn Premium directly through one of Apple’s subscription services.
1. Access Your LinkedIn Premium Account
To cancel your LinkedIn Premium account through a browser, log into your LinkedIn homepage:
On the top bar where it says Me, click on the white arrow.
After you click on the arrow, press Access My Premium.
Once you’re on your Premium page, you’ll see two tabs: My Premium and Explore Premium.
Under My Premium, there will be a main section with your personalized insights. You’ll also see a list of dropdown menus on the right-hand side, where you can look at different areas of information associated with your account.
Click on the Manage Premium account tab, to expand it.
Then click on Cancel subscription.
2. Confirm That You Want to Cancel LinkedIn Premium
LinkedIn makes it very easy for you to cancel your subscription, but the company doesn’t want you to leave for obvious reasons.
When you press Cancel subscription, the site will take you to another page where it will show you what you’ll lose if you cancel LinkedIn Premium. The company will also show you a list of additional options that you can consider, such as switching to a different plan that is more suited to your needs.
If you weren’t dead-set on cancelling your LinkedIn Premium account, this is the time to back out.
However, if you’re sure you want to leave, click Continue to cancel.
Once you click Continue to cancel, you’ll see a page where LinkedIn requires you to give feedback on your reason for cancelling. The options here are pretty straightforward, and you can pick only one.
If you don’t see an option that fits your needs, click on Other, and fill out the details.
After you’ve chosen your reason for leaving, click on Confirm cancellation.
LinkedIn will then take you to one last page where it tells you that your cancellation was successful. From here, press Done. And that’s it. You has successfully canceled LinkedIn Premium through your browser.
As mentioned earlier, however, you can also cancel LinkedIn Premium through an Apple subscription service. Here’s how…
How to Cancel LinkedIn Premium Through Apple
Now, it should be noted that according to LinkedIn’s help page, there is currently no way to cancel LinkedIn Premium through the LinkedIn mobile app on either iOS or Android.
The only exception to this rule is if you buy LinkedIn Premium directly through an Apple subscription service, such as iTunes or the App Store.
The reason for this is because Apple has very strict user privacy policies: the company keeps the purchasing history of its users centralized. You can read about Apple’s full instructions for cancelling any of your subscriptions on Apple’s help pages.
If you want to cancel your LinkedIn Premium subscription through the App Store on your Mac:
Open up the App Store.
Sign in with your Apple ID.
At the bottom of your left-hand sidebar, you’ll see your account name. Click on it, or sign in.
Once you’re signed in, click View Information at the top of the App Store. If prompted (for security reasons), sign in again.
Once you’re on your information page, scroll down until you see Subscriptions.
Click Manage.
Click Edit on your LinkedIn Premium subscription.
After you click Edit—and you’re taken to the details on your subscription—click Cancel Subscription.
To cancel your LinkedIn Premium subscription through your iOS device:
Go to the Settings app.
Tap on your name at the very top of the app.
Tap on Subscriptions next.
Once you’re in Subscriptions, tap on your subscription for LinkedIn. Please note, if you have not bought LinkedIn Premium through Apple directly, it will not show up.
Once you tap on your subscription for LinkedIn, choose Cancel Subscription.
What Happens After You Cancel LinkedIn Premium?
After you cancel LinkedIn Premium, there’s not much more that you need to do. At the end of your billing cycle, your account will revert back to a basic one and you’ll lose access to your Premium features.
The one major thing that I’ve noted—as someone who has cancelled LinkedIn Premium more than once—is that for the first few months after you unsubscribe, LinkedIn will send you lots of emails asking you to resubscribe to Premium.
These emails are frequent enough to get annoying, but if you ignore them they will eventually stop.
Quit LinkedIn Premium If It’s Not Right for You
While LinkedIn Premium is a great service with a lot of amazing features, there’s nothing wrong with cancelling the service if you don’t feel like it’s a right match for your needs. It’s just another tool that you can use to find a job, and not actually a necessity.
Learning a language is a great way to expand your horizons, meet new people, and even improve your résumé. Many apps can help you get started, but few actually give you the skills to start a conversation. Babbel is a language learning app that puts conversation skills front and center. It covers a large selection of languages, and you only need to practice for a few minutes each day. Want to get started? Sign up today and get 25% off selected subscriptions.
Become a Conversationalist
Learning to speak any language takes time. However, you can speed up the process by focusing on the words and phrases you are most likely to use.
Babbel helps you master this everyday language through interactive lessons lasting just 15 minutes each. Instead of wading through grammar, this app gets you speaking straight away. You pick up new vocabulary through fun picture quizzes, and Babbel uses speech recognition to check your accent. You can even take part in virtual conversations.
The app also allows you to choose which words and phrases are relevant to you. For instance, there is a section on business vocabulary — but you can ignore this if you are planning a vacation. Available on iOS, Android and online, Babbel lets you practice anywhere and speak with confidence.
Human rights charity Amnesty International is the latest to call for reform of surveillance capitalism — blasting the business models of “surveillance giants” Facebook and Google in a new report which warns the pair’s market dominating platforms are “enabling human rights harm at a population scale”.
“[D]despite the real value of the services they provide, Google and Facebook’s platforms come at a systemic cost,” Amnesty warns. “The companies’ surveillance-based business model forces people to make a Faustian bargain, whereby they are only able to enjoy their human rights online by submitting to a system predicated on human rights abuse. Firstly, an assault on the right to privacy on an unprecedented scale, and then a series of knock-on effects that pose a serious risk to a range of other rights, from freedom of expression and opinion, to freedom of thought and the right to non-discrimination.”
“This isn’t the internet people signed up for,” it adds.
What’s most striking about the report is the familiarly of the arguments. There is now a huge weight of consensus criticism around surveillance-based decision-making — from Apple’s own Tim Cook through scholars such as Shoshana Zuboff and Zeynep Tufekci to the United Nations — that’s itself been fed by a steady stream of reportage of the individual and societal harms flowing from platforms’ pervasive and consentless capturing and hijacking of people’s information for ad-based manipulation and profit.
This core power asymmetry is maintained and topped off by self-serving policy positions which at best fiddle around the edges of an inherently anti-humanitarian system. While platforms have become practiced in dark arts PR — offering, at best, a pantomime ear to the latest data-enabled outrage that’s making headlines, without ever actually changing the underlying system. That surveillance capitalism’s abusive modus operandi is now inspiring governments to follow suit — aping the approach by developing their own data-driven control systems to straitjacket citizens — is exceptionally chilling.
But while the arguments against digital surveillance are now very familiar what’s still sorely lacking is an effective regulatory response to force reform of what is at base a moral failure — and one that’s been allowed to scale so big it’s attacking the democratic underpinnings of Western society.
“Google and Facebook have established policies and processes to address their impacts on privacy and freedom of expression – but evidently, given that their surveillance-based business model undermines the very essence of the right to privacy and poses a serious risk to a range of other rights, the companies are not taking a holistic approach, nor are they questioning whether their current business models themselves can be compliant with their responsibility to respect human rights,” Amnesty writes.
“The abuse of privacy that is core to Facebook and Google’s surveillance-based business model is starkly demonstrated by the companies’ long history of privacy scandals. Despite the companies’ assurances over their commitment to privacy, it is difficult not to see these numerous privacy infringements as part of the normal functioning of their business, rather than aberrations.”
Needless to say Facebook and Google do not agree with Amnesty’s assessment. But, well, they would say that wouldn’t they?
Amnesty’s report notes there is now a whole surveillance industry feeding this beast — from adtech players to data brokers — while pointing out that the dominance of Facebook and Google, aka the adtech duopoly, over “the primary channels that most of the world relies on to engage with the internet” is itself another harm, as it lends the pair of surveillance giants “unparalleled power over people’s lives online”.
“The power of Google and Facebook over the core platforms of the internet poses unique risks for human rights,” it warns. “For most people it is simply not feasible to use the internet while avoiding all Google and Facebook services. The dominant internet platforms are no longer ‘optional’ in many societies, and using them is a necessary part of participating in modern life.”
Amnesty concludes that it is “now evident that the era of self-regulation in the tech sector is coming to an end” — saying further state-based regulation will be necessary. Its call there is for legislators to follow a human rights-based approach to rein in surveillance giants.
Google is launching a number of updates to its G Suite tools today that, among other things, brings to Google Docs an AI grammar checker, smarter spellchecking and, soon, spelling autocorrect. The company is also launching the ability for G Suite users to use the Google Assistant to read out a calendar schedule and, maybe even more importantly, create, cancel and reschedule events. Google is also adding new accessibility features to the Assistant for use during meetings.
In addition, Google yesterday announced that Smart Compose would soon come to G Suite, too.
It’s maybe no surprise that Google is adding its new grammar suggestions to Docs. This feature, after all, is something Google has talked about quite a bit in recent months, after it first introduced it back in 2018. Unlike other grammar tools, Google’s version utilizes a neural network approach to detect potential grammar issues in your text, which is quite similar to the techniques used for building effective machine translation models.
Google is also bringing to Docs the same autocorrect feature it already uses in Gmail. This tool uses Google Search to learn new words over time, but in addition, Google today announced it’s also introducing a new system for offering users more customized spelling suggestions based on your documents. That includes commonly used acronyms that may be part of a company’s internal lingo.
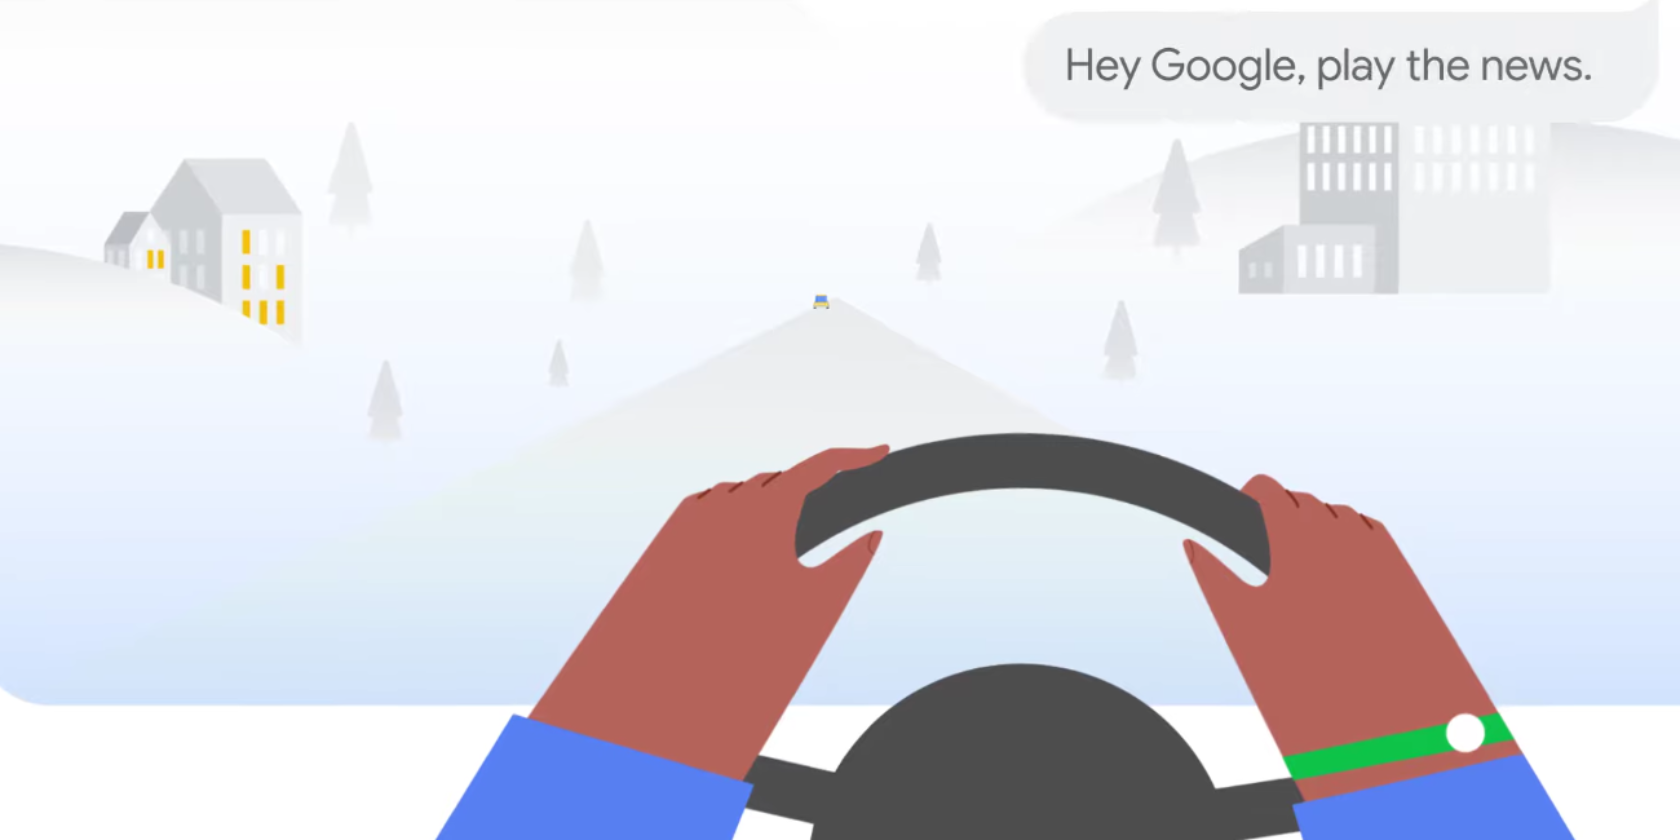
The new Assistant calendaring features are now in beta and pretty self-explanatory. Indeed, it’s somewhat surprising that it took Google so long to offer these abilities. In addition to managing their calendar by voice, the company is now also making it possible to use the Assistant to send messages to meeting attendees and even join calls (“Hey Google, join my next meeting”). Surely that’s a handy feature when you’re once again running late to work and need to join an 8am call from your car while driving down the highway.
Google has added a new way for your Google Assistant to deliver the news. It’s called Your News Update, and it pulls news stories from a number of different sources from around the world. The upshot is a news update personalized to your location and interests.
From News Briefings to Your News Update
As you may already be aware, Google Assistant can already read News Briefings to you. However, the current system makes you choose particular news sources. So, you can hear the hourly news update from NPR, then CNN, followed by The New York Times.
Your News Update pools these resources and more to create a news update which includes stories from a number of different sources. So, you may hear world news from Reuters, then local news from CBS, followed by entertainment news from Billboard.
How to Listen to the News on Google Assistant
Google offers more details on The Keyword. The company states that Your News Update is “a smarter way to listen to the news hosted by the Google Assistant.” And it’s all thanks to collaborative efforts with news publishers over the past two years.
These news publishers are the key to Your News Update, and Google has roped in dozens of them. Participating partners include USA Today, The Washington Post, Fox News Radio, Cheddar, The Associated Press, Politico, Al Jazeera, and The Motley Fool.
To start receiving Your News Update, open Google Assistant and go to your Settings. Then, under the You tab, click News > Change Your Playlist Format. Tick Your News Update and you’re all set. Then you just need to say, “Hey Google, play me the news”.
How to Find News Sources You Can Trust
Your News Update is currently only available in English in the United States. However, Google is promising to expand internationally in 2020. In the meantime, we can at least recommend the best news sites you can trust. Because the truth IS out there.
Hardly anything on the web uses Adobe Flash anymore, which is why Adobe plans to kill off Flash after 2020. For the most part, this won’t be a huge loss. But there’s one type of content that many people will miss: Flash games.
Flash games were once wildly popular, as they let budding developers share their creations with others. Unfortunately, once Flash is no longer supported, these games will disappear from the internet.
If you have any favorite Flash games you still enjoy playing, you should download them now so you can continue to play them offline.
First, Enable Flash in Chrome
We’ll demonstrate how to download Flash games using Google Chrome. If you haven’t already, you’ll need to enable click-to-run for Flash because by default, Chrome blocks sites from running Flash.
To do this, click the three-dot Menu button in the top-right of Chrome and choose Settings. Scroll down to the bottom of the list and click Advanced to show more options. Under the Privacy and security section, click the Site Settings entry.
This will open a list of Chrome’s website permissions that let you change what websites can do with your browser. Select Flash and make sure the slider at the top enabled and shows Ask first.
How to Download Flash Games
For the purposes of this tutorial, we’ll download a Flash game called New Super Mario 63. Unfortunately, you’ll need to repeat these steps for each game you want to download. It doesn’t take too long, so you should have a little collection built up before long.
Step 1: Load the Game in Chrome
Navigate to the page containing the Flash game you want to download. Where the game should be, you’ll see a puzzle piece and Click to enable Adobe Flash Player message.
Select this and hit Allow in the top-left corner of your browser to let that site use Flash. Allow the game to fully load before moving onto the next step.
Step 2: View the Page Source
Next, you’ll need to open the source code for the page hosting the game. Right-click anywhere on the page (aside from the game) and hit View page source. The keyboard shortcut for this is Ctrl + U on Windows and Cmd + Option + U on macOS.
You’ll see a new page with the HTML source code of the page. Here, press Ctrl + F (Cmd + F on a Mac) to open the search box, and enter “.swf” to search for Flash files.
This should find at least one result, though it may have up more depending on the page. The file you’re looking for typically has the name of the game, so you can ignore installer files like expressInstall.swf. In our example, the full link was the following:
https://ift.tt/2Oxo0K1
If you can’t find a Flash game file on the site, you’ll have to track it down first.
If You Can’t Find the Right Link
Some Flash games aren’t actually hosted on the website where you play them. If that’s the case, you won’t find the right file in the source code and will need to look elsewhere.
Thankfully, it’s pretty easy to do this. On the game startup screen or main menu, you’ll often see an “Originally hosted on” message along with the source page for the game. You can also try right-clicking on the game; many developers place a link to their website in that menu.
If there’s nothing there, a quick Google search for the game should bring up additional pages that host it. Take a look at those and you should eventually find one that has the actual Flash file.
In case all else fails, you can try File2HD, which lists all the files on a site and allows you to download them. Enter the game page’s URL, agree to the terms, and hit Get Files. Here you can search for the SWF file using the Ctrl + F menu again.
Step 3: Download the SWF File
Now you can download the SWF file that contains the game. Simply right-click the blue link ending in “.swf” that you found earlier and choose Save link as to download it to your computer.
Make sure that the Save as type shows as Shockwave Flash Object or something similar. This confirms that the file is actually a Flash document. If it shows as an HTML page or something else, you either right-clicked in the wrong place or the URL doesn’t go to a Flash object.
If you plan to download several games, we recommend creating a new folder on your computer to keep them all together. You should consider backing up this directory so you don’t lose the games if something ever happens.
Step 4: Play Your Flash Games Locally
At this point, you might be wondering how you’ll actually play the Flash games when they’re not in a browser. As it turns out, many media player apps can handle SWF files (which are Flash objects). This lets you play them offline without worrying about the security of enabling Flash in your browser.
On Windows, for instance, Windows Media Player will open SWF files. However, in our testing, it had issues detecting keyboard inputs. Thus if you plan to play Flash games offline, we recommend downloading Adobe’s local version of Flash Player. This is a tool intended for developers to open Flash files without a browser, but it works for personal use, too.
Visit Adobe’s Debug Downloads page and click the Download the Flash Player projector content debugger text under Windows, Macintosh, or Linux depending on what platform you use. On Windows, you don’t even have to install it—just launch the downloaded file and you’ll have a Flash Player window.
Go to File > Open or drag and drop your downloaded SWF file onto the app to play it. From there, you’ll have an experience just like playing in the browser.
Handily, you can resize the window to change the size of the game. Right-click or use the toolbar buttons to change the zoom level or game quality. If you have any issues, check out our tips to improve the performance of Flash games.
You Can Now Play Your Favorite Flash Games Forever
That’s it. Now you know how to download Flash games from the internet and play them offline. Flash games are an important part of the history of gaming. And now, in just a few minutes, you can preserve some of that history and keep your favorite games around long past 2020.