12 April 2018

7 Android Apps for Recording Your Own Podcasts Anywhere


Want to start podcasting on the go? Android is the perfect mobile platform for podcasting, whether you’re using a smartphone or a tablet. But which podcast recording app should you use on your Android device?

1. Spreaker Studio

Spreaker Studio Android Podcast App

We’ll start with the most feature-packed podcast recording app of the lot. Spreaker Studio is a comprehensive podcasting tool. It offers a full virtual studio user interface, including editable soundboard functionality. You can broadcast your podcasts live, or record them as live, with separate volume controls for each channel.

Once done, the podcast uploads automatically to Spreaker’s hosting. (You don’t have to do this, however. You can upload the file to hosting of your choice, such as a dedicated podcast host, your web host, or a service like Audioboom or Soundcloud.)

Uploading lets you give the podcast a title, image, set tags, and a description. Spreaker will even let you share the podcast on YouTube and iHeartRadio (the latter with a Pro subscription).

For professional podcasters on the move, Spreaker Studio is the top choice for Android users. You can improve the experience further by connecting a high-quality podcasting microphone over USB OTG.

Download: Spreaker Studio (Free)

2. Anchor: Make Your Own Podcast!

Anchor Android Podcasting App

Also available on the web at anchor.fm, Anchor offers completely free hosting for creators. Vying with Spreaker Studio for features, Anchor offers voice message importing, group chat, music importing from Spotify, transitions, background tasks, and sound effects, as well as standard recording. Once completed, you can upload your podcast to iTunes or Google Play.

Interestingly, Anchor also has a feature that imports your own existing podcast (as long as you commit to claiming them as your own), but this limits you to using Anchor’s hosting. (Even if you import an existing library of podcasts, no change is made to your existing setup until you agree to use the hosting).

To make a multiple-voice podcast, your guests will need to use Anchor on their phones too. You can send invite links via SMS. Once received, your guests can take part, using their phone as normal (or connecting a headset and mic).

All in all, Anchor is a good choice for recording podcasts on your Android device. After all, who would argue with free hosting? If you don’t fancy this service, however, note that other free podcast hosting is available.

Download: Anchor (Free)

3. Podbean

Podbean Android Podcasting App

Offering a mobile app and hosting package, Podbean starts from $3 a month for 100MB of monthly storage and 100GB of bandwidth. Bigger packages are available, offering unlimited and unmetered options. These also include detailed stats and the ability to have multiple admins, depending on how much you want to spend.

The app itself is straightforward, offering access to the Podbean library of podcasts and managing subscriptions. You’ll find the record button only on your profile screen or home screen, although you’ll need to sign up in order to use this functionality.

Basic trim editing is available, as is the ability to record a podcast with some background music. This can be useful for overcoming unwanted background noises, for instance. Several tunes are provided in the app.

Note that you don’t have to use Podbean’s hosting, even if you’re using the app’s recording feature. Via the Settings page, you can specify a location for saving podcasts. This means you can easily upload your recording to the podcast hosting service of your choice.

Download: Podbean (Free)

4. Audioboom

Audioboom Android Podcasting App

If hosting is an issue and you want to publish your podcasts from a mobile device, Audioboom lets you record and upload from a phone or tablet. For $10 a month you get up to five episodes per month, 10,000 plays, distribution via iTunes (simpler than setting it up yourself), iHeartRadio, Spotify, Google Play, and Stitcher, and advanced analytics.

The free app, meanwhile, is focused on listening rather than recording, but still gives you the tools you need. This includes a running counter of how long you have left on your account for the current month, and some basic editing tools to trim your recording.

Once done, you can add image, title, description, and category before you upload the podcast. However, the comparative lack of features here may put you off. I’ve used Audioboom for hosting my podcasts for years, and have not yet felt confident using the mobile app. Your mileage, of course, may vary.

Download: Audioboom (Free)

5. SoundCloud

SoundCloud Android Podcasting App

If you’re looking for a podcast recording app that offers recording and uploading to free hosting (with limits) then SoundCloud is ideal. As well as giving you the option to browse through as many podcasts, songs, audiobooks and trailers as it has, the SoundCloud app also features an effective recorder tool.

You’ll find the Record screen in the hamburger menu, and it’s possible to trim your recording and add a fade to the beginning and end before you upload.

There’s also the option to add some artwork for the podcast, and specify a title. You can set tracks as Public or Private, and they instantly upload when you Tap to post your recording. Remember, you can embed posts in other media, and if you have your social accounts connected to SoundCloud, your podcast shares there too.

Although missing the advanced features of Spreaker Studio, SoundCloud is a good portable podcast recorder and uploader. A companion app, SoundCloud Pulse, is also available for managing your channel, but has no podcasting capability.

Download: SoundCloud (Free)
Download: SoundCloud Pulse (Free)

6. JoJo: Go Record Yourself!

JoJo Android Podcasting App

For a simpler approach, JoJo: Go Record Yourself is a tool for creating “mini-podcast” clips, which you can place on a map at the exact point where you made the recording.

An odd combination of micro-blogging services like Twitter and Tumblr, with tried-and-tested podcasting features (plus some Google Maps), JoJo lets you listen to other people’s podcasts based on location, and shares your own.

Recording is simply a case of tapping a button to start and stop, adding a title, description, and category, and assigning location permissions to the app before uploading. So what are the benefits of a three minute, location-based podcast?

Well, if you’re recording a travel-based podcast, it could be quite useful. However, as most podcasts are enjoyed while the listener is traveling (either in the car or subway, for example), JoJo really needs a strong (if not unique) selling point that the other examples here do not.

But if recording thoughts as you traverse an area or landscape appeals to you, JoJo is the ideal solution.

Download: JoJo (Free)

Maybe You Don’t Need a Podcast Recording App

Android Audio Recorder Podcasting App

If all of this seems a bit overly complicated, rest assured: you don’t actually need a dedicated podcasting app. While the benefits of these apps and hosting services may be obvious, you might already have your hosting sorted. And you might even have a voice recorder installed on your phone or tablet. Even if you don’t, for straightforward, basic podcasting, that’s really all you need.

My own suggestion is Audio Recorder from Sony, a tool I’ve used for some time now. It’s ideal for recording audio for podcasts, either interviewing people or recording your own thoughts, and works with any microphone you connect to your device. If you’re looking for a straightforward recorder that saves to MP3 files you can easily upload, this is ideal.

Download: Audio Recorder (Free)

With seven strong options, your podcasting can go fully mobile. In fact, there’s no need for you to worry about recording your podcast on a PC ever again! For more hints and tips for podcasting, see our guide to starting your own successful podcast.


Read Full Article

Serving Customer Experience on Platter: Data Mining


In today’s world, customer’s data is getting generated from multiple sources. Companies are looking for making sense of this data for micro-marketing (for a target group), enhancing seamless customer experience, and reducing attrition of customers or increasing customer retention.
With this current explosion of data, it becomes important to understand what can be achieved by using this data to gain insights & how to dig deeper to provide a personalized experience. Data mining can help you achieve all this.
In simpler terms, data mining is an analytical process used to extract important knowledge from a large mass of data. Some ways via which data mining can help in this field is:
1.Generating a 360 degree profile of customers:
Customer data is generated from multiple sources. Enterprises are unclear as to how to integrate & synthesize data from social networks, mobile applications, in-store POS etc. Understanding this data & integrating it with a Customer Management Platform is the key to generate a 360 degree profile of the customers. Mapping these profiles & behaviors (for e.g. a vegetarian) to specific product recommendations (e.g. food ordering app only shows vegetarian restaurants in recommended places) will eventually lead to stronger brand building and high loyalty amongst customers.
2.Understanding the Sales Life-cycle of customer
The buying patterns & behaviors of different customers are different and hence when you have created a 360 degree profile of customers, it becomes important that you map them to where they fall in the sales life-cycle. For e.g. if you are an IT service provider and you have got a lead on a customer. Now, if the customer is looking for a solution next year, then your approach towards him will be different from a customer who is looking to buy your services in the next few months. Hence, knowing the current position of your customers in the sales life-cycle becomes important.
3.Decoding the path of Least Resistance
Many a times you get a new visitor to your store (whether in brick & mortar or online) & many a times a customer does not know what she is looking for. Data mining can help us understand that. So, if we can deliver it to her with minimum clicks (efforts), then we have won that customer. Hence, Data mining can help us to determine that optimum & convenient position (whether in brick & mortar or online) to place a product which increases the probability of making a sale

4.Determining cross-selling opportunities
This is the classic case of what we call association in data mining. To understand this in a real scenario, let me give an example. Father’s Day 2017 in India shall be celebrated on June 18; to gift my dad, I go to Amazon.in, and there I find that though I am looking for Aviator sunglasses, it tells me under “Frequently bought together”, that a medium case cover pouch is also available. There is a complete TechTarget article on association, you can read it here
The opportunities provided by data mining is immense. From figuring out new opportunities & new markets (remember Ansoff matrix), to increasing customer retention, building genuine loyalty and enhancing the overall customer experience, data mining can help businesses drive growth in innovative & myriad ways.

Why Enterprises Should Not Believe In Data Analytics


Big data algorithms, machine learning & reasoning has become the heart of almost all applications today. These smart applications are solving crucial business problems and helping decision makers in quickly reaching a business critical decision in a matter of minutes. These techniques are defining the norms by also using statistical analysis & predictive modelling.
But, all that glitters is not gold and we have to understand that it’s NOT always the case that all insights that spawns out of such models is CORRECT. Business leaders have to understand the inflexion point where data starts to control them rather than other way round. If they are thinking that insights coming out from machines will be always Right & Correct, then it’s a Mistake!
In this post, I shall be explaining the various issues which comes with using the data analytics as it is
Simpson’s Paradox
The best way to understand this statistical paradox is – the groups have averages that point in one direction whereas the overall averages points in other direction.
Let’s understand this with 2 real world example:
Take #1:
In tennis, if the loser of the match has actually won more games than the winner, then we have an example of “Simpson’s paradox”. For example, though not very possible, if the final score is 0-6, 7-5, 7-5; then the loser has won more points in the game (16) than the winner (14).
A real game example is Isner–Mahut match at the 2010 Wimbledon Championships. If you see the Records section, the last but one point explains it. Mahut won 502 points in the match as compared to Isner’s 478 (difference of 24). But we all know that Isner won the match 6-3, 3-6, 6-7, 7-6, 70-68.
Take #2:
Suppose your enterprise has two business application towers: A & B. Now let us analyze the overall tickets generated from those applications:
If you look at the analytics reports & dashboards created at the Business Applications level, you shall see that the predicted tickets matches with the Actual tickets. So,
Inferences:
1.    the maturity of the model is very high
2.    resulting to say that we can scale it up to new towers.
However, if you deep-dive into the two towers, you can see that this inference is Incorrect. This is one of the most important challenges in the reporting & dash-boarding world. It is easy to think that we are meeting our numbers, when in reality; the case might be completely different.
Idiosyncrasies in the data
In many businesses, important decisions are made based upon the statistical inferences using the historical references and experiences. A major caveat here is that if the sample size in use is small, then few outliers can skew the understandings/inferences a lot.
Many predictive models use historical data to make predictions on the future. Hence, if the past data and its data model upon which it is based relies heavily on past incidents, and then it may not accurately give predictions on the future.
Believing numbers blindly
Too often, we are so driven by numbers that we forget that there are biases, which creep into the system, possibly during the initial requirement validation phases, designing the data model phase etc. Such biases, though very small, constraints the way with which we look upon the end-results (in the form of dashboards & reports). In addition, it is also important to continuously normalize & check the data for inconsistencies and do a ground check verification before any major decisions can be taken. To give an example, it may be the case that business/operations leaders may be seeing a high inflow of tickets, though at a ground level, those tickets always existed in the system; only thing is that they were NEVER being tracked!
Though these challenges exists, the Solution to these challenges are domain expertise, tacit business knowledge, common sense & above all, Critical Thinking, which can help business manager, escape such caveats.


What Is Blockchain in Simple Terms and How Does It Work?

Mac Pro Delayed to 2019: 5 Best Alternatives


The new Mac Pro you’re waiting for has been delayed till 2019 at the earliest. Apple is working diligently behind the scenes to produce a machine that doesn’t fall victim to the same problems that plagued the 2013 redesign.

So what are your options when you you need a really powerful Mac? And what if you can’t put off your upgrade till next year? Here are a few choices.

1. 27-Inch iMac Pro With Retina 5K Display

iMac Pro Space Grey Accessories

The iMac Pro’s announcement wasn’t entirely surprising given the leaks that preceded it, but it was still one of the best Apple hardware announcements in recent years. Building on the design of the existing 5K iMac, the 27-Inch iMac Pro With Retina 5K Display uses a redesigned dual-fan cooling solution to keep its lightning-fast internals within sensible operating temperatures.

The base model iMac Pro is seriously powerful. It packs a a 3.2GHz Intel Xeon W processor that can reach 4.2GHz, a speed normally reserved for servers and other high-performance workstations. That’s backed up with AMD’s Radeon Pro Vega 56 with 8GB of high-bandwidth memory. That makes it a beast for video-related tasks, 3D modeling, virtual reality, and even gaming (though this isn’t designed with gaming in mind).

Every machine ships with 1TB of solid state storage. This is an important move by Apple to limit performance bottlenecking related to read and write speeds. Finally, a cool 32GB of RAM provides plenty of physical memory for all but the most intensive of processes.

The iMac Pro is Apple’s most expensive machine, but unlike the Mac Pro it comes with all the accessories you need. In the box you’ll find a matching Space Gray Magic Keyboard, Magic Mouse 2, and Lightning to USB cable for charging. This makes it one of the best Mac Pro alternatives you can get today.

2. 27-Inch iMac With Retina 5K Display

27 iMac Retina 5k

If you have to ask “Do I need an iMac Pro?”, then the answer is probably no.

You’re better off investing in an iMac if you don’t need an exceptional level of performance on the macOS platform. If you’re not building complex 3D worlds, working with uncompressed 4K video, or processing huge quantities of data on a daily basis, you won’t need all that power.

The 27-Inch iMac With Retina 5K Display doesn’t include a server-grade processor but the base model is still a monster. Inside you’ll find an Intel Core i5 3.8GHz processor and 8GB of RAM, which you can upgrade to 64GB if you want. It also comes with a 2TB Fusion drive, a trade-off between the speed of a solid state drive and the affordable capacity of a hard disk drive.

It’s very powerful, but still a more reasonable Mac Pro alternative for mortals with budgets.

An AMD Radeon Pro 580 GPU will crunch through your 4K video editing tasks, 3D games, and VR experiences. Install Windows 10 and grab yourself some Boot Camp drivers, then you’ve got an all-in-one gaming machine that will hold a decent frame rate in most games at 1440p.

Your iMac also includes a silver Magic Keyboard, a white Magic Mouse 2, and some cables for powering and charging everything. You can add to the fun using the two spare Thunderbolt 3 ports and four USB 3 ports.

3. 15.4-Inch MacBook Pro With Touch Bar

MacBook Pro 15 with Touch Bar

If you can’t have the power you want, why not have portability? Apple revised its MacBook Pro line in June 2017, introducing a new gimmick: the Touch Bar. This takes the form of a thin OLED panel that replaces the function keys at the top of your keyboard, but also includes a Touch ID fingerprint scanner for biometric authentication.

Even tough it’s a laptop, the current high-end 15.4-Inch MacBook Pro With Touch Bar is a workhorse and a viable Mac Pro alternative. It features a seventh-generation Intel Core i7 3.1GHz CPU, a whopping 16GB of RAM, and an AMD Radeon Pro 560 GPU with 4GB of memory. It’s like a mini iMac Pro, and it even comes in the darker Space Grey unibody casing.

Perhaps the most surprising addition to this machine is the 1TB of solid state storage, comparable with the base model iMac Pro. For mobile video editing and other performance-intensive tasks, that makes all the difference.

The argument for going portable in the absence of a serious desktop model has some merit. Even if you buy a new Mac Pro in 2019, you’ll still have a high-end portable machine that outperforms most other laptops. Of course, it’s not a cheap option.

4. 2013 Mac Pro

Mac Pro 2013

I can’t wholeheartedly recommend the old 2013 Mac Pro, and I’d even go as far as saying you shouldn’t buy it. Apple admitted that it dropped the ball on the current design, which detractors have likened to a trash can. It’s not had an update since 2013, and it’s common knowledge that a complete redesign is already in the works.

But what if an iMac won’t do, and you already have a MacBook? The Mac Pro is Apple’s most serious desktop model that isn’t built around a gorgeous display. It’s considerably smaller and more portable than an iMac, and the internal hardware isn’t that bad either. The iMac Pro can handle three 5K displays or six Thunderbolt displays connected via a daisy chain.

For your money you’ll get dual AMD FirePro GPUs, an 8-core 3.0GHz Intel Xeon E5, and 16GB of DDR3 RAM. The biggest drawback is the measly 256GB solid state drive. But if you’re in the market for a Mac Pro, you should probably already have reliable network-attached storage.

Be aware that you don’t get a mouse or a keyboard with your purchase, something the iMac Pro includes in its eye-watering price tag. Even though you really shouldn’t buy one, it’s still a serious chunk of computing power even if it will go down in history as a failed experiment.

5. Corsair ONE ELITE Desktop

Corsair ONE ELITE Desktop

As an Apple user, I know you’re not here to look at Windows machines. With that in mind, I couldn’t end this list without at least looking at what the competition is doing. Corsair is best known for sticks of RAM, but they also produce some ready-made high end machines like the Corsair ONE ELITE Desktop.

Inside the ONE ELITE you’ll find an Intel Core i7-8700K six-core processor, 32GB of DDR4 RAM, a 2TB hard drive plus a 480GB solid state drive, and a top-of-the-range NVIDIA GeForce GTX 1080 Ti with a ridiculous 11GB of memory.

You’ll get a copy of Windows 10 in the box, but you need to supply your own display and peripherals. It’s not quite an iMac Pro since there’s no 5K display, and you only have access to one USB 3 port. However, it costs $2,000 less than Apple’s current offering.

The Corsair ONE ELITE is clearly built with gaming in mind, and it’ll deliver 60 frames per seconds at 4K in many titles. It’s also perfect for video editing, VR, 3D modeling, and rendering. But since it’s not a Mac, you’ll miss out on macOS, iCloud, and deep integration with the rest of your gadgets.

Can You Wait for the New Mac Pro?

If you can wait, then Apple’s redesigned Mac Pro might be worth holding out for. The company has taken a refreshingly honest stance on the 2013 redesign, and will likely doing everything it can to avoid letting power users down again.

One fact’s certain: the iMac Pro is an all-in-one tour de force for those who need it. If you can’t wait for the Mac Pro, now could be the best time to get a new iMac.


Read Full Article

How to Remove Duplicate Data on Your Mac and Free Up Space


Duplicate files suck. They take up valuable space on your Mac’s SSD, slow down backups, and bog you down when you’re looking for a particular file. Most of the time duplicates are accidental, so you probably aren’t even aware that your Mac has unnecessary copies.

The good news is that you can quickly find and delete duplicate files on your Mac with the right tools. Here’s how to get started.

Using Apps to Find Duplicate Files on Mac

First, let’s see the best apps for finding duplicate files on your Mac and how you can use them.

Gemini 2

Gemini 2 Mac

Gemini 2 has quickly emerged as one of the best duplicate file finders for Mac. It performs a deep scan of your SSD for not only duplicates, but also similar files. For instance, it can automatically mark two similar-looking pictures as duplicate, even if they have a different file name.

Gemini’s super-simple interface makes it easy to get started. Here’s how to use it:

  1. Launch Gemini 2 on your Mac (use Spotlight to find it easily).
  2. Click the large Plus (+) button to select a folder. You can also drag and drop the folder onto the window.
  3. If you’d like to find duplicates in your image library, click Pictures Folder. To find duplicate music, click Music Folder. To search for duplicates in a particular folder, click Add Custom Folder.
  4. Click Scan for Duplicates to initiate the process. The scan may take a while, depending on the size of the directory.

Once the scan is complete, we recommend you choose Review Results to browse through the detected duplicates and similar files. Once you review them, click Smart Cleanup. Gemini will move the duplicates to the Trash.

Gemini Mac Review Duplicates

If you accidentally delete something important, you can restore it easily from the Trash.

Download: Gemini 2 ($20 with a free trial)

DupeGuru

If you’re looking for a free alternative to Gemini, dupeGuru fits the bill. It lets you find duplicate files, pictures, and music. Its fuzzy-matching algorithm finds duplicate files even if they don’t share the exact name.

Note: If you’re running macOS Sierra or High Sierra, you will see a message warning that dupeGuru can’t be opened because it is not from an identified developer. To fix this, open System Preferences > Security & Privacy and click Open Anyway.

Mac Open Unidentified App Anyway

Once you install it successfully, here’s how to use dupeGuru:

  1. Launch dupeGuru.
  2. Select if you want to scan for duplicate files, music, or pictures.
  3. Click the Plus (+) button to select a folder.
  4. Click Scan.

dupeGuru Scan for Duplicates Mac

Once the scan is complete, you can choose to delete duplicate files from your Mac or move them elsewhere. In our testing, it took a little more time to scan than Gemini, but the results came out pretty similar.

Download: dupeGuru (Free)

How to Find and Delete Duplicate Images on Mac

If you have tons of pictures on your Mac, it might take quite a while to manually browse through your library and find duplicates. Photos Duplicate Cleaner is a free Mac app that does all the hard work for you.

Duplicate Photos Cleaner Mac

  1. Download and launch Photos Duplicate Cleaner.
  2. Click Add Folder to select pictures from a folder. You can also click Add Photos Library to directly select pictures from the Photos app.
  3. Click Scan for Duplicates.
  4. Once the scan is complete, you can review the pictures.
  5. Click Auto Mark. It will intelligently mark one copy of each duplicate picture for deletion.
  6. Finally, click Trash Marked to move the duplicate item to Trash.

Duplicate Photos Cleaner Mac Deletion

The app doesn’t sport the cleanest-looking interface, but it does delete duplicate photos from your Mac pretty efficiently.

Download: Photos Duplicate Cleaner (Free)

How to Find and Delete Duplicate Contacts on Mac

It’s pretty hard to keep your address book organized, especially if you meet new people every day. Duplicate contacts only make matters worse.

Here’s how you can find and delete duplicate contacts your Mac.

  1. Launch the Contacts app.
  2. From the menu bar, select Card > Look for duplicates.
  3. After the scan is complete, contacts with the same name but different contact information will be merged. You’ll see an offer to delete identical contacts, too.

Delete duplicate contacts Mac

How to Find and Delete Duplicate Music in iTunes

Do you find the same song playing multiple times when you hit Next in iTunes? If so, you might have duplicate files in your iTunes library.

Thankfully, iTunes comes with a built-in feature to find and remove duplicate music files. Here’s how to use it.

  1. Launch iTunes on your Mac.
  2. Switch to the Library tab.
  3. In the menu bar, navigate to File > Library > Show Duplicate Items.

delete duplicate music iTunes

iTunes shows potential duplicates based on the song name and artist. If you’d like to see only the duplicate songs that have matching names, artists, and albums, hold down the Option button on your keyboard and repeat the above process.

You can use a few tricks to review items before staging them for deletion:

  • Sort the list by artist or song name to help you find similar songs easily.
  • Use other information such as time duration and genre to find duplicate songs.

Once you’ve reviewed the items, hold down the Cmd key and manually select the items you would like to delete. Then right-click on the items and choose Delete to remove the duplicate files from your Mac. Click Done to finish the process.

How About Finding Duplicate Data Manually?

You can, of course, rummage through Finder manually to find duplicate files. Also, there’s a lenghty Mac terminal command that aids you in finding duplicates.

The reason why we don’t recommend these methods is that they make it unnecessarily tough to find duplicates, especially when there are better free alternatives available. These methods may be a good fit for a geek looking to have fun over the weekend, but they aren’t practical for the average Mac user.

Therefore, we will skip those methods here.

Using the above tips, you should be able to find and remove duplicate files on your Mac in no time. If you’re obsessed with reclaiming more storage space, check out our tips on how to free up space on your Mac.


Read Full Article

Here’s what the new Gmail looks like


Yesterday, Google pressed the Send button too quickly and informed G Suite customers that a new Gmail was coming soon. TechCrunch obtained a few screenshots of the new interface from a tipster called Chaim. I confirmed the authenticity of those screenshots with another person who saw the new design. So here’s what you can expect.

As you can see, the new Gmail looks like a hybrid between the current Gmail interface and inbox.google.com. It isn’t a huge departure from the current interface metaphor. So existing Gmail users will still feel right at home.

The new Gmail also looks more like modern Google products with Material design. Android users know these buttons, colors and popups quite well already. All the text buttons have been replaced by icons and it looks much cleaner than before.

On those screenshots, you can see some of the new features that Google mentioned yesterday. You can snooze emails so that they reappear in your inbox hours or days later. On the screenshot, you can see “later today”, “tomorrow”, “this weekend”, “next week” and “someday”. There could be settings to configure those shortcuts.

As you can see, Gmail will suggest smart replies in each email thread. It seems to be working like in the mobile app with a handful of suggestions below the last email.

But the most interesting part is the column on the right-side of the screen. This expandable area lets you load widgets of other apps. By default, Gmail lets you open Google Calendar, Keep and Tasks so that you can add an event while replying to a thread.

Streak co-founder Aleem Mawani also told me that Gmail extensions, such as Clearbit, Streak and Dropbox, will be compatible with the new design. Many of those apps rely on the InboxSDK library, and it looks like you’ll be able to integrate apps in Gmail using the same SDK. According to Google, The new Gmail design is going to come out in a few weeks.


Read Full Article

4 Reasons Why Facebook Is a Security and Privacy Nightmare


Facebook is no longer the king of the social media castle. More and more people are starting to turn their backs on the network for good. And while it’s still possible to contend that you shouldn’t delete your account, the arguments in favor of ditching the service are piling up at an alarming rate.

If you value your security and/or privacy, keep reading.

1. A Terrible Track Record

In early 2018, Facebook hit the news headlines for its role in the Cambridge Analytica scandal. In simple terms, Zuckerberg’s company was complicit in letting the data analysis firm steal and retain information on 50 million of the service’s users.

If the incident was a one-off, you might be able to forgive Facebook. But it wasn’t a one-off. It was just the latest in a long line of data-handling missteps, and further proof that Facebook’s security isn’t up to par.

Here are some of the other most infamous incidents.

Beacon

Cast your mind back to 2007. Facebook had just opened to the public for the first time (previously, it was restricted to students).

In November of that year, the company launched Beacon. It was a script that allowed third-party websites to automatically post the actions of a user onto the network. For example, if you bought a plane ticket, it would suddenly pop up on your wall for everyone to see.

In today’s world, it barely seems believable, but the project lasted for two years until eventually being shut down following the settlement of a class-action lawsuit.

Instant Personalization

Instant Personalization was a pilot program launched in 2010.

It automatically shared a person’s information with affiliate sites. For example, it could share your favorite sports teams with a news site so you see appropriate headlines first, or it could share your favorite bands with a music website, and so on.

Here’s what the Electronic Frontier Foundation said about the scheme at the time:

“For users that have not opted out, Instant Personalization is instant data leakage. As soon as you visit the sites in the pilot program, they can access your name, your picture, your gender, your current location, your list of friends, and all the Pages you have Liked.

Even if you opt out of Instant Personalization, there’s still data leakage if your friends use Instant Personalization websites—their activities can give away information about you.”

This wasn’t the first (or last) time that your friends could be a threat to your Facebook privacy.

Applications and Identifying Information

In another 2010 scandal that—in hindsight—turned out to be a harbinger of things to come, the Wall Street Journal found that many Facebook apps were transmitting identifying information to online advertising tracking companies.

An HTTP referrer made it possible. It could expose both a user’s identity and their friends’ identities, posing a big threat to everyone’s Facebook privacy.

It took Facebook almost 12 months to remedy the issue.

2. Zuckerberg’s Duplicity on Privacy

Mark Zuckerberg is a curious character. Facebook made him a multi-billionaire in his 20s and—for a long time in the 2000s—the media viewed him as a savior of sorts.

Here’s one of his public quotes from Facebook’s early days (via Forbes):

“By giving people the power to share, we’re making the world more transparent. When you give everyone a voice and give people power, the system usually ends up in a really good place. So, what we view our role as, is giving people that power.”

Sounds honorable. But Zuckerberg seems to have a darker, duplicitous side. His quotes are Trump-esque; he doesn’t seem to maintain the same opinion from one interview to the next. Thus, it’s incredibly hard to know what he actually thinks about the topic of user privacy.

Let’s take a closer look.

Of course, there’s one quote that’s now infamous above all others (via The Register):

“I have over 4,000 emails, pictures, and addresses [of Harvard students]. People just submitted it. I don’t know why. They trust me. Dumb f*cks.”

But even if you attribute that to the exuberance of youth, Mark has consistently appeared to flip-flop on the subject of privacy.

Compare this quote from the D8 conference in June 2010:

“There have been misperceptions that we’re trying to make all information open, but that’s false. We encourage people to keep their information private.”

With this one from an interview with Wired June 2009:

“People can make their profile open to everyone. And what I would just expect is that as time goes on, we’re just going to keep on moving more and more in that direction.”

Alternatively, compare this quote from an op-ed in the Washington Post in May 2010:

“We do not share your personal information with people or services you don’t want. We do not give advertisers access to your personal information. And we do not and never will sell any of your information to anyone.”

With this quote from an interview with Time in the very same month:

“The way that people think about privacy is changing a bit […] What people want isn’t complete privacy.”

Even as recently as Spring 2017—just nine months before the Cambridge Analytica scandal—he was offering mixed messages. Here’s what he told Freakonomics Radio host Stephen Dunbar in a podcast:

“Privacy is extremely important, and people engage and share their content and feel free to connect because they know that their privacy is going to be protected on Facebook.”

Why the Duplicity?

In some sense, Zuckerberg is caught between a rock and a hard place. On a personal level, he probably does believe in user privacy. But he’s also the CEO of a publicly listed company that’s worth in excess of $500 billion and happens to be one of the largest ad agencies in the world.

Ultimately, he knows that Facebook’s future is dependent on keeping shareholders happy. To keep shareholders happy, Facebook needs to make copious amounts of cash. And to make copious amounts of cash, he has to play fast and loose with users’ data.

Online Security, Online Privacy, Facebook

The whole thing would feel more palatable if Zuckerberg was more honest about Facebook’s intentions. Why won’t he admit that Facebook users are the company’s product?

Instead, we’re left with an ongoing charade in which Facebook clearly uses your information to make money while simultaneously pretending privacy is one of its central tenets.

Which one do you think is more important to Facebook executives? Exactly. That’s why you should delete your account.

3. Government and Private Surveillance

You can split the issue of surveillance into two parts: government and a private company.

Government Surveillance

Oh, how the East German Stasi must have longed for a tool like Facebook. Can you imagine a better way for a repressive regime to monitor its citizens?

But the surveillance doesn’t end with dictatorships and secret police. People living in “democracies” are also under threat from Facebook’s cooperation with security forces.

Governments across North America and Europe now frequently order Facebook to give up users’ data to help them discover crimes, establish motives, prove or disprove alibis, and reveal communications. Much of it goes under the guise of “fighting terrorism,” but that’s a catch-all term whose meaning is becoming increasingly diluted.

And how does Facebook respond to the requests? Frankly, it rolls over meekly and gives the governments what they want.

If you’re in the US, the only exception is unopened inbox messages that are less than 181 days old. To access those, governments need a warrant and probable cause.

The company even tells you that it hands over data in its data policy (which replaced the Facebook privacy policy). It says the following:

“We may also share information when we have a good faith belief it is necessary to prevent fraud or other illegal activity, [or] to prevent imminent bodily harm […] This may include sharing information with other companies, lawyers, courts, or other government entities.”

Furthermore, in early 2018, the United States announced it was going to start vetting people’s social media profiles as part of its requirements for granting an entry visa. It’s only a matter of time until other countries follow suit.

If you don’t fancy giving the White House complete access to your Facebook life just to go on holiday to Disneyland, it’s better to reach for the delete button.

Private Company Surveillance

How would you feel if that funny-but-offensive meme you posted last week ended up costing you your dream job?

It could happen.

There are numerous instances of employers asking prospective employees for their Facebook login credentials. The issue became so prevalent that New Jersey had to pass a bill that made it illegal for employers to ask potential or current employees for access to their Facebook accounts. Even then, companies in several industries still spy on their employees.

To this day, there is still no federal law that protects the workers. The integrity of their Facebook privacy is left in the hands of employers.

4. Publishing Rights

We’ve all seen the statuses on Facebook. They typically read something like “In response to the new Facebook guidelines I hereby declare that my copyright is attached to all of my personal details, illustrations, blah, blah, blah.”

Here’s the kicker. You already own the copyright to any original work you’ve posted on the network. That status update has absolutely no legal basis.

So, what’s all the fuss about?

It’s because Facebook’s terms and conditions lay claim to “Non-Exclusive, Transferable, Sub-Licensable, Royalty-Free” rights to anything you put on the network.

These all relate to publishing, not ownership. Your ownership of your content is not in question, but you have granted Facebook permission republish it in just about any way the company deems appropriate. It can even sell sub-licenses for your work and directly profit from it.

As we noted in a post on the ownership of Facebook photos elsewhere on the site, the only way you’re going to be able to renegotiate those terms is to talk with Facebook’s lawyers directly. And it’s just a hunch, but we suspect they won’t be too receptive to your protests.

From a privacy perspective, it means that you could create a piece of artwork with personally identifying information (like a selfie, or a love letter, or a poem), and Facebook could transfer the publishing rights to another entity, sell the sub-license for a fee, and not pay you a penny. Before you know it, you’re looking at a mugshot of yourself on the side of the New York subway.

Don’t take the risk.

The List Goes On…

We could list Facebook security and privacy concerns all day, but we won’t. Hopefully, you now have enough information to make an informed decision.

If you’re still not sure whether to delete Facebook, consider the non-privacy-based reasons to delete Facebook.


Read Full Article

Cambridge University hits back at Zuckerberg’s shade


Facebook’s CEO Mark Zuckerberg’s testimony to the House yesterday was a mostly bland performance, punctuated by frequent claims not to know or remember certain fundamental aspects of his own business. But he gave a curiously specific and aggressive response to a question from congressman Eliot Engel.

Starting from the premise that Facebook had been “deceived” by other players in the data misuse scandal it’s embroiled in, the congressman wondered whether Facebook intends to sue Cambridge Analytica, professor Aleksandr Kogan and Cambridge University — perhaps for unauthorized access to computer networks or breach of contract?

“It’s something that we’re looking into,” replied Zuckerberg. “We already took action by banning [Kogan] from the platform and we’re going to be doing a full audit to make sure he gets rid of all the data that he has as well.”

But the Facebook founder also seized on the opportunity to indulge in a little suggestive shade throwing which looked very much like an attempt to blame-shift responsibility for the massive data scandal embroiling his company onto, of all things, one of the UK’s most prestigious universities. (Which, full disclosure, is my own alma mater.)

“To your point about Cambridge University what we’ve found now is that there’s a whole program associated with Cambridge University where a number of researchers — not just Aleksandr Kogan, although to our current knowledge he’s the only one who sold the data to Cambridge Analytica — there are a number of the researchers who are building similar apps,” said Zuckerberg.

“So we do need to understand whether there is something bad going on at Cambridge University overall that will require a stronger action from us.”

What’s curious about this response is that Zuckerberg elides to mention how Facebook’s own staff have worked with the program he’s suggesting his company “found now” — as if it had only discovered the existence of the Cambridge University Psychometrics Centre, whose researchers have in fact been working with Facebook data since at least 2007, since the Cambridge Analytica story snowballed into a major public scandal last month.

A Facebook data-related project that the center is involved with, called the myPersonality Project — which started as a student side project of the now deputy director of the Psychometrics Centre, David Stillwell — was essentially the accidental inspiration for Kogan’s thisismydigitallife quiz app, according to testimony given to the UK parliament by former Cambridge Analytica employee Chris Wylie last month.

Here’s how the project is described on the Centre’s website:

myPersonality was a popular Facebook application that allowed users to take real psychometric tests, and allowed us to record (with consent!) their psychological and Facebook profiles. Currently, our database contains more than 6,000,000 test results, together with more than 4,000,000 individual Facebook profiles. Our respondents come from various age groups, backgrounds, and cultures. They are highly motivated to answer honestly and carefully, as the only gratification that they receive for their participation is feedback on their results.

The center itself has been active within Cambridge University since 2005, conducting research, teaching and product development in pure and applied psychological assessment — and claiming to have seen “significant growth in the past twelve years as a consequence of the explosion of activity in online communication and social networks”. 

And while it’s of course possible that Zuckerberg and his staff might not have been aware of the myPersonality Facebook app project — after all 4M Facebook profiles harvested is rather less than the up to 87M Kogan was able to extract, also apparently without Facebook noticing — what’s rather harder for Zuckerberg to deny knowledge of is the fact his company’s own staff have worked with Cambridge University researchers on projects analyzing Facebook data for psychological profiling purposes for years. Since at least 2015.

In a statement provided to TechCrunch yesterday, the University expressed surprise at Zuckerberg’s remarks to the house.

“We would be surprised if Mr Zuckerberg was only now aware of research at the University of Cambridge looking at what an individual’s Facebook data says about them,” a spokesperson told us. “Our researchers have been publishing such research since 2013 in major peer-reviewed scientific journals, and these studies have been reported widely in international media. These have included one study in 2015 led by Dr Aleksandr Spectre (Kogan) and co-authored by two Facebook employees.”

The two Facebook employees who worked alongside Kogan (who was using the surname Spectre at the time) on that 2015 study — which looked at international friendships as a class marker by examining Facebook users’ friend networks — are named in the paper as Charles Gronin and Pete Fleming.

It’s not clear whether Gronin still works for Facebook. But a LinkedIn search suggests Fleming is now head of research for Facebook-owned Instagram.

We’ve asked Facebook to confirm whether the two researchers are still on its payroll and will update this story with any response.

In its statement, Cambridge University also said it’s still waiting for Facebook to provide it with evidence regarding Kogan’s activities. “We wrote to Facebook on 21 March to ask it to provide evidence to support its allegations about Dr Kogan. We have yet to receive a response,” it told us.

For his part Kogan has maintained he did nothing illegal — telling the Guardian last month that he’s being used as a scapegoat by Facebook.

We’ve asked Facebook to confirm what steps it’s taken so far to investigate Kogan’s actions regarding the Cambridge Analytica misuse of Facebook data — and will update this story with any response.

During his testimony to the House yesterday Zuckerberg was asked by congressman Mike Doyle when exactly Facebook had first learned about Cambridge Analytica using Facebook data — and whether specifically it had learned about it as a result of the December 2015 Guardian article.

In his testimony to the UK parliament last month, Wylie suggested Facebook might have known about the app as early as July 2014 because he said Kogan had told him he’d been in touch with some Facebook engineers to try to resolve problems with the rate that data could be pulled off the platform by his app.

But giving a “yes” response to Doyle, Zuckerberg reiterated Facebook’s claim that the company first learned about the issue at the end of 2015, when the Guardian broke the story.

At another point during this week’s testimony Zuckerberg was also asked whether any Facebook staff had worked alongside Cambridge Analytica when they were embedded with the Trump campaign in 2016. On that he responded that he didn’t know.

Yet another curious aspect to this story is that Facebook hired the co-director of GSR, the company Kogan set up to license data to Cambridge Analytica — as the Guardian reported last month.

According to its report Joseph Chancellor was hired by Facebook, around November 2015, about two months after he had left GSR — citing his LinkedIn profile (which has since been deleted).

Chancellor remains listed as an employee at Facebook research, working on human computer interaction & UX, where his biography confirms he also used to be a researcher at the University of Cambridge…

I am a quantitative social psychologist on the User Experience Research team at Facebook. Before joining Facebook, I was a postdoctoral researcher at the University of Cambridge, and I received my Ph.D. in social and personality psychology from the University of California, Riverside. My research examines happiness, emotions, social influences, and positive character traits.

We’ve asked Facebook when exactly it hired Chancellor; for what purposes; and whether it had any concerns about employing someone who had worked for a company that had misused its own users’ data.

At the time of writing the company had not responded to these questions either.


Read Full Article

What Are Popsockets? 6 Reasons Why You Need One


Have you seen one of those weird circular discs slapped on the back of someone’s phone?

Chances are that’s a Popsocket. They’re hugely popular right now, especially with the younger crowd. But what are Popsockets, and what are they used for?

They’re plastic circles that attach themselves to flat phones (or cases) with a sticky, reusable adhesive. They “pop” out twice and look like a small accordion. They’re easy to remove too.

What’s so great about them and why are they so popular? We’re going to dive in and help you figure that out.

1. Get a Grip and Stop Dropping

Popsocket Grip

The most obvious use of a Popsocket is as an additional grip. This is especially useful for larger smartphones. If you have a tendency to drop your phone a lot, or have smaller hands and find it hard to hold the phone comfortably, a Popsocket fixes that.

I have petite hands, so it gets difficult for me to hold my iPhone 8 Plus sometimes, especially with one hand. With a Popsocket, I can hold my device one-handed and browse without issue, plus it’s much more comfortable.

I also tend to drop my phone quite a bit. Since using the Popsocket, though, the number of drops is significantly lower. Often, I prefer carrying my phone around in my hand. The Popsocket allows me wrap two fingers around it, making my phone appear like it’s “floating” in my hand. I get quicker access to my phone this way, and I’m always camera-ready.

2. Picture-Perfect Selfies

Popsocket Selfie

In addition to providing a much better grip on your device, the Popsocket is great for taking selfies—if you’re into that.

Why is this? Since the Popsocket makes it easier to hold your phone with one hand, reaching the shutter button should be effortless. It also provides more freedom with the angle, and the sturdy grip means you no longer need to fumble around as you find the most flattering shot.

Before the Popsocket, I often used two hands when taking selfies, since holding my iPhone 8 Plus is a huge pain with one hand. After purchasing a Popsocket, I find myself taking more selfies because I’m able to hold my phone at more interesting angles without any fuss.

You may also want to invest in a mobile tripod if you’re looking for more smartphone camera tools.

3. Make a Stand and Prop Up Your Phone

If you need to prop your smartphone or tablet up for a better view while watching videos or playing games, the Popsocket has you covered too. There’s no need to make your own stand.

Using a Popsocket as a stand works better when there are two of them attached to your phone or tablet (especially the latter), but a single one works too.

With one Popsocket, just pop it out twice and lean your device in landscape orientation. This works best when the Popsocket is more towards the center of your phone—otherwise it just falls over and isn’t effective. This method might take a few tries to get right.

For larger devices, such as your tablet, it’s best to use two Popsockets, placed slightly off-center at the top and bottom. This way, you can prop your tablet up on a table or hang it in either portrait or landscape mode with the optional Popsocket mounts.

While putting a Popsocket on your smartphone may still work with your existing car mounts, it could become harder to fit, depending on your equipment. For those ready to completely switch over to Popsockets, the optional Popsockets Mount or Vent Mount are an inexpensive but valuable item to have around. Unlike Popsockets though, the adhesive for the regular mount is not reusable.

4. Tangle-Free Earbuds

Not everyone wants to use Bluetooth headphones, or they still might want to take advantage of their existing headphone jack. But with wired earbuds (check out wired Lightning Cable earbuds) come tangled messes. Not with Popsockets, though.

Using the dual Popsocket setup in the video above, you can wrap your wired earbuds around the Popsockets for tangle-free cord storage when they’re not in use. It may look a bit silly, but it’s easier than having to untangle those earbuds each time you dig them out of your pocket.

5. Personalize It

Personalize Popsocket

Popsockets come in a variety of premade designs and you can find them at brick-and-mortar stores like Best Buy and Target. Or you can order Popsockets from Amazon. But the real fun comes from creating your own unique Popsocket, which adds just the right amount of personality to your device.

The only way to create a custom Popsocket is through the Popsocket website. From here, you can upload images (make sure you own them first) from your device, or import something from your Facebook or Instagram. Then add some text, change the typeface and positioning, and even pick the base colors of the button and disc.

The price for custom Popsockets starts at $15. It’s fairly reasonable pricing, and adds a splash of character to your device that’s hard to replicate.

6. Use It Only When You Need It

What’s great about about Popsockets is that you can use them only when you really need them. If the idea of having a slight bulge on the back of your phone all the time bothers you, don’t worry. Popsockets are easy to remove and install or reposition at any time.

If you’re like me and change your phone case as frequently as your socks, what do you do when you only have one Popsocket? Do you need to buy one for every phone case you own? Nope. Popsockets have reusable adhesive so you can remove it and pop it back on as often as you’d like.

To do this, make sure your Popsocket is flattened, then peel it up slowly from the bottom platform base, where the adhesive is. I’d recommend taking your case off first. If it’s a bit flexible, removing the Popsocket should be no issue.

For harder shell cases, or even on the back of the device itself, you may want to try some dental floss. Just slide it underneath the platform and it should lift and separate the adhesive.

The only concern with removing Popsockets is that you can only expose it to air for so long. For the adhesive gel to maintain its stickiness and not dry out, make sure the Popsocket doesn’t get more than 15 minutes of air exposure.

It’s also possible for the adhesive gel to get dirty over time. Cleaning Popsockets just requires a quick rinse of water, and then letting it air dry. Again, make sure it’s drying for no more than 15 minutes.

Popsockets: Simple but Life-Changing

While they may look silly at first, there are many great ways to use Popsockets. It takes time to get used to the Popsocket, but after a while, it becomes an essential smartphone accessory. You’ll find it hard to go back to a phone or tablet without one.


Read Full Article

Covering “Virtual Insanity” in virtual reality


A musician from Raleigh, North Carolina named Chase Holfelder, recorded a cover of Jamiroquai’s “Virtual Insanity,” a stonerific acid jazz anthem that should be familiar to ’90s kids. This version, however, is recorded entirely inside a virtual reality rig with the help of the HTC Vive and VRScout.

Holfelder used the SoundScape VR project to play and sequence the music, allowing him to snap drums with virtual drumsticks and play the piano using the Vive paddles. In all it’s a pretty exciting of Vive’s interactive elements.

There is very little real commercial utility in VR… yet. However, when artists like Holfelder fire up their rigs and make artistic stuff like this they show us the possibilities of the medium and how we might be interacting with complex systems in the future. Sadly, he did not slide across a virtual floor or wear a furry hat in this video, an oversight that sets VR research back by at least a few years.


Read Full Article

Luminar puts its lidar tech into production through acquisitions and smart engineering


When Luminar came out of stealth last year with its built-from-scratch lidar system, it seemed to beat established players like Velodyne at their own game — but at great expense and with no capability to build at scale. After the tech proved itself on the road, however, Luminar got to work making its device better, cheaper, and able to be assembled in minutes rather than hours.

“This year for us is all about scale. Last year it took a whole day to build each unit — they were being hand assembled by optics PhDs,” said Luminar’s wunderkind founder Austin Russell. “Now we’ve got a 136,000 square foot manufacturing center and we’re down to 8 minutes a unit.”

Lest you think the company has sacrificed quality for quantity, be it known that the production unit is about 30 percent lighter and more power efficient, can see a bit further (250 meters vs 200), and detect objects with lower reflectivity (think people wearing black clothes in the dark).

The secret — to just about the whole operation, really — is the sensor. Luminar’s lidar systems, like all others, fire out a beam of light and essentially time its return. That means you need a photosensitive surface that can discern just a handful of photons.

Most photosensors, like those found in digital cameras and in other lidar systems, use a silicon-based photodetector. Silicon is well-understood, cheap, and the fabrication processes are mature.

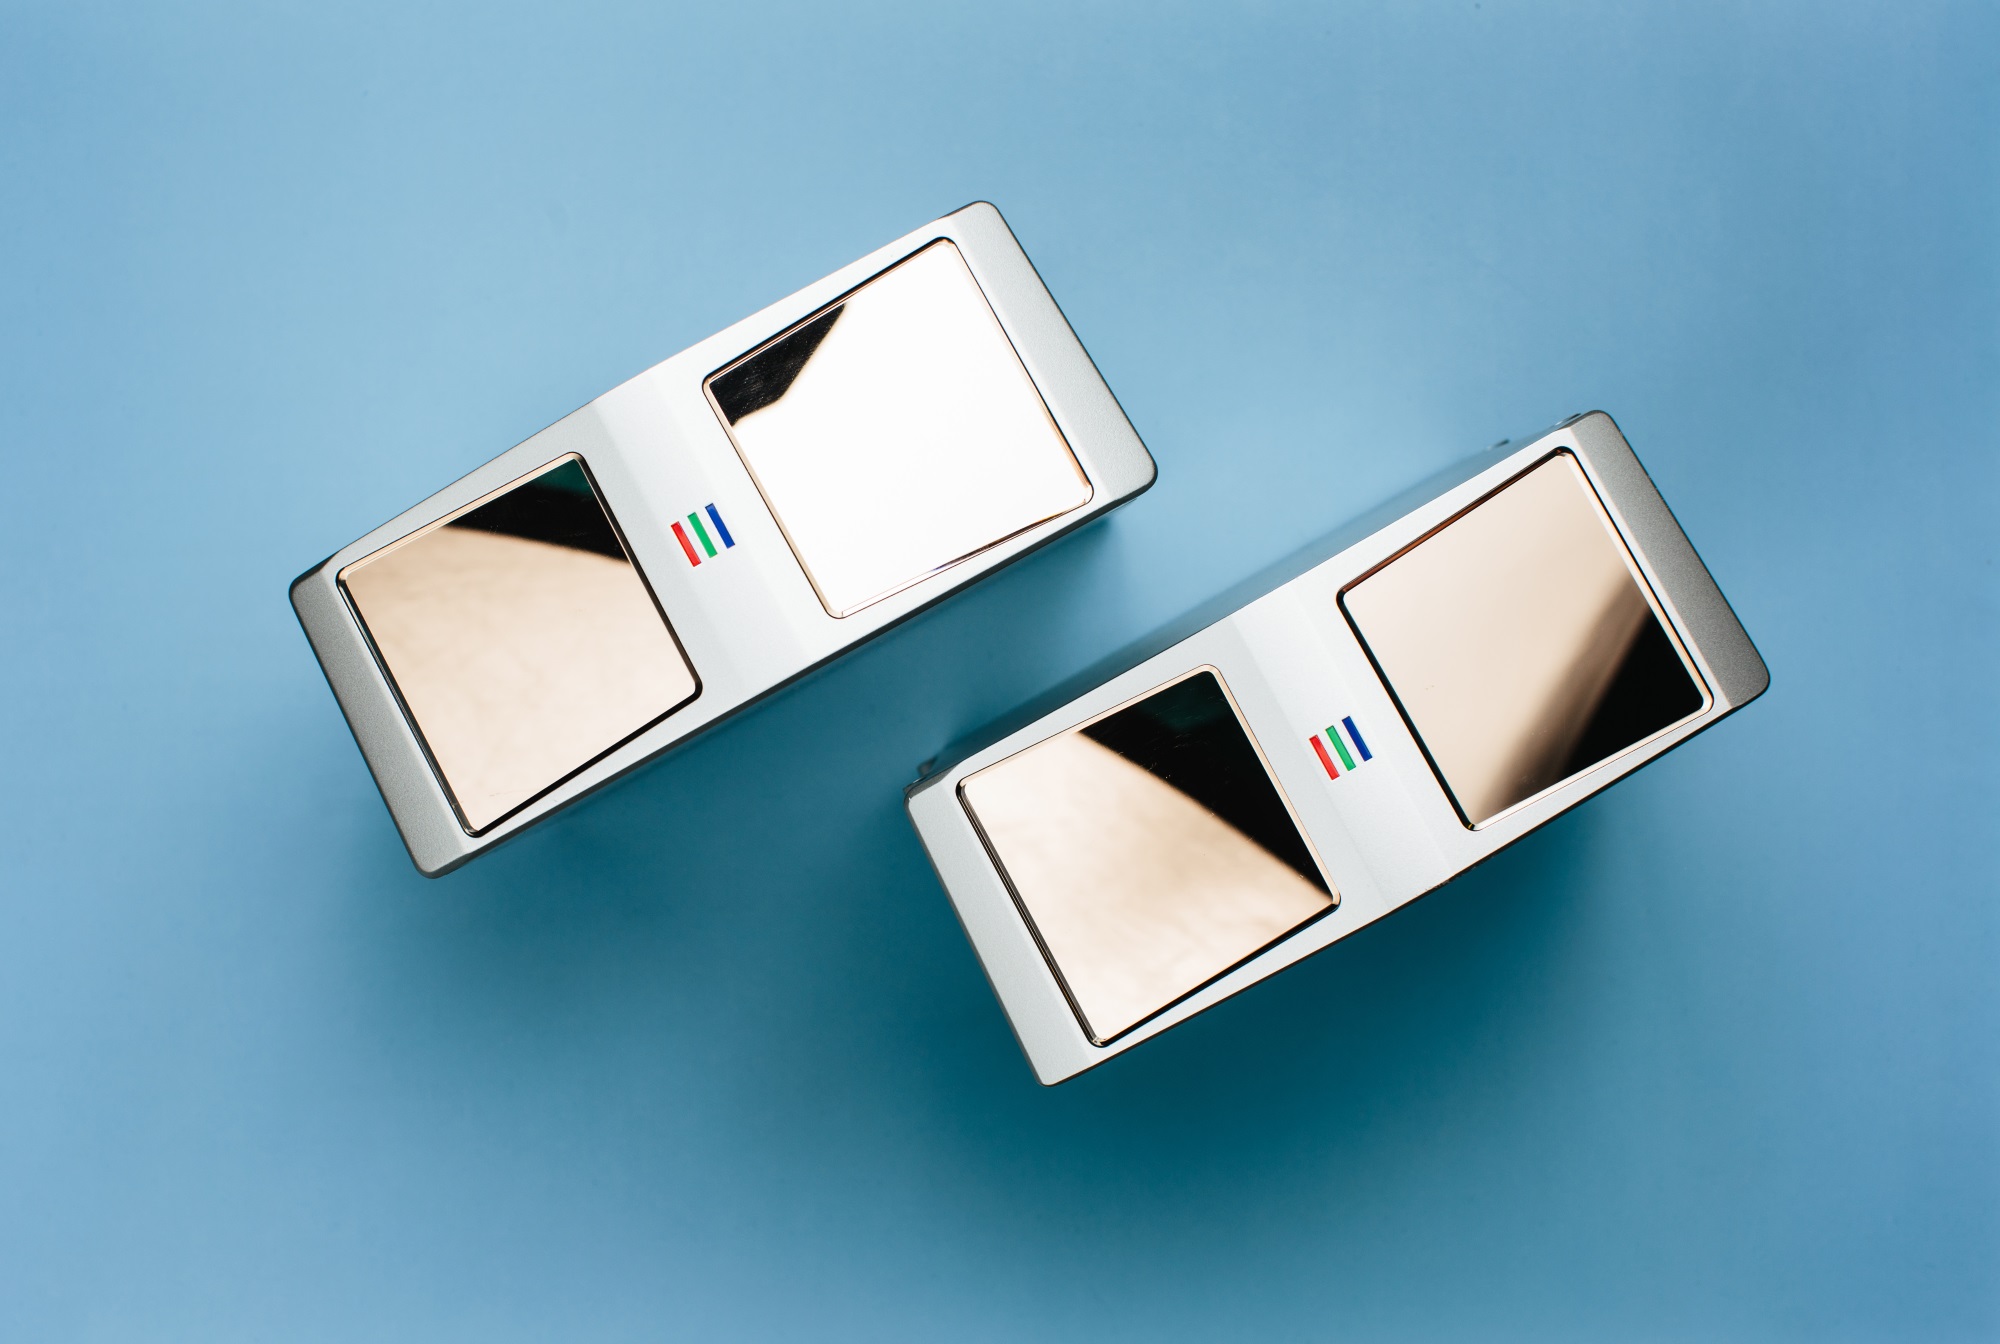
Luminar, however, decided to start from the ground up with its system, using an alloy called indium gallium arsenide, or InGaAs. An InGaAs-based photodetector works at a different frequency of light (1,550nm rather than ~900) and is far more efficient at capturing it. (Some physics here.)

The more light you’ve got, the better your sensor — that’s usually the rule. And so it is here; Luminar’s InGaAs sensor and a single laser emitter produced images tangibly superior to devices of a similar size and power draw, but with fewer moving parts.

The problem is that indium gallium arsenide is like the Dom Perignon of sensor substrates. It’s expensive as hell and designing for it is a highly specialized field. Luminar only got away with it by making a sensor a fraction of the size of a silicon one.

Last year Luminar was working with a company called Black Forest Engingeering to design these chips, and finding their paths inextricably linked (unless someone in the office wanted to volunteer to build InGaAs ASICs), Luminar bought them. The 30 employees at Black Forest, combined with the 200 hired since coming out of stealth, brings the company to 350 total.

By bringing the designers in house and building their own custom versions of not just the photodetector but also the various chips needed to parse and pass on the signals, they brought the cost of the receiver down from tens of thousands of dollars to… three dollars.

“We’ve been able to get rid of these expensive processing chips for timing and stuff,” said Russell. “We build our own ASIC. We only take like a speck of InGaAs and put it onto the chip. And we custom fab the chips.”

“This is something people have assumed there was no way you could ever scale it for production fleets,” he continued. “Well, it turns out it doesn’t actually have to be expensive!”

Sure — all it took was a bunch of geniuses, five years, and a seven-figure budget (and I’d be surprised if the $36M in seed funding was all they had to work with). But let’s not quibble.

Quality inspection time in the clean room.

It’s all being done with a view to the long road ahead, though. Last year the company demonstrated that its systems not only worked, but worked well, even if there were only a few dozen of them at first. And they could get away with it, since as Russell put it, “What everyone has been building out so far has been essentially an autonomous test fleet. But now everyone is looking into building an actual, solidified hardware platform that can scale to real world deployment.”

Some companies took a leap of faith, like Toyota and a couple other unnamed companies, even though it might have meant temporary setbacks.

“It’s a very high barrier to entry, but also a very high barrier to exit,” Russell pointed out. “Some of our partners, they’ve had to throw out tens of thousands of miles of data and redo a huge portion of their software stack to move over to our sensor. But they knew they had to do it eventually. It’s like ripping off the band-aid.”

We’ll soon see how the industry progresses — with steady improvement but also intense anxiety and scrutiny following the fatal crash of an Uber autonomous car, it’s difficult to speculate on the near future. But Luminar seems to be looking further down the road.


Read Full Article

How to Batch Crop Photos in Adobe Lightroom


There are plenty of apps available for batch cropping and resizing your photos. But if you already use Lightroom to edit your photos, you might as well use Lightroom to quickly crop all your photos down to size.

This can be particularly useful if you’re looking to crop all your photos for posting on Instagram. The catch here is, of course, that you can’t choose which part of your image will be preserved.

How to Batch Crop Photos in Adobe Lightroom

To batch crop photos, open your Lightroom library and find the photos you want to batch crop:

  1. If the photos aren’t already in one folder you can add them to a new collection. Select the images you want to crop and then go to Library > New Collection.
  2. In the window that popups, you can choose a name for your collection and make sure that Include selected photos is checked. If you want to, you can also check Create virtual copies, but because of Lightroom’s nondestructive nature this isn’t entirely necessary. It is useful, however, if you want to make easy comparisons.
  3. The collection will open up. Make sure all the photos are selected, and find the Quick Develop panel on the right. (If it’s not showing go to Window > Panels > Quick Develop.)
  4. Under Saved Preset find the Crop Ratio dropdown menu, select the ratio you want to use. By default you can choose from some popular formats include 1×1, 4×5 / 8×10, and 5×7.
  5. Once you make your selection – all the photos will be instantly cropped to the new ratio. You can easily revert to the original ratio from the same dropdown menu.


Read Full Article