15 October 2018

Winamp returns in 2019 to whip the llama’s ass harder than ever


The charmingly outdated media player Winamp is being reinvented as a platform-agnostic audio mobile app that brings together all your music, podcasts, and streaming services to a single location. It’s an ambitious relaunch, but the company behind it says it’s still all about the millions-strong global Winamp community — and as proof, the original desktop app is getting an official update as well.

For those who don’t remember: Winamp was the MP3 player of choice around the turn of the century, but went through a rocky period during Aol ownership (our former parent company) and failed to counter the likes of iTunes and the onslaught of streaming services, and more or less crumbled over the years. The original app, last updated in 2013, still works, but to say it’s long in the tooth would be something of an understatement (the community has worked hard to keep it updated, however). So it’s with pleasure that I can confirm rumors that substantial updates are on the way.

“There will be a completely new version next year, with the legacy of Winamp but a more complete listening experience,” said Alexandre Saboundjan, CEO of Radionomy, the company that bought Winamp (or what remained of it) in 2014. “You can listen to the MP3s you may have at home, but also to the cloud, to podcasts, to streaming radio stations, to a playlist you perhaps have built.”

“People want one single experience,” he concluded. “I think Winamp is the perfect player to bring that to everybody. And we want people to have it on every device.”

Laugh if you want but I laugh back

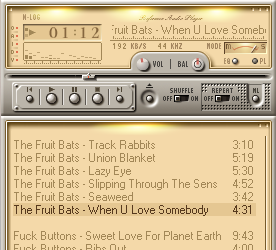
Now, I’m a Winamp user myself. And while I’ve been saddened by the drama through which the iconic MP3 player and the team that created it have gone (at the hands of TechCrunch’s former parent company, Aol), I can’t say I’ve been affected by it in any real way. Winamp 2 and 5 have taken me all the way from Windows 98 SE to 10 with nary a hiccup, and the player is docked just to the right of this browser window as I type this. (I use the nucleo_nlog skin.)

And although I bear the burden of my colleagues’ derisive comments for my choice of player, I’m far from alone. Winamp has as many as a hundred million monthly users, most of whom are outside the US. This real, engaged user base could be a powerful foot in the door for a new platform — mobile-first, but with plenty of love for the desktop too.

“Winamp users really are everywhere. It’s a huge number,” said Saboundjan. “We have a really strong and important community. But everybody ‘knows’ that Winamp is dead, that we don’t work on it any more. This is not the case.”

This may not come as a shock Winamp users still plugged into the scene: following years of rumors, an update to the desktop player leaked last month, bringing it from version 5.666 to 5.8. It was a pleasant surprise to users who had encountered compatibility problems with Windows 10 but had taken the “more coming soon” notice on the website with a massive grain of salt.

This kind of thing happens a lot, after all: an old property or app gets bought, promises are made, and after a few years it just sort of fades away. So a free update — in fact, 5.8 eliminates all paid options originally offered in the Pro version — bringing a bucketful of fixes is like Christmas coming early. Or late. At any rate it’s appreciated.

The official non-leaked 5.8 release should come out this week (the 18th, to be precise), and won’t be substantially different from the one we’ve been using for years or the one that leaked. Just bug and compatibility fixes that should keep this relic trucking along for a few years longer.

The update to the desktop app is basically a good faith advance payment to the community: Radionomy showing they aren’t just running away with the property and slapping the brand on some random venture. But the real news is Winamp 6, which Saboundjan says should come out in 2019.

“What I see today is you have to jump from one player to another player or aggregator if you want to listen to a radio station, to a podcast player if you want to listen to a podcast — this, to me, is not the final experience,” he explained. It’s all audio, and it’s all searchable in one fashion or another. So why isn’t it all in one place?

The planned version of Winamp for iOS and Android will be that place, Saboundjan claims. On desktop, “the war is over,” he said, and between the likes of iTunes and web apps, there’s not much room to squeeze in. But mobile audio is fractured and inconvenient.

While Saboundjan declined to get into the specifics of which services would be part of the new Winamp or how the app would plug into, say, your Spotify playlists, your Google Music library, your Podcasts app, Audible, and so on, he seemed confident that it would meet the needs he outlined. There are many conversations underway, he said, but licensing and agreements aren’t the main difficulty, and of course release is still quite a ways out. The team has focused on creating a consistent app across every platform you might want encounter mobile audio. A highly improved search will also play a role — as it ought to, when your media is all lumped into one place.

No word on whether it will retain its trademark intro upon installation — “WINAMP. It really whips the llama’s ass.” I certainly hope so.

This lack of specifics is a bit frustrating, of course, but I’m not worried about vaporware. I’m worried that other services will insist on the fragmented experience they’ve created that serves their interests better than ours. But if Radionomy can navigate these tricky waters and deliver a product even a little like what they’ve described, I’ll be thrilled (and my guess is tens of millions more will be as well). And if not, well, we’ll always have the original.


Read Full Article

How to Protect Your PS4 From This Messaging Bug


There’s a malicious message doing the rounds that, when opened on a PlayStation 4, can cause your console to crash. Thankfully, there’s a way of deleting the message without accessing it on your PS4, and a way of preventing it being sent to you in the first place.

There have been various examples of this over the years. In 2016, there was a video capable of crashing iPhones. And unusual characters in messages aren’t a new phenomenon. However, this malicious messaging bug is the first to hit games consoles.

The PlayStation 4 Malicious Messaging Bug

The message, as first reported on Reddit, looks innocuous enough. However, opening it on your PlayStation 4 will cause your console to slow down to a crawl and eventually crash. A factory reset is then required to get it back up and running.

Thankfully, this only works if you open the message on your PS4. If you access the message on Sony’s website or the PlayStation Messages app on Android or iOS, you can delete it without any trouble. That is if you’re not using your PS4 at the time.

How to Protect Your PS4 Against Malicious Messages

The best way to avoid being hit with this message is to take preventative measures. Which is as simple as limiting who can message you on PSN. Here’s what to do on your PlayStation 4:

  • Open Settings
  • Click Account Management
  • Click Privacy Settings
  • Enter Your Password
  • Open Personal Info | Messaging
  • Set Messages to “Friends” or “No One”

If you choose Friends then only people you’re friends with on PSN will be able to message you. If you select No One then absolutely nobody will be able to message you, ensuring your safety.

Sony Is Reportedly Working on a Permanent Fix

Sony is reported to be working on a fix, which will likely involve the company releasing a firmware update to patch the problem. Thankfully, now that you’re aware of the situation you should be able to fix the problem yourself, albeit temporarily.

While you’re fiddling with your PlayStation these are the PS4 privacy settings you should change for peace of mind. And if the worst case scenario plays out and you’re forced to buy a new PS4 here is how to transfer data from your old PS4 to a new PS4.

Image Credit: Niklas Hellerstedt/Flickr

Read the full article: How to Protect Your PS4 From This Messaging Bug


Read Full Article

How to Change the Windows Login Screen Message and Font


Everyone knows how about the Windows “look”, but what if you’re feeling a bit tired of seeing the same old thing each time you switch on your computer?

Windows 10 and the earlier Windows 7 each have good options for tweaking the login screen. Here’s how to access those options and configure the login screen to look just how you want.

Customize the Login Screen on Windows 10

You have two options for customizing the Windows 10 login screen: the message, and the background.

Change the Windows 10 Login Screen Message

Whether you use a desktop, laptop, or even a Surface-like tablet, it’s possible to set a custom login screen message. This has various uses, from delivering a corporate message, to making the end user smile. It might also be useful if your device goes missing, displaying your address to the finder.

Note that the actual login screen itself will remain unchanged. Rather, a new screen will be displayed, with an OK prompt, before the login screen.

Start by opening the Registry Editor by pressing WIN+R and typing regedit. Click OK, then browse the left-hand pane for HKEY_LOCAL_MACHINE. Expand this entry, following the path Software\Microsoft\Windows\Current Version\Policies\System.

Under System, in the right-hand pane, you should see a registry item, legalnoticecaption. Right-click this and select Modify, and under Value Data input a heading for your new message. Some sort of hail, or attention-grabbing phrase, should do.

Change the login message in Windows 10

Next, find legalnoticetext. Again, right-click to Modify, this time entering into Value Data a more detailed message.

This might be something like “Log in to access the ACME Plc network” or “If found, please return to…” Ultimately, it needs to be a message that serves some sort of purpose, otherwise there’s not much point in changing anything!

With the message input, click OK to confirm, then exit the Windows Registry. Next, restart Windows to apply the registry tweak.

Set a message to appear when Windows 10 boots

Your new Windows 10 login message should be displayed! You’ll need to click OK to reach the login screen.

It isn’t only this message you can tweak from the Windows Registry. Here are five more registry tweaks you can make in Windows 10.

Add a New Windows 10 Login Screen Background

In addition to the login screen message, you can also change the background.

Change the login screen background on Windows 10

Hit WIN+I to open the Settings screen and select Personalization > Lock Screen. Find the Background drop-down menu and select between Windows spotlight (images from Microsoft), Picture, and Slideshow. The latter two options let you select images from your own library.

Now, as this new image is specifically for the lock screen at this stage, you’ll also need to ensure the Show lock screen background picture on the sign-on screen option is switched to On. Otherwise, the lock screen with display a different image, or remain blank. Once you’re done, close the Settings screen. (Check our full guide to the Windows 10 Settings menu for more.)

Again, you should sign out of Windows to check that the tweak has been applied. If all has gone to plan, you should have a new Windows 10 lock screen background and accompanying message!

Unfortunately, that’s as far as you can go in Windows 10. Tweaks are limited to the login screen message and background; you cannot change the font. However, other Windows 10 tweaks are available, such as switching the desktop wallpaper to an animated background.

Customize the Windows 7 Login Screen

While tweaks are limited on Windows 10, things are a bit more generous on Windows 7. Here, you can customize the login screen message, as well as the login screen font.

Change the Windows 7 Login Screen Message

Intended for Windows 7 32-bit or 64-bit computers with Service Pack 1 installed, the following can be done with or without User Account Control active. You will also need a copy of Resource Hacker, a free tool designed to enable you to modify, add, rename, delete and view resources in Windows EXE files.

While this is downloading, open C:\Windows\System32\en-US\ (note that non-English versions of Windows will have a different folder name, such as \es-ES\ for Spanish) and find winlogon.exe.mui.

Assign an owner to an object in Windows 7

Right-click this file and select Properties > Security > Advanced > Owner.

In this window, click Edit and then under Change owner to, select your own login name and click Apply. Click OK to proceed and select OK to exit these windows and the original Properties box.

Assign permissions to a Windows 7 object

Once done, return to Properties > Security and select Edit. In the following box, click Add and search for your login name; it should resolve as PCNAME\USERNAME.

Select this, click OK to add the login, and you will be returned to the Security tab. From here, click Advanced > Permissions > Change Permissions, and under Permission Entries select the newly added entry and click Edit.

Select the Full Control checkbox in the Allow column, then click OK, and then Apply to exit.

You should then copy the winlogon.exe.mui to a new location, preferably your desktop.

Run as admin in Windows 7

Next, install Resource Hacker and launch the software from the Windows Start menu by right-clicking and selecting Run as Administrator.

Agree to the UAC notice and when the application has loaded open File > Open.In the Files of type box select All files (*.*), browse to the desktop and load winlogon.exe.mui into Resource Hacker.

Tweak a file with Resource Hacker

You will see that the tool has a similar interface to the Windows Registry Editor, so expand String Table > 63 > 1033 and in the right pane update the entries in quotes on lines 1002 and 1005—this will be your new Windows 7 login screen message!

Change the Windows 7 login message

Ensure the quotes remain in place, and click Compile Script then File > Save to complete the process.

Close Resource Hacker and copy the winlogon.exe.mui file back to C:\Windows\System32\en-US\ (choosing Copy and Replace). Open Start and type CMD, right-clicking the resulting command prompt icon and selecting Run as administrator.

Run mcbuilder in the Windows 7 command prompt

Type mcbuilder and tap Enter, then wait until the process is complete (the cursor will flash on a new line).

When done, type exit and tap Enter to close the command prompt.

You’ll need to restart Windows to complete the process and confirm your changes.

To undo this and restore the original message, simply start the process again, replacing your custom message with “Welcome”.

Alternatively, delete winlogon.exe.mui and replace it with the winlogon.exe_original.mui file created by Resource Hacker, making sure to give it the old filename.

Select a New Windows 7 Login Screen Font

While changing the login screen message might take a while, changing the font is much quicker.

Open Start and type regedit, tapping Enter to launch the utility and agreeing to any UAC prompts (before proceeding use File > Export to make a backup of your Windows Registry—useful if an error is made).

Use the Registry Editor to tweak the Windows 7 login screen

Expand the path HKEY_LOCAL_MACHINE\SOFTWARE\Microsoft\Windows NT\CurrentVersion\FontSubstitutes and find MS Shell Dlg in the right pane#

Right click on this and select Modify.

In the resulting box, input the name of the font you wish to use (check C:\Windows\Fonts for a list of currently installed choices), and repeat for the entry MS Shell Dlg 2 (note that the default option is Tahoma).

Once this is done, close the Windows registry and restart your computer to apply the changes. (While you can also logoff and login, locking your computer will not display the new font.)

The Login Text Is Too Light/Dark!

Changing the color of the Windows login screen font isn’t possible.

However, you can change the weight of the text—that is, how prominent it appears in front of your chosen background.

To do this, return to the Windows Registry Editor and expand the path HKLM\SOFTWARE\Microsoft\Windows\CurrentVersion\Authentication\LoginUI.

Change the login screen text weight in Registry Editor

In the right-hand pane, right-click some empty space, and select New > DWORD, naming it ButtonSet.

Once this is done, double click to edit the value, clicking OK when you’re done. You have a choice of the following:

0: This gives lighter text shadows, darker buttons and is the default choice.

1: Suitable for lighter backgrounds, this option offers darker text shadows and lighter buttons.

2: Intended for a darker background, text shadows are removed, and buttons are opaque.

When your choice is made, close Registry Editor and restart Windows to check the results.

Change Your Windows Login Screen!

We’ve looked at login screen tweaks for two versions of Windows, those that are currently most popular: Windows 7, and Windows 10.

To recap, if you want to tweak the Windows 10 login screen, you must:

  • Open the Windows Registry
  • Expand HKEY_LOCAL_MACHINE. Expand this entry, following the path Software / Microsoft / Windows / Current Version / Policies / System
  • Right-click legalnoticecaption, select Modify, and under Value Data input your new message.

For tweaks to the Windows 7 login screen, meanwhile, you can:

  • Change the login screen message
  • Change the login screen font
  • Adjust the weight of the text, making it lighter or darker

Although third party software and changes to the Windows Registry are required to make these customizations, the results can be impressive, especially when combined with a custom login screen background.

Looking for more Windows tweaks? Here are six tools for tweaking the Windows 10 Start menu.

Read the full article: How to Change the Windows Login Screen Message and Font


Read Full Article

How to Watch Everything on Netflix No Matter Where You Live


netflix-everywhere

For anyone who loves movies and TV shows, Netflix is a must-have. The video streaming giant is available in 190 countries. Unfortunately, the library isn’t the same everywhere. But there are a few tricks to get access to those other libraries.

You might be surprised to find that Netflix has different movies and TV shows available for streaming in different countries. In this article, we explore why Netflix content differs from country to country, and how you can watch everything on Netflix regardless of where you live.

Why Does the Netflix Library Differ?

According to Netflix CEO Reed Hastings, the Netflix library or catalogue differs in each country because of territorial licensing. Here’s how it works.

The producers of any movie or TV show want to maximize profits from their product. So they license their creation to different content distributors in different parts of the world. Naturally, the highest bidder wins the rights.

For the sake of an example, let’s talk about Star Wars, one of the best geek movies of all time. As a distributor (yes, streaming content counts as “distributing”), Netflix has to decide if enough people in the US, the UK, India, and other regions will watch Star Wars to recover the expense of buying the rights.

If Netflix’s research shows an interest for Star Wars in the US but not in India, then it will buy the Star Wars territorial license for the US but not for India. So US Netflix users will be able to watch Star Wars, but Indian Netflix users will not.

If Netflix’s research shows an interest for Star Wars in both the US and India, it will then bid for the territorial license for both regions. However, some other distributor might offer a higher price for the Indian territorial license, or perhaps already have the license. Then, once again, US Netflix users will be able to watch Star Wars, but Indian users will not.

In short, audience interest and territorial licensing determine why the Netflix library varies depending from region to region.

Netflix is trying hard to secure global availability of all the content on Netflix so that geographic restrictions go away. But that will take some time. So, at least for now, different countries will have access to different Netflix libraries.

How to Watch Netflix From a Different Country

how to watch netflix anywhere

The good news is that it’s actually pretty easy to watch the Netflix library from a different country. Our ultimate guide to Netflix notes that you can access any country’s library by using virtual private networks (VPNs). There’s also another technology called DNS tunnelling or Smart DNS. Both routes serve the same end purpose: they make Netflix think your device is in a different region to the one you are actually in.

These methods have some limitations though. For instance, you won’t be able to use a Chromecast to relay Netflix from your phone to your TV. The speed of buffering and streaming might also be adversely affected through these methods. However, on the flip side, you’ll have a larger video library than ever before.

Using Netflix With a VPN

We have previously made the case for using VPNs instead of proxy DNS. But the biggest point in the favor of VPNs is how easy it is to get started.

Netflix is available on all platforms, which gives you some freedom in choosing a reputable VPN that works for you. (Netflix is vigilant about VPN usage and blocks most free VPNs, but many paid VPN services still work.) The process is the same for all of them:

  1. Install and switch on your VPN.
  2. In the VPN, choose the country whose Netflix library you want to browse.
  3. Open the Netflix app or go to the Netflix website.
  4. Enjoy that country’s Netflix catalog.

Not all paid VPNs are equal. For the best chance of success, we recommend using ExpressVPN (use this link to get up to 49% off).

Using Netflix With Smart DNS

With things like YouTube, it’s better to use Smart DNS services to watch region-blocked video. But Netflix has made it harder than ever to use Smart DNS to access another country’s catalogue.

The advantage of using this technology is that unlike VPN, Smart DNS does not route data through an intermediary server between you and Netflix, so it’s faster. This is especially evident with high-quality streams like 4K videos.

But unlike VPNs, your options are severely limited if you want to use a Smart DNS for Netflix. The only one that still works is Smart DNS Proxy, and that too supports mainly the U.S. and Canadian Netflix catalogs.

Right now, unless you have some specific other reasons apart from Netflix to pay for Smart DNS Proxy, we recommend paying for a good VPN instead.

How to Find What’s Available in Netflix Regions

uNoGS is a universal search engine for Netflix catalogues in any country

So, now you know how to access Netflix from other countries, but that still leaves one problem. How do you search for a movie to know which country’s Netflix you can stream it on? That’s where uNoGS comes in.

This web app searches Netflix libraries across the world. One quick search and the service will tell you which country’s library you need to change your VPN or DNS to.

You can filter your search results by IMDb rating, the year the film was released in, the genre, and other categories. And of course, you can choose which of the 28 countries on offer you want to search in.

Visit: uNoGS 

Which VPNs Work With Netflix?

Netflix is routinely cracking down on VPNs, making it difficult to bypass regional licensing. So while the methods listed above work right now, we cannot guarantee they will work forever. However, we do regularly check on what methods are still functioning, so it’s worth bookmarking this article.

Overall, Express VPN and Private VPN are among our favorite options. The first always works with Netflix US, which is one of the best catalogs among all countries. And Private VPN supports the most number of countries for Netflix libraries. You can try either of them with a free trial, or check our updated list to find which VPNs still work with Netflix.

Read the full article: How to Watch Everything on Netflix No Matter Where You Live


Read Full Article

Modified Bayes' Theorem


Modified Bayes' Theorem

How to Use Snapchat Memories: Everything You Need to Know


snapchat-memories

Snapchat Memories—introduced in 2016—shifted Snapchat away from being the platform of self-destructing photos and videos, to being direct competition for Facebook.

Snapchat Memories is now a key component of Snapchat, but do you know how to use the feature effectively? Here’s everything you need to know about using Snapchat Memories.

Your Personalized Album of Snaps

Snapchat Memories offers a personalized album of your favorite snaps and stories that you access by swiping up on the camera home screen. And it’s one of the things every Snapchat user should know how to use.

Previously, you could download your snaps and stories directly to your phone. Now, you can save them within the app itself for even easier access. This makes for a fun, more engaged way to share your memories with friends and family without scrolling through unsorted camera rolls, while still keeping your “private” shots safe.

Everything you save to Snapchat Memories is securely backed up by Snapchat using Google’s reliable App Engine Cloud. This means that even if you lose your phone, you’ll still be able to access your saved snaps and stories next time you log in to the app.

Understanding the Memories Tab

When you open up Memories within Snapchat, you’ll see a reverse chronological list of your saved snaps and stories. Snaps are displayed as rectangles, and stories as circles.

To search for specific snaps and stories, click on the Search button in the top-left. This search feature will not just look for words within your captions, but also recognizable objects (like cats or hats), as well as location (if you’ve allowed Snapchat to access your location).

The Select button in the top right enables you to select one or more of your saved snaps and stories. You can then send these to friends, delete them, add them to your current story, share them on other platforms, or move to the My Eyes Only folder (more on that later).

Saving Your Snaps and Stories to Memories

Just before you send a snap to a friend or publish it to your Story, click on the Save button at the bottom of the screen. This will save that snap to your Memories. Alternatively, if you long-hold the Download button, you can also choose to Save to Camera Roll and Memories.

If you want to save your currently viewable Snapchat Story (My Story) to Memories, navigate to the Stories screen. Click the Save button that’s next to My Story. This will save the entire Story to your Memories.

Naturally, you can only save your own snaps and stories to Memories, not anyone else’s.

Posting Old Snaps and Stories

One of the main benefits of Snapchat Memories is the ability to re-share your old snaps and stories. This is perfect for some #TBT posts. These can either be added to your current story or sent individually to friends.

Note that all old stories and snaps that you share will have a black border around them, as well as a timestamp, to make it clear how old they are.

  • To re-share a saved snap, long-hold the snap from within Memories, then edit as you normally would. Click the blue Share button and choose to either add the snap to your story or select the friends you want to send it to.
  • To re-share a saved story, long-hold that story, and make any edits. Click Send Story, and choose where you would like the story to be sent. You also have the option of only sending individual snaps from within your stories.

Create New Stories From Your Memories

If you’ve created loads of snaps and taken loads of photos during your holiday and saved these to Memories, you can easily compile these into a brand new story.

To do this, click the Select button in the top right, and choose each of the snaps, stories, and photos from your Camera Roll, which you want to compile. Then click the circular + button at the bottom of the screen. A new story will be created.

To name your new story, long-hold the story, click the hamburger button (top left), and click “Rename Story“.

You can then share this story as explained earlier.

Understanding “My Eyes Only”

How many times have you allowed a friend to browse through your camera roll, only to realize there’s a photo in there you just didn’t want them to see?

That’s what “My Eyes Only” is for. This is a private album that you can add your private snaps and stories to.

Click the Select button within Memories, then choose one or more snaps or stories to make private. When you’re done, click on the Padlock button at the bottom of the screen, and click Move. The first time you do this, you’ll be asked to provide a 4-digit passcode. Make sure you choose something you’ll remember. If you forget this, Snapchat can’t help you recover those Memories.

Why Snapchat Memories Is a Game-Changer

There are two main reasons why introducing Memories was a very smart move by Snapchat.

Saving snaps and stories used to be incredibly frustrating. This turned a lot of people (and brands) away from the platform because they didn’t want to spend time creating content that would simply disappear. Now that’s changed. Snapchat is already popular, with more users than Pinterest, Twitter, and LinkedIn. And Memories is helping Snapchat continue to grow.

But more importantly, Snapchat is helping to revolutionize the way we store, share, and look back on our memories. Up to now, social media has offered us a way to create semi-public albums of photos, and streams of status updates.

Snapchat is instead offering a searchable archive of stories that we’ve lived through. Each of these stories now comprises filters, stickers, captions, images, and short-form video. If images paint a thousand words, Snapchat stories could easily paint a million. It offers a whole new experience when we’re looking back at old memories, or showing them to our friends and family.

Not only can we rest easy knowing that our private photos are behind lock and key. But with stories offering so much more than a set of photo albums, what we have is a camera roll on steroids. A camera roll that comes alive, and brings our memories to life. Plus, it allows us to snap later, rather than right now, so we can spend more time in the present.

Mix this with Snapchat’s other cool features, along with Snapchat’s most creative users, and you have an app everyone should be using.

Read the full article: How to Use Snapchat Memories: Everything You Need to Know


Read Full Article

Casio adds modern tech to the classic G-Shock watch


Casio released the first G-Shock watch in 1983. The original set the bar for tough watches with incredible shock resistant to protect the quartz module. It’s a classic and still available for purchase in several forms in 2018.

Recently, Casio released an all-metal version of the watch that features the iconic design but with modern technology like Bluetooth connectivity. This isn’t a smartwatch, but simply a watch that’s a bit smarter than most.

The Bluetooth function is simple and worth a look. It gives owners an easy way to access settings. Instead of navigating through the menus on the watch, owners can use a smartphone app to sync the watch to the phone’s time, adjust settings and set alarms and reminders. It takes just one button press on the watch and for the owner to launch the app. The watch does not have to be connected through the phone’s Bluetooth menu; the app takes care of it all.

I found the experience a refreshing update. I don’t need a smartwatch all the time but there are advantages to connecting a watch to a phone. If this is a glimpse at the future of timekeeping, I’m all in. I enjoy a complicated complication as much as the next guy, but sometimes it’s overwhelming to set the primary timezone let alone the alarm. I don’t mind when an app can do it for me.


Read Full Article

The 15 Best Offline Music Player Apps for Android

Tech Will Save Us offers STEM toys you’ll actually use


I hate STEM toys. I have three kids and ultimately every “educational” toy they’ve used – from LittleBits to Nintendo Labo – has ended up in a corner somewhere, ignored for more exciting fare. This happens for a few reasons but the primary one is that the toys require too much attention and have no lasting play value.

Given this fact, I thought our species (or at least my kids) would be doomed to Idoicracy-style techno illiteracy. Luckily, a set of toys from the optimistically-named organization Tech Will Save Us, has changed my mind.

TWSU toys are nice in that they are at once rugged toys that withstand constant play and electronic devices that can be programmed by a clever eight year old. For example, the $60 Creative Coder is basically a LilyPad device with a USB interface and a block-based programming language that lets you program it. The TWSU website features a number of little programs you can upload to the board including a Pokemon sensor that starts out red and white until you shake the board, activating the sensor and causing the lights to blink. My son loved it and he slept in it, strapping the wearable to his wrist like an Apple Watch.

Programming the Creative Coder is very simple. It uses a Scratch-like interface to set colors and activate timers and in a few minutes I was able to make a Ghost Detector that “hunted” for ghosts and then blinked when it found one. I based the idea on an old toy I had in the 1980s called IAN that beeped when it got close to “invisible aliens.” I still remember the excitement I felt walking around in my Grandma’s basement looking for monsters. I think he felt the same excitement.

The other toys – including a simple game machine that uses an Arduino and a 9×9 LED display – were similarly interesting. The game machine, for example, included a primitive version of Flappy Bird that my son played for hours and he was excited to get the LED to spell his name on command. It did, however, require knowledge of Arduino programming which limited the usability. However, because it comes preloaded with a simple game the device felt complete right out of the box.

How are these toys different from all the other STEM junk I’ve tried? Again, they worked out of the box. The Creative Coder could double as a bike light as soon as you assembled it and it came inside of a plastic case that made it a wearable instead of a science project. The other toys were just that – toys – and the programming was an afterthought. Ultimately I’m sure this stuff will end up under the couch, dead and forgotten, but until that happens they’ve supplied a great deal of fun.

STEM toys often focus on the STEM. I suspect this is because engineers are building them and not toymakers. Further, toymakers create things like the Zoomer Playful Pup (another clever toy) and hide all of the technology deep behind layers of plastic. Finding the right balance in so-called STEM toys is incredibly difficult but its doable and, as Tech Will Save Us have proved, these toys don’t have to be too boring or too complex for the kids (and parents) who might buy them.


Read Full Article

Vinli launches mobility data platform, signs partnership with ALD Automotive


Connected car startup Vinli aims to connect vehicles to the cloud and is today announcing a change in its business model as it partners with the largest fleet operator in Europe, ALD Automotive.

Vinli launched in 2014 as a direct consumer company that allowed owners to add cloud services to automobiles. It was a clever concept, and when it launched four years ago, it was ahead of the curve. The company went on to raise to $6.5M through four rounds of funding, slowly evolving the product to meet the changing needs of the market.

Today, the company is announcing a change in focus and will no longer sell products directly to consumers. The company founder and CEO Mark Haider tells TechCrunch this is in response to the product’s evolution, which can now offer enterprises a platform for them to launch their own mobility applications directly to their users.

Vinli is discontinuing the production of its hardware and will work with partners to offer the same services to consumers.

To go along with this new business strategy, Vinli is launching a data platform that Haider tells me can ingest data from any source and correlate it with machine learning and AI, allowing customers to develop predictive services for their products. Called Era, Vinli believes this will enable its customers to mine trends from data without the need of data scientists.

Vinli signed a deal with ALD Automotive to add its connected services to its fleets of 1.6 million vehicles. In a press release, ALD Automotive says Vinli will enrich ALD’s “overall service offering and develop new value-added solutions to improve both driver experience and optimize overall Total Cost of Ownership for efficient fleet management.”

“We believe that the automotive industry is evolving to become a service-based and subscription-driven industry,” said Mark Haidar, CEO of Vinli. “Connected cars and data are at the epicenter of this change. Collecting, analyzing, and discovering trends from ALD’s 1.6 million vehicles will not only be transformative to the driver but to the industry as a whole”

Terms of the partnership were not released.

Connecting vehicles to the cloud has significant implications as car makers, insurers and consumers alike can gain deep insights into the habits of the driver and mechanics of the car throughout its life. Vinli seems well positioned to offer a platform to provide this data and today’s moves should help the company into the future.


Read Full Article

How to Install New Themes on RetroPie for an Awesome New Look


You’ve set up your Raspberry Pi as a retro gaming station, perhaps under your TV, as a handheld, or even in a full-sized arcade machine. But the default look isn’t really rocking for you.

Fortunately, you’ve got a great selection of themes to choose from. Here’s how to install and apply themes to EmulationStation in RetroPie.

RetroPie and EmulationStation

If you’re using RetroPie already, then you’ll be aware of EmulationStation. It’s the “front-end” for the emulators that are grouped together in RetroPie. EmulationStation is the user interface that lets you access the emulators, and the gaming ROMs you have installed.

EmulationStation load image for RetroPie

You see it when you’re browsing through the games on your system; it’s there when you press the menu button in a game to go and choose another game, or restart the computer.

Default RetroPie theme

RetroPie itself can be found lurking in the background. In some cases, you’ll come across it via the Configuration menu. It’s here that you can configure various options, which include adding a new theme for EmulationStation.

Finding New Themes for RetroPie

Remarkably straightforward to use, the EmulationStation interface can sadly get old quickly. Fortunately, the alternative themes will give your RetroPie a stunning new look.

browse the RetroPie configuration menu

To find the new themes, you’ll need to navigate to the RetroPie menu, and select ES Themes.

Here, you’ll see the RetroPie Setup view. Proceed to select the first option, Download Theme Gallery, and wait as the gallery downloads. (Note that if you don’t want to wait for the gallery, you can simply scroll down and select a theme from the list.)

launch the theme browser in RetroPie

Once this is done, select View or Update Theme Gallery, then View Theme Gallery to see a preview of the themes. This will launch a slideshow, but you can cycle through the options using the main button on your controller. It’s a good idea to make a note of the theme names, as they cannot be installed without going back to the previous menu.

You can also check the themes on the RetroPie wiki.

Browse the list of themes for EmulationStation

To install a new EmulationStation theme, simply scroll down to highlight the one you want, and click OK. You can install as many as you need, or pop back into this screen later to add more.

But which themes should you choose?

The Best Themes You Can Add to RetroPie

To get you started with a brand-new look for your RetroPie system, we’ve had a look through the themes to find the best ones. Some of our favorites include:

  • Minimal: a stripped back version of the main EmulationStation theme (Carbon), this has a white and blue color scheme.
  • SNES-Mini: boasting a SNES-themed user interface, this is heavy on 1990s style pixels and neon colors. If you’ve turned your Raspberry Pi into a DIY SNES classic, this is a good option.
  • ComicBook: far more sophisticated than the name suggests, this is available in 16:9 and 4:3 resolutions.
  • Stranger Stuff: as the name suggests, this is inspired by the Stranger Things TV show, and is certainly as evocative. Along with a few other retro gaming platform themes, this looks particularly good when RetroPie is running on an old TV.
  • Vertical_Arcade: finally, if you’re planning on building your RetroPie box into a full-sized arcade machine, this theme is ideal. Note that you will need to change the orientation of your Raspberry Pi’s output to use this (as well as your display!)

If you’re using the vertical_arcade, or any other suitable theme, you’ll need to change your Raspberry Pi configuration. This can be done easily by accessing the config.txt file in the /boot/ directory, and setting the display_rotate value as shown:

display_rotate=2

Remember to save the file before exiting, and reboot your Raspberry Pi to apply the tweak.

This will set orientation of your Pi’s display output to portrait mode, ideal for the vertical_arcade theme.

While these are good options, they’re not our only suggestions. Other themes you might check include the Nintendo Wii-inspired pii_wii; you might prefer retrorama, or perhaps the library feel of boxcity. If you’re a fan of Game of Thrones, Star Trek, or Star Wars, some themes dedicated to those franchises are also available (look for tributeGoT, tributeSTrek, and tributeSWars.)

Selecting a New RetroPie Theme

To select an installed theme for your RetroPie system, you’ll need to open the RetroPie Main Menu. You’ll find this by pressing the Menu button on your controller.

Select your new EmulationStation theme

Here, select UI Settings > Theme Set and use the controller’s left and right buttons to select one of the installed themes.

Select Back when the preferred theme is selected, and close the menu.

Change how games are listed in RetroPie

It’s that simple, and in a few moments time you’ll be enjoying a stunning new look on your RetroPie system. You can benefit from changing the default options, too, to view more game information. Once again in the UI Settings menu, change the Gamelist View Style from the default Basic to Detailed, or even Video. The end result is a slick looking new interface for your retro gaming hub.

Don’t like the new look? Simple! Just head back to the ES Themes menu and revert to the original theme. It should be easy to find; if not, look for a theme called “carbon”.

Improving RetroPie Even Further

Amiga theme for RetroPie

Because RetroPie is so easy to install (even as an app), you might not have considered how easy it is to give it a new look. Once you’ve personalized it, however, you probably won’t look back.

However, don’t go into this blind. Make sure you have a few themes in mind before you install them. Also, don’t feel that you must stick to a new theme if it turns out you don’t like it. Just swap back to Carbon, or choose a different theme.

Your new RetroPie set up might look pretty slick, but does the performance measure up? See our RetroPie tips for better gaming performance.

Read the full article: How to Install New Themes on RetroPie for an Awesome New Look


Read Full Article

How to Add an Email Signature in Microsoft Office 365


If you sign all or most of your emails the same way, you can create an email signature. It shows professionalism in business communications and acts as a digital business card. A well-designed email signature can also serve as a promotional tool for just about anything, like a business, website, blog, or a book.

We’ve discussed how to add an email signature in Outlook for the desktop. But what if you use the Microsoft Outlook Web App in Office 365? In this article, we’ll show you how to add, insert, and change your signature in the Outlook Web App in Office 365.

Step 1: Log Into Microsoft Office 365

To access Microsoft Outlook online, go to Microsoft’s Office site and sign in using your personal Microsoft account. Or you can log in with your business or school Microsoft account.

Then, click Outlook under Apps.

Log in to your Microsoft account and click Outlook

Step 2: Open Microsoft Outlook Settings

Click the Settings gear icon in the upper-right corner of the window.

Then, click View all Outlook settings at the bottom of the Settings pane.

Click View all Outlook settings in the Outlook Web App

Step 3: Access the Email Signature in Settings

On the Settings screen, click Mail in the left pane. Then, click Compose and reply in the middle pane.

Click Mail the Compose and reply in Outlook in Office 365

Step 4: Format Your Email Signature

The Email signature box has a toolbar at the top that allows you to format your signature. You can make the text bold, italic, or underlined, and also change the size and alignment of the text.

When we tested the formatting toolbar, it applied the formatting we selected at the beginning of the signature, no matter where the cursor was. So you may have to put your formatted text at the beginning of your signature and then copy and paste it to where you want it.

Format a signature in Outlook in Office 365

Step 5: Add an Office 365 Email Signature

Enter the text you want in your signature in the Email signature box.

The Outlook Web App does not allow you to insert an image file in your signature. But you can copy an image from another program and paste it into your signature. Any text or images you paste are inserted at the cursor, not at the beginning of the signature, like with the formatting we discussed in the previous step.

Alternatively, you can use a free email generator app to design one and paste it here.

There are two options for automatically including your signature in emails:

  • To include your signature automatically on all new messages, check the Automatically include my signature on new messages that I compose box.
  • To automatically include your signature when you reply to messages or forward messages, check the Automatically include my signature on messages I forward or reply to box.

Because there’s only one signature allowed in the Outlook Web App, the signature is the same for new emails and for replies and forwarded messages. The Outlook desktop app allows you to have different signatures for replies and new emails.

Click Save and click the X in the upper-right corner to close the Compose and reply dialog box.

Create a signature and click Save in Outlook in Office 365

If you use both the Outlook Web App and the Outlook desktop app, a signature created in one will not be available in the other. You must create a signature separately in each app. The web app only allows you to create one signature. But you can create one default signature and multiple alternative signatures in the Outlook desktop app.

Step 6: Automatically Insert Your Email Signature

If you selected to automatically insert your signature into all new emails, you’ll see your signature in the message body when you click New message.

Signature automatically inserted into a new email in Outlook in Office 365

Step 7: Manually Insert Your Email Signature

If you chose not to automatically add your signature to all your email messages in the Outlook Web App, you can manually add it by clicking the menu button at the top of an email and selecting Insert Signature.

The signature is inserted into the email message and the cursor is placed at the beginning of the message body. Just don’t forget to add the recipient(s) and a subject line.

Select Insert signature in Outlook in Office 365

Step 8: Change Outlook Email Signature in Office 365

To change your signature in the Outlook Web App in Office 365, simply go back to the Compose and reply screen in the Settings and change the content in the Email signature box.

Your revised signature will be inserted in all new emails, replies, and forwards from this point on.

Communicate Professionally With an Email Signature

Email signatures allow you to easily and quickly make a good personal or professional impression, personally. Just make sure you don’t make the wrong impression with your email signature.

Read the full article: How to Add an Email Signature in Microsoft Office 365


Read Full Article