03 July 2019

Girlboss Launches a LinkedIn for Women


Girlboss, a media company which creates content aimed at females, has launched a new professional networking site. Given Girlboss’ focus on females, its new professional networking platform is being pitched as LinkedIn for women. At least unofficially.

LinkedIn is an amazing resource packed with cool features. However, LinkedIn has been around since 2003, which, in internet years, is a very long time ago. Girlboss is hoping to exploit this by launching a new professional networking built for a younger audience.

What Is Girlboss’ Professional Networking 2.0?

The Girlboss professional network is “built for ambitious women”. It’s designed as a platform for entrepreneurs, marketers, creatives, side hustlers, and executives to connect on a number of levels, with the aim being to help each other succeed.

Members are invited to connect with each other, ask questions, and exchange ideas. Just like LinkedIn, you can send connection requests to other community members. If and when they accept the request, you can then start chatting to them.

Sophia Amoruso, the CEO of Girlboss, told Business Insider that “This is the place where you can have a beautiful profile that shares not just what you do but who you are.” In other words, you can talk about more than just your professional achievements.

The examples given are completing a marathon or buying a house. Both of which are achievements worth sharing with others, but which don’t belong on LinkedIn. The idea is to offer a more rounded profile of yourself than is possible with a resume.

Can Girlboss Compete With LinkedIn?

Girlboss’ professional network is available right now at Community.Girlboss.com. Anyone can sign up for free, including men, but Girlboss is aiming the site at professional women. The website is already live, with Girlboss also planning to launch an app.

Girlboss faces an uphill battle competing with the mighty LinkedIn. However, unlike Girlboss, LinkedIn isn’t exactly built with millennial women in mind. Girlboss isn’t alone either, so here are the best websites for women everyone should know about.

Read the full article: Girlboss Launches a LinkedIn for Women


Read Full Article

DuckDuckGo vs. Google: The Best Search Engine for You

How to Delete Your Browsing History on Android

9 Things to Do Before Using a New Computer


The first thing you want to do with a new computer is jump right into using it. But we don’t recommend doing that. There are some tasks that you must take care of before you start using your new machine. These tasks are easy to do and you won’t have to put too much effort.

In the long run, it can make your PC safer, faster, and better poised for the future. Complete these Windows customizations before using your new computer.

1. Review the Update Settings

Microsoft releases periodic updates to Windows 10. Quality updates consist of both bug and security fixes, while Feature updates are significant upgrades. In the recent versions of Windows 10 (after 1809), Microsoft gives you more hands-on control over the updates.

Open the Settings app and navigate to Update & Security > Windows Update.

open windows update settings

Click Change active hours to prevent Windows from automatically restarting your PC. The View update history neatly organizes the updates installed on your system. If an update is causing a problem, click Uninstall updates and follow the dialog prompt.

The Advanced Options offers you more granular options to control and configure updates. Do note that Windows 10 Pro provides more option than Windows 10 Home.

options in windows update settings

The toggle for Pause Updates lets you temporarily pause all updates. Enable Update notifications to prompt you when a pending update requires a reboot.

Under Choose when updates are installed, you can separately defer the installation of quality updates (up to 30 days) and feature updates (up to one year). This option is available only in Windows 10 Pro.

choose when updates are installed in windows 10

2. Check the Power Plan

Pay close attention to power management settings for productivity benefits. It helps you extend the battery life and balance resource usage while doing an intensive computing task.

Open the Settings app and navigate to System > Power & sleep. Set the idle time before the screen goes dark and the time before it goes to sleep.

open the power and sleep settings

Click the Additional Power Settings link to open the Power Options pages in Control Panel. You can create a custom Windows power plan according to your needs.

create a custom power plan

If you want to fine tune it further, click Change advanced power settings. The options on this dialog box provide a great deal of granular control over power-related events. You can tailor them to your hardware and software needs.

advanced power options to minutely control power related events

3. Battery Health and Calibration

The laptop battery is an essential piece of hardware, yet we’re often less informed and least excited about its health. When you buy a new machine, it’s necessary to monitor battery health right from the beginning. If you don’t know where to start, we have a guide on some of the best third-party diagnostic tools to analyze laptop battery health.

Over time, the capacity of any battery diminishes. The battery stops holding its charge and shows fluctuating readings. That’s why you should calibrate it now and then.

Monitoring the battery health will tell you when to calibrate the battery and take corrective steps to increase longevity. Visit your laptop’s manufacturer website on the calibration procedure. Or follow the instructions in the product manual.

msi battery calibration tool

4. Create a Recovery Drive

When your PC runs into problems and won’t start, then a USB recovery drive can help you troubleshoot and fix those problems. The recovery drive boots your PC into a Windows Recovery Environment which consists of many helpful utilities.

To create a recovery drive, type “recovery” in the search box and choose the Recovery Drive app from the results. From the window, check Back up system files to the recovery drive.

create a recovery drive in Windows 10

There are two benefits of selecting this option. You’ll be able to reset the PC and access other Windows Recovery Environment tools from the drive itself.

Note: It’s best to choose an empty USB drive with a capacity of at least 16GB.

5. Uninstall Bloatware and Turn Off Annoyances

Bloatware is an app pre-installed or available on your system that you don’t want. These apps are generally trial versions including antivirus, games, and DVD rippers. You’ll find lots of apps and games littering the Start menu’s All Apps and tiles areas.

In most cases, it’s easy to remove them. There are three different methods available:

  1. Traditional uninstall
  2. With PowerShell commands
  3. Using third-party uninstaller utilities

Here’s the guide on how to easily remove bloatware in Windows 10. There are other types of annoyances too, like unwanted advertising in the Start menu.

Turn Off Start Menu Advertising

Windows 10 will often show you suggested apps or games in the Start menu. To stop this, navigate to Settings > Personalization > Start and turn off Show suggestions occasionally in Start.

turn off start menu advertising

Disable Lock Screen Ads

Windows 10 sometimes shows you ads on the lock screen via Windows Spotlight. To disable this, head to Settings > Personalization > Lock screen and set the background to a picture or slideshow.

disable lock screen ads in Windows 10

Turn Off Nagging Taskbar Pop-Ups

Persistent Windows 10 tips include recommendations to use Microsoft Edge. To disable this, go to Settings > System > Notifications & actions and turn off Get tips, tricks, and suggestions as you use Windows option.

Also, turn off the Show me the Windows welcome experience after updates and when I sign in option.

disable notification popups in Windows 10

Disable File Explorer Advertising

Microsoft uses File Explorer to advertise OneDrive storage and Microsoft Office 365 service. To stop this, go to View > Options > Change folder and search options. In the Folder Options window that appears navigate to the View tab and turn off Show sync provider notifications.

turn off file explorer advertising

6. Create a System Restore Point

The System Restore feature is a part of the recovery toolkit to quickly undo recent changes in hardware or software that made the system unstable. It does this by creating restore points periodically. When you enable System Restore, the Volume Shadow Copy service takes an occasional snapshot of the local storage volume.

The snapshots take into account the difference in the details of system configuration—driver files, registry settings, third-party apps, and more. To check the status of System Restore, open the Control Panel and click System > System protection. If any drive is On, then it means that the restore point is working for that drive.

create a restore point in Windows 10

By default, Windows automatically creates a restore point once per week, right before installing new device drivers, Windows Update, and more. You can also create a restore point at any time.

7. Setting Up Windows Defender Security

Many people ignore setting up Windows Defender option before using a new computer. It’s essential to configure them correctly. As of Windows 10 1809, all the options have moved to Windows Security app.

Virus & Threat Protection

Here, you can see the details of recent scans (manual or automatic). Click Manage settings to adjust more options. The Cloud delivered protection along with automatic submission sample turned on helps you block malware in real-time even if it’s is not in the database.

virus and threat protection in Windows Defender

Block Ransomware With Controlled Folder Access

This feature, introduced in version 1709 prevents malicious and suspicious apps from making changes to any files stored in designated folders. To enable this feature, go to Virus and Threat protection page and click Manage ransomware protection. Turn on Controlled Folder Access and modify the list of folders.

ransomware protection in Windows Defender

App & Browser Control

You can control how Windows behaves when you download apps and files from the web. Turn on Windows Defender Application Guard to open Edge in a secure, isolated browsing environment. Exploit protection automatically applies many exploit prevention techniques to the system processes and apps.

app and browser settings control in Windows Defender

Device Security

Windows 10 also uses virtualization-based security to prevent attacks from inserting malicious code into high-security processes.

core isolation feature in Windows Defender

8. Setting Up Scheduled Backup Routine

No amount of maintenance guarantees against hard drive failure or theft. Any potential catastrophe could imperil your computer and data. To keep your data safe, take regular backups.

Here’s our ultimate Windows 10 guide on taking backups.

Key Hardware and Software Requirements

One or two external hard drives of minimum 1TB or more with USB 3.0. Use the first disk for system backups and another for data backups. Or if it feels redundant, divide the drive into two partitions.

You should choose an app that lets you backup data automatically according to a schedule with minimal manual intervention. Cloud storage services like Dropbox or Google Drive works best to sync selected files and not as a complete backup tool. Consider Backblaze, Backblaze B2, Amazon S3, Amazon Glacier, Google Storage Nearline, and more.

9. Use Ninite to Install Multiple Apps

After setting up your computer, you probably want to install your favorite apps. But having to download, install, and keeping them up-to-date is time consuming and annoying. Ninite lets you automatically install multiple apps in one fell swoop and save time. Click the Get Your Ninite button at the bottom of the list.

install multiple apps with ninite

Download the Ninite installer file. Then let Ninite take care of installing all the apps. The apps silently install in the background with default settings and that too in the default location. Ninite even offers you an update checker app for $10/year that periodically checks for any updates that Ninite supports and install them automatically for you.

Apps You Must Install on a New Computer

Getting a new computer is an exciting time. Although at first sight, these tips may seem a lot, it’s not tough. Your PC will be safer, faster, and better equipped for your tasks.

While there are dozens or more amazing Windows apps, knowing which are must-have makes setting up a new installation easy. Read this piece to find out some amazing Windows apps you should install right away along with alternatives.

Read the full article: 9 Things to Do Before Using a New Computer


Read Full Article

5 Sites With Lots of Completely Free Ebooks That Don’t Suck


If you are an avid reader always looking for new ebooks to check out, the online options can feel limited. But, if you know where to look, you can snag free ebooks to read online, download to your computer, and/or transfer to your Kindle.

With some truly classic books from well-known authors, these websites have you covered. And there are also humor, thriller, science fiction, and romance books to discover. So, take a seat, grab your laptop, and prepare to immerse yourself in a wonderful story.

1. Planet EBook

Planet eBook free ebooks

Planet eBook is an attractive site that offers classic literature for free. Some books are out of copyright and are offered to you in an entirely legal fashion. But, be sure to click the Copyright & Usage link on the ebook details page for any restrictions on that particular book.

Right now, Planet eBook offers just over 80 books, all of which have been carefully selected. True, you will not have the buffet of thousands that you may find on other sites, but you can rest assured that each and every piece of writing on Planet eBook is of outstanding quality.

All books on the site can be downloaded as a PDF, EPUB, or MOBI file for reading at any time. So, you can enjoy titles like Wuthering Heights, A Tale of Two Cities, or Great Expectations without distractions. Again, the selection may not be enormous on Planet eBook; however, if you want a quick and easy way to find the best of best when it comes to the classics, this site delivers.

2. ManyBooks

Many Books free ebooks

ManyBooks works in the same way as Planet eBook, offering classic literature for free. However, where Planet eBook presents a carefully selected array of literature, ManyBooks handles everything in bulk (as the name truthfully implies).

At the time of writing, there are over 50,000 free and discounted books available and the majority of those are available for many readers. Plus, you can read online or download your pick as a PDF, EPUB, MOBI, or similar file format.

To find a book, you can browse by genre, author, title, trending, or language. You can also look through the editor’s picks or search for a particular book or author.

As a bonus, you can subscribe to the ManyBooks email newsletter to get deals delivered straight to your inbox. Overall, ManyBooks is a solid way to find free ebooks worth reading.

3. Classic Reader

Classic Reader free ebooks

Classic Reader resides somewhere between Planet eBook and ManyBooks. It offers a large selection of fiction, non-fiction, classical, drama, and young reader options. You can also browse through the poetry and short story sections for some light reading.

Once you choose a book, you can read it online. Since the site employs a basic UI, this makes reading those books you choose a nice, unobtrusive experience. Each book’s table of contents makes it easy to pick up on the chapter you left off when reading online. And, if you sign up for a free account you can download books as well.

Classic Reader may not have as many titles as some other sites, with just under 4,000 at the time of writing. However, you can still enjoy a classic from Charles Dickens, Jules Verne, or H.G. Wells. And, if you have a favorite author, you can view all ebooks available from that author besides their biography. Overall, Classic Reader may not be the prettiest of this bunch, but it is definitely worth checking out.

4. Project Gutenberg

Project Gutenberg free ebooks

With almost 60,000 free ebooks, you will definitely find a good read on the Project Gutenberg site. You can search for a specific title, look at recently added books, or check out the Top 100 ebooks. If you want to browse through offline options, for example, if you have a slow internet connection, the site offers a catalog specific to those types of books.

There are a few things that make Project Gutenberg stand out from other free ebook sites. First, you can either read the books online, with a reader like Kindle, or download them to read later. Second, you can send the books to Dropbox, Google Drive, or OneDrive with the click of a button.

Third, you can access the mobile site using the link or QR code provided on the main page. So, reading on your mobile device is perfect for work breaks or bus rides. Finally, if you sign up for a free membership, you can bookmark those ebooks you are reading online, which is handy for picking up right where you leave off.

Project Gutenberg provides select books in a variety of languages from Chinese to Yiddish and categories from animals to technology. For a huge collection, a number of reading avenues, and a few little extras, check out Project Gutenberg.

5. DigiLibraries.com

DigiLibraries free ebooks

One more website to check out for free ebooks you’ll love is DigiLibraries.com. With thousands of books to choose from, in tons of categories, there is definitely something for every taste, mood, or preference.

Search for a certain title, author, or subject to find what you’re looking for right off the bat. Or browse through the categories neatly displayed on the left. If you sign up for a free account, you can save your favorites and share a link to the book with your friends on social media or via email.

When you’re ready to download a book, the site supports EPUB, PDF, and MOBI file formats, so you should be covered with your reader. The only real limitation the site has is that you can only download up to 50 ebooks per day, but this shouldn’t be a problem for most people.

If you want to bookmark another great site for free ebooks, then visit DigiLibraries.com and take it for a spin.

More Free Ebooks Than You Can Ever Read

Hopefully you are ready to visit these terrific sites for free ebooks. Then, when you are in the mood to sit down with a good book, whether during a break at school or on vacation, you will not have to look far. On that note, here are our tips to find Kindle books to read on vacation.

We have really just scratched the surface here, so you should read our guide detailing how to find infinite free Kindle books next to continue your quest for freebies.

Image Credit: Mike Beales/Flickr

Read the full article: 5 Sites With Lots of Completely Free Ebooks That Don’t Suck


Read Full Article

Planning a Trip Soon? Nail Your Travel Preparation With These 8 Tips


trip-planning-tips

So you’ve decided to go on a trip. There’s a lot you will have to take care of to avoid unpleasant surprises. You need to build an itinerary, reserve places to stay, switch to an international mobile plan, and more.

But even before you go ahead with those tasks, you can lay the groundwork with some efficient planning. Here are a few important things you should consider doing before planning a trip.

1. Block Internet Trackers

Everywhere you go online, you leave behind a digital footprint. Flight aggregators and other similar websites take advantage of this to shoot up prices based on your web activity. For instance, if you’ve been looking for tourist spots in Miami, a service like Booking.com might show you increased fares for hotels because it knows you’ll need them soon.

Therefore, it’s crucial you block these trackers so that they don’t end up influencing the prices. Getting rid of trackers will also speed up resource-intensive travel platforms such as Booking.com and Skyscanner.

To do that, simply install an extension like Ghostery in your browser and research your trip as you would normally. Ghostery will restrict websites that track you in the background. Alternatively, you can exclusively use Brave Browser for vacation planning since it comes configured with those measures by default.

Visit: Ghostery

Visit: Brave Browser

2. Set Up Flight Alerts

Track prices on Google Flights

Flight prices fluctuate constantly and you have to catch them at their lowest for the best deals. Lucky for you, there are a handful of apps that can keep tabs on the routes you’re interested in. Google Flights has a facility which can notify you every time there’s a price update.

For setting it up, head over to Google Flights and search for the tickets you want to eventually book. At the top, you will see a Track Prices option. Enable it and you’re good to go.

Now, Google will automatically email you each time the fare shifts. If you’d like to turn it off, you will have to go into the Tracked Flight Alerts tab. You can access it by clicking the hamburger menu icon present at the top left corner.

3. Organize Emails With Labels

Create labels on Gmail

Preparing for a trip means a flood of confirmation and automated emails in your inbox. You can’t delete these straight away either since you’ll need them later. What you can do is organize them before they pile up and the easiest way is through Gmail labels.

In Gmail, you cannot group emails into various folders. Gmail uses Labels instead which helps you quickly find a particular message. You can create sub-labels as well.

Therefore, for a trip label called “Japan”, you can develop sub-categories like Flight Tickets and Hotel Reservations. Gmail’s left navigation drawer houses the Create New Label option.

4. Sign Up for a Smart Trip Planning Service

If you find scrounging for emails with labels a little cumbersome, try third-party smart itinerary apps. These services comb through your emails and sort all the essential bits in a neat interface. Some of them even arrange the bookings in a timeline enabling you to get a better sense of your journey.

Plus, you can add items such as restaurants and tourist attractions to your trips. Hence, you’ve access to everything in a single place and on the majority of platforms, you can download your trip plans for offline use.

TripIt is one such service and to build a trip, you’re required to forward emails to a custom address. Once you’ve done that, TripIt compiles them in a timeline with their timing, duration, confirmation numbers, and more.

Google also has a web app called Trips which automatically grabs all the data from your Gmail account and organizes it in the order of your trip. However, at the time of writing, its Android and iOS clients were being shut down. It can be only used on a browser.

Download: TripIt for Android | iOS (Free, Subscription available)

5. Save Money for Trips

A stay at a lavish beach resort or an expensive activity like skydiving might seem out of your budget but with a bit of planning, you can save for just about anything. And you don’t have to do it yourself either. Intelligent apps like Digit take the hassle out of this process.

Digit learns from your spending habits and figures out how much you can set aside for your financial goals every month. The app takes into account your income and indispensable expenditures such as rent. It then comes up with a comfortable amount you can save and transfers it into a separate account. Digit has a free one-month trial, after which you will have to pay a monthly fee of $2.99.

Download: Digit for Android | iOS ($2.99/month, trial available)

6. Find Destinations Based on Your Budget

Find travel destinations by your budget with Wander

Once you’ve locked down a budget, your next job could be to find a destination that falls in that bracket. Of course, there’s a service which lets you work that out.

On a website called Wander, for instance, you can enter your departing city, total budget, dates, and it will pull up the locations that fit your wallet. Wander fetches both the airfare and accommodation tariffs for your travel dates, hence it should cover the majority of your expenses.

Visit: Wander

Want to browse destinations by other factors like the weather? The internet has you covered there too. Here are a couple of unique travel planning apps to find your next trip.

7. Figure Out the Most Optimal Means of Transit

Find the best way to travel with Rome2rio

Air travel isn’t always the most optimal means of transit. Often, reaching your destination by road or sea saves time as well as cost. To know which method suits your situation, try Rome2rio.

Rome2rio is a free discovery tool that helps you decide whether you should travel by ferry, train, flight, bus, or a car. Once you search for a trip, the website brings up comprehensive details for each available method including the costs, duration, route, and more. It also offers combinations, so you can mix and match to find the most efficient travel route.

Visit: Rome2rio

8. Find Someone to Travel With

Find a travel companion with Workaway

Solo trips can be refreshing and are quite common today. But if you’re not comfortable traveling alone or want to share the memories with someone, you can easily find a companion online.

There are a handful of communities you can explore for connecting with other travelers who are in the same position as you. On networks such as Workaway, all you need to do is post where you’re going, for how long, and a bit about what you’re looking for. Instead of creating a new entry, you can also browse the existing posts and contact the person you find the most appealing.

Visit: Workaway

Plan Your Travel Like a Pro

Trip planning can be a chaotic process. But it doesn’t have to be if you take care of all the finer aspects. You can save hundreds of bucks in airfares by setting up flight alerts, rescue your inbox from the expected deluge with email labels, and solve a series of other annoying tidbits with the aforementioned tips.

Once you reach the actual itinerary stage, there are several smart apps you can use for planning your travel.

Read the full article: Planning a Trip Soon? Nail Your Travel Preparation With These 8 Tips


Read Full Article

5 Clever Ways to Use DIY Cleaning Slime or Putty


cleaning-slime

Need a way to clean your laptop keyboard right away? Looking for something that will clear the gunk that accumulates on devices you use regularly?

Cleaning putty or slime has become an increasingly popular solution. But how can you make cleaning putty? How does it clean up without getting gooey? Here’s how to make some DIY cleaning slime and then set to work keep your tech tidy.

Make Your Own Cleaning Slime

To get started right away cleaning up gunk from your gadgets, you’ll need to make some cleaning slime. Start by grabbing some rubber gloves and measuring out the following ingredients:

  • 1 ½ cups of warm water
  • ¼ cup of Borax (NOTE: there is a burning risk as borax is caustic. Use rubber gloves when mixing.)
  • 5 oz of white PVA glue

To make your slime:

  1. Mix a cup of the water with the Borax, stirring until dissolved.
  2. In a separate container, mix the remaining half cup of water with the glue. (If you want colored slime, add a couple of drops of food coloring at this stage)
  3. Stir the borax liquid into the glue mixture, transforming it from a gooey splodge into a firm putty. (If it refuses to stiffen up, add more borax, a teaspoon at a time.)
  4. As the mixture stiffens, place in a larger bowl or on a flat surface and knead, like bread dough.

The slime should roll up into a ball when pinched, a little like adhesive putty. If it doesn’t, keep mixing; don’t put it anywhere near your tech until it firms up.

This video demonstrates making slime with fewer ingredients: PVA glue, baking soda, and contact lens cleaner.

Don’t Want to Make Cleaning Slime? Buy It Instead

Making slime might be difficult for you. After all, there is a danger if you get it wrong. Then there’s the clean-up afterwards. So, what’s the solution?

Fortunately, several retailers stock cleaning slime that can be used in a similar way. Visbella cleaning putty is one example, capable of picking up dust, gunk, crumbs, hair, and other dirt.

5 Ways to Clean With DIY Cleaning Putty

With some freshly made cleaning gel ready to use you can put it to good use. Typical tech cleaning with putty includes:

  1. Cleaning your keyboard (especially laptops)
  2. Pulling gunk out of the speaker jack or charging port on your phone
  3. Cleaning your computer mouse
  4. Clean the air vents on your car
  5. Picking up dust from standing hardware like PCs and games consoles

Here’s a bit more detail about how to clean with DIY clearing putty.

1. Clean a Keyboard With Cleaning Gel

Clean a keyboard with DIY putty

The number one reason to use cleaning gel is to get the crumbs and dirt out of a keyboard.

While desktop keyboards are prone to dirt, they’re generally easier to clean than laptop keyboards. Here, you need to be careful how you clean the device. Break the putty up into small balls, around the size of your thumb, to pick up dirt.

Laying the putty over the keyboard might sound like a good idea to save time, but invariably results in bits of putty being left behind. This just results in even more dirt between the keys on your keyboard.

Cleaning a keyboard is important to maintain performance of the device. Fixing a laptop keyboard is not easy.

2. Clean Up Your Phone or Tablet With Slime

Smartphones and tablets accumulate dirt not just on the display (thanks to greasy fingers) but in the case and ports.

Cases tend to collect dirt when you place your device in a pocket or bag. Ports, too, can find small items of debris wedged inside. Cleaning putty or slime is ideal for unblocking these areas. A brief clean and you’ll soon have your earphones plugged in again, or the device on charge.

Need more help? Here’s how to clean an iPhone charging port.

3. Unclog Gunk From a Mouse

Anyone who has ever used a mouse has spent time hacking gunk from the buttons or underside. In the days of the ball mouse it meant removing the ball and cleaning the wheels inside. These days less cleaning is required, but sweat, grease, and dirt still accumulate.

The buttons, any ergonomic grips, and even the wheel can become clogged up. Use your cleaning putty to get into these areas and grab the gunk.

4. Car Vent Cleaning With Putty

The grilles on your car’s air vent no doubt accumulate a lot of dust. As the distance between the grilles is too narrow to clean with a cloth, cleaning putty is the answer.

Simply press the putty onto the grilles one at a time to pick up the dust and dirt. Take the time (with the ignition off) to also clean the buttons on your steering wheel with the slime. Anything your thumb regularly hovers over probably accumulates gunk. You might also clean up crumbs from between the two front seats if your regularly place snacks there.

5. Use Cleaning Slime to Pick Up Dust

Clean dust from your PC with slime

Some items of consumer technology are like giant dust magnets.

Blu-ray players, set-top boxes, TVs, and PCs are the key examples. Using cleaning slime, you can effortlessly pick up the dust and dirt that automatically accumulates.

This is particularly important for PCs. Dust gathering on the top is one thing; if it accumulates around the fans it can block airflow. Reduced airflow results in a hotter PC and slower performance. Keep these areas dust free with cleaning putty! However, if you’re opening a PC, be sure to keep the putty away from the motherboard and RAM components. Instead, concentrate on the accumulation of dust on the fans and cabling.

Keep It Clean and Tidy With Putty or Slime

Fancy cleaning your tech with slime? Admittedly, it’s not an option everyone would take; dust-repellent sprays and cloths are a good option. However, for keyboards, and devices with openings that often collect dirt, it’s a smart idea. The same applies to automobile air vents.

And if you don’t want to make your own cleaning slime, simply buy your own.

Cleaning putty is a great tool for keep tech free of dirt and dust. Once you’ve cleaned your PC, why not head under the desk, and declutter your cables?

Image Credit: diy13@ya.ru/Depositphotos

Read the full article: 5 Clever Ways to Use DIY Cleaning Slime or Putty


Read Full Article

How to Set Up Windows Sandbox on Windows 10


setup-windows-sandbox

Microsoft is always adding new and exciting features to Windows 10. They don’t always work. Many don’t receive a great reception on arrival. However, the introduction of a Windows Sandbox environment for Windows 10 was met with significant interest.

Previously, you could only create a sandbox in Windows 10 using third-party tools. Having an integrated tool is potentially easier and safer than the alternatives.

Here’s how you can set up the Windows Sandbox on Windows 10.

What is Windows Sandbox?

Windows Sandbox is a temporary virtual desktop environment. While Windows Sandbox is running, you’re essentially running a clean version of your operating system, in which your activities do not affect the rest of your machine.

The Windows Sandbox, then, is a secure environment where you can test any software before installing it on your main device. When you close the sandbox, it destroys any activity before returning to the host machine.

How Does Windows Sandbox Work?

Microsoft uses several tools to bring Windows Sandbox to life.

  • Dynamic image generation. The Windows Sandbox copies an image of your existing operating system into the virtual machine. Your Windows Sandbox environment always uses a fresh, clean Windows 10 installation with the latest updates. But you don’t have to store an extra copy of the operating system to boot into as you do with other virtualization software.
  • Smart memory management. Virtual machines can become quite resource heavy and require the host machine to share their hardware. Windows Sandbox uses smart memory management to dynamically allocate memory between the host and the sandbox, making sure the host doesn’t slow to a crawl.
  • Snapshot and Clone. Windows Sandbox uses two common virtualization technologies called Snapshot and Clone, to ease the load on the host system. The snapshot allows the Windows Sandbox to boot the environment once, then “preserve the memory, CPU, and device state to disk.” From here, the environment can restore from the disk rather than having to boot it each time a new instance of the sandbox is needed.

Windows Sandbox also uses improved graphics virtualization to make the sandbox environment a seamless experience mirroring the host.

Can I Run Windows Sandbox?

Windows Sandbox is currently available for Windows 10 Pro or Enterprise installations running Insider Preview build 18305 or later, or the Windows 10 May 2019 update or later. Unfortunately, Windows 10 Home users will not have access to Windows Sandbox.

You will also need:

  • A 64-bit processor
  • Virtualization switched on in your system BIOS
  • 4GB RAM minimum (Microsoft recommends 8GB)
  • At least 1GB free disk space (Microsoft recommends using an SSD)
  • At least 2 CPU cores (Microsoft recommends four cores with hyperthreading)

How to Check If Virtualization Is Switched On

Before delving into your BIOS to turn virtualization on, there is a quick check you can do to see if it is already active.

Type task in your Start Menu search bar and select the Best Match. In the Task Manager, switch to the Performance tab. It will either list Enabled or Disable alongside Virtualization.

task manager virtualization on

If virtualization is disabled, you need to head to the BIOS and switch it on. Follow Ben Stegner’s handy guide to find out how to switch on virtualization.

Once its on, restart, and continue.

How to Switch on Hyper-V and the Windows Sandbox Feature

Okay, now you need to check that Microsoft Hyper-V is up and running. Hyper-V is a Windows Server virtualization tool built into Windows. In this case, Hyper-V is used to create the Windows Sandbox, so you must switch it on before proceeding.

turn on windows sandbox windows features

Type windows features in your Start Menu search bar and select the Best Match. Scroll down and check Hyper-V. It will check the nested options automatically. Now, scroll down a little more and find the Windows Sandbox option and check the box. Hit OK, then restart your system.

How to Access Windows Sandbox

After Windows restarts, type windows sandbox in your Start Menu search bar. The Windows Sandbox will appear as the Best Match. Open the Windows Sandbox; there you have it!

windows sandbox

The Windows Sandbox opens a clean version of your current Windows version each time you open it. It is always up to date, with the same system updates as the host.

When you finish using the Window Sandbox, simply close the application. Any changes you make to the operating system running in the Windows Sandbox will disappear permanently.

Running Windows Sandbox Inside a Virtual Machine

If you’re trying to use the Windows Sandbox in a virtual machine, there is an extra step to take. You must set your system up to allow nested virtualization. That’s running a virtual environment within a virtual machine.

In the virtual machine, type powershell in your Start Menu search bar, right-click the Best Match and select Run as Administrator.

Now, input the following command:

Set-VMProcessor -VMName <VMName> -ExposeVirtualizationExtensions $true

Swapping out <VMName> for the virtual machine name.

Restart your virtual machine. After restarting, the Windows Sandbox option should be available in your Start Menu.

Running Windows Sandbox on Windows 10 Home

I know I said that Windows Sandbox cannot run on Windows 10 Home. It is true; out of the box, you cannot. But a patch developed by the Deskmodder team allows Windows 10 Home users to spin up Windows Sandbox.

Now, I haven’t had a chance to try this patch out. The results appear mixed and introducing Windows Sandbox to your system via a patch could have unintended consequences. If you do want to try Windows Sandbox out on your Windows 10 Home system, take a system backup before doing so.

Give Windows Sandbox a Try!

If you have the capability, give Windows Sandbox a try. The Windows 10 May 2019 update is still filtering through to most Windows 10 users. The massive update rollouts do take some time. But when the update arrives, Windows Sandbox comes with it.

In the meantime, you can check out the best third-party Windows 10 sandbox tools. You can use these tools to test new software safely without wrecking your system in the process.

Read the full article: How to Set Up Windows Sandbox on Windows 10


Read Full Article

The Best Augmented Reality Games for Android and iOS

The Easiest Way to Set Up Your Own Online Store for Free


setup-online-store

Have you ever wanted to sell something online? From handmade products like badges or pottery to clothes, artwork, or decor items, there are a million ways to put your crafty skills to use and sell over the internet.

However, it can be tough to set up an online store if you don’t have much web design experience. For that reason, we’ve put together a guide on setting up an online store, for free and with absolutely no coding knowledge required.

Why Use Storenvy?

You’ve probably heard of Etsy, which is a popular way to create a website to sell goods online. However, there aren’t many customization options on Etsy so it’s hard to make your store stand out.

A good alternative is Storenvy, which lets you set up and customize your own store for free. You can list up to 1000 products at a time and you don’t have to pay any monthly subscription fees. You can list any item for sale as long as it isn’t on the list of prohibited products.

Payments from customers are handled through PayPal or Stripe, so these merchants will charge a cut of transactions when people buy from you. But that’s it. It won’t cost you anything to set up your store.

Creating a Storenvy Store

Set Up Your Own Online Store for Free - Join

To begin setting up your store, head to the Storenvy join page. Fill out basic information like your name, email address, and password. Then select the I WANT MY OWN STORE, TOO! checkbox. This brings up more options for your store like the store name, URL, and address.

Once everything has been filled in, you’ll be taken to a page that says Congratulations! You’ve created a Storenvy Store.

You’re now ready to start editing your store.

Setting Up a Storenvy Store

Set Up Your Own Online Store for Free - Admin Panel

Begin by going to your store admin panel. The panel is located at https://ift.tt/2ROIG1A. In this case we’ll go to https://ift.tt/2KSEIUQ as makeuseof is the URL of our store.

Now we need to add essential information to the store like its name, phone number, an about blurb, and a logo. You can add these things by going to Settings in the menu at the top of the admin panel.

On this page you can also add links to your Twitter, Instagram, website, or a website you have built yourself.

Make any changes you want and the click Save Changes.

Now you need to sort out your payment options. You can take payments either with Stripe or Paypal, and you’ll need to have your own account for each service you want to use. Go to https://ift.tt/2RNnGrO and connect either your Stripe account, your Paypal account, or both.

You may also want to add a FAQ section so your visitors can easily see answers to questions about your products. To do this, go to https://ift.tt/2KW14EZ and here you can use the form to add FAQs. You can also a separate customer support address if you don’t want customer questions coming to your primary email address.

Adding a Product to Your Storenvy Store

Set Up Your Own Online Store for Free - Add a Product

Now we’re ready to start adding products to the store. To do this, go to Products in the top menu of the admin panel.

Click on the blue button on the right which says Add new product. Enter a product name and a price in US Dollars. Now choose a category and subcategory for your product from the dropdown menu. This will help shoppers find your product when they are browsing.

Once you have entered this information you’ll be taken to a page where you can add more details about the product. The key things to add here are a description of your product, and tags to help people find your item.

Set Up Your Own Online Store for Free - Customize Your Store

Your tags should be relevant to your product but can be creative. For example, if you’re selling a kitchen apron in a robot printed fabric, obviously you should tag it with apron. But you should tag it with robot too, so that people searching for robot-themed items can find it.

Another very important step here is to add images of your product. The images should be clear, well-lit, and show off the product well. You can upload photos in the Product Images section using the Add Image function.

Once you’re done with your product, hit Save Changes. Repeat this process to add as many items to your store as you want.

Setting Shipping and Taxes for Your Storenvy Store

Set Up Your Own Online Store for Free - Set Shipping Rates

Another important step is setting your shipping rates. To do this, go to Settings in your admin panel and then to Shipping rates. You start off with two shipping classes, which represent where the items will be sent to—Standard, for within your country, and Everywhere Else, for international shipping. If you want to offer more options, like fast shipping, you can use the Add Shipping Class button.

As well as the classes, there are shipping rates. These are for different products, so stickers can be shipped for cheaper than pottery, for example. The default shipping rate is for T-shirts, and you can use this for all your products if you want. Or you can add a new shipping rate by going to https://ift.tt/2ROIOy6 and clicking on Add Shipping Group.

Finally, you need to add tax information for your particular location. To do this, go to https://ift.tt/2KVtmiO and fill in information about sales tax and VAT in your country.

Customizing Your Storenvy Store

Set Up Your Own Online Store for Free - Customized Store

Before you launch your store, you’ll want to customize the way it looks. To do that, go to your store’s URL. For example, our URL is https://ift.tt/2ROIGP8.

At the top you’ll see a set of colored boxes with labels next to them. Click on a box to change the color of various elements, like the background, the text, the titles, and the links. You can choose a color using the popup color palette. Once you’re happy with your colors, click Save Changes.

Now you can change the layout as well. Go to Layout in the top left and you can change the fonts, the alignment of the title, and the way the background image displays. To select a background image and a header image, go to https://ift.tt/2KSEKvW to upload your images.

Once all your changes are made, hit Save Changes.

Opening Your Storenvy Store

Now you have products, information, and a store layout. The last thing to do is to open your store to shoppers.

To do this, go to your store’s main URL. At the bottom right of the page you’ll see a switch saying Your storefront is currently Closed. Hit this button and it will switch to saying Open.

Set Up Your Own Online Store for Free - Storefront Closed

And that’s it! You can send customers to https://ift.tt/2ROIQ9c and they can browse your products and make purchases.

Set Up a Free Store With Storenvy, No Coding Required

Storenvy makes it easy to set up your own store and start selling products, with no coding required. The site is free to use and you’ll just need to pay fees to Paypal or Stripe on purchases made by your customers.

Alternatively, if you’re looking for something with more features but which is a bit more technical to use, then you can learn how to create an online store using Shopify.

Read the full article: The Easiest Way to Set Up Your Own Online Store for Free


Read Full Article

Colonna call, timing a VC pitch, WeChat, patents, and growth


Editor’s Note: Shortened week

Due to the U.S. Independence Day holiday this week on July 4th, Extra Crunch will not be publishing our normal editorial on Thursday and Friday of this week, nor will we send out this EC Roundup newsletter on Saturday. Normal publishing will resume starting next week on Monday.

Conference Call Today with VC and Coach Jerry Colonna

TechCrunch’s Silicon Valley editor Connie Loizos will be conducting an Extra Crunch exclusive live conference call with noted venture capitalist and long-time executive coach Jerry Colonna today at 2pm EST / 11am PST. Dial-in details have been sent to all subscribers.

For those joining, the two will talk about Colonna’s new book Reboot, his other projects, and of course questions from subscribers.

When is the right time to pitch VCs for funding?

DocSend is among the most popular tools used by founders seeking venture capital to send their pitch decks to VCs, but when do VCs actually read those pitches? DocSend CEO Russ Heddleston works through the data to find the patterns that can help with timing a fundraise.

Interestingly, March comes in third as the best month for decks viewed by investors, with an index value of 89, yet fundraisers don’t seem to send many decks in March, only 67% compared to October.

And while summer is often considered a poor season for fundraising, it’s not as unproductive as you might think. Indeed, in July and August decks are reviewed almost as much as in April, May and June.

In-depth with Freada Kapor Klein

Megan Rose Dickey had the opportunity to sit down with noted diversity and inclusion champion Freada Kapor Klein, who co-founded Kapor Capital and also Project Include. The two talk about a bunch of topics, including the current state of affairs in the tech industry, “the Founders’ Commitment,” and how to approach diversity from a comprehensive angle.


Read Full Article

App revenue tops $39 billion in first half of 2019, up 15% from first half of last year


App store spending is continuing to grow, although not as quickly as in years past. According to a new report from Sensor Tower, the iOS App Store and Google Play combined brought in $39.7 billion in worldwide app revenue in the first half of 2019 — that’s up 15.4% over the $34.4 billion seen during the first half of last year. However, at that time, the $34.4 billion was a 27.8% increase from 2017’s numbers, then a combined $26.9 billion across both stores.

Apple’s App Store continues to massively outpace Google Play on consumer spending, the report also found.

In the first half of 2019, global consumers spent $25.5 billion on the iOS App Store, up 13.2% year-over-year from the $22.6 billion spent in the first half of 2018. Last year, the growth in consumer spending was 26.8%, for comparison’s sake.

Still, Apple’s estimated $25.5 billion in the first half of 2019 is 80% higher than Google Play’s estimated gross revenue of $14.2 billion — the latter, a 19.6% increase from the first half of 2018.

The major factor in the slowing growth is iOS in China, which contributed to the slowdown in total growth. However, Sensor Tower expects to see China returning to positive growth over the next 12 months, we’re told.

To a smaller extent, the downturn could be attributed to changes with one of the top-earning apps across both app stores: Netflix.

Last year, Netflix dropped in-app subscription sign-ups for Android users. Then, at the end of December 2018, it did so for iOS users, too. That doesn’t immediately drop its revenue to zero, of course — it will continue to generate revenue from existing subscribers. But the number will decline, especially as Netflix expands globally without an in-app purchase option, and as lapsed subscribers return to renew online with Netflix directly.

In the first half of 2019, Netflix was the second highest-earning non-game app with consumer spending of $339 million, Sensor Tower estimates. (We should point out the firm bases its estimates on a 70/30 split between Netflix and Apple’s App Store that drops to 85/15 after the first year. To account for the mix of old and new subscribers, Sensor Tower factors in a 25% cut. But Daring Fireball’s John Gruber claims Netflix had a special relationship with Apple where it had an 85/15 cut from year one.)

In any event, Netflix’s contribution to the app stores’ revenue is on the decline.

In the first half of last year, Netflix had been the No. 1 non-game app for revenue. This year, that spot went to Tinder, which pulled in an estimated $497 million across the iOS App Store and Google Play, combined. That’s up 32% over the first half of 2018.

1h 2019 app revenue worldwide

But Tinder’s dominance could be a trend that doesn’t last.

According to recent data from eMarketer, dating app audiences have been growing slower than expected, causing the analyst firm to revise its user estimates downward. It now expects that 25.1 million U.S. adults will use a dating app monthly this year, down from its previous forecast of 25.4 million. It also expects that only 21% of U.S. single adults will use a dating app at all in 2019, and that will only grow to 23% by 2023.

That means Tinder’s time at the top could be overrun by newcomers in later months, especially as new streaming services get off the ground (assuming they offer in-app subscriptions); if TikTok starts taking monetization seriously; or if any other large apps from China find global audiences outside of China’s third-party app stores.

For example, Tencent Video grossed $278 million globally in the first half of 2019, outside of the third-party Chinese Android app stores. That made it the third-largest non-game app by revenue. And Chinese video platform iQIYI and YouTube were the No. 4 and No. 5 top-grossing apps, respectively.

Meanwhile, iOS app installs actually declined in the first half of the year, following the first quarter that saw a decline in downloads, Q1 2019, attributed to the downturn in China.

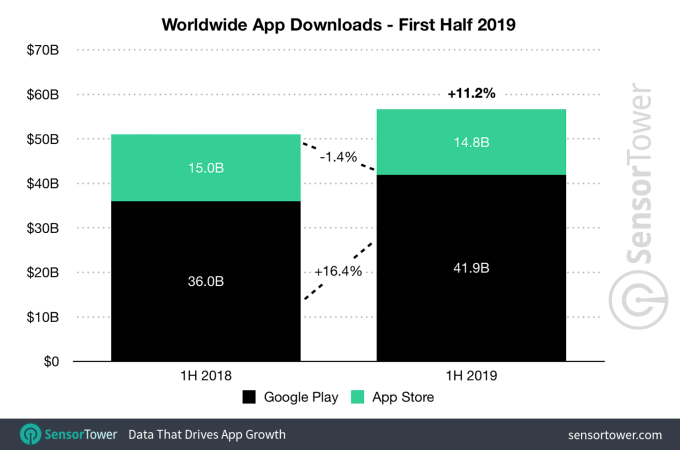
The App Store in the first half of 2019 accounted for 14.8 billion of the total 56.7 billion app installs.

Google Play installs in the first half of the year grew 16.4% to 41.9 billion, or about 2.8 times greater than the iOS volume.

1h 2019 app downloads worldwide

The most downloaded apps in the first half of 2019 were the same as before: WhatsApp, Messenger, and Facebook led the top charts. But TikTok inched ahead of Instagram for the No. 4 spot, and it saw its installs grow around 28% to nearly 344 million worldwide.

In terms of mobile gaming specifically, spending was up 11.3% year-over-year in the first half of 2019, reaching $29.6 billion across the iOS App Store and Google Play. Thanks to the fallout of the game licensing freeze in China, App Store revenue growth for games was at $17.6 billion, or 7.8% year-over-year growth. Google Play game spending grew by 16.8% to $12 billion.

The top-grossing games, in order, were Tencent’s Honor of Kings, Fate/Grand Order, Monster Strike, Candy Crush Saga, and PUBG Mobile.

1h 2019 game revenue worldwide

Meanwhile, the most downloaded games were Color Bump 3D, Garena Free Fire, and PUBG Mobile.

Image credits: Sensor Tower


Read Full Article