05 March 2020

Google Search will make mobile-first indexing the default by September


For a while now, Google has been working on making mobile-first indexing the default behavior of its search engine. With mobile-first indexing, Google Search primarily uses a page’s mobile content for creating its search index and ranking. Google announced this initiative in 2016 and as it announced today, by September 2020, it’ll become the default behavior for all sites.

After a few small tests, the company started going all-in last year and by December, it used mobile-first indexing for over half of the web pages it showed in its search results. Today, that number is 70 percent already.

Google says most sites are now ready for its new system, but it will still occasionally crawl the desktop site with its traditional Googlebot. That means site owners may see increased crawling by Google in the coming months, too, as the company will now use two different crawlers: one that identifies itself with the mobile smartphone user-agent and one that will look like the Chromium version it uses to render the desktop site. For the most part, though, website owners will see the mobile agent.

For most sites, this switch should be seamless, but if you only expose structured data on your desktop site and not on mobile, it’s now time to switch it on for both. Google also notes that it recommends that sites don’t use separate mobile URLs “because of issues and confusion we’ve seen over the years, both from search engines and users.”

Webmasters who want to make sure their sites are ready can head to Google’s Search Console and check the status of their pages.


Read Full Article

The 8 Cheapest Phone Plans With Unlimited Everything


unlimited-phone-plans

Picking an affordable phone plan with unlimited calling, texting, and data can be pretty overwhelming. Each mobile carrier—whether prepaid or postpaid—offers additional perks from Netflix subscriptions to mobile hotspots.

While unlimited calls and texts really are unlimited, data is more complicated. Most carriers throttle your data after you pass a certain threshold. Let’s take a look at different unlimited phone plans and how they compare.

Prepaid Unlimited Plans for Phones

Prepaid carriers—also known as mobile virtual network operators (MVNO)—rely on major carriers for their networks. But they allow you to get many of the same perks, often at a lower price and without a contract. Here are some of the cheapest phone plans with unlimited everything.

1. Boost

Boost Mobile Cheap Phone Plans

Boost offers an unlimited plan in three tiers, the cheapest of which comes with standard definition streaming, a 12GB hotspot, and a six-month Tidal music subscription. Bumping up to one of the more expensive tiers gets you HD streaming and a 30 or 50GB hotspot, respectively.

For the cheapest unlimited phone plan, the price drops the more lines you add:

  • One line: $50 per month.
  • Two lines: $80 per month.
  • Three lines: $110 per month.
  • Four lines: $140 per month.
  • Five lines: $170 per month.

Boost’s data deprioritization applies during congestion regardless of how much data you use.

2. Metro by T-Mobile

Metro Unlimited Cheap Cell Phone Plan

Metro by T-Mobile (formerly MetroPCS) has two unlimited data plans. With the lower tier, you get a 5GB hotspot, but just keep in mind that the hotspot isn’t included. You also get Google One, a service that automatically backs up and stores your phone’s data.

For the cheapest tier, the price will drop as you add lines:

  • One line: $50 per month.
  • Two lines: $80 per month.
  • Three lines: $110 per month.
  • Four lines: $140 per month.
  • Five lines: $170 per month.

On Metro, exceeding 35GB per month could see your speed throttled during “congestion.”

3. TextNow

TextNow Unlimited Cheap Phone Plans

TextNow is a great calling app that allows users to get an ad-free unlimited data plan at $40 per month for one line. But there’s a catch. Unlimited on TextNow translates to 23GB, after which you’ll experience 2G speeds. Even then, you could run into further restrictions.

If you do any of the following, you could lose access to unlimited 2G data:

  • Use over 170MB of data per day while using unlimited 2G data (after exceeding your plan’s 3G/4G data allowance), for two or more consecutive days
  • Use more than 1GB of data in a five-day period while using unlimited 2G data
  • Use unlimited 2G data as a substitute for home internet

That is, until you take “corrective action.” This includes connecting to home Wi-Fi, minimizing the streaming of video and audio without Wi-Fi, and restricting background data usage on your phone.

To get started with TextNow, you have to have a Sprint-compatible phone, order a SIM activation kit for $10, and download the TextNow app. Otherwise, you can purchase a phone on the TextNow shop that comes preloaded with TextNow’s SIM card.

4. Cricket Wireless

Cricket Wireless Unlimited Cheap Cell Phone Plan

Cricket Wireless has two unlimited plans: one that includes a 15GB hotspot and one that doesn’t. The plan with the hotspot has the highest 4G LTE speeds, while the cheaper plan has standard high-speed data.

On the cheapest unlimited data plan, the price gets lower as you add more lines:

  • One line: $55 per month.
  • Two lines: $80 per month.
  • Three lines: $90 per month.
  • Four lines: $100 per month.
  • Five lines: $125 per month.

Like the other prepaid phone plans on this list, there are some limitations in terms of data. Cricket might cap your data speeds when the network is busy, but you may be able to get around this If you know how to bypass data caps.

The Best Prepaid Plan for Phones

Looking purely at the cheapest tier, both Metro and Boost give you the best value for money. Plus, both services have decent perks—Boost boasts a hotspot and a six-month trial of Tidal, while Metro offers a helpful Google One subscription.

Postpaid Unlimited Plans for Phones

With a postpaid plan, no matter which popular mobile carrier you choose, enrolling in autopay and paperless billing ensures the lowest bill possible. You’ll also find that the more lines you add to your plan, the cheaper each line becomes.

5. AT&T

AT&T Unlimited Cheap Phone Plan

AT&T offers three unlimited plans: AT&T Unlimited Elite, AT&T Unlimited Extra, and AT&T Unlimited Starter. The lower-tier package comes with standard-definition streaming, automatic fraud blocking, as well as unlimited calls and roaming in the US, Mexico, and Canada.

The cost depends on how many lines you add to your plan. These prices are based on a discount for enrolling in autopay and paperless billing.

  • One line: $65 per month.
  • Two lines: $120 per month.
  • Three lines: $135 per month.
  • Four lines: $140 per month.

For the Unlimited Starter plan, AT&T may temporarily slow data speeds when the network is congested.

6. T-Mobile

T-Mobile Cheap Cell Phone Plans Unlimited

As you’d expect, T-Mobile also has a range of unlimited plans. .If you add two or more lines to the Magenta or Magenta Plus plan, you’ll get a free subscription of Netflix. For each plan, you’ll still get unlimited talk, text, and data in Mexico and Canada.

Both plans also offer unlimited data in over 210 countries, in-flight texting, as well as in-flight Wi-Fi.

For the standard Magenta package, the cost also depends on how many lines you add. Right now, T-Mobile has a promotion that gives you the third line for free:

  • One line: $70 per month.
  • Two lines: $120 per month.
  • Three lines: $120 per month.
  • Four lines: $140 per month.
  • Five lines: $160 per month.

If you don’t want all the extra perks, you can get T-Mobile Essentials. This provides unlimited talk, text, and data for $60 per month for one line or $120 for four lines.

If you cross the 50GB threshold, T-Mobile may temporarily slow data speeds when the network is congested.

7. Sprint

Sprint Unlimited Cheap Cell Phone Plan

Sprint offers three unlimited packages: Basic, Plus, and Premium.

Each plan includes a hotspot and access to Hulu. You’ll only get 480p video streaming quality with the Basic plan, but this goes up 1080p with Unlimited Plus. Some other perks that come with Unlimited Basic include unlimited talk, text, and 5GB 4G LTE in Mexico and Canada, as well as roaming in 200 countries.

The pricing for the Unlimited Basic plan is currently one of the best cell phone deals around:

  • One line: $60 per month.
  • Two lines: $100 per month.
  • Three lines: $100 per month.
  • Four lines: $100 per month.
  • Five lines: $100 per month.

The prices above are based on discounts for enrolling in autopay, and for new accounts only. After one year, Sprint will increase your rates—one line will cost you $60, a second line will be $40, and any other lines beyond that will be priced at $20 each.

Sprint may temporarily slow data speeds when the network is congested after you cross the 50GB threshold.

8. Verizon

Verizon Unlimited Cheap Phone Plans

Verizon offers a diverse set of unlimited plans: Start Unlimited, Play More Unlimited, Do More Unlimited, and Get More Unlimited.

The basic Verizon plan, Start Limited, is comparable to basic plans on other lines, but with more limited features. You get DVD quality streaming, international texting to over 200 countries, as well as a subscription to Apple Music for six months.

While the pricier tiers give you a threshold ranging from 25GB to 75GB before your speeds are throttled, the lowest tier will be throttled during congestion.

  • One line: $70 per month.
  • Two lines: $120 per month.
  • Three lines: $135 per month.
  • Four lines: $140 per month.

The prices above are based on a $10 discount for enrolling in autopay and paperless billing.

The Best Postpaid Plan for Phones

Looking purely at the cheap phone plans offered by each carrier, there are a couple of winners. T-Mobile and Sprint both offer unlimited data, along with several added bonuses.

If you’re a frequent traveler, T-Mobile will save you money in the long run with its roaming and in-flight perks. The carrier’s no-frills $140/month unlimited data plan for four lines is also quite reasonable.

Sprint gives T-Mobile a run for its money with added value, including a Hulu subscription and a 500MB hotspot. While it won’t last forever, Sprint’s special offer also lets you start out at a significantly reduced price.

The Best Cheap Unlimited Phone Plans

In addition to unlimited data and perks, there are other considerations to keep in mind when choosing one of the major carriers, including coverage, travel features, and budget-friendly plans. You’ll need to weigh the pros and cons of each service before you commit to a prepaid or postpaid plan.

Even with unlimited data, you might find your cell service slowing down. If that happens, you should take a look at how to speed up a slow mobile data connection.

Read the full article: The 8 Cheapest Phone Plans With Unlimited Everything


Read Full Article

VirtualBox’s Guest Additions: What They Are and How to Install Them


virtualbox-guest-additions

When working in VirtualBox, you may have seen a prompt or noticed a reference to Guest Additions. But what are Guest Additions, and should you use them?

Let’s take a look at what VirtualBox’s Guest Additions do, why you should install them, and how to activate them.

What Are Guest Additions in VirtualBox?

The VirtualBox Guest Additions are extra pieces of software, included with your copy of VirtualBox, that enable better performance and functionality in virtual machines. You install Guest Additions inside the virtual machine to activate this functionality.

VirtualBox Guest Additions Install

As you probably know, VirtualBox is a hypervisor, which allows you to create and use virtual machines. This means that you can install Windows and other operating systems inside VirtualBox and have them think that they’re running on actual hardware.

Read our full guide to using VirtualBox to get up to speed if you’re not familiar.

However, just because you get a working virtual machine running in VirtualBox doesn’t mean the experience is perfect from the start. There are certain elements of running an OS in an app window that are frustrating.

For example, on your main computer, Windows knows what resolutions it can display using the drivers from your graphics card. A virtual machine can’t do this, though, so it displays in a low resolution (such as 800×600) by default.

The Guest Additions of VirtualBox contain display drivers and other useful tools that make your virtual machine much more usable.

What Do the Guest Additions Do?

Now that we know what Guest Additions are, let’s look at what the VirtualBox Guest Additions actually do for you.

1. Shared Clipboard/Drag and Drop

Chances are that you’ll eventually want to move some content between your virtual machine (the guest) and your actual computer (the host). With the Guest Additions installed, VirtualBox packs a few features to make this easy.

First is the shared clipboard/drag and drop support. This allows you to copy items on one platform and paste them on the other, as well as dragging files between them. To adjust this, select your VM on the VirtualBox home page and choose Settings.

In the General section, switch to Advanced tab and you can choose options for Shared Clipboard and Drag’n’Drop. You can choose Disabled, Host to Guest, Guest to Host, or Bidirectional for both of them.

Unless you have a specific reason to choose something else, Bidirectional is the most convenient.

VirtualBox Clipboard Sharing

Once you have this enabled, both copy/paste and dragging will work across systems.

2. Shared Folders

If you’d rather make folders on your host system accessible in the VM, you can utilize shared folders. This Guest Additions feature lets you mount host folders as “network resources” in the guest OS without actually using a network.

To use it, click Settings on a VM and jump to the Shared Folders section. Select the Add Share button on the right side, then choose a folder on your computer to share with the guest.

Give it a name, choose Auto-mount if you want it to connect automatically, and hit OK.

VirtualBox Shared Folders

Now, that folder will appear as a network drive in the guest OS.

3. Improved Graphics Support

As mentioned earlier, virtual machines don’t support high-resolution graphics from the start. Once you install the Guest Additions, though, you’ll have full control over the resolution options in the guest OS’s settings menu. For instance, if you have a 1920×1080 monitor, you can display the VM in full-screen at 1080p.

VirtualBox Full Resolution

That’s not the only graphical enhancement that the Guest Additions add. Using them, the guest OS’s resolution will dynamically resize as you adjust the VirtualBox window on your computer. This lets you use the VM at any size you like without playing with resolution options.

Finally, with Guest Additions, the guest OS can take advantage of your computer’s graphics hardware. If you’re playing games or using other graphically intensive software in a WM, this makes a huge difference.

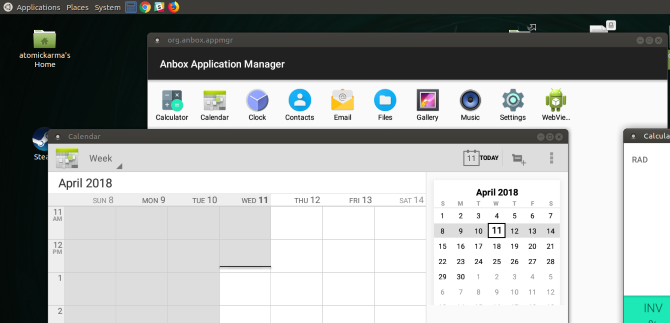
4. Seamless App Windows

Another neat benefit of the Guest Additions is a seamless mode. This lets you run app windows from the guest alongside apps from your host OS, so it feels like they’re all part of one system. It’s a lot like how Parallels runs Windows apps on a Mac.

To use this mode, press the Host key + L when your virtual machine is in focus. If you haven’t changed it, the default Host key in VirtualBox is the right Ctrl key.

VirtualBox Seamless Mode

Once you’ve done this, the VM will go full-screen and VirtualBox will remove its background. You’re then free to use its windows with your regular desktop software. Hit Host + L again to turn this off—if it doesn’t seem to work, make sure you select the VirtualBox VM first.

5. Other Benefits of VirtualBox Guest Additions

The above functions are the main features of VirtualBox’s Guest Additions. There are a few other useful perks to installing them, though these are not as generally useful.

One that may affect you, depending on the guest OS, is seamless mouse integration. With most modern OSes, VirtualBox allows you to seamlessly move your mouse between your host and guest system. However, some older OSes require exclusive control of your keyboard and mouse.

If this is the case, your mouse pointer will become “trapped” inside the VirtualBox window after you click inside it. This means that you must hit the Host key (right Ctrl by default) to bring the mouse control back to the host OS.

Otherwise, the Guest Additions bring time synchronization with your host machine, the option for automated logins, and can monitor communications between the guest and host. None of this has much use for the average user.

How to Install VirtualBox’s Guest Additions

It’s easy to install the Guest Additions on your VirtualBox system. In fact, every time VirtualBox receives an update, it includes a new version of the Guest Additions too. You don’t necessarily need to update the Guest Additions every time you update VirtualBox, but Oracle recommends it for best performance.

Keep in mind that the Guest Additions are available for Windows and Linux, but not macOS. You’ll need other workarounds if you’re running macOS in a virtual machine.

Install Guest Additions on Windows VMs

To install the Guest Additions for VirtualBox in a Windows VM, boot into your guest OS as normal. On the toolbar at the top, select Devices > Insert Guest Additions CD Image. This mounts a virtual disc to the VM.

VirtualBox Install Guest Additions

When you do this, Windows will respond as if you’ve just inserted a physical disc. If it doesn’t prompt you to run it, open a File Explorer window and go to This PC. You should see a device in the CD Drive named something like VBox_GAs_x.

VirtualBox Guest Additions CD Drive

Double-click this to open the disc’s contents. Inside, run the VBxWindowsAdditions file (or VBxWindowsAdditions-x86 on a 32-bit VM).

VirtualBox Guest Additions File Windows

From there, simply walk through the steps to install the Guest Additions like you would any other software. After it completes, you’ll be prompted to reboot the VM, which you should do as soon as possible.

Once you’re done, you can go to Devices > Optical Drives > Remove disk from virtual drive to “eject” the virtual Guest Additions disc.

Install Guest Additions on Linux VMs

The process to install VirtualBox’s Guest Additions into a Linux VM is quite similar. Once you’ve booted up, select Devices > Insert Guest Additions CD Image from VirtualBox’s menu bar. Depending on your flavor of Linux, you may see a message to automatically run the CD’s contents.

You can accept this, but if you don’t, you’ll find the CD available on the taskbar in many Linux distros. If it doesn’t appear there, open the file browser and look for VBox_GAs_x on the left sidebar.

VirtualBox Guest Additions Install Linux

On Ubuntu, a Run Software button appears at the top-right of the window. Click this to start the install process, then provide your admin password to continue. A Terminal window will open to keep you updated with its progress.

Once it’s done, reboot the VM and you’re all set. You can then eject the disk using the Devices > Optical Drives > Remove disk from virtual drive option, or by right-clicking it in your OS and choosing Eject.

VirtualBox Remove Guest Additions Disc

Guest Additions Make VirtualBox Even Better

As we’ve seen, the Guest Additions make running virtual machines with VirtualBox much smoother. You should always take a few moments to install the Guest Additions when setting up a new VM, as there’s no drawback to doing so.

If VirtualBox isn’t working for you, check out how VirtualBox compares to other virtualization tools.

Read the full article: VirtualBox’s Guest Additions: What They Are and How to Install Them


Read Full Article

Use This Trick to Convert Any Image to PDF on Windows 10


compress-pdf

Converting images to PDFs on Windows 10 machines couldn’t be easier. You don’t have to download any additional software or rely on resource-hogging programs like Adobe Reader.

Unlock the FREE "Ultimate Windows Keyboard Shortcuts" cheat sheet now!

This will sign you up to our newsletter

Enter your Email

You can use the following method to convert image formats like JPG, PNG, TIFF, and more to PDF.

However, it’s not just limited to image files. This is because the method uses a feature called Microsoft Print to PDF. If the program has a print function, you can convert it to PDF. This includes web pages and Microsoft Word documents.

How to Convert an Image to PDF

To convert an image to a PDF on Windows 10, do the following:

  1. Open up the photo in your default image viewer—that could be the Windows 10 Photo app or an editing program like Paint.
  2. Once the image has opened, press Ctrl + P to open the Print dialog box.
  3. Select Microsoft Print to PDF as the printer and click Print. (If you don’t see this option, refer to the section below.)
  4. Another dialog box will pop up where you can enter the File name and select the file location. Once done, click Save.

Windows Photos Print to PDF

This method will work with any image file and with any program that supports printing.

How to Enable Microsoft Print to PDF

If you don’t see Microsoft Print to PDF listed as a printer, you might need to enable the feature.

Do a system search for turn windows feature on or off and select the match. This will open Windows Features.

Windows Featues Print to PDF

Scroll down the list and tick Microsoft Print to PDF and click OK. You shouldn’t need to restart your computer for the changes to take effect.

You Can Convert on Mobile Too

Remember, this is a great method for converting images to PDF, but it also works with other formats on any program that supports printing.

If you want to convert an image to PDF or vice versa on your Android phone, try one of these file conversion apps for Android.

Read the full article: Use This Trick to Convert Any Image to PDF on Windows 10


Read Full Article

How to Get Incoming Call Alerts on Windows 10 With Android


Sometimes when you’re working on your PC, you don’t want to be distracted by your phone. But you still want to know when someone is calling you.

Unlock the FREE "Ultimate Windows Keyboard Shortcuts" cheat sheet now!

This will sign you up to our newsletter

Enter your Email

You can use one of these three methods to get phone call notifications from an Android device on your PC.

Get Call Notifications on PC Using Cortana

If you use an Android phone and a Windows 10 computer, you can get phone alerts on your computer whenever you receive or miss calls. All you need to do is set up Cortana on your Android phone.

After you install the official Cortana app, you’ll want to log in with the same Microsoft account you’re using on your computer. Then it’s just a matter of going into the Cortana app settings and turning on notifications.

Go to Settings > Sync Notifications and toggle on Missed Call Notification and Call Notification.

You can also toggle on Low battery notifications to find out when you’re running out of juice, and you can also get additional App notifications on your computer.

What’s really great about this last feature is that you can choose which apps to receive notifications for, so you’re not bombarded with notifications from all your apps.

Incoming call alerts - Cortana settings

On your computer, make sure that notifications are turned on by going to Settings > System > Notifications & actions.

Your phone should be listed as one of the senders you receive notifications from. You can adjust the settings of these notifications as you would with any other sender.

These settings include showing or hiding notification banners, keeping notifications private on the lock screen, showing notifications in the action center, and playing a sound.

Incoming call alerts - Notification settings

When you receive a call or missed call, you should see an alert with the contact name or number. While you can’t respond to the call from your computer, you can respond with a text message. This feature is particularly useful if you’re in a meeting or if your phone is out of reach.

Incoming call alerts - Cortana notifications

Get Call Notifications on PC Using Pushbullet

Another option for getting call notifications on a laptop or desktop is to use a tool called Pushbullet. This service syncs notifications between multiple devices, including phone calls if you use Android.

To use Pushbullet, first install the app for Android onto your phone.

Sign into the app using your Google or Facebook account. Go to the Mirroring section using the menu at the bottom of the app. From here, enable notification mirroring by sliding the toggle into the on position.

Now install Pushbullet on your PC to get phone notifications. You can either install Pushbullet in your browser or install the Windows software.

  • To use the desktop software, install the Windows app.
  • To install on your browser, download the extension for Chrome or for Firefox.

Once the software has been installed onto your PC, you should sign into Pushbullet using the same account you used for your phone.

Now, when you get an alert on your phone, such as a notification for an SMS message or phone call, a notification will appear on your PC as well.

To test that everything is working, open up the Android app. Go to the Mirroring section once more and tap Send test notification.

A notification should be visible on both your phone and your PC. If you dismiss the notification from your PC, it should be dismissed from your phone too.

Enable End-To-End Encryption on Pushbullet

If you’re going to use Pushbullet, you should enable end-to-end encryption to make sure your notifications stay secure and private.

Using encryption means that even if someone is able to intercept your notifications, they won’t be able to read them. The content of the notifications will be hidden to anyone who doesn’t have your password.

To enable end-to-end encryption, follow these steps:

  1. Open the Android app.
  2. Go to Account and then to Settings.
  3. Scroll down to the Advanced settings section.
  4. Tap on End-to-end encryption.
  5. You’ll see a popup saying Enable encryption? It will inform you that you must enable this on every device. Tap Enable.
  6. Now you need to enter a password. This should be something easily memorable. Type your password and tap OK.
  7. Now encryption is enabled on your phone. Next, you need to enable it on your PC too.
  8. Open up the Windows or browser app on your PC. Go to Account and then to Settings.
  9. Find the End-to-end encryption heading and slide the toggle to enable it.
  10. Now enter your password. This should be the same password you use for your Android app. Then click Save.

This activates end-to-end encryption so your notifications are kept safe and private.

Get Call Notifications on PC Using IFTTT

Incoming call alerts - IFTTT

Another option for receiving call notifications on your PC is to use IFTTT. The extremely useful service work across multiple apps and platforms.

When a trigger event occurs (“if this”), then an action automatically happens (“then that”). To learn more about the many ways to use this service, check out our ultimate IFTTT guide.

To use the service to get phone call notifications, start by installing the IFTTT app for Android. Make sure that the Notifications and Android Phone Call services are enabled.

Now, you can select what you want to happen when you receive a phone call on your Android device. Here are some of the IFTTT applets you can use to pair Windows 10 with the Android phone:

  1. Get an email when you miss a phone call.
  2. Get a Pushbullet notification is you receive a phone call.
  3. Get a notification on your Android Wear device if you miss a phone call.
  4. Get a roundup email of all your missed calls after you finish work.

To enable any of these options, open the page and then toggle the Connect option. Once connected, your chosen action will be triggered whenever you get a phone call on your Android device.

Make Android and Windows 10 Work Together

Using these three methods, you’ll be able to see phone call notifications from your Android device on your Windows PC. However, that’s not all you can do. You can also see other Android notifications on your PC as well. For example, incoming emails or software updates.

Apart from Windows, you can also see Android notifications on other operating systems such as Mac or Linux. To learn more, see our guide on how to sync Android notifications with Windows, Mac, and Linux.

Read the full article: How to Get Incoming Call Alerts on Windows 10 With Android


Read Full Article

How to Run Android Apps and Games on Linux


android-apps-linux

Want to run Android apps on Linux? How about play Android games? Several options are available, but the one that works the best is Anbox. This is a tool that runs your favorite Android apps on Linux without emulation.

Unlock the "Essential Linux Commands" cheat sheet now!

This will sign you up to our newsletter

Enter your Email

Here’s how to use Anbox to run Android apps on your Linux PC today.

Meet Anbox, Your “Android in a Box”

Having access to your preferred Android apps and games brings an exciting new dimension of productivity to Linux. Mobile apps are, by design, a lot simpler than those found on desktop operating systems.

This could be just what you’re looking for to improve desktop productivity!

Meanwhile, mobile games are becoming increasingly sophisticated. It makes sense that you might want to continue playing on a different device. This is especially true considering the limited battery life of a phone or tablet.

Several macOS and Windows tools are available for running Android apps (such as Bluestacks) but this isn’t available for Linux.

Instead, Linux users should try Anbox, a free and open source tool to run Android apps on Linux. It’s based on the latest version from the Android Open Source Project (AOSP) and offers a window-based Android environment.

Anbox uses containers to separate Android from the host operating system, enabling you to run Android games on Linux

That’s not all; Anbox has no limits, so in theory you can run any Android app on Linux. There’s no hardware virtualization either, so Anbox works as well on a laptop or desktop, whatever the system spec.

Which Linux Distros Support Snap?

Although free to use, Anbox comes as a snap package. This means that the binary and any dependencies are included in a single package, easing installation. Unfortunately, it means that your Linux OS cannot use Anbox unless it can unpackage and install snaps.

The snapd service is required to install snaps, and this is compatible with Linux distributions such as:

  • Arch Linux
  • Debian
  • Fedora
  • Gentoo
  • Linux Mint
  • Manjaro
  • openSUSE
  • Solus
  • Ubuntu

In Ubuntu, snapd comes pre-installed from 14.04 onwards. You’ll find full details for your distro at the Snapcraft website.

To install snapd, use the following terminal command:

sudo apt install snapd

Wait until the installation completes before proceeding. Note that while snapd runs or is preinstalled with the above distros, Anbox is official supported on:

  • Ubuntu 16.04 LTS (Xenial Xerxes)
  • Ubuntu 18.04 LTS (Bionic Beaver)

Subsequent releases of Ubuntu should also run Anbox. This support means that you’re likely to get better results running Android apps on Ubuntu than other distros.

Installing Anbox on Linux

With the snapd service installed on your Linux PC, you’re ready to install Anbox. Use the following command, which installs everything you need:

snap install --classic anbox-installer && anbox-installer

Enter a password when prompted and the snap package will download.

Shortly after, you’ll see a choice:

  1. Install Anbox
  2. Uninstall Anbox

Setup Anbox to run Android apps on Linux

Should you need to remove the software later, simply re-run the installer command above, and select option 2. In the case of installing Anbox, however, you can proceed with option 1.

Following this, you’ll see a summary of what the installation will do. Take a moment to read through this.

You’ll see that files added from a PPA listed. There should also be a notice that the anbox runtime will autostart when you log into Linux. (This is a software library that enables other software and apps to run.)

Set up Anbox on Linux

If you’re happy with all of this, enter I AGREE and wait for Anbox to install. Once done, follow the instruction to reboot your system before proceeding.

Downloading APK Files to Your Linux PC

With your PC rebooted, you should find Anbox available in your desktop’s menu. Click it to launch— you’ll soon see the Anbox window.

Anbox runs Android apps on Linux

If nothing happens, or you’re stuck on a splash screen with the Starting message, cancel or wait for this to end. Then open a new terminal and enter

anbox session-manager

Next, click the icon in the menu again. A few moments later, Anbox should run. This is a known bug in Ubuntu 16.04-based distributions and shouldn’t affect later distros.

With Anbox running, you’ll see a list of the basic Android apps you can run on Linux, such as Calendar and Email. Simply left click these icons to open them; they’ll appear in new windows that you can resize as required. If you need a browser, the WebView Shell is included.

To add your own apps and games, all you need to do is download (or copy from another device) the appropriate APK files. These are installer files, like DEB files (or snaps) in Linux, or EXE files in Windows.

On Android phones and tables, APK files are available via Google Play on Android… but that doesn’t apply on Anbox.

Installing Android Apps on Linux With Anbox

Because the Anbox implementation of Android is not registered, you won’t be able to access (or install) Google Play. So, how can you run Android apps on Ubuntu and other Linux distros with Anbox?

The answer, therefore, is to download and sideload APKs. You’ll find these via Google Play alternatives, but you can also extract APKs from Google Play.

While Google restricts access to the Play Store to registered Android devices, bypassing this is not piracy. If you already own the APK files, or they’re available freely, it’s okay to run them on unregistered Android devices.

Once you’ve got hold of any APK files you want to install, you’ll need to enable installation from unknown sources. Do this by opening the Settings menu from the apps screen, then find Security. Enable the switch next to Unknown Sources and click OK to accept.

With this done, find your APK files and double-click the first one you want to install. A few moments later, the app or game should be ready, and will run in its own window. Installed games are listed alongside all other Linux apps.

Running Android apps on Linux is that simple!

Now You Can Run Android APKs on Linux

How to run Android apps on Linux

Since Anbox is in the alpha stage, there may be some stability issues. However, it is reassuring to know how simple it is to set up, install, and run Android apps on Linux Ubuntu with Anbox.

To recap:

  1. Confirm your distro supports snap packages.
  2. Install or update the snapd service.
  3. Install Anbox.
  4. Launch Anbox from your Linux desktop.
  5. Download APK files and run them.
  6. Wait as the APK file installs.
  7. Click to run Android apps on your Linux desktop.

Anbox isn’t the only way to run Android apps and games on Linux, but we reckon it will be the most popular within a few years. And to go the other way, check out how to run Linux on your Android device.

Read the full article: How to Run Android Apps and Games on Linux


Read Full Article

How to Switch Google Authenticator to a New Phone


two-step-authentication

Google Authenticator is one of the most popular two-factor authentication apps around. But if you’ve opted to use Google Authenticator and switch to a new phone, you’ll find that moving Google Authenticator to your new phone is not an entirely straightforward task.

Here’s how to change Google Authenticator to a new phone.

How to Switch Google Authenticator to a New Phone

Note: It is important to complete your Google Authenticator switch while you still have your old phone. If you get rid of, lose, or sell your phone before switching your Google Authenticator app and the 2FA codes, there is a strong chance you will not regain access to some of your accounts. Google Authenticator does not include a method to retrieve lost 2FA codes.

Now that this disclaimer is out of the way, let’s find out how to switch the 2FA codes before getting rid of your old device.

  1. Install the Google Authenticator app for iOS or Android on your new phone.
  2. Load the Google Authenticator page in a browser. You’ll receive a prompt to log in with your Google credentials.
  3. You should see the Authenticator app listed. Click Change phone.Google Authenticator change phone
  4. In the popup window, you’ll receive a prompt to select what kind of new phone you have: Android or iPhone. After you make your selection, click Next.
    Google Authenticator new phone type
  5. Open up the Google Authenticator app on your new phone and tap Begin setup > Scan barcode.Google authenticator new phone setup
  6. Once you’ve used your new phone to scan the barcode displayed in your browser, choose Next on the webpage. You’ll be prompted to enter the authenticator code you see on your phone.
  7. Click Verify.

Next comes the time-consuming bit. If you use Google Authenticator for other apps, you’ll need to log into each of those sites separately to remove the old Google Authenticator app and add your new phone, also by scanning the QR code.

Once you finish updating each account on your new phone, you can head back to your old phone. Tap the Edit button (pencil icon) and begin deleting the individual 2FA codes. After you delete all those codes, you can delete Google Authenticator from the old device.

What Are Google Backup Codes?

Google backup codes are a set of unique security codes that allow you to gain access to your Google accounts without using 2FA. If you lose your phone or are otherwise unable to access Google Authenticator, you can use one of your unique backup codes to enter your Google account, bypassing the two-factor authentication.

Please note: this only works for your Google accounts, such as Gmail, Google Drive, YouTube, and so on. Other services may also offer a 2FA bypass procedure, but you have to contact and work through each service individually.

You can create a secure backup copy of your Google backup codes, ready for use should the moment ever arrive. Here’s how you create a set of Google backup codes:

  1. Open the 2-Step Verification settings page of your Google account.
  2. Scroll down to Backup codes, then select Set Up.
  3. Make a copy of the codes. Select Download to create a text file of the codes that you can save, or select Print to create a hard copy of the codes.

google backup codes generate

You can create a new set of Google backup codes at any time. However, once you create a new set of backup codes, the previous set becomes unusable.

Use a Google Authenticator Alternative to Sync Your 2FA Codes and Accounts

Everyone should use a two-factor authentication app to boost security, and Google Authenticator handles this. But for all the good that Google Authenticator provides, the fact you can lose your 2FA codes—and potentially your accounts—is pretty terrible.

Given the risks of Google Authenticator if you lose or break your phone, you should consider an alternative 2FA app. If you don’t like any of these, take a look at other methods for two-factor authentication instead.

1. Authy

Authy is a Google Authenticator alternative with a major difference: you can sync your 2FA codes across multiple devices and back up your accounts to easily restore them on any new device. That means you don’t have to go through this arduous process with each new device you purchase. Furthermore, Authy encrypts your 2FA codes before backup, and you can use a passphrase to lock your account.

Authy is available for iOS and Android, and is compatible with all the same sites as Google Authenticator.

Download: Authy for iOS | Android (Free)

2. LastPass Authenticator

Another excellent Google Authenticator alternative is LastPass Authenticator. As you may know, LastPass is a well-respected password management tool, and the LastPass Authenticator is an extension that allows you to protect your accounts with 2FA.

LastPass Authenticator backs up to your LastPass account automatically. This means your 2FA accounts remain secure in the case of a lost, broken, or new phone.

Also, LastPass Authenticator integrates with the LastPass extension in your browser. That means you can use automatic login on some sites and services, rather than having to enter your 2FA code manually. The system is still secure, but saves you some additional seconds during the login process. (Not that 2FA takes long to use anyway!)

Download: LastPass Authenticator for Android | iOS (Free)

3. andOTP

In comparison to the 2FA app big hitters, andOTP is an outsider. But andOTP ticks many of the boxes you want in a security product.

For instance, andOTP is completely open source. It requests as few permissions as possible, asking for only what the app requires to run. As an Android app, it offers a handy UI that uses the minimalist Material Design, allowing you to select from three different themes.

andOTP offers multiple backup options, too. You can store your 2FA codes in plain text (which is inadvisable), using a password, or using OpenPGP encryption.

Download: andOTP for Android (Free)

Do You Need 2FA for Every Account?

You want to protect your online accounts, without a doubt. If you go to great lengths to protect your accounts with a strong and unique password, why not take the extra step and use a 2FA app? The apps above are all free, relatively easy to use, and the additional layer of protection could stop someone hacking into your email or social media accounts and causing havoc.

Backing up your 2FA codes is extremely handy. However, you do have to trust the 2FA application with your backups. For many users, backing up and trusting a third party with a 2FA code is an absolute security no-no. For most people, however, the additional functionality of a safety backup is perfect. And given that you can encrypt your backups, there is little to worry about.

There is one remaining question: should you use two-factor authentication over SMS?

Read the full article: How to Switch Google Authenticator to a New Phone


Read Full Article

What to Know When Buying a Robot Vacuum: 3 Tips to Keep in Mind


Are you in the market for a robot vacuum, but can’t tell your suction power from your side brushes? Don’t worry! Taking the first uncertain steps into buying any sort of tech can lead to confusion at first. Especially when terms you’re not familiar with crop up in item descriptions.

Robot vacuums are becoming increasingly popular. They’re convenient to have at home, especially if you’d rather fill your life with more soul-nourishing pursuits than cleaning! If you’d like to learn more about robot vacuums, read on. We’ve put together this handy guide to buying (or upgrading) your robot servant and what to look out for.

1. It’s All About Suction Power

Woman relaxing on sofa drinking tea while robot vacuum cleans

The most important thing your robot vacuum can do is suck up dust and debris from your floor. That is, after all, the point of a vacuum. It is therefore crucial that you are aware of the suction power of the vac you’re looking at buying. This will determine whether or not it has done a good enough job once it has finished cleaning.

You are most likely to see suction measured in Pa. This refers to the suction pressure in the unit of measurement called Pascals. Not all manufacturers will tell you the suction power of their vacuum in this way, but it is good to look out for. For example, iRobot doesn’t readily give you this information for their Roomba series, but Bagotte mentions that the max suction power their BG600 model is 1,500 Pa. Great for hard floors!

Bagotte BG600 Robot Vacuum Bagotte BG600 Robot Vacuum Buy Now On Amazon $219.83

If you have pets, carpets, or both, then you’ll want to look at something with a higher max suction. The Roborock S4, for example, is a great vacuum if you’re thinking about something with more meat on its bones. It crams in a hefty 2,000 Pa suction power, alongside a wealth of other cool features. This means it will even lift dust and trapped hair from low-pile carpets.

Roborock S4 Robot Vacuum Roborock S4 Robot Vacuum Buy Now On Amazon $399.99

2. Loudness Is Also Important

Man Relaxing On Sofa With Robotic Vacuum Cleaner On Hardwood Floor

Let’s face it, robot vacuum cleaners should be convenient. They become less so if the noise they make is enough to disturb you. If you want to stay in bed on a Sunday morning, you don’t want the sound of a vacuum interrupting your snores! So, factor in the amount of noise your robot buddy is going to be making before you leap in and buy.

The noise level of the Neato Robotics D4 operates at a fairly loud 65 dB. To give you a comparison, a busy street (with traffic) will probably push around 80 dB in volume. If you feel this is too loud, then Eufy has just the ticket to endless sleepy Sundays: their RoboVac 11S makes only 55 dB of noise. Practically a whisper! The suction for this model isn’t the best they offer, though. The RoboVac 30C Max maintains the 55 dB noise limit while boasting a respectable 2,000 Pa suction.

eufy BoostIQ RoboVac 30C Max Robot Vacuum eufy BoostIQ RoboVac 30C Max Robot Vacuum Buy Now On Amazon $209.99

At some point, though, you’re probably going to have to make a compromise. Do you want a super-quiet vacuum with less powerful suction or a slightly louder one with great cleaning efficiency? Given that you’re unlikely to want to follow your robot vacuum around with a handheld, we’d recommend the latter.

3. Don’t Neglect Cleaning Modes

The cleaning pattern that your robot vacuum follows—referred to as cleaning mode—will have a major effect on its cleaning efficiency. It affects the time spent cleaning and the cleaning coverage. There are two modes that you will come across and we will explain a little about each, below.

Random Mode

Robot vacuum cleaner stuck between chair legs

Random mode, also known as “bounce mode” is, as the name suggests, completely random. The vacuum won’t follow a specific path and will, instead, clean in what may seem like an erratic fashion. While this isn’t specifically an issue, you may find that the random cleaning mode doesn’t cover your floor completely. It can also mean that your robo-vac may get stuck between chair and table legs.

The majority of vacs that use bounce mode, come with built-in “bumpers” that cover the front of the device. As you may have guessed, these inform the vacuum when it knocks into a footboard or a table leg, so it knows to change direction and keep cleaning elsewhere. As mentioned, this means it might miss a spot or two. You can quite easily work around this by using the remote control, directing your robo-servant to the spots it has missed.

Generally, the more basic, less costly models will run in bounce mode. The Ecovac Yeedi K600 Robot Vacuum Cleaner, for example, is a great budget model that covers all the basics. If you’re looking for a simple robot vacuum cleaner as an entry-level device, then you could do significantly worse. It uses a random cleaning pattern and you can then use the bundled remote to sweep up any bits it has missed.

Ecovac Yeedi K600 Robot Vacuum Ecovac Yeedi K600 Robot Vacuum Buy Now On Amazon $199.99

Linear Mode

robot vacuum cleaner in kitchen

Linear mode is equally easy to understand. Rather than bounce around in a vaguely haphazard fashion, the vac will clean in straight lines. This is an excellent way of cleaning as it provides the most floor coverage. If you think of the vac operating in the same pattern as a gardener mows a lawn, then this is how linear cleaning works.

If you want a vac that uses linear cleaning, you will likely have to pay a little more for it. The investment will mean that you get a robot vacuum with more autonomy, so you have even less to worry about in terms of cleaning efficiency. Some of the cheaper linear-mode models will still feature bumpers, but you are pretty much guaranteed a better clean in terms of how much dust and dirt the vacuum picks up.

One vacuum that comes with a super-low price-tag, when all of its features are taken into consideration, is the X6 VSLAM Camera Robot Vacuum Cleaner. It cleans in linear mode, and will only set you back $229. Honestly, with the other features available, this is a steal!

X6 VSLAM Camera Robot Vacuum X6 VSLAM Camera Robot Vacuum Buy Now On Amazon $229.99

Other Options to Know About

using a robot vacuum cleaner with a smartphone app

So we’ve covered cleaning modes, noise, and suction power. Robot vacs are becoming more and more advanced, though. Many of them work with an app so you can clean from the office (!!!). Some models actually map the floor of your home, scanning for obstacles, and allow you to draw virtual walls using the app. You can even get hybrid models that mop and vacuum. (Get one of these and your life will be complete!)

The X6 VSLAM mentioned above won’t break the bank but features: up to 2500 Pa suction, so a powerful vac; Wi-Fi-integrated remote control via the app; a built-in floor mapping mode with virtual walls; and much more. Definitely worth the cash!

Which Robot Vacuum Is Right for You?

Hopefully, this guide has made your decision a little easier. With a wealth of features to choose from, all you need to do is decide how much of in investment to make. If you want your life to be less about chores and more about actually living, it is definitely worth a punt.

Still not sure which robot vacuum model to plump for? Check out our review of the Roborock S6 robot vacuum to see why we think it’s easily one of the best-value robot vacuums on the market right now.

Read the full article: What to Know When Buying a Robot Vacuum: 3 Tips to Keep in Mind


Read Full Article

Daily Crunch: Twitter tests ephemeral Fleets


Twitter tries out its own version of the popular Stories format, a court orders Otto’s founder to pay a big fine to Google and electric skateboard company Boosted makes cuts. Here’s your Daily Crunch for March 5, 2020.

1. Twitter starts testing its own version of Stories, called ‘Fleets,’ which disappear after 24 hours

Twitter is testing a new sharing format called “Fleets,” starting in Brazil, which will let users post ephemeral content to its social network for the first time. Unlike Tweets, Twitter’s new Fleets can’t receive Likes, Replies or Retweets. And they’ll disappear entirely after 24 hours.

To be clear, Fleets are publicly viewable, but they’re a little less accessible. You could visit someone’s public Twitter profile and tap to view their Fleets even if you don’t follow them. But their Fleet won’t circulate Twitter’s network, show up in Search or Moments and it can’t be embedded on an external website.

2. Anthony Levandowski ordered to pay $179M to Google

An arbitration panel ruled in December that Levandowski and Lior Ron had engaged in unfair competition and breached their contract with Google when they left the company to start a rival autonomous vehicle company focused on trucking, called Otto. (Uber acquired Otto in 2017.) On Wednesday, a San Francisco County court confirmed the panel’s decision.

3. Boosted lays off ‘a significant portion’ of its team as it looks for a buyer

Boosted — the company behind Boosted Boards and the Boosted Rev electric scooter — attributes the layoffs to the costs of developing, producing and maintaining electric vehicles and the “unplanned challenge with the high expense of the US-China tariff war.”

4. 5G is now live in 24 markets, GSMA predicts it’ll be 20% of global connections by 2025 — and eyes a big tech break-up

The next-gen flavor of mobile connectivity, 5G, is now live in 24 markets globally, according to industry group GSMA’s annual state of the global mobile economy report.

5. Despite earnings beat and upbeat forecast, Zoom shares fall after reporting Q4 results

Zoom came in ahead of both current-quarter expectations and full-fiscal-year anticipation. Why did the share price go down, given all of that? Perhaps investors expected an even more impressive beat? Or an even more impressive forecast? (Extra Crunch membership required.)

6. Hailo raises $60M Series B for its AI chips

What makes the Hailo chip stand out is its innovative architecture, which can automatically adapt resources to best run its users’ custom neural networks. With this, the chip doesn’t just run faster — it’s also far more energy efficient.

7. Judge rejects Tulsi Gabbard’s ‘free speech’ lawsuit against Google

Last July, Hawaii representative and longshot Democratic presidential hopeful Tulsi Gabbard filed a lawsuit against Google, accusing the company of violating her First Amendment rights to free speech when it briefly suspended her campaign’s ad account. On Wednesday, California’s Central District Court rejected the suit outright.

The Daily Crunch is TechCrunch’s roundup of our biggest and most important stories. If you’d like to get this delivered to your inbox every day at around 9am Pacific, you can subscribe here.


Read Full Article

Reddit partners and integrates with mental health service Crisis Text Line


Reddit, a discussion website and home to thousands of communities, announced this week a new partnership with mental health service, Crisis Text Line. The company offers a mental health text line offering live, 24/7 support for people in crisis, including those considering suicide or engaging in self-harm. With this partnership, Reddit users will be able to now flag others whose posts indicate they’re struggling or in crisis. The flagged user is then immediately sent a private message offering them resources and an optional helpline where they’ll be connected with a Crisis Counselor.

Unlike helplines in the past which required users to call in, Crisis Text Line instead operates over text — the preferred communication mechanism for a generation who grew up with smartphones, and who may feel that phone calls are too intimidating.

To get started, they’ll be prompted to text the phrase “CHAT” to 741741. They can then text with their counselor for as long as they need, and the counselor will help them sort through their feelings and thoughts, ask questions, empathize and actively listen.

The person who flagged the user can also get help through the same service, as taking that step can be triggering.

The option to report a post or comment is available directly from the post, by selecting the reporting option: “Someone is considering suicide or serious self-harm.” You can also visit the person’s profile directly and select: “Get them help and support.” (On the web, this is under the “more options” section.)

Reddit also notes that the person in crisis won’t sent multiple messages in short succession even if a number of people flag and report their post. And it will have a link to report “messages received in error” so Reddit can monitor for abuse of the feature.

Crisis Text Line has said in the past that only 30% of its cases are about suicide, and because it’s able to de-escalate the situation it only engages it an “active rescue” (meaning the phone number is provided to a 911 center) in 0.82% of conversations. The counselor doesn’t otherwise have the texter’s phone number, which is encrypted, and they will not call the texter.

Reddit decided to partner with Crisis Text Line because of how often its platform is used for support. Today, the company already offers a number of forums where users can get help facing challenges in their life — like quitting smoking or drinking, getting pregnant, or addressing anxiety and depression, for example. There are also communities solely focused on finding someone to talk to, says Reddit, like r/KindVoice and r/CasualConversation.

“On Reddit, people are able to find community around an infinite number of topics relevant to them – and as an anonymous platform, we provide a space for people to express the most vulnerable parts of themselves,” the company wrote, in its announcement.

Of course, if Reddit wants to host communities like this, it also has a responsibility to its users to provide safety mechanisms and reporting features.

“We’re thrilled to be partnering with Reddit, where redditors can feel safe and supported by their community, 24/7,” added Bob Filbin, Co-Founder & Chief Data Scientist of Crisis Text Line, in a statement. “Reddit has proven to be thoughtful leaders in the online safety space as they ensure users have access to trusted mental health resources at all times,” he said.


Read Full Article