14 February 2020

Bloomberg memes push Instagram to require sponsorship disclosure


Instagram is changing its advertising rules to require political campaigns’ sponsored posts from influencers to use its Branded Content Ads tool that adds a disclosure label of “Paid Partnership With”. The change comes after the Bloomberg presidential campaign paid meme makers to post screenshots that showed him asking them to make him look cool.

Instagram provided this statement to TechCrunch:

“Branded content is different from advertising, but in either case we believe it’s important people know when they’re seeing paid content on our platforms. That’s why we have an Ad Library where anyone can see who paid for an ad and why we require creators to disclose any paid partnerships through our branded content tools. After hearing from multiple campaigns, we agree that there’s a place for branded content in political discussion on our platforms. We’re allowing US-based political candidates to work with creators to run this content, provided the political candidates are authorized and the creators disclose any paid partnerships through our branded content tools.”

Instagram explains to TechCrunch that branded content is different from advertising because Facebook doesn’t receive any payment and it can’t be targeted. If marketers or political campaigns pay to boost the reach of sponsored content, it’s then subject to Instagram’s ad policies and goes in its Ad Library for seven years.

But previously, Instagram banned political operations from running branded content because the policies that applied to it covered all monetization mediums on Instagram, including ad breaks and subscriptions that political entities are blocked from using. Facebook didn’t want to be seen as giving monetary contributions to campaigns, especially as the company tries to appear politically neutral.

Yet now Instagram is changing the rule and not just allowing but requiring political campaigns to use the Branded Content Ads tool when paying influencers to post sponsored content. That’s because Instagram and Facebook don’t get paid for these sponsorships. It’s now asking all sponsorships, including the Bloomberg memes retroactively, to be disclosed with a label using this tool. That would add a “Paid Partnership with Bloomberg 2020” warning to posts and Stories that the campaign paid meme pages and other influencers to post. This rule change is starting in the US today.

Instagram was moved to make the change after Bloomberg DM memes flooded the site. The New York Times’ Taylor Lorenz reported that the Bloomberg campaign worked with Meme 2020, an organization led by the head of the “FuckJerry” account’s Jerry Media company Mick Purzycki, to recruit and pay the influencers. Their posts made it look like Bloomberg himself had Direct Messaged the creators asking them to post stuff that would make him relevant to a younger audience.

Part of the campaign’s initial success came because users weren’t fully sure if the influencers’ posts were jokes or ads, even if they were disclosed with #ad or “yes this is really sponsored by @MikeBloomberg”. There’s already been a swift souring of public perception on the meme campaign, with some users calling it cringey and posting memes of Bernie Sanders, who’s anti-corporate stance pits him opposite of Bloomberg.

The change comes just two days after the FTC voted to review influencer marketing guidelines and decide if advertisers and platforms might be liable for penalties for failing to mandate disclosure.

At least the Democratic field of candidates is finally waking up to the power of memes to reach a demographic largely removed from cable television and rally speeches. The Trump campaign has used digital media to great effect, exploiting a lack of rules against misinformation in Facebook ads to make inaccurate claims and raise money. With all his baked in media exposure from being President already, the Democratic challengers need all the impressions they can get.


Read Full Article

How symbols and brands shape our humanity | Debbie Millman

How symbols and brands shape our humanity | Debbie Millman

"Branding is the profound manifestation of the human spirit," says designer and podcaster Debbie Millman. In a historical odyssey that she illustrated herself, Millman traces the evolution of branding, from cave paintings to flags to beer labels and beyond. She explores the power of symbols to unite people, beginning with prehistoric communities who used them to represent beliefs and identify affiliations to modern companies that adopt logos and trademarks to market their products -- and explains how branding reflects the state of humanity.

Click the above link to download the TED talk.

What is Pseudocode and How Does it Make You a Better Developer?


pseudocode

When you first begin to learn to program there are many things to study before you build your first app. Thinking like a programmer helps you break down problems into algorithms to solve them. Algorithms are the steps your code will take to solve a problem or answer a question.

It can be challenging if you’re a new coder to think like a programmer from the very start. Translating app ideas to actual code takes some practice.

To bridge the gap between what you want your app to do and the actual code you need to write, you can use pseudocode.

What Is Pseudocode?

Pseudocode is a plain-text description of a piece of code or an algorithm. It’s not actually coding; there is no script, no files, and no programming. As the name suggests, it’s “fake code”.

Pseudocode is not written in any particular programming language. It’s written in plain English that is clear and easy to understand.

While it’s not written in a programming language, there are still keywords used that refer to common coding concepts. These are written in uppercase letters to make it easier to read.

  • START
  • INPUT
  • READ/GET
  • PRINT/DISPLAY
  • CALCULATE/DETERMINE
  • SET
  • INCREMENT/DECREMENT
  • PROGRAM
  • END

Here is a snippet of what pseudocode might look like for a program that asks you to input your favorite color and prints your choice.

START
PROGRAM getColor
Create variable Color
Ask the user for their favorite color
READ INPUT into Color
PRINT Color
END 

This is a pretty simple algorithm written in pseudocode. Anyone can read and understand what this is trying to do. As the coder, all you have to do is bring this to life using whichever programming language you code in. Here’s the same program in JavaScript:

let color = window.prompt("What is your favorite color?");
console.log(color);

This program uses JavaScript syntax to write the algorithm. If you don’t know JavaScript it can be a little challenging to figure out what is happening.

Pseudocode writes the algorithm, programming languages write the syntax.

How Is Pseudocode Helpful?

Pseudocode helps you plan out your app before you write it. It helps you create algorithms in a format that is easier to read than code syntax. Once programming languages come into the picture it can be harder to understand what your code is doing.

The JavaScript example is easy to read if you know the language. But what if you’re just reading it and trying to determine the logic? Specific terms like window.prompt or console.log don’t reveal much about the algorithm.

Good software principles are important. If you interview to become a software engineer, they won’t expect you to memorize syntax. They will ask about your knowledge of algorithms and structure. You’ll write much better code if you construct your algorithms and structure before you start coding.

How to Write Pseudocode

Writing a full program in pseudocode requires a lot of different statements and keywords much like regular programming. In fact, once you get far enough along in your pseudocode it will start to look very close to a real program.

Let’s build on the keywords with pseudocode statements to build algorithms.

Conditionals

Conditional statements are critical to programming. These statements are IF statements or IF/ELSE statements which can add logic to your code. These statements are written in pseudocode using:

  • IF
  • ELSE
  • ELSE IF
  • THEN

Here’s a program that performs a simple IF/ELSE statement written in pseudocode. See if you can determine what this code is trying to do just by reading.

START
PROGRAM isOdd
Create variable Choice
Ask the user for a number
READ INPUT into Choice
IF Choice is even THEN
 PRINT "No"
ELSE
 PRINT "Yes"
ENDIF
END

It’s a pretty simple program. It asks the user for a number and does something depending on whether the number is odd or even.

Iteration

Another essential part of programming is iteration, also known as creating loops. Some common loops are for loops and while loops, both of which can be written in pseudocode.

START
PROGRAM forLoop
FOR 1 through 12
 PRINT "Hello"
ENDFOR
END

This algorithm is for a program that will print “Hello” 12 times, which is a bit excessive but shows how simple it is to write a loop in pseudocode.

While loops are also written very easily

START
PROGRAM whileLoop
Create variable Counter
SET Counter equal to 1
WHILE Counter is less than 10
 Print "Hello"
 INCREMENT Counter
ENDWHILE
END

Another pretty simple algorithm using a while loop to print “Hello”.  Both loop examples have a clear start and end to the iteration.

You also can write what is commonly known as Do-While loops. The keywords in pseudocode are different: REPEAT and UNTIL.

START
PROGRAM doWhileLoop
Create variable Counter
SET Counter equal to 1
REPEAT
 Print "Hello"
 INCREMENT Counter
UNTIL Counter is equal to 10
END

Just like a do-while loop, this will perform an action until certain criteria are met. Once it is met the loop will exit.

Functions

Functions are a programmer’s best friend. They contain code that can be called over and over again and are used in all high-level programming languages. Adding functions into your pseudocode is very easy.

START
PROGRAM sampleFunction
PRINT "This is a function"
END

You can call functions in pseudocode.

call sampleFunction

There is not much to functions; they’re very simple and you can add any logic you like.

Error Handling

Being able to write code that reacts to errors is very important when apps are developed. As such, you can include these catches into your pseudocode.

You can handle errors and exceptions using the keyword: EXCEPTION. Here’s a simple algorithm that catches an error

START
PROGRAM catchError
Create variable Number
Ask the user for a number
READ INPUT into Number
EXCEPTION
WHEN Number is not a number
 PRINT "Error: Please pick a number"
END

The exception code will catch bad input from the user. Code testing is vital to writing good apps. Some of these exceptions will re-appear in your testing, so it’s good to be able to write them in your pseudocode when planning the app.

Software Development and More

Pseudocode is all about making you a better coder. Now that you know how to write it you can see just how useful it can be as part of your programming process. Programmers make some pretty good money, so if this is your career move you have a lot of opportunities if you learn a lot.

Knowing how to use pseudocode is recommended however you’re learning to code. Want to know more? Check out some basic principles that every programmer should follow.

Read the full article: What is Pseudocode and How Does it Make You a Better Developer?


Read Full Article

How to Listen to Spotify on Your Fitbit


fitbit-spotify

One of the many benefits of having a smartwatch is controlling content on your wrist without having to take your phone out of your pocket. Which includes controlling music playback.

Unlock the FREE "Spotify Keyboard Shortcuts" cheat sheet now!

This will sign you up to our newsletter

Enter your Email

In this article, we’ll show you how to listen to Spotify on your Fitbit. While this only works with Fitbit’s high-end smartwatches, if you own a compatible device, it makes workouts more fun.

Which Fitbit Devices Are Compatible With Spotify?

Only Fitbit’s high-end smartwatches work with Spotify. At the time of writing, you’ll need one of these devices to listen to Spotify on your Fitbit:

  • Versa 2
  • Versa
  • Versa Lite
  • Ionic

If you have a different Fitbit, you’ll have to sit this feature out. In addition, you must have a Spotify Premium account; a free account doesn’t work with the Fitbit app. We think Spotify Premium is worth it, so consider signing up for a free trial if this feature is enticing to you.

We’ll demonstrate this process with a Versa 2, but it should be similar for other devices. Check out our Fitbit model comparison if you’re not sure which one you have.

1. Install the Spotify App on Your Fitbit

To start, you’ll need to install the Spotify app on your Fitbit. Do this by opening the Fitbit app on your phone and tapping your profile photo in the top-left.

Next, select your device from the Devices list. In the settings for your particular device, tap Apps.

You might have Spotify pre-installed; check for it under My Apps to see. If not, switch to the All Apps tab and find Spotify by browsing or searching for it.

Tap Install on Spotify’s app page, then wait for the process to complete. Once it does, you must approve the permissions so it can run properly. Select Permissions on this page to double-check them if needed.

2. Authorize Your Spotify Account

Once you’ve installed the Spotify app, you’ll need to sign in. If you’re still on the app page, select Settings there. Otherwise, you can head back to My Apps, select Spotify from the list, then choose Settings.

Here, you’ll need to sign into your Spotify account to authorize its use with your Fitbit. After that’s done, you’re ready to go.

How to Use Spotify on Your Fitbit

To open Spotify on your Fitbit, wake up the watch and swipe from right to left on the home screen to show your apps. Select Spotify from the list and you’ll see a Connecting screen while it looks for compatible devices.

Fitbit Versa Spotify Apps List

For this to connect properly, you’ll need to have music playing on another device connected to your Spotify account. This could be a desktop, laptop, tablet, or even a Bluetooth speaker that supports Spotify Connect.

After a moment, you should see information about the currently playing track on your watch. Use the controls to play/pause, change tracks, toggle shuffle mode, and add the song to your library.

Spotify Now Playing Fitbit Versa

If you want to start playing something new, swipe from left to right. You’ll see a few of your recently played playlists, albums, and artists for easy access. Otherwise, tap Library and you can access all of your playlists, Spotify’s “Made for You” content, as well as Spotify workout playlists to help you get fit.

Changing the Device Used to Play Music

The Spotify Connect button in the top-left allows you to change which device is playing the music. For best results based on our testing, you should play music via the phone connected to your Fitbit.

Spotify Connect to Device Fitbit

When controlling music playing on a desktop computer, the Fitbit app only showed a Play/Pause button and the Connect button. To see track info and the rest of the controls, we had to switch to playing music on our phone.

You CAN Listen to Spotify on Fitbit, But It’s Limited

As we’ve explained, the Spotify app for Fitbit is more of a remote for music playing elsewhere than a true standalone app.

While you can pair Bluetooth headphones to your Fitbit, Spotify doesn’t work with this. Thus, you’ll want to pair headphones to your phone and use the Fitbit app as a convenient controller from your wrist.

Most of the Fitbit watches discussed do support other music services that work without your phone. Pandora, for example, offers offline listening with a Pandora Plus account. You can also sync music locally to your Versa 2.

If you’re looking for something different, take a look at the best music apps for workouts.

Read the full article: How to Listen to Spotify on Your Fitbit


Read Full Article

The 6 Best Gaming Keyboards and Mice for the PS4


gaming-keyboard-mice

In some video game genres, a keyboard and mouse offer better accuracy than a gamepad. As such, some games on the PS4 support a mouse and keyboard, even if you never knew that Sony’s console supported such hardware!

Let’s explore a few key points of using a gaming keyboard and mouse for the PS4, and a few good models to get you started.

Can You Use a Keyboard and Mouse on PS4?

Not all keyboards work with the PS4, but the ones that do don’t need special adapters. USB keyboards and mice can plug into one of the two ports on the front of the PS4.

Unfortunately, if you want both a mouse and a keyboard, you’ll come across an annoying problem. Both devices will take up a single port each, and the PS4 only has two. This means there’s no room for controller charging cables and external hard drives.

As such, you may want to consider purchasing a keyboard adapter for the PS4. These only take up one USB port and accept inputs from both the keyboard and the mouse.

One of the best adapters available is the XIM APEX, which unfortunately doesn’t come cheap. Its competitors are either not as reliable, or haven’t received enough user attention to draw a conclusive decision on their overall quality.

Which Games Are Compatible With Keyboard and Mouse?

If you’re using something like the XIM APEX above, you can use a keyboard and mouse on any game. The device will convert your keyboard and mouse inputs into a controller-like format, tricking the PS4 into thinking you’re playing with a gamepad.

If you’re not using an adapter, you can only use a keyboard and mouse on games that support it. Unfortunately, Sony doesn’t have an official page for game compatibility at the time of writing, but sources such as this Reddit discussion list a few key games that do work.

Can You Add Bluetooth Devices?

Yes! The PlayStation 4 has Bluetooth capabilities; after all, that’s how the wireless controllers connect. It takes a little bit of extra setup to pair a Bluetooth keyboard to a PS4, but it is possible. As such, it’s worth looking into Bluetooth models to see if anything matches your needs.

The Best Wired Keyboards and Mice for PS4

Now we it’s possible to connect a keyboard and mouse to the PS4, there’s only one question left to answer; which keyboards work with the PS4? Let’s cover some of the wired options available to you before diving into the Bluetooth keyboards.

1. Redragon S101 Wired Gaming Keyboard and Mouse Combo

Redragon S101 Wired Gaming Keyboard and Mouse Combo Redragon S101 Wired Gaming Keyboard and Mouse Combo Buy Now On Amazon $29.98

If you want a keyboard that does more than play games, try the Redragon S101 Wired Gaming Keyboard and Mouse Combo. It’s designed to fit every niche, from gaming to work productivity. On the gaming side, you have the Redragon keyboard’s stylish look and customizable color patterns.

The 25-key conflict-free design means you can press multiple keys down without fear of dropped inputs, and the Win key can be disabled to prevent it from interrupting your gaming. This makes it a great gaming keyboard for PS4 and PC alike. Then there’s the gaming mouse with an ergonomic design and up to 3200DPI. It even comes with six buttons, five of which are programmable.

When it’s time for work, the Redragon keyboard nicely shifts into productivity mode. The wrist rest is useful for prolonged typing, and the quiet keypresses mean you won’t annoy those around you.

2. BlueFinger RGB Gaming Keyboard and Mouse Combo

BlueFinger RGB Gaming Keyboard and Mouse Combo BlueFinger RGB Gaming Keyboard and Mouse Combo Buy Now On Amazon

If you want a keyboard and mouse package that punches above its price level, try the BlueFinger RGB Gaming Keyboard and Mouse Combo. It has an attractive, affordable price point, but nothing about this combo feels cheap. Everything has a good weight and a solid build to it, so it doesn’t feel like you’re gaming on flimsy hardware.

The usefulness of a Numpad is often a topic of fierce debate; you either love it or you loathe it. If you don’t want a Numpad taking up room in your play area, this one cuts it off to save room for more useful gaming buttons such as the Print Screen key. This makes the BlueFinger the best keyboard and mouse combo for PS4 if you want to save space without sacrificing crucial keys.

3. Orzly Gaming Keyboard and Mouse

Orzly Gaming Keyboard and Mouse Orzly Gaming Keyboard and Mouse Buy Now On Amazon $34.99

Who says you need to pay a premium to look good? The Orzly Gaming Keyboard and Mouse is a stylish addition to this list without breaking the bank. This combo also comes with a mousemat and a headset. Unfortunately, the latter has a microphone that isn’t compatible with the PS4 without an adapter. Regardless, if you want to use this hardware on your PC too, it’s a great way to get yourself fully equipped.

Just because it’s cheap, doesn’t mean the keyboard and mouse skimp on the details. The keyboard has an attractive RGB display with three different color modes, and the mouse has four adjustable DPI options.

4. HAVIT Gaming Keyboard Mouse Headset & Mouse Pad Kit

HAVIT Gaming Keyboard Mouse Headset & Mouse Pad Kit HAVIT Gaming Keyboard Mouse Headset & Mouse Pad Kit Buy Now On Amazon $43.99

In a similar vein to the above option, the HAVIT Gaming Keyboard Mouse Headset & Mouse Pad Kit also comes with everything you need to get started with gaming. However, this kit allows more customization with what you buy. For example, if you want to use the official PS4 headset instead of a third-party one, you can select the kit without the headset and save some money.

Otherwise, this kit does tick all the boxes the previous entry covered. The mouse has four DPI options and has customizable colors along with pulsing patterns. The keyboard has seven different patterns and displays an attractive range of colors.

The Best Bluetooth Keyboards and Mice for PS4

If you’re on the hunt for a wireless PS4 compatible keyboard, you’re best looking into Bluetooth keyboards. Bluetooth peripherals aren’t a gamer’s ideal choice, as the latency between a keypress and the on-screen action can make or break games. Regardless, the luxury of going cordless will appeal to some.

5. Seenda Rechargeable Keyboard and Mouse Combo

Seenda Rechargeable Keyboard and Mouse Combo Seenda Rechargeable Keyboard and Mouse Combo Buy Now On Amazon $25.99

While it’s not the most stylish or colorful selection in the list, the Seenda Rechargeable Keyboard and Mouse Combo is still a good way to get started with PS4 Bluetooth gaming. For one, the lack of flashy colors and special effects means the battery drain is reduced. This means the keyboard and mouse can be used daily for three months straight before it requires a recharge.

This combo is best for anyone interested in a Bluetooth keyboard and mouse in general. Its lightweight design and slim look make it portable enough to bring along with a tablet or phone. It doesn’t matter if you’re playing Minecraft or typing up some work on the train; this package can do both!

6. Logitech Wireless Combo MK360

Logitech Wireless Combo MK360 Logitech Wireless Combo MK360 Buy Now On Amazon $29.98

Logitech has been in the keyboard and mouse business for a long time, which makes the Logitech Wireless Combo MK360 a good choice for gamers. It’s mainly designed for business use, but as many users reported in reviews, it’s great for typing out messages in games such as Final Fantasy XIV.

The battery life of this Logitech device is one of the most impressive out there. At a solid three-year life span using only two AA-batteries, this keyboard may outlast the games you want to use it for! It also encrypts all data sent, which makes it useful as a work device on the side.

Finding the Right Keyboard and Mouse for the PS4

If you want more accuracy in your online gaming, consider a keyboard for your PS4. While it can be tricky to find some that work, those that do perform just as well as if you were playing on a PC.

If you want to kit our your PS4 even further, why not treat yourself with something from our gift guide for the ultimate PS4 fan?

Read the full article: The 6 Best Gaming Keyboards and Mice for the PS4


Read Full Article

Instagram prototypes “Latest Posts” feature


Instagram users who miss the reverse chronological feed might get a new way to see the most recent pics and videos from who they follow. Instagram has been spotted internally prototyping a “Latest Posts” feature. It appears as a pop-up over the main feed and brings users to a special area showing the newest content from their network.

Instagram Latest Posts

For now, this doesn’t look like a full-fledged “Most Recent” reverse-chronological feed option like what Facebook has for the News Feed. But if launched, Latest Posts could help satisfy users who want to make sure they haven’t missed anything or want to know what’s going on right now.

The prototype was discovered by Jane Manchun Wong, the master of reverse engineering who’s provided tips to TechCrunch on scores of new features in development by tech giants. She generated the screenshots above from the code of Instagram’s Android app. “Welcome Back! Get caught up on the posts from [names of people you follow] and 9 more” reads the pop-up that appears over the home screen. If users tap “See Posts” instead of “Not Now”, they’re sent to a separate screen showing recent feed posts.

We’ve reached out to Instagram for a confirmation of the prototype, more details, and clarification on how Latest Posts would work. The company did not respond before press time. However, it has often confirmed the authenticity of Wong’s findings, and some of the features have gone on to officially launch months later.

Back in mid-2016, Instagram switched away from a reverse-chronological feed showing all the posts of people you follow in order of decency. Instead, it forced all users to scroll through a algorithmic feed of what it thinks you’ll like best, ranked based on who and what kind of content you interact with most. That triggered significant backlash. Some users thought they were missing posts or found the jumbled timestamps confusing. But since algorithmic feeds tend to increase engagement by ensuring the first posts you see are usually relevant, Instagram gave users no way to switch back.

Instagram previously tried to help users get assurance that they’d seen all the posts of their network with a “You’re All Caught Up” insert in the feed if you’d scrolled past everything from the past 48 hours. Latest Posts could be another way to let frequent Instagram users know that they’re totally up to date.

That might let people close the app in confidence and resume their lives.


Read Full Article

Spotify Now Lets You Search Songs by Songwriter


Spotify has launched what it’s calling songwriter pages. These give songwriters a public profile on the streaming service, giving them a little bit of the spotlight. And Spotify users can use these songwriter pages to find songs by their favorite songwriters.

Unlock the FREE "Spotify Keyboard Shortcuts" cheat sheet now!

This will sign you up to our newsletter

Enter your Email

Your Favorite Artists Don’t Write Their Own Songs

You may be surprised to learn that your favorite artists probably don’t write their own songs. This is especially true of popstars, who usually employ teams of songwriters to write hits for them. And these songwriters rarely get the recognition they deserve.

However, things are slowly changing, and streaming music services are part of that change. Spotify has been publicly displaying song credits since 2018. And now, Spotify has launched songwriter pages which gives songwriters their own public profiles.

Spotify Launches Public Profiles for Songwriters

Spotify announced songwriter pages in a post on Spotify for Artists. It’s being launched in beta, with a limited number of high-profile songwriters involved from the beginning. These include Meghan Trainor, Fraser T. Smith, Teddy Geiger, and Justin Tranter.

These initial profiles have been created in collaboration between Spotify, the songwriters in question, and music publishers. However, Spotify is openly inviting other songwriters to express an interest in gaining a public profile on the streaming service.

Songwriter pages make it easier for you to get to know particular songwriters and discover what songs they have written. All you need to do is click the three dots next to a track, and select Song Credits. You can then click on the name of one of the songwriters.

You’ll see all of the songs they have written and the artists they’ve collaborated with. You can also click the Listen on Spotify button to open a playlist full of the songs they’ve written or co-written. Potentially allowing you to discover new music.

Timeless Ways to Discover New Music to Stream

Spotify’s songwriter pages are still only in beta, so they’re not yet perfect. However, this is a good first attempt to give songwriters the credit they deserve. And, as a bonus, they also give Spotify users another great way to discover new music to stream.

Read the full article: Spotify Now Lets You Search Songs by Songwriter


Read Full Article

How to Resize Images on Mac Using Photos or Preview


If you want to resize images on your Mac, you don’t need an expensive app to do it. Fortunately, macOS provides you with a few built-in tools that you can use to resize your images easily.

Here’s how to resize an image on Mac quickly using Preview, Photos, ColorSync Utility, and even the Mail app.

For Most Tasks: Resize Using Preview

Preview is a robust app that you can use for all sorts of tasks like viewing images, reading documents, and even signing PDFs. One of its most useful features is the ability to resize images, which is a task that Preview makes simple.

Preview does not require you to import an image into a library first, and it lets you unlock the aspect ratio so you can stretch or squish the image if you want to. For that reason, Preview is the best choice when it comes to quick resizing jobs for images other than those in your Photos library.

To resize an image with Preview:

  1. Double-click on your image to open it with Preview, if it’s your default image viewer. You can also select multiple images in Finder, right-click, and choose Open With > Preview.
  2. Click Tools > Adjust Size from the menu bar.
  3. Use the Fit into box to specify a preset value or input your own width and height into the boxes provided.
  4. Select the dropdown box to choose from pixels, percent, inches, or another unit.
  5. Optionally, you can check the box for Scale proportionally to retain the aspect ratio.
  6. Hit OK when you finish.

preview resize image

You can then save your resized image using File > Save or Save As (by holding the Option key). Alternatively, you can click File > Export to specify a file format and image quality. Check out our tutorial for additional image edits you can make using Preview.

Resize Images Using Photos

Apple replaced iPhoto with the new Photos app in 2015. Nowadays, most people are more familiar with the Photos app than its predecessor. As it turns out, you can use Photos for more than looking at your images. It lets you edit RAW photos, import your own custom filters, and even create slideshows.

You’ll need to import an image into your library before you can edit it in Photos. Images you add from your iPhone, digital camera, or SD card should already be in your library. If you have images from the web or other sources, you can drag them onto the Photos window or click File > Import from the menu bar.

From there, here’s how to resize an image in Photos:

  1. Open Photos and select your image(s).
  2. Click File > Export 1 Photo (or however many you are resizing).
  3. Under Size you can choose the Full Size, Large, Medium or Small presets. Custom allows you to set your own size (in pixels).
  4. Choose Custom to specify a maximum Width or Height, or choose Dimension to limit both width and height to the number you provide.
  5. Optionally, you can choose the file type, compression quality, whether to omit embedded location information, and pick a color profile if you like.
  6. Click Export and choose where you want to save the image.

photos resize Mac

Note: You also have the option to Export Unmodified Original, which is what you should choose if you’re printing your images or plan on working with them in an external photo editor like Photoshop or Pixelmator.

Resize Images Using ColorSync Utility

ColorSync Utility is one of those default Mac apps you might not even know exists. Its purpose is to help you finely control color profiles on your system. But you can also use this hidden gem to resize images in a hurry.

One point to note about using ColorSync Utility to resize an image: images resized in this way must maintain their aspect ratio. To get started:

  1. Select the image in Finder, right-click, and choose Open With > ColorSync Utility.
  2. At the top of the window, click the Adjust Image Size button.
  3. Choose scale, width, or height in the Resize dropdown and enter the value in the To box.
  4. You can optionally adjust the Quality and Set DPI settings.
  5. Click Apply.

ColorSync Utility Resize Image Mac

You can then click File from the menu bar and pick Save, Save As, or Export to save the resized image.

Resize Images Using Mail

If you want to resize an image on your Mac simply to attach it to an email, you can actually resize that image in the Mail app itself:

  1. Open the Mail app to the email you’re composing.
  2. Attach the image by dragging it into the body of the email or by clicking the Attach button in the toolbar to locate and insert the image.
  3. With the image still selected in your email, click the Image Size dropdown box and select a different size. You can pick from Small, Medium, Large, or of course, the actual size.
  4. Finish composing your email and send when you’re ready.

Mail App Resize Image Mac

While you can’t resize an image in Mail to a specific size, if you only want to resize it so that it’s smaller for the email message, then this is convenient.

For Legacy OS X Users: Resize Images Using iPhoto

If you’re using an older Mac that isn’t compatible with the latest version of macOS, it’s possible that you still have iPhoto. So for you legacy Mac users, here’s how to resize your images with iPhoto.

In order to resize an image with iPhoto, that image must be in your iPhoto library. If you use iPhoto to import your images from an iPhone or digital camera, then this is already done. If you’re grabbing an image from the web, the best way to import it is by dragging the image into an iPhoto window.

Once you have the image in your library, you can export and resize it as you see fit. iPhoto will maintain the image aspect ratio, so you can’t stretch the image unnaturally. Resize by following these steps:

  1. Open iPhoto and select your image(s).
  2. Click File > Export.
  3. Under Size you can choose Full Size, Large, Medium or Small presets. Custom allows you to set your own size (in pixels).
  4. Choose Custom to specify a maximum Width or Height, or choose Dimension to limit both width and height to the number you provide.
  5. Hit Export and choose a location to save the image.

iphoto resize

You can also choose the file type, compression quality, whether or not to strip location information, and set a prefix filename. The latter is handy for exporting a series of images that follow a naming convention.

Resize an Image With Little Effort on Mac

Any of these built-in apps gets the job done when you want to resize an image on Mac. For example, you might use Preview most of the time, but take advantage of the Mail image resizing feature here and there. Whichever way you decide to go, you have options to make the process convenient.

Meanwhile, if you’re interested in resizing a batch of images on your Mac, we have a tutorial for that too!

Read the full article: How to Resize Images on Mac Using Photos or Preview


Read Full Article

The 10 Best Drawing and Painting Apps for Android


So you just picked up a new Android tablet, and you’re wondering what to do with it. How about drawing? While you may not be an artist (yet), a tablet with a painting app could be exactly what you need to jump-start the skill.

As tablets have increased in capabilities, sketching and paintings apps have followed suit. That means you can hold a complete painting studio right in your hands.

The following painting apps for Android are aimed at professionals and amateurs alike. While you don’t need a stylus, it’s recommended if you want to use these apps to their full potential.

Before You Start: Get Ready to Draw on Android

Drawing with a tablet is not like working with a pen and paper, and varies a lot from using a paintbrush. Unsurprisingly, using a mouse is also completely different.

Whatever digital art app you choose, be sure that your Android tablet has multiple touch points. Better still, it should be able to detect when your palm is resting on the display.

While most Android painting apps will let you use your fingers, a stylus is a smart option. Some Android tablets ship with a stylus. For example, the Samsung Galaxy Tab 4 has an S-Pen, a larger version of the Samsung Galaxy Note’s stylus.

A good all-around option is the Adonit Dash Capacitive stylus, compatible with all Android phones and tablets.

Adonit Dash Capacitive stylus Adonit Dash Capacitive stylus Buy Now On Amazon $34.11

If your budget is smaller, consider the MEKO Universal Stylus. This uses a disc stylus nib for improved accuracy. While it doesn’t look as impressive as other styli, it is a great entry-level option.

MEKO Universal Stylus MEKO Universal Stylus Buy Now On Amazon $12.99

Once you’re ready to draw, check these best Android drawing apps.

1. Adobe Illustrator Draw

Adobe offers a free sketching app called Adobe Illustrator Draw. It features a simple interface, intuitive gesture mechanics, and comprehensive feature list.

Adobe Illustrator Draw allows you to create and save vector illustrations on your phone or tablet. Not only are the brush tools sleek and easy to use, this feature-packed drawing app is surprisingly smooth.

Since this makes vector art, images are crisp and clear. And as an official Adobe app, you can seamlessly transfer sketches or finished products into Adobe Illustrator to continue working. From layering to sketching to painting, this app has it all.

Download: Adobe Illustrator Draw (Free)

2. Adobe Photoshop Sketch

Where Adobe Draw excels in vector drawing, Adobe Sketch is excellent at raster sketching (like Adobe Photoshop). Filled to the brim with brushes, Sketch lets you create anything you have the skills to draw.

Tools in Sketch overlap with those in Adobe Draw, so you can move back and forth between apps. After all, Adobe doesn’t just make fantastic apps—it also make creative, cross-device environments.

Download: Adobe Photoshop Sketch (Free)

3. ArtFlow

With everything ArtFlow has to offer, you won’t believe it’s free. Packing multiple brushes and in-app features available at the click of an icon, Artflow is one of the best Android sketch apps. Use it to just play around, or create serious art.

The free option only allows you to save art as either a JPEG or PNG. The Pro version, however, allow PSD format exports so you can continue working on your desktop.

Download: ArtFlow (Free, premium version available)

4. MediBang Paint

MediBang Paint is just that: a banger of a drawing app. It does everything you would want it to. The UI is similar to the Adobe suite, which will feel familiar to desktop graphic designers.

Because this app is both free and feature-packed, you’ll find plenty of online resources to help you start.

Download: MediBang Paint (Free, in-app purchase available)

5. Infinite Painter

Infinite Painter is an instant fan favorite. It’s so simple: all you see by default is a handful of tools (brush, smudge, brush size, color, and brush opacity).

That’s everything you get in the stock UI because it’s all you need. All additional tools are one button away, and Infinite Painter makes great use of that single button. It’s minimal, but packs enough features in its free version to create truly impressive, professional work.

Download: Infinite Painter (Free, premium version available)

6. Autodesk SketchBook

Another quasi-desktop iteration of tablet sketching, Autodesk’s SketchBook supplies useful tools and features to design whatever your imagination creates. And it’s more than just a fantastic app: Autodesk has also developed a fantastic ethic. From the SketchBook website:

“At Autodesk, we believe creativity starts with an idea. From quick conceptual sketches to fully finished artwork, sketching is at the heart of the creative process . . . . For this reason, we are excited to announce that the fully featured version of SketchBook is now FREE for everyone!”

It’s always pleasant to see a fantastic paid app go free. This includes both the desktop and mobile versions of Sketchbook, so you can work using whatever medium suits your expertise.

Download: SketchBook (Free)

7. PaperColor

While most apps try to give you a modern, minimal UI, PaperColor lays the pens and brushes out in front of you. It’s as close to an easel and canvas as you can get from an Android app.

PaperColor also features a fantastic portfolio display and one of the widest and intuitive brush selections of any drawing app. Purchase the VIP version, and you’ll have carte blanche of all the fantastic tools PaperColor has to offer.

Download: PaperColor (Free, premium version available)

8. DotPict

Is pixel art more your scene? DotPict is a simple but remarkable 8-bit drawing app. In addition, this artsy app is also partly a game.

Move a small hand with your finger or stylus, then push your color to create an 8-bit shape. There’s a variety of canvas sizes, so you can create anything from a small figure to a whole landscape.

Select a color, aim your cursor, and push. You can customize the color palette endlessly to complete an entire 8-bit project. It’s that easy. If you like it, have a look at other pixel art tools for creating great retro art.

Download: DotPict (Free, in-app purchase available)

9. ibis Paint X

With stroke stabilization, rulers, and clipping masks, ibis Paint X is a great tool for artists keen on illustration. As a strong alternative to Adobe Illustrator Draw, it also features a video tool to record your progress.

Ibis Paint X features over 300 brushes along with unlimited layers, each with individual parameters. When you’re done, you can share your creations from this Android painting app online with other users.

Two premium options are available: remove ads and a Prime membership. Membership adds advanced features such as new fonts and filters, so it’s worth considering. You should also check out the ibis Paint X YouTube channel for tutorial videos.

Download: ibis Paint X (Free, in-app purchases available)

10. Corel Painter Mobile

Finally, it’s worth considering an offering from another publisher with desktop art package experience: Corel. Painter Mobile is aimed at all levels of artist, with options to paint photos, trace, or start from nothing.

You’ll find the usual paint, blend, eyedropper, and paint bucket tools, along with support for 15 layers. There’s also integration with Samsung’s PENUP social art network.

Download: Corel Painter Mobile (Free, in-app purchases available)

A Great Selection of Free and Paid Painting Apps for Android

If you’ve had a hankering for drawing or sketching in the past, now you have no excuse. You can seriously develop your drawing capabilities anywhere you go with these best painting apps for Android.

In summary, the Android painting and drawing apps you should check out are:

  1. Adobe Illustrator Draw
  2. Adobe Photoshop Sketch
  3. ArtFlow
  4. MediBang Paint
  5. Infinite Painter
  6. Sketchbook
  7. PaperColor
  8. DotPict
  9. Ibis Paint X
  10. Corel Painter Mobile

These will all work on Android phones and tablets, although for the best results you should use an Android-compatible stylus. And if you find an Android tablet isn’t suitable for your artistic purposes, consider a dedicated drawing tablet.

Read the full article: The 10 Best Drawing and Painting Apps for Android


Read Full Article

The 5 Most Secure and Encrypted Email Providers


From hackers to businesses and overreaching governments, many people are looking to snoop on our communications. Free email providers surreptitiously use software to mine information from your emails and contacts to sell you ever more targeted advertising.

If you’re fed up with this state of affairs and want to secure your communications from prying eyes, it might be worth choosing a secure, encrypted email service instead.

Why Should You Use an Encrypted Email Service?

Google’s Gmail has over 1.5 billion users, while Microsoft’s Outlook sports 400 million. There’s a good chance, then, that you currently use a free email provider. These services feel like they are good value for money—they are free after all—but they do come at a cost; your privacy.

We use email for our most private conversations and documents, so it makes sense that you’d want to keep them private. However, as with many free services, if you aren’t paying, then your data is the product. Google famously used to scan the content of your emails to show you targeted ads. They have since disabled that feature, but your data is still freely available to the provider.

This is further complicated by the relationships these providers have, willingly or otherwise, with law enforcement agencies around the world. Many of the world’s most popular email providers are based in the US, leaving them open to requests from law enforcement and the NSA. If you choose to use these services, you should encrypt your webmail service, too.

Encrypted email is the most secure alternative to free email providers, and allows you to keep your sensitive data private. Most encrypted email providers are located outside of the US, putting them out of reach of the NSA. Even if those agencies could gain access to your account, encryption means that only you can view your data.

1. ProtonMail

ProtonMail encrypted inbox

Price: Free. Premium accounts available.

Storage: 500MB. Up to 20GB for premium accounts.

Country: Switzerland

ProtonMail first launched in 2013 and was developed by researchers at CERN. Following a successful crowdfunding campaign, the open-source, encrypted email provider exited beta in March 2016. ProtonMail uses end-to-end encryption so that messages are only viewable by you and the recipient. Accordingly, it is widely considered one of the best private email services.

Although there are premium options, many of the service’s users are on free accounts. It is reasonable, then, to consider how they can sustain the service without leaning on targeted advertising. Fortunately, the company operates a Defence Fund which can support the service for up to a year without any other revenue.

Why ProtonMail?

All data is stored on the company’s servers in Switzerland—a country well known for its tough stance on privacy and data protection. Importantly, ProtonMail has open-sourced parts of their service. The code is available on ProtonMail’s GitHub for anyone to view and verify the security of the platform.

Although emails to and from other ProtonMail users are end-to-end encrypted, if you communicate with unencrypted services like Gmail, ProtonMail will scan these emails to protect against spam. However, these messages are scanned in memory, meaning that they aren’t kept and will be overwritten in very little time. As soon as the email has been examined, it is then encrypted. If all this talk of encryption is getting confusing, you may want to read up on encryption terms you should know.

According to their Privacy Policy, IP logging is disabled by default, although you can enable this in your account settings. Your IP address can reveal your location, so the lack of logging is a benefit to your privacy.

ProtonMail also doesn’t store any of your data once it’s deleted. If you delete an email, it’s really gone. The only exception is when the data has been stored in a backup, in which case it may take up to 14 days to be entirely removed. There is no need to submit any personal information while signing up. The company will even allow you to pay for premium accounts in the cryptocurrency Bitcoin.

ProtonMail’s parent company, Proton Technologies AG, also develops ProtonVPN, a multi-platform VPN. As with the email service, ProtonVPN offers free and premium tiers. Some ProtonMail premium accounts also come with access to ProtonVPN’s premium features. We even listed ProtonVPN as one of the best unlimited free VPN services.

Download: ProtonMail for Android | iOS | Web (Free)
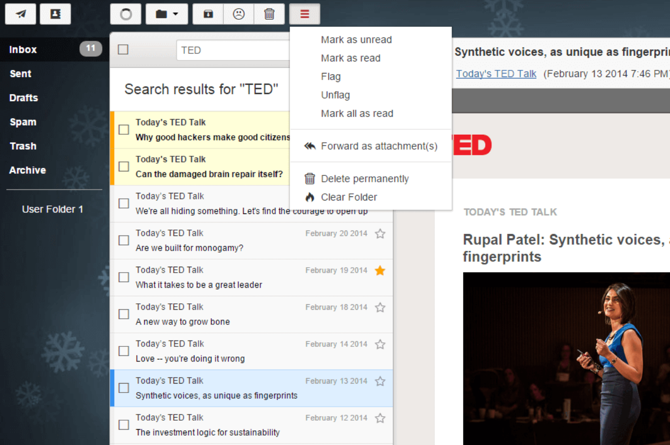
2. TutaNota

Tutanota Secure Email inbox

Price: Free. Premium accounts available.

Storage: 1GB, upgradable.

Country: Germany

Tutanota was launched in 2011 by the German company Tutao GmbH. The service’s name comes from the Latin for secure message. It should be no surprise then that Tutanota is a free encrypted email service. Their servers are also based in Germany, making them subject to Germany’s rigorous Federal Data Protection Act.

While that sounds great in theory, it’s also worth noting that Germany’s Federal Intelligence Service collaborated with their American counterparts, the NSA, in their surveillance programs. While that impacts all data held in Germany, there’s no suggestion that Tutanota has ever been complicit. However, for the privacy-focused, it is worth keeping in mind as one of the best encrypted email services.

Why Tutanota?

Like ProtonMail, Tutanota uses end-to-end encryption to ensure the privacy of your emails. Where things differ slightly is in how the service handles external emails. If you send a message to another email service like Gmail, Tutanota sends a link to a temporary account where the recipient can view the message.

Tutanota is open-source, too, with the code available on the Tutanota GitHub page. All data stored in your inbox is encrypted, with only metadata like sender, recipient, and date visible. However, their FAQ states that they are looking into encrypting metadata too.

The company uses 2048-bit RSA and 128-bit AES encryption methods. However, they do not support PGP, a feature often used to judge secure email providers. That said, they believe their encryption offers advantages over PGP, like encrypting the subject line. There’s also room for them to build more encrypted services in the future, like the available-to-all calendar and planned cloud storage.

According to their Privacy Policy, they do collect mail server logs. Although these are only kept for seven days, they do contain sender and recipient email addresses, but no customer IP addresses.

While you can open a Tutanota account for free, they too offer paid-for options. A Premium account costs just 12€ per year and allows you to add an additional user, use up to five aliases, and enables support for custom domains.

Download: TutaNota for Android | iOS | Web (Free)

3. Mailfence

Mailfence Web Inbox

Price: Free. Premium accounts available.

Storage: 500MB of emails, 500MB of documents as standard.

Country: Belgium

Mailfence is a free secure email service from the creators of ContactOffice. Following the Snowden revelations documenting US government surveillance, ContactOffice felt there was a need for a privacy-focused email service.

Their servers are in Belgium, and, as with many European countries post-GDPR, the country has strong privacy laws. These regulations usually favor the consumer rather than the company, strengthening protections. Unlike some countries—namely the Five Eyes nations—there is no evidence to suggest Belgium collaborated in the NSA surveillance schemes.

Why Mailfence?

One concern when choosing a new digital service is whether it will remain operational for years to come. ContactOffice was started in 1999, and so the company has proven longevity. They also earn operational funds for Mailfence by licensing the software to businesses. To do so, they need to keep their software proprietary, so, unfortunately, Mailfence is not open-source.

Unlike the other services in this list, Mailfence is more than just a secure email provider. An account also provides access to calendars, contacts, and document storage. Free accounts come with storage space for 500MB of emails, 500MB of documents, and one calendar. Entry and Pro accounts upgrade this storage and add additional features. Bolstering their privacy-focused credentials, you can even opt to pay for your account using Bitcoin.

Disappointingly, there is no Mailfence mobile application. However, the company has stated one has been in development since at least 2017. If this is a deal-breaker, you could send encrypted email on Android using OpenKeychain instead. For the time being, though, if you want to manage your Mailfence mail on your smartphone, you’ll need to pay for a premium account. This gives you access to Exchange ActiveSync, POP, IMAP, and SMTPS.

Mailfence is end-to-end encrypted and supports OpenPGP. You can generate a key on your computer, which is then encrypted using 256-bit AES and stored on Mailfence’s servers. They also support two-factor authentication to prevent unauthorized access to your account.

Taking a stand for your principles is admirable in itself, but alongside that ContactOffice donates 15 percent of the income from their Pro plans to the pro-privacy organizations. Currently, donations go to the Electronic Frontier Foundation (EFF) and the European Digital Rights Foundation (EDRi).

Download: Mailfence for Web (Free)

4. Disroot

Rainloop email interface

Price: Free

Storage: 1GB, upgradeable.

Country: Netherlands

Disroot is a free secure email provider based in the Netherlands. Although free email services, especially those without premium options, are generally not recommended, Disroot is an exception. The service was set up in response to the lack of similar services and is run by volunteers, supported by donations.

There’s not just email here; Disroot has a comprehensive range of productivity and communications tools bundled in an Office-style web service. Unlike many of their peers, Disroot is open-source, decentralized, and some of their services are federated, too.

Why Disroot?

Although there are many reasons to use open-source software, most people do so because of what it stands for. To them, the open-source community represents the freedom and ideals of the early internet, before large companies came to dominate the sector. Disroot is part of this movement, expanding beyond open-source into decentralization and federalization.

Federalization is a popular feature of alternative social networks, allowing different services to communicate with one another. However, Disroot’s email service remains resolutely private. The service has been operational since 2015, although usage is hard to pin down as the company doesn’t keep track of active users.

In fact, the company hopes to know as little about you as possible. Disroot’s Privacy Policy explicitly states that they only collect essential data needed to provide you with their services. They do not sell it, analyze it, or access any of your stored data. Where Disroot falls short of the other providers on this list is encryption.

Disroot is not end-to-end encrypted, nor are your emails encrypted on the server. According to their Privacy Policy, all emails are stored in plain-text, unless you have manually encrypted them using PGP or GPG. There are no mobile or desktop applications either; you can only access your account through their webmail client. However, Disroot does support IMAP and POP3 so that you can access your emails through third-party apps.

Download: Disroot for Web (Free)

5. Posteo

Posteo secure email

Price: €1/month

Storage: 2GB, upgradeable.

Country: Germany

Posteo is an encrypted email provider based in Germany. In many ways, Posteo is the best alternative to ProtonMail and replicates many of the features found on other services. However, unlike ProtonMail, your data is centrally encrypted on Posteo’s servers, rather than end-to-end encrypted.

While that does mean that it isn’t the safest email provider, there are upsides to the lack of end-to-end encryption. For example, you can easily set up your Posteo account on any email software or app, giving you greater control over how you access your mail. Your account comes bundled with an Address Book and Calendar, too, smoothing the transition from Gmail or Outlook.

Why Posteo?

Posteo has been operational since 2009, making it one of the longest-running secure email services. However, its popularity and use increased dramatically after the Snowden leaks. Around the same time, Posteo introduced the DNS-based Authentication of Named Entities (DANE). This technology prevents man-in-the-middle attacks, and forces provider-to-provider encryption where available.

They also offer a one-click option to encrypt all of your emails, attachments, and other data using their Crypto Mail Storage feature. After activating the encryption, your emails will no longer be accessible on the server without your password. This prevents Posteo or any third-party from accessing your data on the server.

However, Crypto Mail Storage is an optional feature, which is off by default. To protect your data even without this encryption, all of Posteo’s servers, located in Frankfurt, are encrypted. They are hosted at a third-party data center, but this encryption prevents anyone at the data center from accessing your data.

Posteo is also focused on financial and environmental sustainability. All of their servers and offices run on green and renewable energy from Greenpeace Energy. To ensure the company can work independently, they have no debts, take out no loans, and are supported only by user subscriptions. Even their finances are conducted through Umweltbank, one of Germany’s environmental banks.

Download: Posteo for Web (Subscription required)

The Most Secure Email Provider

Many free email providers don’t take steps to protect your privacy, or they even take steps to undermine it. Switching to an encrypted email account is a change worth making and is a simple way to improve your security. When choosing, it’s essential to evaluate the provider on their encryption methods, how they finance the service, and where the servers are located.

Of course, no online service is entirely secure, no matter the ethics of the provider. There will always be hackers and surveillance agencies looking to expand their ever-growing databases. To increase your security, don’t forget the basics. That’s why you may want to consider improving your cyber hygiene and looking at our tips for handling data at work.

Read the full article: The 5 Most Secure and Encrypted Email Providers


Read Full Article