18 October 2018

Researchers create virtual smells by electrocuting your nose


The IEEE has showcased one of the coolest research projects I’ve seen this month: virtual smells. By stimulating your olfactory nerve with a system that looks like one of those old-fashioned kids electronics kits, they’ve been able to simulate smells.

The project is pretty gross. To simulate a smell, the researchers are sticking leads far up into the nose and connecting them directly to the nerves. Senior research fellow at the Imagineering Institute in Malaysia, Kasun Karunanayaka, wanted to create a “multisensory Internet” with his Ph.D. student, Adrian Cheok. Cheok is Internet famous for sending electronic hugs to chickens and creating the first digital kisses.

The researchers brought in dozens of subjects and stuck long tubes up their noses in an effort to stimulate the olfactory bulb. By changing the intensity and frequency of the signals, they got some interesting results.

The subjects most often perceived odors they described as fragrant or chemical. Some people also reported smells that they described as fruity, sweet, toasted minty, or woody.

The biggest question, however, is whether he can find a way to produce these ghostly aromas without sticking a tube up people’s noses. The experiments were very uncomfortable for most of the volunteers, Karunanayaka admits: “A lot of people wanted to participate, but after one trial they left, because they couldn’t bear it.”

While I doubt we’ll all be wearing smell-o-vision tubes up our noses any time soon, this idea is fascinating. It could, for example, help people with paralyzed senses smell again, a proposition that definitely doesn’t stink.


Read Full Article

How to Install WordPress on Bluehost


setup-bluehost-email

Thanks to a streamlined, 1-click install, installing WordPress on Bluehost is incredibly simple. However, there may be cases where the Bluehost WordPress 1-click install isn’t right for your situation.

In this article, you’ll learn how to install WordPress on Bluehost using various methods. We’ll also cover what makes BlueHost unique for WordPress hosting.

1-Click Bluehost WordPress Install

On any web host where there’s no 1-click WordPress install option, you’ll need to set up WordPress manually.

You’re going to need two things: a domain name and web hosting. Bluehost provides both. Best of all, their basic web hosting plan is extremely cheap. Sign up using this link for a special Bluehost offer.

When you click the 1-Click Install sign-up button on the Bluehost site, you’ll see a screen where you can set up your domain name for your new site.

choose bluehost domain name

If you don’t have a domain name yet, then choose the new domain option. With your first year of hosting with Bluehost, a single domain is free.

The only catch is that your domain name needs to be available for registration.

If you already have a domain name, then go ahead and type it into the i have a domain name field.

The next steps are straightforward. Just fill out your personal details, choose the hosting plan you want, and fill in your payment details.

Finally, fill out a secure password to access your site controls.

set up bluehost password

Once you’re done, you’ll see your main site portal page.

If you’re familiar with Cpanel on most web hosts, you’ll notice how much more simplified this control panel is (you can click on Advanced to see more of a traditional Cpanel).

bluehost main panel

You’ll notice there’s a Log in to WordPress button. That’s because your WordPress site for the domain you chose, is already installed and ready to use.

It’s literally a one-click install. You’re done. Almost.

Transferring Your Domain to Bluehost

If you chose to take advantage of registering a single domain name for free, then you can stop here. The WordPress site is connected to that domain and live.

However, if you have an existing domain already registered, you’ll need to point it or transfer it to Bluehost.

  • Assigning: This means you change the nameserver settings at your existing domain registrar to point to Bluehost
  • Transferring: This means you change your registrar for that domain from your previous one to Bluehost

If you want to transfer the domain from your old registrar to Bluehost:

  1. Click on Domains in the left navigation bar
  2. Choose Transfer a new domain to your account
  3. Fill in the Enter domain to transfer field

Bluehost then manages your domain transfer for you. This is the easiest approach if you don’t know how domain transfers work, or you simply don’t want to deal with it.

If you’d like to keep all of your domains with the same registrar or don’t want to change domain registrars for any reason, you don’t have to.

Just go to the registrar where you bought your domain, and edit the nameservers there. You’ll usually find this under your Domain settings, by clicking on Manage DNS.

change nameservers

You’ll need to enter two nameservers.

The details for the first Bluehost nameserver are:

  • ns1.bluehost.com
  • 162.88.60.37

The details for the second Bluehost nameserver are:

  • ns2.bluehost.com
  • 162.88.61.37

It can take from 24 to 48 hours for the change to propagate. Once it does, the next time you type your domain into a browser URL field, you’ll see your new Bluehost website come up.

Transferring Your Website to Bluehost

If you’re transferring a website to Bluehost, the process is a little bit more involved. However it’s still only a moderate effort.

This process involves the following steps.

  1. Back up your old WordPress files
  2. Back up your old SQL database
  3. Create a new, matching SQL database on Bluehost
  4. Upload your old WordPress files to Bluehost

Step 1: Back Up Previous WordPress Site

To back up your WordPress files, just connect to your old host with your favorite FTP client.

Upload all of the site files to your local computer in a location you’ll remember..

wordpress-site-upload

Next, go into the Cpanel on your old host, and download the SQL database for that site.

Step 2: Back Up Previous WordPress Database

You’ll typically find this by clicking on the Backups icon.

backups in cpanel

Scroll down to the list of your SQL databases, and click on the relevant database link to download it.

Typically it’ll get downloaded as a zipped file. When you upload the file at Bluehost, it’ll know how to handle it.

save old website database

Now you’re ready to upload your old website into your Bluehost account.

Step 3: Import Your Database

Log into Bluehost, and click on Advanced in the left navigation panel.

Under Databases, click on MySQL Databases.

  1. Create a database using any website name you like.
  2. Scroll down and create a new MySQL User and password.
  3. Scroll down and under Add User To Database, assign the new user to the new database.
  4. Check the ALL PRIVILEGES box on the final Manage User Privileges page.

Now, go to the directory on your computer with the old website files you backed up, and find the wp-config.php file in the parent directory.

Edit the three lines in the config file where the database, user name, and user password is defined.

edit config file

Now import the database you backed up by clicking on Advanced in your Bluehost Portal Page, and clicking on phpMyAdmin.

Select the new database you created, click on Choose File and select the database you backed up previously.

Make sure Partial Import is not selected, and the database format is SQL.

import database

Click Go, and in a few seconds you should see a message that the import was successful.

Step 4: Import Your WordPress Files

Under the Files menu, click on FTP Accounts and scroll down to the list of FTP accounts.

For the one that is mapped to your home directory for the website you’re transferring to, click on Configure FTP Client and note the login details. Your password will be the one you signed up with when you opened your Bluehost account.

Open your favorite FTP client and connect.

Delete all of the files under the public-html directory on your Bluehost account. Replace those files with all of the files you backed up from your other WordPress site.

upload wordpress files

Once all of the files are uploaded, your site is fully transferred and live on Bluehost!

Just go back to Home in your site portal to see your site displayed in the preview window.

new bluehost wordpress site

Installing a New WordPress Theme

Transferring to a new host is also a great opportunity to refresh your site theme.

When you click on the Home tab in your Bluehost portal, you’ll notice there’s a Themes link in your website preview window.

bluehost themes

This will take you to the Bluehost Themes & Templates marketplace. You’ll find thousands of templates here available for purchase.

Regardless where you purchase it from, the upload process to your Bluehost WordPress site is the same.

Use your favorite FTP client to upload the theme folder containing all of the theme files, to the /wp-content/themes/ directory.

transfer theme

Once all files are uploaded, open up your WordPress admin panel, click Themes, find the theme you’ve uploaded, and click Activate.

install theme plugins

You may see a message in WordPress that you’re missing a few plugins for the theme. Just click Begin installing plugins to install them all.

Installing WordPress on Bluehost: Simple and Done

As you can see, there are a lot of parallels between a Bluehost WordPress installation or a migration.

The main difference is how the Bluehost Portal looks, and the differences between a BlueHost Cpanel and a standard one. Luckily, Bluehost offers all of the tools you need to start a new site, or migrate over an old one.

If after all this, you aren’t entirely sure you want to stick with Bluehost. Have no fear, we’ve provided a list of the best WordPress hosting providers available. Have a look at some of those to see if they suit your needs ever better.

Read the full article: How to Install WordPress on Bluehost


Read Full Article

Google improves Android App Bundles and makes building Instant Apps easier


Google is launching a number of new features for Android app developers today that will make it easier for them to build smaller apps that download faster and to release instant apps that allow potential users to trial a new app without having to install it.

Android App Bundles, a feature that allows developers to modularize their apps and deliver features on demand, aren’t a new feature. The company announced these a while ago and there are now “thousands of app bundles” in production and that the average file size reduction is 35 percent. With today’s update, Google is making some changes to how app bundles handle uncompressed native libraries that are already on a device. Those will lead to downloads that are on average 8 percent smaller than before and take up 16 percent less space on a device.

Talking about size, Google now lets developers upload app bundles with installed APK sizes of up to 500 megabytes, though this is currently still in early access.

In addition, App Bundles are now supported in Android Studio 3.2 stable and Unity 2018.3 beta.

While small app sizes are nice, another feature Google is announcing today will likely have a larger impact on developers and users alike. That’s because the company is making some changes to Instant Apps, a feature that allows developers to ship a small part of their apps as a trial or to show a part of the app experience when users come in from search results — and there’s no need to download the full app and go through the (slow) install procedure.

With this update, Google is now using App Bundles to let developers build their instant apps. That means they don’t have to publish both an instant app and an installable app anymore. Instead, they can enable their App Bundles to include an instant app and publish a single app to the store. Thanks to that, there’s also no additional code to maintain.

Developers can now also build instant apps for their premium titles and publish them for their pre-registration campaigns, something that wasn’t previously an option.

Other updates for Android developers include improved crash reports that now combine real-world data from users with that from the Firebase Test Lab when Google sees those crashes under both circumstances. There are also updates to how developers can set up subscription billing for their apps and a couple of other minor changes that you can read about here.


Read Full Article

A ton of people don’t know that Facebook owns WhatsApp


Americans looking to reduce their reliance on products from tech’s most alarmingly megalithic companies might be surprised to learn just how far their reach extends.

Privacy-minded browser company DuckDuckGo conducted a small study to look into that phenomenon and the results were pretty striking.

“… As Facebook usage wanes, messaging apps like WhatsApp are growing in popularity as a ‘more private (and less confrontational) space to communicate,'” DuckDuckGo wrote in the post. “That shift didn’t make much sense to us because both services are owned by the same company, so we tried to find an explanation.”

DuckDuckGo gathered a random sample of 1,297 adult Americans who are “collectively demographically similar to the general population of U.S. adults” (i.e. not just DuckDuckGo diehards) using SurveyMonkey’s audience tools. The survey found that 50.4% of those surveyed who had used WhatsApp in the prior 6 months (247 participants) did not know that the company is owned by Facebook.

Similarly, DuckDuckGo found that 56.4% of those surveyed who had used Waze in the past 6 months (291 participants) had no idea that the navigation app is owned by Google. A similar study conducted back in April found the same phenomenon when it came to Facebook/Instagram and Google/YouTube, though for Instagram the effect was even stronger (wow).

If you’re reading TechCrunch it’s probably almost impossible to imagine that average people aren’t tracing the lines between tech’s biggest companies and the products scooped up or built under their wings. And yet, it is so.

Even as companies like Google and Facebook suffer blowback from privacy crises, it’s clear that they can lean on the products they’ve picked up along the way to chart a path forward. If this survey is any indication, half of U.S. consumers will have no idea that they’ve jumped ship from a big tech product into a lifeboat captained by the very same company they sought to escape.

And for the biggest tech companies, it’s at least one reason that keeping satellite products at arm’s length from their respective motherships is advantageous for maintaining trust — especially while aggressive data sharing happens behind the scenes.


Read Full Article

Embracing multimodality, Uber pioneers ride recommendations


For the first time, Uber will make contextual, personalized suggestions about the best way to get from point A to point B. The startup offers more than just cars now, and it’s starting to understand the tradeoffs between price, speed, convenience, and comfort amidst its multi-modal fleet. Most noticeably, you’ll now see JUMP bikes get premier billing right alongside Uber’s other vehicles. Going a short distance and there’s a charged up bike nearby? Uber will suggest you pedal. Might need extra room for luggage on your way to the airport? UberXL and SUV will appear. Always take cheap Pools? It won’t show you a pricier Black car.

Uber is finally getting smart. It has to if it’s going to make sense of its growing patchwork of ride types without overwhelming passengers with too many options. Uber’s algorithm can help them choose. “We think there’s a lot to be gained by being a one-stop shop to get somewhere” says Uber director of product Nundu Janakiram.

Uber now dynamically recommends different ride types

In particular, Uber could block disruption by scooter-specific startups like Spin, Bird, or Skip. If those apps have no vehicles nearby or you’re going to far, they’ve got nothing to offer. But Uber can provide a competitively priced Express Pool when there’s no open-air ride available, while convincing its existing UberX riders to try a bike or scooter for quick trips when congestion is thick thanks to its new in-house traffic estimates.

Uber Director Of Product Nundu Janakiram

Previously, you’d get a static set of three ride options from the price class you booked from last, regardless of your destination. Meanwhile, bikes and scooters were buried in Uber’s hamburger menu sidebar or an awkward toggle at the top of the screen. The company hans’t done a good job of communicating the definition of Select (nicer normal-sized cars) or Express Pool (walk and wait for a discount) either.

Now Uber’s homescreen can cherry pick the most relevant ride suggestions from across all price classes and vehicle types based on your trip length, destination type, and your personal ride history. Along with better explanations of the different options, this could get users experimenting with modes they’d never tried before.

To make room for more recommendations, the Uber Pool option will unfold to offer both Pools and Express Pools. Uber will even point you to nicer vehicles like Black cars or XLs if UberX is surging to the point that their prices are similar. If you want to compare all the options manually, you can tap to see a list with all the specs and prices lined up.

Beyond ride recommendations, Uber is moving the address bar to the bottom of the screen so its closer to your thumbs (which is great as phones keep getting bigger). Finally, in the coming weeks Uber will add a dynamic message bar to the center of the homescreen. Here depending on your pickup and drop off, it could show instructions for hailing from an airport, a discount offer, a birthday message, or just a friendly “Good Morning”. 

Eventually, Uber hopes to integrate public transportation ticketing like through its partner Masabi, car rentals, and even multi-leg trips into its recommendations. Maybe a JUMP bike to the train, then an UberPool that’s waiting to take you to your final destination is quicker and cheaper than any one mode alone. If you’re looking at an hour-plus Uber, it might cost less to just rent a car through its partner GetAround and drive yourself. And if a scooter is by far the best ride for you but all of Ubers are rented out, it could recommend one from its partner Lime.

A new communication box is coming to the center of Uber’s homescreen

Uber’s data shows users are rapidly embracing the multi-modal future. A study found the introduction of JUMP bikes to one city led to a 15 percent increase in total Uber + JUMP trips, even though Uber use dropped 10 to 15 percent.

Even if Uber sometimes cannibalizes itself by recommending cheaper options, it’s a smart long-term strategy. Janakiram laughs that “If we wanted to optimize for revenue, we wouldn’t have shown UberX, Pool, and Express Pool first for every user for the last few years.” The lifetime value of ridesharing users is so high that’s worth losing a couple of bucks here or there to keep users from straying to multi-modal competitors like Lyft. Retention will be a key metric under scrutiny as it eyes a 2019 IPO at a potential $120 billion valuation.

“The big picture is that we want your phone to replace your personal car” Janakiram concludes. “If we want to be a true transportation platform, we need to be everywhere our riders need to be as well. The right ride for the right context, and what’s the right ride for you.”

[Disclosure: Uber’s Janakiram and I briefly lived in the same three-bedroom apartment 5 years ago, though I’d already agreed to write about the redesign when I found out he was involved.]


Read Full Article

A Complete Guide to Managing Firefox Bookmarks


firefox-tabs

Many people claim that browser bookmarks have become obsolete with the advent of online bookmarking, social bookmarking, speed dials, and features like that. But bookmarks are still useful if you learn how to manage and organize them.

Today we’ll show you how to create, organize, and manage your bookmarks in Firefox so you don’t end up with a cluttered, chaotic collection.

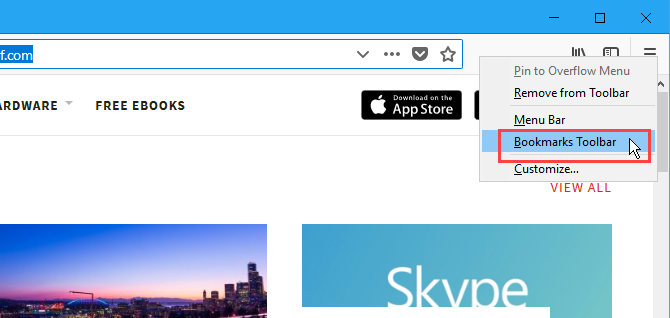
Show the Bookmarks Bar

If you don’t see the Bookmarks bar in Firefox, that’s easy to fix.

Right-click on the toolbar and select Bookmarks Toolbar.

Show the Bookmarks Toolbar in Firefox

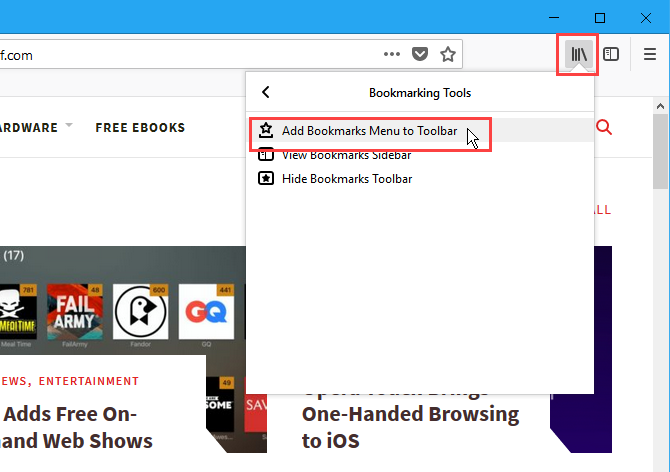
Add the Bookmarks Menu Button to the Toolbar

If you want quick access to bookmarking tools, add the Bookmarks Menu button to the toolbar.

Click the library icon, go to Bookmarks > Bookmarking Tools, and then select Add Bookmarks Menu to Toolbar.

Add Bookmarks Menu to the Toolbar in Firefox

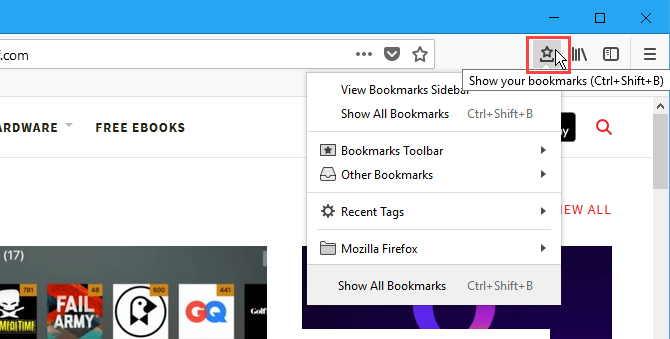
The Bookmarks Menu icon (a star on a tray) button is displayed next to the library icon.

To remove the Bookmarks Menu button from the toolbar, go back to Bookmarks > Bookmarking Tools and select Remove Bookmarks Menu from Toolbar on the Bookmarking Tools menu.

Bookmarks Menu on Firefox toolbar

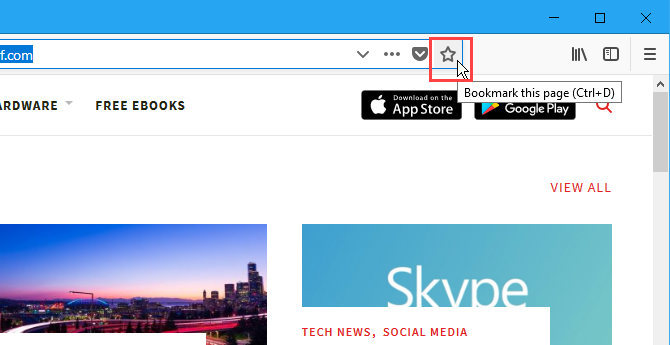
Add a Bookmark for a Web Page

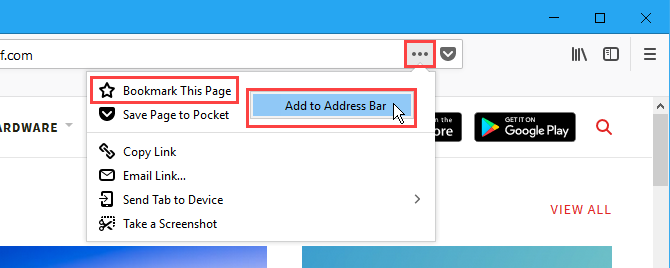
To bookmark a web page, visit the web page and then click the star in the address bar.

Or you can press Ctrl + D.

The Bookmark this page star on the address bar in Firefox

If you don’t see the star on the address bar, click the Page actions menu (three horizontal dots) on the right side of the address bar.

Then, right-click on the Bookmark This Page option and select Add to Address Bar.

Add the star back to the address bar in Firefox

When you click the star, it turns blue and the New Bookmark dialog box pops up.

A default Name is assigned to the bookmark, but you can change it. This name is used for the bookmark in menus.

Select the Folder where you want to store the bookmark. If you want it displayed on the Bookmarks bar, select Bookmarks Toolbar.

Tags help you categorize your bookmarks to make them easier to find. Enter tags for the new bookmark in the Tags box, separated by commas. Use the down arrow button to the right of the Tags box to assign existing tags to the bookmark.

New Bookmark popup dialog box in Firefox

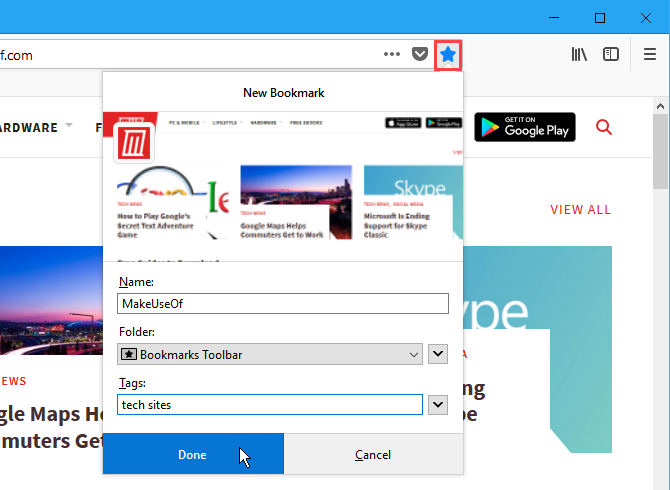
The new bookmark is added to the Bookmarks bar (if that’s where you chose to save it).

Clicking on a bookmark opens that web page on the current tab.

A bookmark on the Bookmarks bar in Firefox

Bookmark All Open Tabs

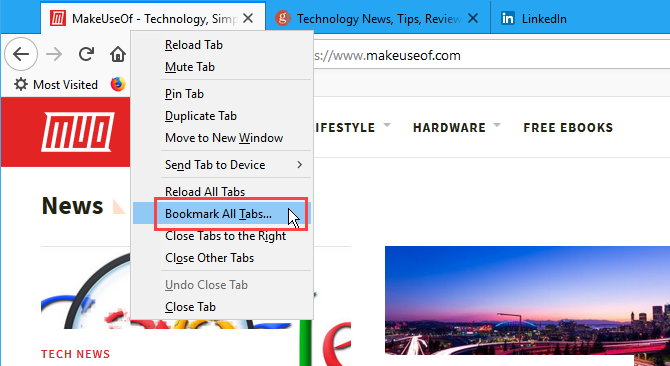
Bookmarking all open tabs is useful if you need to close Firefox, but you want to preserve the web pages you have open. Or maybe you have a certain set of web pages you want to be able to open with one click.

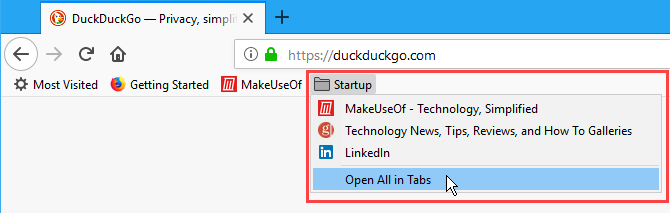
Open all the web pages you want to bookmark on separate tabs. Then, right-click on any tab and select Bookmark All Tabs.

Bookmark all tabs in Firefox

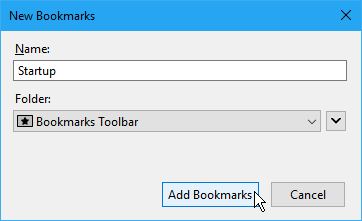
In the Name box on the New Bookmarks dialog box, enter a name for the folder that will contain the bookmarks for all the open tabs.

Select the Folder where you want to store the new folder of bookmarks. Again, if you want the folder available on the Bookmarks bar, select Bookmarks Toolbar.

Then, click Add Bookmarks.

New Bookmarks dialog box in Firefox

To open all the bookmarks at once on separate tabs, click the folder and select Open All in Tabs.

All the web pages in the folder are opened on new tabs, preserving any tabs currently open.

Open all Bookmarks in tabs in Firefox

Rename and Edit a Bookmark

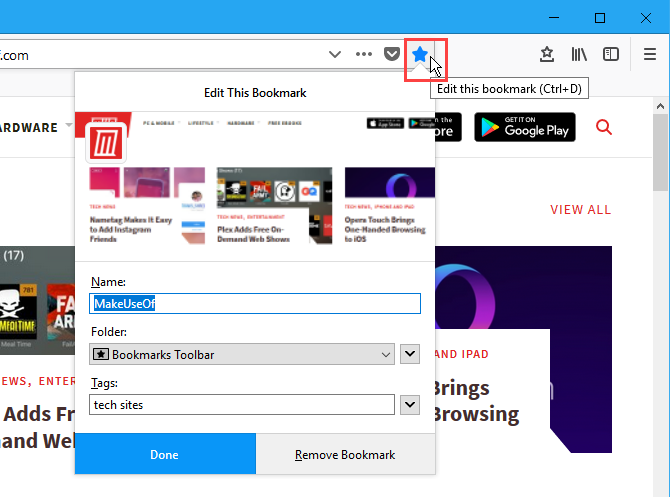
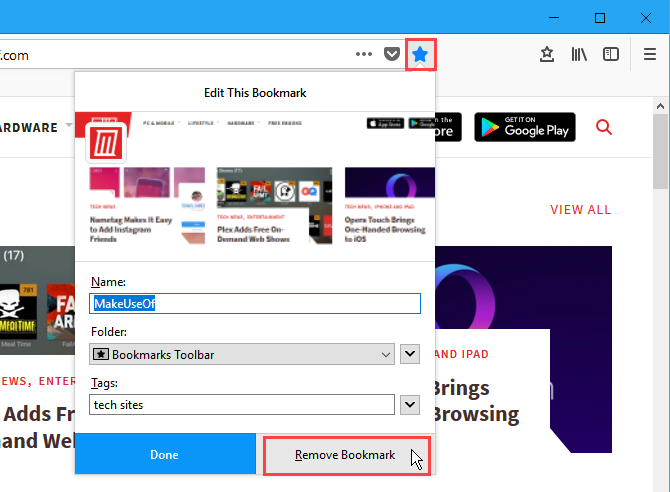
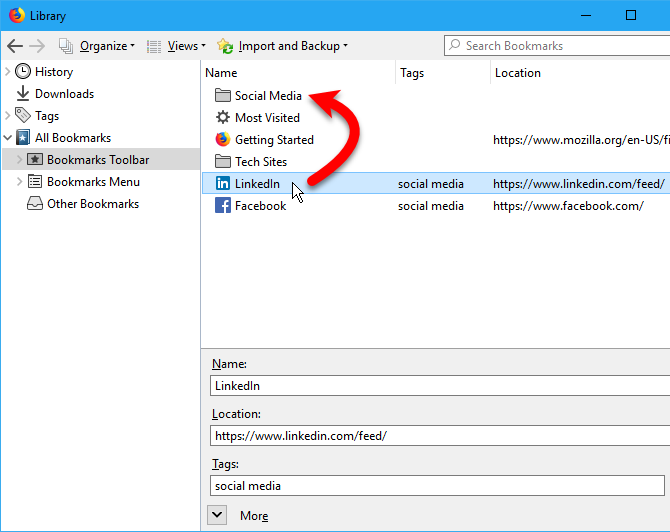
You can rename a bookmark and change its location and tags using the star icon on the address bar.

First, visit the bookmarked site. Then, click the blue star icon to open the Edit This Bookmark popup dialog box. This dialog box is just like the New Bookmark dialog box. You can change the Name, the Folder where the bookmark is stored, and the Tags assigned to the bookmark.

To change the URL for the bookmark, see the next section.

Click Done once you’ve made your changes.

Click Edit this bookmark (blue star icon) in Firefox

Add a Keyword to a Bookmark and Change a Bookmark’s URL

Keywords are abbreviations for bookmarks you can type into the address bar to quickly go the bookmarked web page.

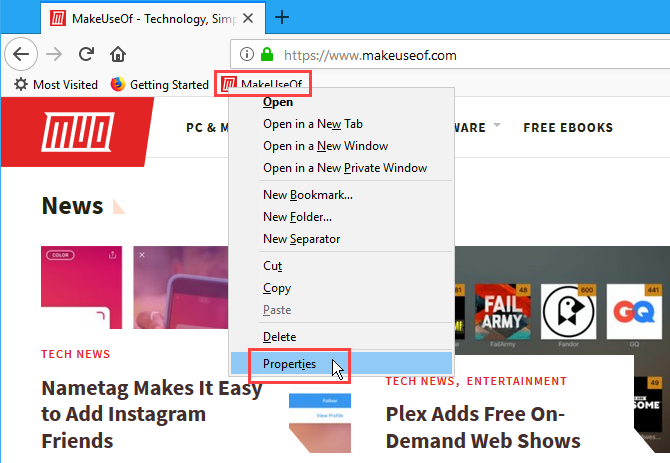
To add a keyword to a bookmark, right-click on the bookmark and select Properties.

Get the Properties of a bookmark in Firefox

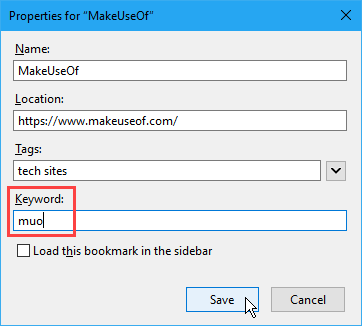
On the Properties dialog box, enter the keyword you want to use for the bookmark in the Keyword box.

You can also change the URL for the bookmark in the Location box.

Click Save.

Add a keyword to a bookmark in Firefox

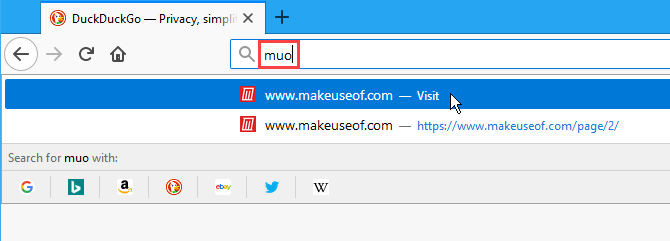
To visit a bookmarked web page using a keyword, type the keyword into the address bar. Bookmarks that match the keyword display in a dropdown list below the address bar.

Click the URL for the page in the results.

Use a keyword to visit a bookmarked site in Firefox

Delete a Bookmark

You can delete a bookmark in two ways.

If you’re on the web page for the bookmark you want to delete, click the blue star on the address bar. Then, click Remove Bookmark.

No confirmation dialog box displays when deleting a bookmark.

Click Remove Bookmark on the Edit This Bookmark dialog box in Firefox

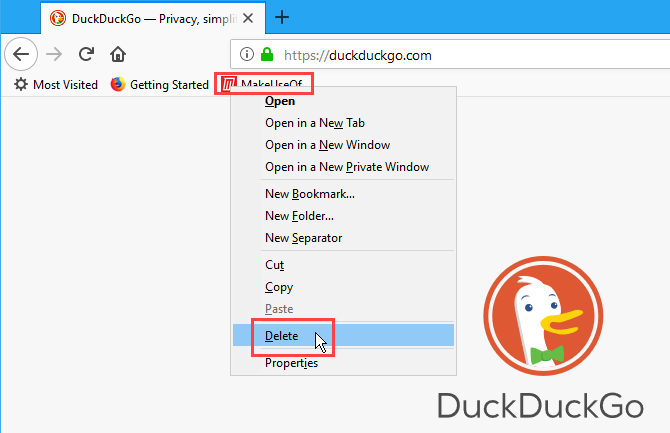
If you’re not on the web page for the bookmark you want to delete, you can right-click on the bookmark and select Delete.

Right-click on a bookmark in Firefox and select Delete

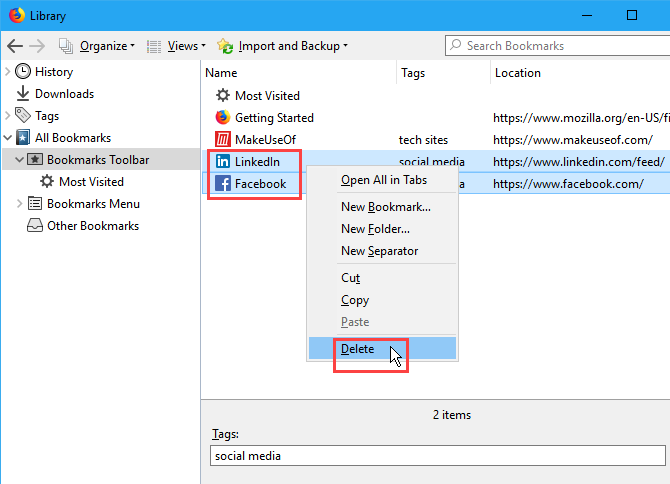
Delete Multiple Bookmarks at Once

The methods in the previous section allow you to delete one bookmark at a time. But you can also delete multiple bookmarks at once.

Press Ctrl + Shift + B to open the Library dialog box. Use Shift and Ctrl while clicking on the bookmarks you want to delete, just like selecting files in File Explorer.

Then, right-click on the selected bookmarks and click Delete.

No confirmation dialog box displays when deleting multiple bookmarks either.

Delete multiple bookmarks in Firefox

Organize Your Bookmarks

Bookmarks are only useful if you keep them organized. If your bookmarks are cluttered and chaotic, you won’t be able to find what you need when you need it.

You can use folders and tags to organize your bookmarks. If you don’t like dealing with folders and subfolders to organize your bookmarks, we’ve discussed how to use tags on your Firefox bookmarks.

For those of you who like using folders, we’ll show you how to organize your Firefox bookmarks here using folders.

Create a New Folder on the Bookmarks Bar

To add a new folder directly on the Bookmarks bar, right-click on the bar and select New Folder.

Create a new bookmarks folder on the Bookmarks bar in Firefox

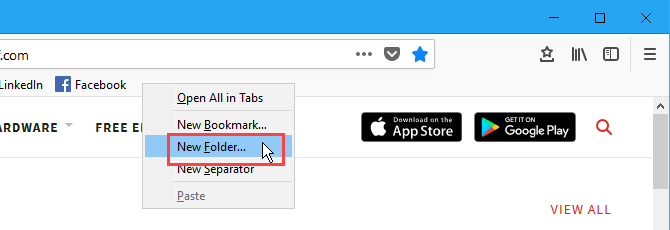
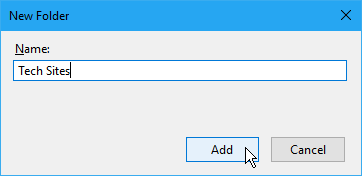
On the New Folder dialog box, enter a Name for the folder and click Add.

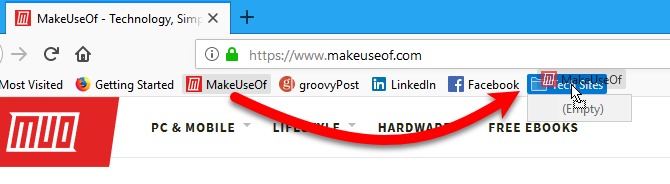
Firefox adds the folder on the right end of the Bookmarks bar, but you can drag it to any other location on the bar.

New Folder dialog box in Firefox

Move Bookmarks into Folders on the Bookmarks Bar

To add a bookmark to the new folder using the Bookmarks bar, drag the bookmark to the folder.

Drag a bookmark into a folder on the Bookmarks bar in Firefox

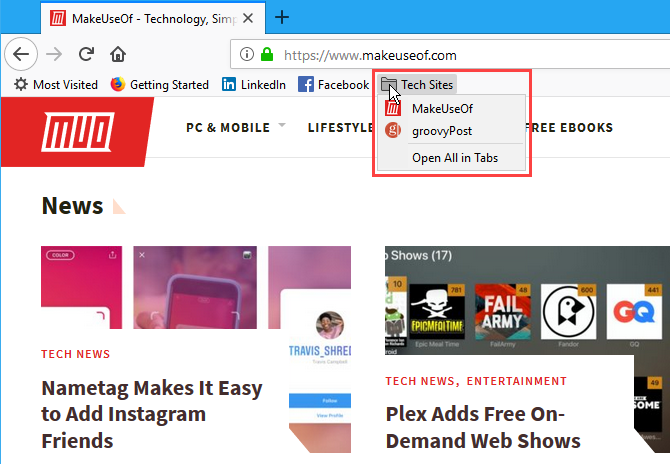
Click the folder to open it and access the bookmarks in it.

You can also drag bookmarks around in folders to rearrange them.

Access bookmarks in a folder on the Bookmarks bar in Firefox

Use the Library Dialog Box to Create New Folders

If you prefer using the Library dialog box to manage your bookmarks, press Ctrl + Shift + B.

Right-click in an empty area in the right pane, select New Folder and enter a name for the folder.

Create a new folder on the Library dialog box in Firefox

Move Bookmarks into Folders on the Library Dialog Box

Drag bookmarks into the new folder. You can select multiple bookmarks using the Shift and Ctrl keys and drag them into the folder at one time.

Drag a bookmark into a folder on the Library dialog box in Firefox

View Your Bookmarks in Different Sorted Views

On the Library dialog box, you can temporarily view your bookmarks and folders in different sorted views.

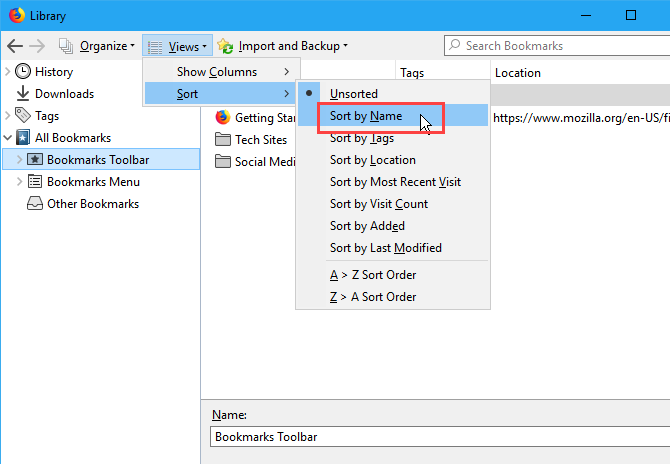
Press Ctrl + Shift + B. Select the group of bookmarks and folders you want to sort under All Bookmarks. Or select a tag under Tags to sort all bookmarks with the same tag.

Then, go to Views > Sort and select a sorting method from the submenu. for example, Sort by Name.

Sort bookmarks by name on the Library dialog box in Firefox

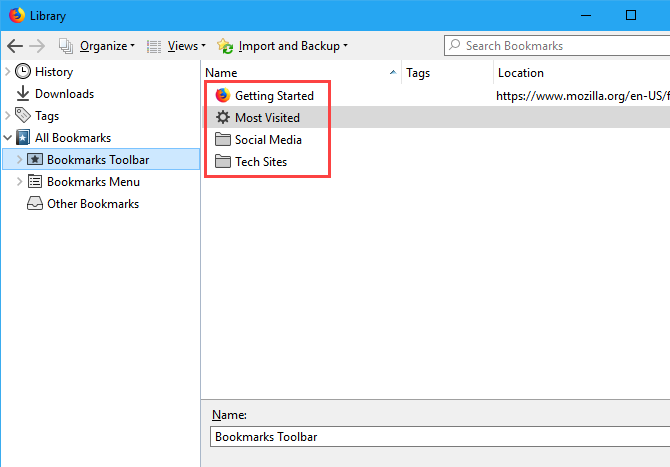
You can only sort on one level of bookmarks and folders, whether it be the top level or inside a folder. Once you sort a different level, the previous level you sorted becomes unsorted.

For example, we sorted on the Bookmarks Toolbar. But if we go into a folder, like Tech Sites, and sort there, the Bookmarks Toolbar is no longer sorted.

The sorting feature only sorts bookmarks and folders on the Library dialog box. Bookmarks and folders on the Bookmarks Toolbar or the Bookmarks Menu are not affected.

Sorted bookmarks and folders on the Library dialog box in Firefox

Rearrange Your Bookmarks on the Library Dialog Box Manually

You can manually rearrange your bookmarks and folders on the Library dialog box.

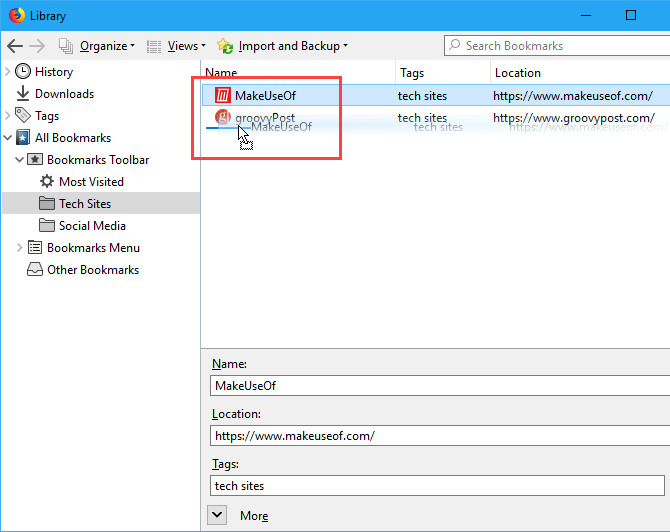
Press Ctrl + Shift + B. Use the left pane to navigate to the Bookmarks Toolbar or the Bookmarks Menu, and then to the folder you want if you want to rearrange the bookmarks inside a folder.

Click and drag a bookmark in the right pane to another location in the list to move it. To move the bookmark into a subfolder, drag the bookmark on top of that subfolder.

When you sort your bookmarks manually, the sorted order is reflected on the Bookmarks Toolbar, the Bookmarks Menu, and on the sidebar.

Sort bookmarks manually on the Library dialog box in Firefox

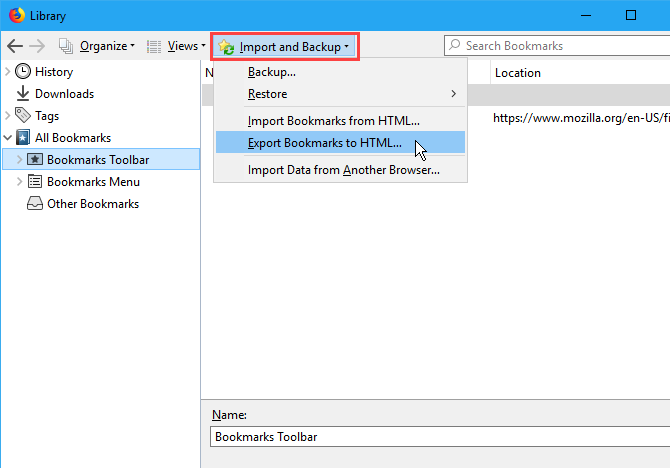
Back Up and Restore Bookmarks in Firefox

The Library dialog box also allows you to back up your bookmarks and import and export bookmarks to and from other browsers.

The Backup option on the Import and Backup menu saves the JSON file Firefox uses to store the bookmarks. You can use the JSON file to Restore your bookmarks if you need to reinstall Firefox. Restoring bookmarks will replace all current bookmarks in Firefox.

The Import Bookmarks from HTML and Export Bookmarks to HTML options allow you to save your bookmarks in HTML format. You can open the exported HTML file in any browser and click the links to access your bookmarks. And you can use the exported HTML file to import your Firefox bookmarks into other browsers that may not support direct transfer of bookmarks.

You can import bookmarks from Edge, Chrome, and Internet Explorer using the Import Data from Another Browser option.

Import and backup bookmarks in Firefox

Organize Bookmarks in More Than Just Firefox

Browsers still pay attention to bookmarks. And you should too. A well-organized bookmarks folder saves you the bother of installing any third-party apps with doubtful futures. If you’re looking to sync bookmarks with other browsers, like Chrome and Edge, we’ve covered the best alternatives to Xmarks.

Read the full article: A Complete Guide to Managing Firefox Bookmarks


Read Full Article