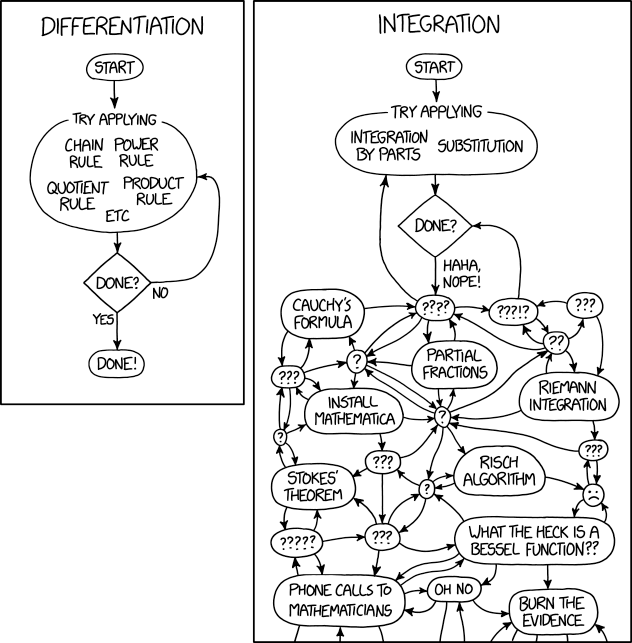
Differentiation and Integration

When you submit a resume, do you always include a cover letter? In almost all cases, it is appropriate and wise. The letter allows you to introduce yourself, personalize your interest in the company, address points that do not belong on a resume and make yourself stand out.
If you need a little assistance, here’s how to write a cover letter, along with tips and templates to help get you started.
One of the first things to remember about writing a cover letter is that you should tailor it to the specific position. While using a template does help, you should always customize it for the job and company.
The template should be your starting point, not the end result with only minor tweaks.
From Glassdoor online:
“When starting to write any cover letter, it is always best to plan the content of your letter based on the requirements of the job you’re applying for.”
If you plan to use a template, you also want to choose the correct one for the letter. For example, some include salary requirements while others work better for the creative field.
Some sources say that if you start a cover letter by saying that you are applying for X job that you saw in X advertisement, it is a waste of text. Of course, you must state the position you are applying for.
The opening should cover why you are writing and provide a brief idea of who you are. But be sure to stand out when you say why you want the job and why you are the right fit for it.
As Time.com writes:
“To grab a recruiter’s attention, a good narrative — with a killer opening line — is everything.”
You should think through your opening carefully and show your personality, but avoid corny humor. Be clear, concise, and confident.
Take the time to research the company you are applying at so that you can express how your experience can help. Plus, having knowledge of the company is ideal for when you land an interview.
As Harvard Business Review puts it:
“Hiring managers are looking for people who can help them solve problems… show that you know what the company does and some of the challenges it faces.”
When you have information about the company and their needs, you can then highlight your relevant skills and achievements to show why you are the person for the job.
In your final paragraph, include your contact information, express your enthusiasm, and state if you plan to follow up. Monster.com offers this advice for the closing:
“If you will wait for their reply, tell them that. If you will be following up, tell them when they can expect to hear from you. Don’t drop the ball on your first promise to a potential employer, though.”
If you are including additional material with your cover letter and resume, such as a portfolio or sample of your work, be sure to mention this as well. And of course, thank your reader for their consideration
While your opening should grab their attention, your closing should also be strong and clear.
Here are additional tips to keep in mind when crafting your cover letter:
Knowing how to write a cover letter for a job is essential. But just as important is how not to write a cover letter. Here are just a handful of those things you should leave out when composing your letter.
Along with knowing how to write a cover letter that targets the job you want, is the appearance of it. This is another important part of creating your letter so that it has a clean and professional appearance.
Microsoft Office online has one of the nicest selections of cover letter templates beginning with this simple design. Just swap out the text on the template with your own.

If you want a little splash of color on your cover letter, this next one from Microsoft Office is a good choice. Remember, a small amount of color is fine as long as you do not overdo it. If you prefer another color, Office also has green and blue options.

For a cover letter in response to an advertisement asking that you include salary requirements, this template from Microsoft Office is ideal. The template includes language that addresses the salary, along with employment history, but you can adjust it, of course.

If you are applying for a position that involves design or another creative field, you may prefer a cover letter to match, especially if you believe the hiring manager expects it. This one lets you express your creativity while still maintaining a professional appearance.

Maybe you are looking for a particular style of cover letter. For instance, the Dublin design is often used for those lacking experience while the Chicago design is suitable for those with management experience. Each has different formatting to accompany the highlights of the style.
For eight free downloadable templates that include Dublin, Chicago, Milano, and Harvard, check out the selection from ResumeGenuis. You can download an entire pack from each design with various color options that include helpful prompts.

When what you really need is a template plus a sample with helpful text for that specific position, review these options on Template.net. You can download cover letter templates for jobs in nursing, education, retail, technology, business development, and other fields.
The sample text is provided to help you, but remember that you can change it easily to suit your skills and experience.

Now that you know how to write a cover letter, hopefully, the additional tips and templates will help you on your way to a great letter that leads to an interview. Just remember to use the cover letter to tell your story, briefly but with confidence.
And for some help creating your resume, take a look at these resume templates for Word or other resume templates for Photoshop Illustrator.
Read the full article: How to Write a Cover Letter

The age of streaming is upon us. In the move from cinemas and cable TV to the internet, a handful of paid movie streaming apps have become extremely popular.
However, there are a lot of free movie apps that will let you watch and download movies. All for free, and all legally. Here are the best free movie apps available.

Tubi TV has a catalog of free movies, neatly sorted into categories by genre, like horror, romance, and comedy. You can also browse through featured and most popular movies. As far as the movies go, they’re high quality, and the movie player works smoothly.
As a bonus, all the films have subtitles available. Logging in will give you the option to add movies to your queue, which is accessible across devices, and even on the web version of Tubi TV. You also get an option for screencasting.
Download: Tubi TV for Android | iOS | Roku | Xbox One | PlayStation 4 | Amazon Kindle Fire (Free)

Popcornflix is a free movie app which offers a great collection of movies. The app presents you with a wall of free movies, sorted by categories, with the new arrivals shown right on top.
Popcornflix also has exclusive content, called Popcornflix Originals. The movies are of good quality, and streaming works smoothly. The movie player can be a tad overwhelming but is feature rich and smooth. Popcornflix will also let you stream TV series for free.
Download: Popcornflix for Android | iOS | Roku | Xbox One | PlayStation 4| Amazon Kindle Fire (Free)

Yidio is a very convenient source for you to find movies. This free movie app comes with a twist: most of its free movies are not on the app itself. Yidio will point you to a lot of other free movie apps, which you can use to watch movies online for free.
The catalog is gigantic, given that Yidio aggregates content from a lot of other free movie apps. The only issue is that there are quite a lot of paid movies and subscription movie apps listed. However, Yidio lets you manage movies very efficiently, which means that with some tweaking, you can find thousands of free movies.
Download: Yidio for Android | iOS | Amazon Kindle Fire (Free, subscription available)

As we all know, Sony Pictures is a big name in the film industry, and when it comes to watching free movies online, Sony Crackle lives up to its reputation. Sony Crackle has one of the best collection of free movies out there, with old classics, as well as new hit movies.
The movie player works smoothly and is easy to use. The free movies are ad-supported, so you have to watch a few ads. However, the ads are not too intrusive, and seem like a fair price to pay for the kind of content Sony Crackle provides. It also lets you watch TV shows online for free.
Download: Sony Crackle for Android | iOS | Roku | Xbox One | Windows | PlayStation 4 | Amazon Kindle Fire (Free)
Sony Crackle also has a great website, which is among our picks for the best free movie streaming sites.

SnagFilms is a great free movie app for indie movies and documentaries. The catalog consists of a great selection of critically acclaimed independent movies. The movie player is simple, and most of the free movies are of high quality.
The app is ad-supported like most free movie apps, but the ads are not too intrusive or frequent. SnagFilms has a catalog that is aimed at classics and indie films, so don’t expect the latest releases.
Download: SnagFilms for Android | iOS | Roku | Xbox One/Windows | PlayStation 4 | Amazon Kindle Fire (Free)

Pluto TV is one of the most feature-rich free movie apps on this list. It has a simple user interface, despite packing in so many features. When you open the app you’re greeted with Pluto’s free TV channels, with a dedicated tab for free movies and TV shows.
There are also live channels on which you can watch free movies as they play, and a range of other free TV channels with a variety of other content. The movie player is nice and clean, with subtitles available for most free movies. You can sign in to customize Pluto TV to your needs.
Download: Pluto TV for Android | iOS | Roku | Windows/Mac | PlayStation 4 | Amazon Kindle Fire (Free)

Vudu has a great collection of ad-supported free movies. The catalog is one of the biggest for any free movie app, and new movies are added regularly. You can choose to watch free movies in your preferred choice of quality.
Vudu will let you browse the catalog right away, but you have to be signed in to be able to watch movies. While Vudu has a focus on their rentals, you can select the “Free” tab to see the collection of free movies. The free movies are easy to spot otherwise, as well, having the “Free with Ads” label on them.
Download: Vudu for Android | iOS | Roku | Xbox One/Windows | PlayStation 3 | PlayStation 4 (Free)
If you’re looking for a more interactive movie experience, you can also watch free virtual reality movies.

At first sight, Viewster feels like a YouTube competitor, but it also works as a free movie app and has a user interface that makes finding free movies easier, sorted by genres. The movie player will also give you video quality and subtitle options.
Viewster has a bit of a social zing to it, with a comment section on every free movie, along with reactions, and their movie blog baked right into the app. Signing in to the app gives you options to personalize it including history, queue, and more.
Download: Viewster for Android | iOS | Roku | Amazon Kindle Fire (Free)

BIGSTAR Movies is a free movie app that has a focus on critically acclaimed independent movies. If you’re looking for a free art movie app, then BIGSTAR Movies might be the way to go. It has a simple user interface and a dark mode button.
There is a tab to sort all the free movies by genres, and you can even create a playlist. The only problem with BIGSTAR Movies it has video ads as well as banner ads, which are sometimes poorly placed.
Download: BIGSTAR Movies for Android | iOS | Roku | Amazon Kindle Fire (Free)
It’s important to remember that when it comes to movies, copyrights and distribution rights are a big concern. This means that the apps in this list are available in a limited number of countries. In case one of these free movie apps is not available in your country, you might want to consider using a VPN, rather than sideloading apps from unreliable sources.
On the other hand, if you would rather download a movie rather than streaming it, check out how to legally download movies for offline viewing.
Read the full article: The 9 Best Free Movie Apps to Watch Movies Online

If region restrictions have denied you access to a website, you’ve probably used a proxy server to circumvent it. While they’re useful at skirting around these blocks, free proxy servers’ level of security has much to be desired.
Let’s explore some reasons why you should skip free proxy servers.
To understand why you shouldn’t use free proxy servers, we must first break down what they are and why people use them.
People use proxy servers when they want to hide their location. When you connect to a website, it can detect what country you’re from via your IP address. If you’re connecting to a site with region restrictions and your country isn’t allowed to view the website, it will block you from visiting it.
The key is to use an IP address from a country that isn’t blocked. The best way to do that is to “piggy-back” off of a computer or server that’s in a whitelisted country. That way, you can circumvent the restriction and visit the website. This is where proxy servers come in.

If a Canadian user wanted to view a website restricted to the US, they can find a proxy server located in the US and tell it to visit the website. The website sees the server’s location instead of the user’s, so it gives the proxy server its contents. The proxy server then hands the data it received to the user.
There are many free proxy server sites on the internet, each one giving you a range of countries to choose from. All they ask of you is the address of the site you want to visit, and they’ll load it up. It sounds too good to be true, and a lot of the time, it is!
Despite this seemingly generous service, the old adage rings true here; “if you’re not paying for it, you’re the product.” As such, you may find free proxy servers aren’t as great as you imagined. Here are five reasons why you should stay away.
Christian Haschek did a scan on some free proxy servers to see if they passed basic security tests. He discovered that 79% of them didn’t allow HTTPS connection. This is a huge security problem and something that everyone should take to heart when using a free proxy server.
The lack of HTTPS means your connection to the server is not encrypted. Someone monitoring the connection could easily see the data you’re sending as it travels through the network. This makes proxy services a very poor choice for doing anything that requires privacy, such as entering your login details into a website.
If you want to keep your data safe, try our article on how to get Chrome to alert you when your connection isn’t secure.
In his article, Haschek goes on to theorize that the reason free proxy websites dislike using HTTPS is that they themselves want to monitor you. This isn’t a far-fetched theory, as hackers have set up proxy servers in the past for this very reason.
When you use a free proxy website, you’re trusting that the owners have set it up out of the kindness of their heart and won’t use it as a honeypot to glean sensitive information. There’s no way to know what the server owners installed on their hardware to monitor you, so it’s not worth taking the gamble!
The server may not be the cleanest option for viruses and malware. By trusting your connection to a proxy server, you’re hoping that it won’t abuse the connection to infect your PC.
Even worse, a free proxy owner may infect you by complete accident! Due to their service being free, some owners rely on ad revenue to keep the lights on. They’ll inject advertisements into the content they show you in the hope that you’ll click them and help pay for the server.
Unfortunately, some malware authors use advertisements as a vehicle for their programs, and prey on websites with lax advertising checks to display them. This is called malvertising, and you can learn more in our guide to malvertising.
If the owners haven’t been diligent with what ads they show, they may accidentally show you ads laced with malware. They likely won’t even know this is happening until your computer has been infected!
When you log into a server, your computer creates a small file called a cookie. This stores your login data, so you don’t have to keep logging in every time you visit the site. This is normally a very useful feature, but when a proxy server is between you and the website, there’s a chance the owners of the server can steal the cookies as they’re being made.
Once they have the login cookies from your browsing session, they could use them to impersonate you online. How much damage they could do depends on what sites you visited on the proxy server. If you visited very sensitive sites, you might be in a lot of trouble!
After you put your privacy on the line and take a gamble on a free proxy server, you’ll probably find it wasn’t worth it! Free proxies found on the internet are typically very slow, both due to lack of funding and because so many other people are using them.
With all the problems that free proxies can bring, the service they provide doesn’t live up to the risks.
If free proxy servers are a good example of “you get what you pay for,” a good VPN service is on the opposite end of that spectrum. By paying for a quality VPN, you can browse anonymously without risking your information being stolen. You can learn more about how they work in our guide to VPN connections.
Just be sure to stay away from free VPNs, as these often have the same issues as free proxy servers!
If you really have to use a free web proxy, never submit any personal information across it. It’s best to imagine a hacker reading every piece of information you send over a free proxy server. If this makes you uneasy about using the server, it’s best to stay well away!
It’s also a good idea to install browser extensions that help protect against malvertising. You can also install a well-regarded antivirus solution to stop any ad-based infections from taking hold. We discussed how to do this in our article about protecting yourself from malvertising.
Free proxies are a convenient way to skip around country restrictions on the internet. The non-existent price tag, however, means that proxy server owners feel more obligated to make a profit off of you and your details. If you can, always avoid using a free proxy server, and use a VPN if you want consistent security.
If you like the sound of a VPN, why not read about the best VPNs picked out by Reddit?
Read the full article: 5 Reasons Why You Should Avoid Free Proxy Servers

Chances are, of the many tasks you tackle on your computer, some of them are repetitive. Why manually delete the same types of files or type the same email over and over? With some of the tools below, you don’t even need to manually send that email.
The four automation apps below let you focus on what’s important to you, rather than tedious maintenance tasks. This saves you time and brain power that can be put to better use elsewhere.
The power of automation can save you a lot of time and simplify your day. We’re talking about improvements to productivity that can be programmed into your computer with just a few clicks.
Here’s a flavor of what you can handle with some of the apps on this list.
That’s just the beginning. Every scenario is different and you might find even more ways for automation software to improve your life.

One of the most complex apps on this list, Actiona lets you automate mouse clicks, edit files, and more. It is somewhere between the Automator software included in macOS and apps like AutoHotKey when it comes to the type of functionality available.
For the bulk of what you’re doing in Actiona, you can use the visual editor to put together certain actions. An example would be to read the contents of a file and copy it to the clipboard. Another would be to read the clipboard, and if it contains a URL, open that URL in the browser. These, of course, are extremely simplified examples.
Actiona can also control windows, kill processes, and call and end procedures. You can also use it to display messages and prompts, making interactive workflows. If you’re a power user, you can write JavaScript code to make Actiona even more powerful. At a certain point, the only limit is your imagination.
The app has been around for years and doesn’t appear to have made much of a splash, likely due to how open-ended it is. Still, if you’re looking for a customizable automation tool, this is one of the best we’ve seen for Linux.
Download: Actiona (Free)

We’ve extolled the virtues of text expansion before, and for good reason. You can automate anything you need to type more than once or twice, saving yourself time in the process.
Typing three or four characters instead of a few sentences every time can also save your hands and wrists from unnecessary strain. While apps like TextExpander and PhraseExpress provide this functionality for Mac and Windows respectively, AutoKey gets the job done on Linux. While it may not be as popular as either of those apps, AutoKey isn’t lacking in features.
If you’re familiar with the concept, it works the same here. If you’re new to text expansion, it’s simple: Create snippets of things you type all the time, then choose how to trigger them. This can be either a hotkey or an abbreviation. For example, typing “adr” could expand into typing your home address.
Just be careful not to type things that could be parts of actual words you type.
AutoKey doesn’t bring much new to the world of text expansion, but it doesn’t need to in order to be useful. It’s free, it’s actively developed, and it can save you a whole lot of time. The only caveat is that because it relies on X11, it currently doesn’t function fully on distributions that use Wayland instead of Xorg.
Download: AutoKey (Free)

Another example of text expansion on Linux, Texpander works a little differently than AutoKey. Because of this, it might be a good choice if you can’t use AutoKey for reasons listed above, or if you’re looking for something a little more lightweight. The trade-off is that you’ll need to put in a little more work to get Texpander up and running.
While AutoKey is a full-fledged app, Texpander is a relatively simple Bash script that aims to provide similar functionality. You assign a keyboard shortcut to the script, which then pops up a dialog similar to what you would see from a launcher application for Linux. Then you type your abbreviation as you would with other text expansion software.
When it comes to managing your snippets, there’s no application interface to do this. Instead, you simply create text files in the .texpander directory inside your home directory. If, for example, you keep your email signature in a text file named sig.txt, typing “sig” in the Texpander dialog would insert the contents of this file.
While this isn’t as advanced as AutoKey, it has some advantages. Namely, it doesn’t rely on a specific back end in order to work. This avoids the issues with Wayland that AutoKey runs into, and also means it works in Firefox and Thunderbird, whereas AutoKey doesn’t.
Download: Texpander (Free)

If you have any actions you want to occur at a certain time or date, like creating a set of files, mounting or unmounting drives, or other actions, chances are you’ve heard about cron. This is the default way of doing anything that requires scheduling on Linux, but editing the crontab file isn’t exactly easy.
If you’re not overly experienced with Linux, it can seem downright arcane.
Gnome-Schedule lets you use cron to schedule tasks in a much easier fashion. Instead of the notation you’ll see in a crontab file, which looks like 0 * * * *, Gnome-Schedule presents this in an easily readable format. If you want a task to occur every hour, just schedule it to run every hour. Gnome-Schedule handles the heavy lifting for you.
If you are an expert at editing crontab files, advanced mode offers you all that power without having to jump into vim to edit the file manually. You can even run Gnome-Schedule as root, which will let you edit any user’s crontab and at tasks. Being able to do this all in one place makes it as handy for system administrators as it is for normal users.
Another handy feature is the calendar, which lets you easily schedule tasks in the future. The app also features a panel applet with a dropdown to keep an eye on your scheduled tasks.
Download: Gnome-Schedule (Free)
To recap, with the above tools, here’s what you’re taking care of.
The above apps cover many needs, but what if you’re looking to get other things done faster? The answer, as is the case with a lot of Linux tasks, likely lies in the command line.
You don’t have to memorize every useful command line action to get things done. Instead, we’ve got a cheat sheet full of Linux commands. You can keep this with you to reference anytime you can’t quite remember a command.
Image Credit: Dukekom/Depositphotos
Read the full article: 4 Linux Automation Apps to Streamline Your Tasks and Workflows

Watching live TV seems old school in the Netflix era, but you can’t always find every show or movie you want on a streaming service. The alternative is paying out for cable or satellite TV, and who wants to do that?
Thankfully, if you’re in a country with terrestrial TV broadcasting, you can cut the cord and record live TV to a network DVR with Tvheadend instead, running on a Raspberry Pi. Here’s how you do it.
Tvheadend is a streaming server for live TV broadcasts. It can handle streaming and recording over-the-air terrestrial DVB-T/T2 broadcast TV, like Freeview in the UK. It can also handle other forms of TV streaming, including cable (DVB-C), satellite (DVB-S and DVB-S2), ATSC, and IPTV.
This guide will focus on using Tvheadend with a DVB-T/T2 tuner for over-the-air terrestrial TV, but many of the instructions for setting up Tvheadend will remain the same if you prefer to use Tvheadend to record TV from other input sources.
To set up a Tvheadend DVR, you’ll need the following:
The Raspberry Pi Foundation released a Pi TV HAT which uses the Raspberry Pi’s GPIO pins to become a DVB-T2 receiver. If you don’t have one of these, you can use a typical USB DVB-T/T2 tuner instead.
You’ll need to install an operating system onto your Raspberry Pi first; this guide will assume you’ve flashed the latest version of Raspbian Lite onto a microSD card and your Pi has internet connectivity. It’s also a good idea to run the usual commands on first boot to update your Pi and change the default password:
sudo apt update
sudo apt upgrade
passwd
If you haven’t already, after you’ve flashed your microSD card, add a file named ssh without a file extension to your boot partition. This will enable you to connect via SSH. You’ll have to check your Pi’s IP address, which you can do using a network monitoring app on your smartphone.
Once your Pi boots, plug your DVB-T/T2 tuner into your Pi (or attach to the GPIO pins, if you’re using the HAT) and connect via SSH. Confirm that your USB tuner is working:
lsusb
Assuming that it is, check that the firmware for your tuner exists and loads:
dmesg | tail | grep dvb
If the command returns nothing (or there are no errors), your DVB-T/T2 tuner should be ready. If the command returns log snippets that suggest your firmware can’t load, or the firmware files you need are missing, you’ll need to download them.
A Git repository from the developers of OpenELEC, a Linux media center distro, contains a large number of firmware files for various tuner chipsets. To install these onto your Pi, run the following commands on your terminal and reboot:
sudo apt install git
git clone https://github.com/OpenELEC/dvb-firmware.git
cd dvb-firmware
./install
sudo reboot
To install Tvheadend and any additional packages, type:
sudo apt install tvheadend
Type Y and hit enter to agree to installation. As it begins, you’ll need to provide a username for Tvheadend for administrative access once it’s installed. Type a suitable username in, then hit enter.
You’ll need to provide a password, so type one in and hit enter. A final menu provides information on what to do once Tvheadend has installed to access the web interface on port 9981; just hit enter to continue installation.
With installation complete, open a web browser and go to http://YourIPAddress:9981 replacing “YourIPAddress” for the IP Address of your Pi. Use the username and password you created during installation to gain access.

Select languages for both the web interface and the EPG (electronic program guide, for TV listings) and click Save & Next.
At the next menu, unless you plan on allowing access to Tvheadend outside of your internal network, and assuming your IP address is in the 192.168.1.0/24 range, type 192.168.1.0/24 under Allowed Network. You can also provide additional usernames and passwords for a standard administration and standard user account; fill in the username and password sections, as required, and then click Save & Next.
The next stage configures your tuner. Tvheadend should already detect your DVB-T/T2 tuner; for my configuration, this was listed under Network 2. Select the network type as DVB-T Network. Again, click Save & Next to proceed.
To get your tuner to scan for the right channels, the next menu has you choose”pre-defined muxes” which are lists of appropriate frequencies to scan. Search the list for one that corresponds with your country and area. As I live in the UK, I used this search tool from the BBC to locate the transmitter closest to my location.
Once you’ve selected one, hit Save & Next to continue.

This will start a scan for channels operating on the frequencies from your chosen transmitter. Let it run through until the progress reaches 100%, then click Save & Next.
The next menu will have options to map these services to channel names that can be understood by media players. Check the checkboxes for Map all services, Create provider tags and Create network tags before hitting Save & Next.
Once you’ve done that, your Tvheadend installation should be complete, with channels matched to services being broadcast in your area. Just click Finish to close the configuration pop up.
With Tvheadend installed and configured, you can now get to the fun part—watching or recording TV. You can use Tvheadend to stream to media players like Kodi, to your phone or tablet using apps like Tvhclient, to your PC using VLC, or through Tvheadend’s web portal itself.
If you want to quickly load your channels into VLC to test, type the following into your web browser to download a playlist for streaming, replacing the username, password and IP address with your own:
http://username:password@YourIPAddress:9981/playlist/channels
To record TV through the web portal, search for content under the Electronic Program Guide and click the first icon (with an “i” symbol) to show information about it.

To record a show, select Record program. Select Record series if you want to record episodes of a TV series automatically.
Thanks to Tvheadend, you can do away with costly TV and streaming packages. Using a Raspberry Pi, you can stream media content, whether it’s live or pre-recorded, to all of the devices in your home, cutting the cord for good.
With your network DVR ready, it’s time to take your media ambitions further, so consider building yourself a media center PC to stream your favorite TV shows and movies in style (and without the buffering).
Read the full article: How to Record and Stream Live TV With Raspberry Pi

The personal brand is no longer the exclusive domain of thought leaders and CEOs. Everyone has an opportunity to educate others in their industry, but before you can do so, you need to develop your brand.
Personal branding is about controlling the way others see you. Allowing you to showcase your expertise, and make new connections. In this article, we explain how to brand your personal social media accounts.
Defining your audience is an important step toward building a personal brand. If you don’t know who you’re talking to, how can you connect with anyone? If you don’t know where to start, look at others’ profiles and see who they follow and what they talk about.
Who to look at:
Take note of who responds to posts, what questions the audience has, and what content people tend to share most.
It’s also worth joining some relevant groups. LinkedIn and Facebook make it easy to connect with others who share your interests and expertise.
Keep in mind, some of these groups are really stuffed. This example, DesignersTalk, boasts over 180k members. Smaller, niche groups are better for making actual connections.

Decide which social media platforms make the most sense for your personal brand. While all of them are free, there’s no reason to use every single channel. You’ll also want to consider what kind of content you feel most comfortable posting.
If visuals aren’t your thing, stick to LinkedIn and Twitter. Here, the emphasis is less aesthetic-focused and more about the content you share.
LinkedIn is the most formal channel in the bunch, so be careful about following strangers or asking for recommendations. It’s better to prove your value first.
LinkedIn rules:
Twitter is something of a catch-all professional platform. It might be best known for trolls and political troublemakers, but it’s also a great way to keep track of industry leaders and brands.
Twitter rules:
Facebook is more than a place to share fake news and get lost in old classmates’ vacation albums. It’s also a flexible platform where you can share videos, links, images, and more.
Facebook rules:
Instagram is best for those working in creative industries. It’s great for designers, artists, and people working in the food and beverage industry. If you want to be known for eye-catching visuals, here’s how to craft the perfect Instagram profile.
Instagram rules:
We get it, a lot of this “personal branding” stuff conjures up some cringeworthy feelings.
Establish a voice that both feels like “you” and fits in with your industry and audience. Are you the friendly expert, the cheeky and irreverent jokester, or perhaps, a bit more serious?
Social media is overcrowded with self-proclaimed experts, so you’ll need to position yourself in a way that differentiates you from your coworkers and competitors. Much like how corporate brands set social media goals, you’ll want to establish a few of your own.
Some potential goals:
For example, if you want to be seen as an expert in the graphic design space, Google common phrases and start looking for articles, industry updates, and trends. From there, you can start writing your own posts or sharing your opinions about them on social media.
Think of any successful brand you’ve encountered—they have a distinct image and voice that spans platforms. Apple, McDonald’s, Coca-Cola. All of these achieve a certain consistency by using the same logo, colors, and tone across all representations of their brand.
To do this, brands create style guides with rules for everything from colors. You don’t need to write yourself an entire rulebook—but embracing consistency is one of the most important things you can do. It helps you build trust with your audience and make sure that they remember you long-term.
With that in mind, here are a few areas visuals can help communicate what you’re all about:
Keep it simple and use your first and last name as your username.
Your headshot and usernames should be the same (or similar) across every platform. While it might sound boring, it’s better to save your creativity for your actual posts.
This makes discoverability a breeze, allowing people to quickly identify you on Twitter, LinkedIn, or wherever else you hang out.
Your professional bio should be a clear, concise overview of your experience and expertise. This represents you across social channels, blogs, and websites, and serves as an online first impression.
Ann Handley’s two Twitter profiles (her business and personal) are a good example of using that same bio across different accounts.
People can quickly see that these belong to the same person based on her use of the same bullet points.

Whether you think color psychology is bogus or a bonafide science, there’s no doubt that colors can visually communicate the personality you want to portray.
A good example of this is Rachel Parcell’s profile (pictured below). She sticks to this soft, feminine aesthetic, using pinks and whites throughout her feed.

Start by considering the colors you’re naturally drawn to, then think about how those colors fit with your brand.
Blue, for example, signifies clarity, intelligence, and authority. While red demonstrates power, attraction, love, and enthusiasm. Do you want to make people feel calm or excited?
We recommend selecting a color scheme, like this one from Design Seeds:

If you need help selecting your “paint swatches,” here are some tools to find beautiful color schemes that do the heavy lifting for you.
Generally, you’ll want to polish off your pics with a unifying filter. Stick to one or two filters and use the same editing process for every image.
In general, built-in photo editors are best left to the amateurs. Create your own using an app like Lightroom or VSCO and save your settings for easy access. This gives you the ability to maintain a consistent “mood” with a single click.
As with colors, developing a font palette is essential for creating a cohesive brand. Limit your font use to two or three options to keep things consistent.
If your main channels are social (rather than a personal website) the font rule applies to your logo and any pull-quote visuals you post in your feeds.
Social media is supposed to be a conversation, so it’s crucial that you give and take. Make sure you respond to every comment you receive, even if it’s just to say thanks.
We get that after a certain point, this might not be possible, but in the meantime, it’s a good way to connect with your audience.
People don’t visit social media platforms to look at ads. As such, you need to make sure you’re sharing useful information that can help others. Do this consistently, and your followers will share your content with others.
Unless your end game is becoming a social media personality, remember to treat personal branding as a stepping stone to better opportunities in real life.
While there’s a lot to take in, the main thing to remember is to be consistent—both in terms of aesthetics and tone. You’ll also want to make sure you post regularly and respond to comments as they come in. After the initial “remodel” phase, your brand should just need some maintenance here and there.
If you’d like to learn more about sprucing up your social media, here’s how to create the perfect Instagram profile.
Read the full article: How to Brand Your Personal Social Media Accounts

Font management software is crucial for someone who works with fonts. macOS comes with its very own font manager called Font Book, but it falls short in several aspects and that’s why we recommend using a third-party font manager app. It’s a key tool to have, especially if you’re involved in graphic design or typography.
A good font manager helps in activating, renaming, viewing, or uninstalling fonts from Mac. Here are the best font management tools available for macOS.

It is very important for a font manager to help you search for the font and keep the same organized across different categories. This is where the TypeFace 2 excels. The app offers a comprehensive font-by-font comparison feature while letting you cherrypick fonts by superimposing one font over the other.
TypeFace 2 also pulls ahead of the competition with its minimalistic user interface and seamless flow between the menus. The app is capable of automatically organizing the imported fonts by creating a different folder. The makers of this software understand that staring at fonts for long might cause eye strain and this is the reason they have included a Dark Mode.
Download: TypeFace ($19.99 with free trial)

It’s very important for a designer to equip themselves with as many fonts as possible. Fontbase is the only free Mac-based font manager in this list and yet it can match pace with some of the paid premium alternatives. The font management on Font base is handled via a nested expanding menu and the basic user interface adds to the simplicity.
Other highlights of Fontbase include the ability to drag and drop fonts and preview multiple fonts at once. On the flipside, the grid view option is restricted to FontBase Pro. If you are on a lookout for a basic free font management tool for Mac then Fontbase is a good pick.
Download: Fontbase (Free)

Most of us have a hard time remembering font names. Wordmark.it was conceived to help you find the font you want without having to burden your grey cells. Wordmark.it is a browser-based tool and offers access to your font library.
The best part is the way this web app functions. All you need to do is type in the words and then click on “Load Fonts.” In the next step, the tool searches your hard drive for all the fonts. This is a pretty useful feature as other alternatives restrict font canning to a single directory. Lastly, Wordmark.it has one of the best font preview features offered by any Mac-based font management tool.

Flipping Typical is yet another browser-based font manager that can be used for your Mac. This tool lets you type and compare the fonts in a single go. It automatically detects the fonts in your computer across all the font library (requires Flash). You can also use keyboard shortcuts to toggle various options like bold/italics and get a better sense of how the font would look.

Font Picker is a free font management app for your Mac. The app lets you mark fonts as favorites and view all the available fonts in a single menu. Font Picker is a simple tool aimed at helping you preview fonts.
The tool is also available as a web app and it is here that the things start getting dull. Preview on the web app is clumsy and it is very difficult to view more than a couple of fonts at a time. However, the web app still gives you options to delete the fonts and reset the font display.

Thanks to the timely updates, Font Explorer Pro is now more accomplished than before. The Font Tile View is useful as it displays the first two letters if the font name on each tile. If you want more information about the font all you need to do is hover the mouse on the font. Other than that the app also lets you change the foreground, background colors and add rounded corners to the tiles.
The Detect Fonts in Documents feature is my personal favorite. This feature lets you scan a document for fonts without opening the document. Font Explorer Pro supports plug-ins for the apps from Adobe and Quark. Lastly, the feature that lets you preview blocks of text on any webpage to be useful, especially if you are a developer/graphic designer.
Download: Font Explorer Pro ($100 with free trial)

RightFont 5 was created with the sole purpose of helping designers and creators manage their fonts on the app. The RightFont is a simple app that cuts the fluff while focussing on the essential. This app can be accessed anytime from your menubar and you can also favorite the fonts from the menu bar itself.
The RightFont 5 also lets you change Font Preview and Font Size real-time. Apart from turning fonts on/off, the app will also let you preview the local fonts. You can use the fonts on Photoshop by simply selecting a layer and double-clicking on a font. Right Font 5 also lets you share fonts via cloud services like Dropbox and Google Drive.
Download: RightFont 5 ($40 with free trial)

FontAgent 8 is a simplistic font management app for Mac. FontAgent 8 comes with the basic option and offers multiple font display preview. The sidebar is dedicated for folders and other font management features. Other highlights of FontAgent 8 include Adobe Typekit integration, font search engine, Table View, auto-activation plugin for Adobe Creative Cloud and FontAgent Sync.
If you are an existing FontAgent user than you can opt for a V8 upgrades license or a FontAgent Sync subscription for $59/Year. As part of the Sync license, you will get software upgrades, support, and access to Insider cloud services.
Download: FontAgent 8 ($99 with free trial)
Font management tools help you handle various operations like installing and uninstalling fonts, handling missing fonts, comparing fonts, and other nuisances related to fonts. When you’re dealing with fonts on a day-to-day basis, the boost to productivity is certainly welcome.
If you do not want to invest in a third-party tool, you can always use the built-in Font Book to manage fonts on Mac.
Read the full article: The 8 Best Font Management Tools for Mac
Nintendo and The Pokémon Company have unveiled the next Pokémon game in the main series. The new game will come in two variants later this year — Pokémon Sword and Pokémon Shield.
Nintendo announced the new game in a Pokémon Direct live stream. And if you’ve been playing Pokémon in the past, you’ll feel right at home. The design of the world and the characters looks just like Pokémon Let’s Go on the Nintendo Switch, but with more details.
There will be a new region called Galar and that vaguely looks like the U.K. In addition to cities, you’ll be walking around mountains, caverns and woods. And of course, there will be new monsters, new gym leaders, new fights and a blank Pokédex to fill.
Seeing this brand new world feels surreal when you think about the GameBoy days. Nintendo is probably going to sell a ton of games to new players and older players who still have fond memories of the early days of the franchise.
The new starting roster is made of three different monsters — Grookey, Scorbunny and Sobble. You’ll have plenty of time to think about your pick as the game should hit the stores at the end of 2019.
On the heels of news that TikTok has reached 1 billion downloads, the company today is launching new initiative designed to help inform users about online safety, TikTok’s various privacy settings and other controls they can use within its app, and more. Instead of dumping this information in an in-app FAQ or help documentation, the company will release a series of video tutorials that are meant to be engaging and fun, in order to better resemble the other content on TikTok itself.
The safety series, called “You’re in Control,” will star TikTok users and will make use of popular memes, in-app editing tricks and other effects, just like other TikTok videos do.
The videos will focus on a range of privacy, safety and well-being settings and other safety-related policies. This includes TikTok’s Community Guidelines, how in-app reporting works, plus other settings for protecting your privacy, control comments, those to manage your screen time, and more.
They’re not exactly your traditional how-to videos, however.
Instead, the videos showcase what’s often a more serious issues – like being overrun with unwanted messages – in a humorous fashion. For example, in the video about configuring your message controls, angry commenters are depicted as shouting passengers on an airplane while the user is depicted by an overwhelmed flight attendant.
 “Too many DMs?,” the video asks. The flight attendant snaps his fingers, which causes most of the passengers to disappear. The scene returns to peace and quiet. It’s a simple enough analogy for TikTok’s younger user base to understand.
This is then followed by a screen recording that shows you how to turn off messaging within the TikTok app’s settings.
Other videos have a similar style.
A barking, growling dog is used to demonstrate Restricted Mode, for instance. A noisy crowd overlooking someone’s shoulder is the intro on the video about using comment controls.
Another video encourages the use of screen time controls, asking “can’t put your phone down?” and shows someone so wrapped up in their phone they aren’t watching where they’re walking.
But the video about the Community Guidelines is maybe the most cringe-y, as it feels a bit like your parents reminding you to “play nice.” However, it still manages to set a tone for what TikTok wants to promote – a community for “positive vibes” where everyone feels “safe and comfortable.”
 At launch, there are seven of these short-form videos in the safety series, which will launch in the TikTok app in the U.S. and U.K on Wednesday. In time, the company plans to add other tutorials and expand the series across its global markets, it says.
Of course, TikTok needs more than a series of videos to make its app a safe and welcoming community, the way it desires. It also needs a combination of policies, settings, controls, technology, moderation, and more, the company says.
That said, a focus on user education is an important aspect to this larger goal – and it stands in stark contrast to how Facebook intentionally made its privacy settings so complex and difficult to find and use for so many of its earlier years, that people gave up trying.
How well TikTok can execute on user privacy and safety as the app grows still remains to be seen. For now, it tends to be talked about as either a wholesome and fun video experience, or an online cesspool filled with hateful content and child predators. It’s an app on the internet, so both versions of this story are likely true.
There is no large user-generated content site – even those run by Facebook, Twitter, and YouTube – that has figured how to properly police the hatefulness and evil contained in humanity. But TikTok, at least, takes care not to showcase that content in its main feed – you have to seek it out directly (or train its algorithm by never clicking on anything wholesome.)
But, so far, TikTok has been better reviewed by child safety advocates than you might expect. For instance, Common Sense Media – a nonprofit that provides unbiased and trusted advice about all sorts of media, including apps – said that the app, used with parental supervision, can be “a kid-friendly experience.”
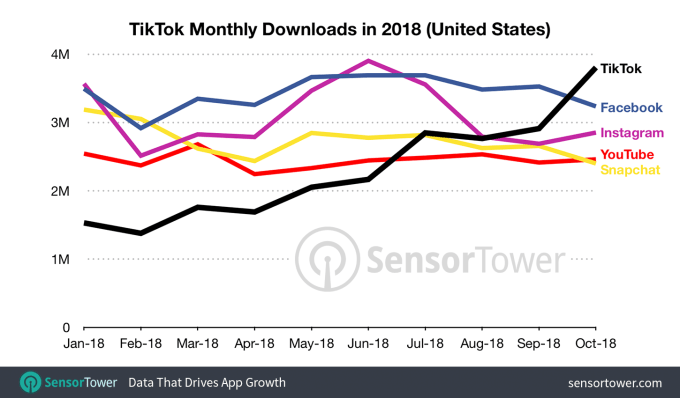
The launch of the video series comes at a time when TikTok’s growth is surging. The app recently surpassed a billion installs across the iOS App Store and Google Play, including Lite versions and regional variations, but excluding Android installs in China, according to data from Sensor Tower.
Roughly 25 percent of those installs are from India, the report said. And around 663 million of TikTok’s total installs occurred in 2018, which made the app the No. 4 most downloaded non-game for the year.
However, installs alone don’t tell the story of how many people actually use the app or how often. And a chunk of these could be the same user installing the app on multiple devices, or even bots used to push the app up the charts. In addition, parents often download the app their tween or teen is using for monitoring purposes, but don’t engage with the app or its content on a regular basis.
On the heels of news that TikTok has reached 1 billion downloads, the company today is launching new initiative designed to help inform users about online safety, TikTok’s various privacy settings and other controls they can use within its app, and more. Instead of dumping this information in an in-app FAQ or help documentation, the company will release a series of video tutorials that are meant to be engaging and fun, in order to better resemble the other content on TikTok itself.
The safety series, called “You’re in Control,” will star TikTok users and will make use of popular memes, in-app editing tricks and other effects, just like other TikTok videos do.
The videos will focus on a range of privacy, safety and well-being settings and other safety-related policies. This includes TikTok’s Community Guidelines, how in-app reporting works, plus other settings for protecting your privacy, control comments, those to manage your screen time, and more.
They’re not exactly your traditional how-to videos, however.
Instead, the videos showcase what’s often a more serious issues – like being overrun with unwanted messages – in a humorous fashion. For example, in the video about configuring your message controls, angry commenters are depicted as shouting passengers on an airplane while the user is depicted by an overwhelmed flight attendant.
“Too many DMs?,” the video asks. The flight attendant snaps his fingers, which causes most of the passengers to disappear. The scene returns to peace and quiet. It’s a simple enough analogy for TikTok’s younger user base to understand.
This is then followed by a screen recording that shows you how to turn off messaging within the TikTok app’s settings.
Other videos have a similar style.
A barking, growling dog is used to demonstrate Restricted Mode, for instance. A noisy crowd overlooking someone’s shoulder is the intro on the video about using comment controls.
Another video encourages the use of screen time controls, asking “can’t put your phone down?” and shows someone so wrapped up in their phone they aren’t watching where they’re walking.
But the video about the Community Guidelines is maybe the most cringe-y, as it feels a bit like your parents reminding you to “play nice.” However, it still manages to set a tone for what TikTok wants to promote – a community for “positive vibes” where everyone feels “safe and comfortable.”
At launch, there are seven of these short-form videos in the safety series, which will launch in the TikTok app in the U.S. and U.K on Wednesday. In time, the company plans to add other tutorials and expand the series across its global markets, it says.
Of course, TikTok needs more than a series of videos to make its app a safe and welcoming community, the way it desires. It also needs a combination of policies, settings, controls, technology, moderation, and more, the company says.
That said, a focus on user education is an important aspect to this larger goal – and it stands in stark contrast to how Facebook intentionally made its privacy settings so complex and difficult to find and use for so many of its earlier years, that people gave up trying.
How well TikTok can execute on user privacy and safety as the app grows still remains to be seen. For now, it tends to be talked about as either a wholesome and fun video experience, or an online cesspool filled with hateful content and child predators. It’s an app on the internet, so both versions of this story are likely true.
There is no large user-generated content site – even those run by Facebook, Twitter, and YouTube – that has figured how to properly police the hatefulness and evil contained in humanity. But TikTok, at least, takes care not to showcase that content in its main feed – you have to seek it out directly (or train its algorithm by never clicking on anything wholesome.)
But, so far, TikTok has been better reviewed by child safety advocates than you might expect. For instance, Common Sense Media – a nonprofit that provides unbiased and trusted advice about all sorts of media, including apps – said that the app, used with parental supervision, can be “a kid-friendly experience.”
The launch of the video series comes at a time when TikTok’s growth is surging. The app recently surpassed a billion installs across the iOS App Store and Google Play, including Lite versions and regional variations, but excluding Android installs in China, according to data from Sensor Tower.
Roughly 25 percent of those installs are from India, the report said. And around 663 million of TikTok’s total installs occurred in 2018, which made the app the No. 4 most downloaded non-game for the year.
However, installs alone don’t tell the story of how many people actually use the app or how often. And a chunk of these could be the same user installing the app on multiple devices, or even bots used to push the app up the charts. In addition, parents often download the app their tween or teen is using for monitoring purposes, but don’t engage with the app or its content on a regular basis.