12 June 2018

Snapchat Now Lets You Delete Sent Messages


We have all said things we later regret, and the moment they leave your mouth, there’s no going back. However, digital forms of communication mean there is the option to rescind a statement, as long as you change your mind before the recipient reads it.

Each and everyone of you will, at some time or another, have sent a message in error. Whether by mistake, or sent intentionally only to be regretted at a later date. Thankfully, Snapchat now has your back, with the option to delete sent messages…

Snapchat Clear Chats Lets You Clear Chats

Snapchat has launched a new feature called Clear Chats. The name says it all really, as Clear Chats gives you the option to clear out messages and conversations from your chats. Which should put an end to drunken messages being sent in error.

To delete a message, all you need to do is open the conversation you want to delete a message from, press and hold on the offending message, and then hit Delete. The message will then disappear from view, never to be seen again.

If the people in the conversation have already seen that message then there’s no way of erasing it from their memories. However, if you’re quick enough, you should be able to delete a message before anyone involved in the conversation has seen it.

Either way, all of the recipients will be notified that you have deleted something. While this could lead to some awkward questions over what was deleted and why, that’s surely preferable to the alternative. It also deletes any paper trail of evidence.

Snapchat Saves You From Heartbreak and Hate

This might be a simple little addition to Snapchat, but it has the potential to save both heartbreak and hate. Of course, it will be preferable to not send messages-you-later-regret in the first place, but we are all human, and therefore prone to making mistakes.

Clear Chats is rolling out now on Android and on iOS. So if you don’t see it right away, keep the Snapchat app up to date, and you should gain the ability to delete sent messages within the next few weeks. In the meantime, just be even more careful than usual.

Snapchat isn’t the first messaging app to add the option to delete sent messages. In January 2017, Telegram added the option, and in October 2017, WhatsApp followed suit. However, given Snapchat’s popularity with teenagers, this should prove useful.

Image Credit: Susanne Nilsson/Flickr

Read the full article: Snapchat Now Lets You Delete Sent Messages


Read Full Article

Google brings offline neural machine translations for 59 languages to its Translate app


Currently, when the Google Translate apps for iOS and Android has access to the internet, its translations are far superior to those it produces when it’s offline. That’s because the offline translations are phrase-based, meaning they use an older machine translation technique than the machine learning-powered systems in the cloud that the app has access to when it’s online. But that’s changing today. Google is now rolling out offline Neural Machine Translation (NMT) support for 59 languages in the Translate apps.

Today, only a small number of users will see the updated offline translations, but it will roll out to all users within the next few weeks.

The list of supported languages consists of a wide range of languages. Because I don’t want to play favorites, here is the full list: Afrikaans, Albanian, Arabic, Belarusian, Bengali, Bulgarian, Catalan, Chinese, Croatian, Czech, Danish, Dutch, English, Esperanto, Estonian, Filipino, Finnish, French, Galician, Georgian, German, Greek, Gujarati, Haitian, Creole, Hebrew, Hindi, Hungarian, Icelandic, Indonesian, Irish, Italian, Japanese, Jannada, Korean, Lavtian, Lithuanian, Macedonian, Malay, Maltese, Marathi, Norwegian, Persian, Polish, Portuguese, Romanian, Russian, Slovak, Slovenian, Spanish, Swahili, Swedish, Tamil, Telugu, Thai, Turkish, Ukrainian, Urdu, Vietnamese and Welsh.

In the past, running these deep learning models on a mobile device wasn’t really an option since mobile phones didn’t have the right hardware to efficiently run them. Now, thanks to both advances in hardware and software, that’s less of an issue and Google, Microsoft and others have also found ways to compress these models to a manageable size. In Google’s case, that’s about 30 to 40 megabytes per language.

It’s worth noting that Microsoft also announced a similar feature for its Translator app earlier this year. It uses a very similar technique but for the time being, it only supports about a dozen languages.


Read Full Article

Google wants to make the college search easier


Google Search is getting an update today that will put data about colleges front and center when you search for a school’s name. The idea here is somewhat similar to what Google did with its job search feature. In this case, the company aggregates data about a school that’s typically hard to find and then presents it in a single widget.

One caveat here, though, is that this only works for four-year schools. So if you’re looking for data about community colleges, for example, this new tool won’t help you.

Finding all of this information about cost, acceptance and graduation rates, available majors, stats about the student body and other details like the typical annual income of graduates after ten years can be very time-consuming. This new widget puts all of this data right into the sidebar (on desktop) or at the top of the page (on mobile).

Google is mostly getting this data from the U.S. Department of Education’s College Scorecard and Integrated Postsecondary Education Data System. The company notes that it worked with researcher and nonprofit organizations, as well as high school counselors and admissions professional to design the new experience.

This new feature is now live and should automatically pop up when you search for any four-year school in the U.S.


Read Full Article

Google brings offline neural machine translations for 59 languages to its Translate app


Currently, when the Google Translate apps for iOS and Android has access to the internet, its translations are far superior to those it produces when it’s offline. That’s because the offline translations are phrase-based, meaning they use an older machine translation technique than the machine learning-powered systems in the cloud that the app has access to when it’s online. But that’s changing today. Google is now rolling out offline Neural Machine Translation (NMT) support for 59 languages in the Translate apps.

Today, only a small number of users will see the updated offline translations, but it will roll out to all users within the next few weeks.

The list of supported languages consists of a wide range of languages. Because I don’t want to play favorites, here is the full list: Afrikaans, Albanian, Arabic, Belarusian, Bengali, Bulgarian, Catalan, Chinese, Croatian, Czech, Danish, Dutch, English, Esperanto, Estonian, Filipino, Finnish, French, Galician, Georgian, German, Greek, Gujarati, Haitian, Creole, Hebrew, Hindi, Hungarian, Icelandic, Indonesian, Irish, Italian, Japanese, Jannada, Korean, Lavtian, Lithuanian, Macedonian, Malay, Maltese, Marathi, Norwegian, Persian, Polish, Portuguese, Romanian, Russian, Slovak, Slovenian, Spanish, Swahili, Swedish, Tamil, Telugu, Thai, Turkish, Ukrainian, Urdu, Vietnamese and Welsh.

In the past, running these deep learning models on a mobile device wasn’t really an option since mobile phones didn’t have the right hardware to efficiently run them. Now, thanks to both advances in hardware and software, that’s less of an issue and Google, Microsoft and others have also found ways to compress these models to a manageable size. In Google’s case, that’s about 30 to 40 megabytes per language.

It’s worth noting that Microsoft also announced a similar feature for its Translator app earlier this year. It uses a very similar technique but for the time being, it only supports about a dozen languages.


Read Full Article

Google puts an end to Chrome extension installs from third-party sites


Google today announced a major change to its Chrome Web Store policy that aims to shield users from websites that try to fool them into installing their Chome extensions. Until now, developers who publish their apps in the Web Store, could also initiate app and extension installs from their own websites. Too often, though, developers combined these so-called ‘inline installs‘ with deceptive information on their sites to get users to install them. Unsurprisingly, that’s not quite the experience Google had in mind when it enabled this feature back in 2011, so now it’s shutting it down.

Starting today, inline installation will be unavailable to all newly published extensions. Developers who use the standard method for calling for an install from their site will see that their users will get redirected to the Chrome Web Store to complete the installation.

Come September 12, 2018, all inline installs of existing extensions will be shut down and users will be redirected to the store, too. Come December and the launch of Chrome 71, the API that currently allows for this way of installing extensions will go away.

“As we’ve attempted to address this problem over the past few years, we’ve learned that the information displayed alongside extensions in the Chrome Web Store plays a critical role in ensuring that users can make informed decisions about whether to install an extension,” James Wagner, the product manager for the extensions platform, writes in today’s update. “When installed through the Chrome Web Store, extensions are significantly less likely to be uninstalled or cause user complaints, compared to extensions installed through inline installation.”

As Wagner notes, inline installations have been an issue for a long time. Back in 2015, for example, sites that tried to deceive users into installing extensions by getting them to click on fake ads or error messages were the main issue.


Read Full Article

What Is a Breadboard and How Does It Work? A Quick Crash Course


whats-breadboard

The breadboard is the bread-and-butter of DIY electronics. Breadboards allow beginners to get acquainted with circuits without the need for soldering, and even seasoned tinkerers use breadboards as starting points for large-scale projects.

If you are taking your first steps in the world of DIY or microcontrollers, you might have received a breadboard in your Arduino starter kit or Raspberry Pi starter kit. Let’s look at what a breadboard actually is, where they came from, and how you can make use of them.

What Is a Breadboard?

A breadboard is a simple device designed to let you create circuits without the need for soldering. They come in various sizes, and the design can vary, but as a general rule they look something like this:

What is a breadboard?

If you’ve never seen one before, you might wonder how to tell which holes do what. It becomes a little easier to understand what’s going on when you see one from the bottom.

What is a breadboard?

Seeing it from this perspective makes it easier to understand what is going on. The two larger pieces of wire down each side are typically used to connect a power source to the board. They are usually referred to as power rails. The other smaller pieces of wire running perpendicular all the way across the board are used for components in your circuit. This diagram will help visualize this pattern from the top.

What is a breadboard?

The power rails run horizontally as two rows at the top and bottom. Meanwhile, the vertical columns run inwards as you move down the board.

If you were to pull any one of these metal pieces out, you would see their purpose. They’re designed to grab onto the legs of any components pushed through the breadboard holes. This allows you to test circuits without having to worry about soldering, or making a good contact with the board.

What is a breadboard?

As a general rule, this is how all breadboards operate, though they can come in a variety of sizes. Some breadboards have binding posts to attach to a power supply, but you can get by just fine without them. Also, most breadboards are designed to clip together, in case you need loads of room for a mega-project!

What is a breadboard?

Before we move on, there is one other notable feature of breadboards to know about:

Integrated Circuits (IC) and Dual In-Line Packages (DIP)

See that little gap in the middle of the breadboard? That gap is there for a reason. Integrated Circuits!

What is a breadboard?

Integrated Circuits (IC) are in almost every electronic device. They run motors, regulate voltage, act as timers, perform logic tasks, and do pretty much anything you need them to.

ICs can have different numbers of pins, sizes, and functions. However, many ICs comply to a standard called Dual In-Line Packages (DIP), meaning they all share a set width. That width is—you guessed it—exactly the right size to fit across the gap in the middle of the breadboard. This makes it much easier to work with ICs without worrying about accidentally connecting the wrong pins together.


How Are Breadboards Used Today?

In recent years, almost all entry-level electronics involve the use of either an Arduino or a Raspberry Pi.

While there are many things you can do with a Raspberry Pi that require no external components, things get interesting when you use microcontrollers with DIY circuits. The Blink sketch for Arduino—typically the first thing beginners do—can be modified to use an actual LED and resistor combo on a breadboard.

What is a breadboard?

Using what we know already, we can see that the wire from pin 2 of the Arduino goes into the power line, before being bridged to the positive pin of the LED. A resistor goes in line with the negative pin, and the other end of the resistor goes into the ground side of the power line, before returning to the GND pin of the Arduino.

If you want to try this yourself, view the code for the modified blink sketch.

Pin Power

For simple projects like this, the power rails are not always used, but if you need to use multiple components which all require power, you can provide power from the power pins of an Arduino or Raspberry Pi

What is a breadboard?

The picture above shows a servo, which requires power as well as instructions from the Arduino. We run cables from the 5v and GND pins of the Arduino to the top set of power rails. We then bridge the gap at the other end to supply power to the bottom power rails, and use small pieces of wire to provide power to the VCC and GND wires of the servo. This bridging technique for the power lines is a good practice to get into, as it’ll ensure your components always have access to power no matter where they are on the breadboard.

For a slightly more in-depth project using Arduino, LEDs and a breadboard check out our Traffic Light Controller beginner tutorial.

You use a breadboard the same way for standalone amateur electronics projects, as you would for Raspberry Pi builds. For an example project using multiple components, simple code, and a practical outcome, take a look at our Raspberry Pi Door Sensor tutorial.

What If You Don’t Have a Breadboard?

If you don’t have a breadboard, it is still possible to create simple circuits, but it’s just a little less convenient.

One method is to use a variation of point-to-point construction, either soldering components directly together, or wrapping wire around each component leg to join them. This method is incredibly fiddly, however, and if you are forced to use this method, it can help to use electrical tape to hold everything in place.

Proto-Board vs. Breadboard

An easier but more permanent method is to use proto-board. These boards are covered in holes with copper rings around them, allowing you to create circuits by soldering components in place and connecting them with wire or more solder. This is a much more permanent solution though, and usually comes later in the process once you know your circuit is going to work without any problems!

What is a breadboard?

This image is from our Motion Activated Christmas Wreath tutorial and is the perfect example of a project that would require the use of proto-board over a breadboard.

Printed Circuit Boards (PCB)

A final example would be to make your own printed circuit board for a project.

This is a permanent solution, made custom for your circuit. Usually, printed circuit boards are the last step after testing on both breadboard and proto-board. There are many companies which will make PCBs to order, though it is possible to make them yourself at home if you want the full DIY experience.

YouTuber Extralife has a video explaining how the process works:

Take Your First Steps With Arduino or Raspberry Pi

The breadboard is the perfect accessory to learning electronics at any level.

Whether you are taking your first steps with Raspberry Pi beginner projects or Arduino beginner projects, the breadboard is the place to start your tinkering.

Read the full article: What Is a Breadboard and How Does It Work? A Quick Crash Course


Read Full Article

Amino raises $45M for to bring fan communities to smartphones


Amino has raised a big Series C round of funding — $45 million from GV, Venrock, Union Square Ventures, Goodwater Capital and Time Warner Investments, with Hearst Ventures joining as a new investor.

Co-founder and CEO Ben Anderson has described Amino as an way to help people who have “passionate niche interests” find others who feel the same way, via smartphone apps.

The company started out with apps focused a handful of topics like K-pop, anime and Doctor Who, but it later added the ability for anyone to launch a new community in the main Amino app, and there are now more than 2.5 million communities.

Of course, some of these communities are more active than others, and there’s some overlap between them — but Max Sebela, who’s general manager for Amino’s English-language apps, said there’s less than you might think, because “each interest is actually a universe of micro interest.” For example, there might be one community focused on sharing strategy and tactics around the video game Overwatch, while another might revolve around sharing Overwatch fan art.

Ultimately, Sebela said it’s up to the founders and leaders of each community to decide what the community wants to focus on, and which product features they want to use to enable that. Meanwhile, Anderson said Amino is constantly tweaking its algorithms to make sure it’s surfacing the best communities for each user.

“Instead of one big, blue ocean, we provide a million lakes and help you find the exact right one,” he added.

Amino Voice Chats

Perhaps even more impressive than the number of communities is the amount of time the average user spends in Amino — more than 70 minutes per day.

One of the initial inspirations for the startup was a real-world anime convention, and Amino getting closer to that experience with the addition of features like live voice and video chat, as well as the screening room, where you can watch videos with other users.

During our conversation, Sebela opened up one of the K-Pop communities on his phone and was quickly able to listen in on a chat room where multiple users were singing along together. (Sadly, we didn’t join the singing.)

“The technology not super unique,” Anderson acknowledged. “What makes it really special is, I can voice chat with my friends on a lot of idfferent networks, but here I can hop in and join a voice chat with 10 Harry Potter fans who I may not know in my real life.”

While these features are already live, Anderson said they’ve been “downplayed” while Amino tests them out and works out the kinks. Now it’s ready to put them “front-and-center” in the app.

Amino has now raised more than $70 million in total funding.

It’s also been testing out ways to make money, which Anderson said will occur primarily through a subscription service — though apparently it’s too early for him to offer more details.


Read Full Article

Scooter startup Bird is reportedly about to hit a $2B valuation


More financing is coming in for Bird, this time potentially valuing the company at $2 billion, according to a new report by Axios.

There’s not a ton to add here compared to the last round (which happened just weeks ago), as the same dynamics are probably in play here. While Uber was a bet on car rides and generally getting around, Bird is that but at a dramatically more granular level — thinking short hops of a few miles in congested areas. Startups that are exceedingly hot can sometimes pull off these rolling rounds where investors are coming in at various points, especially as the model further proves out over time.

If you live in a major metropolitan area, you’ve probably seen Bird (and Lime) scooters hanging out on the sidewalks — potentially knocked over in a spot where someone might trip over them while checking his or her phone. That’s been a point of tension in areas like San Francisco, where Bird has had to temporarily come off the sidewalks as a permit system rolls out. Bird isn’t the first mobility-focused service that has faced regulatory challenges before, but it is one that’s become very popular very quickly.

This too, as Axios notes, could be an easy play to get into a hot market that a major ridesharing company could want to buy its way into. Uber acquired Jump, an on-demand bike service, in the midst of its own financing round. While bikes don’t seem to be getting quite the hype that scooters are, Lyft is also planning to acquire Motivate, an on-demand biking network.

Bird just weeks ago raised $150 million at a $1 billion valuation, while Lime raised an additional $250 million. Bird was valued at $300 million in a financing round earlier this year.


Read Full Article

Google Home can now handle three queries at once


In November, Google Home gained the ability to multitask with added support for a feature called “multiple queries,” which allows you to combine two requests into one voice command. For example, “OK Google, turn up the volume and play music.” Now, Google Home is getting even smarter about multitasking by enabling support three requests at once.

The new feature was announced on Google’s @madebyGoogle Twitter account on Monday, where users quickly discovered its limitations. Unfortunately for Google’s global customer base, multiple queries is only available in the English language for the time being, in the U.S., U.K., Canada and Australia.

The feature works by combining voice queries with the word “and” in between them, to separate the different requests. Each command must also be the sort of thing Google Assistant can respond to on its own without further input or clarification.

That means you can’t ask it to just “set an alarm,” you’d have to say “set an alarm for 7 AM” so it doesn’t need to ask a follow-up question.

Multiple queries was first rolled out in November 2017, also with little fanfare.

But it’s not the only way Google Home can multitask. In February, Google Assistant gained support for Routines, as well, which allow you to create custom workflows kicked off with a single voice command.

For instance, your “I’m home” routine could turn on the lights, adjust the thermostat and play some music. (Alexa also offers routines, as of last October.)

Meanwhile, at Google’s I/O developer conference in May, the company formally announced multiple queries for Google Home (then referred to as “Multiple Actions”), along with a host of other upgrades for Google Home Actions. This included Routine Suggestions, which allow voice app developers to prompt users to add their app’s Action to a Routine, plus Action Notifications, which allows voice apps to alert users to new features and content, and more.

Google is not providing an ETA on when multiple queries will roll out to non-English users, saying only that:“We look forward to supporting additional languages, but have nothing to announce at this time.” 

h/t: Voicebot


Read Full Article

Amino raises $45M for to bring fan communities to smartphones


Amino has raised a big Series C round of funding — $45 million from GV, Venrock, Union Square Ventures, Goodwater Capital and Time Warner Investments, with Hearst Ventures joining as a new investor.

Co-founder and CEO Ben Anderson has described Amino as an way to help people who have “passionate niche interests” find others who feel the same way, via smartphone apps.

The company started out with apps focused a handful of topics like K-pop, anime and Doctor Who, but it later added the ability for anyone to launch a new community in the main Amino app, and there are now more than 2.5 million communities.

Of course, some of these communities are more active than others, and there’s some overlap between them — but Max Sebela, who’s general manager for Amino’s English-language apps, said there’s less than you might think, because “each interest is actually a universe of micro interest.” For example, there might be one community focused on sharing strategy and tactics around the video game Overwatch, while another might revolve around sharing Overwatch fan art.

Ultimately, Sebela said it’s up to the founders and leaders of each community to decide what the community wants to focus on, and which product features they want to use to enable that. Meanwhile, Anderson said Amino is constantly tweaking its algorithms to make sure it’s surfacing the best communities for each user.

“Instead of one big, blue ocean, we provide a million lakes and help you find the exact right one,” he added.

Amino Voice Chats

Perhaps even more impressive than the number of communities is the amount of time the average user spends in Amino — more than 70 minutes per day.

One of the initial inspirations for the startup was a real-world anime convention, and Amino getting closer to that experience with the addition of features like live voice and video chat, as well as the screening room, where you can watch videos with other users.

During our conversation, Sebela opened up one of the K-Pop communities on his phone and was quickly able to listen in on a chat room where multiple users were singing along together. (Sadly, we didn’t join the singing.)

“The technology not super unique,” Anderson acknowledged. “What makes it really special is, I can voice chat with my friends on a lot of idfferent networks, but here I can hop in and join a voice chat with 10 Harry Potter fans who I may not know in my real life.”

While these features are already live, Anderson said they’ve been “downplayed” while Amino tests them out and works out the kinks. Now it’s ready to put them “front-and-center” in the app.

Amino has now raised more than $70 million in total funding.

It’s also been testing out ways to make money, which Anderson said will occur primarily through a subscription service — though apparently it’s too early for him to offer more details.


Read Full Article

8 Ubuntu Flavors Compared: Kubuntu vs. Lubuntu vs. Xubuntu vs. MATE vs. Budgie vs. Studio vs. Kylin

Instagram adds shopping tags directly into Stories


Instagram’s shoppable tags are about to pop up in Stories. The company first started testing the feature back in 2016 with a limited set of 20 partners. Since then it’s been a hit, expanding broadly to regular brand posts in the feed. Starting today, hitting a little shopping bag sticker in a Story will lead you to more details on the cute and/or dope thing that caught your eye and how to score it.

It’s a simple addition, but given the success of Stories it’s a potent one for brands that drive sales on the platform.

“With 300M using Instagram Stories everyday, people are increasingly finding new products from brands they love,” Instagram said in a press release.

“In a recent survey, Instagrammers said they often watch stories to stay in the-know with brands they’re interested in, get an insider view of products they like, and find out about new products that are relevant to them.”

As a longtime daily Instagram user, I used to be skeptical that people really engaged with brands like this and not just their friends or dogs they know. Now, after seeing my fiancée’s considerable #engagement around makeup brands running wildly popular accounts, Stories and all, I get it. Well, I don’t get it, but I get that some people get it and that the often vast and expertly crafted brand Stories are a logical evolution for a platform trying to get more users buying more stuff in the product categories that call to them.


Read Full Article

The Best Camera Lenses for 10 Popular Types of Photography

YugaByte’s new database software rakes in $16 million so developers can move to any cloud


Looking to expand the footprint of its toolkit giving developers a unified database software that can work for both relational and post-relational databases, YugaByte has raised $16 million in a new round of funding.

For company co-founder, Kannan Muthukkaruppan, the new database software liberates developers from the risk of lock-in with any provider of cloud compute as the leading providers at Amazon, Microsoft and Google jockey for the pole position among software developers and reduces programming complexity.

“YugaByte DB makes it possible for organizations to standardize on a single, distributed database to support a multitude of workloads requiring both SQL and NoSQL capabilities. This speeds up the development of applications while at the same time reduces operational complexity and licensing costs,” said Kannan Muthukkaruppan, co-founder and chief executive of YugaByte, in a statement. 

Muthukkaruppan and his fellow co-founders know their way around database software. Alongside Karthik Ranganathan and Mikhail Bautin, Muthukkaruppan built the NoSQL platform that powered Facebook Messenger and its internal time series monitoring system. Before that Ranganthan and Muthukkaruppan had spent time working at Oracle. And after Facebook the two men were integral to the development of Nutanix’s hybrid infrastructure.

“These are tens of petabytes of data handling tens of millions of messages a day,” says Muthukkaruppan.

Rangantahan and Muthukkaruppan left Nutanix in 2016 to begin working on YugaByte’s database software. What’s important, founders and investors stress is that YugaByte breaks any chains that would bind software developers to a single platform or provider.

While developers can move applications from one cloud provider to another, they have to maintain multiple databases across these systems so that they inter-operate.

“YugaByte’s value proposition is strong for both CIOs, who can avoid cloud vendor lock-in at the database layer, and for developers, who don’t have to re-architect existing applications because of YugaByte’s built-in native compatibility to popular NoSQL and SQL interfaces,” said Deepak Jeevankumar,  a managing director at Dell Technologies Capital

Jeevankumar’s firm co-led the latest $16 million financing for YugaByte alongside previous investor Lightspeed Venture Partners.

What attracted Lightspeed and Dell’s new investment arm was the support the company has from engineers in the trenches, like Ian Andrews, the vice president of products at Pivotal. “YugaByte is going to be interesting to any enterprise requiring an elastic data tier for their cloud-native applications,” Andrews said in a statement. “Even more so if they have a requirement to operate across multiple clouds or in a Kubernetes environment.” 

With new software infrastructure, portability is critical, since data needs to move between and among different software architectures.

The problem is that traditional databases have a hard time scaling, and new database technologies aren’t incredibly reliable when it comes to data consistency and durability. So developers have been using legacy database software from folks like Oracle and PostgreSQL for their systems of record and then new database software like Microsoft Azure’s CosmosDB, Amazon’s DynamoDB, Apache’s Cassandra (which the fellas used at Facebook), or MongoDB for distributed transactions for applications (things like linear write/read scalability, plus auto-rebalancing, sharding and failover).

With YugaByte, software developers get support for Apache Cassandra and Redis APIs, along with support for PostgreSQL, which the company touts as the best of both the relational and post-relational database worlds.

Now that the company has $16 million more in the bank, it can begin spreading the word about the benefits of its new database software, says Muthukkaruppan.

“With the additional funding we will accelerate investments in engineering, sales and customer success to scale our support for enterprises looking to bring their business-critical data to the cloud,” he said in a statement. 


Read Full Article

The Best VPN for Torrenting: ExpressVPN vs. CyberGhost vs. Mullvad


best-vpn-torrent

With hundreds of VPN providers out there, it can be difficult to know which is the right one to meet your needs.

If your primary purpose for buying a VPN (you should never use a free VPN!) is for torrenting, you’ve come to the right place. Keep reading to find out more.

How to Choose a VPN for Torrenting

If you’re looking for a VPN for torrenting, there are some specific criteria that will need to be met if you want a smooth and efficient time.

Speed and Bandwidth

Torrent files can be massive. If you’re downloading a lengthy 4K video, its file size could reach upwards of dozens of gigabytes.

Therefore, a VPN for torrenting needs two things: firstly, it needs to offer faster-than-average download speeds, and secondly, it cannot throttle your bandwidth.

Security

VPN security comes in many forms. Of course, the more secure your plan, the better. Encryption should be a standard, but people who torrent should also sign up for a plan with a kill switch and DNS leak protection.

A kill switch will protect you if you unexpectedly lose your VPN connection, while a DNS leak can reveal your identity and undermine the purpose of using a VPN in the first place.

Privacy

Ideally, you should never sign up for a VPN that logs your browsing habits. However, for torrenting, it’s especially important.

A lack of logging means the VPN provider cannot be hacked, forced, or coerced into giving up your data to media companies and government authorities.

Shared IP Addresses

Using a VPN provider with shared IP addresses adds an extra layer of anonymity to your torrenting. Because you’re sharing with hundreds of other people, it is more difficult for bits of traffic to be traced back to your specific machine.

So which VPN providers are best for torrenting?

1. ExpressVPN: The Fastest VPN for Torrenting

Our first pick is ExpressVPN. Let’s look at the service in light of the criteria we discussed above.

Firstly, speed. ExpressVPN is fast—really fast. If you live in the United States and have a 100Mbps connection speed without a VPN, you can expect to get around 85Mbps when connected to a server in North America and 60Mbps if you connect to a server in Europe.

Just as importantly, ExpressVPN does not limit, throttle, nor restrict your bandwidth usage. It is entirely unlimited. It also boasts more than 2,000 servers in 148 cities across 94 countries.

Unfortunately, the company does do some minor logging, but only to record of the amount of bandwidth you use and your timestamps—presumably to help with internal resource management. It does not log your traffic, DNS requests, or IP addresses in any way.

It’s also worth noting that the company is based in the British Virgin Islands. The country is not directly part of the Fourteen Eyes information-sharing alliance; however, it’s a British Overseas Territory, and the UK is part of that group.

ExpressVPN offers robust security and privacy features. They include 256-bit AES encryption, DNS and IPv6 leak protection, a kill switch, and split tunneling. Split tunneling is useful for torrent users: it lets you put your torrent client on the VPN network while leaving the rest of your web traffic untouched.

2. CyberGhost: A VPN With Unlimited Torrenting

CyberGhost’s biggest forte is safety and security. Firstly, CyberGhost is based in Romania, and Romania isn’t part of the Fourteen Eyes alliance. There isn’t even a tenuous link, as there might be with ExpressVPN.

The company is also entirely log-free. It does not keep records about your traffic, DNS requests, timestamps, bandwidth, or IP address. It also offers shared IP addresses for an extra layer of anonymity.

The service comes with both a kill switch and DNS leak protection.

However, it has fewer servers in fewer countries than ExpressVPN, with 1,300 servers in 40 locations as of this writing. At least the developers have shown a desire to improve this number—10 new servers were added in late 2017.

From a speed standpoint, CyberGhost promises you won’t experience less than 6Mbps (assuming your connection with your ISP is fast enough). It does claim the maximum speed attainable given “ideal conditions” is 600Mbps, but that sounds generous to us.

With CyberGhost, you have access to unlimited, unthrottled bandwidth.

3. Mullvad: The Best Torrent VPN According to Reddit

There are quite a few subreddits where you can find VPN recommendations. Two of the best are /r/VPN and /r/VPNTorrents, but you can also check out /r/Piracy.

After painstakingly reading endless posts on those subreddits, our entirely unscientific methodology has determined that Reddit’s favorite VPN for torrenting is… Mullvad! To be fair, it shouldn’t come as a surprise. Mullvad might not boast the brand recognition that some of its more well-known competitors can, but it matches them in terms of quality.

Like CyberGhost, it does not log any data, not even for troubleshooting purposes.

It is also one of the fastest VPNs. Independent testing saw it boast an average download speed of 93Mbps on its US-based servers. Its international server average is 14Mbps.

Security-wise, Mullvad uses AES-256 encryption for all your web traffic. The SSL handshake uses RSA-4096 encryption. The service also offers a kill switch and DNS leak protection.

The privacy mantra extends beyond the service itself. Mullvad is also one of the few VPN providers that accept payment in cryptocurrency. It accepts both Bitcoin and Bitcoin Cash.

The service has two downsides. Firstly, Mullvad is based in Sweden. Sweden is a Fourteen Eyes member. However, because the company does not keep any logs, the issue is somewhat mitigated.

And secondly, because the Mullvad is based in Sweden, the price is only listed in Euros. If you’re based in the US or UK, the precise amount you pay each month will change with currency exchange rate fluctuations.

And the Best Torrenting VPN Is…

For us, it’s a tossup between ExpressVPN and Mullvad. ExpressVPN has the edge thanks to its non-Fourteen Eyes jurisdiction, but Mullvad’s complete lack of logging will appeal to heavy torrent users who fear reprisals.

Mullvad also wins on cost, but non-European users might not appreciate being unable to budget a fixed amount for the service every month.

And if none of these three services appeals to you, you can always check out our broader list of high-quality paid VPNs.

Read the full article: The Best VPN for Torrenting: ExpressVPN vs. CyberGhost vs. Mullvad


Read Full Article

Yi Mini Dashcam: Yi Continues to Dominate the Budget End of Everything

How to Email Photos Directly From Adobe Lightroom


lightroom-photographers

If you shoot photographs for clients, an essential part of your workflow likely involves emailing those shots when they’re ready. This isn’t particularly difficult to do, but it can be a hassle when you’re doing it all the time.

Adobe Lightroom Classic CC allows you to email one single photo or batches of many photos directly from within the app. It also gives you handy options to choose the quality of the photos you would like to email and the email account you would like to send them from.

How to Email Photos Directly From Adobe Lightroom

You can configure an email client or multiple clients to publish or send your photos from within Lightroom. You can use the default email client or use an internet email like Gmail. Configure the email tool first from the Lightroom Classic CC Email Account Manager.

  1. Open Lightroom and go to any module except the Book module. Select the single photo or multiple photos to email.
  2. Go to File > Email Photo. Alternatively, use the shortcut Command + Shift + M (Mac) and Control + Shift + M (Windows).
    Lightroom Email Photos
  3. The email creation dialog box is displayed. Click the From popup menu and choose Go To Email Account Manager.
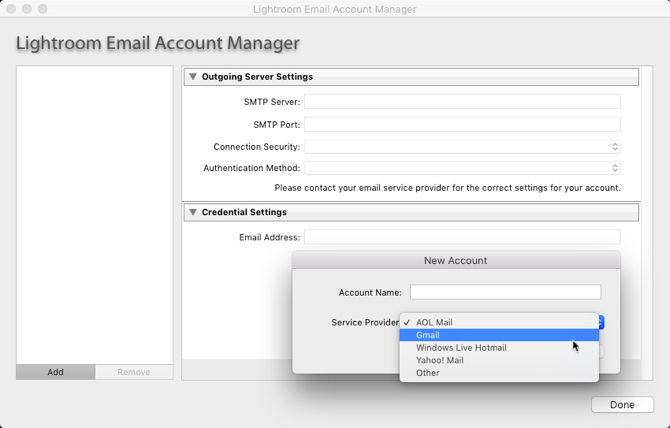
    Lightroom Email Account Manager
  4. The Lightroom Classic CC Email Account Manager window appears. Start configuring your email account with the fields provided for outgoing server settings.
    Configure Email in Lightroom
  5. Click Validate to let Lightroom Classic CC connect with the outgoing mail server.
  6. To add another email account, click on the Add button on the bottom right of the box. Follow the same steps as above to set up the account.
  7. With the email accounts set up, all you have to do now is add the address of the recipient or recipients and add the other information as you would for a regular email.
  8. Choose the Preset for the quality of the photos you want to send. Lightroom converts the photos to the appropriate JPEG quality before sending them.
  9. Click Send.
  10. Lightroom opens the selected email client and lets you add a message along with the attached photos. If you choose an online email service like Gmail, the photos are directly shared as embeds with the email.

Email remains a quick and common way to share a bunch of photos, and Adobe Lightroom Classic CC makes it easier. Remember, there are many more Lightroom shortcuts that can improve your workflow!

Read the full article: How to Email Photos Directly From Adobe Lightroom


Read Full Article

4 Ways to Remove and Disable Link Previews in Slack


slack-integrations

If you’re sharing several links in one message in Slack, it can get pretty cluttered and messy. Slack gives you several ways to remove those links and make it easier to follow what’s happening in your channels.

Method 1: Manually Remove Link Previews

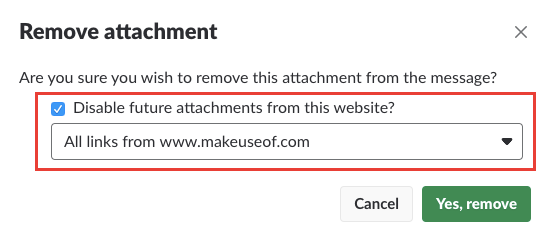
Manually removing link previews after you’ve posted your message is an easy task. Just click the grey X in the corner of the preview. A popup message will appear asking you to confirm if you’re sure you want to remove the link attachment. Click Yes Remove.

Method 2: Disable Link Previews for Certain Domains

If you’re an administrator of a Slack group, you can turn link previews for certain domains. You can only do this after a link has already been shared.

Go to the link shared in Slack and click the grey X in the corner of the preview, and in the popup message, check Disable future attachments from this website? And from the dropdown menu, select All links from [domain name].

Method 3: Disable All Link Previews Globally

If you want to declutter Slack just for yourself, you can turn off link previews globally in Slack with a setting. Go to Preferences > Messages & Media and scroll down to Inline Media & Links. Make sure that Show images and files from linked websites and Show text previews of linked websites are both turned off.

Method 4: Remove Link Previews With Formatting

You can also use text formatting to remove link previews. When pasting the link in use block quotes. When pasting the link into your Slack message, place it on a separate line and precede it with a single arrow bracket (>). It would look like this when you type it:

> http://makeuseof.com

And it would look like this once posted:

There are plenty of other ways you can get more out of Slack. The team communication platform gives you a ton of ways not only to customize your Slack experience, but to make it work with all your favorite services.

Read the full article: 4 Ways to Remove and Disable Link Previews in Slack


Read Full Article
Vietnam’s new cyber security law draws concern for restricting free speech


Big tech firms including Google, Facebook and Twitter have expressed major concern after Vietnam’s government passed a law that promises to introduce tighter restrictions on free speech online.

The new regulation passed this week strengthens the government’s position on censoring the internet, drawing Amnesty International to decry that it leaves “no safe place for people to speak freely” in Vietnam. Asia Internet Coalition (AIC) — a group that represents Facebook, Google, Twitter, LinkedIn, Line and others — furthered cautioned that it would harm the development of the country’s digital economy.

Among the broad points, the new cyber security law forbids internet users from organizing with, or training, others for anti-state purposes, spreading false information, and undermining the nation state’s achievements or solidarity, according to reports.

“This decision has potentially devastating consequences for freedom of expression in Vietnam. In the country’s deeply repressive climate, the online space was a relative refuge where people could go to share ideas and opinions with less fear of censure by the authorities,” Amnesty International added in a statement.

Internet censorship isn’t new to Vietnam, but the law increases the state’s potential to act. Concern is already high following a string of arrests over the past year which has seen bloggers jailed for discussing environmental issues, politics and more online.

Beyond limiting free speech, the cyber law also applies pressure to foreign internet companies who will now be required to operate a local office and store user information on Vietnamese soil. Currently, in the case of Google and Facebook, data on Vietnam-based users is stored overseas in locations such as Singapore and Hong Kong.

Google and Facebook both declined to comment, but they are part of the AIC which did make a statement condemning the new law.

“The provisions for data localization, controls on content that affect free speech, and local office requirements will undoubtedly hinder the nation’s fourth Industrial Revolution ambitions to achieve GDP and job growth,” AIC wrote in a statement.

“Unfortunately, these provisions will result in severe limitations on Vietnam’s digital economy, dampening the foreign investment climate and hurting opportunities for local businesses and SMEs to flourish inside and beyond Vietnam,” the organization added.

The people of Vietnam have also voiced their discontent at the new law. Bloomberg reports that demonstrations took place on Sunday ahead of the voting.


Read Full Article

How to Mention (@) Other Users in the New Gmail


Gmail New Design & Features

In 2018, Google finally rolled out its redesigned Gmail app. Aside from the greatly improved on-screen visuals, the redesign also introduced several new features into the ubiquitous email service.

We’ve already looked at how to use the new nudge feature, so now it’s time to look at how to mention (@) other users. You’re probably already familiar with the concept of using the @ symbol to mention someone—it’s a feature that’s available in many other services, including Twitter, WhatsApp, and Telegram. Now here’s how to use it in Gmail.

How to Mention (@) Other Users in Gmail

First, you need to make sure you’ve upgraded to the new version of Gmail. If you’re still running the old interface, the mention feature will not be available. To upgrade to the latest version, go to Gear > Try new Gmail. Don’t worry, it’s possible to switch back to the classic version if you don’t like the new one.

Ready? Now follow the step-by-step instructions below to enable the mention feature in Gmail:

  1. Open the Gmail app in a browser.
  2. Start to compose a new email.
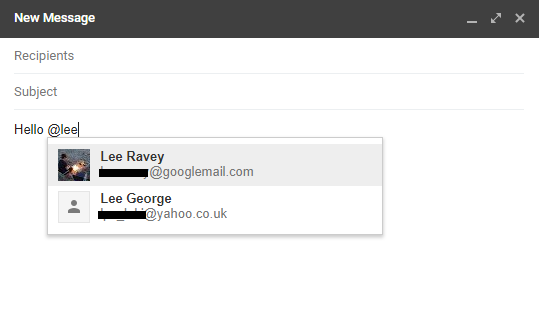
  3. While writing your message, type @ followed by the first few letters of a person’s name.
  4. A list of anyone who matches your search query will pop up.
  5. Select the name of the person you want to mention.
  6. Their email address will be added to the list of recipients and the person will become part of the email thread.

Note: Unlike the new nudge functionality, there is no way to turn off the mention feature.

And remember, to remove someone from a thread after mentioning them, you will need to remove them from the CC field of the address box, otherwise the person will be permanently privy to all future correspondence.

Nudge and mentions are just two of the latest Gmail features, there are plenty more you should try out.

Read the full article: How to Mention (@) Other Users in the New Gmail


Read Full Article

Build your own L3-37 droid complete with voice interaction


Robot maker Patrick Stefanski has created a 3D-printed – and animated – model of L3-37, the droid in the recent Solo movie. L3-37 is one of the funnest – and woks – droids in recent memory and this recreation is fun and ingenious.

Stefanski used Alexa voice controls to let the robot head respond to voice commands and he set the wake word to “Hey L3” to which the robot responds with a grumpy “What!”

The version you see above is painted and weathered but you can 3D print your own pristine version from here and then add in a Raspberry Pi and Arduino with a simple servo to control the head motion. In all it looks like a lot of fun and the hardest part will be printing all of the larger head parts necessary to recreate L3’s saucer-like dome.

It could make for a nice weekend project and looks to be surprisingly simple to build. Just don’t be surprised L3 rallies your DVR and air conditioner to revolt against attacks on droid rights.


Read Full Article

3 Ways the Windows Services Menu Is Actually Useful


The Services utility in Windows is a place power users know about, but not many others use. It collects the various background processes running on your computer, but it’s different from the Processes tab of the Task Manager.

In the Services menu, you’ll find everything from important Windows processes (like the print spooler and time service) to those from third-parties. You can access it by typing services.msc into the Start Menu.

Here are three quick operations you should know how to do in the Services menu.

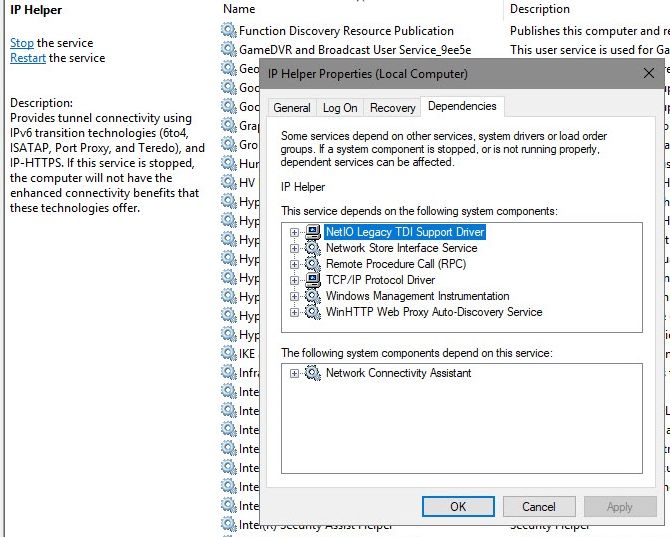
1. Check Service Dependencies

Windows-Service-Dependencies

Many Windows services depend on another to work properly. If you see service-related errors, it’s helpful to see what services the one in question depends on for troubleshooting.

To find this information, select a service from the list. Right-click it and choose Properties. On the resulting window, click the Dependencies tab.

You’ll see both a list of services that this service depends on, as well as services that depend on the one you’re currently viewing. You can follow this chain to see where the problem lies.

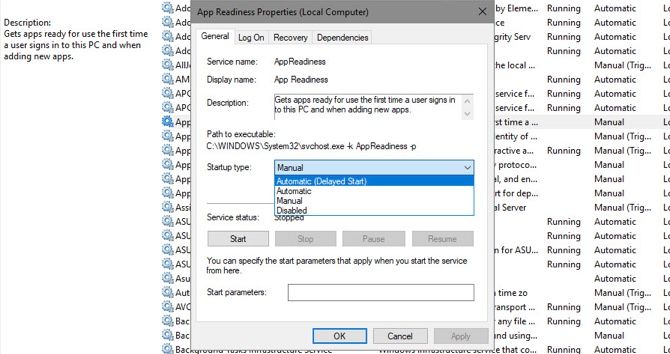
2. Set Services to Delayed Start

Windows Service Delayed Start

Windows does a fine job at managing services on its own most of the time. You shouldn’t disable or set services to manually run unless you know what you’re doing. What you can do, though, is set services to delayed start. This has them run at startup, but waits a bit so they don’t slow down your boot.

To change this, open the Properties window for the service in question, and look for the Startup type dropdown on the General tab. Set it to Automatic (Delayed Start if needed.

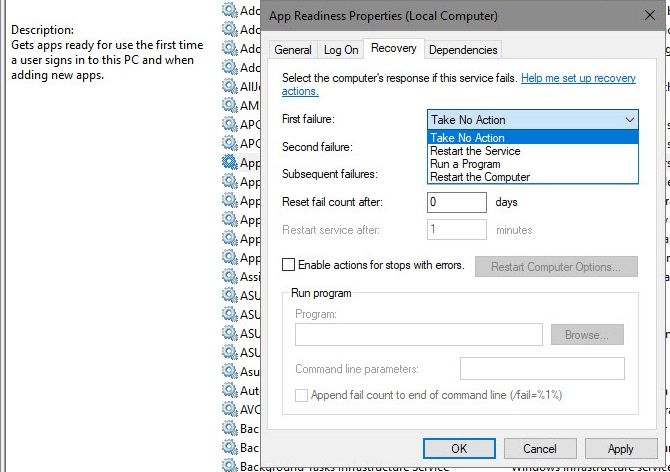
3. Set Services to Automatically Start After Failing

Windows-Services-Recovery

Windows has an option that will attempt to restart a service if it fails. This is better than manually having to restart a service if you’re having issues with it.

Enter the Recovery tab on a service’s Properties window to find this. You’ll find dropdown options for First failure, Second failure, and Subsequent failures. Choose the Restart the Service option to try it again automatically.

Note that you should rarely need to dive into the Services menu. If you have an issue, you should try basic Windows troubleshooting before diving this deep. There’s no need to disable services when you can simply uninstall the programs that created them.

Read the full article: 3 Ways the Windows Services Menu Is Actually Useful


Read Full Article