Tensions between the U.S. and Huawei show no sign of easing. Last week, the electronics giant announced that it has filed a lawsuit against the government, over an “unconstitutional” ban on its products. Meanwhile, earlier this week, the U.S. threatened German intelligence over the country’s use of Huawei 5G products.
The company has understandably been prepping for a further downtown in relations by building its own in-house alternative to Android. The backup was noted by Huawei mobile head Richard Yu, following a year of rumors around the mobile OS.
“We have prepared our own operating system, if it turns out we can no longer use [Android], we will be ready and have our plan B,” the exec said.
Huawei began building the software in earnest after a U.S. ban on ZTE. The use of software and hardware from U.S. companies like Google and Qualcomm in Chinese smartphones has led to increasing tariffs on both sides.
In addition to concerns over ties to the Chinese government, Huawei has also been hit over its alleged skirting of Iranian tariffs. That landed the company’s CFO Meng Wanzhou in a Canadian jail.Of course, all of this hasn’t slowed Huawei’s global growth. The company saw a 50 percent jump in revenue in spite of mounting concerns.
We’ve reached out to Huawei for further confirmation.
Valve doesn’t want to miss the cloud gaming bandwagon. As PC Gamer spotted, The company quietly released a beta version of Steam Link Anywhere. As the name suggests, it lets you turn your gaming PC into a cloud gaming server and stream games from… anywhere.
The company’s strategy is a bit puzzling here as Valve recently discontinued its hardware set-top box, the Steam Link. While Valve might be done on the hardware side, the company is still iterating on Steam Link apps.
You can now download the Steam Link app on an Android phone, an Android TV device or a Raspberry Pi. Unfortunately, Valve still hasn’t found a way to release its Steam Link app on the App Store for iOS devices and the Apple TV. You can start Steam on your computer and play demanding PC games on other screens.
Steam Link works fine on a local network, especially if you use Ethernet cables between all your devices. With Steam Link Anywhere, your performance will vary depending on your home internet connection. If you don’t have a fiber connection at home, the latency might simply be too high to play any game.
Now let’s see if Valve plans to flip the switch and let you run Steam games on a server in a data center near you. That would turn Steam Link Anywhere into a Shadow competitor.
Microsoft recently showed off Forza Horizon 4 running on an Android phone thanks to Project xCloud. Google has also been teasing its Game Developers Conference to learn more about its gaming projects. It’s clear that everybody wants to turn 2019 into the year of cloud gaming.
The Daily Crunch is TechCrunch’s roundup of our biggest and most important stories. If you’d like to get this delivered to your inbox every day at around 9am Pacific, you can subscribe here.
In a message sent to his Telegram channel, founder Pavel Durov wrote, “I see 3 million new users signed up for Telegram within the last 24 hours.” Durov doesn’t offer an explicit explanation for Telegram’s sudden spike in signups, but he does take a thinly veiled swipe at social networking giant Facebook.
It’s probably not a coincidence that Facebook and its related family of apps went down for most of Wednesday.
Using both manual reviews and machine learning, Google said that in 2018 it removed 2.3 billion “bad ads” that violated its policies — which at their most general forbid ads that mislead or exploit vulnerable people.
Uber is in negotiations with investors, including the SoftBank Vision Fund, to secure an investment as large as $1 billion for its autonomous vehicles unit. The deal would value the business at between $5 billion and $10 billion, according to a report from The Wall Street Journal.
The Opportunity Mars Rover may be officially offline for good, but its legacy of science and imagery is ongoing — and NASA just shared the last (nearly) complete panorama the robot sent back before it was blanketed in dust.
At the moment, Polarr is probably best known for its photography app for iOS and Android, which utilizes machine learning and AI to improve image editing. The company says it has around four million monthly active users.
When Mark Zuckerberg said in a lengthy blog post that Facebook would not build data centers in countries with poor human rights, he chose to ignore Singapore — known for a lack of privacy and freedom of expression.
Apple’s annual developer conference is returning to San Jose for the third year in a row, at the McEnery Convention Center. This year, WWDC will take place on June 3-7. As always, you should expect a keynote on the first day of the event with consumer-focused announcements. This year marks the 30th year anniversary of WWDC.
You can now register on Apple’s website for $1,599 — the same price as in previous years. But buying a ticket doesn’t necessarily mean that you’ll get to attend the event. Apple will hold a lottery to select the lucky winners who get to pay to go to a developer conference.
You have until March 20 at 5 p.m. to register. Developers will receive a notification on the next day if they’ve been selected. And if you’re a student, you should consider applying for a WWDC scholarship. This year, 350 students will be able to attend the event for free through this process.
In addition to some new announcements on the first day, Apple will hold many technical sessions and hands-on labs to help third-party developers in the Apple ecosystem at large. This conference is mostly aimed at developers working on apps for iOS, macOS, tvOS and watchOS. It’s a good way to understand how new frameworks are going to affect your apps and how you could take advantage of them.
Windows File Explorer claims the file you’re trying to delete is open in another program or the system? When you can’t open, edit, or delete a file, it’s either still running in the background or didn’t close properly.
Fortunately, you can force close, rename, move, or delete a file that is in use. Here’s how!
How to Overcome the “File in Use” Error
If you want to skip the manual solutions, scroll down to the section where we list tools that can help you unlock and delete a file in use.
1. Close the Program
Let’s start with the obvious. Did you just open the file and not close it? If the file is closed, but the program is still running, close it too, then try again.
2. Reboot your computer
While rebooting is inconvenient, it requires zero skills or fiddling with stuff like the Task Manager or third party tools. Rebooting also clears your RAM and possibly fixes other nuisances in one go. So try this if you can’t be bothered to look into the cause.
If you have already tried rebooting and it didn’t help, skip to the next option.
3. End the Application via the Task Manager
The reason rebooting helps is because the system will start from scratch and—among other things—all processes currently running in the Task Manager will be closed. Instead of rebooting, you can also try to manually end the process or application that holds your file hostage. This is the most successful method to fix the “file is open in another program” error.
Click Ctrl + Shift + ESC to open the Task Manager. Alternatively, you can right-click the Taskbar or click Ctrl + Alt + Del anywhere in Windows and select Task Manager. If you see the compact Windows 1o version, click More details and make sure you’re in the Processes tab. Now browse for the application that you used to open the “file in use”. For example, if you were viewing a document, look for Word.
Once you find the process, select it and click End task in the bottom right. This will close all instances of the program. If you cannot seem to find the process, have you tried rebooting, yet?
4. Change File Explorer Process Settings
By default, File Explorer launches all its windows in a single process (explorer.exe). It could be, however, that your settings force File Explorer to launch separate processes, which could cause a conflict between different processes.
Press Windows + E to open File Explorer. Go to View > Options > Change folder and search options.
In the Folder Options window, switch to the View tab and find the Launch folder windows in a separate process option. Make sure it’s not checked. Click Apply to save any changes.
If the option was unchecked in the first place, you could try if checking it solves your issue.
5. Disable the File Explorer Preview Pane
Previews in the File Explorer can cause conflicts like the “file is open in another program” error.
Press Windows + E, switch to the View tab, and press Alt + P to close the preview pane. The screenshot below shows an open preview pane on the right.
After closing the preview pane, try the operation again and see whether the “file in use” error has disappeared.
6. Force Delete the File in Use via the Command Prompt
You can bypass the File Explorer and force delete the file using the command prompt.
First, we need to track down the file path directory in File Explorer. Press Windows + E to open file explorer, locate the affected file, and copy the file path.
Now press Windows + S, search for Command Prompt, right-click the respective result, and select Run as administrator. To navigate to the file directory of your file in use, enter cd [directory path you copied] and hit Enter.
Before we can proceed and force delete the file in use, we have to temporarily kill the File Explorer process. This will cause your Taskbar, wallpaper, and open folders to disappear. But don’t worry, you can restart File Explorer and we’ll show you how below.
To close File Explorer, press Ctrl + Shift + ESC, find Windows Explorer, right-click the process, and select End task.
Return to the Command Prompt. If you lost the window, press Alt + Tab to jump to it.
Enter this command to delete the file, replacing everything between the quotes with your actual file name: del "File in Use.doc"
To restart the File Manager, open the Task Manager (Ctrl + Shift + ESC), click File > Run new task, enter explorer.exe, and click OK. This should restore your desktop to its usual appearance.
Unlock the File in Use With a Tool
Sometimes, the file in use remains locked, even though it shouldn’t be. If trying to delete it through the Command Prompt didn’t work or if that task is too daunting, use one of these tools.
Process Explorer is a more powerful File Explorer. It doesn’t just list all running processes, it can also show you which process took your file hostage. Simply open the Process Explorer Search via Find > Find Handle or DLL (or press Ctrl + F), enter the file name, and wait for the list of processes accessing your file.
You can’t close the process from the search window, but you can use Process Explorer or Windows Task Manager to close the offending application.
Unlocker used to add itself to the Windows context menu, meaning you could right-click the file in use and unlock it via the context menu.
In Windows 10, launch Unlocker, browse for the file, select the file, and click OK. Unlocker will look and (if found) remove locking handles. Even if it does not find a handle, you can use Unlocker to Delete, Rename, or Move the file.
Should the file still be in use, you can let Unlocker perform the action upon your next reboot.
LockHunter will add itself to the Windows context menu. Once installed, just right-click the locked file and select What is locking this file? This should bring up a window showing all processes using the file. You can now select to Unlock, Delete (at next system restart), or Unlock & Rename the file. In our case, we couldn’t unlock the file, but deleting it at the next system restart did work.
Another third-party tool, FilExile, failed to delete our file in use, even though it reported success. However, if your file path is too long, you might still want to give this tool a try.
File Still in Use? Boot Into Safe Mode
If the above didn’t work or if you’re not interested in installing software, there is one last thing you can try: boot into Windows Safe Mode. The file you’re trying to delete may automatically be loaded by another application. Unlockers should still work if that’s the case, but if malware is involved or if you don’t want to deal with third-party tools, this is an alternative route you can take.
In Windows 10, press Windows + I, navigate to Update & Security > Recovery and under Advanced startup select Restart now. From the next screen, select Troubleshoot > Advanced Options > Startup Settings > Restart. When your computer reboots, you’ll see the Startup Settings screen, from where you can choose Safe Mode.
Once you’re in Safe Mode, navigate to the file in question and try your luck once more.
More Windows File Explorer Tricks to Know About
We showed you a few ways to unlock a file open in another program or in use by the system. Hopefully, one of them worked. Two methods involved the Windows File Explorer.
Whenever I think of a KVM switch, my mind turns to those archaic hardware A-B switches that allow you to hook up a parallel printer to two computers. In the days before high-speed internet, seamless Wi-Fi, and USB hubs, a physical KVM switch was a handy tool.
A KVM switch isn’t quite that archaic. It’s short for “keyboard, video, and mouse,” and they’re still handy even with all the mod-cons at our disposal.
Times are changing, however. You no longer need a dedicated KVM switch for your multi-system setup. Here are three software you can use instead!
What Does a KVM Switch Do?
A KVM switch is a hardware switch that allows you to control multiple computers from one keyboard, video display (monitor), and mouse. Essentially, you can control two computers with a single mouse and keyboard, all through your regular monitor. A KVM switch can save you a fortune in hardware costs if you have more than one computer at home.
KVM switches are not just physical hardware. There are several handy virtual KVM applications that let you share your mouse and keyboard across computers. Better still, they’re easy to set up!
3 Software KVMs to Replace a Physical Switch
Critical to the success of a virtual KVM is ease of use. The following programs represent the easiest way to share your mouse and keyboard without requiring a physical KVM switch.
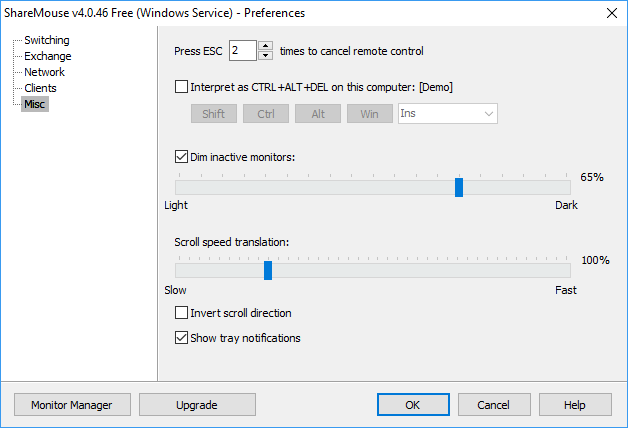
ShareMouse is the easiest of the three programs to set up and run. Once installed, it shows up in the taskbar as an arrow icon. Hover over the icon to see how many other PCs on your local network are set up with ShareMouse and ready to use. ShareMouse instantly detects my laptop and desktop.
ShareMouse has some cool features. One I particularly like is the ability to dim the monitor you are not using. It is an excellent reminder for the screen your mouse is currently lurking on, but also helps preserve precious laptop battery life if you’re not charging.
Another excellent feature is the file drag and drop and shared clipboard between your computers. ShareMouse definitely makes it easy to share files without using a USB flash drive or otherwise.
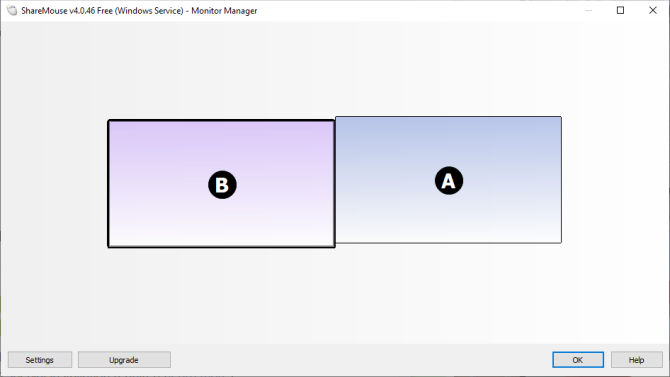
You can use the Monitor Manager to tell ShareMouse where your monitors are in relation to one another. The Monitor Manager is simple to use; just drag and drop your monitors into their correct position. ShareMouse displays the monitor letter on each screen as you move them, so you know which is which.
The free version of ShareMouse does come with a few limitations. For instance, you can only use two computers, and those computers must only have one screen each. You cannot use the free version in a server environment.
LiteManager is a little different to other KVM options on this list. LiteManager is more akin to a VNC viewer but shares many of the same mouse and keyboard sharing characteristics you want in a KVM. (Here are 7 more screen sharing and remote viewing tools for you to check out.)
The key difference is that instead of sliding your mouse to one side of your monitor to take control of your second screen, LiteManager displays the second system on the screen you are working on. In that, LiteManager is a better match for multi-system setups that involve computers in separate rooms (although it is perfectly fine for a side-by-side configuration, too).
Once you download LiteManager, you must install either the Viewer (client) or Server software depending on which computer you’re using. For instance, I use my desktop primarily, so this is my Server. My laptop is the Viewer.
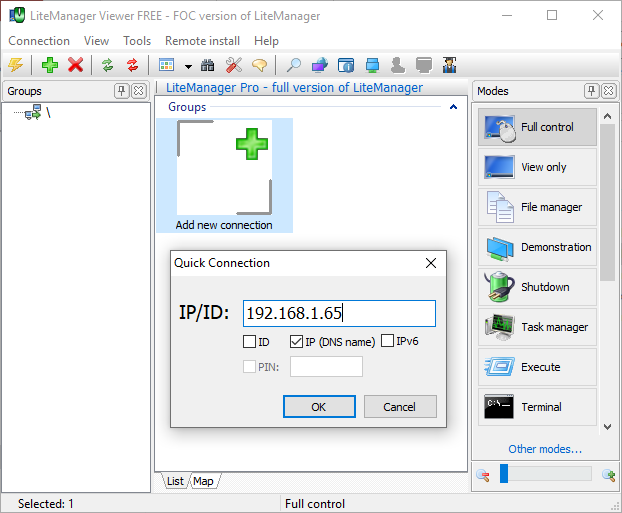
Once the server installation completes, select the OpenLiteManager Free Server Now option. A new icon will appear in your system tray. If you roll your mouse over it, the LiteManager server icon will give you a list of IP addresses you can use to connect the viewer (on your other computer) to the server.
Copy one of the local IP addresses down and head to your second computer where you installed the Viewer. Open the Viewer, then select Add new connection. Paste the local IP address and any passwords, and you’re good to go. You can access your new remote connection by double-clicking the screen in the Online section.
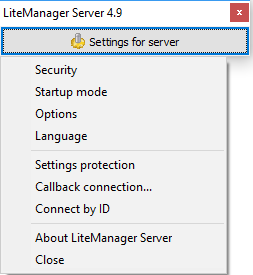
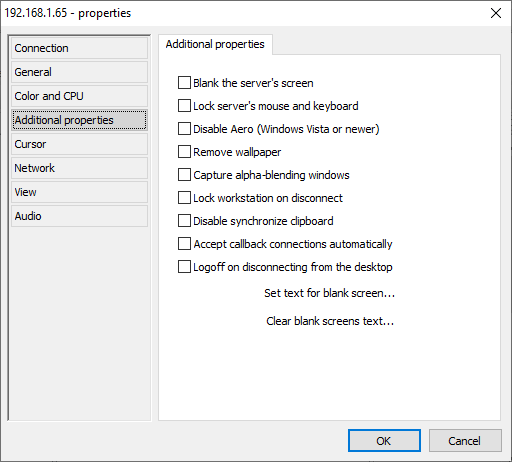
LiteManager Free comes with a vast range of tools for managing your remote connection. For instance, you can lock the server’s mouse and keyboard, remove the server wallpaper, disable the synchronized clipboard, and more.
You can also change a number of security settings, such as the level of encryption for the connection, the password difficulty, IP filtering with white or blacklists, and the denial of certain connection types.
LiteManager Free is available for several different operating systems, extending the functionality of the tool and your productivity!
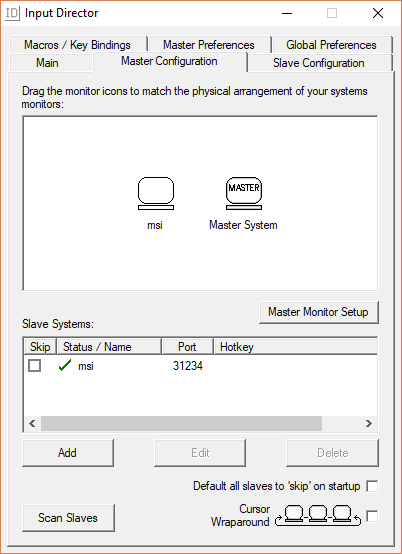
Input Director is the final virtual KVM program for you to consider. Input Director uses on installation to give you the option of being a Master (server) or Slave (client). You run the Master on your primary system, then install the Slave on as many additional systems as you like. In that, Input Director allows you to build an extensive network of Master/Slave systems all using a single keyboard and mouse.
Configuring the placement of your screens isn’t quite as pretty as ShareMouse, but it does the trick. You can add Slaves using their network IP address, or the hostname provided in each Input Director window. Setting up your network across all the systems you want to control is a piece of cake.
Input Director has some cool features, too. If you enable the Cursor Wraparound feature, you can take your cursor off the edge of any screen on to another (rather than in parallel). Another handy feature is the cursor ripple effect. When you near the edge of the screen, the cursor gains a water ripple effect, letting you know you’re approaching the transition zone.
If you have more than one system in use, a KVM switch is an effective way to boost your productivity. Using a single keyboard and mouse to control multiple systems will save you both time and money. And who doesn’t want that?
Video editing is no longer the exclusive domain of powerful PCs and expensive software. There are plenty of free or affordable video editing apps that will do the job for most people. In this article, we list the best video editing apps available across multiple platforms.
The Best Paid Video Editing Apps on Desktop
Let’s begin by looking at some of the best video editors for Windows and macOS.
Adobe Premiere Pro is aimed at professional users, and its features are numerous.
The app offers an unlimited number of video tracks, multicam editing, 3D editing, a resolution of up to 10240 × 8192, 32-bits per channel color, audio sample-level editing, and more.
Adobe Premiere Pro is so good that it has been used to edit Hollywood movies. Films such as Deadpool, Monsters, and Gone Girl were all edited using the app.
Adobe Premiere Pro costs $20.99/month. If you don’t need the full feature list, you can buy the consumer-grade Adobe Premiere Elements for $99.99.
Final Cut Pro is the best video editing app for macOS. The app is developed by Apple, so it integrates seamlessly with the Mac operating system.
The app is supremely easy to use. Some of its best features include grouping tools, 360-degree VR editing, multicam editing, effect options, and an audio editing suite.
Like Adobe Premiere Pro, Final Cut Pro has been used to edit several Hollywood movies, including X-Men Origins: Wolverine, The Simpsons Movie, Napoleon Dynamite, and The Social Network.
Corel VideoStudio Ultimate is slightly more consumer-focused than the two options we’ve looked at so far. That means an easier-to-use interface and a lower price point ($99).
The app offers more than 2,000 effects, filters, and transitions, six-cam multi-camera editing, color grading, morph transitions, split-screen video templates, color correction, stop motion animation, a subtitle editor, and a 360-degree video editor.
The slightly less equipped VideoStudio Pro video editor is $10 cheaper. It only offers four-cam editing, and there’s no 3D title editor, video mask creator, or MXF (XAVC) import.
The Best Free Video Editing Apps on Desktop
If you want good video editing apps, you don’t necessarily need to pay anything. There are several free video editors available for desktop.
If you want a free video editor for Windows, Mac, or Linux, Lightworks is a great place to start.
The app’s features include timeline editing, trimming, an audio and video effects library, a low-resolution proxy workflow for when you’re editing 4K, and professional sequence grading.
DaVinci Resolve is a premium video editing suite, but the app has a free tier that’s worth checking out.
The free version includes editing tools, visual effects, motion graphics, color correction, and audio post-production tools. The pro plan—which costs $299—adds multi-user collaboration features, support for 4K videos, and frame rates of up to 120 FPS.
VSDC Free Video Editor is a non-linear video editor, which differentiates it from the other desktop video editors in this list.
Features include visual and audio effects, blending modes, Instagram-like filters, masking, 4K and HD exporting, a YouTube uploader, a video stabilization tool, and a video file converter.
The Best Video Editing Apps on Android and iOS
Now let’s look at some video editing apps for Android and iOS.
FilmoraGo is probably the best video editing app for Android. It functions in the same way as many of the best video editors for Windows and Mac; you work with a timeline, and trim, cut, render, add themes, and add audio as required.
There’s also a bevy of special effects and support for reverse videos, slow-motion videos, in-video text, and overlays.
Because it’s a mobile app, FilmoraGo also has additional features that will appeal to smartphone users, such as support for 1:1 Instagram videos and instant social media sharing.
FilmoraGo is available for free if you’re willing to accept a watermark at the end of your video. If not, you’ll need to pay $59.99 for a lifetime license.
KineMaster is a mobile app for on-the-go professionals. There’s a free version, but unlike FilmoraGo, it is very feature-limited. To unlock the app’s full potential, you need to upgrade to the pro version. It costs $4/month and is overkill for casual users.
If you are a professional, however, KineMaster Pro video editor for Android and iOS is worth considering.
Impressively for a smartphone app, KineMaster supports chroma key (which is used in green screen video), along with audio filters, multiple video, image, and effect layers, and instant previews.
Adobe Premiere Clip is the smartphone version of the previously discussed Adobe Premiere Pro.
Naturally, the app does not have the same number of features as its desktop-based big brother. However, given that it’s entirely free to use (you just need to create a free Adobe ID to log in), it’s a great way to use Adobe’s products without paying a cent.
Some of Adobe Premiere Clip’s most notable features include timeline editing, audio options, filters, speed adjustments, and the ability to auto-generate videos images and videos that are already on your device.
If you have an Adobe Creative Cloud account, you can sync projects between all your devices for a smoother editing experience.
We’ll end with a less serious option. After all, not everyone who wants to edit a video needs to be able to produce a Spielberg-esque masterpiece.
So, if you want a fun video editing app for Android and iOS, check out the appropriately named Funimate.
The app is ideally suited for creating short, engaging social media video posts for sharing with your friends and followers. There are more than 15 filters, 100 advanced video effects, and a massive music library.
You can use the app to add emojis and other stickers to your videos, and you can even create your own effects in the app.
Which Is the Best Video Editing App?
So, there you have it. This is a list of the best video editing apps. However, as is often the case with these types of roundups, it’s hard to definitively call one app the best. It will vary based on your level of experience and what you want to achieve.
Professional users should probably turn to Adobe Premiere Pro or Final Cut Pro, depending on their operating system. If you’re a casual user who’s willing to spend some money, grab Corel. If you want a free app, choose Lightworks.
Pro mobile users might appreciate KineMaster the most, and anyone who wants a bit of light-hearted fun should grab Funimate.
The Windows 10 error code 0x8000ffff relates to Windows Update. The error code is known to affect the functionality of the Microsoft Store, too. After you update Windows 10 and head back to the Microsoft Store, the 0x8000ffff error indicates something is broken, somewhere.
The 0x8000ffff isn’t so critical that it paralyzes your computer, and there are a few methods to fix the error. Let’s take a look and troubleshoot the problem.
1. Use the Windows Store Apps Troubleshooter
Did you know that Windows 10 has a bunch of built-in troubleshooters? It is an extensive list of troubleshooters. One of the options is for the Microsoft Store.
To run the troubleshooter:
Press Windows Key + I.
Type Troubleshoot in the search bar.
Scroll down the long list until you find Windows Store Apps, then select Run the troubleshooter.
Follow the on-screen instructions to alleviate your Microsoft Store 0x8000ffff error.
2. Clear the Microsoft Store Cache
Another quick fix for 0x8000ffff errors is to clear the Microsoft Store cache.
Press Windows Key + R to open Run
Type wsreset.exeand click OK.
A blank Command Prompt window will open for about ten seconds. After which the Store will open itself.
If that didn’t work, press Windows Key + R again. Enter this:
If there’s a Cache folder already, rename it Cache.old. Then, whether it existed before or not, create a new folder called Cache. Finally, run the Troubleshooter as outlined above and it should detect and resolve the problem.
3. Reconfigure or Reinstall the Microsoft Store
You can reconfigure the Microsoft Store in an attempt to remove your 0x8000ffff error. To reconfigure the Microsoft Store:
Type Powershell into your Start menu search bar, then right-click the best match and select Run as Administrator.
Sometimes the reconfigure option isn’t enough to clear the 0x8000ffff error. In that case, you can try a full Microsoft Store reinstallation. It doesn’t take long!
Type powershell into your Start menu search bar, then right-click the best match and select Run as Administrator.
CHKDSK is a Windows system tool that verifies the file system and with certain settings, fixes issues as it runs. You run CHKDSK from the Command Prompt, and it has a bunch of nifty features.
Type command prompt in your Start menu search bar, then right-click the best match and select Run as administrator. (Alternatively, press Windows key + X, then select Command Prompt (Admin) from the menu.)
Next, type chkdsk /r and press Enter. The command will scan your system for errors and fix any issues along the way.
If that doesn’t work, you can run the Windows System File Check (SFC). System File Check is another Windows system tool that checks for missing and corrupt Windows system files. Sounds like CHKDSK, right? Well, SFC checks for Windows system files specifically, while CHKDSK scans your entire drive for errors.
But before running the SFC command, it is best to double-check that it is completely functional.
DISM stands for Deployment Image Servicing and Management. DISM is an integrated Windows utility with a vast range of functions. In this case, the DISM Restorehealth command ensures that our next fix will work properly. Work through the following steps.
Type Command Prompt (Admin)in the Start menu search bar, then right-click and select Run as administrator to open an elevated Command Prompt.
Type the following command and press Enter: DISM /online /cleanup-image /restorehealth
Wait for the command to complete. The process can take up to 20 minutes depending on your system health. The process seems stuck at certain times, but wait for it to complete.
When the process completes, type sfc /scannow and press Enter.
5. Delete Software Distribution Folder
Deleting your Software Distribution folder can jolt your Windows Update back into life, and remove your 0X8000ffff error along with it.
However, before continuing with this fix, please be aware that removing the contents of your Software Distribution folder does come with some side effects. Most notably, deleting the folder removes your Windows Update history and the next time you attempt to update your system, the process could take a few minutes longer.
Type command in your Start menu search bar, then right-click the best match and select Run as Administrator. An elevated Command Prompt will appear.
Enter net stop wuauserv
Enter net stop bits
Open a Windows Explorer window. Copy and paste C:\Windows\SoftwareDistribution into the address bar.
Open the Software Distribution folder. Press CTRL + A to select all files, then Delete.
If you are unable to delete all of the files, reboot your computer, and run through the process again. Once you remove the files, reboot your system.
6. Check Your Cryptographic Service
The Windows Cryptographic Service has close ties to Windows Update and the Microsoft Store. If the Cryptographic Service isn’t working or is switched off, Windows will not update and throws up a bunch of errors. The 0x8000ffff error is one of them.
Type services in your Start menu search bar and select the best match.
Browse to Cryptographic Services.
Make sure that the service is set to start automatically.
If the Cryptographic Service is turned off, select Start.
7. Repair a Network Problem
Some users report the 0x8000ffff error stemming from a network issue. You can use the Windows 10 integrated network repair troubleshooter to fix this, too.
To run the troubleshooter:
Press Windows Key + I.
Type troubleshootnetwork in the search bar.
Scroll down and select Network troubleshooter, then follow the on-screen instructions.
If that doesn’t work, try changing your DNS settings. Switching to an alternative DNS can sometimes resolve network-related issues.
Type network in your Start menu search bar and select the best match.
Select Change adapter options.
Right-click your active connection and select Properties, then internet Protocol Version 4, then Properties.
Select Use the following DNS server addresses, and enter 1.1.1.1 and 8.8.8.8. Press OK.
1.1.1.1 is a privacy-focused DNS, while 8.8.8.8 is the Google Public DNS.
8. Reset Windows 10 (Last Resort)
Okay, still tearing your hair out? Sometimes nothing other than a Windows 10 Reset will fix your problem. Windows 10 Reset replaces your system files with a completely fresh set of files and theoretically clears lingering issues relating to the Memory Management error while keeping the majority of your important files intact.
Head to Settings > Update and Security > Recovery, then under Reset this PC select Get started.
Your system restarts as soon as you hit the button, so make sure you to back up any critical files beforehand. Your system will restart, then you may select Keep my files or Remove everything.
Error Code 0x8000FFFF Solved!
One of these or a combination of the seven fixes should remove your 0x8000ffff error and let you back in the Microsoft Store. I hope you don’t have to reach for the eighth option, Reset Windows 10. That said, it is handy as an absolute last resort.
A password manager is a piece of software that remembers passwords, so you don’t have to. By remembering a single master password, all of your other passwords are stored securely for retrieval as and when you need them.
Everyone should attempt to store their passwords securely. Along with two-factor authentication, it’s one of the best practices for locking down your precious online accounts. But which password manager is right for you?
Today we’ll try to answer that question.
Best Free Password Managers
Want to keep your accounts secure but can’t afford to cough up for a paid solution? Sometimes security doesn’t cost a penny.
KeePass is a lightweight open-source password manager. The official KeePass client is designed for Windows (with a portable version available). However, there are countless alternative projects that allow you to use KeePass on just about every platform.
The KeePass client stores your credentials in a database file. This encrypted file is protected by a master password or keyfile. KeePass is a bare-bones solution to credential management, and it lacks many of the fancy features found in proprietary subscription apps.
There’s no in-built sync between the version of KeePass you run on your desktop computer and your smartphone. If you want access to the same database on another device, you’ll have to share it manually using cloud storage solutions like Dropbox or Google Drive. This is easy enough to do, but it’s a somewhat manual process that isn’t for everyone.
KeePass can store your various passwords within folders or categories, with fields for information such as usernames, passwords, and additional notes. Some clients include secure password generators, the ability to export the contents of your database to other formats, AutoType support for filling in web forms, and plugins.
Bitwarden is another open-source password manager, but one that also offers a premium option. Unlike the “try before you buy” premium services listed below, Bitwarden doesn’t impose limits or restrictions on free accounts.
The service is an online affair. Register for a Bitwarden account then download the client for your platform of choice. Syncing is handled by the server, and you can host your own version of Bitwarden’s cloud service if you want. There’s no need to share database files via third-party cloud services, as is the case with KeePass.
There’s excellent support for a wide range of platforms, including clients for Windows, Mac and Linux. There are also browser plugins for Chrome, Firefox, Safari, and Edge among others to provide access to relevant passwords where required. If you get stuck and need a password, you can login to Bitwarden’s web vault and access your credentials from there.
Another advantage over KeePass is the ability to store four different types of sensitive information: login credentials, debit or credit card information, identity documents, and secure notes. You can further organize these entries by folder, add favorites, or search the database.
LastPass is now free to use on any device, anywhere. Previously LastPass only offered their free service for a single device, which meant you had to subscribe if you wanted to sync passwords between devices. This is no longer the case, since you can use LastPass to store all of your passwords and have them sync to any device, free of charge.
There still exists a premium service for $2 per month which provides 1GB of encrypted file storage, customer support, and biometric authentication. LastPass Free also includes adverts in the vault, which the premium $36/year package removes. For a free solution that handles all of the technical details for you, it’s a steal.
LastPass allows you to store both website login credentials and secure notes within your account. Notes can have a more specific label applied such as software license, social security number, or Wi-Fi password. It’s also possible to add “form fills” to LastPass to add information to web forms for identification, shipping, payment, and other circumstances.
With such a great free option, you’d be justified in wondering why you’d ever give any money to LastPass.
The answer might be in features like emergency access (for enabling others to have access to your accounts in exceptional circumstances), one-to-many sharing for sharing credentials with multiple other users, and advanced multi-factor authentication for added security.
One of the longest-running password managers, 1Password switched from a steep one-off fee to a modest subscription model a few years ago. You can now try 1Password free for 30-days, after which you will be charged the equivalent of $2.99 per month annually, or $4.99 for a family package of up to five members.
1Password has excellent native apps for Windows, Mac, Linux, iOS, Android, and Chrome OS. The level of polish outshines freebies like KeePass, with labels for various services, multiple vaults per account, and the ability to view an entry’s old passwords. Syncing between different instances of 1Password is handled automatically using the company’s own servers.
Password organization is pretty straightforward, with categories used to separate a wide range of different entries. Store logins, payment details, documents, bank account credentials, secure notes and more. Use the 1Password extension for Chrome, Firefox, Opera, and Safari to gain access to your password repository while browsing the web.
1Password isn’t open-source, but the company maintains transparency in many of its processes. Anything stored in your 1Password database is encrypted using your master password and a secret key before being uploaded to the company’s servers. This means even if the servers are breached, the data is still safe.
Dashlane is a premium password manager with a decent free option. You can store up to 50 passwords on a single device for free. If you want to sync your passwords with other devices (like a smartphone) then you’ll have to sign up for the equivalent of a $3.33 monthly charge, billed annually.
For your money you’ll get an unlimited amount of password storage, complete with automatic syncing. Simply login to the Dashlane apps and all of your credentials will be there. The app can store and generate passwords, and autofill your information on both desktop and mobile.
Dark Web Monitoring scans the dark web for any leaked or stolen personal data that may pertain to you. In case of anything being found Dashlane will notify you with a plan of action. In this regard, Dashlane feels more like a personal security suite than a simple password manager, and it’s not badly priced either.
Surprised to learn that iOS and macOS come with an in-built password manager? It’s convenient, free to use, and comes with its own benefits and drawbacks that potential users should know about.
iCloud Keychain
If you use Apple hardware exclusively, iCloud Keychain could be the solution for you. You can enable the feature by turning on Keychain under iCloud preferences on iOS and macOS.
Once you’ve done so, Safari will offer to store passwords for you as you enter them. If you register for any new accounts, Keychain will offer to generate secure passwords and store them immediately.
iCloud Keychain works in both Safari and at a system level on macOS and iOS. Many iOS apps are able to query Keychain for credentials, filling in passwords and logins once you’ve been authenticated with Face ID and Touch ID.
If you need access to your master list of passwords you can do so under Settings > Safari > Passwords. (Safari > Preferences > Passwords on macOS.) Since the service uses iCloud, all of your credentials are stored and synced securely, across your Apple devices. There is no iCloud Keychain app for Windows or other platforms.
Don’t forget: iOS apps also exist for both the premium and free solutions listed in this article. Check out our recommendations for the best iPhone password managers.
Best Password Manager for Android Users
Like Apple’s iCloud Keychain, Google also has a proprietary service that allows Android and ChromeOS users to store
Google Smart Lock
Smart Lock is Google’s equivalent to iCloud Keychain. The service works on Android smartphones, ChromeOS, and in the Chrome desktop browser. If you can use the Chrome browser, you can use Google Smart Lock to save and sync your credentials.
The service is enabled by default in that Android, ChromeOS, and Chrome will offer to save and store your passwords. When you use another instance of Chrome, your passwords will be automatically available to you.
You can view your master list of passwords by clicking on your profile and selecting Passwords in the Chrome browser. Like Apple’s solution, Google Smart Lock is purely for login credentials—you cannot store other sensitive information (like notes or software keys) in Smart Lock.
Don’t forget: Android apps also exist for both the premium and free solutions listed in this article. Check out our recommendations for the best Android password managers.
Other Ways to Secure Your Accounts
Two-factor authentication (2FA) should be enabled on your accounts wherever possible. This uses something you know (your password) and something you have (usually your smartphone) to prove your identity, but even 2FA is susceptible to attacks.
Instead of using SMS or 2FA apps (like Authenticator) to generate codes, the most secure way of using 2FA is with a universal second-factor key. Most of us still use 2FA though, and that’s fine because 2FA is still better than a simple username and password combination.
Kodi is a powerful app; its wide range of features will meet most of your home entertainment needs. You can use Kodi to watch live TV, listen to the radio, and even keep up with the news and weather. Kodi’s most used feature, however, its ability to stream movies and TV shows.
If you want to know how to watch movies on Kodi, keep reading. We’re going to explain how to add, organize, and watch your locally saved movies, then introduce you to a few (legal!) movie streaming add-ons. We’ll end with a brief note explaining how to use a VPN with Kodi.
How to Watch Your Movies on Kodi
If you have bought lots of movies online or you’ve ripped DVDs onto your hard drive, you probably have a fairly significant number of locally saved films.
Kodi is one of the best ways to view and manage your local movie library. The functionality is a native part of the app.
How to Add Movies to Kodi
To add your existing movies to Kodi, you need to create a new video source. Let’s walk through the process.
To begin, open the Kodi app and select Movies in the menu on the left-hand side of the home screen. On the next window, choose Add videos. The Add Video Source window will open.
Next, we need to tell Kodi where to find your videos. Click on Browse and navigate to the folder where you keep your digital movie collection. In Enter a name for this media source, type Movies or something similar.
On the final window, you need to set up some further options about the content. Click on This directory contains and choose Movies from the dropdown list.
The Information provider will automatically default to The Movie Database. You can change to local metadata or add an alternative provider if you wish.
If you want to change any further settings—such as trailers, ratings provider, or preferred language—click on the Settings button. At the bottom of the window, you can set up library exclusions and scan options.
When you’re ready, click OK to begin the import process. Depending on the size of your library and your internet speed, it could take quite a while for Kodi to scan the files and download the appropriate metadata.
Eventually, you will see all the videos in your movie library listed on the Kodi home screen. To watch a movie, click on the thumbnail. To see the full library, along with plotlines and other metadata, select Movies in the left-hand menu. From this view, you can click on a movie’s title to begin playback.
Trakt
At this stage, we also recommend that you install the Trakt add-on. The service is like LastFM, but for films and TV shows.
It will monitor the movies you’re watching across lots of Kodi add-ons, keeping track of where you’re up to in series and suggesting other films for you to check out.
The Trakt add-on is free to download and use. You can find it on Trakt’s official website.
If you want to watch free movies on Kodi via streaming services, there are a few add-ons worth checking out.
Note: Several illegal add-ons provide movie streaming on Kodi. Using the add-ons could land you in trouble with your country’s authorities.
1. PopcornFlix
Don’t be fooled by the name; PopcornFlix is a legal Kodi movie add-on that is available in the official Kodi repo.
You’re not going to find the latest theatre blockbusters, but there are hundreds of old classics, plenty of modern stuff, and even some original content. Currently-available titles include Beverly Hills Cop III, Saturday Night Fever, Sophie’s Choice, and Terms of Endearment.
Comet is an American television network that specializes in science fiction movies. Some airtime is also given to associated genres such as supernatural, horror, adventure, and fantasy.
The over-the-air network is available to 72 percent of the U.S. population, but you can use the network’s official Kodi app to access all the content no matter where you are.
Sci-fi lovers can enjoy movies such as Godzilla, The Amityville Horror, Gattaca, and Labyrinth.
Crackle—which is owned by Sony—is a firm favorite among cord cutters. The add-on has existed for several years and available on all the major cord-cutting platforms, including Roku and Android TV.
The company has partnerships with several leading networks and studios, including 20th Century Fox, Paramount Pictures, Miramax, Disney, Lions Gate Entertainment, Metro-Goldwyn-Mayer, and many more.
The large number of partners means the movies on Crackle are both varied and numerous. The films are divided into six primary genres: action, comedy, crime, drama, horror, and sci-fi. Current titles include Captain America, Cars 2, Thor, Iron Man 2, Finding Nemo, Monsters Inc., and Pirates of the Caribbean.
You can also watch movies on Kodi using subscription streaming apps like Netflix, Amazon Prime Video, and Hulu.
Unfortunately, none of the big movie streaming providers offer official Kodi add-ons. However, as long as you’re happy to access services’ libraries via third-party apps, there are several options available.
Don’t Forget to Use a VPN With Kodi
If you’re using Kodi to watch movies online, you should always use a VPN. It’s the best way to ensure your viewing habits are not being tracked by the add-ons and services you’re using. The exact way to use a VPN with Kodi varies depending on which device you’re using, and explaining each approach is beyond the scope of this article.