12 November 2018

Chappy, the Bumble-backed dating app for gay men, inks partnership with GLAAD


Chappy, the dating app for gay men, has today announced a partnership with GLAAD. As part of the partnership, Chappy will make a donation to GLAAD for each conversation initiated on the dating app, from now throughout 2019.

The company won’t disclose the amount of the donation, but said that it hopes to raise “hundreds of thousands of dollars.”

Chappy launched in 2017 to give gay men an authentic, discrimination-free way to connect with one another. The app uses a sliding scale to let users indicate what they’re looking for in a relationship, ranging from ‘Cute’ to ‘Sexy.’ The app has more than 650,000 registered users, and has seen more than 1 billion swipes.

Chappy is backed by Bumble and controlled by Bumble shareholders, falling under the Badoo umbrella of dating apps. Last month, Bumble named Chappy its official dating app for gay men. As part of that relationship, Bumble and Chappy will be cross-promoting each other’s apps.

Adam Cohen-Aslatei, Managing Director at Chappy, says that the donations to GLAAD will be unrestricted, and can be used by GLAAD however they see fit. Cohen-Aslatei also hopes to contribute to GLAAD’s research projects, and said that he sees the opportunity for the Chappy community to provide data-based insights to that research.

Cohen-Aslatei joins the Chappy team from Jun Group, where he was Vice President of Marketing. He was appointed to the position last month.

“There are a lot of dating apps out there and a lot of gimmicks out there,” said Cohen-Aslatei. “We’re trying to improve the way the gay community meets each other and thinks about relationships, but also the way they think about their commitment to the community. We’re a relationship and advocacy app, and we want to partner with the right organizations to drive awareness to what we are.”


Read Full Article

Sony filed a patent for a touchscreen-equipped PlayStation controller


According to a patent application continuation filed in 2017 and published recently, Sony may have tentative plans to build out a touchscreen-equipped PlayStation controller.

Whether the value added from having a touchscreen right on the controller will be worth the added cost is not yet clear.

Right now, PlayStation controllers have a touch-enabled center button that allows users to navigate through menus and other activities with a touch-based interface. The center button also lets gamers access more information, such as game stats, when clicked.

This patent application also leaves us wondering what type of content might be displayed on the touchscreen. As you can imagine, controller content could include in-game information that is usually shown on a heads-up display on the main screen.

However, it’s far more likely that a touchscreen-equipped PlayStation controller would offer a new interface for console-based information and actions, such as sharing a video broadcast or dealing with incoming invites and friend requests.

Interestingly, Nintendo’s own experiment with a touchscreen-enabled controller failed miserably. Remember the Wii U? Nintendo eventually corrected the mistake with the launch of the Switch, which has found its place among casual gamers as a sort of hybrid console and sold more than 20 million units since launch.

Of course, Sony’s touchscreen controller is nothing more than a patent application for now, so there’s a solid chance that the same controllers we’ve grown to know and love ship alongside the next-gen PlayStation with no update to be seen. But just in case someone at Sony decides to get inventive, the patent is in place for the company to start thinking about touchscreen controllers.

Reports suggest that the next-generation Sony console could arrive as early as 2019 or as late as 2021.

[via DualShockers]


Read Full Article

The Essential Ebook Converter Guide


ebook-converter-guide

When it comes to ebooks there are more than a dozen common file types. And each of these has different strengths and is compatible with different ereaders. Which is why you might find yourself in need of an ebook converter.

In this article, we’ll explain everything there is to know about converting ebooks.

The Best Ebook Converters

You can divide ebook converters into two categories—web-based apps and standalone desktop apps.

Desktop Apps

The best free desktop app for converting ebooks is Calibre.

If you’re an avid ebook reader, you probably already have Calibre installed on your computer. Ebook conversion is just a small part of the app’s feature list; its main strength is as an ebook management tool. You can edit metadata, add artwork, and automatically send books to your devices.

Calibre’s ebook converter supports a long list of ebook formats. You can add EPUB, AZW, MOBI, LRF, ODT, PDF, CBZ, CBR, CBC, CHM, FB2, HTML, LIT, PRC, PDB, PML, RB, RTF, SNB, TCR, and TXT as inputs and receive EPUB, MOBI, AZW4, AZW, PDB, FB2, OEB, LIT, LRF, PML, RB, PDF, SNB, and TXT as outputs.

Another free option is Any Ebook Converter. It supports EPUB, MOBI, AZW, PDF, and TXT files and allows you to edit a book’s metadata. Interestingly, the tool will also remove the DRM from any ebook automatically. Calibre can remove DRM from ebooks, but doing so requires a setup process.

The only other free option worth mentioning is Auto Kindle eBook Converter. It’s available on Windows. It can convert PDF, LIT, and HTML files into the Kindle-compatible MOBI format.

Sadly, most other recommendable desktop apps require payment. If you don’t want to use Calibre or Any Ebook Converter, it’s better to look to web apps instead.

Web Apps

There’s no shortage of free-to-use websites that can convert ebooks, some of which are better than others.

Luckily for you, we’ve sifted through the wheat from the chaff on your behalf. We looked at the best online ebook converters for every format and found these five to be the best:

EPUB vs. MOBI vs. AZW vs. PDF

With so many ebook formats in use, how do you even decide which ebook format is right for your needs?

The four ebook formats that you’re most likely to see in the wild are EPUB, MOBI, AZW, and PDF.

EPUB is the most common. It’s an open standard, free-to-use, vendor-free format. Because it’s open standard, vendors can use it to add DRM to their books, though it’s relatively easy to remove.

MOBI is a fork of the old OEB format; it was created by Mobipocket in 2001. Amazon bought the company in 2005 and continued MOBI development until 2016. Unlike EPUB books, MOBI cannot support sound or video.

AZW (along with AZW3) is a proprietary Amazon format. It’s based on the MOBI format. Any ebooks you buy on Amazon will be delivered in the AZW format. Kindles can read it, but popular ereaders from other manufacturers cannot.

Lastly, some books appear in the PDF format. Most ereaders can open PDFs, but you’ll encounter layout issues semi-frequently.

Other ebook file types that you could come across include CBR and CBZ (used for comics, manga, and other graphic novels), RTF (widely-supported and with improvements over TXT), Apple’s IBA, and PDF-esque DJVU.

If you would like to learn more we have covered all of the most common ebook formats in more detail.

Which Ebook Formats Does a Kindle Support?

The original Kindle is now more than 10 years old. Since it hit the shelves, Amazon has sold more than 100 million units, making it comfortably the most popular ereader on the market.

However, if you’re the type of person who has amassed hundreds of books from lots of different sources, Kindles aren’t necessarily ideal. They have fewer supported file types than their competitors.

The glaring issue is a lack of support for EPUB files. EPUBs are the reading world’s equivalent of MP3 files—widely-used and widely-supported. There’s also a lack of support for CBR and CBZ, DJVU, and FB2.

Indeed, Kindles only support AZW, AZW3, DOC, HTML, MOBI, PDF, and TXT files.

So, if you own a Kindle and have books in the EPUB format, you will need to convert them.

How to Convert EPUB to MOBI

Calibre and Any Ebook Converter both allow you to convert EPUB files into Amazon’s proprietary AZW and AZW3 formats.

However, we recommend converting them into MOBI. Kindles and other mainstream ereaders can read the MOBI format, whereas most non-Kindle devices cannot read AZW ebooks. Therefore, to save you from more effort further down the line if you ever move away from Kindles, it makes sense to convert them into the most widely-supported standards.

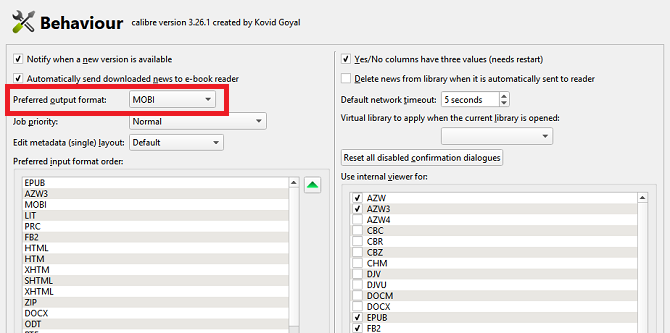
Setting up Calibre to automatically convert freshly-added ebooks into the MOBI format is a two-step process. Firstly, go to Preferences > Interface > Behavior and set the Preferred Output Format to MOBI from the drop-down menu.

calibre output selection

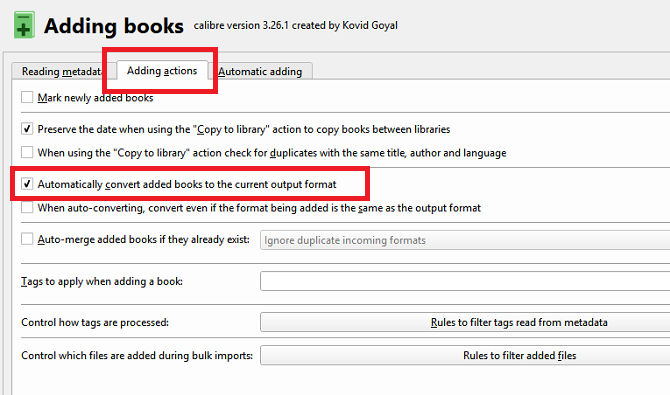
Next, return to the Preferences menu and navigate to Import/Export > Adding Books. At the top of the window, click on the Adding Actions tab, then mark the checkbox next to Automatically convert added books to the current output format. Click on Apply to save your changes.

calibre convert ebooks automatically

To convert your existing library books, open Calibre and select the books you want to convert. To begin the process, click on the Convert Books icon at the top of the window and choose either Convert Individually or Bulk Convert, depending on your needs.

convert single ebook calibre

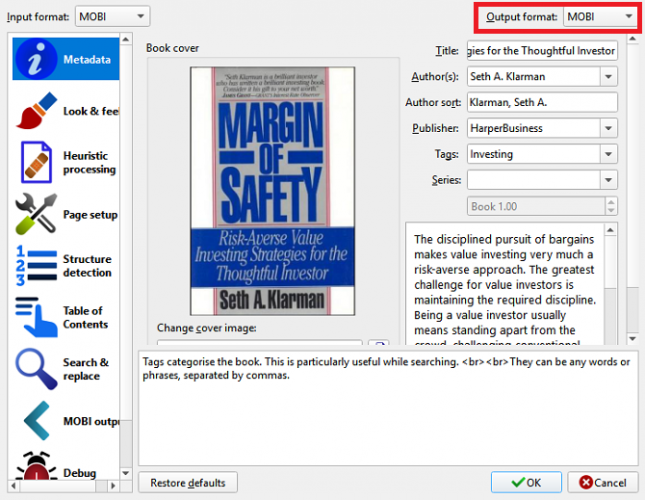
Select MOBI using the drop-down menu in the upper right-hand corner of the new window, then click on OK. The conversion process will take place in the background.

Check out our article on how to use Calibre to convert ebooks if you’ve got more questions.

Convert EPUB to PDF Using a Web App

Sometimes, you might want to convert an EPUB file into a PDF file; PDFs are often easier to work with on a computer.

For single, on-the-fly conversions, it makes more sense to use a web app.

online-convert epub to pdf

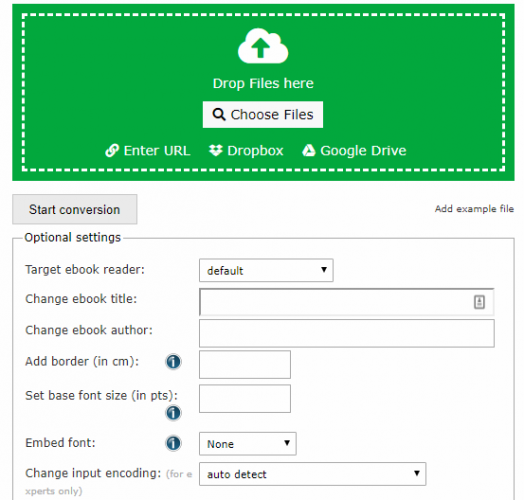
If you use Online-Convert, select Convert to PDF from the drop-down menu under Ebook Converter and click Go. Click Choose Files to upload your EPUB file. You’ll get the chance to edit the book’s name, layout options, and other metadata. When you’re ready, click on Start Conversion.

Other Ebook Conversions

It doesn’t matter whether you want to convert PDFs to EPUBs, convert MOBIs to AZWs, or convert any other combination of ebooks, the processes are broadly the same as the ones outlined above.

And remember, if you’re short of ebooks to convert, there are lots of sites full of free ebooks.

Read the full article: The Essential Ebook Converter Guide


Read Full Article

The 7 Best Tablets for Reading Digital Books

5 Raspberry Pi Digital Signage Projects You Should Try

6 Tips for Managing Privacy and Security Settings in iOS 12

5 Microsoft Word Settings You Should Definitely Customize


ms-word-customize

When you first open Microsoft Word, you can start creating documents immediately. The application offers many built-in features and default settings to help you produce the exact type of the document, whether a professional report for business or a paper for school.

You see helpful tabs, buttons, and toolbars. And behind the scenes, Word takes care of spelling, grammar, other corrections for you. Most people just start typing and don’t think about these tools. But you can improve your experience with the application by just taking a few minutes to adjust these settings.

1. The Spelling, Grammar, and Proofing Settings

Changing the way that Word handles your spelling and grammar is a great first start to customize the application to fit your needs. These types of settings come in handy for making sure you aren’t misspelling words or using incorrect grammar. But they can also be distracting in some cases.

For instance, you may work for a company that uses all uppercase letters in the name or has a name that’s a word and number combination. You can adjust the settings for these types of situations so that you don’t continually see error indicators when creating your documents.

Open Word on your Windows computer to any document. Select File from the menu, click Options, and then pick Proofing. You will see all your options for correcting spelling and grammar. Some apply to all Microsoft Office programs you have, while others apply just to Word.
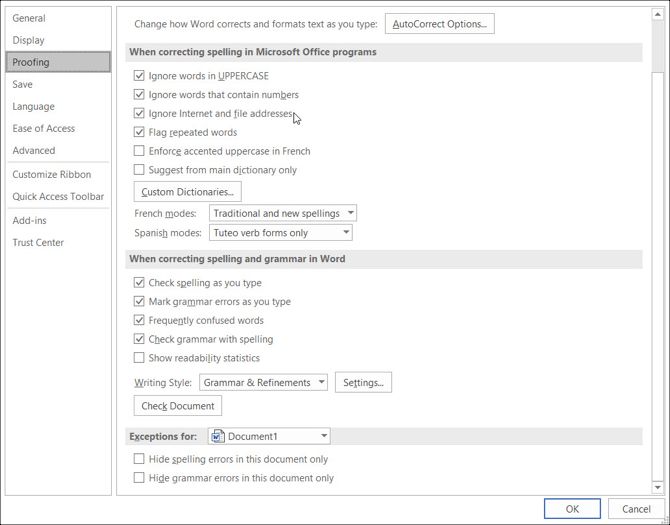
Proofing Settings Windows

Open Word on your Mac with any document. Select Word from the menu bar, pick Preferencs, and then click Spelling & Grammar. You will see a slew of settings listed under both Spelling and Grammar.
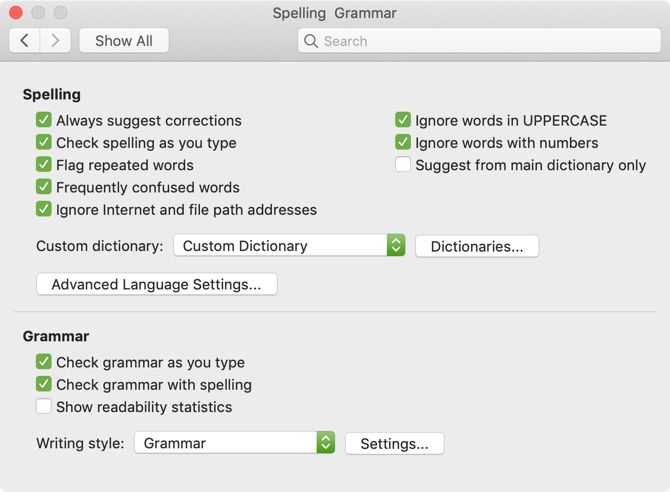
Spelling Grammar Settings Mac

Using our above example for the company name, you can mark the checkboxes to ignore words in uppercase and ignore words with numbers, on both platforms. You can also enable or disable settings for checking spelling or grammar as you type, flagging repeated words, and ignoring internet and file path addresses.

Take your time to read through each setting for those you really want to use and those you prefer not to use.

Also, if you click the Settings button, you can enable or disable many additional grammar settings such as capitalization, comma usage, slang, and redundancy. This is also a helpful area to review the settings which are right for you.

In Windows, the button is in the When correcting spelling and grammar in Word section and on Mac, it’s under Grammar.
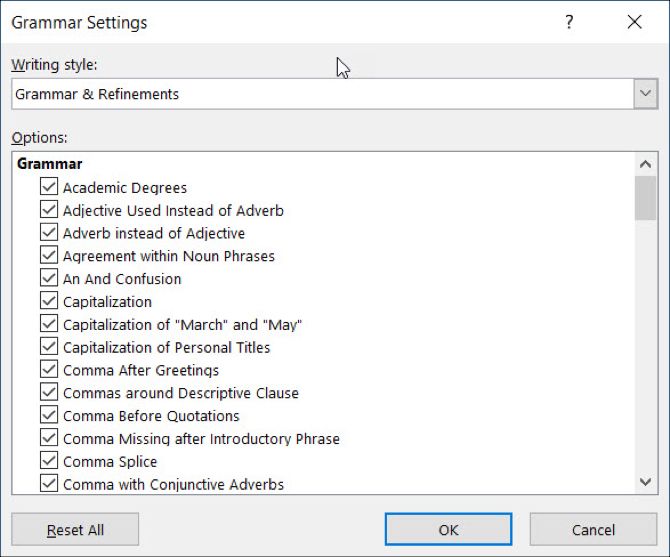
Grammar Settings Windows

2. The AutoCorrect Settings

Like the spelling and grammar options, the AutoCorrect feature is there to help you avoid errors in your documents. But as we’ve seen many times, AutoCorrect isn’t always that correct when it comes to what we really try to say.

If your company name happens to begin with two capital letters, it will be automatically corrected to just the first letter as a capital by default. This, like our other examples with your company name, can get distracting and even aggravating when creating documents.

On the other hand, you may want specific things corrected for you. For instance, capitalizing the names of days of the week and the first letters of sentences is convenient. Here’s how to adjust those settings in both Windows and Mac.

In Word on Windows, select File from the menu, click Options, and then pick Proofing. Click the AutoCorrect button at the top of the window.
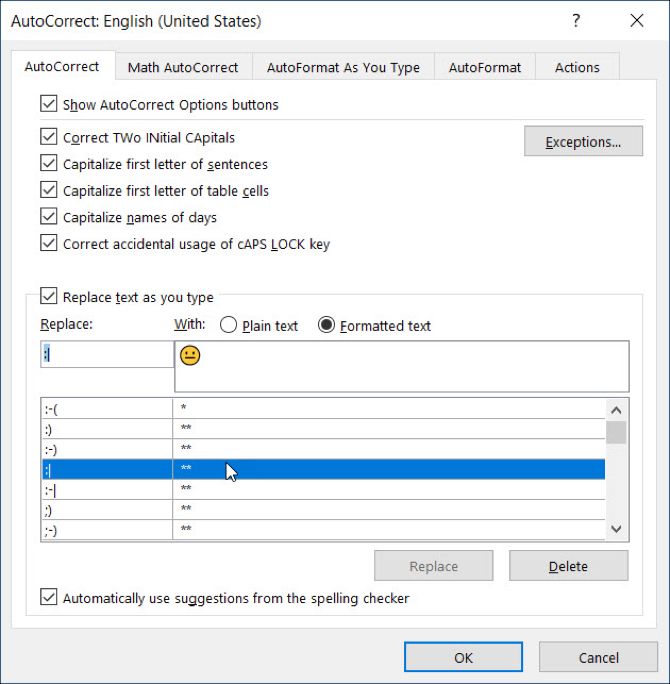
AutoCorrect Windows

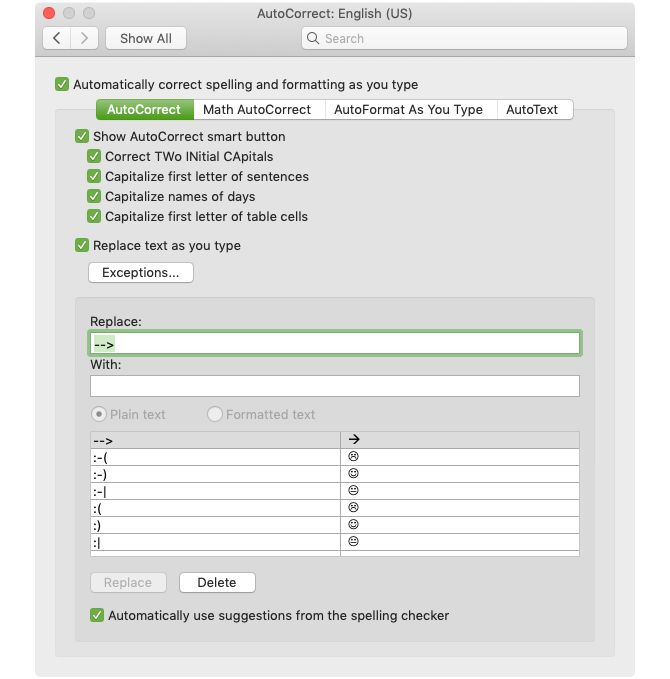
In Word on Mac, select Word from the menu bar, pick Preferences, and then choose AutoCorrect.
AutoCorrect Settings Mac

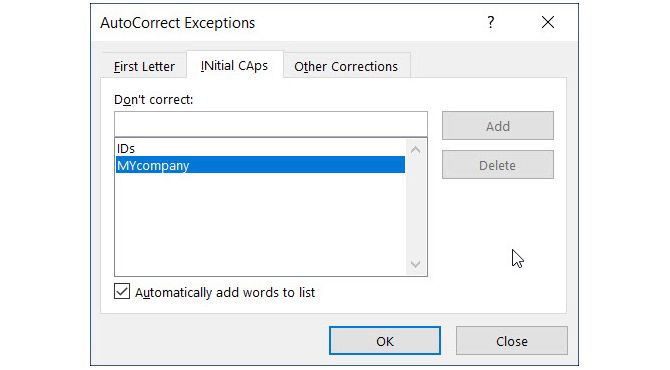
In the pop-up window, you can enable or disable the above types of AutoCorrect options with the click of a checkbox. You can also create exceptions to the rules you have in place by clicking the Exceptions button. This is the perfect place to set up that company name with two capital letters because Word will ignore that as an error moving forward.

Click Exceptions and then the Initial Caps tab. Enter the word that you want Microsoft Word to ignore that contains two capital letters at the beginning. You can also review the First Letter tab for built-in exceptions to the rules and add more in the Other Corrections tab. Click OK when you finish.
AutoCorrect Exceptions Windows

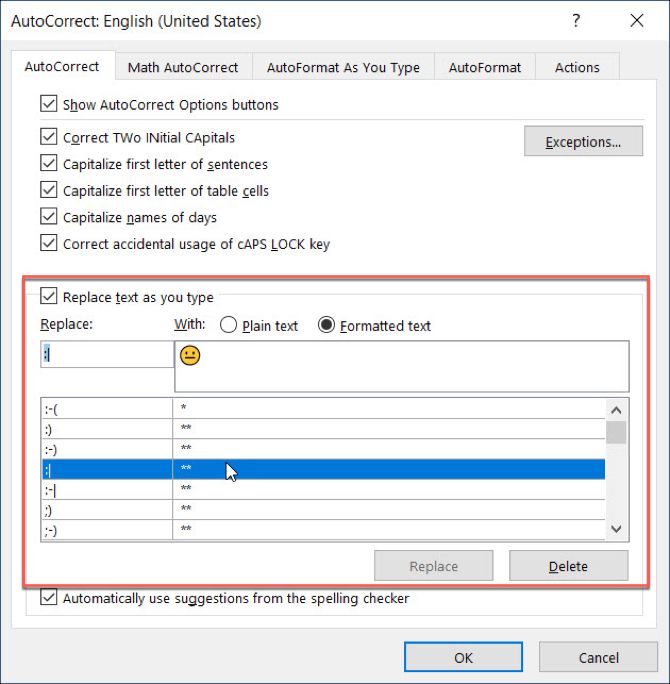
Back on the main AutoCorrect screen, the bottom of the window lets you review existing replacements and add your own. Things like special characters, emojis, and commonly misspelled words are listed to automatically change when you type them. You can add to the list or delete any that you no longer want.
AutoCorrect Replace Windows

3. The Quick Access Toolbar

The Quick Access Toolbar lives on the top left of the Word window. It is meant to be a spot for you to access tools you need quickly, as the name implies. So take the time to customize this toolbar as it will save you a ton of time later.

By default, the toolbar contains buttons like Save, Undo, and Redo. But if you use different tools much more often, then it’s best to put those in this handy place instead. This way, you can perform the quick actions you need with just a click.

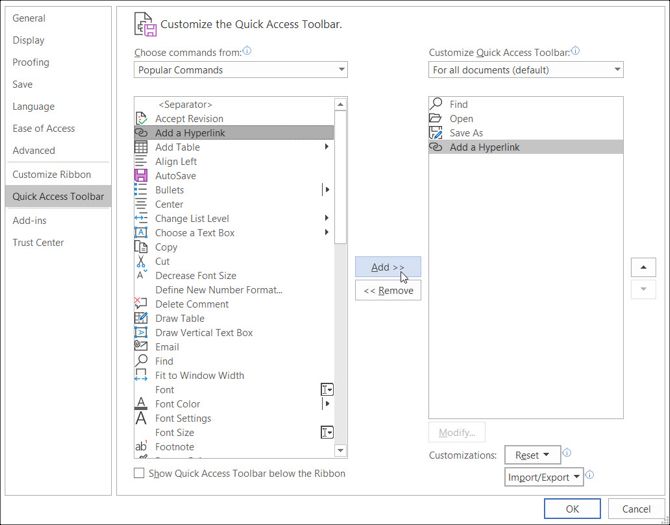
On Windows, select File from the menu, click Options, and then pick Quick Access Toolbar.
Quick Access Toolbar Settings Windows

On Mac, select Word from the menu bar, pick Preferences, and choose Ribbon & Toolbar. Click the Quick Access Toolbar button at the top of the window.
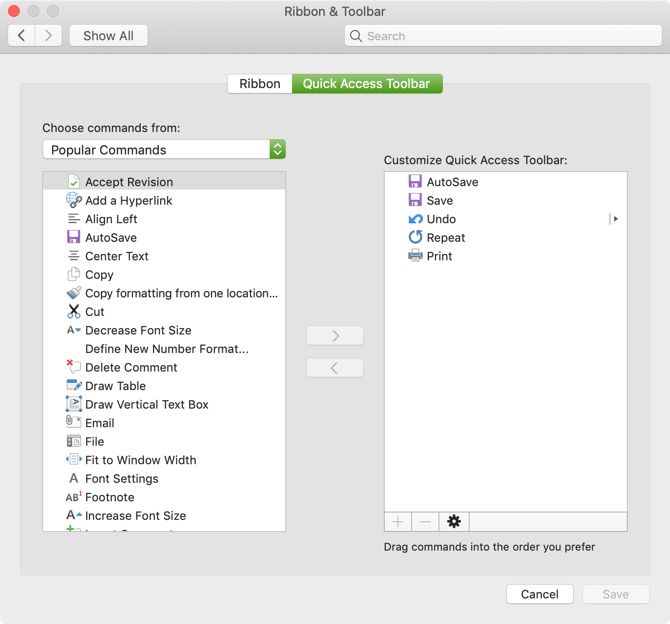
Quick Access Toolbar Settings Mac

In the Quick Access Toolbar settings area, the items on the left are the commands you can use and those on the right are what’s currently in the toolbar. You can remove an action from the toolbar by selecting it and clicking the Remove arrow in the center. To add an action, select it on the left and click Add in the center.

You can pick from Popular Commands or click the drop-down box for a full list of actions that exist in the Word tabs. So, maybe you use the Find, Open, Save As, and Add a Hyperlink tools often. Click each one on the left and add them to the right. Click OK when you finish.
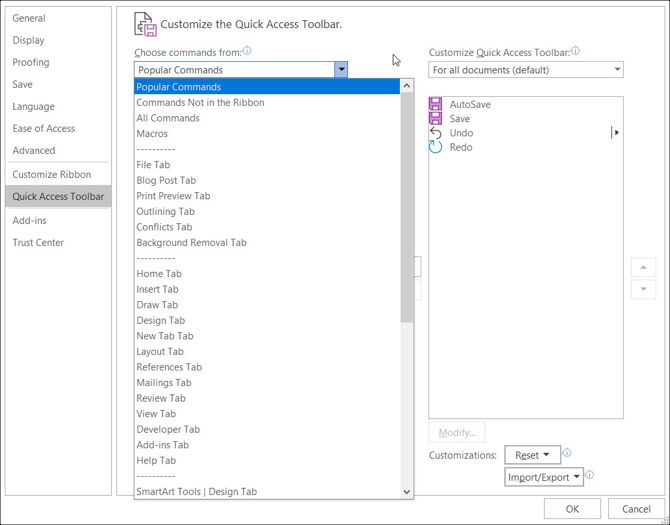
Quick Access Toolbar Commands Windows

If you ever want to revert to the default commands, access the Quick Access Toolbar settings once again. Then in Windows at the bottom of the window under Customizations, click Reset and then Reset only Quick Access Toolbar. On Mac, click the Settings (gear icon) button and choose Reset only Quick Access Toolbar.
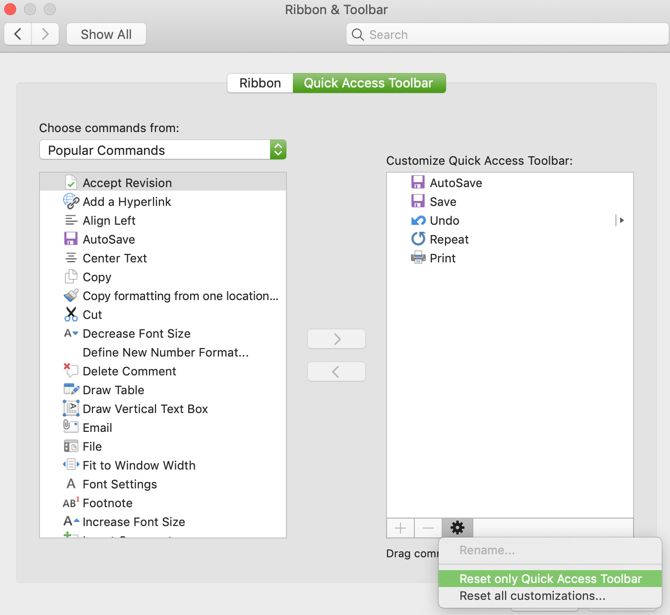
Quick Access Toolbar Reset Mac

4. The Ribbon

The Ribbon in Word is another spot that you should consider customizing. Similar to the Quick Access Toolbar, you want the actions you use most at your fingertips.

By default, Word has tabs across the top for things like Home, Insert, Draw, Design, and View. But if you never use the Draw or Design tabs, why have them there taking up space?

At the same time, maybe there are commands within the Home tab you would like to use in an order that you find more useful. These types of customizations lead to a more productive Word experience.

On Windows, select File from the menu, click Options, and then pick Customize Ribbon.
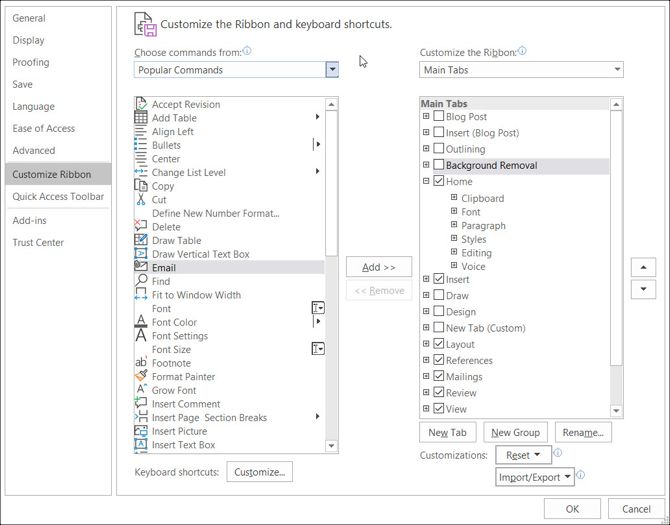
Ribbon Settings Windows

On Mac, select Word from the menu bar, pick Preferences, and choose Ribbon & Toolbar. Click the Ribbon button at the top of the window.
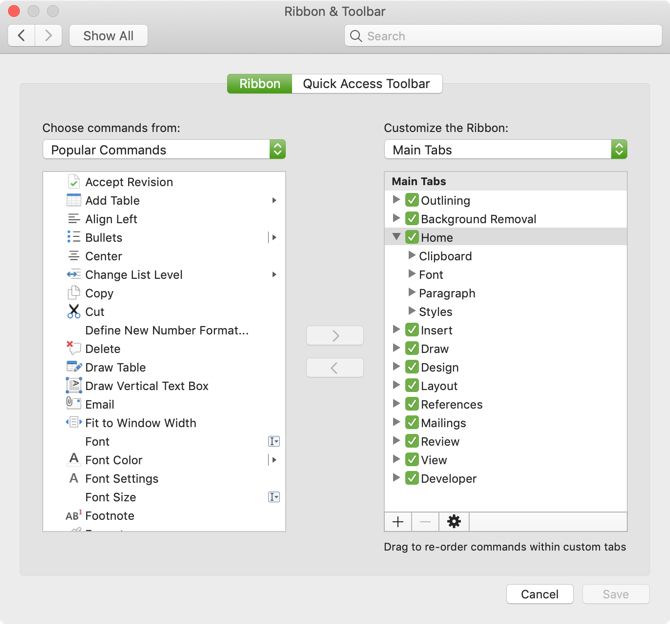
Ribbon Settings Mac

Like the Quick Access Toolbar Settings, the Ribbon settings window has the commands on the left and the currently used actions on the right. Move them into the ribbon or out of the ribbon using the Add and Remove arrow buttons in the center.

  • To adjust the tabs that you see across the top, simply check or uncheck them on the right side.
  • To view the commands within each tab, select the plus sign (Windows) or arrow (Mac) next to the tab and then the subsequent indicators for each set of commands.
  • To rearrange the order of the tabs or the commands select them and use the arrows on the right to move the up or down in the list in Windows. On Mac, select and drag the items to reorder them.

For a more in-depth look at customizing your Microsoft Word Ribbon in Windows, take a look at our detailed tutorial.

5. The Status Bar

The Status Bar, which resides on the bottom of the Word window, is one last place you likely don’t touch as far as customizations go. However, this toolbar provides a lot of helpful information, so it’s worth your time to adjust it.

For example, if you constantly check your word count or switch Word’s layout views, you want to make sure these tools are readily available. Alternatively, you may never need a macro recording tool or the vertical page position, so you can remove them.

In Windows, right-click on the Status Bar and on Mac either right-click it or hold the Control key and click on it.

When the menu appears, you simply check those items that you want to display in the Status Bar. You will see this toolbar update automatically as you check and uncheck the various options.
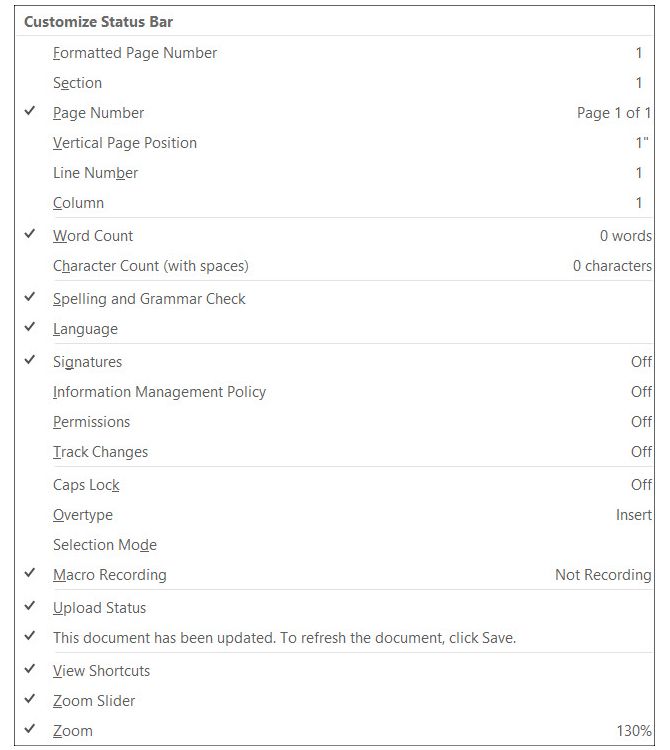
Status Bar Settings Windows

Changes to Default Word Settings Can Be Good

When you take the time to review settings for an application that you use regularly, you might be surprised at how much better you can make it. By changing small things like these, you can work more effectively.

Read the full article: 5 Microsoft Word Settings You Should Definitely Customize


Read Full Article

Indirect Detection


Indirect Detection

Alibaba made a smart screen to help blind people shop and it costs next to nothing

Facebook Portal needs more. At least it just added YouTube


To offset the creepiness of having Facebook’s camera and microphone in your house, its new Portal video chat gadget needs best-in-class software.  Its hardware is remarkably well done, plus Messenger and the photo frame feature work great. But its third-party app platform was pretty skimpy when the device launched this week.

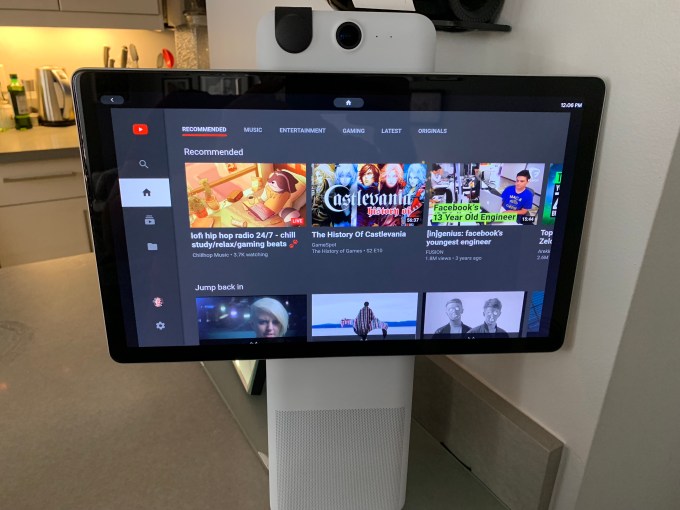
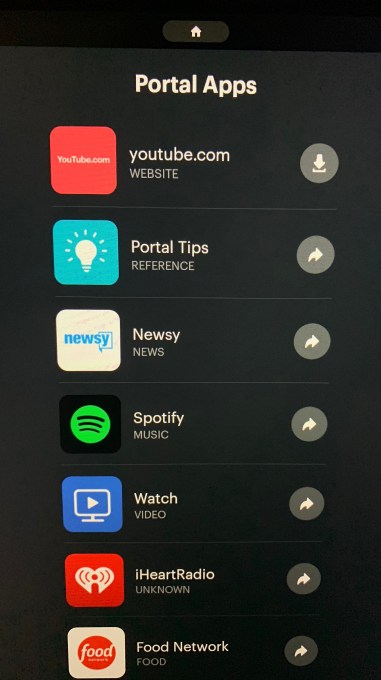
Facebook is increasingly relying on its smart display competitors to boost Portal’s capabilities. It already comes with Amazon Alexa inside. And now, Google’s YouTube is part of the Portal app platform. “Yes, YouTube.com is available through an optional install in the ‘Portal Apps’ catalog” a Facebook spokesperson tells me. You can open it with a “Hey Portal” command, but there currently seems to be no way to queue up specific videos or control playback via voice.

The addition gives Portal much greater flexibility when it comes to video. Previously it could only play videos from Facebook Watch, Food Network, or Newsy. It also brings the device to closer parity with Google’s Home Hub screen, the Google Assistant-powered smart displays from JBL and Lenovo, and the Amazon Echo Show 2 which Google blocked from using YouTube before Amazon added a web browser to the device to reopen YouTube access.

Read our comparison of the top smart display gadgets

YouTube makes the most of the $349 Portal+’s 15.6-inch 1080p screen, the biggest and sharpest of the smart display crop. Whether for watching shows or recipe videos while making dinner, instructional clips while putting together furniture, or Baby Shark to keep the kids busy, Portal becomes a lot more useful with YouTube.

But we’re still waiting for the most exciting thing Facebook has planned for Portal: Google Assistant. A month ago Facebook’s VP of Portal Rafa Camargo told me We definitely have been talking to Google as well. We view the future of these home devices . . . as where you will have multiple assistants and you will use them for whatever they do best . . . We’d like to expand and integrate with them.” Now a Facebook spokesperson tells me that they “Don’t have an update on Google Assistant today but we’re working on adding new experiences to Portal.”

The potential to put both Google and Amazon’s voice assistants on one device could make Portal’s software stronger than either competitor’s devices. Many critics have asked if Facebook was naive or calloused to launch Portal in the wak of privacy issues like the Cambridge Analytica scandal and its recent data breach. But as I found when testing the Portal with my 72-year-old mother, not everyone is concerned with Facebook’s privacy problems and instead see Portal as a way for the social network to truly bring them closer to their loved ones. With Amazon and Google racing to win the smart display market, Facebook may see it worth the tech insider backlash to have a shot at mainstream success before its boxed out.


Read Full Article

Facebook simulates itself up a better, more gradual product launch


When you’re launching a new social media product, like an image-sharing app or niche network, common wisdom is to make it available to everyone as soon as it’s ready. But simulations carried out by Facebook — and let’s be honest, a few actual launches — suggest that may be a good way to kneecap your product from the start.

It’s far from a simple problem to simulate, but in the spirit of the “spherical cow in a vacuum” it’s easy enough to make a plausible model in which to test some basic hypotheses. In this case the researchers crafted a network of nodes into which a virtual “product” could be seeded, and if certain conditions were met it would either spread to other nodes or “churn” permanently, meaning this node deleted the app in disgust.

If you’re familiar with Conway’s Game of Life it’s broadly similar but not so elegant.

In the researchers’ simulation, the spread of the product is based more or less on a handful of assumptions:

  • User satisfaction is largely governed by whether their friends are on the app
  • Users start using the app at a low rate and use it either more or less based on their satisfaction
  • If a user is unsatisfied, they leave permanently

Based on these (and a whole lot of complex math) the researchers tried various scenarios in which different numbers and groups nodes were given access to the product at once.

It wouldn’t be unreasonable to guess that under these basic conditions, giving it to as many people as possible (not everyone, since that’s not realistic) would be the right move. But the model showed that this isn’t the case, and in fact creating a few concentrated clusters of nodes had the best results.

If you think about it, it becomes clear why: When you make it available to a large number of people, the next thing that happens is a large die-off of nodes that didn’t have enough friends at the start or whose friends weren’t active enough. This die-off limits the reach of other nearby nodes, which then die off as well, and although it doesn’t start an extinction-level event for the virtual app, it does permanently limit its reach due to the number of people who have churned.

On the other hand, if you seed a few clusters that are self-sufficient and keep usage high, then introduce it to others adjacent at a regular rate, you see steady growth, low churn, and a higher usage cap since far fewer people will have bounced off the product at the beginning.

You can see how this would work in real life: get the app to a few small, active communities (socially active photographers, celebrities, or influencers and their networks) and then create adjacent nodes through invitations sent out by existing users.

Turns out, lots of apps already do this! But now it’s supported by science.

Will this affect the next big Facebook product rollout? Probably not. Chances are the people in charge have a few other factors that figure into these decisions. But research like this, simulating crowds and group decision-making, will surely only increase in accuracy and usage.

The study, by Facebook’s Shankar Iyer and Lada A. Adamic, will be presented at the International Conference on Complex Networks and their Applications.


Read Full Article