Instagram is expanding its ban on content related to suicide and self-harm. Instagram will no longer allow drawings or memes about suicide and self-harm on its platform. And the accounts posting this content will have their reach severely limited.
Hundreds of thousands of people take their own lives each year. And suicide is one of the leading causes of death amongst young adults. There are a myriad of different reasons for this, but the internet and social media certainly play a part.
The Death of Holly Russell
The role social media plays in this problem was felt most keenly when Molly Russell took her own life in 2017. The British teenager was found to have viewed graphic material concerning suicide and self-harm online in the run-up to her death.
“Instagram helped kill my daughter”
Molly Russell, 14, took her own life in 2017
Her family found graphic material about self-harm and suicide on her Instagram account pic.twitter.com/qZH7Fl9lCG
In the aftermath of her passing, Molly’s father Ian told BBC News that he holds Instagram partly responsible for her death. Instagram has since upped its efforts to remove content depicting suicide and self-harm, and it’s now doing even more.
Instagram Bans More Suicidal Content
In a post on the Instagram Info Center, Adam Mosseri, the head of Instagram, explains what the social media platform is doing to keep its users safe. Especially with regards to young people, some of whom are “influenced in a negative way by what they see online.”
After assuring users that Instagram doesn’t let people “share content that encourages or promotes self-harm or suicide,” Mosseri says Instagram will “no longer allow fictional depictions of self-harm or suicide on Instagram, such as drawings or memes.”
What’s more, “accounts sharing this type of content will also not be recommended in search or in our discovery surfaces, like Explore.” Lastly, Instagram will be sending more people more “resources with localized helplines like the Samaritans.”
As Mosseri points out, this is a complex issue that “no single company or set of policies and practices alone can solve.” So, Instagram has sought “expert advice from academics and mental health organisations like the […] National Suicide Prevention Line”.
Report Worrying Social Media Posts
Sadly, this isn’t going to stop people from taking their own lives. However, Instagram is clearly doing what it can to prevent any more youngsters such as Molly Russell being influenced by what they see online. Let’s hope other social media platforms follow suit.
As a writer, blogger, and podcaster, I’ve conducted many interviews. Producing high-quality, interesting conversations with fascinating people is one thing, but you’ve got to get the audio right.
Whether sharing the interview on a podcast or playing it back to transcribe, clear, audible speech is vital. For this, you’ll need a digital audio workstation (DAW) such as Audacity (other DAWs are available).
While audio enthusiasts will find the edits below simple, for those with little audio editing experience, they’re critical. Use these tricks to enhance voice recordings in Audacity.
Why Use Audacity for Interviews?
I use the Audacity audio recording software to record and edit all my interviews.
My recording setup is nothing unusual. For PC recording, a Bluetooth headset, and a Blue Snowball desktop microphone. If I’m using Skype, then I’ll rely on the Skype call recording feature that is part of the service.
For mobile recording, I tend to double up, using my smartphone as a backup for a Sony portable voice recorder.
Both work well and produce high-quality conversations. However, as with anything, there are flaws in the setup that produce less than optimum conditions.
The beauty of Audacity (besides it being free to use) is that you have the capability to “fix” those flaws. Voice recordings are prone to three common problems:
Background noise
Quiet voice
Distortion and call drop-out
Below you’ll learn how to fix these issues and even enhance the Audacity production with some music.
1. How to Enhance Quiet Voices in Audacity
Boosting quiet voices is simple. The volume of the voice is equivalent to “amplitude,” so just use Audacity’s Amplify tool to enhance the voice.
First, highlight the section of the audio track with a quiet voice. Next, select Amplify from the Effect menu option.
In the amplify tool, select an amplification level to increase the voice volume to match the other person speaking. It may take some trial and error the first time. Don’t worry—just undo the change and try a new value until you get it right.
In my case, I found that an increase of 5 dB does the trick. Once you know the right value, the only tedious part of this fix is that you’ll need to find every place in the track where the quiet voice shows up, and do the highlight/amplify routine to fix it.
2. How to Remove Background Noise With Audacity
The second most common flaw in an interview audio file is background noise. Maybe you left a fan on in the other room, or cars are passing an open window? PC fans can also cause a problem, as can nearby industry, humming refrigerators, and washing machines.
The problem is, you never realize until you listen to the audio that the sound quality is terrible.
To remove background noise, identify an area in your file that features only the background noise. When you find it, highlight that section of the audio track.
Next, open Effects > Noise Reduction.
In the toolbox, click Get Noise Profile. Doing this captures a snapshot of the background noise itself. The software uses this to “erase” that sound profile from a section (or all) of the audio file.
The next step is just to highlight the area where you want to remove the noise. Usually, this is the entire track, so left-click the track header (on the left side of the screen).
Finally, return to Effects > Noise Reduction and this time click OK.
A few moments later, the background noise will be removed or at least reduced.
There is one caveat, and it is this—carefully gauge the amount of noise that you want to remove. Removing too little won’t do much good; removing too much will make the audio sound over-digitized or artificially quiet.
In most cases, the default option should be enough. Otherwise, the middle to lower-middle setting is usually ideal.
3. Remove Distortion in Audacity
A key problem with recording phone calls on Skype and other voice chat services is distortion. It can occur as stuttered audio, robotic distortion, or even call “drop out”. This is where the person at the other end of the call appears to have gone for a few moments.
The best way to fix these problems is Clip Fix.
Start off by looking for the distortion. Open View > Show Clipping.
This will reveal the problem areas. Simply select these (as a whole, or one at a time) then Effects > Clip Fix. Again, rely on the default option to start with, changing only if the initial attempt doesn’t fix the distortion enough.
Use the Preview option to get an idea of how it sounds, then OK to fix the distortion. You may need to undo (Ctrl + Z) and re-do the fix with a slightly higher amplitude to increase the volume.
Integrating a Musical or Voice Introduction
Many great podcasts feature a great musical introduction. Believe it or not, it isn’t difficult to add one yourself in Audacity with just a few simple steps.
The first step, obviously, is finding the music that you would like to use and avoid infringing on any licenses. If you’re not composing your own tune, try one of the best royalty-free music sites to find something suitable.
Next, import the music into Audacity (right-click the downloaded file and choose Audacity) so it is ready to use. The file will appear in a new Audacity window.
In the main audio file, click Tracks > Add New > Stereo and create a new track. This is where you’ll drop the music.
Switch to the Audacity window with the music track. Select the music (or a portion of it) then click Copy. Then place the cursor at the start of your primary audio file and select Paste. The copied music clip will be inserted into your track.
If there is an overlay, use the Time Shift tool (a double-headed arrow icon) to arrange the audio files as needed. At the point you want to taper off the intro music, left click and select Effect > Fade Out.
You’ll see the amplitude of the music clip taper off as it approaches the end of the clip. If done right, this will create a nice fade into the interview itself.
Enhance Your Audacity Audio Project Today
With these simple tips, you can equalize voice volume, remove background noise, and fix distortion.
You can even embed a professional music introduction into your audio interview. With just these few simple changes, you’ll transform amateur sounding interviews into well produced, professional sounding conversations. The results are great—in fact, you’ve created a podcast.
But what do you do next? Make sure people hear it! Here’s how to promote your podcast to make sure that happens.
Nearly every app and service available today wants you to sign up for a subscription. While this spreads out costs over time instead of charging you all at once, it’s easy to lose track of your subscriptions. If you typically enroll using your mobile device, you might wonder how to cancel subscriptions on an iPhone or iPad.
We’ll show you how to view all subscriptions you’ve signed up for on your iPhone and help you get these under control.
How to Find All Subscriptions on Your iPhone
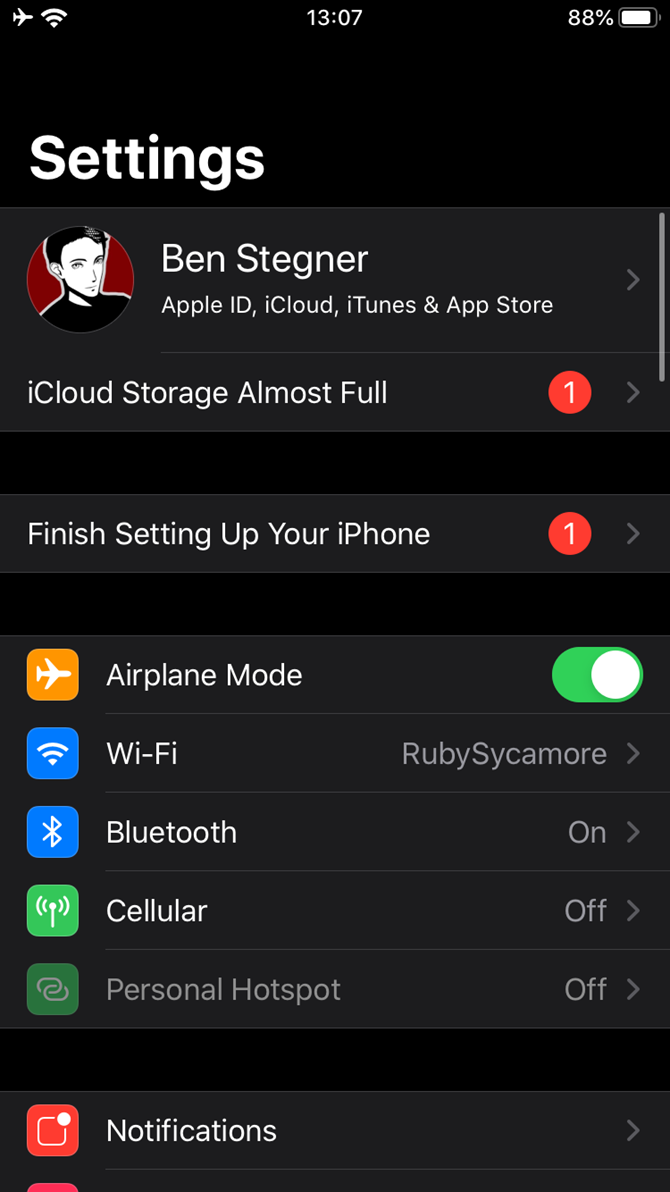
Apple makes it easy to review all subscriptions you currently have active through your Apple ID. Here’s where to find subscriptions on your iPhone:
Open the Settings app on your iPhone or iPad.
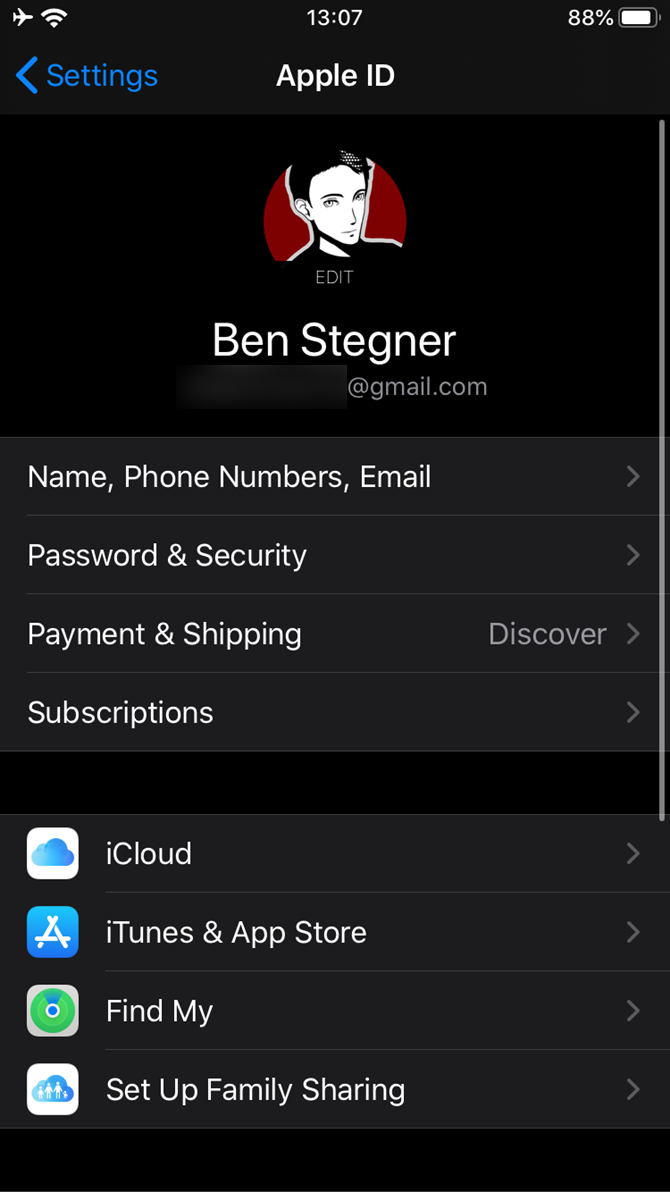
Tap your name at the top of the list.
On the resulting page, tap Subscriptions.
In addition to app subscriptions, this page is also how you cancel magazine subscriptions on your iPhone. Next, we’ll look at managing them.
How to Cancel Subscriptions on iPhone
Follow the above steps to access the Subscriptions page for your Apple ID. Here you’ll see all subscriptions that are billed through your Apple account. Tap the subscription you want to unsubscribe from or change. If you only have one subscription, this page will take you right to it.
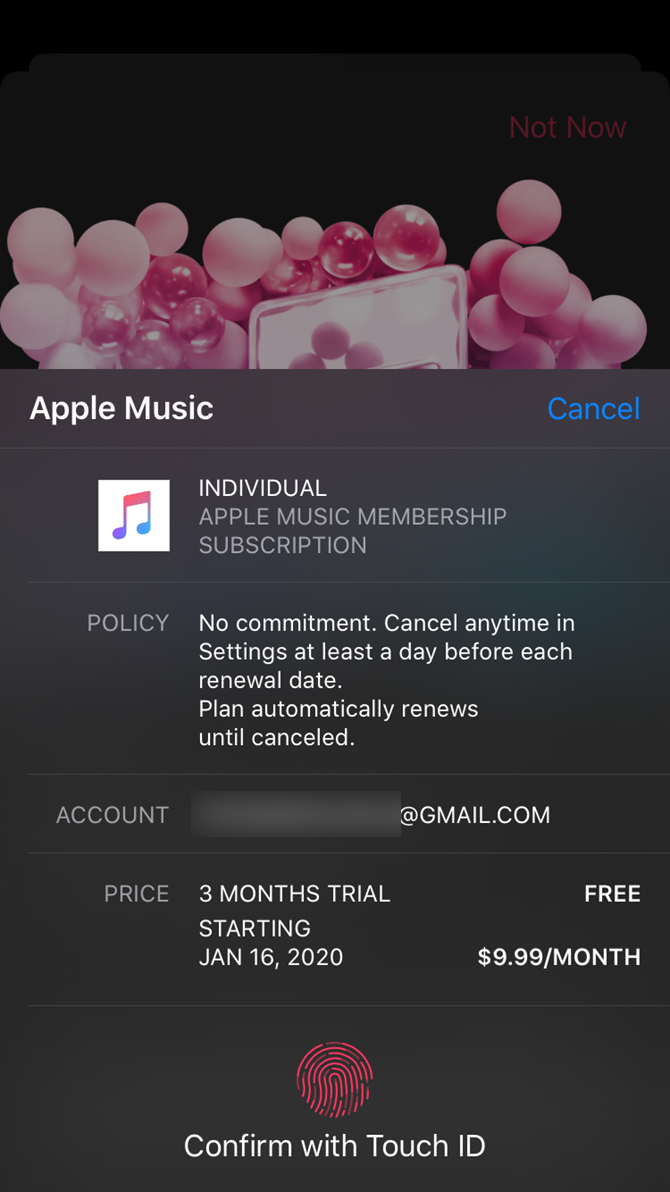
In the below example, you can see how to cancel Apple Music. Tap Apple Music Membership to see details and change the subscription if you want. It shows you what kind of plan you have, when the subscription renews, and your other options for subscribing.
You’ll see the Cancel Subscription (or Cancel Free Trial if you’re still in the trial period) button below. Tap this and confirm it to unsubscribe from the app’s service.
When you cancel an app, most services allow you to continue using them until your subscription period ends. This isn’t the case for some free trials, though. For instance, if you cancel the Apple Music trial, you’ll immediately lose access to the premium service.
Thus, if you want to utilize the entire free trial but don’t want to get charged when it’s over, we recommend setting a reminder to cancel the app subscription a few days before it ends.
How to Cancel Apple Subscriptions on Your Mac
If you’d prefer, you can also cancel an app subscription on your Mac. Because Apple has split iTunes on macOS into several distinct apps, this functionality is now located in the App Store.
Open the App Store on your Mac and click your name and profile icon in the bottom-left corner. Next, select View Information at the top-right. You may need to confirm your Apple ID password to proceed.
Once you see the Account Information page, scroll down to the Manage section. You’ll see a Subscriptions entry with the number of subscriptions currently on your account; click Manage to the right of this.
From here, you’ll see a very similar panel to that on iPhone and iPad. This lets you change or unsubscribe from an Apple or third-party app, as long as you’re signed in with the same Apple ID.
How to Cancel iTunes Subscriptions on Windows
If you use a Windows PC, you’ll still manage your Apple subscriptions through the iTunes subscriptions page. Open iTunes and head to Account > View My Account. This will bring you to a panel similar to the App Store’s Account Information above.
Scroll to the bottom and in the Settings section, you’ll see a Subscriptions line. Click Manage next to this. Then you can edit or cancel your subscriptions.
Managing Other Subscriptions on Your iPhone
Didn’t find the subscription you were looking for using the above methods? You’ll need to unsubscribe in a different way. The above subscription management only applies to apps that you’ve subscribed to through your Apple ID. It won’t show subscriptions you made through other devices.
For example, you might have signed up for Spotify Premium through the Google Play Store on an Android device, or joined Netflix on the company’s website. While you can enjoy these accounts by signing into the apps on your iPhone, Apple has nothing to do with your subscription.
You’ll need to deal with the service directly to manage your subscription. A quick Google search should bring you to the appropriate website so you can log in and manage your subscription.
If you have trouble tracking down where a subscription comes from, check your credit card statement to see who you’ve made payments to. Vendors like “Apple” or “App Store” signify a subscription through your Apple ID, while the company name will likely appear for direct subscriptions. You might have also subscribed using a service like PayPal or Amazon Pay.
Otherwise, if you use Apple’s Family Sharing, one of your family members might have signed up for a subscription on their own. You can’t manage this from your Apple ID, so you’ll need to use one of their devices to manage that subscription. You may also pay someone else for a shareable subscription and need to talk with them.
Finally, make sure you didn’t subscribe with a different Apple ID than the one you’re currently using.
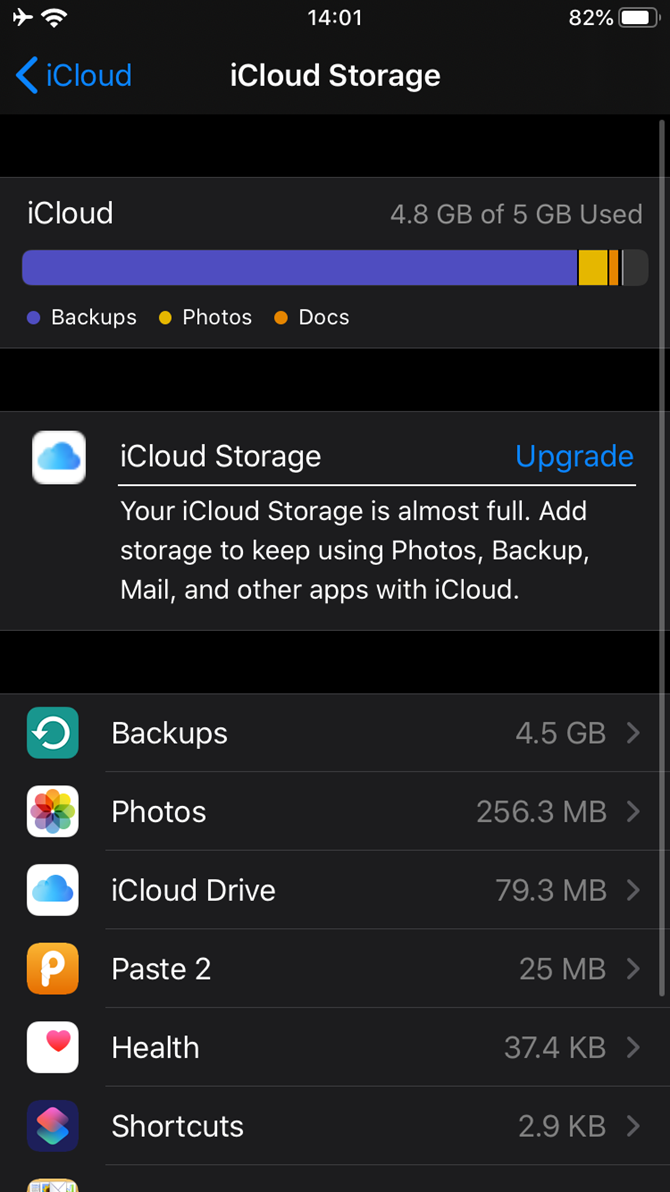
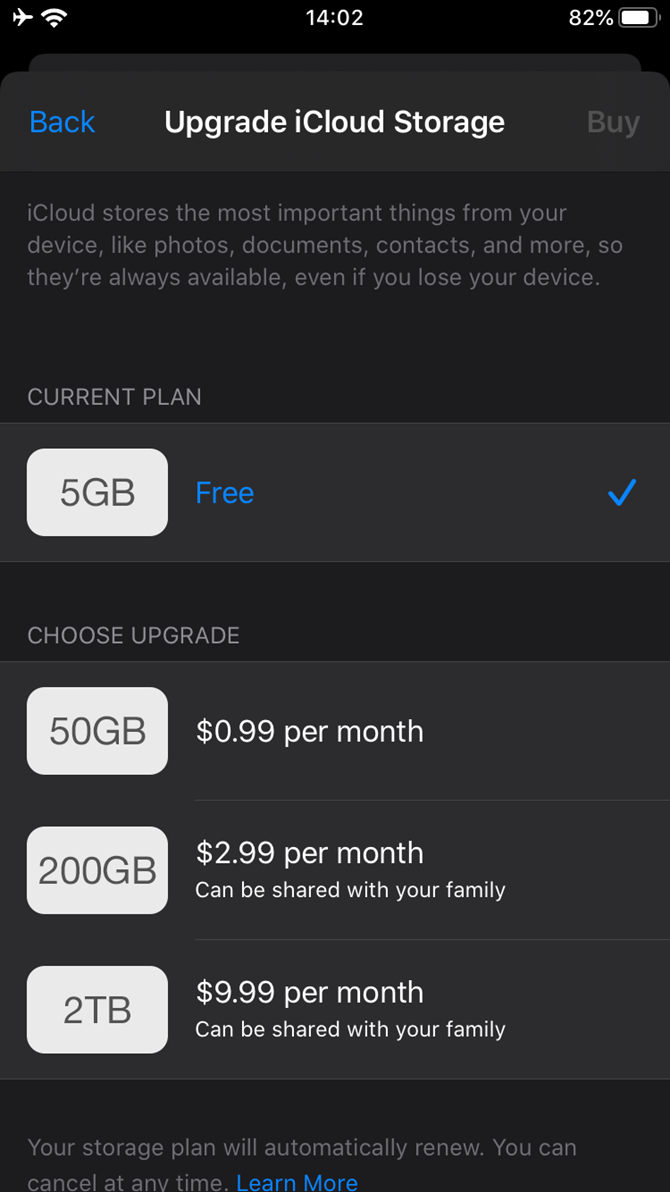
How to Manage Your iCloud Storage Plan
There’s one notable exception when wondering how to unsubscribe from an Apple app: iCloud storage. Apple will bill you for iCloud plans that include more storage than the 5GB default, but this doesn’t appear in the above locations.
Instead, to unsubscribe from iCloud plans on your iPhone, you’ll need to visit Settings > [Your name] > iCloud > Manage Storage. Here, tap Change Storage Plan, then Downgrade Options to go back to the free plan.
A Note on Subscribing Through Apple
We’ve covered how to unsubscribe from plans on your iPhone, so you’re all set to take control of your recurring charges.
Before we wrap up, you should be aware that subscribing to services through Apple often results in paying a higher price. This is because Apple takes a 30% cut of all purchases made through the App Store, resulting in developers charging more to offset that cost.
For example, Spotify Premium costs $9.99 per month normally. However, if you sign up through the iPhone app, you’ll end up paying $12.99 per month instead. There’s no reason to do this, as you get an identical service either way.
@jmoneyjesse Hi, Jesse. When you sign up for premium via iTunes the price is $12.99. You can always register on our website instead at $9.99
If you have any subscriptions through Apple, we recommend checking the applicable company’s website to see if you can get it for a lower cost.
Cancel Subscriptions and Save Some Money
Subscriptions are a convenient way to access services you use month-to-month, but they can easily get out of hand. It’s wise to take a few minutes to review the subscriptions you’re currently paying for to make sure you aren’t wasting money.
Laptop batteries have a habit of dying at the most inopportune moments. And as everyone knows, a battery with no juice is a sure-fire way to halt your productivity dead in its tracks.
If you’re the type of person who spends a lot of time on the road, it makes sense to keep a portable battery pack handy. They help to ensure that you’re never caught short when you’re away from a socket.
Here are six laptop power banks that can recharge your laptop anywhere.
If you want a laptop power bank that can also comfortably charge your other equipment when you’re on-the-go, you should check out the Mophie Powerstation AC. It has an AC socket, a USB-A port, and a USB-C port. It’s arguably the best overall portable laptop charger available today.
It provides 100W of power through a GFCI-protected outlet and offers a three amp current to each connected device. The power bank even supports USB-C PD fast charging. You can connect up to three devices at once.
The Mophie Powerstation AC’s battery size is 22,000mAh. For a typical laptop, it will provide 15 hours of extra battery life. For smartphones, that figure jumps to 100 hours. A DSLR camera will enjoy approximately eight extra hours.
Although the Mophie Powerstation AC is the best overall portable laptop charger, it is also one of the most expensive. For a cheaper option, you might consider the RAVPower 27000 instead. It’s not as sleek or refined as the Mophie model, but it will get the job done.
The power pack offers 70W of power and can charge up to three devices simultaneously. You can connect your devices to a standard AC plug, a USB-C connection, or two regular USB connections. At 27,000mAh, the RAVPower’s battery is larger than the Mophie model; it has enough juice to recharge a 12-inch MacBook 1.4 times. A typical smartphone can be recharged roughly eight times.
It takes about five hours to recharge the RAVPower 27000’s battery when it’s completely empty. There are easy-to-see LED indicators so you can see exactly how much power is remaining.
The NOVOO AC Power Bank is a well-designed laptop power bank. It’s ideal for anyone that values stylish tech. The cylindrical design and grey and black color scheme mean it won’t look out of place on your desk, in the office, or when you’re traveling. The device is also small—it’s just 5.8 inches tall and doesn’t have a bulky profile.
The NOVOO model boasts a 22,500mAh battery with 85W of power and 3A current. It has a maximum AC output of 110V-120V and 60Hz. Away from the AC socket, the power bank also has both a USB-C and a USB-A port, so you can use it to charge phones, tablets, and other portables. The unit takes 5.5 hours to charge fully before it is ready to use.
If you want a power bank that’s considerably beefier than the options we’ve discussed so far, you should consider the Jackery Portable Power Station Explorer 500. It’s ideal for camping trips, long road trips, and other excursions where you know you won’t have access to mains electric.
The unit can supply a mammoth 500W of power and has a 518Wh lithium battery. The 518Wh battery equates to roughly 144,000mAh. It has an AC socket, three USB ports, and a DC carport.
Where the Jackery Portable Power Station Explorer 500 really shines, however, is the recharging options. It will recharge in eight hours when connected to the mains, but you can also recharge it in 16 hours from your car and in 14 hours using the Jackery SolarSaga 100W Solar panel. The solar panel is sold separately and costs around $350.
If you want value for money, the SinKeu Portable Laptop Charger is a power bank worth considering. It has a 24,000mAh battery and can supply 88.8W of power. There are two USB ports, an AC socket, and a 12V DC connection with a 10A current. The unit takes four hours to recharge when connected to a wall socket. You can also repower the device via a car charger.
Although it’s one of the best budget power banks for laptops, it is also one of the best options for long-distance travel. The device only weighs 1.1 pounds, so it’s easy to throw in your hand luggage and forget that it’s there. Like most of the devices on our list, you can use the SinKeu Portable Laptop Charger to charge up to three devices at once.
Our final pick is the MAXOAK Laptop Power Bank. If having a massive amount of backup battery power is more important to you than the power bank’s weight, this is the device for you.
The 50,000mAh battery can charge a laptop almost three times before it runs out of juice. It also provides 185W of power. The huge battery means it’s an ideal unit for anyone who wants to use their laptop while charging it. Doing so with most power banks would cut their recharging potential in half.
The trade-off is the weight of the unit. At 2.77 pounds, it’s not something you’re going to want to lug around in your bag when you’re on-the-go. 50,000mAh is also well above the safety limit set by most airlines. Other features include six power outputs (one 20V/5A, one 12V/2.5A, and four USB ports) and 14 different laptop power connectors. The power bank will recharge in eight hours.
The Best Laptop Power Banks for You
Portable laptop power banks aren’t the only way to recharge your devices when you’re away from a regular power source.
If you have a Chromebook and travel around a lot, consider protecting it with a rugged case. A rugged Chromebook case will protect it from drops, falls, trips, and shocks. In many cases, a rugged Chromebook case will protect against accidental water exposure, too. What’s not to like?
Here are seven of the best rugged Chromebook cases.
Nacuwa’s Hardshell Protective Case is one of the top-selling rugged Chromebook cases on Amazon. Designed for compatibility with 11 to 11.6-inch Chromebooks, the Nacuwa Hardshell fits an extensive range of hardware, including a 12-inch MacBook.
The Nacuwa Hardshell is made from a toughened EVA material. The case offers strong protection against drop damage, coming with a padded internal lining to cushion any falls. The external shell is also waterproof, protecting it from the elements or an errant cup of coffee. The Nacuwa Hardshell Protective Case also features four internal storage pockets.
Better still, it comes in several sizes. If you have a larger Chromebook, check out the Nacuwa Hardshell 15-inch option instead.
The UZBL Always On rugged Chromebook case will fit a wide range of hardware, covering devices from 11 to 11.6-inches. The case is made of toughened EVA, helping protect your hardware against all types of bumps and knocks. Fortunately, it is waterproof, too.
Setting it apart from other rugged Chromebook cases is the internal mechanism that secures your device. The Always On case features locking corner grips (which give the case its “Always On” name) that keep your Chromebook in place at all times. Locking the laptop in place adds another level of protection against any drops or falls.
Another nice feature of the UZBL Always On is the carry strap and handle. Finally, the case comes with a one-year manufacturer warranty against any manufacturing defects.
The Cyber Acoustics Work-In Chromebook Case is of a similar design to the UZBL Always On. It fits most 11 to 11.6 inch Chromebooks, giving your hardware some welcome external ruggedization. The case is designed with K-12 students in mind.
It has a handy carry strap and handles, while the shell is a rigid armor covered in a rubber-based nylon skin, for extra grip. Handily for parents and educators, each Cyber Acoustics Work-In case features a customizable identity window. It’ll help your kids (and you!) keep track of each Chromebook.
The CASEMATIX 15.6-inch solid Chromebook case is a step up in terms of rugged protection. The major differences between this and the other options here come in size, protection, material, and manufacturing. Almost everything, then.
CASEMATIX’s 15.6-inch case is waterproof (not water-resistant, like the other options), airtight via its rubber seal, and can handle a serious drop. Inside the case, your Chromebook has the protection of additional foam to cushion any falls, with extra foam available to secure hardware of different sizes (within reason).
The case uses a briefcase-style design to secure your Chromebook. It also makes it a handy option for passing through airport security or otherwise. Given its size, the CASEMATIX 15.6-inch case suits larger hardware, such as the Chromebook 14 or Chromebook 15.
This Gumdrop DropTech Case is for the Dell 3100 Clamshell Chromebook. Gumdrop do manufacture an extensive range of rugged Chromebook cases though, primarily for educational instituations and devices. The DropTech Case is made using shock-resistant materials and has a durable silicone bumper to protect edges from jarring drops or bumps.
It is also very lightweight to boot. The DropTech Case for the Dell 3100 Chromebook is designed for specifically for that hardware. All of the charging and USB ports are in the correct location, keeping the device secure and allowing easy and familiar access.
The IBENZER Bumptect Stay In case caters for 13-inch Chromebooks (and 13 to 14-inch MacBooks), providing a lightweight-yet-protective case. The outer shell of the Bumptect case features shockproof materials to protect against unexpected knocks. It also has strengthened corners for additional protection.
Your Chromebook will remain snug in the Bumptect Stay In case using the securable micro clips. Plus, the case exterior is easy to grip, helping to protect against unexpected slippage.
Handily, the case has additional external storage pockets. Used in combination with the shoulder strap or carry handle, the Bumptect Stay In is like a rugged laptop case rather than a simple rugged Chromebook case. But because the case is lightweight, you won’t notice the difference.
Like Gumdrop, MAXCases produce an extensive range of rugged Chromebook cases. This particular model is for the HP G4-Education Edition. It is a custom-molded, lightweight Chromebook case. Even though the case is lightweight, it exceeds military standard drop testing specifications (MIL-STD-810).
With this case, your Chromebook should survive a drop from around half a meter, with extra cushioning coming from the shock-absorbing TPU bumpers. The underside of the case has rubber feet to stop unexpected slipping.
It also has pop-out feet that allow you to raise the case, giving you a better viewing and typing angle. Propping the case up also increases ventilation under your Chromebook, another handy feature. Also, because the MAXCases products are designed for specific Chromebook models, the USB and charging port slots are all in the correct place.
What Is the Best Rugged Chromebook Case?
The specifications for rugged Chromebook cases vary. A rugged Chromebook case should protect your hardware from a fall. It should also offer some water and dust resistance. Keeping the case lightweight is important, too, given most Chromebook models are lightweight to begin with.
To figure out which rugged Chromebook case suits you, think about how you use your Chromebook. Do you carry it freely? A rugged always-in case might best suit you. Does your Chromebook live in your hand, always ready to go? A hard-shell case might be the ideal option for you instead.
Sometimes it can be tricky to return items that you bought online. Unlike physical shops, there are lots of extra things you need to contend with—shipping costs, packaging, different addresses, even customs checks.
If you want to return an item on Amazon, there are several different things you need to be aware of. Furthermore, the rules change, depending on the type of item you are sending back.
Let’s take a closer look at how to return unwanted purchases on Amazon.
Will Amazon Accept Any Returns?
Although there some exceptions, Amazon lets you return most items within 30 days of the date you received the delivery.
Some of the most notable exceptions include:
ebooks (seven days)
Baby items (90 days)
Gift cards (non-returnable)
Grocery items (non-returnable, but refundable/replaceable)
Amazon Reneweditems (if bought from Amazon you get 90 days rather than 30 days)
Handmade items (third-party sellers are not required to accept returns)
Collectibles (items above $500 must be insured)
Appstore purchases (non-refundable)
Can You Get a Refund From a Third-Party Amazon Seller?
Most third-party sellers on Amazon adhere to the same returns policy like Amazon. Technically, however, they are free to set their own policies. You should always check before completing your purchase.
Regardless of the individual policies, all third-party sellers need to meet two requirements:
They must supply a returns address within the United States (for Amazon.com purchases).
They must provide a pre-paid returns label or a full refund without requiring you to return the item.
If the two conditions are not met, you can file a dispute through Amazon’s A-to-Z Guarantee process.
How to Request a Refund on Amazon
Amazon has a dedicated Returns Center that you can use to request refunds on your purchases.
When you fire up the page, you can either choose to return an item you bought or return a gift. If you want to return an item you bought, the site will take you to a list of your purchases from which you can select the merchandise you want to send back. If you want to return a gift, you need to know the order number.
To return one of your purchases, click on Return on replace items alongside the order. If you don’t see the link, it means the return period has expired.
On the next page, you will need to select the reason for your return. Because Amazon has a generous returns policy, there is no right or wrong answer. Be honest about why you are sending the item back; it will not affect your eligibility.
The next window will prompt you to choose whether you want a refund or a replacement. Select your preference as needed.
Lastly, you need to choose how you plan to return the item. The most common method is to ship the item back. However, most people don’t realize that you can also use one of Amazon’s drop-off services or an Amazon Locker facility. In some cases, Amazon will even offer to collect the item from your home.
If you choose the shipping method, you’ll need to print the label and authorization letter, then pack the item in a suitable box. Make sure you take good care with the packing process; if an item is damaged in transit, Amazon will hold you responsible and it may impact your ability to get your money back.
Do You Have to Pay Shipping on Amazon Returns?
Amazon’s terms state that you are liable for paying the upfront cost of the return shipment. After Amazon receives the item back at its center, it will refund you up to $20 for the cost of shipping.
If the shipping cost is more than $20, you need to contact Amazon directly to request a refund on the remaining balance. In this regard, Amazon is a bit vague. The company does not confirm that you are guaranteed to receive a refund on the excess shipping. A cursory Google search, however, reveals that almost everyone does receive the extra amount.
The $20 limit does not apply if you are returning defective, damaged, or incorrect items.
Of course, if you’re planning to return lots of items, you could ensure that you get a complete refund for shipping by processing each return individually, rather than doing a bulk return of multiple purchases. It’s a hidden trick that many people overlook.
How to Check the Status of Your Refund on Amazon
It’s easy to monitor the progress of your refund on Amazon. There are two methods you can use:
Go to Your Order > Order Details > Order Summary.
Head to the Returns Center and click on Manage Returns.
You will be able to see if Amazon has received your return, whether it has been processed, and whether the rebate has been sent to your bank account.
Does Amazon Respect Manufacturer Warranties?
Yes! If you bought an item directly from Amazon (rather than via a third-party seller), and it stops working during the warranty period, Amazon lets you send the product to one of its repair centers.
It is free to ship an item to a repair center. And if the item is still under warranty, the cost of shipping of the fixed item back to you is also free.
Repairs typically take 14 working days to complete.
How Quickly Will You Receive a Refund From Amazon?
It can take more than a month from the date you ship the returned item back to Amazon until you see the money back in your bank account.
According to Amazon, shipments can take up to 25 days to arrive back at its warehouses. After receiving the return, it takes two business days for Amazon to process the return in its own systems. It then takes a further three to five business days for your bank to process the refund and for it to show up on your statement.
Learn More About Returning Items to Stores
The Amazon returns process is straightforward. As long as you’re not trying to “pull a fast one,” you should be able to get a full refund on almost any item you bought.
Most kids would rather have fun than learn anything. However, these educational mobile games educate and entertain at the same time.
For parents who want their children’s smartphone time to be more productive, here are the best educational mobile games kids will enjoy playing.
1. Khan Academy Kids
Khan Academy Kids is one of the best educational mobile games available. Led by a cast of colorful animal characters, children can learn skills like reading, writing, and problem solving by partaking in drawing, storytelling, and lots of other fun activities.
It’s suitable for children aged six and under. Each child has their own profile and learning path. They can also bring up a collection of books and videos to enjoy at any time, at their own pace. As they learn, kids are rewarded with fun things like hats for the animals or bugs for their collection.
And best of all? It’s entirely free, with no ads or in-app purchases.
Download: Khan Academy Kids for Android | iOS (Free)
2. ABC Kids – Tracing and Phonics
ABC Kids is a game entirely focused on helping children recognize and draw letters. Hosted by an upbeat lion, alongside other animal companions who dance and cheer in encouragement, kids can switch between a variety of games in order to have fun while learning the alphabet.
Whether it’s tracing letters, matching lowercase to uppercase, or pairing through phonics, this is perfectly designed for children in the early stages of education. There’s also a handy parent’s mode, where you can track progress and enable specific parts of the app if there’s something you want your child to focus on.
Download: ABC Kids – Tracing and Phonics for Android | iOS (Free)
3. Algorithm City
Aimed at older children, Algorithm City is a fun game that teaches the basics of programming across more than 50 levels. The aim is to guide a little blocky penguin along stages, collecting all of the coins possible. This is done by selecting actions through a simple graphical interface and then watching how it plays out.
There’s a smooth learning curve, with difficulty increasing with every level. Although there’s only ever a limited set of functions at the child’s disposal, they must learn how to create efficient code in order to get the highest score. Algorithm City is a great, subtle introduction to programming.
Space, the final frontier. There’s nothing quite like the excitement of space and this app lets children explore the solar system and wider universe with high quality animations and audio. They will learn about planets, constellations, comets, and more.
Information can be gathered by visiting places like the observatory and cinema, before eventually blasting their friendly cow companion into space. Occasional quizzes also pop up to test knowledge, blending the fun and learning together perfectly.
Download: Astronomy for Kids for Android | iOS (Free)
5. Math Land
In Math Land, kids take control of a pirate called Ray. He’s out to find the gems that have been stolen by the evil Max. With the gems scattered around various islands, children must solve math problems in order to unlock spy glasses and sail the sea.
The game covers all sorts of math problems—addition, subtraction, multiplication, division, and more—and adjusts the complexity depending on the child’s age. There is a one-time fee to unlock the later islands, but it’s worth it thanks to the quality puzzles and bright, charming experience.
Download: Math Land for Android | iOS (Free, premium version available)
6. Logic Land
Logic is just as important as more traditional subjects like math and science. This is where Logic Land can help. All the games within are designed to improve development of logical reasoning, spatial intelligence, and memory.
These games include identifying the odd one out, completing a sequence, calculating how many blocks are in a shape, and more. As children solve them, they earn treasure and allow the characters Jack and Alice to progress to other islands.
You can’t go wrong with Cookie Monster and Elmo. Children can join both of them in the kitchen to help bake three and four letter words. They can adorn their cookies with colorful, tasty-looking decorations and then share them with Cookie Monster and Elmo.
Along the way, children will be practicing their literacy skills. While baking, the Sesame Street characters will be teaching children how to speak the words, what they mean, and how vowels are used to make different words. If you want to unlock all words, you’ll need to pay a one-off fee.
Download: Sesame Street Alphabet Kitchen for Android (Free, premium version available) | iOS ($2.99)
8. Play and Learn Science
Play and Learn Science is all about exploring how science surrounds us in everyday life. Kids can test experiments, engineer solutions, and learn about things like temperature and shadows. There are loads of games and activities to keep them busy for a while.
It’s best to use this app as a co-learning solution. Each game has parent notes that prompt you with questions to ask your children to get them thinking and taking the lessons beyond the app. There’s even a Spanish mode, should you want to encourage your youngster to be bilingual.
Download: Play and Learn Science for Android | iOS (Free)
9. Shaun Learning Games for Kids
Shaun the Sheep and his friends are on hand to make learning an incredibly fun experience for kids in this app. Primarily targeted at children aged three to eight, the difficulty can be adjusted depending on the child’s needs.
There’s a huge amount of games to enjoy here, covering topics like math, direction, memory, and creation. Kids can also take a break from it all and let their creativity flow as they draw, paint, and sticker various scenes. Around a third of the games are free, with the rest unlocked through a single purchase.
Download: Shaun Learning Games for Kids for Android | iOS (Free, premium version available)
10. Chess for Kids
Playing chess will help improve your child’s problem-solving skills, pattern recognition, concentration, and more. There’s a reason that the game is so popular with all ages.
This app is designed specifically for children, which means it’s colorful, easy to use, and kids are protected from chatting or adding friends without parental permission. It lets kids play chess with others around the world or tackle the bot at different skill levels. A single payment will unlock puzzles and videos, but the app is perfectly good without them.
Download: Chess for Kids for Android | iOS (Free, premium version available)
More Educational Apps for Kids
Hopefully, your kids will enjoy playing these games, but also learn a thing or two along the way. After all, that’s what these educational mobile games are striving to achieve.
We’ve all struggled to get out of bed in the morning after a terrible night’s sleep. You wake up feeling drowsy, demotivated, and downright miserable. If this sounds familiar, you’re not the only one. It turns out there’s a sleep loss epidemic sweeping industrialized nations, and your iPhone might be the cause.
Blue light from the screen makes you feel less sleepy. Distracting apps stimulate you when you ought to be winding down. And random notifications disrupt what would otherwise be a peaceful night.
But it’s possible to change all that. Tweak these four settings on your iPhone to improve your sleep. Your body will thank you for it.
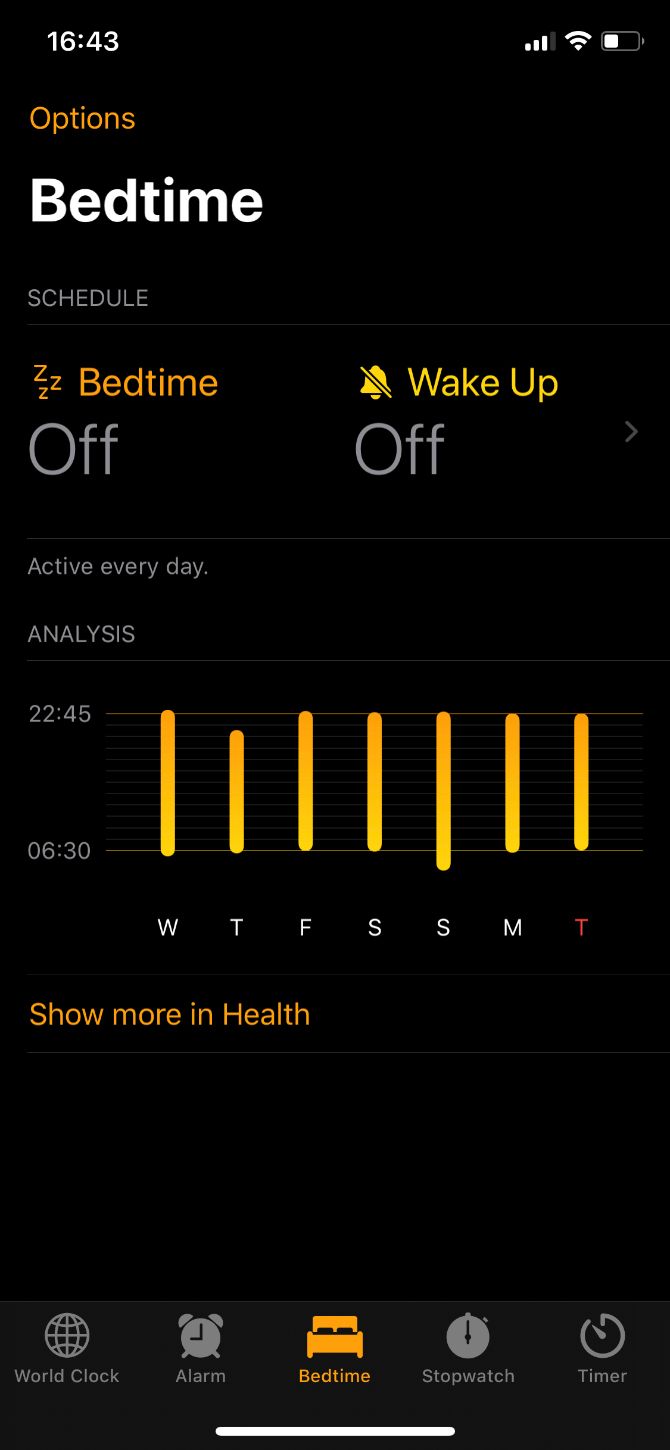
1. Set a Regular Bedtime in the Clock App
We need between seven and nine hours of sleep every night. Ideally, that means going to bed and waking up at the same time every day, including the weekends. This trains your body to fall asleep faster and wake up feeling more refreshed
The two biggest mistakes most of us make when it comes to healthy sleep habits are not getting enough of it and not sticking to regular times. You can address both of these issues with the Bedtime feature.
Open the Clock app, select Bedtime, then tap the Schedule button.
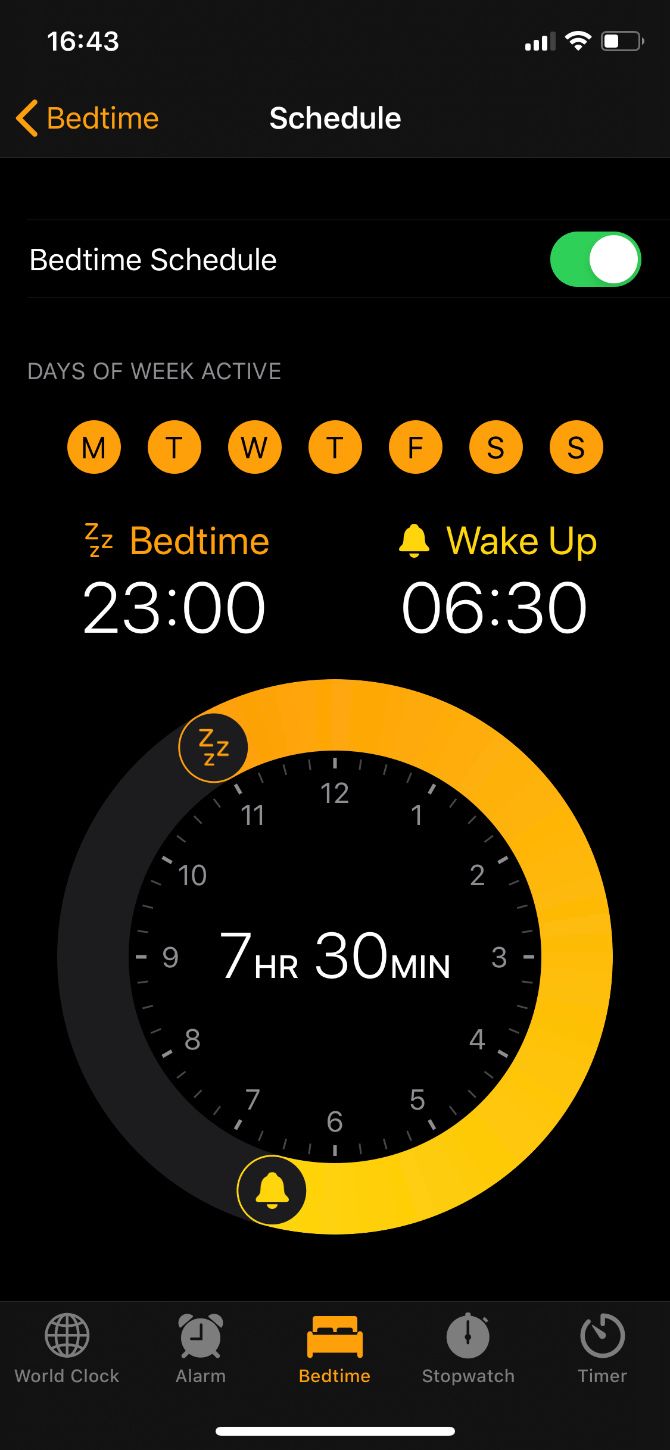
Turn on Bedtime Schedule and make sure it’s active for every day of the week.
Adjust the times to give yourself plenty of sleep. Since we sleep in 90-minute cycles, I’d aim for either 7.5 hours or 9 hours.
Now return to the Bedtime tab and tap Options in the top-left corner.
Turn on the Bedtime Reminder so you don’t forget to go to bed on time. Remember to allow yourself at least 15 minutes in bed to fall asleep.
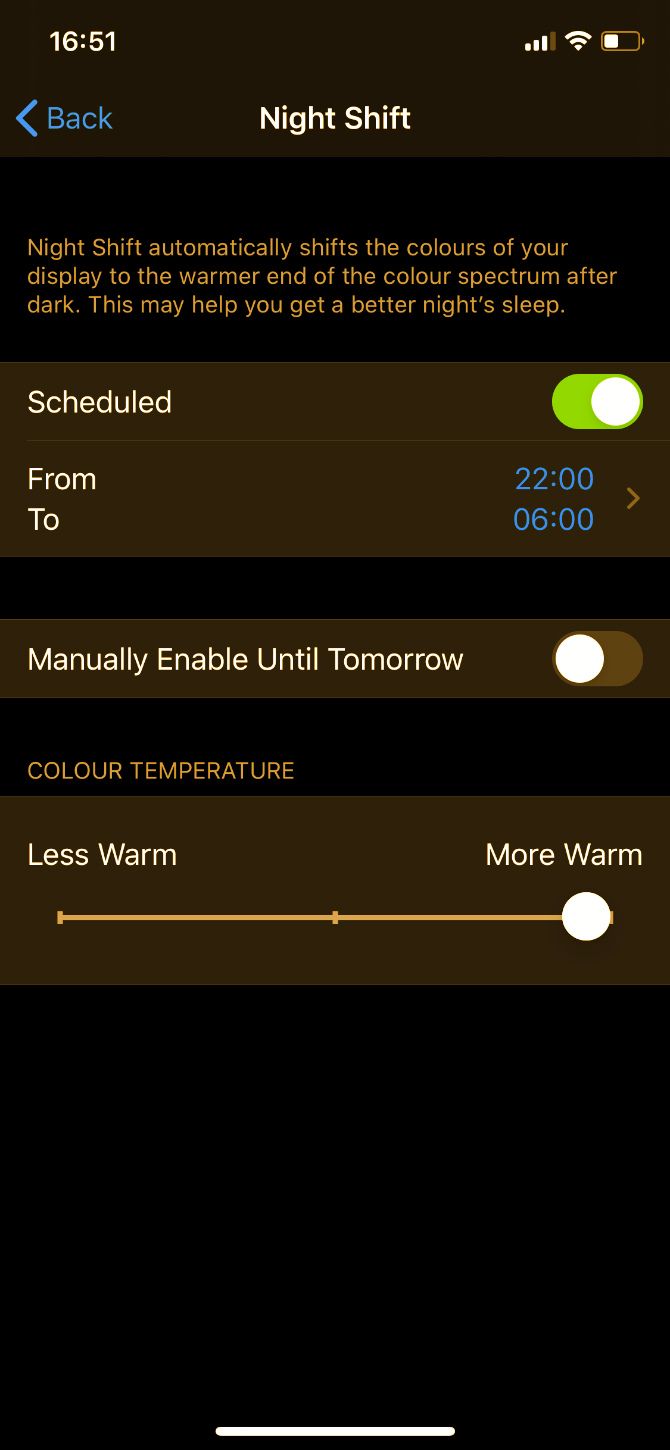
2. Turn On Dark Mode and Night Shift
One of the reasons many of us don’t sleep enough is because we don’t feel tired when it’s time to go to bed. This is partly because the bright light from our iPhone screen tricks our brains into thinking it’s still daytime.
When you look at a bright screen in the night—particularly if it’s shining blue or white light—your brain thinks the sun is still up. This stops it from releasing melatonin, which is the chemical that makes you feel tired. Even if you don’t feel sleepy anymore, you still suffer the negative consequences of sleep loss.
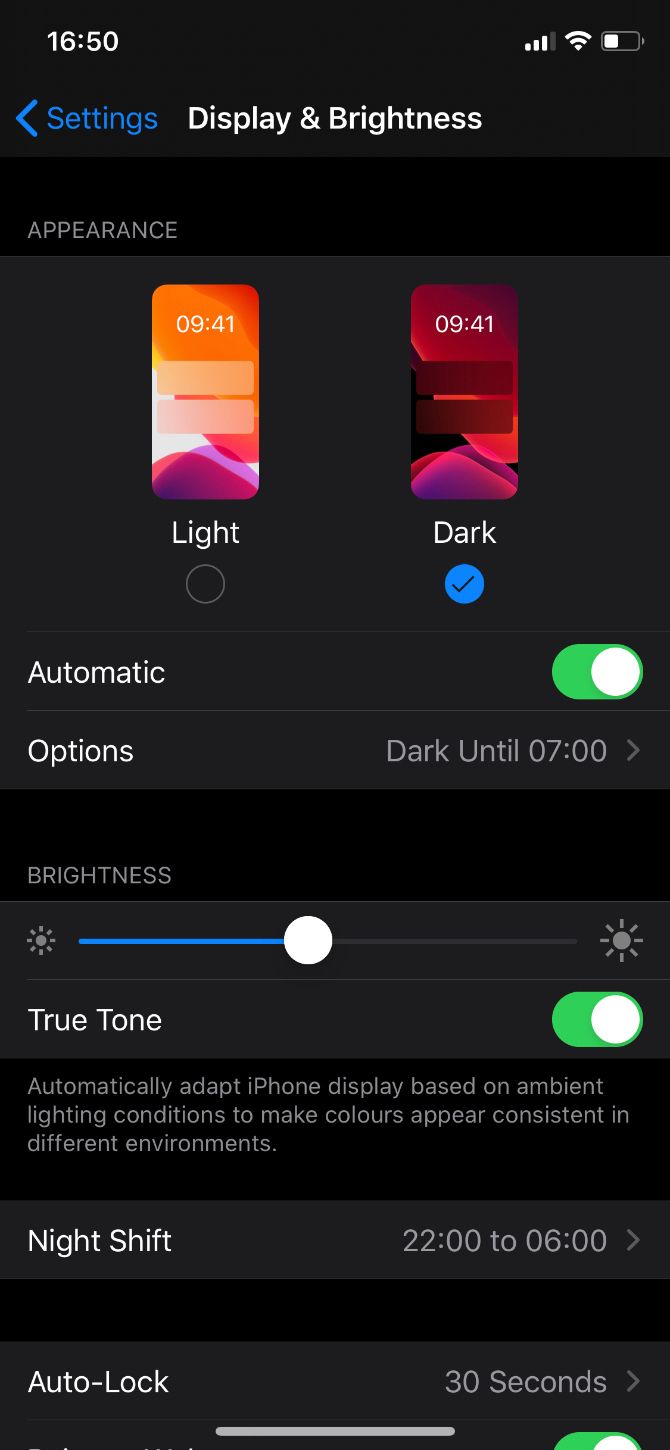
Set a schedule to turn on Dark Mode and Night Shift at least an hour before you go to bed. Dark Mode eliminates bright white screens while Night Shift reduces the blue light from all your apps.
Go to Settings > Display & Brightness.
Beneath the Light and Dark Mode options, turn on Automatic and tap Options to set a schedule. Use Light Mode in the mornings to help you wake up.
Return to the Display & Brightness settings, tap Night Shift, then turn on Scheduled and set it to come on at least an hour before bed.
Use the slider to make the color temperature More Warm, further reducing the blue light.
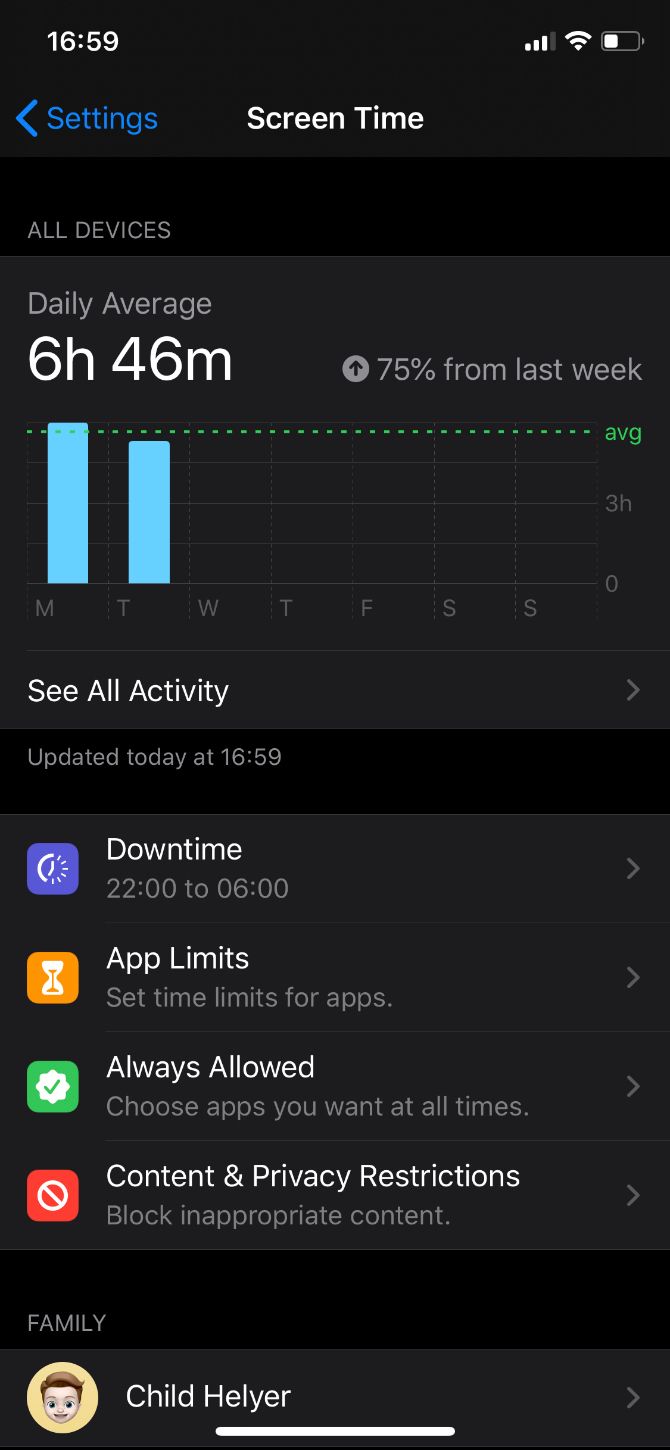
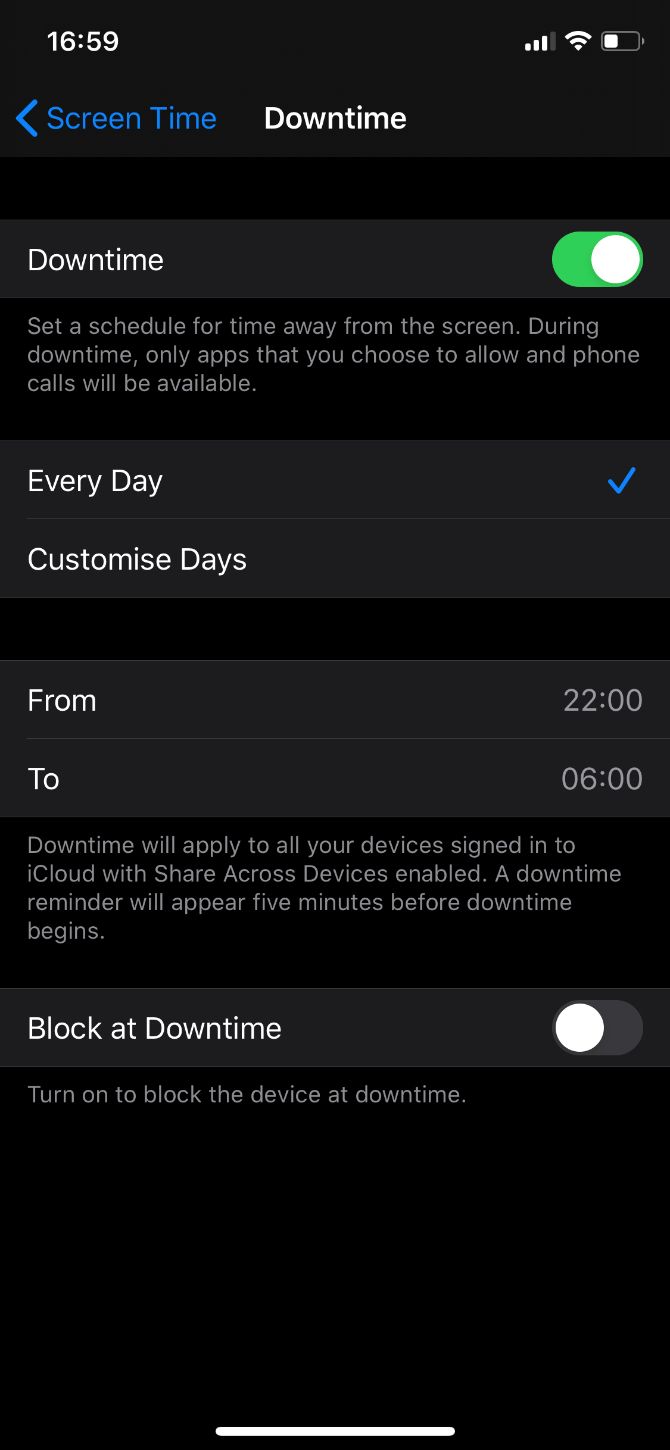
3. Use Downtime to Get Away From Your iPhone
Blue light isn’t the only problem with using your iPhone at night. Most apps are designed to stimulate and engage us. This keeps us hooked to our iPhones when we ought to be winding down for bed.
Of course, it’s difficult to break an iPhone addiction with willpower alone. Instead, use Downtime to block apps you don’t want to use at night, which should be most of them. You can always ignore the Downtime limits to keep using apps in an emergency.
The best advice for healthy sleep is to spend 30 minutes to one hour relaxing before you even try to fall asleep. Use this time to read, bathe, listen to gentle music, or reflect on your day. Don’t use it to scroll through news feeds or get to the next level in a mobile game.
Go to Settings > Screen Time > Downtime.
If prompted, enter your Screen Time passcode.
Turn on Downtime and set it for Every Day, then set a schedule for it to come on at least 30 minutes before bed.
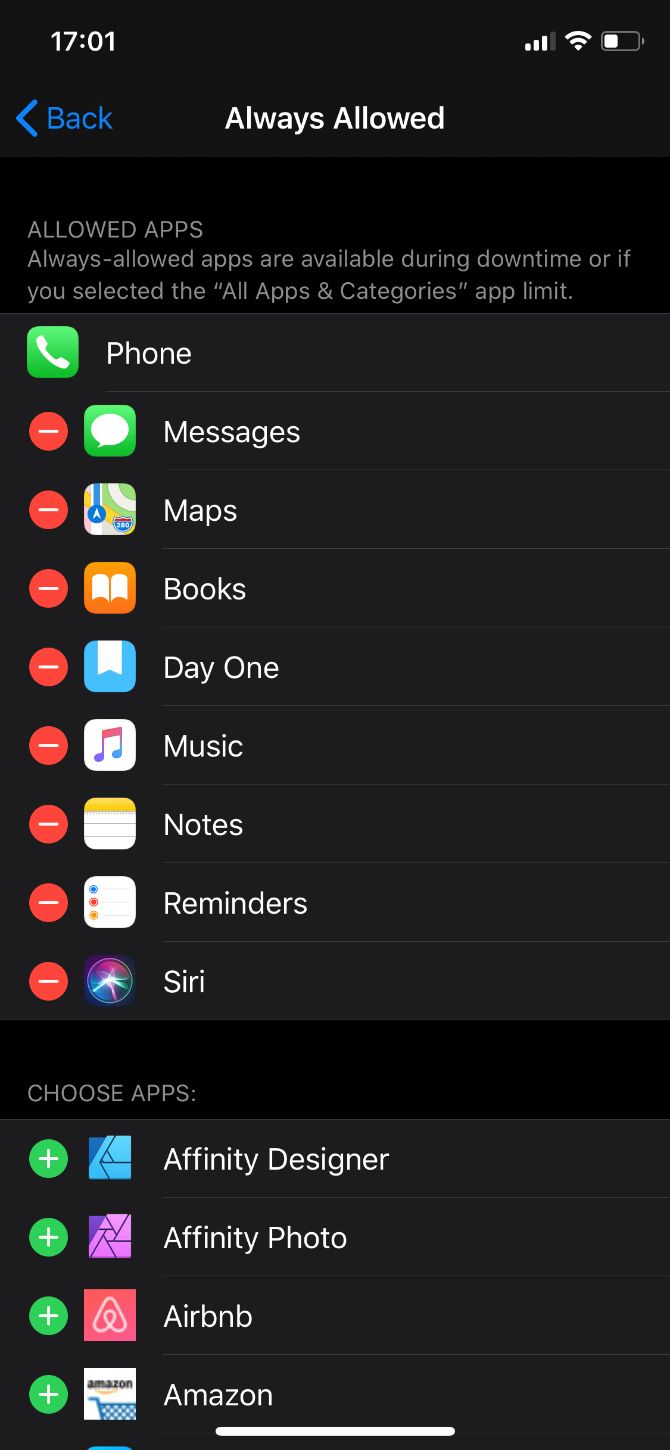
Return to the Screen Time settings and tap Always Allowed. Add your critical apps to the list so they don’t get blocked.
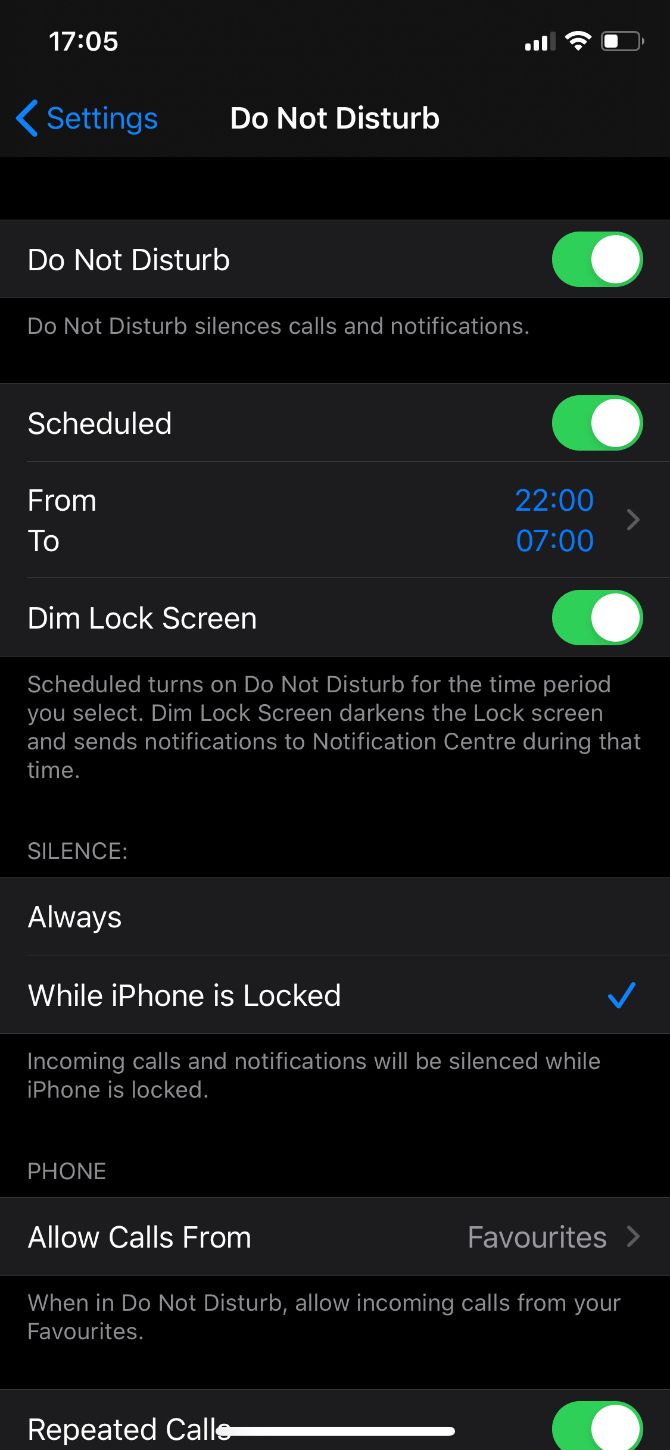
4. Schedule Do Not Disturb While You’re Asleep
The last thing you want is for peaceful sleep to be interrupted by unimportant notifications. Even if your iPhone is on silent, the bright light from your screen turning on can be enough to wake you up.
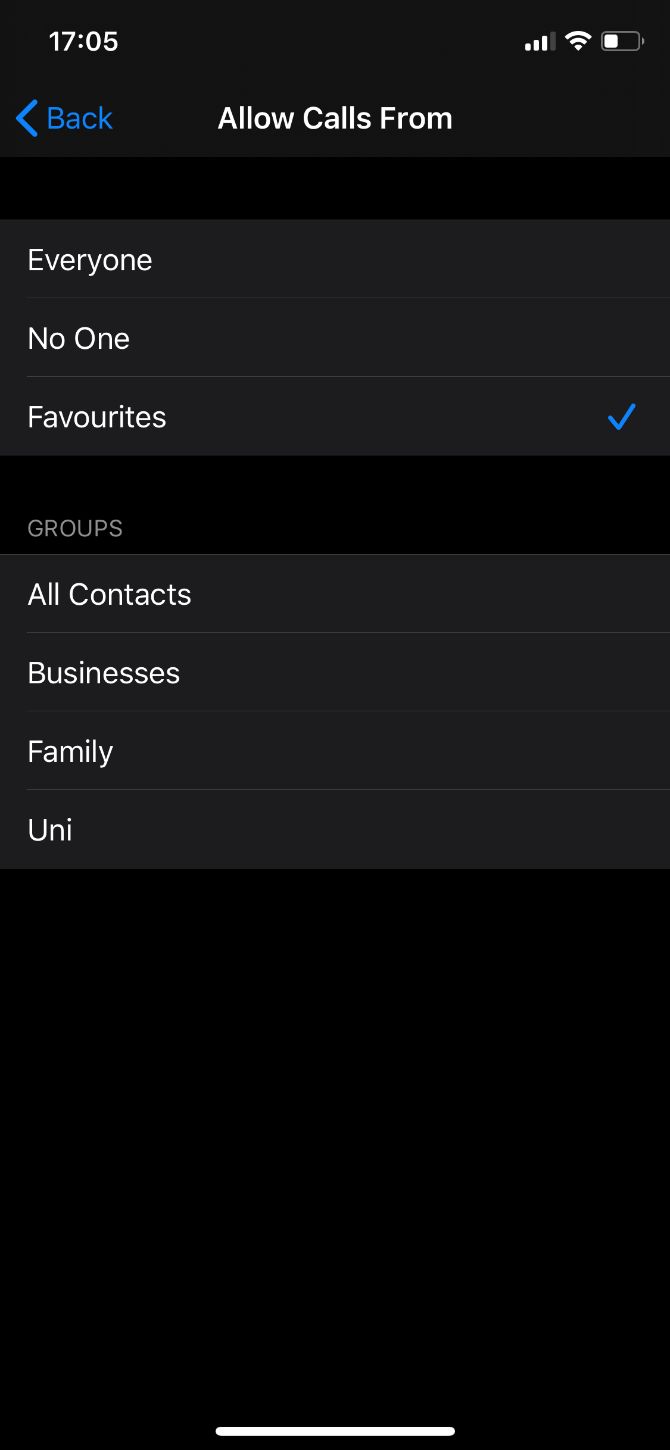
It’s easy to combat this using Do Not Disturb. If you’re worried about missing emergency calls, add contacts to your Favorites list or turn on repeated calls so people can still reach you if they need to.
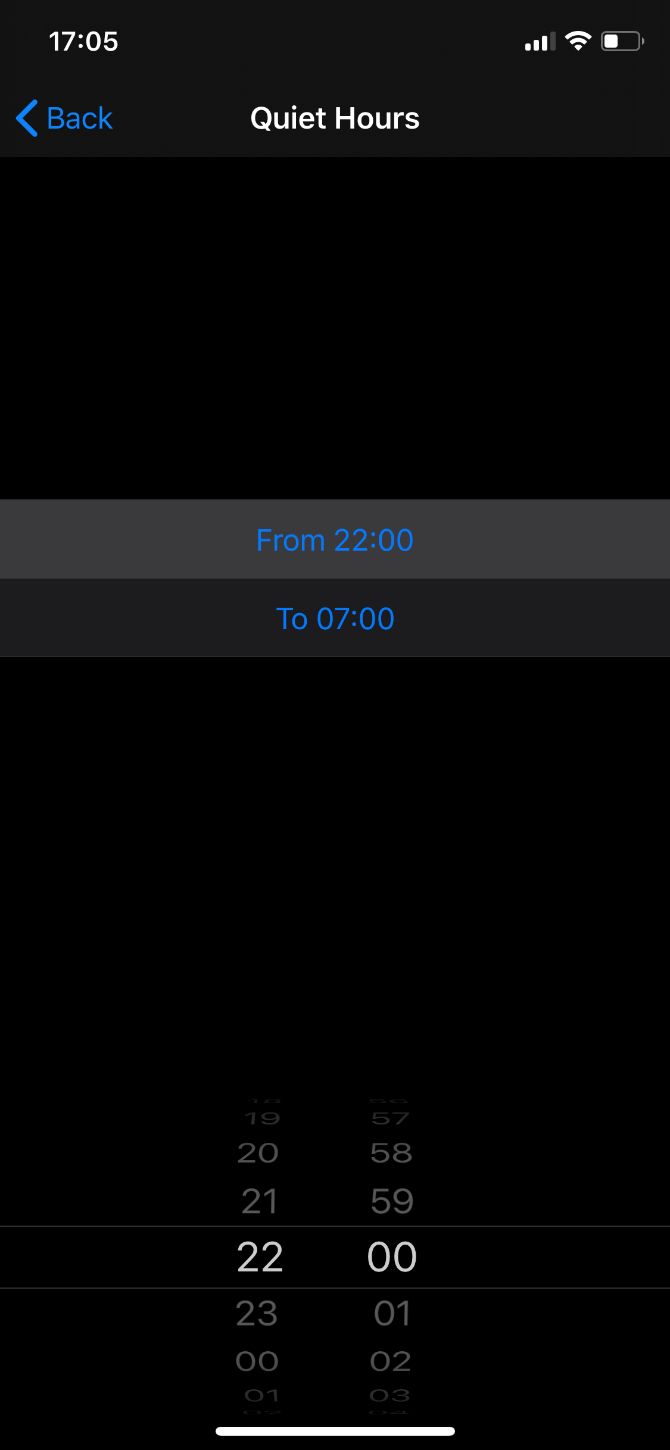
It’s possible to turn on Do Not Disturb During Bedtime from the Bedtime options, but I suggest you do it from the Settings app instead. This way, you can prepare for emergency calls and schedule Do Not Disturb to start before your bedtime if you want it to help you wind down.
Go to Settings > Do Not Disturb.
Turn on Scheduled and set your Quiet Hours. Be sure to turn on the option to Dim Lock Screen as well.
If you’re worried about missing emergency calls, scroll down and tap Allow Calls From, then choose to allow calls from Everyone or only your Favorites.
Alternatively, scroll down further and turn on the option for Repeated Calls.
Bonus Tips for Smart Home Owners
You can do even more to improve the quality of your sleep if you’ve set up a smart home by automating the temperature and lighting in the bedroom. We fall asleep faster in cooler environments and wake up easier when a bright light is shining.
Use the Home app on your iPhone to reduce the temperature in your bedroom before you go to bed. You’ll be warm enough when you get under the covers and you might find you fall asleep faster.
In the mornings, use bright white lights to simulate the sun and make it easier to wake up. If you increase the brightness gradually, you can wake up to the light instead of a shrill alarm. Although you might want to set an alarm as a backup just in case.
Track Your Sleep to See It Improve
One of the best incentives for sticking to a healthy sleep schedule is seeing the effect it has on your life. When you use these iPhone settings to improve sleep, you might not feel an instant change in your wellbeing, but it’s sure to make a big difference over time.
Use one of the many sleep tracking iPhone apps to watch your sleep quality improve. You’ll surely notice positive trends in other areas of your life as well.
Apple has released iOS 13.2 and iPadOS 13.2 for the iPhone and iPad. This update features the usual bug fixes and security improvements. But Apple is also adding a handful of new features to its operating system.
First, iOS 13.2 brings a ton of new emojis. The company now officially supports Unicode 12.0. You can now create all possible combinations of handholding couple emojis regardless of gender or skin tone. There are new accessibility-focused emojis, such as a service dog, people using wheelchairs, prosthetic arms and legs, a person with a white cane and more. There are also new animals, a yawning face and new food options.
If you have an iPhone 11 or iPhone 11 Pro, iOS 13.2 enables Deep Fusion, an image processing feature that should make your photos look better thanks to machine learning-enabled processing.
It’s also worth mentioning that you can now change the resolution and framerate of your videos in the Camera app directly.
With iOS 13.2, you can opt out of sharing Siri recordings with Apple employees and delete your Siri and dictation history. Go to Settings > Privacy > Analytics and Improvements to opt out at any time.
Finally, iOS 13.2 enables HomeKit Secure Video for HomeKit-enabled camera and adds support for the newly announced AirPods Pro.
Before updating to iOS 13.2, back up your device. Make sure your iCloud backup is up to date by opening the Settings app on your iPhone or iPad and tapping on your account information at the top and then on your device name. Additionally, you can also plug your iOS device into your computer to do a manual backup in iTunes.
Don’t forget to encrypt your backup in iTunes. It is much safer if somebody hacks your computer. And encrypted backups include saved passwords and health data. This way, you don’t have to reconnect to all your online accounts.
Once this is done, you should go to the Settings app as soon as possible to get in the queue. Navigate to ‘Settings,’ then ‘General’ and then ‘Software Update.’ Then you should see ‘Update Requested…’ It will then automatically start downloading once the download is available.