15 June 2018
10 Soccer-Themed DIY Projects to Build for World Cup 2018

There’s nothing quite like the FIFA World Cup to get you into a competitive sporting mood. But what if you’re not quite prepared for the festival of football? Need a score counter, or perhaps an automated drinks maker?
The answer is simple: DIY!
What better way to get into the soccer spirit than by building your own DIY soccer tech projects that aren’t just fun, but practical too? These projects show you how it’s done.
1. Arduino Bluetooth Scoreboard
This giant scoreboard was built by YouTube channel I Like To Make Stuff. Using a timber frame, some LEDs, 3D-printed diffusion, and an Arduino, this project can be completed in a weekend.
If you don’t have the space for such a large scoreboard, it’s simple to reduce the size. The clear instructions and high quality video shows you how to make one of your own. You don’t even have to use Bluetooth if you don’t want to.
If you’re overwhelmed even after watching the video several times, then perhaps some of our tutorials will help you. Our Arduino beginner’s guide is a good place to start, as is our ultimate beginner’s guide to 3D printing.
2. Arduino Goal Counter
This project by Ondrej Krama is a great way to keep track of the score. Slightly simpler than the previous project, this one uses a remote central locking device from a car.
This project also uses an Arduino, alongside a giant seven-segment display, but don’t worry if you don’t own one of those, this project can easily be replicated with different kinds of Arduino displays.
3. Arduino Table Soccer Goal Counter
This cool project by YouTube creators OSZ Täuffelen is an awesome way to digitize a table soccer game. Built once again using an Arduino, this project uses LED sensors to detect when a team has scored a goal.
Sensors aside, this project even uses a USB power bank to run the system for well over 30 hours. The code is provided in German, but the core concepts and ideas behind programming languages don’t really change between human languages. If you’re new to Arduino programming, then these Arduino clean coding tips may come in useful.
4. Raspberry Pi Ball Tracking Robot
Built by YouTube channel Circuit Digest, this neat little robot uses a Raspberry Pi at its heart. Built with several motors, a Raspberry Pi camera, and some code written in Python, this machine could be the beginning of your robot soccer squad!
No video tutorial is provided, but a full written tutorial with code is provided.
If you’re not sure on the differences between a Raspberry Pi and an Arduino, then why not look at our Arduino vs. Raspberry Pi comparison?
5. Arduino Robot Drinks Machine
This drinks machine is a guaranteed way to liven up any sports party. Why risk missing the action when this robot can serve you?
While this machine is designed to serve alcoholic drinks, there’s no reason you couldn’t serve juice or other alcohol-free drinks.
This project does require several 3D-printed parts, and a few specialist components, but don’t let that put you off. Besides, you could even program your own 3D models using OpenSCAD, if you’re feeling adventurous.
6. Automatic Pet Feeder
With this automatic pet feeder, you’ll never have to miss another goal again. Built by the Ntrobotics YouTube channel, this cool project can be completed in an afternoon—providing you have 3D-printed the parts.
This project uses an ESP8266 at its heart, which is quite possibly our favorite maker board here at MakeUseOf. Learn more about the ESP8266 and how it differs from Arduino. If you don’t own a 3D printer, consider using these awesome websites for ordering 3D prints.
7. 3D Food Printer
Sticking with the 3D printing theme, YouTube channel Dr. D-Flo presents an excellent and comprehensive tutorial for building your own food 3D printer.
This machine is perfect for when Brazil are playing Germany and you just can’t stop watching the action. Although it is a little on the slow side…
Dr. D-Flo adapted a less conventional 3D printer design, but you could easily use a more traditional format. Our 3D printer buying guide can help you out.
8. Electronic Ball Kicker
Moving outdoors, this electronic ball kicker was built by the Nudge Me YouTube channel. This slightly scary looking project is a great way to brush up on your goal keeping skills.
A circuit diagram is provided, and this project uses good old fashioned electronics, with no Arduino or Raspberry Pi to be found. You could probably find many of the parts needed by taking apart a microwave. High voltage, anyone?
9. Arduino TV Controller
Fed up with losing the remote? Hate being in a blind panic at the thought of missing the kick off? Then worry no more, as this gadget (built by Keenan Van Deusen) will save the day.
With a video tutorial and full code provided, this is a great project for the absolute beginner. You could even install a real-time clock and schedule your TV to come on automatically when the games start!
10. Color Tracking Robot
This color tracking robot was once again built by the Nudge Me YouTube channel. Using Bluetooth and a mobile phone, this robot tracks the ball based on its color. It races off at surprising speed, and would make the perfect defender for your robot soccer league.
Code and schematics are provided, and the tracking app is published on the app store. What are you waiting for? With this on your side, how could you lose?
If you’re looking for a simpler wheeled robot tutorial, then why not check out our Arduino 4WD robot tutorial?
The Best DIY Soccer Projects for the World Cup
These ten projects have shown just how much creativity and variety there is when it comes to soccer tech projects. There is every chance that you could considerably improve your FIFA World Cup experience with one or more of these builds. Controlling the all-important TV with an Arduino is particularly ingenious.
Meanwhile, if you’re not the DIY type, why not take a look at these Android soccer games instead? No assembly required!
Image Credit: golubovy/Depositphotos
Read the full article: 10 Soccer-Themed DIY Projects to Build for World Cup 2018
Read Full Article
Venmo is discontinuing web support for payments and more
PayPal-owned, peer-to-peer payments app Venmo is ending web support for its service, the company announced in an email to users. The changes, which are beginning to roll out now, will see the Venmo.com website phasing out support for making payments and charging users. In time, users will see even less functionality on the website, the company says.
The message to users was quietly shared in the body of Venmo’s monthly transaction history email. It reads as follows:
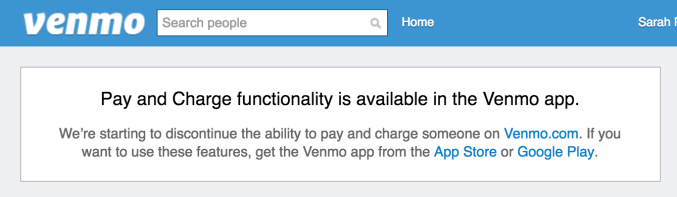
NOTICE: Venmo has decided to phase out some of the functionality on the Venmo.com website over the coming months. We are beginning to discontinue the ability to pay and charge someone on the Venmo.com website, and over time, you may see less functionality on the website – this is just the start. We therefore have updated our user agreement to reflect that the use of Venmo on the Venmo.com website may be limited.
The decision represents a notable shift in product direction for Venmo. Though best known as a mobile payments app, the service has also been available online, similar to PayPal, for many years.
The Venmo website today allows users to sign in and view their various transaction feeds, including public transactions, those from friends, and personal transactions. You can also charge friends and submit payments from the website, send payment reminders, like and comment on transactions, add friends, edit your profile, and more.
Some users may already be impacted by the changes, and will now see a message alerting them to the fact that charging friends and making payments can only be done in the Venmo app from the App Store or Google Play.
It’s not entirely surprising to see Venmo drop web support. As a PayPal-owned property after its acquisition by Braintree which later brought it to PayPal, there’s always been a lot of overlap between Venmo and its parent company, in terms of peer-to-peer payments.
Venmo had grown in popularity for its simple, social network-inspired design and its less burdensome fee structure among a younger crowd. This made it an appealing way for PayPal to gain market share with a different demographic.
It’s also cheaper, which people like. PayPal doesn’t charge for money transfers from a bank account or PayPal balance, but does charge 2.9 percent plus a $0.30 fixed fee on payments from a credit or debit card in the U.S. Venmo, meanwhile, charges a fee of 3 percent for credit card payments, but makes debit card payments free. That’s appealing to millennials in particular, many of whom have ditched credit cards entirely, and are careful about their spending.
Plus, as a mobile-first application, Venmo was offering a more modern solution for mobile payments, at a time when PayPal’s app was looking a bit long in the tooth. (PayPal has since redesigned its mobile app experience to catch up.)
Another factor in Venmo’s decision could be that, more recently, it began facing competition from newcomer Zelle, the bank-backed mobile payments here in the U.S. which is forecast to outpace Venmo on users sometime this year, with 27.4 million users to Venmo’s 22.9 million. In light of that threat, Venmo may have wanted to consolidate its resources on its primary product – the mobile app.
Not everyone is happy about Venmo’s changes, of course. After all, even if the Venmo website wasn’t heavily used, it was used by some who will certainly miss it.
Reached for comment, Venmo explained the decision to phase out the website functionality stems from how it sees its product being used.
A Venmo spokesperson told TechCrunch:
Venmo continuously evaluates our products and services to ensure we are delivering our users the best experience. We have decided to begin to discontinue the ability to pay and charge someone on the Venmo.com website. Most of our users pay and request money using the Venmo app, so we’re focusing our efforts there. Users can continue to use the mobile app for their pay and charge transactions and can still use the website for cashing out Venmo balances, settings and statements.
The company declined to clarify what other functionality may be removed from the website over time, but noted that using Venmo to pay authorized merchants is unaffected.
Read Full Article
Gmail proves that some people hate smart suggestions
Gmail has recently introduced a brand new redesign. While you can disable or ignore most of the new features, Gmail has started resurfacing old unanswered emails with a suggestion that you should reply. And this is what it looks like:
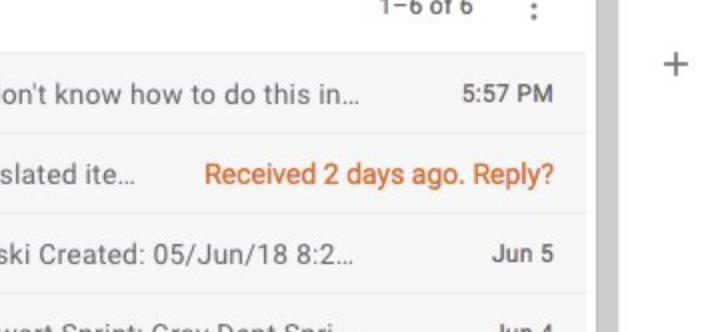
The orange text immediately grabs your attention. By bumping the email thread to the top of your inbox, Gmails also breaks the chronological order of your inbox.
Gmail is also making a judgement by telling you that maybe you should have replied and you’ve been procrastinating. Social networks already bombard us constantly with awful content that makes us sad or angry. Your email inbox shouldn’t make you feel guilty or stressed.
Even if the suggestions can be accurate, it’s a bit creepy, it’s poorly implemented and it makes you feel like you’re no longer in control of your inbox.
There’s a reason why Gmail lets you disable all the smart features. Some users don’t want smart categories, important emails first and smart reply suggestions. Arguably, the only smart feature everyone needs is the spam filter.
A pure chronological feed of your email messages is incredibly valuable as well. That’s why many Instagram users are still asking for a chronological feed. Sure, algorithmic feeds can lead to more engagement and improved productivity. Maybe Google conducted some tests and concluded that you end up answering more emails if you let Gmail do its thing.
But you may want to judge the value of each email without an algorithmic ranking.
VCs could spot the next big thing without any bias. Journalists could pay attention to young and scrappy startups as much as the new electric scooter startup in San Francisco. Universities could give a grant to students with unconventional applications. The HR department of your company could look at all applications without following Google’s order.
When the Gmail redesign started leaking, a colleague of mine said “I look forward to digging through settings to figure out how to turn this off.” And the good news is that you can turn it off.
There are now two options to disable nudges in the settings on the web version of Gmail. You can tick off the boxes “Suggest emails to reply to” and “Suggest emails to follow up on” if you don’t want to see this orange text ever again. But those features should have never been enabled by default in the first place.
Read Full Article
Gmail proves that some people hate smart suggestions
Gmail has recently introduced a brand new redesign. While you can disable or ignore most of the new features, Gmail has started resurfacing old unanswered emails with a suggestion that you should reply. And this is what it looks like:
The orange text immediately grabs your attention. By bumping the email thread to the top of your inbox, Gmails also breaks the chronological order of your inbox.
Gmail is also making a judgement by telling you that maybe you should have replied and you’ve been procrastinating. Social networks already bombard us constantly with awful content that makes us sad or angry. Your email inbox shouldn’t make you feel guilty or stressed.
Even if the suggestions can be accurate, it’s a bit creepy, it’s poorly implemented and it makes you feel like you’re no longer in control of your inbox.
There’s a reason why Gmail lets you disable all the smart features. Some users don’t want smart categories, important emails first and smart reply suggestions. Arguably, the only smart feature everyone needs is the spam filter.
A pure chronological feed of your email messages is incredibly valuable as well. That’s why many Instagram users are still asking for a chronological feed. Sure, algorithmic feeds can lead to more engagement and improved productivity. Maybe Google conducted some tests and concluded that you end up answering more emails if you let Gmail do its thing.
But you may want to judge the value of each email without an algorithmic ranking.
VCs could spot the next big thing without any bias. Journalists could pay attention to young and scrappy startups as much as the new electric scooter startup in San Francisco. Universities could give a grant to students with unconventional applications. The HR department of your company could look at all applications without following Google’s order.
When the Gmail redesign started leaking, a colleague of mine said “I look forward to digging through settings to figure out how to turn this off.” And the good news is that you can turn it off.
There are now two options to disable nudges in the settings on the web version of Gmail. You can tick off the boxes “Suggest emails to reply to” and “Suggest emails to follow up on” if you don’t want to see this orange text ever again. But those features should have never been enabled by default in the first place.
Read Full Article
6 Simple Steps to Fix Mac Apps That Crash or Freeze

Apps you install on your Mac can run into a variety of problems. An app might refuse to open a particular file, crash or hang in the middle of the work, or worse—crash at launch. Any erratic behavior that impedes the ability to use your Mac is frustrating.
The cause can be something external or internal. We’ll show you how to fix common app problems on macOS.
1. Quit or Force-Quit the App
An app might hang in the middle of work. After a few seconds of this, your mouse pointer will turn into a spinning rainbow beach ball. This indicates that the app is not responding, which arises due to several reasons. These include low free RAM, high CPU usage, or a bug in the app.
Most of the time, your other apps will continue to function. The pointer appears as a beach ball only when it’s over the window of the problematic app. To solve this problem, you need to quit the apps you aren’t actively using and free up valuable resources.
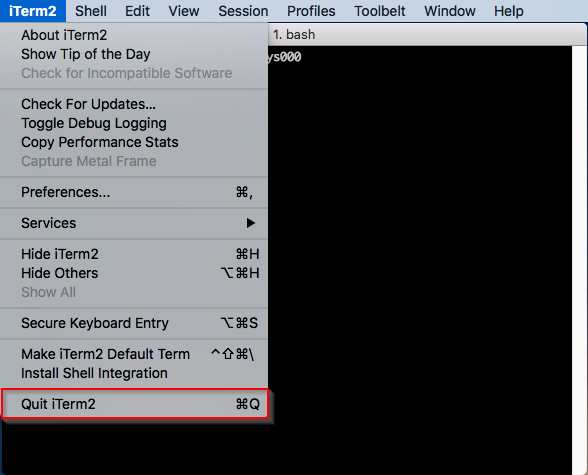
To quit an app, bring it to the foreground (the app name should be visible in the menu bar) and choose Quit from the app’s menu. The shortcut Cmd + Q also works.
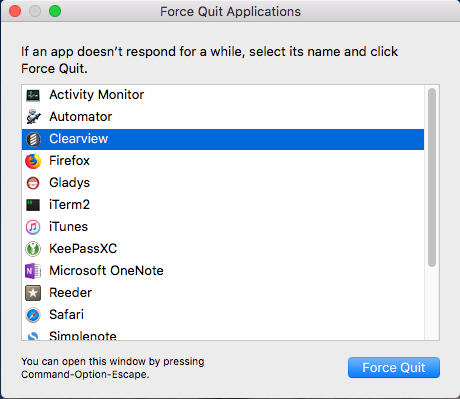
When an app gets stuck, and the regular Quit command won’t work, go to Apple menu > Force Quit or press Option + Cmd + Esc. Select the app in this window, then click Force Quit.
If an app keeps running even after you use the Force Quit command, a second attempt should do the trick.
2. Restart Your Mac
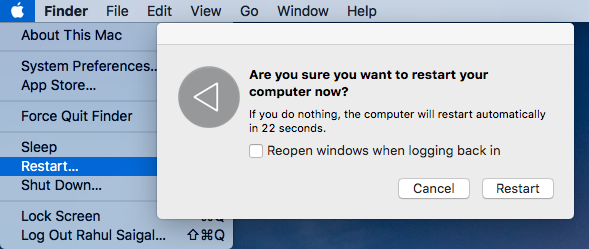
This simple procedure can resolve hangs, crashes, memory leaks, and other problems related to an app. To restart, click Apple Menu and choose Restart. When the confirmation alert appears, click the Restart button.
macOS then quits all background apps and running processes. This eliminates memory leaks, frees up RAM and CPU, and reduces the number of virtual memory swap files from the hard disk.
If the Apple Menu won’t open or your Mac is frozen, then press and hold Control + Cmd while you press the power button to force a restart. Alternatively, you can press and hold the power button for approximately 10 seconds to restart your Mac.
3. Apply Software Updates
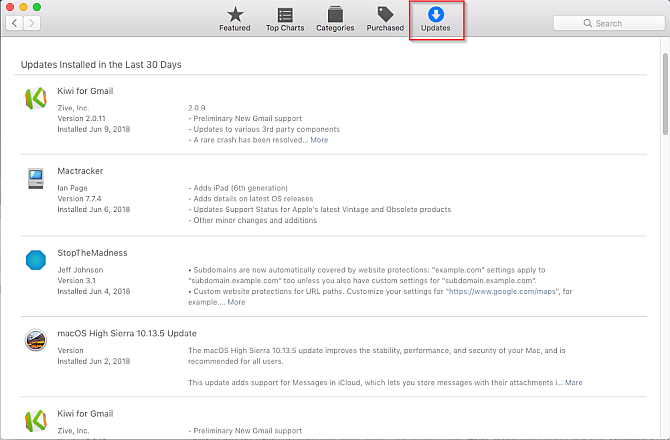
If an app is not functioning properly, you might want to download and apply any available updates. Launch the App Store, and click the Updates button. To update the app, click the Update button next to it.
When an app update is available, you’ll also receive a notification, and a badge will appear on the App Store icon.
Apps you’ve downloaded from a developer website may or may not have an automatic update mechanism. Some apps check for updates every time you launch, while others check on a fixed schedule, or only on demand. Look for a Check for Updates command on the Help menu, Application menu, or the Preferences window.
Keeping up with updates is challenging. To solve this problem, turn on the automatic update feature whenever possible or add the app to a Twitter list. The developer will likely share on Twitter when it releases a minor or major update to the app.
4. Check for Compatibility Issues
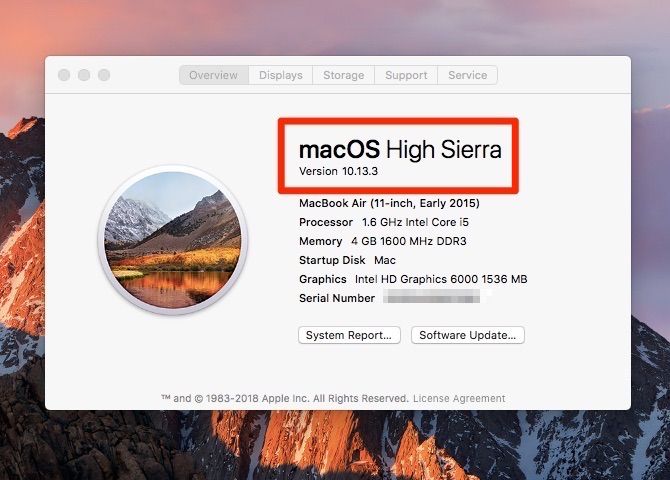
If you’re still having issues, you should ensure that your apps are compatible with the newest version of macOS. To do so, open Apple Menu > About This Mac to check which OS version you’re using. Most app developers list compatibility on their websites, so you can check if yours is supported.
While this should be no problem for the majority of apps, check with the developer for specific compatibility with your version of macOS if needed. The developer might also update users of any serious compatibility issues.
You should also check for old 32-bit apps on your system. To do so, open Apple Menu > About This Mac and click on the System Report button.
Scroll down the left pane and select Applications from the Software section. Wait for few seconds to build the list of installed apps. In the right pane, look for the 64-bit (Intel) column header. Adjust the column widths and click the header to sort the list.
No means the app is 32-bit, and Yes means the app is 64-bit.
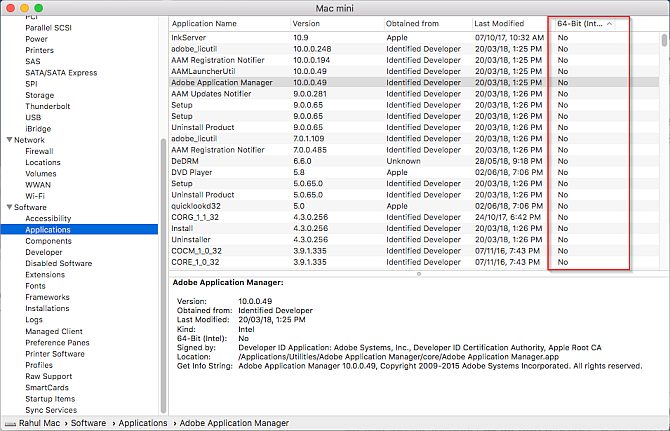
At WWDC 2018, Apple announced that macOS Mojave is officially the last version to support 32-bit apps. This means that if you rely on a 32-bit app, you should find a replacement or contact the developer about updating it.
Aside from this, most developers have their apps ready to go when a new macOS version releases, but you may run into bugs early on. Check support forums and similar communities to see if others have had your issue.
5. Delete the Preference File
Preference files contain an application’s settings. They’re essential because they include parameters required for an application to work correctly. If there’s a fault in the preference file, an app could experience a crash, hang, or even corrupt data.
Most preference files live in the following Library folders:
~/Library/Preferences or /Library/Preferences
~/Library/Application Support/[App or Developer name] or /Library/Application Support/[App or Developer name]
~/Library/Containers/[App name]/Data/Library/Preferences
According to the Apple developer documentation, the preference files follow a standard naming convention, known as reverse domain naming system. It includes the company name, then application identifier, followed by the property list file extension (.plist). For example, com.apple.finder.plist is the preference file for Finder.

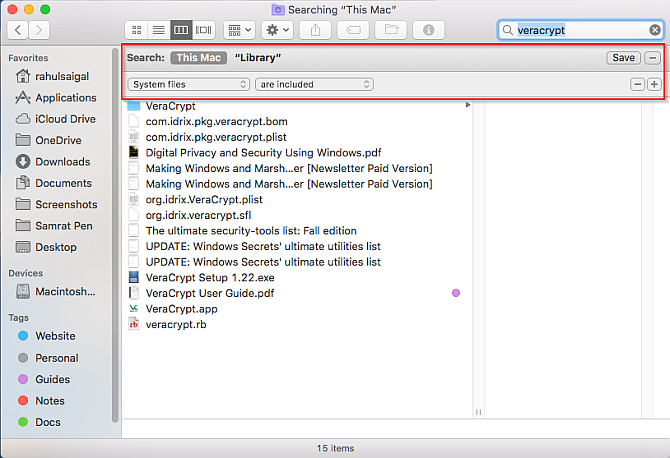
A developer might use a proprietary naming convention, but concentrating on the app name usually makes it clear. For example, org.idrix.Veracrypt.plist is the preference file for the Veracrypt app.
To locate the preference file for an app, first quit it if it’s running. Open the Library folder and set the window to List view, then click the Name column to sort the list alphabetically.
Type the app name in the Search field. To narrow the search results, click the Plus button and set the second row to System files are included.
Drag the preference file to your desktop. Since a background server process maintains the entire preference architecture, you need to clear its cache to remove the outdated preference information. This way an app won’t continue to use the old preference file.
To do this, choose Apple Menu > Log Out and log back in. Now, open the Terminal and type killall cfprefsd, and press Return.
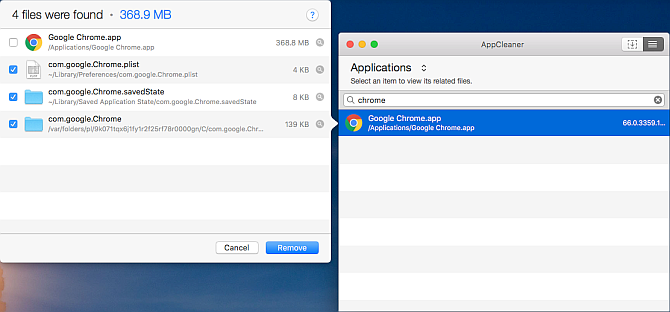
There’s another way to remove preference files. AppCleaner is a free utility to uninstall any Mac app without leaving data behind. But it can also remove the preference file without touching the rest of an app.
Type an app name into AppCleaner, and click it to load the results. Uncheck the app, tick all the other options, and click Remove.
6. Delete the Cache
All Mac apps use caches. The cache file stores frequently used information, which helps apps run more efficiently.
If a cache file becomes corrupt for some reason, then an app may crash or misbehave while reading that file. macOS may try to remove that corrupt cache, but because of the hidden nature of these cache files, problems resulting from corrupt cache contents are difficult to find.
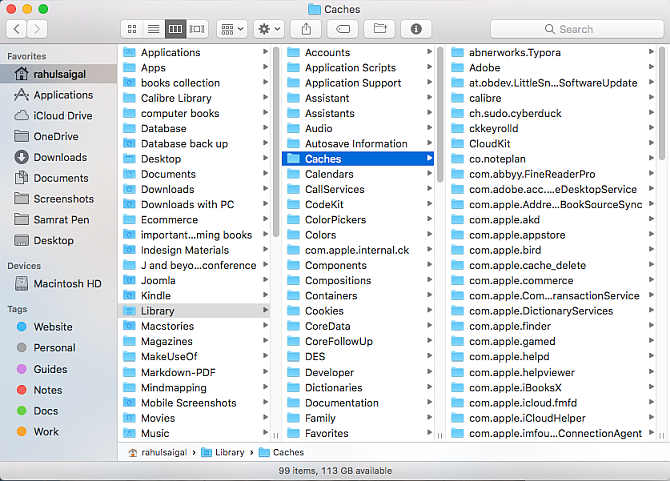
Cache files live in the following Library folders:
~/Library/Caches or /Library/Caches
~/Library/Containers/[App Name]/Data/Library/Caches/[App Name]
~/Library/Saved Application State
The app name follows the same naming convention as the preference files. Quit the app, and look for the particular cache file or folder in the above location. Once you locate them, drag them to the trash. The app will again regenerate the cache files automatically.
If the app has display issues, you might want to clean the system level font cache. Open the Terminal and type the following:
sudo atsutil databases -remove
Press Return and type your administrator password at the prompt. When the process is complete, restart your Mac.
You should not wipe out caches indiscriminately, because they keep your Mac performance smooth. Deleting them means your computer has to rebuild them, so only do so when you have an issue.
How to Troubleshoot Your Mac Even Further
Ideally, one of the above steps will fix the app problems you’re facing. If not, you can always try uninstalling the app and reinstalling a fresh copy.
Beyond these general approaches, an app might require specific troubleshooting steps for more in-depth problems. You’ll likely have to examine log files or contact the developer for individual support.
If you have some other macOS issues, you might want to try quick fixes for common Mac problems.
Image Credit: SIphotography/Depositphotos
Read the full article: 6 Simple Steps to Fix Mac Apps That Crash or Freeze
Read Full Article
Apple’s new Mac ads show that even Grimes uses dongles
Apple has launched an new advertising campaign for the Mac called “behind the Mac”. In this campaign, the company is sharing user stories of people using Mac for work, creative projects and accessibility reasons.
The Mac is a versatile platform. People use it for boring tasks, such as checking emails and browsing the web. But you can also use it for countless of other things. Apple wants to show you what you can do with a Mac beyond Word and Excel.
Apple has shared 4 videos today. The first one is a 60-second recap of the three other videos. Each standalone video is a portrait of someone who is using a Mac every day. There will be 12 portraits in total on Apple’s website.
Peter Kariuki is a developer who created an iPhone app to improve road safety in Rwanda. Bruce Hall is a photographer who is legally blind and uses photography to see more details of the outside world. And Grimes is one of the most interesting music artists out there.
There are a few interesting things to note. All three are using laptops. It’s clear that MacBooks have become the most popular computers from Apple. It doesn’t mean that Apple should abandon the iMac, iMac Pro, Mac Mini and Mac Pro. But only a fraction of Apple’s customers will buy them.
It’s also interesting to see that none of the Macs have been updated in the last twelve months. Apple has nothing new to sell on the Mac front. And it’s a bit worrying that the company is starting a new advertising campaign right now. Maybe there won’t be any Mac update for at least a few months.
And if you’re currently using a recent MacBook or MacBook Pro, you might be using stupid dongles right now to plug accessories to USB-C and Thunderbolt 3 ports. The good news is that, yes, even Grimes has to use dongles.
Read Full Article
Zelle forecast to overtake Venmo this year
Despite some concerns over its adoption by scammers, new payment service Zelle is shaping up to overtake rival Venmo this year, according to a new forecast from eMarketer. The firm expects Zelle to grow more than 73 percent in 2018, to reach 27.4 million users in the U.S., ahead of Venmo’s 22.9 million. Square Cash will trail with 9.5 million users.
This growth isn’t necessarily chalked up to user preference, but rather, ubiquity.

Zelle is backed by a network of over 30 U.S. banks, as their means of winning over users from other payment apps including Venmo, PayPal, and Square Cash. The banks had wanted to develop their own alternative these apps for several years, but only recently had those efforts gained momentum. The Zelle website now claims participation from over 100 financial institutions, as well as processor partners CO-OP Financial Services, FIS, Fiserv and Jack Henry, and network partners VISA and Mastercard.
The participating banks are now integrating Zelle into their own websites and mobile apps – meaning, users are finding Zelle as they use their existing banking applications. They’re not seeking it out directly, in many cases.
“One of the main hurdles new apps face is building trust and a sizable audience,” explained eMarketer forecasting analyst Cindy Liu. “But Zelle has leapfrogged the early stages of adoption by having the benefit of being embedded into the already existing apps of participating banks,” she said.
Earlier this year, Zelle said it was signing up users at a rate of 100,000 consumers per day, and claimed it had processed 247 million payments totaling $75 billion in 2017. That’s a sizable chunk of the peer-to-peer payments market.
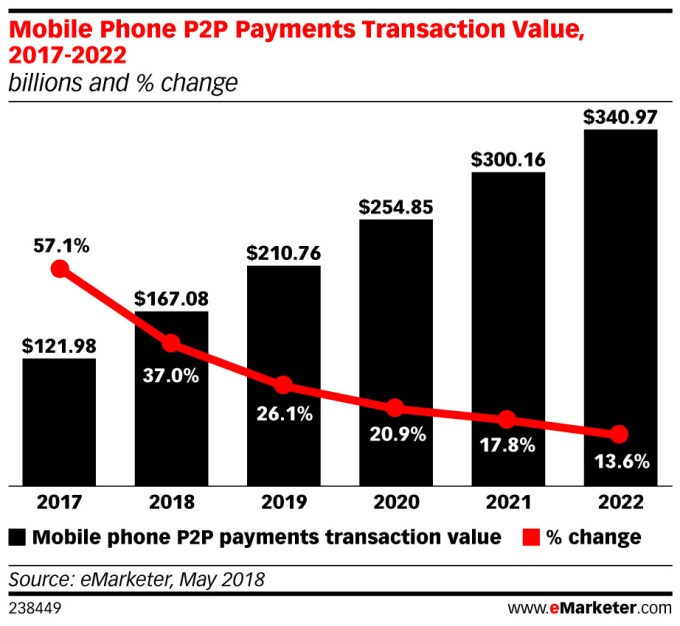
Emarketer’s forecast estimates the total number of U.S. p2p mobile payment users will grow 30 percent in 2018 to reach 82.5 million people, or 40.5 percent of U.S. smartphone users. It also expects the total transaction volume of p2p mobile payments to grow 37 percent this year to reach $167.08 billion. By 2021, that figure will reach over $300 billion.
That leaves room for all services to carve out their piece of the market, even if Zelle ends up in the lead.
Read Full Article
How to Use Adobe Spark as a Free Photo Collage App

There aren’t many tools or apps that Adobe gives you for free. But Adobe Spark is one that you should catch if you love making photo collages with minimum effort. With that photo collage, you can tell a story to others or create fancy visual bucket lists for yourself. Let’s start.
How to Make a Photo Collage With Adobe Spark
Adobe Spark is a storytelling application. Both the website and the iOS apps (Spark Video, Spark Page, and Spark Post), are free. Both the website and the apps help you create beautiful photo collages in seconds with its intuitive interface. You can use your Adobe ID or sign up for free.
- Start. Log into (or create a new ID) Adobe Spark and its free collage maker.
- Select a collage size. The collage size can depend on the platform you plan to publish on.
- Choose the photos. Search Creative Commons images from sites like Unsplash and Pixabay, or upload your own photos.
- Preview images. Image thumbnails appear on the left. You can finetune the selection by deleting the ones you don’t like.
- Design the collage. Click Next to display the Spark Post Layout and Design view which has all the tools to tweak the look of the collage. A few arrangements, frame, and color options are provided. You can also add text, more photos, icons, and a logo to the project if you want.

- Finish. Share or download the collage to your desktop as a JPEG file.

Adobe Spark is an easy tool to use, unlike many Adobe tools which come with steep learning curves. The fact that it is one of the nicer free tools from Adobe adds to the charm.
Read the full article: How to Use Adobe Spark as a Free Photo Collage App
Read Full Article
How to Download Your Privacy Data From Spotify
Cast your mind back to May 2018. Your inbox was probably drowning under a near-endless stream of amended privacy policies from every service you have ever signed up for.
It was all part of the European Union’s General Data Protection Regulation (GDPR) policy which forced companies to give their customers much more control over the personal data they have collected.
As part of the reforms, Spotify introduced a new privacy tool. It allows you to download and view all the data that Spotify holds on you. Let’s look at how it works.
How to Download Your Privacy Data From Spotify
To download your data from Spotify, you will need to head to your account portal using a web browser. You cannot do it through the desktop or mobile apps.
- Go to spotify.com/us/account and enter your login credentials.
- In the menu on the left-hand side of the screen, click on Privacy settings.
- Scroll down to the Download your data section.
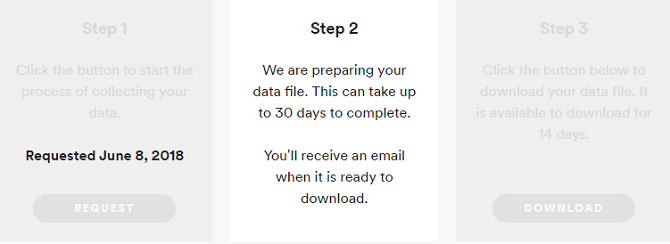
- Go to Step 1 > Request. You will probably have to complete a captcha.
- You will receive an on-screen notification saying Spotify is processing your data. It could take up to 30 days.
- When the processing is complete, you will receive an email.
- After seeing the email, return to Privacy settings; you will now have access to Step 3.
- Click on Download.
There are a couple of other settings worth noting in the Privacy section of your account portal:
- Facebook data: You can choose whether Spotify can process the Facebook data you share with the company. This setting is beneficial for people who use Facebook credentials to log into their account.
- Tailored ads: If you use the free version of Spotify, this setting prevents Spotify from sharing your data with third-party ad companies.
Of course, you won’t need to worry about tailored ads if you upgrade to Spotify Premium. If you’re thinking about forking out, check out our guide to the Spotify Premium service before opening your wallet.
Read the full article: How to Download Your Privacy Data From Spotify
Read Full Article
How to Install Microsoft Store Apps to Remote Windows 10 Devices

The Microsoft Store, formerly the Windows Store, is Microsoft’s hub for downloading apps made for Windows 10. While you probably install most of your software from outside it, the Store still has lots of great apps. And thanks to its ubiquity, it has a few handy features like centralized updates.
Up until recently, you could only install apps from the Store from your device directly. Recently, Microsoft has added a new feature that lets you install Store apps on any of your devices. This takes advantage of using a Microsoft account with Windows 10 to keep all your devices in sync. Here’s how to give it a try.
How to Install Store Apps to Remote Windows Devices
While this is a feature of the Microsoft Store, it actually doesn’t work through the Store app in Windows 10. Instead, you’ll need to visit the Microsoft Store page of the app you want to install through your browser. This isn’t limited to just Edge; we tested it as working in Chrome too.
Head to Microsoft’s Store on the web, sign into your Microsoft account, and search for the app you want to install.
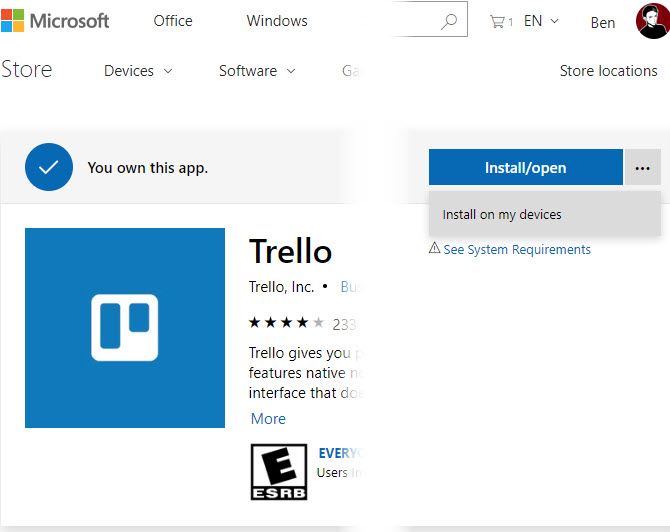
Note that you must already own the app you want to install on other devices. You’ll see a Get button if you visit an app you haven’t downloaded yet. But on an app you own, you’ll see a three-dot button next to the Install/open button. Click it, then choose Install on my devices.
You’ll then see a window that lets you check all the devices you want to install that app on. Choose Install now, and the app will download on each device that’s online. Now when you find a great app, you can install it everywhere and save time!
Having trouble with the Store? Check out our troubleshooting tips for the Windows Store and its apps.
Read the full article: How to Install Microsoft Store Apps to Remote Windows 10 Devices
Read Full Article