Tinder has already developed a fairly robust chat platform within its dating app, with support for sharing things like Bitmoji and GIFs, and the ability to “like” messages by tapping a heart icon. Now, the company is testing a new integration – sharing music via Spotify. Tinder confirmed with TechCrunch it’s trying out a new way to connect users, by allowing them to share music within their chats.
The test is currently taking place across global markets, and Spotify is the only music service involved.
The new feature was first spotted by the blog MSPoweruser who speculated the addition could be an experiment on Tinder’s part, ahead of a public launch. That does seem to be the case, as it turns out.
According to screenshots the site posted, a green music icon has been swapped in for the Bitmoji icon. Clicking this allows you to enter a query into a search box and see matching results displayed above. You’re not able to share the full song, however – only a 30-second clip.
Above: Tinder music test with Spotify; credits: MSPoweruser
Tinder, like its rival Bumble, has offered integration with Spotify’s streaming music service since 2016.
Both apps allow users to connect their Spotify accounts in order to showcase their top artists on their profile. As Tinder explained at the time of launch, music can be a powerful signal in terms of attraction and plays an important role in terms of getting to know a new connection, as well.
The company even launched its own profile on Spotify with playlists focused on dating, love and romance as a part of its collaboration with the music service.
The Spotify integration has paid off for Tinder in terms of user engagement within its app, the company tells us.
“Users love connecting over shared tastes in music,” a Tinder spokesperson explained. “In fact, users who update their ‘Anthem’ are most likely to start a conversation via Feed. With this in mind, we’re testing the ability to share music with a match while chatting on Tinder,” they added.
The “Anthem” is a feature that lets you pick a favorite song or one that’s representative of your tastes or personality. This is then highlighted in a special section on your Tinder profile.
Tinder did not offer any details as to when it expects the test to wrap or when it would launch music sharing more broadly.
Google Cloud today announced that Nvidia’s Turing-based Tesla T4 data center GPUs are now available in beta in its data centers in Brazil, India, Netherlands, Singapore, Tokyo and the United States. Google first announced a private test of these cards in November, but that was a very limited alpha test. All developers can now take these new T4 GPUs for a spin through Google’s Compute Engine service.
The T4, which essentially uses the same processor architecture as Nvidia’s RTX cards for consumers, slots in between the existing Nvidia V100 and P4 GPUs on the Google Cloud Platform. While the V100 is optimized for machine learning, though, the T4 (as its P4 predecessor) is more of a general purpose GPU that also turns out to be great for training models and inferencing.
In terms of machine and deep learning performance, the 16GB T4 is significantly slower than the V100, though if you are mostly running inference on the cards, you may actually see a speed boost. Unsurprisingly, using the T4 is also cheaper than the V100, starting at $0.95 per hour compared to $2.48 per hour for the V100, with another discount for using preemptible VMs and Google’s usual sustained use discounts.
Google says that the card’s 16GB memory should easily handle large machine learning models and the ability to run multiple smaller models at the same time. The standard PCI Express 3.0 card also comes with support for Nvidia’s Tensor Cores to accelerate deep learning and Nvidia’s new RTX ray-tracing cores. Performance tops out at 260 TOPS and developers can connect up to four T4 GPUs to a virtual machine.
It’s worth stressing that this is also the first GPU in the Google Cloud lineup that supports Nvidia’s ray-tracing technology. There isn’t a lot of software on the market yet that actually makes use of this technique, which allows you to render more lifelike images in real time, but if you need a virtual workstation with a powerful next-generation graphics card, that’s now an option.
With today’s beta launch of the T4, Google Cloud now offers quite a variety of Nvidia GPUs, including the K80, P4, P100 and V100, all at different price points and with different performance characteristics.
A study by the Pew Research Center suggests most Facebook users are still in the dark about how the company tracks and profiles them for ad-targeting purposes.
Pew found three-quarters (74%) of Facebook users did not know the social networking behemoth maintains a list of their interests and traits to target them with ads, only discovering this when researchers directed them to view their Facebook ad preferences page.
A majority (51%) of Facebook users also told Pew they were uncomfortable with Facebook compiling the information.
While more than a quarter (27%) said the ad preference listing Facebook had generated did not very or at all accurately represent them.
The researchers also found that 88% of polled users had some material generated for them on the ad preferences page. Pew’s findings come from a survey of a nationally representative sample of 963 U.S. Facebook users ages 18 and older which was conducted between September 4 to October 1, 2018, using GfK’s KnowledgePanel.
In a senate hearing last year Facebook founder Mark Zuckerberg claimed users have “complete control” over both information they actively choose to upload to Facebook and data about them the company collects in order to target ads.
But the key question remains how Facebook users can be in complete control when most of them they don’t know what the company is doing. This is something U.S. policymakers should have front of mind as they work on drafting a comprehensive federal privacy law.
Pew’s findings suggest Facebook’s greatest ‘defence’ against users exercising what little control it affords them over information its algorithms links to their identity is a lack of awareness about how the Facebook adtech business functions.
After all the company markets the platform as a social communications service for staying in touch with people you know, not a mass surveillance people-profiling ad-delivery machine. So unless you’re deep in the weeds of the adtech industry there’s little chance for the average Facebook user to understand what Mark Zuckerberg has described as “all the nuances of how these services work”.
Having a creepy feeling that ads are stalking you around the Internet hardly counts.
At the same time, users being in the dark about the information dossiers Facebook maintains on them, is not a bug but a feature for the company’s business — which directly benefits by being able to minimize the proportion of people who opt out of having their interests categorized for ad targeting because they have no idea it’s happening. (And relevant ads are likely more clickable and thus more lucrative for Facebook.)
Hence Zuckerberg’s plea to policymakers last April for “a simple and practical set of — of ways that you explain what you are doing with data… that’s not overly restrictive on — on providing the services”.
(Or, to put it another way: If you must regulate privacy let us simplify explanations using cartoon-y abstraction that allows for continued obfuscation of exactly how, where and why data flows.)
From the user point of view, even if you know Facebook offers ad management settings it’s still not simple to locate and understand them, requiring navigating through several menus that are not prominently sited on the platform, and which are also complex, with multiple interactions possible. (Such as having to delete every inferred interest individually.)
The average Facebook user is unlikely to look past the latest few posts in their newsfeed let alone go proactively hunting for a boring sounding ‘ad management’ setting and spending time figuring out what each click and toggle does (in some cases users are required to hover over a interest in order to view a cross that indicates they can in fact remove it, so there’s plenty of dark pattern design at work here too).
And all the while Facebook is putting a heavy sell on, in the self-serving ad ‘explanations’ it does offer, spinning the line that ad targeting is useful for users.What’s not spelt out is the huge privacy trade off it entails — aka Facebook’s pervasive background surveillance of users and non-users.
Nor does it offer a complete opt-out of being tracked and profiled; rather its partial ad settings let users “influence what ads you see”.
But influencing is not the same as controlling, whatever Zuckerberg claimed in Congress. So, as it stands, there is no simple way for Facebook users to understand their ad options because the company only lets them twiddle a few knobs rather than shut down the entire surveillance system.
The company’s algorithmic people profiling also extends to labelling users as having particular political views, and/or having racial and ethnic/multicultural affinities.
Pew researchers asked about these two specific classifications too — and found that around half (51%) of polled users had been assigned a political affinity by Facebook; and around a fifth (21%) were badged as having a “multicultural affinity”.
Of those users who Facebook had put into a particular political bucket, a majority (73%) said the platform’s categorization of their politics was very or somewhat accurate; but more than a quarter (27%) said it was not very or not at all an accurate description of them.
“Put differently, 37% of Facebook users are both assigned a political affinity and say that affinity describes them well, while 14% are both assigned a category and say it does not represent them accurately,” it writes.
Use of people’s personal data for political purposes has triggered some major scandals for Facebook’s business in recent years. Such as the Cambridge Analytica data misuse scandal — when user data was shown to have been extracted from the platform en masse, and without proper consents, for campaign purposes.
In other instances Facebook ads have also been used to circumvent campaign spending rules in elections. Such as during the UK’s 2016 EU referendum vote when large numbers of ads were non-transparently targeted with the help of social media platforms.
And indeed to target masses of political disinformation to carry out election interference. Such as the Kremlin-backed propaganda campaign during the 2016 US presidential election.
Last year the UK data watchdog called for an ethical pause on use of social media data for political campaigning, such is the scale of its concern about data practices uncovered during a lengthy investigation.
Yet the fact that Facebook’s own platform natively badges users’ political affinities frequently gets overlooked in the discussion around this issue.
For all the outrage generated by revelations that Cambridge Analytica had tried to use Facebook data to apply political labels on people to target ads, such labels remain a core feature of the Facebook platform — allowing any advertiser, large or small, to pay Facebook to target people based on where its algorithms have determined they sit on the political spectrum, and do so without obtaining their explicit consent. (Yet under European data protection law political beliefs are deemed sensitive information, and Facebook is facing increasing scrutiny in the region over how it processes this type of data.)
Of those users who Pew found had been badged by Facebook as having a “multicultural affinity” — another algorithmically inferred sensitive data category — 60% told it they do in fact have a very or somewhat strong affinity for the group to which they are assigned; while more than a third (37%) said their affinity for that group is not particularly strong.
“Some 57% of those who are assigned to this category say they do in fact consider themselves to be a member of the racial or ethnic group to which Facebook assigned them,” Pew adds.
It found that 43% of those given an affinity designation are said by Facebook’s algorithm to have an interest in African American culture; with the same share (43%) is assigned an affinity with
Hispanic culture. While one-in-ten are assigned an affinity with Asian American culture.
(Facebook’s targeting tool for ads does not offer affinity classifications for any other cultures in the U.S., including Caucasian or white culture, Pew also notes, thereby underlining one inherent bias of its system.)
In recent years the ethnic affinity label that Facebook’s algorithm sticks to users has caused specific controversy after it was revealed to have been enabling the delivery of discriminatory ads.
As a result, in late 2016, Facebook said it would disable ad targeting using the ethnic affinity label for protected categories of housing, employment and credit-related ads. But a year later its ad review systems were found to be failing to block potentially discriminatory ads.
The act of Facebook sticking labels on people clearly creates plenty of risk — be that from election interference or discriminatory ads (or, indeed, both).
Risk that a majority of users don’t appear comfortable with once they realize it’s happening.
And therefore also future risk for Facebook’s business as more regulators turn their attention to crafting privacy laws that can effectively safeguard consumers from having their personal data exploited in ways they don’t like. (And which might disadvantage them or generate wider societal harms.)
Commenting about Facebook’s data practices, Michael Veale, a researcher in data rights and machine learning at University College London, told us: “Many of Facebook’s data processing practices appear to violate user expectations, and the way they interpret the law in Europe is indicative of their concern around this. If Facebook agreed with regulators that inferred political opinions or ‘ethnic affinities’ were just the same as collecting that information explicitly, they’d have to ask for separate, explicit consent to do so — and users would have to be able to say no to it.
“Similarly, Facebook argues it is ‘manifestly excessive’ for users to ask to see the extensive web and app tracking data they collect and hold next to your ID to generate these profiles — something I triggered a statutory investigation into with the Irish Data Protection Commissioner. You can’t help but suspect that it’s because they’re afraid of how creepy users would find seeing a glimpse of the the truth breadth of their invasive user and non-user data collection.”
In a second survey, conducted between May 29 and June 11, 2018 using Pew’s American Trends Panel and of a representative sample of all U.S. adults who use social media (including Facebook and other platforms like Twitter and Instagram), Pew researchers found social media users generally believe it would be relatively easy for social media platforms they use to determine key traits about them based on the data they have amassed about their behaviors.
“Majorities of social media users say it would be very or somewhat easy for these platforms to determine their race or ethnicity (84%), their hobbies and interests (79%), their political affiliation (71%) or their religious beliefs (65%),” Pew writes.
While less than a third (28%) believe it would be difficult for the platforms to figure out their political views, it adds.
So even while most people do not understand exactly what social media platforms are doing with information collected and inferred about them, once they’re asked to think about the issue most believe it would be easy for tech firms to join data dots around their social activity and make sensitive inferences about them.
Commenting generally on the research, Pew’s director of internet and technology research, Lee Rainie, said its aim was to try to bring some data to debates about consumer privacy, the role of micro-targeting of advertisements in commerce and political activity, and how algorithms are shaping news and information systems.
Update: Responding to Pew’s research in a statement, Facebook said:
We want people to see better ads — it’s a better outcome for people, businesses, and Facebook when people see ads that are more relevant to their actual interests. One way we do this is by giving people ways to manage the type of ads they see. Pew’s findings underscore the importance of transparency and control across the entire ad industry, and the need for more consumer education around the controls we place at people’s fingertips. This year we’re doing more to make our settings easier to use and hosting more in-person events on ads and privacy.
Motorola has revived the Razr name a few times over the years, but the once mighty brand has failed to regain the heights of its early days as an ultra-slim flip phone. But what better time for for the phone maker’s parent Lenovo to bring back the brand in earnest as the mobile world is readying itself for a wave of foldable smartphones?
Nostalgia’s a bit of a mixed bag in consumer electronics. Take the recent returns of Nokia (good), BlackBerry (okay) and Palm (yikes). Slapping a familiar brand on a new product is a fast track to prominence, but not necessarily success. What ultimately may hinder Razr’s rumored return, however, is price.
All of this stems from a new Wall Street Journal report noting Lenovo’s plan to revive the Razr as a foldable smartphone. The price point puts the handset north of even Apple and Samsung’s flagships, at $1,500. Of course, there isn’t really a standardized price point for the emerging foldables category yet.
The Royole FlexPai starts at around $1,300 — not cheap, especially for a product from a relative unknown. And Samsung, the next on the list to embrace the foldable, has never been afraid to hit a premium price point. Ultimately, $1,500 could well be standard for these sorts of products. Whether or not consumers are willing to pay that, however, is another question entirely.
The new Razr is apparently destined for Verizon this year. The carrier (which, as it happens, also owns TechCrunch) has had a longstanding relationship with Motorola. Success, however, is going to hinge on more than name recognition alone.
A picture says a thousand words. Which is why it’s so helpful that you can share your screen on Skype. There’s no need to cumbersomely explain something when you can instantly show it.
We’re going to show you how to share your screen on Skype, for both Windows and mobile. It’s so easy! We’ll also cover Skype for Business, for those of you in an enterprise. You’ll be sharing your screen with Skype in no time.
How to Share Your Screen on Skype for Windows
First, call a contact. It can be an individual or a group. It can be an audio or a video call.
Once in the call, hover in the Skype window and click the two overlapping squares icon in the bottom-right. If you don’t see this, it’s because your Skype window is too narrow—click the plus icon instead and then click Share screen.
You will see your screen outlined in the Skype window. If you have multiple monitors, you can click the monitor you want to share. If you only have one monitor, it’ll be preselected.
To share your computer’s audio, slide Share computer sound on.
When ready, click Share screen (or Share screen and sounds if applicable.)
The other people in the call will now see your entire screen. This works regardless of what device they’re using.
To end screen sharing, go back to the Skype window and click the same button you used to turn it on.
How to Share Your Screen on Skype for Mobile
Unfortunately, it isn’t possible to share a stream of your screen on mobile versions of Skype. But there are a couple of alternatives.
Firstly, while on the call, you can press the snapshot icon in the bottom-left. It’s a small circle encased by the corners of a square. This will immediately take a picture of the call and share it into the chat for everyone to see. This is only useful for when you want to capture a moment from those using their webcams in the call since the button won’t appear on the Skype overlay in other apps.
To share any other screen on your phone, you will need to take a screenshot and share it into the chat. It’s not the same as a constant screen share, but it might do the job.
Taking a screenshot on your phone is easy.
On Android, hold volume down and power together for a few seconds.
On iOS, hold power and volume up or power and home (depending on your model) together for a few seconds.
In Skype, tap the screen to bring up the overlay and then tap the message icon in the top-right. Next, in the bottom-right, tap the camera icon. Then enter your phone gallery by tapping the image in the bottom-left. You may need to change the folder by tapping the text at the top. Select what you want to share, then tap the send message icon in the bottom-right.
How to Share Your Screen on Skype for Business
If you’re in an enterprise setting, you may have to use Skype for Business rather than the regular version. But don’t fear—the Business version is better for screen sharing.
Open up a chat with one of your contacts. You don’t even need to call them to start screen sharing, though you can do it during a call too. Click the monitor icon from the bottom of the chat window.
To share a specific window, click Present Programs. This will bring up a window where you can select which programs to share. Once done, click Present.
To share your entire screen, click Present Desktop. This opens a window where you can select your monitor. If you only have one monitor, it will be preselected. When ready, click Present. A yellow outline will surround the area that you’re sharing.
You can click Give Control from the top pane to pass control of your cursor to someone on the call. This is really useful when someone needs you to do something specific on your machine since it’ll be quicker for them to do it.
To stop sharing your screen, click Stop Presenting.
Skype is great when you need to quickly and easily share your screen. When you’re already using Skype to chat, it’s a great solution.
However, perhaps you need something different, like being able to share in smooth high definition or without installing a program. If so, check out our roundup of easy screen sharing and remote access tools.
Wireless security is extremely important. The vast majority of us connect a mobile device to a router at some point during each day, be that smartphone, tablet, laptop, or otherwise. Furthermore, Internet of Things devices connect to the internet using Wi-Fi.
They’re always on, always listening, and always in dire need of additional security.
That’s where Wi-Fi encryption steps in. There are several different ways to protect your Wi-Fi connection. But how do you know which Wi-Fi security standard is best? Here’s how.
Wi-Fi Security Types
The most common Wi-Fi security types are WEP, WPA, and WPA2.
WEP vs. WPA
Wired Equivalent Privacy (WEP) is the oldest and least secure Wi-Fi encryption method. It is laughable how terrible WEP is at protecting your Wi-Fi connection; if you are using WEP, you need to change this right away.
Furthermore, if you’re using an older router that only supports WEP, you should upgrade that too, for both security and better connectivity.
Why is it bad? Crackers figured out how to break WEP encryption, and it is easily done using freely available tools. In 2005, the FBI gave a public demonstration using free tools to raise awareness. Almost anyone can do it. As such, the Wi-Fi Alliance officially retired the WEP Wi-Fi encryption standard in 2004.
By now, you should be using a version of WPA.
WPA and WPA2 Definitions
Wi-Fi Protected Access (WPA) is the evolution of the insecure WEP standard. WPA was only a stepping stone to WPA2.
When it became apparent WEP is woefully insecure, the Wi-Fi Alliance developed WPA to give network connections an additional layer of security before the development and introduction of WPA2. The security standards of WPA2 were always the desired goal.
WPA3
At the current time, the vast majority of routers and Wi-Fi connections use WPA2. At least, they should do because even with the encryption standards vulnerabilities, it is still very secure.
However, the latest upgrade to Wi-Fi Protected Access—WPA3—is firmly on the horizon.
WPA3 includes some important upgrades for modern wireless security, including:
Brute Force Protection. WPA3 will protect users, even with weaker passwords, from brute-force dictionary attacks (attacks that attempt to guess passwords over and over again).
Public Network Privacy. WPA3 adds “individualized data encryption,” theoretically encrypting your connection to a wireless access point regardless of password.
Securingthe Internet of Things. WPA3 arrives at a time when Internet of Things device developers are under enormous pressure to improve baseline security.
Stronger Encryption. WPA3 adds much stronger 192-bit encryption to the standard, drastically improving the level of security.
WPA3 still hasn’t hit the consumer router market, despite an initial timeline suggesting it would arrive some time toward the end of 2018. The jump from WEP to WPA, to WPA2 took some time, so it isn’t anything to worry about at the current time.
Furthermore, manufacturers must issue backward compatible devices with patches, a process that can take months, if not years.
There are three Wi-Fi Protected Access iterations. Well, the third one isn’t quite with us, but it will soon arrive on your router. But what makes them different from one another? Why is WPA3 better than WPA2?
WPA Is Inherently Vulnerable
WPA was doomed from the outset. Despite featuring much stronger public key encryption, using 256-bit WPA-PSK (Pre-Shared Key), WPA still contained a string of vulnerabilities it inherited from the older WEP standard (both of whom share the vulnerable stream encryption standard, RC4).
The vulnerabilities centered on the introduction of the Temporal Key Integrity Protocol (TKIP).
TKIP itself was a big step forward in that it used a per-packet key system to protect each data packet sent between devices. Unfortunately, the TKIP WPA rollout had to take into account old WEP devices.
The new TKIP WPA system recycled some aspects of the compromised WEP system and, of course, those same vulnerabilities eventually appeared in the newer standard.
WPA2 Supersedes WPA
WPA2 officially superseded WPA in 2006. WPA, then, had a short run as the pinnacle of Wi-Fi encryption.
WPA2 brought with it another raft of security and encryption upgrades, most notably the introduction of the Advanced Encryption Standard (AES) to consumer Wi-Fi networks. AES is substantially stronger than RC4 (as RC4 has been cracked on multiple occasions) and is the security standard in place for many online services at the current time.
WPA2 also introduced the Counter Cipher Mode with Block Chaining Message Authentication Code Protocol (or CCMP, for a much shorter version!) to replace the now vulnerable TKIP.
TKIP remains part of the WPA2 standard as a fall back as well as to offer functionality for WPA-only devices.
WPA2 KRACK Attack
The somewhat amusingly named KRACK attack is no laughing matter; it is the first vulnerability found in WPA2. The Key Reinstallation Attack (KRACK) is a direct attack on the WPA2 protocol and unfortunately undermines every Wi-Fi connection using WPA2.
Essentially, KRACK undermines a key aspect of the WPA2 four-way handshake, allowing a hacker to intercept and manipulate the creation of new encryption keys within the secure connection process.
Even with the potential for a KRACK attack, the likelihood of someone using it to attack your home network is slim.
WPA3: The (Wi-Fi) Alliance Strikes Back
WPA3 picks up the slack and offers much greater security, while actively taking into account the oft-lacking security practices everyone is guilty of at times. For instance, WPA3-Personal provides encryption to users even if hackers crack your password after you connect to a network.
Furthermore, WPA3 requires all connections to use Protected Management Frames (PMF). PMFs essentially augment privacy protections, with additional security mechanisms in place to secure data.
The 128-bit AES remains in place for WPA3 (a testament to its enduring security). However, for WPA3-Enterprise connections, 198-bit AES is required. WPA3-Personal users will have the option of using the extra-strength 198-bit AES, too.
The following video explores WPA3 new features in more detail.
What Is a WPA2 Pre-Shared Key?
WPA2-PSK stands for Pre-Shared Key. WPA2-PSK is also known as Personal mode, and it is intended for home and small office networks.
Your wireless router encrypts network traffic with a key. With WPA-Personal, this key is calculated from the Wi-Fi passphrase you set up on your router. Before a device can connect to the network and understand the encryption, you must enter your passphrase on it.
The primary real-world weaknesses with WPA2-Personal encryption are weak passphrases. Just as many people use weak passwords like “password” and “letmein” for their online accounts, many people will likely use weak passphrases to secure their wireless networks. You must use a strong passphrase or unique password to secure your network or WPA2 won’t protect you much.
What Is WPA3 SAE?
When you use WPA3, you will use a new key exchange protocol called Simultaneous Authentication of Equals (SAE). SAE, also known as the Dragonfly Key Exchange Protocol, is a more secure method of key exchange that addresses the KRACK vulnerability.
Specifically, it is resistant to offline decryption attacks through the provision of “forward secrecy.” Forward secrecy stops an attacker decrypting a previously recorded internet connection, even if they know the WPA3 password.
As well as this, WPA3 SAE uses a peer-to-peer connection to establish the exchange and cut out the possibility of a malicious middle man intercepting the keys.
Here’s an explanation as to what “key exchange” means in the context of encryption, using the pioneering Diffie-Hellman exchange its example.
What Is Wi-Fi Easy Connect?
Wi-Fi Easy Connect is a new connection standard designed to “simplify the provisioning and configuration of Wi-Fi devices.”
Within that, Wi-Fi Easy Connect offers strong public key encryption for each device added to a network, even those “with little or no user interface, such as smart home and IoT products.”
For instance, in your home network, you would designate one device as the central configuration point. The central configuration point should be a rich media device, like a smartphone or tablet.
The rich media device is then used to scan a QR code which in turn runs the Wi-Fi Easy Connect protocol as designed by the Wi-Fi Alliance.
Wi-Fi Easy Connect reduces the complexity of connecting devices to Wi-Fi networks. The connected home market is predicted to grow exponentially, configuring devices easily & securely is even more critical. https://t.co/yPIhhNhwFkpic.twitter.com/jEHiVIO4lG
Scanning the QR code (or entering a code specific to the IoT device) gives the connecting device the same security and encryption as other devices on the network, even if direct configuration isn’t possible.
Wi-Fi Easy Connect, in conjunction with WPA3, will drastically increase the security of IoT and smart home device networks.
Wi-Fi Security Is Important
Even at the time of writing, WPA2 remains the most secure Wi-Fi encryption method, even taking the KRACK vulnerability into account. While KRACK undoubtedly is an issue, especially for Enterprise networks, home users are unlikely to encounter an attack of this variety (unless you are a high-worth individual, of course).
WEP is very easy to crack. You should not use it for any purpose. Moreover, if you have devices that can only use WEP security, you should consider replacing them to boost the security of your network.
It is also important to note that WPA3 isn’t going to appear magically and secure all of your devices overnight. There is always a long period between the introduction of a new Wi-Fi encryption standard and widespread adoption.
The adoption rate depends on how quickly manufacturers patch devices and how quickly router manufacturers adopt WPA3 for new routers.
At the current time, you should focus on protecting your existing network, including WPA2. A great place to start is looking at your router security. Check out why you should change your default router password before it gets hacked!
Have you bought an Audible book you don’t like and want to return it? No problem. It’s surprisingly easy to return an Audible book and get a full refund.
Whether you bought the wrong book by mistake, don’t like it after the first chapter, or just can’t get into the narration, we’ll explain how to return books on Audible.
Audible’s Return Policy
Returning audiobooks is one of the best Audible insider tips everyone should be aware of. But before you start the return process, it’s wise to review the requirements for returning a book on Audible.
First, you must be an Audible member to return books. If you use the service, you’re likely to be a member. The standard plan costs $15/month and includes a credit for one book of your choosing every 30 days. While you can buy from Audible without a membership, it’s more expensive to do so.
Audible also requires that you return books within 365 days of purchasing them. This gives you plenty of time, but you still can’t return a book you bought three years ago and forgot about.
You should also know that you’ll receive a refund in the same way you purchased the book. If you used a monthly credit to buy your book, you’ll get the credit back. Whereas if you paid for the book, you’ll get a refund for the cost.
I applaud Audible's return policy
If you don't like the book, you can return it within a year's time
It makes it so easy to start books and switch to another if you aren't interested
Finally, make sure to play fair with this system. It’s designed so you don’t ever regret trying a new audiobook, but you shouldn’t use it to game the system. Audible may suspend your account if you return books too often.
How to Return a Book on Audible
To return an Audible book, you’ll need to visit the desktop or mobile site. There’s no option to do so in the app.
Visit the Audible homepage and click Sign in at the top-right. Then log in with your Amazon/Audible credentials.
Next, mouse over Hi, [Name]! near the top of the page and click Account Details. On the left side of the page, click the Purchase History option.
By default, this will show all your orders in the last 365 days (which are the ones eligible for return). For each book, you’ll see the date you purchased it and can click Order details for more.
In the Options column, you’ll see a Return Title button for any book that’s eligible for return. Click this, and Audible will ask you why you’re returning it. These include reasons like Did not like the narrator, Bought it by mistake, and similar.
Once you’ve chosen a reason, click Return Title again to confirm that you want to return it. That’s all it takes; Audible will start processing the return.
If you bought that book with a credit, you’ll immediately have that credit back to use on another book. In the case of purchase by card or other method, you’ll receive a refund after several days.
Can’t Return an Audible Book?
If you see Not eligible for return next to your book, you unfortunately won’t be able to do this. The most likely case is that it’s been more than 365 days since you bought the book. However, Audible notes that “Only a certain number of titles can be returned using the online tool.”
Thus, the company may have restricted your return privileges. The help page states that it’s willing to chat with you to help you find books you’ll enjoy, but you can also contact Audible to process the return in some cases. Click the why? text next to Not eligible for return, then click the Contact us link in the resulting window to access the support page.
Meanwhile, if you’ve had enough of the service, follow our guide detailing how to cancel Audible.
Audible Returns Made Easy
Audiobooks aren’t cheap, so it’s important that you enjoy every one you choose to read. Next time a book isn’t what you thought it would be or you can’t stand the narrator, return it. Audible has thousands of other books to choose from, so the chances are you’ll love the next one you choose.
Facebook is launching some of its self-styled ‘election security’ initiatives into more markets in the coming months ahead of several major votes in countries around the world.
In an interview with Reuters the social networking giant confirmed it’s launching checks on political adverts on its platform in Nigeria, Ukraine and the European Union, reiterating too that ad transparency measures will launch in India ahead of its general election.
Although it still hasn’t confirmed how it will respond in other countries with looming votes this year, including Australia, Indonesia, Israel and the Philippines.
Concern about election interference in the era of mass social media has stepped up sharply since revelations about the volume of disinformation targeted at the 2016 U.S. presidential election (and amplified by Facebook et al).
More than two years later Facebook’s approach to election security remains ad hoc, with different policy and transparency components being launched in different markets — as it says it’s still in a learning mode.
It also claims its variable approach reflects local laws and conversations with governments and civil society groups. Although it says it’s also hoping to have a set of tools that applies to advertisers globally by the end of June.
“Our goal was to get to a global solution. And so, until we can get to that in June, we had to look at the different elections and what we think we can do,” Facebook’s director of global politics and outreach, Katie Harbath told Reuters.
Many markets where Facebook’s platform operates also still have no limits on who can buy and target political ads, as too do many smaller elections, such as local elections.
Even as the checks and balances the company does offer in other markets remain partial and far from perfect. For instance Facebook does not always offer meaningful checks on issue-based political advertising because, in some markets, it narrowly draws the definition as related to parties and candidates only, thereby limiting the effectiveness of the policy.
(And plenty of Kremlin propaganda targeted at the 2016 US presidential election was focused on weaponizing issues to whip up social divisions, for example, such as by playing up racial tensions, rather than promoting or attacking particular candidates.)
Facebook told Reuters it’s launching an authorization process for political advertisers in Nigeria today, ahead of a presidential election on February 16, which requires those running political ads to be located in the country.
It said the same policy will apply to Ukraine next month, ahead of elections on March 31.
Facebook also reiterated that election security measures are incoming ahead of India’s general election last month. From next month it will launch a searchable online library for election ads in India which votes for parliament this spring. The ads will be held in the library for seven years.
It has already launched searchable political ad archives in the U.S., Brazil and the U.K. But again its narrow definition of what constitutes a political ad limits the scope of the transparency measure in the U.K., for example. (Whereas in the U.S. the archive can include ads about much debated issues such as immigration and climate change.)
The Indian archive will contain contact information for some ad buyers or official regulatory certificates, according to Reuters.
While, in the case of individuals buying political ads, Facebook said it would ensure their listed name matches government-issued identity documents.
The European Union, which goes to the polls in May to elect MEPs for the European Parliament, will also get a version of the Indian authorization and transparency system ahead of that vote.
The European Commission has stepped up pressure on tech platforms over election security, announcing a package of measures last month intended to combat democracy-denting disinformation which included pressing platforms to increase transparency around political ads and purge fake accounts.
The EC also said it would be monitoring platforms’ efforts — warning that it wants to see “real progress”, not more “excuses” and “foot-dragging”.
We contacted Facebook for further comment on its international election security efforts but at the time of writing it said it had nothing more to add.
Verizon Wireless is now offering free access to Apple Music. The music streaming service is available on select Verizon Wireless plans starting on January 17, 2019. Previously, Verizon and Apple offered a free 6-month trial to the streaming service.
This comes as Apple is clearly looking for partners to help extend the reach of Apple’s services. Just last week, at CES 2019, multiple consumer electronic companies announced compatibility and support for several of Apple’s services including Airplay 2, HomeKit and iTunes video streaming services. This Verizon partnership further demonstrates Apple’s willingness to piggyback on another company to reach new users.
Verizon Wireless is America’s largest wireless carriers though it’s unclear how many users will have access to this service. The free Apple Music offer is only available to Verizon subscribers on select plans. Starting January 17, Apple Music will be included in Beyond Unlimited and Above Unlimited plans. For other users, a six-month trial is still available.
Wireless carriers have long looked to offering outside services to its subscribers to prop up their offerings. T-Mobile offers free Netflix and limited access to GoGo. Sprint gives subscribers free Hulu and Tidal. Sprint lets users on some plans pick from free HBO, Cinemax, Showtime or other services. Verizon is the first to offer free Apple Music.
Disclosure: TechCrunch is a Verizon Media company.
What do you get when you put one Internet connected device on top of another? A little more control than you otherwise would in the case of Alias the “teachable ‘parasite'” — an IoT project smart speaker topper made by two designers, Bjørn Karmann and Tore Knudsen.
The Raspberry Pi-powered, fungus-inspired blob’s mission is to whisper sweet nonsense into Alexa’s (or Google Home’s) always-on ear so it can’t accidentally snoop on your home.
Alias will only stop feeding noise into its host’s speakers when it hears its own wake command — which can be whatever you like.
The middleman IoT device has its own local neural network, allowing its owner to christen it with a name (or sound) of their choosing via a training interface in a companion app.
The open source TensorFlow library was used for building the name training component.
So instead of having to say “Alexa” or “Ok Google” to talk to a commercial smart speaker — and thus being stuck parroting a big tech brand name in your own home, not to mention being saddled with a device that’s always vulnerable to vocal pranks (and worse: accidental wiretapping) — you get to control what the wake word is, thereby taking back a modicum of control over a natively privacy-hostile technology.
This means you could rename Alexa “Bezosallseeingeye”, or refer to your Google Home as “Carelesswhispers”. Whatever floats your boat.
Once Alias hears its custom wake command it will stop feeding noise into the host speaker — enabling the underlying smart assistant to hear and respond to commands as normal.
“We looked at how cordyceps fungus and viruses can appropriate and control insects to fulfill their own agendas and were inspired to create our own parasite for smart home systems,” explain Karmann and Knudsen in a write up of the project. “Therefore we started Project Alias to demonstrate how maker-culture can be used to redefine our relationship with smart home technologies, by delegating more power from the designers to the end users of the products.”
Alias offers a glimpse of a richly creative custom future for IoT, as the means of producing custom but still powerful connected technology products becomes more affordable and accessible.
And so also perhaps a partial answer to IoT’s privacy problem, for those who don’t want to abstain entirely. (Albeit, on the security front, more custom and controllable IoT does increase the hackable surface area — so that’s another element to bear in mind; more custom controls for greater privacy does not necessarily mesh with robust device security.)
If you’re hankering after your own Alexa disrupting blob-topper, the pair have uploaded a build guide to Instructables and put the source code on GitHub. So fill yer boots.
Project Alias is of course not a solution to the underlying tracking problem of smart assistants — which harvest insights gleaned from voice commands to further flesh out interest profiles of users, including for ad targeting purposes.
That would require either proper privacy regulation or, er, a new kind of software virus that infiltrates the host system and prevents it from accessing user data. And — unlike this creative physical IoT add-on –that kind of tech would not be at all legal.
Grab is Southeast Asia’s top ride-hailing firm, thanks in no small part to its acquisition of Uber’s local business last year, but the company also houses an ambitious fintech arm, too. That just added another vertical to its business after Grab announced it is teaming up with China’s ZhongAn to introduce insurance.
Grab and ZhongAn International, the international arm of the Chinese insurance giant, said today they will create a joint venture that will provide digital insurance services across Southeast Asia. Grab said the new business will partner with insurance companies to offer the services via its mobile app. Chubb — a company that already works with Grab to offer micro-loans to its drivers — is the first partner to commit, it’ll offer insurance for Grab drivers starting in Singapore.
ZhongAn is widely-lauded for being China’s first digital-only insurance platform. It’s backed by traditional insurance giant PingAn and Chinese internet giants Tencent and Alibaba.
This ZhongAn partnership adds another layer to Grab’s services and fintech business, which already includes payments — both offline and online — and is scheduled to move into cross-border remittance and online healthcare, the latter being a deal with ZhongAn sibling PingAn Good Doctor.
The push is also part of a wider strategy from Grab, which was last valued at over $11 billion and is aiming to turn its app from merely ride-hailing to an everyday needs app, in the style of Chinese ‘super apps’ like Meituan and WeChat.
Indeed, Grab President Ming Ma referenced that very ambitious calling the insurance products “part of our commitment to becoming the leading everyday super app in the region.”
Last summer, Grab opened its platform to third-parties which can lean on its considerable userbase — currently at 130 million downloads — to reach consumers in Southeast Asia, where the fast-growing ‘digital economy’ is tipped to triple to reach $240 billion by 2025. Grab’s platform has welcomed services like e-grocer HappyFresh, deals from travel giant Booking and more.
Grab has also made efforts to develop the local ecosystem with its own accelerator program — called ‘Velocity’ — which, rather than providing equity, helps young companies to leverage its platform.
Go-Jek, Grab’s chief rival, is expanding its business outside of Indonesia after launching in Vietnam, Thailand and Vietnam. Like Grab, it, too, offers services beyond ride-hailing and the company — which is backed by the likes of Meituan, Google and Tencent — is close to finalizing a new $2 billion funding round for its battle with Grab.
So you forgot your Facebook login and password and can’t log into Facebook anymore? Or was your Facebook account hacked, meaning you can’t access it anymore?
If so, you are not alone. Fortunately, Facebook offers several automated ways to recover your account. Whether you forgot your Facebook password or can no longer log in because a hacker changed it, you have several options. In this article we’ll show you how to recover your Facebook account, step-by-step.
Note: This article covers everything we know about Facebook account recovery. Read the article, read the comments, and if you still have questions, feel free to ask it in the comment. Unfortunately, we can’t offer one-on-one support and we also don’t have a direct line to Facebook.
1. Are You Still Logged In Somewhere?
Before you try to recover your account, check whether you are still logged into Facebook on any of your devices. This could be another browser or browser profile on your computer, your Facebook Android or iOS app, or a mobile browser, for example on your tablet.
If you can still access Facebook anywhere, you might be able to “recover” your Facebook password without a confirmation reset code; though what you’ll actually do is create a new password. Proceed to step 1a of our article on what to do when your Facebook account gets hacked, where we explain how to change your Facebook password. At this point, also consider setting up two-factor authentication on Facebook.
Note: If you set up two-factor authentication and have lost access to your Code Generator, here’s how you can regain your Facebook login.
2. Have You Tried Default Account Recovery Options?
OK, so you could not find a device where you were still logged into Facebook. Let’s proceed with the recovery then. If possible, use a network or computer from which you’ve logged into your Facebook account before.
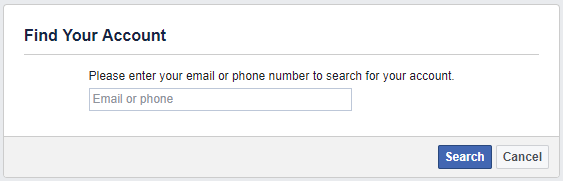
First, you need to identify your account. Head to the Facebook recover page and use an email address or phone number you previously added to your Facebook account. Even if it doesn’t say so, you can also use your Facebook username.
Once you successfully managed to identify your account, you will see a summary of your profile. Before you proceed, carefully check whether this really is your account and whether you still have access to the email address(es) listed.
Should you No longer have access to these? proceed to point 3 of this article.
If all looks well with the contact details that Facebook has on file for you, however, click Continue. Facebook will send you a security code.
Retrieve the code from your email, enter it, and rejoice in having recovered your Facebook account.
At this point, you can set a new password, which we strongly recommend.
If the code never arrives, click Didn’t get a code?, which will take you back to the previous screen. You can try again or maybe you’ll realize that you don’t have access to the account after all.
Back Into Your Facebook Account
If you managed to regain access to your account and if you suspect that your Facebook account was hacked, immediately change your password and update your contact information. These are key steps in securing your Facebook account. Be sure to remove any email addresses or phone numbers that are not your own or that you can no longer access.
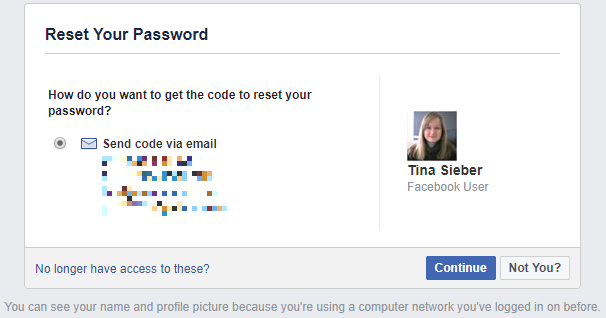
Often, it’s not possible to recover a Facebook account using the options above. Maybe you have lost access to the email address(es) and phone number(s) you once added to your profile. Or maybe a hacker changed this information. In that case, Facebook allows you to specify a new email address or phone number, which they will use to contact you about recovering your account.
To start this process, click the link No longer have access to these? in the bottom left on the reset password page (see above) to start the Facebook account recovery process. Facebook will ask you for a new email address or phone number, so that they can get in touch with you to help you recover your account. Click Continue to proceed.
If you have set up Trusted Contacts, you can ask them to help you recover your Facebook account in the next step. You’ll need to remember at least one full name of your three to five Trusted Contacts to reveal all of them. Note that you only need three codes to recover your Facebook account.
If you didn’t set up Trusted Contacts, you might be given the option to answer one of your security questions and reset your password on the spot. As an additional precaution, this comes with a 24 hour waiting period before you can access your account.
Otherwise, you might have to wait until Facebook gets in touch to verify your identity. Be patient.
This will actually start a similar process to the one outlined above. While you will use the same information to identify your account, in the following step you will be able to use either a current or an old Facebook password to recover your account.
This is useful in case a hacker changed your password, but it may also come in handy in case you forgot your new password.
Find more security-related tips on the Account Security page in the Facebook Help Center.
If all of the Facebook account recovery methods above failed, your last hope is Facebook support itself. You can try emailing security@facebookmail.com to explain your situation. They might give you a chance to prove your identity using your passport or driver’s license. You can try to attach a scan of your ID in your first email, but keep in mind that email isn’t necessarily secure. Either way, hearing back from Facebook can take several weeks, so you’ll need to be patient.
Note: If you didn’t use your real name on Facebook, your hopes for recovering your account this way are close to zero.
If All Else Fails, Create a New Facebook Profile
Over the past few years, we have received countless comments and messages from people who weren’t able to recover Facebook their accounts. Usually, their contact information was outdated, the recovery codes Facebook provided didn’t work, or the company would never reach out to verify their identity. Unfortunately, we couldn’t help either.
If you do discover another way to contact Facebook or recover your Facebook account, please share it in the comments below.
At some point, you just have to move on. As much as it hurts, learn from your mistakes, create a new account, be sure to add several valid contact details, secure your Facebook account, and rebuild your profile.
System Restore is a key computer recovery tool. If you’re experiencing a problem with your Windows computer, System Restore can help you roll back system files, program files, and registry information to a previous state. If these files have been corrupted or damaged, System Restore will replace them with good ones, solving your problem.
System Restore is an excellent tool for many of those unexpected issues. But what about those times when System Restore itself throws up an error message or doesn’t actually fix anything? With a little prior planning, you can ensure System Restore will always have your back in times of need.
1. Try an Alternative System Restore Point
First, try another System Restore point. Something may have corrupted the default restore point during the store process and, as such, won’t boot. Using an alternative point works for a wide range of restore issues.
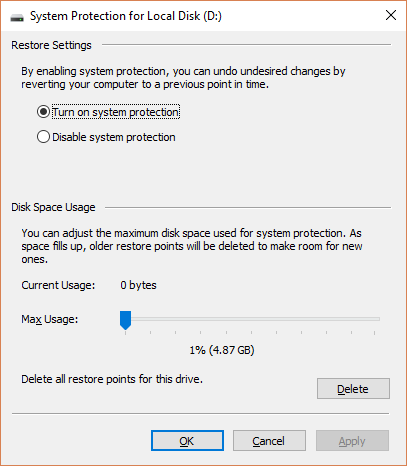
Type recovery in the Start Menu search bar and select the best match. Select Open System Restore. As you can see in the image below, I only have one System Restore point, meaning I could run into some trouble if this one throws up any issues.
However, if your System Restore window has more than one point to choose from, select one before the most recent. You may have to click Show more restore points (not shown above) to see all of your backups. After selecting a restore point, press Next, and follow the on-screen instructions.
Ideally, this will solve your problem. However, if you see an error message, or if System Restore performs a restore operation that doesn’t solve your problem, please continue reading the next section.
2. Run System Restore From Safe Mode
Your first port of call should be Safe Mode. Safe Mode is a lifesaver in many situations. Unlike the regular boot process, Safe Mode loads a limited range of drivers and files. Problems encountered while running System Restore are usually alleviated by trying again in Safe Mode.
Head to Settings > Update & security > Recovery. Under Advanced start-up, select Restart now. This will reboot your system into the Advanced Start-up settings menu. From there, select Troubleshoot > Advanced options > Startup Settings > Restart. On restart, you’ll see a list of options. Select 4 or F4 to boot your PC into Safe Mode (choose 5 or F5 for Safe Mode with Networking).
Press Windows Key + R to open Run. Type msconfig and press Enter. Open the Boot tab. Check the box alongside Safe Mode. If you require Networking, select it from beneath. Once you hit Apply, and close the System Configuration window, you’ll receive a prompt to Restart your system. (Note that your system will continually boot into Safe Mode unless you uncheck the System Configuration option. Repeat the same process within Safe Mode once you’re sure you’ve fixed the issue.)
Restart your PC. Press F8 during the boot process to enter Safe Mode. This is a tried and tested method. However, if you use Windows Fast Startup feature, spamming F8 will not work.
Once you’re in Safe Mode, go ahead and type recovery into the Start Menu search bar. Select Recovery from the list, then Open System Restore from the Advanced recovery tools menu.
Booting Into Safe Mode in Windows 7
The Windows 7 Safe Mode boot process is very similar to the latest version of the operating system. That is, with some slight differences.
Press Windows Key + R to open Run. Type msconfig and press Enter. Open the Boot tab. Check the box alongside Safe Mode. If you require Networking, select it from beneath. Once you hit Apply and close the System Configuration window, you’ll receive a prompt to Restart your system. (Note that your system will continually boot into Safe Mode unless you uncheck the System Configuration option. Repeat the same process within Safe Mode once you’re sure you’ve fixed the issue.)
Restart your PC. Press F8 during the boot process to open the Windows Advanced Boot Options menu. Select Safe Mode or an alternative Safe Mode configuration such as with Networking or with Command Prompt.
After Booting Into Safe Mode
If System Restore works in Safe Mode, it is a clear indicator that something, likely a program or service, is impeding it during a regular boot. Antivirus settings can at times cause System Restore to misbehave (for instance, Norton’s Product Tamper Protection is a well-known culprit).
Alternatively, a virus or malware infection could be creating an issue. In this case, you’ll need to scan your system using an up-to-date antivirus program.
3. Configure System Restore Disk Space Usage
If you still cannot get System Restore to run properly, try adjusting the hard disk space allocation. It might have run out without informing you (a classic Windows move).
I would recommend allocating at least 4 GB. Some will say that is overkill. However, I would contend that each major Windows 10 update weighs in at around 4 GB (major update in this case meaning the October 2018 Update, rather than the regular cumulative updates). On the other hand, you might not want System Restore to take up too much space, especially if you’re already limited.
Configuring Disk Space in Windows 8, 8.1, and 10
Let’s check what is going on with your System Restore allocation. Type system protection into the Start Menu search bar, and select Create a system restore point. Select Configure. Check your Disk Space Usage, and increase if it is less than or equal to 300 MB.
Configuring Disk Space in Windows 7
Windows 7 takes us on a slightly longer route. Open your Start Menu, right-click Computer and select Properties. Select System Properties from the left-hand column. Under Protection Settings, select Configure.
Check your current restore point storage allocation. Windows 7 doesn’t need as much disk space as Windows 8, 8.1, or 10. But if you have the space to spare, as many modern hard drives do, consider increasing from the default 3 percent to over 5 percent.
Clearing Out Old System Restore Points
You can delete old System Restore points. Ultimately, System Restore updates your System Restore points as it goes, replacing the oldest one each time. (This is why some people allocate lots of space to System Restore.) That said, if you do want to delete your System Restore points, I’ll show you how to do it without wrecking everything.
Windows 8, 8.1, and 10 users should type disk clean into the Start Menu search bar. Right-click the best match, and select Run as administrator. Select C: as the drive you’d like to clean, then press OK. Disk Clean-up will calculate the amount of space available for cleaning.
Open the More Options tab. Under System Restore and Shadow Copies, select Clean-up. You’ll meet the following message:
Press Delete if you want to proceed. This method keeps your last System Restore point in place, whereas hitting Delete on the System Protection panel will eliminate all of them.
Windows 7 users should type disk clean into the Start Menu search bar and select the first option. In the Disk Cleanup panel, select Clean up system files. This adds a new More Options tab (after a moment or two). Select Clean up… under System Restore and Shadow Copies.
This will delete all but your last System Restore point. Press Delete if you’d like to proceed.
4. Ensure System Restore Points Are Being Created
This won’t entirely help solve your current issue, but will absolutely help you next time. Are System Restore Points turned on? Are they being regularly and automatically created?
Windows 8, 8.1, and 10
Type rstrui in the Start Menu search bar and select the corresponding entry. Press Next when prompted, and you’ll see a list of your current System Restore points.
Nothing there? You’ll need to head back to the System Protection options we used earlier. Type system protection into the Start Menu search bar and select Create a system restore point. Select Configure. Under Restore Settings, make sure Turn on system protection is checked.
Windows 7
The Windows 7 version is minutely different. Head to Computer > System Protection. On the System Protection tab, select Configure. Make sure Restore system settings and previous versions of files is checked. Apply and OK.
5. Reinstall, Reset, or Repair Windows 7, 8, 8.1, or 10
This is where the options between Windows 7 and modern Windows versions diverge. Windows 8, 8.1, and 10 users can either Refresh or Reset their installation files. This process usually clears any lingering issues relating to system files. Furthermore, with additional options as to what files are refreshed or reset, you do not lose any important data. (But back up any important files first!)
Windows 8, 8.1, and 10
Windows 8, 8.1, and 10 users can choose to either Refresh or Reset their operating system.
Refresh (Windows 8): reinstalls Windows, keeping personal files and settings intact.
Reset: reinstalls Windows but deletes files, settings, and apps, except for those that came with your PC.
Reset with Keep My Files (Windows 10): reinstalls Windows from the Recovery Drive, keeping files, settings, and apps intact
Windows 8 Refresh featured evolved into Windows 10 Reset with Keep My Files. They perform the same restoration process.
Press Windows Key + I and head to Update & security > Recovery. Under Reset this PC, hit Get started. Select either Keep my files or Remove everything. As we just want to refresh your system, select the former.
Click Reset when prompted, and the actual process can take a few minutes to complete.
Windows 7
Windows 7 users are limited to reinstalling or repairing.
Press F8 during the boot process to enter the Advanced Boot Options menu. Select Repair Your Computer from the top of the list. Follow the on-screen instructions.
If the Advanced Boot Menu repair option fails (or isn’t there), revert to your Windows 7 installation media, or a system repair disc.
If you have installation mediaor a system repair disc, insert the disc or USB drive into your PC. Start your system, and select Press any key to boot from CD. If you’re using a USB drive, there is a chance you’ll have to specifically choose to boot from a USB drive. Some manufacturers have a specific function key to enter a quick boot option menu, while others require you to enter the BIOS. Check your manufacturer specifications. (Also, here’s how to create bootable Windows installation media.)
When you arrive at the Welcome to Startup screen, select Repair Install, and follow the on-screen instructions.
How to Fix System Restore and Recover Your System
It can be an excruciating moment when System Restore fails. Don’t panic. One of the methods listed above will coax System Restore back into life, and with it, the rest of your ailing system. Remember:
Try an alternative System Restore point.
Run System Restore from Safe Mode.
Configure your disk space usage.
Ensure Windows creates System Restore points when it should.
Use Reset, Refresh, or Repair to revive your system files.