14 May 2020

Daily Crunch: Uber will require masks for drivers and passengers


Uber announces some COVID-19 related changes, Google’s Chrome browser is giving users a way to organize their tabs and the Senate rejects an amendment that would have raised the bar for law enforcement access to browsing data.

Here’s your Daily Crunch for May 14, 2020.

1. Here’s how your Uber ride will change, starting May 18

The changes — which include an online checklist for all rides, limits on the number of passengers in vehicles and a face mask verification feature for drivers — are designed to stop the spread of COVID-19, the company said Wednesday.

Riders and drivers, as well as delivery workers and even restaurants that use Uber Eats, will have the power to report unsafe COVID-19 behavior and give low ratings. For instance, a delivery worker can give feedback that a restaurant doesn’t have proper protocols in place, such as social distancing.

2. Google Chrome will finally help you organize your tabs

Google announced the launch of “tab groups” for the beta version of its web browser, which will allow you to organize, label and even color-code your tabs for easy access. The feature will make its way to the stable release of Chrome starting next week.

3. Senate narrowly rejects plan to require a warrant for Americans’ browsing data

Senators have narrowly rejected a bipartisan amendment that would have required the government first obtain a warrant before accessing Americans’ web browsing data. The amendment brought by Sens. Ron Wyden (D-OR) and Steve Daines (R-MT) would have forced the government to first establish probable cause (or reasonable suspicion of a crime) to obtain the warrant.

4. Kustomer acquires Reply.ai to enhance chatbots on its CRM platform

Reply.ai is a startup originally founded in Madrid that has built a code-free platform for companies to create customized chatbots to handle customer service inquiries. Its customers include Coca-Cola, Starbucks and Samsung.

5. Why we’re doubling down on cloud investments right now

Three investors at Bessemer Venture Partners argue that COVID-19 is a turning point for the cloud and cloud company founders, and that the cloud model offers businesses a promising future in the age of social distancing and beyond. (Extra Crunch membership required.)

6. Facebook, telcos to build huge subsea cable for Africa and Middle East

The project, called 2Africa, will see the companies lay cables that will stretch to 37,000km (22,990 miles) and interconnect Europe (eastward via Egypt), the Middle East (via Saudi Arabia) and 21 landings in 16 countries in Africa.

7. 7 top mobility VCs discuss COVID-19 strategies and trends

TechCrunch spoke to seven venture capitalists about how COVID-19 affected their portfolio and investment strategy, their current advice for startup founders and where they think the next hot opportunity will be. (Extra Crunch membership required.)

The Daily Crunch is TechCrunch’s roundup of our biggest and most important stories. If you’d like to get this delivered to your inbox every day at around 9am Pacific, you can subscribe here.


Read Full Article

Restoring human dignity at the US southern border | Norma Pimentel

Restoring human dignity at the US southern border | Norma Pimentel

After seeing the conditions in which children were held at a detention center on the US-Mexico border, Sister Norma Pimentel established a humanitarian respite center in Texas where people can get clean clothing, a warm shower and a hot meal. In this powerful talk, Sister Pimentel discusses her work restoring human dignity at the border -- and calls on us all to put aside prejudice and lead with compassion.

Click the above link to download the TED talk.

Google makes it easier to migrate VMware environments to its cloud


Google Cloud today announced the next step in its partnership with VMware: the Google Cloud VMware Engine. This fully managed service provides businesses with a full VMware Cloud Foundation stack on Google Cloud to help businesses easily migrate their existing VMware-based environments to Google’s infrastructure. Cloud Foundation is VMware’s stack for hybrid and private cloud deployments

Given Google Cloud’s focus on enterprise customers, it’s no surprise that the company continues to bet on partnerships with the likes of VMware to attract more of these companies’ workloads. Less than a year ago, Google announced that VMware Cloud Foundation would come to Google Cloud and that it would start supporting VMware workloads. Then, last November, Google Cloud acquired CloudSimple, a company that specialized in running VMware environments and that Google had already partnered with for its original VMware deployments. The company describes today’s announcement as the third step in this journey.

VMware Engine provides users with all of the standard Cloud Foundation components: vSphere, vCenter, vSAN, NSX-T and HCX. With this, Google Cloud General Manager June Yang notes in today’s announcement, businesses can quickly stand up their own software-defined data center in the Google Cloud.

“Google Cloud VMware Engine is designed to minimize your operational burden, so you can focus on your business,” she notes. “We take care of the lifecycle of the VMware software stack and manage all related infrastructure and upgrades. Customers can continue to leverage IT management tools and third-party services consistent with their on-premises environment.”

Google is also working with third-party providers like NetApp, Veeam, Zerto, Cohesity and Dell Technologies to ensure that their solutions work on Google’s platform, too.

“As customers look to simplify their cloud migration journey, we’re committed to build cloud services to help customers benefit from the increased agility and efficiency of running VMware workloads on Google Cloud,” said Bob Black, Dell Technologies Global Lead Alliance Principal at Deloitte Consulting. “By combining Google Cloud’s technology and Deloitte’s business transformation experience, we can enable our joint customers to accelerate their cloud migration, unify operations, and benefit from innovative Google Cloud services as they look to modernize applications.””


Read Full Article

NVIDIA begins shipping the A100, its first Ampere-based data center GPU


NVIDIA announced today that its NVIDIA A100, the first of its GPUs based on its Ampere architecture, is now in full production and has begun shipping to its customers globally. Ampere is a big generational jump in NVIDIA’s GPU architecture design, providing what the company says is the “largest leap in performance to date” across all eight generations of its graphics hardware.

Specifically, the A100 can improve performance on AI training and inference as much as 20x relative to prior NVIDIA data center GPUs, and it offers advantages across just about any kind of GPU-intensive data center workloads, including data analytics, protein modelling and other scientific computing uses, and cloud-based graphics rendering.

The A100 GPU can also be scaled either up or down depending on the needs, meaning that you can use a single unit to handle as many as seven separate tasks with partitioning, and you can combine them to work together as one large, virtual GPU to tackle the toughest training tasks for AI applications. The ‘Multi-instance GPU’ partitioning feature in particular is novel to this generation, and really helps emphasize the ability of the A100 to provide the most value for cost for clients of all sizes, since one could theoretically replace up to seven discrete GPUs in a data center if you’re already finding you have some headroom on your usage needs.

Alongside the production and shipping announcement, NVIDIA is also announcing that a number of customers are already adopting the A100 for use in their supercomputers and data centers, including Microsoft Azure, Amazon Web Services, Google Cloud and just about every significant cloud provider that exists.

NVIDIA also announced the DGX A100 system, which combines eight of the A100 GPUs linked together using NVIDIA’s NVLink. That’s also available immediately directly from NVIDIA, and from its approved resale partners.


Read Full Article

Intraday Trading Calls for 15-May-2020

Intraday Trading Calls for 15-May-2020

Please click on the following link to view full post.

https://intradayguruji.blogspot.com/2020/05/intraday-trading-calls-for-15-may-2020.html

Via http://intradayguruji.blogspot.com

How to Collaborate in Default Mac Apps: Notes, Calendar, and More


collaborate on mac

When you need to collaborate with coworkers, you may not all be in the same location. Perhaps you’re part of a permanent remote team, or maybe you’re temporarily working from different spots. And while you can easily use a team communication app, that’s not always the most effective way to collaborate.

Whether it’s a project, a plan, or a paper, you have apps built right into your Mac that offer great sharing options for collaboration.

Collaborate by Sharing Notes on Mac

The Notes app is an excellent tool for taking notes and creating lists. And since it’s available across Apple devices, you can sync and access it whenever you need it. If you and your coworkers need to put your heads together on a project and keep your thoughts organized, you can share both folders and notes on Mac.

To share a folder in Notes, make sure that the folder sidebar is open. You can click the Show Folders button in the toolbar or View > Show Folders from the menu bar if it’s not already.

Select the folder and then use one of these methods to share it:

  • Right-click and pick Add People.
  • Click More (three dots) next to the name and pick Add People.
  • Choose File from the menu bar, pick Add People To, and select Folder [folder name].
  • Click the Add People button in the toolbar and pick Folder [folder name].

To only share a note within a folder, select the note and then use one of these methods to share it:

  • Choose File from the menu bar, pick Add People To, and select Note [note name].
  • Click the Add People button from the toolbar and pick Note [note name].

A small popup window will appear with the sharing methods you have available and the permissions you want to allow. For those Permissions, you can allow those you invite to make changes or simply view the item(s).

Mac Notes Add People

Choose your sharing method, add email addresses or phone numbers if applicable, and click Share. Then follow the prompts to share an invitation to your folder or note. Once your recipient accepts the invitation and starts making changes, you’ll see those edits in real-time.

To view each person you’re sharing with, click the Add People button in the toolbar or File > View Participants from the menu bar. Here, you can also change their permissions, stop sharing with one person or everyone, or add more people.

Mac Notes View People

By sharing notes and folders, you and your team can work on items together easily. Check out our tips for organizing your Notes if they become a little messy.

Collaborate by Sharing Reminders on Mac

The Reminders app on Mac is terrific for creating lists of tasks, setting up priorities and due dates, and of course, receiving reminders. And like Notes, you can sync Reminders with iPhone and iPad.

To share a list in Reminders, make sure that the sidebar is open. Click View > Show Sidebar from the menu bar to reveal it.

Then, select the list you want to share and click the Share button next to the name, or right-click the list and pick Add People.

Mac Reminders Add People Shortcut

You’ll then choose the sharing method you want to use. Unlike Notes, anyone you share the list with can make changes. Thus, there are no permission settings. Choose your method, add any details needed for that method, click Share, and follow the prompts.

Mac Reminders Add People

To view those you’re sharing a list with, stop sharing, or add more people, click the Share button next to the list name.

Mac Reminders View People

When you and your team are responsible for list items or duties at work or on a project, you can each mark off what you complete in Reminders.

Collaborate by Sharing a Calendar on Mac

The Calendar app on macOS lets you use different calendars per the accounts you have set up. So you can use it for iCloud, Gmail, Exchange, and other account types. And by sharing a calendar, you and your team can stay up to date on work-related events, meetings, conferences, and similar.

To share a calendar, make sure that the Calendars sidebar is open. You can click the Calendars button in the toolbar or View > Show Calendar List from the menu bar to bring it up.

Select the calendar and then use one of these methods to share it:

  • Right-click and pick Share Calendar.
  • Choose Edit from the menu bar and pick Share Calendar.
  • Click the Share button to the right of the calendar name.

Click inside the Share With area of the small window and enter those you want to share the calendar with. In most cases, you’ll see suggestions from your contacts that you can pick from.

After you add those you want to share the calendar with, you can click the dropdown box for each person’s name. Then choose the permission you want to allow: View Only or View & Edit. Click Done when you finish.

Mac Share Calendar Add People and Permissions

Once your calendar invitations reach the recipients and they accept, those you’re sharing with will have checkmarks next to their names.

Now with that shared calendar, everyone on your team can stay up to date on the events they need to—whether for the company in general or a specific project. And be sure to share these tricks for mastering the Mac Calendar app with your coworkers.

Collaborate by Sharing Photos or Images

The Photos app on Mac is useful for more than pictures of your pets and family. If you’re in a business where you regularly work with photos and other images, take advantage of the Shared Album feature in the Photos app.

To create a shared album in Photos, follow these steps:

  1. Click the plus sign next to Shared Albums in the sidebar.
  2. Give your album a name and optionally a comment, such as a description.
  3. You can invite others to the album right away by clicking the plus sign and choosing them from your contacts.
  4. Click Create and you’re set.

Mac Photos Create Shared Album

If you want to create the shared album first and share it later, that’s easy to do. Select the shared album in the sidebar and then click the People button in the toolbar. Click the plus sign and choose a contact to invite.

Mac Photos Shared Album View People

You can move existing images to the shared album by simply dragging them there. It’s also possible to import images into the album from your Mac or iCloud Drive. Click File > Import from the menu bar and follow the prompts to locate, select, and import the images.

Share Other Items With Your Team From a Mac

You can quickly share most anything you find using Safari, record in Voice Memos, or use in Contacts using these steps:

  • Share a page in Safari: Click the Share button in the toolbar or File > Share from the menu bar.
  • Share a recording in Voice Memos: Click the Share button in the toolbar or right-click and pick Share.
  • Share a card in Contacts: Select the contact card and click the Share button at the bottom-right of the window, or right-click and pick Share.

And remember, you can forward emails from Mail and texts from Messages for your company in addition to sharing your Mac’s screen over Messages with coworkers.

Collaborate by Sharing on Your Mac

Rather than using copy and paste methods to collaborate on notes, reminders, events, or images, make the most of these default apps and their sharing features on Mac.

If you want to collaborate in Pages, Numbers, or Keynote on Mac, we have a helpful tutorial for sharing those documents as well.

Read the full article: How to Collaborate in Default Mac Apps: Notes, Calendar, and More


Read Full Article

How to Set Your Own Background in Microsoft Teams


change-bg-ms-teams

You’ve been invited to a Microsoft Teams meeting, but your work area is a mess. Perhaps you’re working at home, or your usual office is just simply unsuitable. Maybe some redecorating or renovation work is taking place.

Either way, you don’t want anyone to see the mess. So, what can you do?

The solution is to set a background that hides everything behind you during a video call. It could be anything, from outdoors scenery to a photo of an office. Here’s how you can set a custom background in Microsoft Teams.

Why Use Microsoft Teams?

With the explosion in home working following the COVID-19 pandemic, Microsoft Teams is one of the most complete collaboration tools available.

Featuring messaging, team management, and document sharing, Teams is free for anyone to use. However, you’ll get the best results from it by using corporate login details, so speak to your employer about this.

Like Zoom, Microsoft Teams enjoyed a big increase in use in 2020. Surprisingly, it doesn’t feature an easy option to change your video call background.

Fortunately, changing a background in Microsoft Teams isn’t that difficult. You just need to be handy with the Windows or macOS file manager.

Do You Need a New Background?

Before proceeding, take a moment. You’re about to start rifling through your computer’s hidden files and folders. If this prospect concerns you, it might be smarter to simply tidy up, or even move to a new location.

Microsoft Teams is available on Windows, macOS, iPhone, and Android. As such, it shouldn’t be too difficult to switch to a mobile device and take the call in your garden. At work? Why not join the video call from an unused desk, or even in your parked car?

If you can’t do without a new background in Microsoft Teams, keep reading.

You Could Just Blur the Background

If you don’t want to find a new background, you could use the blur effect instead. This is a simpler solution to finding a background, a task that can quickly become time consuming.

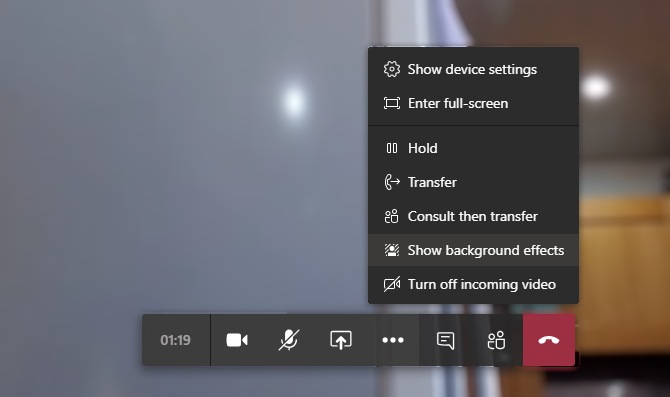
To use the blur feature in Teams, start a call then click the ellipses button on the call toolbar.

Click Show background effects then select the blur option. Use Apply and turn on video to confirm, then carry on with the call.

Blur the background in Microsoft Teams calls

This is a quick and easy fix that saves a lot of messing around with copy, paste, and strange file paths.

How to Choose a Suitable Photo Background

You’ll need an image handy before you set it as the new background, so take a moment to choose one. It might be a corporate logo, or a photo of colleagues at work. Perhaps the photo is a shot of some team building exercise.

It can be a pattern or even just a single color.

In most cases, you’ll need an image that is around 1MB in size. This should ensure that the image quality is high enough to not seem blocky. In terms of resolution, look for images at least 1080px wide.

A low quality, blocky images can be distracting to your colleagues, so keep the background as eye-pleasing as possible.

Save your images in an appropriately named folder in your personal drive and leave this open.

How to Set a Background for Microsoft Teams Video Calls

Windows and macOS Microsoft Teams users can both set a custom background on video calls.

On Windows PCs:

  • Press WIN+R to open the run box
  • Enter %AppData%\Microsoft\Teams\Backgrounds\Uploads

Add custom images to Microsoft Teams

  • Click OK
  • Paste the image(s) from your source location into this folder
  • In a Teams video call, click the ellipses button and select Show background effects

Open the background effects menu in Microsoft Teams

  • You’ll see a selection of pre-installed images including the blur option
  • Browse to the end of the list to select your image then Preview it
  • When you’re happy with the results simply Apply and turn on video to broadcast your feed with the new background

If you use macOS follow these steps:

  • In Finder browser to /users/<username>/Library/Application Support/Microsoft/Teams/Backgrounds/Uploads
  • Paste the chosen background image(s) into the folder
  • During a Teams video call, click the ellipses button and Show background effects
  • Select the image, then Preview

Set custom backgrounds in Microsoft Teams

  • Click Apply and turn on video to add the background to the call

By now you should be broadcasting to your colleagues with a beautiful sunshine scene, a Minecraft landscape, whatever you want!

Where You Can Find Microsoft Teams Backgrounds

What background you choose will depend on what kind of visual you want to share with your colleagues. Short of ideas? Fortunately, there are many places you can find images to use as Microsoft Teams as backgrounds.

Star Wars Backgrounds

Need to remind your coworkers of your galactic power? What better than a collection of Star Wars backgrounds for video calls? This includes the ruined Death Star from The Rise of Skywalker, the planets Jakku, Hoth, and Tatooine, and of course the Millennium Falcon.

Download: Star Wars backgrounds

Marvel Backgrounds

Combining MCU and Marvel Comics images, this is a nice collection if you want to pose as a member of SHIELD or be an Avenger.

Download: Marvel Comics backgrounds

BBC Backgrounds

Fawlty Towers video chat background

The BBC has released a collection of “empty set” backgrounds from a range of TV shows spanning over 50 years. These included sitcoms such as Fawlty Towers (pictured) (other British sitcoms are on Netflix), Doctor Who, Pride and Prejudice, and many others.

Note that these image files are high-resolution format, with some as large as 50MB.

Download: Empty Set backgrounds from the BBC

Harry Potter Backgrounds

For something a little more magical, these images of Hogwarts, Platform 9 ¾, and the popular houses are perfect.

Download: Harry Potter backgrounds

Get Serious: Use Professional Backgrounds

If you prefer to keep your Microsoft Teams video calls serious, simply apply more professional backgrounds. You have a wide choice here. For example, sites like Pexels and Pixabay provide free, professional images.

Meanwhile, your organization probably has a collection of corporate images suitable for video call backgrounds. The public relations department can probably provide these if they’re not available on the website or company intranet.

Share Ideal Surroundings in Microsoft Teams Calls

By now you should be ready to discard your messy workspace, at least virtually. With Microsoft Teams’ custom backgrounds, you can effortlessly declutter your surroundings. And even attract attention in your video calls as any type of photo with a suitable resolution can be used.

Just be sure to save it in the right folder. And if you don’t have time to find a new background image, don’t panic—simply blur your background so no one can see how cluttered your life is.

New to Microsoft Teams? Get to grips with it quickly with our Microsoft Teams keyboard shortcuts cheat sheet.

Read the full article: How to Set Your Own Background in Microsoft Teams


Read Full Article

Make Quarantine More Entertaining With SelectTV, the World’s Largest Entertainment Library


After several weeks of being stuck at home, you may just be starting to run out of content to watch. If you would like to expand your choice without emptying your bank account, try SelectTV. Billed as the world’s largest entertainment library, this platform gives you unlimited access to hundreds of thousands of TV shows and movies, along with live TV and radio. You can currently pick up a two-year subscription for just $32.99 at MakeUseOf Deals.

Endless Choice

With more content than Netflix and Hulu combined, SelectTV is the ultimate defense against quarantine boredom.

As featured by USA Today and The Huffington Post, this platform gives you unlimited access to 250,000 TV episodes and 10,000 movies. You can also stream 1,500 curated TV channels, and listen to 50,000 radio stations from around the world. You can watch on desktop, mobile, and Chromecast devices.

You can browse over 100 content sources via the Select TV guide. In addition, this app can help you find the best deals on pay-per-view entertainment. This expands your options to 700,000 TV shows and 100,000 movies.

Two Years for $32.99

Two years of service would normally cost $92.78, but you can get SelectTV now for just $32.99. The deal includes a free HD antenna, which lets you enjoy local channels.

Read the full article: Make Quarantine More Entertaining With SelectTV, the World’s Largest Entertainment Library


Read Full Article

How to Set Your Own Background in Microsoft Teams


change-bg-ms-teams

You’ve been invited to a Microsoft Teams meeting, but your work area is a mess. Perhaps you’re working at home, or your usual office is just simply unsuitable. Maybe some redecorating or renovation work is taking place.

Either way, you don’t want anyone to see the mess. So, what can you do?

The solution is to set a background that hides everything behind you during a video call. It could be anything, from outdoors scenery to a photo of an office. Here’s how you can set a custom background in Microsoft Teams.

Why Use Microsoft Teams?

With the explosion in home working following the COVID-19 pandemic, Microsoft Teams is one of the most complete collaboration tools available.

Featuring messaging, team management, and document sharing, Teams is free for anyone to use. However, you’ll get the best results from it by using corporate login details, so speak to your employer about this.

Like Zoom, Microsoft Teams enjoyed a big increase in use in 2020. Surprisingly, it doesn’t feature an easy option to change your video call background.

Fortunately, changing a background in Microsoft Teams isn’t that difficult. You just need to be handy with the Windows or macOS file manager.

Do You Need a New Background?

Before proceeding, take a moment. You’re about to start rifling through your computer’s hidden files and folders. If this prospect concerns you, it might be smarter to simply tidy up, or even move to a new location.

Microsoft Teams is available on Windows, macOS, iPhone, and Android. As such, it shouldn’t be too difficult to switch to a mobile device and take the call in your garden. At work? Why not join the video call from an unused desk, or even in your parked car?

If you can’t do without a new background in Microsoft Teams, keep reading.

You Could Just Blur the Background

If you don’t want to find a new background, you could use the blur effect instead. This is a simpler solution to finding a background, a task that can quickly become time consuming.

To use the blur feature in Teams, start a call then click the ellipses button on the call toolbar.

Click Show background effects then select the blur option. Use Apply and turn on video to confirm, then carry on with the call.

Blur the background in Microsoft Teams calls

This is a quick and easy fix that saves a lot of messing around with copy, paste, and strange file paths.

How to Choose a Suitable Photo Background

You’ll need an image handy before you set it as the new background, so take a moment to choose one. It might be a corporate logo, or a photo of colleagues at work. Perhaps the photo is a shot of some team building exercise.

It can be a pattern or even just a single color.

In most cases, you’ll need an image that is around 1MB in size. This should ensure that the image quality is high enough to not seem blocky. In terms of resolution, look for images at least 1080px wide.

A low quality, blocky images can be distracting to your colleagues, so keep the background as eye-pleasing as possible.

Save your images in an appropriately named folder in your personal drive and leave this open.

How to Set a Background for Microsoft Teams Video Calls

Windows and macOS Microsoft Teams users can both set a custom background on video calls.

On Windows PCs:

  • Press WIN+R to open the run box
  • Enter %AppData%\Microsoft\Teams\Backgrounds\Uploads

Add custom images to Microsoft Teams

  • Click OK
  • Paste the image(s) from your source location into this folder
  • In a Teams video call, click the ellipses button and select Show background effects

Open the background effects menu in Microsoft Teams

  • You’ll see a selection of pre-installed images including the blur option
  • Browse to the end of the list to select your image then Preview it
  • When you’re happy with the results simply Apply and turn on video to broadcast your feed with the new background

If you use macOS follow these steps:

  • In Finder browser to /users/<username>/Library/Application Support/Microsoft/Teams/Backgrounds/Uploads
  • Paste the chosen background image(s) into the folder
  • During a Teams video call, click the ellipses button and Show background effects
  • Select the image, then Preview

Set custom backgrounds in Microsoft Teams

  • Click Apply and turn on video to add the background to the call

By now you should be broadcasting to your colleagues with a beautiful sunshine scene, a Minecraft landscape, whatever you want!

Where You Can Find Microsoft Teams Backgrounds

What background you choose will depend on what kind of visual you want to share with your colleagues. Short of ideas? Fortunately, there are many places you can find images to use as Microsoft Teams as backgrounds.

Star Wars Backgrounds

Need to remind your coworkers of your galactic power? What better than a collection of Star Wars backgrounds for video calls? This includes the ruined Death Star from The Rise of Skywalker, the planets Jakku, Hoth, and Tatooine, and of course the Millennium Falcon.

Download: Star Wars backgrounds

Marvel Backgrounds

Combining MCU and Marvel Comics images, this is a nice collection if you want to pose as a member of SHIELD or be an Avenger.

Download: Marvel Comics backgrounds

BBC Backgrounds

Fawlty Towers video chat background

The BBC has released a collection of “empty set” backgrounds from a range of TV shows spanning over 50 years. These included sitcoms such as Fawlty Towers (pictured) (other British sitcoms are on Netflix), Doctor Who, Pride and Prejudice, and many others.

Note that these image files are high-resolution format, with some as large as 50MB.

Download: Empty Set backgrounds from the BBC

Harry Potter Backgrounds

For something a little more magical, these images of Hogwarts, Platform 9 ¾, and the popular houses are perfect.

Download: Harry Potter backgrounds

Get Serious: Use Professional Backgrounds

If you prefer to keep your Microsoft Teams video calls serious, simply apply more professional backgrounds. You have a wide choice here. For example, sites like Pexels and Pixabay provide free, professional images.

Meanwhile, your organization probably has a collection of corporate images suitable for video call backgrounds. The public relations department can probably provide these if they’re not available on the website or company intranet.

Share Ideal Surroundings in Microsoft Teams Calls

By now you should be ready to discard your messy workspace, at least virtually. With Microsoft Teams’ custom backgrounds, you can effortlessly declutter your surroundings. And even attract attention in your video calls as any type of photo with a suitable resolution can be used.

Just be sure to save it in the right folder. And if you don’t have time to find a new background image, don’t panic—simply blur your background so no one can see how cluttered your life is.

New to Microsoft Teams? Get to grips with it quickly with our Microsoft Teams keyboard shortcuts cheat sheet.

Read the full article: How to Set Your Own Background in Microsoft Teams


Facebook, telcos collaborate on subsea cable for Africa and Middle East


Facebook, and a group of telecom companies including China Mobile International, MTN GlobalConnect, Orange, and Vodafone are collaborating to build the “most comprehensive” subsea cable to serve the African continent and Middle East region where nearly a billion people are still not connected to the internet.

The project, called 2Africa, will see the companies lay cables that will stretch to 37,000km (22,990 miles) and interconnect Europe (eastward via Egypt), the Middle East (via Saudi Arabia), and 21 landings in 16 countries in Africa.

In a joint statement, the companies said they expect the system to be live by 2023 or early 2024. Once live, it should be able to deliver more than the total combined capacity of all subsea cables serving Africa today, with a design capacity of up to 180Tbps on key parts of the system.

The companies, which also includes Saudi Arabia-based telecom firm STC, Telecom Egypt, and African telecom firm WIOCC, say service providers in the countries where 2Africa cable lands will obtain capacity in carrier-neutral data centres or open-access cable landing stations on a fair and equitable basis.

Facebook and telecom operators did not reveal how much money they were investing on the project.

Najam Ahmad, Vice President of Network Infrastructure at Facebook, said 2Africa is “a major element of our ongoing investment in Africa to bring more people online to a faster internet. We’ve seen first-hand the positive impact that increased connectivity has on communities, from education to healthcare.”

The subsea cable would also help Facebook and others drive down their bandwidth costs.

The internet is an amalgamation of tiny bits of code that move around the world in cables across the ocean floor. As of early last year, 750,000 miles of cable have been laid out across the globe.

The involvement of Facebook, which maintains a number of other connectivity efforts to bring more people online, in 2Africa shouldn’t come as a surprise. Telecom firms have long worked on undersea cable projects, but over the past decade, several American technology companies have joined the effort.

Google, Microsoft, Facebook, and Amazon now own or lease nearly half of the undersea bandwidth, according to Washington-based research firm TeleGeography. Google alone has backed at least 14 cables globally.

Last year, the search giant unveiled Equiano, a privately-funded subsea cable to connect Europe and Africa. The first phase of this project was scheduled for completion in 2021. Both 2Africa and Equiano have commissioned Alcatel Submarine Networks for building the cable.

American technology companies aren’t alone in their fascination with laying cables across the globe. China’s Huawei completed a 3,750mile cable between Brazil and Cameroon in late 2018, and last year began work on a 7,500-mile cable connecting Europe, Asia and Africa. It was also finishing up links across the Gulf of California in Mexico, WSJ reported last year, adding that some unnamed current and former U.S. officials were worried that the Chinese tech giant’s cables were vulnerable to espionage. Huawei denied any threat.


Read Full Article

Facebook, telcos to collaborate on most comprehensive subsea cable for Africa and Middle East


Facebook, and a group of telecom companies including China Mobile International, MTN GlobalConnect, Orange, and Vodafone are collaborating to build the “most comprehensive” subsea cable to serve the African continent and Middle East region where nearly a billion people are still not connected to the internet.

The project, called 2Africa, will see the companies lay cables that will stretch to 37,000km (22,990 miles) and interconnect Europe (eastward via Egypt), the Middle East (via Saudi Arabia), and 21 landings in 16 countries in Africa.

In a joint statement, the companies said they expect the system to be live by 2023 or early 2024. Once live, it should be able to deliver more than the total combined capacity of all subsea cables serving Africa today, with a design capacity of up to 180Tbps on key parts of the system.

The companies, which also includes Saudi Arabia-based telecom firm STC, Telecom Egypt, and African telecom firm WIOCC, say service providers in the countries where 2Africa cable lands will obtain capacity in carrier-neutral data centres or open-access cable landing stations on a fair and equitable basis.

Facebook and telecom operators did not reveal how much money they were investing on the project.

Najam Ahmad, Vice President of Network Infrastructure at Facebook, said 2Africa is “a major element of our ongoing investment in Africa to bring more people online to a faster internet. We’ve seen first-hand the positive impact that increased connectivity has on communities, from education to healthcare.”

The subsea cable would also help Facebook and others drive down their bandwidth costs.

The internet is an amalgamation of tiny bits of code that move around the world in cables across the ocean floor. As of early last year, 750,000 miles of cable have been laid out across the globe.

The involvement of Facebook, which maintains a number of other connectivity efforts to bring more people online, in 2Africa shouldn’t come as a surprise. Telecom firms have long worked on undersea cable projects, but over the past decade, several American technology companies have joined the effort.

Google, Microsoft, Facebook, and Amazon now own or lease nearly half of the undersea bandwidth, according to Washington-based research firm TeleGeography. Google alone has backed at least 14 cables globally.

Last year, the search giant unveiled Equiano, a privately-funded subsea cable to connect Europe and Africa. The first phase of this project was scheduled for completion in 2021. Both 2Africa and Equiano have commissioned Alcatel Submarine Networks for building the cable.

American technology companies aren’t alone in their fascination with laying cables across the globe. China’s Huawei completed a 3,750mile cable between Brazil and Cameroon in late 2018, and last year began work on a 7,500-mile cable connecting Europe, Asia and Africa. It was also finishing up links across the Gulf of California in Mexico, WSJ reported last year, adding that some unnamed current and former U.S. officials were worried that the Chinese tech giant’s cables were vulnerable to espionage. Huawei denied any threat.


Read Full Article

How to Add an XML Sitemap to your Blogger Blog


The XML Sitemap file is like a directory of all web pages that exist on your website or blog. Google, Bing and other search engines can use these sitemap files to discover pages on your site that their search bots may have otherwise missed during regular crawling.

Google XML Sitemaps for Blogger

The Problem with Blogger Sitemap Files

A complete XML sitemap file should mention all pages of a site but that’s not the case if your blog is hosted on the Blogger or blogspot platform.

Google accepts sitemaps in XML, RSS, or Atom formats. They recommend use both XML sitemaps and RSS/Atom feeds for optimal crawling.

The default atom RSS feed of any Blogger blog will have only the most recent blog posts – see example. That’s a limitation because some of your older blog pages, that are missing in the default XML sitemap file, may never get indexed in search engines. There’s however a simple solution to fix this problem.

Generate XML Sitemap for your Blogger Blog

This section is valid for both regular Blogger blogs (that have a blogspot.com address) and also the self-hosted Blogger blogs that use a custom domain (like postsecret.com).

Here’s what you need to do to expose your blog’s complete site structure to search engines with the help of an XML sitemap.

  1. Open the Sitemap Generator and type the full address of your Blogger blog.

  2. Click the Generate Sitemap button and this tool will instantly create the XML file with your sitemap. Copy the entire text to your clipboard.

  3. Next, go to your Blogger.com dashboard, navigate to Settings –> Search Preferences, enable Custom robots.txt option (available in the Crawling and Indexing section). Paste the XML sitemap here and save your changes.

Blogger XML Sitemap

And we are done. Search engines will automatically discover your XML sitemap files via the robots.txt file and you don’t have to ping them manually.

Internally, the XML sitemap generator counts all the blog posts that are available in your Blogger blog. It then splits the posts in batches of 500 posts each and generates multiple XML feed for each batch. Thus search engines will be able to discover every single post on your blog since it would be part of one of these XML sitemaps.

PS: If you have switched from Blogger to WordPress, it still makes sense to submit XML sitemaps of your old Blogspot blog as that will aid search engines discover your new WordPress blog posts and pages.


Live Intraday Trading on 14-May-2020

Live Intraday Trading on 14-May-2020

Please click on the following link to view full post.

https://intradayguruji.blogspot.com/2020/05/live-intraday-trading-on-14-may-2020.html

Via http://intradayguruji.blogspot.com

You Can Now Delete Instagram Comments in Bulk


Instagram has introduced more new ways to fight back against online bullies. The headline feature lets you delete Instagram comments in bulk. However, you can also now pin positive comments, and control who can tag and mention you on Instagram.

Online bullying is a serious problem, especially on social media. This is especially true on the social media platforms popular with younger demographics. Such as Instagram. However, Instagram has been trying to combat online bullies over the years.

New Instagram Features to Combat Bullying

Alongside the fifth edition of its Community Standards Enforcement report, Instagram has announced a number of new features. As outlined on the Instagram Blog, these are all designed to help Instagram users fight back against online bullies.

The first new feature lets you manage unwanted interactions. While you could already delete individual comments, you can now delete up to 25 Instagram comments in bulk. You can also block or restrict multiple accounts behind negative comments.

bulk delete Instagram comments

On the flipside, you can also highlight positive comments. Pinned Comments, which are currently being tested, lets you pin a select number of comments to the top of a thread. The idea being that it lets you set the tone you want for your account.

Last but not least, you can now choose who can tag and mention you. Instagram is rolling out a new set of controls that allow you to manage who can tag or mention you. You can limit the option to no one, allow people who follow you, or allow everyone.

How to Hide Your Social Media Profiles

These are all solid ways to help people fight back against online bullies. And giving people the tools they need to combat the problem is all anyone is asking. For many years, Instagram lagged behind its rivals in this, but it’s now leading the way.

While most social media platforms offer ways to combat bullying, things can get out of hand. In which case, you may need to take extra measures to prevent yourself from being harassed. If so, here’s how to hide your social media profiles from bullies.

Read the full article: You Can Now Delete Instagram Comments in Bulk


Read Full Article

How Are Fake Live Video Calls Made? Here’s How to Spot Them


Video calling is ubiquitous. You can video call your friends, family, and colleagues, sharing your face and surroundings at the same time. Being in the same location all time is boring, right? How about appearing with your regular face? Everyone knows what that looks like.

What if you could make a fake video call that switched out your face, or the background, or other important features—would you fake call your family?

Here’s how fake video calls work, and how you can spot one.

What Is a Fake Video Call?

A fake video call can mean a couple of things.

For instance, you could create a fake video background in an attempt to trick people into believing you’re on holiday. You could record a video of yourself staring at your monitor, then play it back during a meeting that you are not required to talk in.

There’s the option of mirroring your webcam input to a YouTube video that does not feature you at all but could show an amusing cat video.

A fake video call could also use deepfake technology, using AI-powered video to switch out the faces and voices on display. You can find more information on deepfake tech later in the article.

How to Make a Fake Video Call Using ManyCam

How you approach making a fake video call depends on the platform. On a desktop computer or laptop, you have multiple software options to use a fake video, but your access to certain apps is limited. For example, the WhatsApp desktop app does not allow any video (or voice) calling.

For those apps that you can use, ManyCam allows you to alter the appearance of your webcam, extensively. For instance, you can use more than one webcam with Skype or other voice calling apps, or stream a completely different video that appears instead of your webcam.

Here’s how you make a fake video call using ManyCam.

1. Configure ManyCam

First, you need to download, install, and configure ManyCam.

Download: ManyCam for Windows | macOS

Once your download completes, install ManyCam.

2. Create a ManyCam Preset & Choose Your Fake Video Source

You can use presets for your fake video call. Open ManyCam, then under Presets, select Preset 1. Underneath the Presets panel are the video source options. Select the video source you want to use, such as a webcam, IP camera, YouTube video, web source URL, and so on.

If you want to use a YouTube video, copy and paste the video URL into ManyCam. Do the same for whichever fake video source you choose.

3. Select ManyCam In Your Voice Calling App

Once you configure the fake video source, you can make your video call. But you must select the ManyCam webcam option in your video call app to display your fake video.

For example, in the Skype desktop app, head to Settings > Audio & Video. In the Camera options, select the ManyCam Virtual Webcam. When you make your video call, the fake video in ManyCam will play instead of your regular webcam.

manycam skype camera options

The process is slightly different for each video calling app, but you’ll find the ManyCam Virtual Webcam option in the camera or webcam options.

How to Make a Fake Video Call Using OBS

OBS (Open Broadcaster Software) is a popular cross-platform, open-source video streaming tool. You can use OBS to stream to multiple platforms simultaneously, record media, and much more. In this case, you can use OBS to stream a fake video in place of your webcam.

The result is similar to ManyCam. However, as OBS is completely free, you can use the full range of video streaming and broadcasting options. Even though OBS has more tools on offer, the software isn’t difficult to use.

Here’s how you make a fake video call using OBS.

1. Configure OBS

First, you need to download and install OBS. Although it is a cross-platform tool, the following steps only work with OBS on Windows due to the plugin required to create a virtual webcam.

Download: OBS for Windows (Free)

2. Configure OBS-VirtualCam

OBS-VirtualCam is an open-source plugin for OBS. The plugin creates a virtual webcam option in OBS. Once you install the plugin, you can output media to the virtual webcam, then select the virtual webcam in your video call options.

Download: OBS-VirtualCam for Windows (Free)

Download and install the plugin. The OBS-VirtualCam plugin will detect your OBS installation folder automatically. When prompted, select Yes, you do want to overwrite the folder. Then select whether you want a single or multiple virtual webcam outputs. Now, complete the installation.

obs virtualcam plugin

Now, open OBS and head to Tools > VirtualCam to switch on the virtual webcam. The virtual webcam option of “OBS-Camera” will now appear in your video calling apps, such as Skype or Facebook Messenger.

3. Select Your Fake Video Source in OBS

OBS has several options you can use for a fake video. You can use OBS to play a local video, display a browser window or online video, create a video stream from a third-party video player (such as VLC), and more.

obs add media source

You can see the range of options along the bottom of the main screen in OBS. Under Source, select the + icon, then choose the video input option for your fake video call.

  • If you already have a video you want to use, select Media Source, then browse to the file location on your computer.
  • Alternatively, you can play the fake video in a separate media player. Select Window Capture, then select the media player using the Window dropdown menu.
  • If you want to use an online video, select Browser, then input the URL of the website you want to display. Next, resize the browser window using Width and Height to fit the video size.

Whichever video configuration you choose, the result will play through the OBS-VirtualCam virtual webcam in your video calling app.

Can You Make Fake Video Calls Using a Smartphone?

Smartphone apps come with a different set of limitations regarding fake video calling.

Fake video apps for smartphones are dime-a-dozen, but they don’t do what you expect. If you search for “fake video calling apps” on Google Play, you’ll find thousands of poorly coded apps that let you “chat” with a fake person, rather than stream a fake video through a video calling app.

Spoofing a smartphone camera within an app isn’t easy. Smartphone video calling apps (and other apps in general) don’t allow such behavior for a simple reason: it presents a security risk. If one app can spoof and mimic the camera for a fun reason, another app will use the same process for nefarious reasons.

What Is a Deepfake?

On the more nefarious side, there are deepfakes. A deepfake video uses AI technology to create an extremely convincing video featuring the likeness of someone else.

Deepfake tech continues to develop, and it is becoming increasingly difficult to spot the difference between a real video and an AI video. For example, check out the example that brought deepfake technology to light, mimicking Barack Obama:

The hands and gestures are Obama’s, but the mouth (voiced by comedian Jordan Peele) is out of sync. Whereas, just over one year later, The Dark Knight’s Tale features Heath Ledger playing himself as Joker in the Dark Knight, but also in A Knight’s Tale.

The Dark Knight’s Tale is fake. But it does illustrate the tremendous advances in deepfake technology over the course of a year.

Around the same time, a deepfake featuring Facebook CEO Mark Zuckerberg was also illustrating the technology.

Again, it is clearly fake. Zuckerberg sounds completely different to the deepfake.

A deepfake requires masses of computing power (specifically, a powerful GPU), time, and data. For the effort creating a lifelike deepfake requires, you’re unlikely to encounter an effective effort as a prank in the near future.

How to Spot a Fake Video Call

Can you spot a fake video call? The answer lies in the quality of the fake video.

The development of deepfake technology is a prime example. Jordan Peele’s deepfake video mimicking Barack Obama was clearly fake. But the quality of public-facing deepfake technology is much better than it was. That’s without considering the deepfake technology that powerful organizations or governments will have access to.

At other times, you’ll know a fake video call is false because of the contact information. Making a truly fake video call on WhatsApp is incredibly difficult because the contact information displays during the connection. Similar limitations are present with other video calling apps that link to a phone number.

There are, of course, tricks to skirt these issues—fake accounts, fake phone numbers, false names, pictures, and so on. But for the most part, would someone go to that length to create a fake video call to fool you?

For most people, tech support scams are a more pressing issue. Either that, or the threat of phishing scams relating to the latest news cycle.

5 Ways to Spot a Fake Video Call

In short, there are a few tell-tale signs regarding a fake video call:

  • Video quality. The quality of the video is usually poor. If the fake video comes from an online source, check for watermarks or other signs the video is stolen.
  • Video sizing. Whoever is fake video calling you will resize a video to fit the webcam window or the app they’re using. Resizing the video will distort the proportions of the video, so it looks out of shape (think extra long or extra wide face, and so on).
  • Contacts. Is the person calling you in your contacts list? If not, does the name mean anything to you? Alternatively, does the contact name appear as the name of an app?
  • If the video call comes from someone you know, and their contact information is correct, what is the video content? Is the person allegedly calling you even in the video?
  • Loops & Cuts. Many fake videos will loop around to the start after a certain amount of time. Alternatively, the video will stop abruptly at the end—but the video call won’t finish.

Also, if someone is using a face swapping app with video functionality, the faces are extremely unlikely to align correctly.

Fake Video Calls Be Gone!

Now you know a few of the methods used to make fake video calls, as well as which platforms they work best on, you’re better prepared to spot and avoid them.

Hopefully, you won’t encounter any fake videos online. But fake news is big business. If something feels fishy, cross-check it using one of the best fact-checking sites for finding the truth.

Read the full article: How Are Fake Live Video Calls Made? Here’s How to Spot Them


Read Full Article

Custom Mouse Cursors for Windows 10: How to Get Started


Are you sick of the default white cursor in Windows? Most people customize their computer wallpaper, sounds, and other elements, but don’t think to tweak the cursor.

Thankfully, it’s easy to change your cursor’s look. Let’s look at how to use a custom cursor in Windows.

Where to Find Custom Mouse Pointers

To change your Windows cursor, you’ll first need a new cursor set. The easiest way to add custom cursors to Windows is to download ready-made packs. You’ll find tons of great free cursor options online with a bit of searching.

One of our favorite cursor packs is Oxygen Cursors, created by LAvalon on DeviantArt. It includes a glassy-looking cursor in 37 different color schemes, meaning that you’re sure to find a color setup you’ll like. In addition to a clean look, they’re also easy to install, making it a great choice if you’re new to cursor customization.

Oxygen Cursors

For tons of cursor options, have a look at the Cursor tag on DeviantArt and Open Cursor Library. You’ll be able to find all sorts of interesting options there.

Sample Mouse Cursor Packs

While we can’t list all the available cursors options, here’s a sampling from DeviantArt that will appeal to most people. Note that you’ll need to have a free DeviantArt account to download these:

  • Capitaine cursors by krourke: A cursor scheme inspired by macOS, with a clean dark look and several alternative icons for loading and other symbols.

Capitaine Cursors

Android Material Cursors

Numix Cursors

  • Entis Cursors by zhorak: A bold cursor set, which is perfect if you often lose track of your cursor.
  • Wii Cursors by allewun: If you’re nostalgic for the pointer from the Nintendo Wii, this pack lets you revive it on your PC.

How to Install Custom Cursor Packs

Because they contain multiple files, most cursor packs download in an archived format, like ZIP or RAR. To proceed, you’ll need to extract the folder contents so you can use them.

If you don’t have it already, install 7-Zip, one of our favorite file extraction tools, to unpack these. Simply right-click on the downloaded folder and choose 7-Zip > Extract to [archive name] and the software will create a new folder with the archive’s contents.

Extract Cursors Windows

Depending on your cursor pack, there may be multiple folders inside for the various themes, so open the one you’re most interested in. Inside, you’ll see several files ending in CUR and ANI. CUR files are static cursors, while ANI file formats are animated cursor files.

Most cursor packs will also have an INF file, typically install.inf or [cursor name].inf. This is an easy installation file that you can use to add the custom cursor to your system.

Right-click on the INF file and choose Install. Windows will show a UAC prompt; once you accept it, the process only takes a moment.

Windows Install Cursors

(If your cursor pack didn’t include an INF file, see the section below on manually changing your mouse cursor.)

Repeat these steps for any other cursor packs you want to install. Now that you’ve added the packs to Windows, you’ll need to apply the cursor set you want to use.

How to Change Your Cursor in Windows

Even on Windows 10, you’ll need to open the Control Panel to change mouse cursors. Type control panel into the Start menu to launch it. If the view option in the top-right says Category, change it to Small icons and choose Mouse.

This opens a new dialog box with several options for customizing mouse behavior. Switch to the Pointers tab to change the look of your mouse cursor. There, click the dropdown box under Scheme to show all your installed cursor sets.

Windows Mouse Options

Everything you installed earlier using INF files should appear here. Select a cursor pack to preview its icons; you’ll see what each one looks like in the Customize box. Choose Apply to try the pointer out for yourself and OK when you’re done.

That’s all it takes to use a new cursor. When you want to change to another theme or revert back to the default, return to this menu and select your new cursor. You’ll also find a few other Windows default cursors here, though they aren’t particularly exciting.

Windows Cursor Choices

How to Manually Change Your Mouse Cursor

If you downloaded a cursor pack that doesn’t include an INF file or want to make your own mouse cursor scheme by combining multiple cursor icons, you can add them manually. This is less convenient than the INF install, but it’s still straightforward.

First, navigate to the Mouse section of the Control Panel using the above instructions. Select any scheme from the top dropdown box to use as a base; (None) is fine.

Next, you’ll need to step through each option in the Customize box and manually assign a cursor. To do this, select an entry and hit the Browse button. Navigate to the folder where you unpacked your cursors earlier and select the appropriate CUR or ANI file for that entry.

Windows Manually Select Cursor

Remember that ANI files have some sort of animation. Also, while some packs use filenames that make it obvious what each icon’s purpose is (such as “normal”, “help”, “busy”, etc.), others aren’t so clear. Feel free to assign cursors based on what you think is best.

Repeat this for each entry in the Customize box until you have a complete cursor set (most have 15 cursors). Once this is done, click the Save As button and give your new scheme a name. This will add it as an option in the dropdown box so you can easily switch to it in the future.

If you ever want to get rid of a scheme, pick it from the list and choose Delete.

Windows Save Cursor Scheme

How to Create Your Own Mouse Cursors

Want to try your hand at creating your own cursors? You’ll find several tools available that let you make a cursor and use it on your system.

Cursor.cc is a simple site that gives you basic tools to create a cursor. You can even publish it on the site so others can use it.

For something more powerful, take a look at Stardock’s CursorFX. It’s available with a 30-day trial, then you’ll need to pay $5 to purchase the software.

If you’re an advanced designer, it’s also possible to convert an image file you created in another tool into a CUR file. Services like Convertio offer CUR conversion from PNG, JPG, and other common image formats. And try AniTuner if you want to create animated cursor images.

Safety When Downloading Cursors

To keep your system safe, you should keep a few security tips in mind when customizing your cursor.

First, only download cursors from trusted websites. An INF file can potentially harm your system because it gives Windows a set of administrator instructions. This is why you should only install cursors from legitimate sources.

Popular resources, like DeviantArt, shouldn’t pose an issue. Beware cursor downloads that appear from ads or on shady-looking websites that you’ve never heard of, though. Remember that cursors are image files, not applications. If a website asks you to run software to install your cursors, it’s malicious.

If you haven’t already, you should enable file extension display in Windows so you can easily see what kinds of files you’ve downloaded. To do this, open a File Explorer window and select the View tab at the top. In the Show/hide section, check the File name extensions box and Windows will show extension types for all files.

Windows File Name Extensions Option

Aside from readme text files and image samples, the only types of files a cursor pack should contain are CUR, ANI, and INF. If you download a pack with an EXE or MSI file, it’s dangerous and you should delete it.

Now You’ve Made Your Cursor Look Cool

You now have everything you need to customize your Windows cursor. Whether you download a ready-made pack or create your own from scratch, we hope you enjoy a more personalized computer with a custom mouse cursor.

Now that you’ve tweaked your mouse, have a look at more ways to change the look and feel of your Windows desktop.

Read the full article: Custom Mouse Cursors for Windows 10: How to Get Started


Read Full Article