You can now speak Spanish to your Alexa-enabled devices in the US. While Alexa would have previously replied with, “I’m sorry, I don’t understand,” she will now be able to respond to your Spanish voice commands and reply in Español.
Amazon Teaches Alexa to Speak Spanish in the US
Given its proximity to Mexico, the United States has a high number of Spanish speakers. However, Google Home learned to speak Spanish in 2018, it has taken longer for Amazon to teach Alexa how to speak Spanish. But it has finally now happened.
In April 2019, Amazon announced that Alexa would soon be able to speak Spanish. In effect, the company had asked developers to “start building skills for Spanish-speaking customers in the US […] with the new Spanish for US voice model.”
How to Start Speaking Spanish to Alexa
With those skills having been certified, Alexa can now speak Spanish in the United States. According to The Amazon Blog, support for Spanish speakers runs deep, so there’s a “brand new Spanish voice, local knowledge, hundreds of skills, and more.”
There’s also a new Multi-lingual mode which allows users to switch seamlessly between Spanish and English. Once enabled, if you ask Alexa a question in Spanish she’ll respond in Spanish, but if you ask Alexa a question in English she’ll respond in English.
"Alexa, ¡Hola!" @alexa99 customers in the U.S. can now access Spanish language and Multi-lingual mode on supported Echo and Alexa built-in devices. https://t.co/BhmiJY8A1G
If you want to start speaking Spanish to Alexa and have her respond in kind, switch to “Español (Estados Unidos)” in the Alexa app. Or, alternatively, enable the Multi-lingual mode, which will be especially useful for multilingual households.
As a bonus for Spanish speakers in the US, Amazon has added a host of Latin music playlists to Amazon Music. These include a playlist full of urban artists and a playlist packed with dance songs. All of which you can ask Alexa to play in Spanish.
Is It Time to Learn to Start Speaking Spanish?
With 50 million Spanish speakers in the United States, this is long overdue. It has taken Amazon a while to catch up to the competition, but it’s better late than never. And if you’re not yet able to speak Spanish, here are the best apps to learn to speak Spanish.
A soundboard can spice up your podcast, or even add some pizzazz to personal conversations. Here are some great readymade soundboards, as well as apps to create your own custom soundboard for free.
Apart from the best apps and software to record podcasts, it’s a good idea to have a soundboard app. You can use it for things like your theme song or background music, or add zing to conversations by playing sound effects, movie one-liners, and so on. It’s all up to how creative you want to be.
1. Soundboard (Web): Huge Database of Sounds and Soundboards
If you’re looking to create your own Soundboard or browse those made by others, visit Soundboard.com as your first destination. This website has one of the largest collections of audio clips and soundboards you’ll find on the internet.
Soundboard claims its database holds over 500,000 sounds in several different categories like comedians, movies, animals/nature, politicians, prank calls, sports, etc. Choose a category to browse available sounds or search the website.
It also hosts several publicly available soundboards created by other users. Most of these are free for anyone to use by opening it in a browser or in the Soundboard apps. You can also download each audio file individually to save it to your hard drive.
With Soundboard, you can also create your own customized soundboard. It’s completely free, and you can upload as many audio files as you want. Create it, add a logo and a description, and upload the tracks you want. Each track can be given a name too. If you’re creating a professional soundboard, you can even charge for it per track or to download them.
The only place where Soundboard is lacking is an easy way to add a sound you find on the site to your own custom soundboard. Instead, you’ll need to download that audio file, and then re-upload it to your own board.
101 Soundboards has one of the largest collections of free soundboards you will find on the internet. The best part is that this is among the few websites where you can control a sound’s playback, stopping it midway.
When you play any sound, especially a quote, you will see the full clip’s sound graph at the bottom of the screen, as well as the full quote. That way, you can decide if you want to stop the clip early or let it play out fully. It’s a tremendously useful feature, and I wish more apps had it.
The website is already populated with soundboards of all types, and you can check out the most popular ones, recently updated boards, or search through the collection. Chances are, you will find multiple soundboards for your favorite TV shows or movies.
And yes, you can register and upload your own sounds too. But there isn’t a handy mobile app, so I wouldn’t suggest this over Soundboard to create your own collection.
3. Myinstants (Web): Find and Add Sound Buttons to Your Board
The design is a bit garish for my taste, but Myinstants is such a good app that you can overlook it. This website has a large collection of small sound clips, ready to be turned into a soundboard of your choice.
It’s best to register for the website, as this will let you save sounds to your own Favorites board, and upload audio too. The website works well on mobiles, and a shortcut lets you turn it into a browser-based mobile app.
Find sounds by browsing categories like games, movies, television, viral, memes, music, politics, etc. Each button is a different color and describes the sound. There’s also a handy search button. If you like a sound, add it to your favorites with one click.
You can also upload custom sounds, give it a desired color and title, and add a short description. Myinstants is a quick and easy way to build a soundboard of buttons for any project, including your own clips.
4. Meme Soundboard (Web): Readymade Soundboard of Popular Memes and More
If you’re looking for a readymade soundboard to use on a computer, tablet, or phone, Meme Soundboard has you covered. As the name suggests, it is populated with sounds from some of the popular memes, but look beneath the surface and it has a few tricks.
The main interface is a delight to use, especially on phones. Meme Soundboard presents the collection as a grid of tiles, which are easy to tap or click. Whether you want to rick-roll someone or get Simon and Garfunkel crooning Sound of Silence, you can perform a super-fast search or just browse to find it.
While the quick search is the best feature, you will also like the Loop button to repeat any sound infinitely. If you like something, click the star to add it to your Favorites. The only issue seems to be that there isn’t a pause or stop button to quickly end the audio.
Apart from memes, the website also has readymade soundboards for other common audio in the Non-Meme Sounds board. And if you don’t mind the foul language, check out the NSFW soundboard.
Psst, do yourself a favor and click the Harlem Shake button. It’s wild!
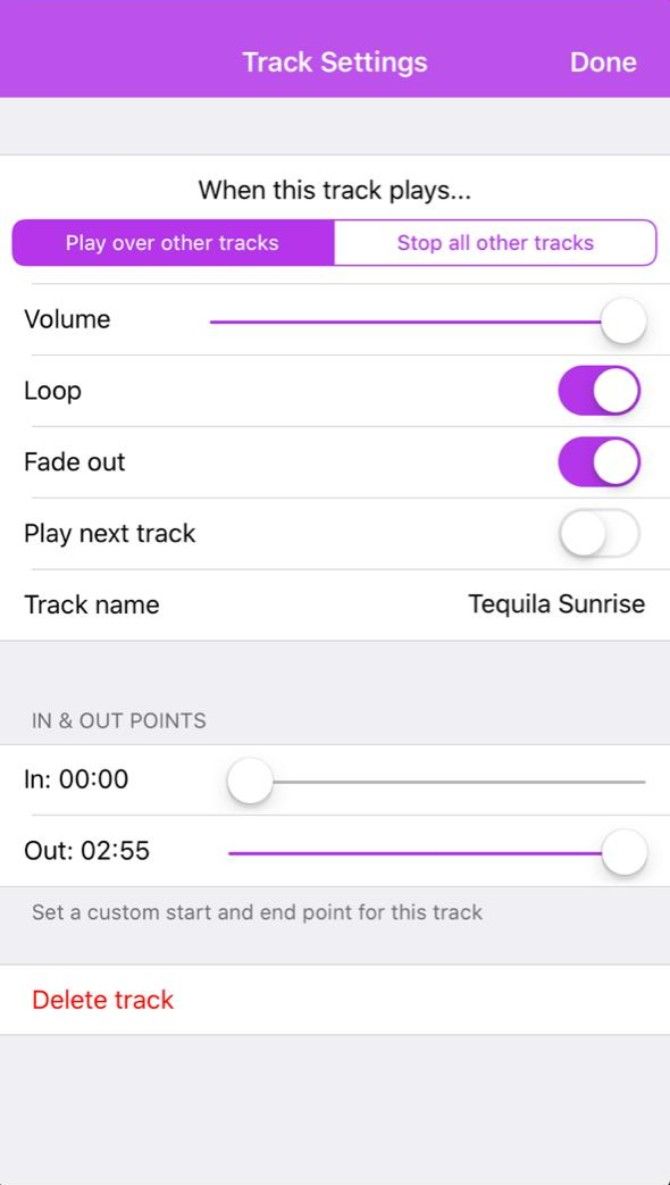
Soundboard Studio is, without a doubt, the best soundboard app for iPhones and iPads. In fact, it’s the best mobile soundboard app, and it’s a pity there isn’t an Android version.
The free version called Soundboard Studio Lite gives you all the features of the full-fledged app but restricts you to 24 tracks. It’s a good way to test the app before paying the hefty price for the full version.
What does it let you do? Well, the question should be, what doesn’t it let you do? Soundboard Studio supports a wide variety of audio file formats, can import from cloud storage, and record audio too. Plus, you can play two tracks simultaneously.
There are advanced settings for each track too. You can trim any track, adjust its volume, set it to loop, play it solo always and hush all other tracks, give it a fade in and fade out, and even set up automated actions. It’s just packed with features and looks great while doing it.
6. Custom Soundboard (Android): Best Free Soundboard Creator for Android
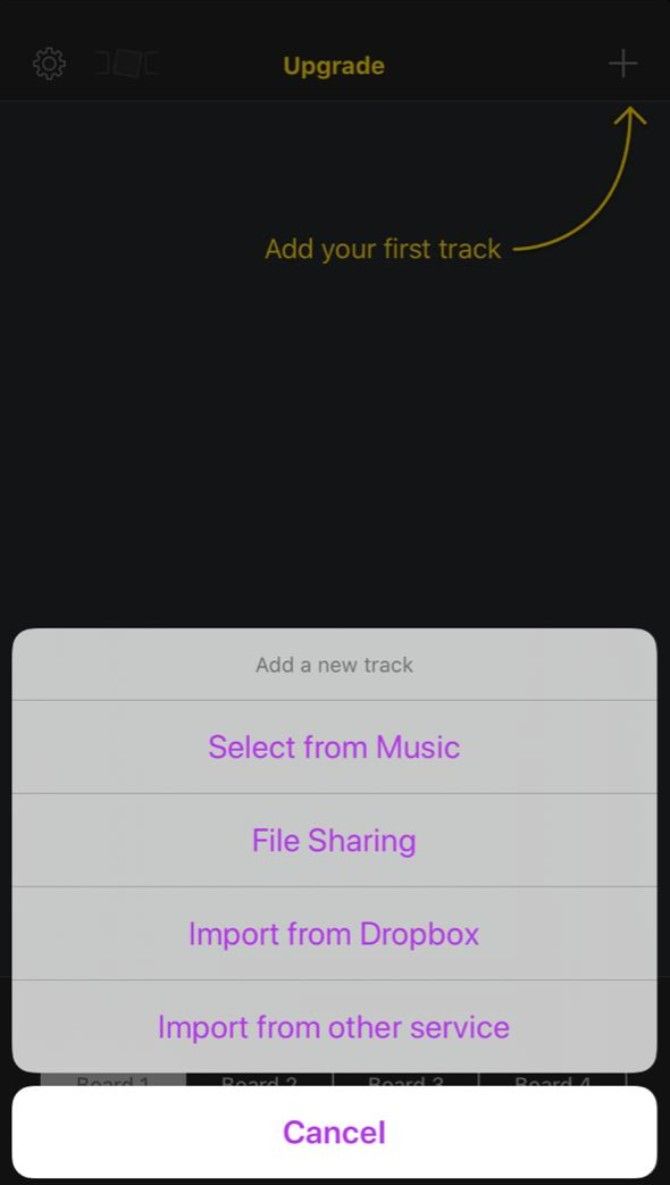
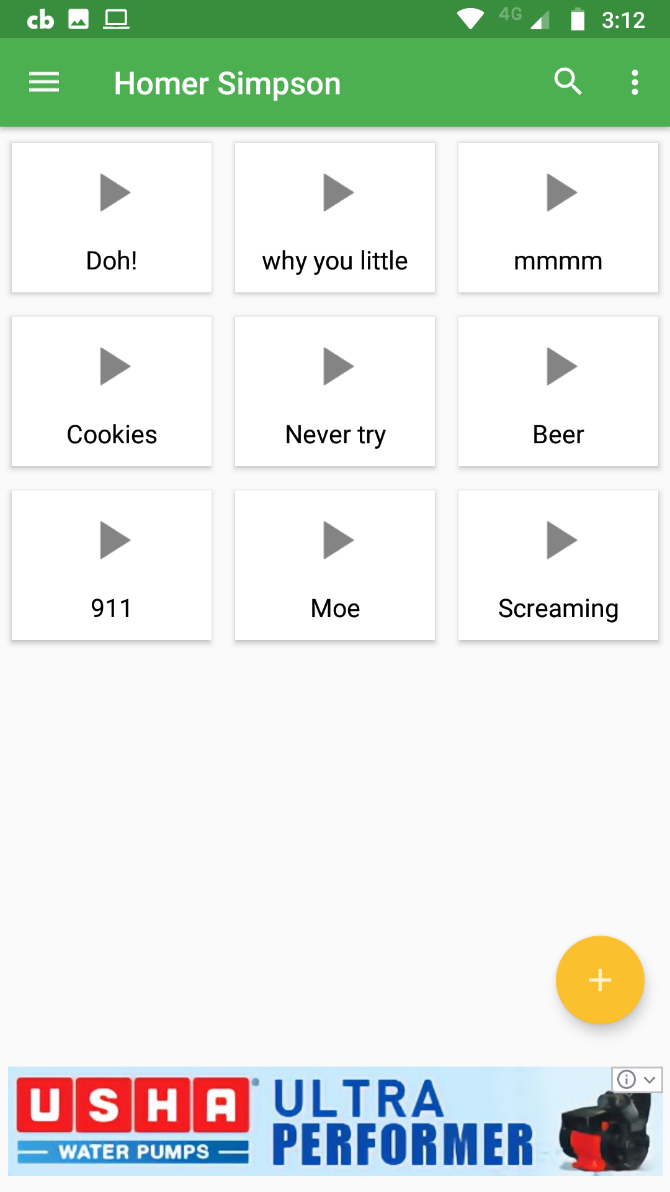
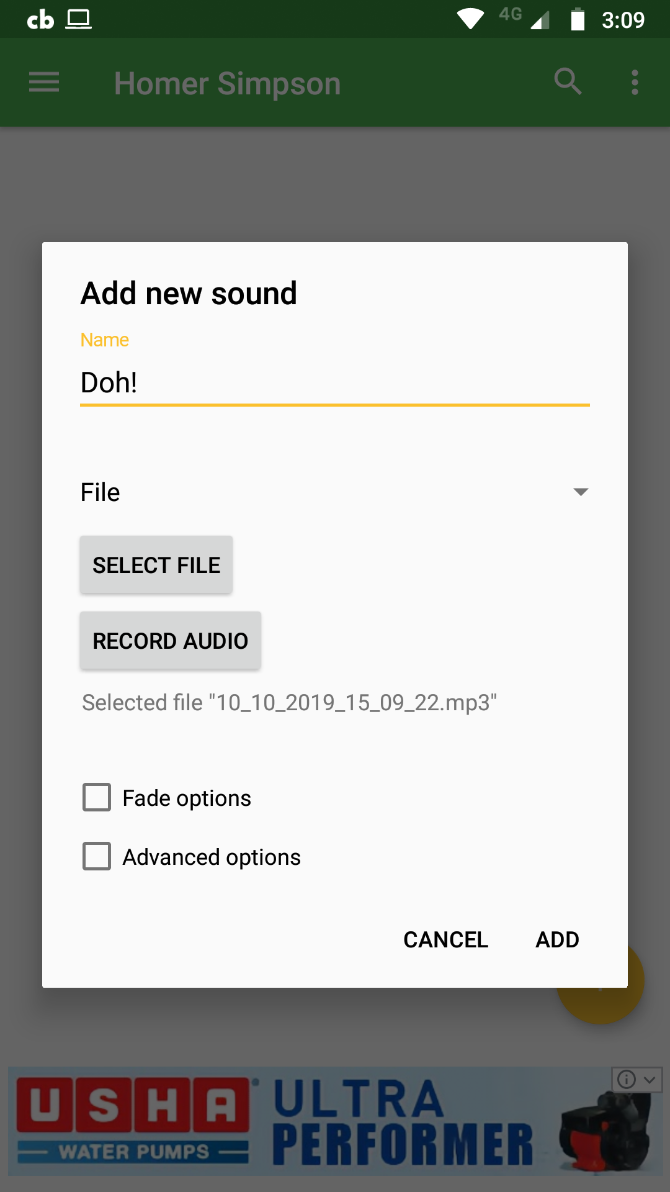
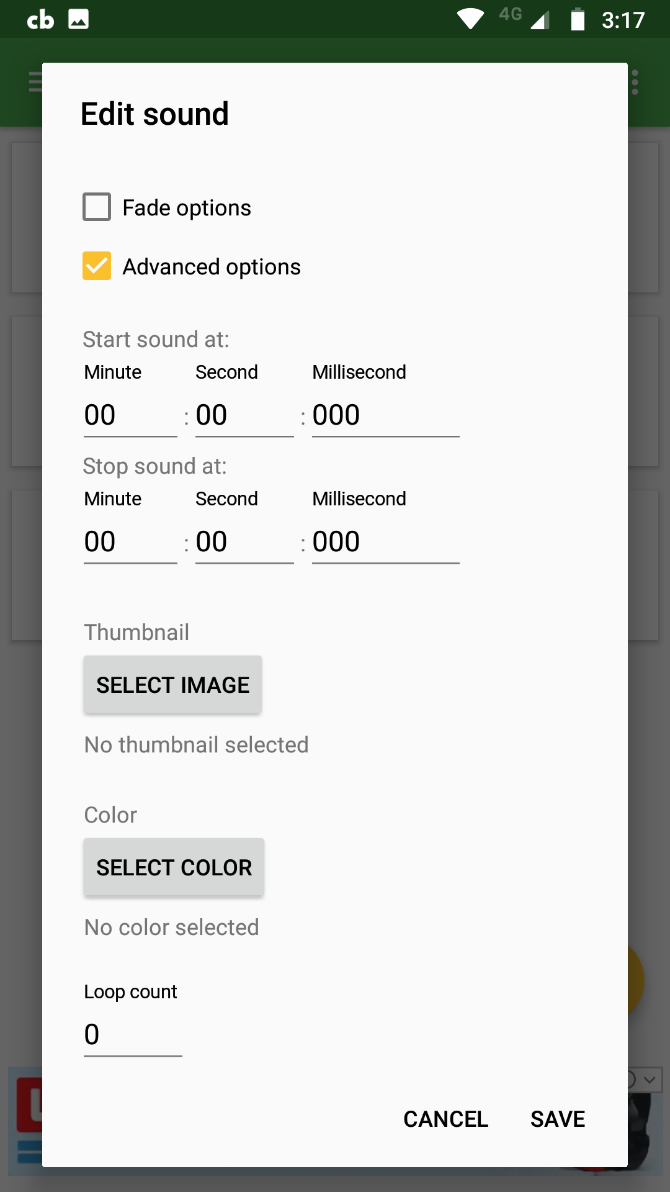
There is no Soundboard Studio for Android. The next best app is Custom Soundboard by Johannes Maagk. It’s completely free but ad-supported and lets you create unlimited soundboards with unlimited tracks.
You can add audio from a file on your Android phone, add multiple tracks at the same time, or record live audio. Each track can fade in or out, have its own thumbnail image or color, be looped a set number of times, and even trimmed.
The app also lets you create a backup of all your soundboards, which is a helpful feature that most others don’t have. If you take the time and effort to customize this app, it will serve you well, and you’ll never lose your data.
The trick to creating a good soundboard is to use good quality audio clips for your collection. But often, the file size can become a bit much, especially if you use WAV files. It’s a good idea to compress your audio files and then add them to the soundboard.
Check out our quick guide on how to compress large audio files while retaining their quality. It can make a big difference for the listener, and you can store more files easily.
Google is rolling out a new feature designed to help people with visual impairments get around. The feature provides detailed voice guidance to those who need it, helping them get from A to B on foot. While it’s aimed at the visually impaired, anyone can use it.
While people with perfect eyesight wouldn’t think twice about going for a walk, it can be a little trickier for people with impaired vision. Especially if they want to venture somewhere they have never been before. Thankfully, Google is on hand to help.
How to Use Google Maps’ Detailed Voice Guidance
Google unveiled Maps’ new detailed voice guidance feature in a post on The Keyword. Wakana Sugiyama, a business analyst at Google, explains that this is the first Google Maps feature “to be built from the ground up by, and for, people with vision impairments.”
Detailed voice guidance gives people “audio information when they’re walking to their destination using Google Maps”. Google has posted a video showing how the feature works, with Sugiyama following the instructions guiding her from A to B.
Sugiyama said, “With this feature, I can navigate the streets of Tokyo with more comfort and confidence. As I take my journey, Google Maps proactively lets me know that I’m on the correct route, the distance until my next turn and the direction I’m walking in.”
To enable detailed voice guidance, open the Google Maps app and go to your Settings. Select Navigation, and then scroll down until you see Walking Options > Detailed Voice Guidance. Flip the switch to enable the feature, and then explore your surroundings.
Google Maps Is Getting More Useful With Every Update
Detailed voice guidance is rolling out gradually on Google Maps. It’s launching first on Android and iOS in English in the United States and Japanese in Japan. However, Google is promising to add support for additional countries and languages over time.
Reading, by definition, is a solo activity and demands your complete concentration as well as a quiet space. The most special books have the power to pull you away from the world around you.
But the actual act of reading only represents half of the whole experience. The other part is a lot more social, and kicks in afterward.
What Is Social Reading?
Most of us, when we’ve finished a book, tend to share what we learned. We dive deep into hours-long conversations with someone who has also read the book. We pick our favorite quotes and post them on social media.
This concept, and its associated behavior, are called social reading. There are several benefits to being more social about what you read.
Social reading enables a community where you can connect with fellow readers, engage in profound discussions, share what you’re reading at the moment, discover excerpts you like, and gather insights on sections you’re stuck on.
Further, an active community inspires you to be more consistent with your reading habits. You can publicly set goals, participate in challenges, and seek recommendations. Social reading isn’t a new term, either. For years, it has existed in various forms, such as book clubs.
To get your started, here are the best social reading apps.
1. Bookself
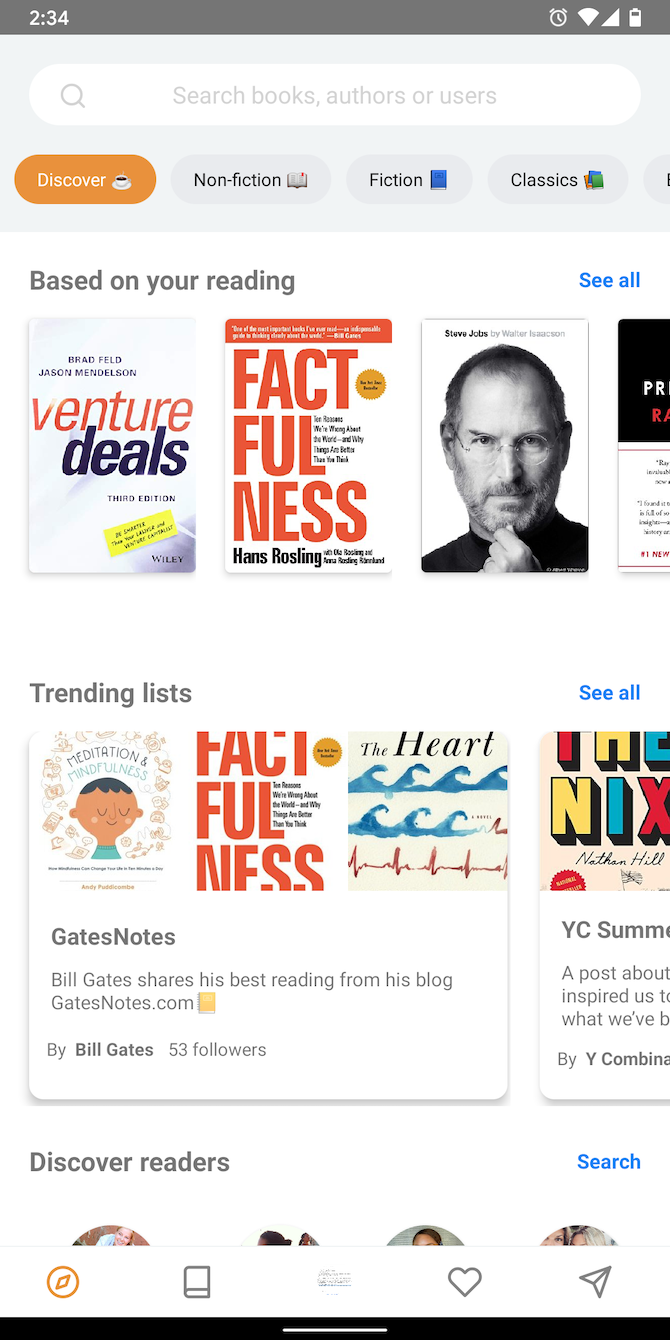
Bookself is an online community of readers and writers where every book has its own dedicated forum. Anyone can visit the page and share their thoughts with the rest of its followers.
You have the option to reach out to other commentators by sending them a private message. Bookself also recommends users and books based on your reading history and the genres you’ve selected.
In addition, you can browse active discussions and which books are trending on Bookself. Bookself can keep tabs on your books, as well. It lets you add books you found interesting to your wishlist and tell your followers what you’re currently reading.
What’s more, Bookself offers you the ability to establish your reading goals. Inside the app, you’ll even find both text and audio previews of a handful of books. Bookself embeds a purchase link if you decide to buy one.
Bookship is for building private virtual reading groups. All you need to do is pick a new book and invite your friends to join you on Bookship.
The app allows everyone to chat and talk about their progress through a handful of custom tools. There are built-in options for sharing your progress and requesting an update from all members.
You can share regular images of pages and excerpts, but Bookship also supports OCR. That means instead of pictures, you have the ability to directly send the page’s content.
What’s more, Bookship houses free ebooks of a range of classics. The app lets you read them right inside the app and highlight text to easily forward to the reading group.
Bookself helps you decide which book to read next by sorting a wide collection based on their popularity, critical reviews, topics, and release dates.
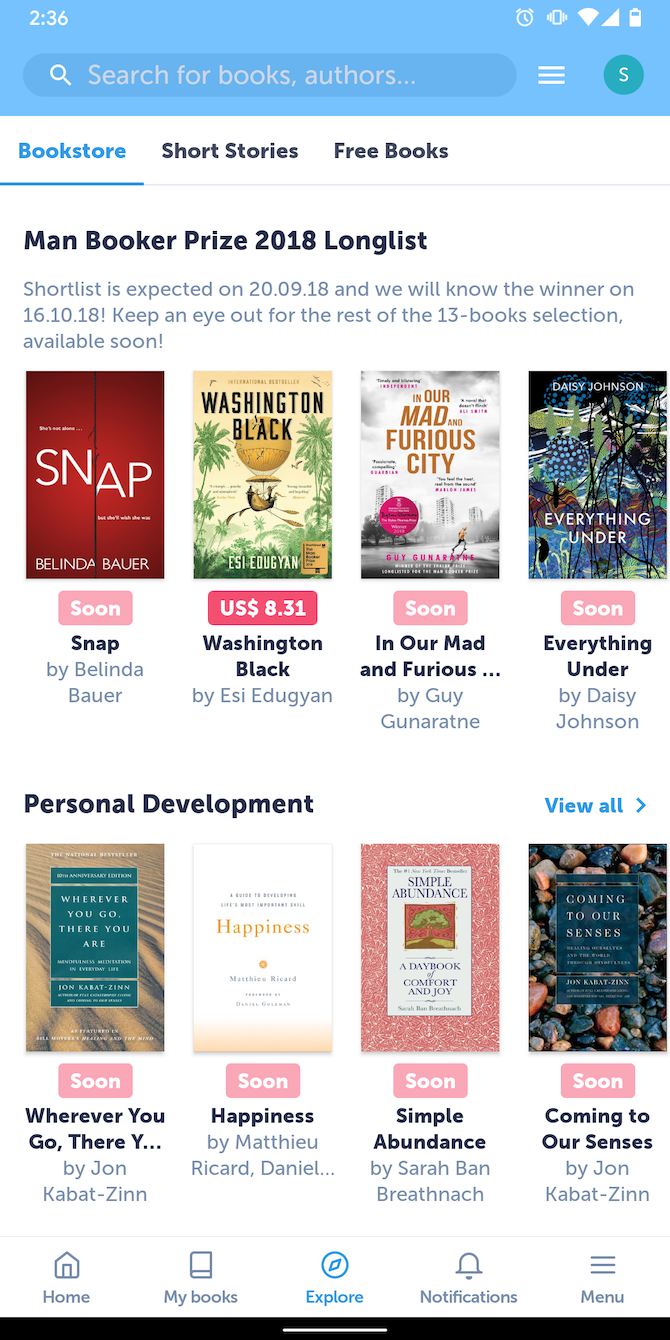
Glose is a social network for readers. It provides a personal feed where you can publish posts and view updates from the people in your friend list. The app hosts all the standard features you’d expect from such a social network.
But the reading feature is what truly sets Glose apart. Unlike the rest, Glose lets you read books on its app itself. You have the option to either upload your own ebooks or choose from the service’s catalog, which contains both paid and free titles.
Each book on Glose has a special page. In the Activity tab, users can check comments and passages others have highlighted. The reading interface also has a bunch of handy social features.
Glose shows the number of activities (like notes or reactions) associated with any line or paragraph. To leave your own, you just need to select a piece of text and tap the action you’d like to perform from the popup menu.
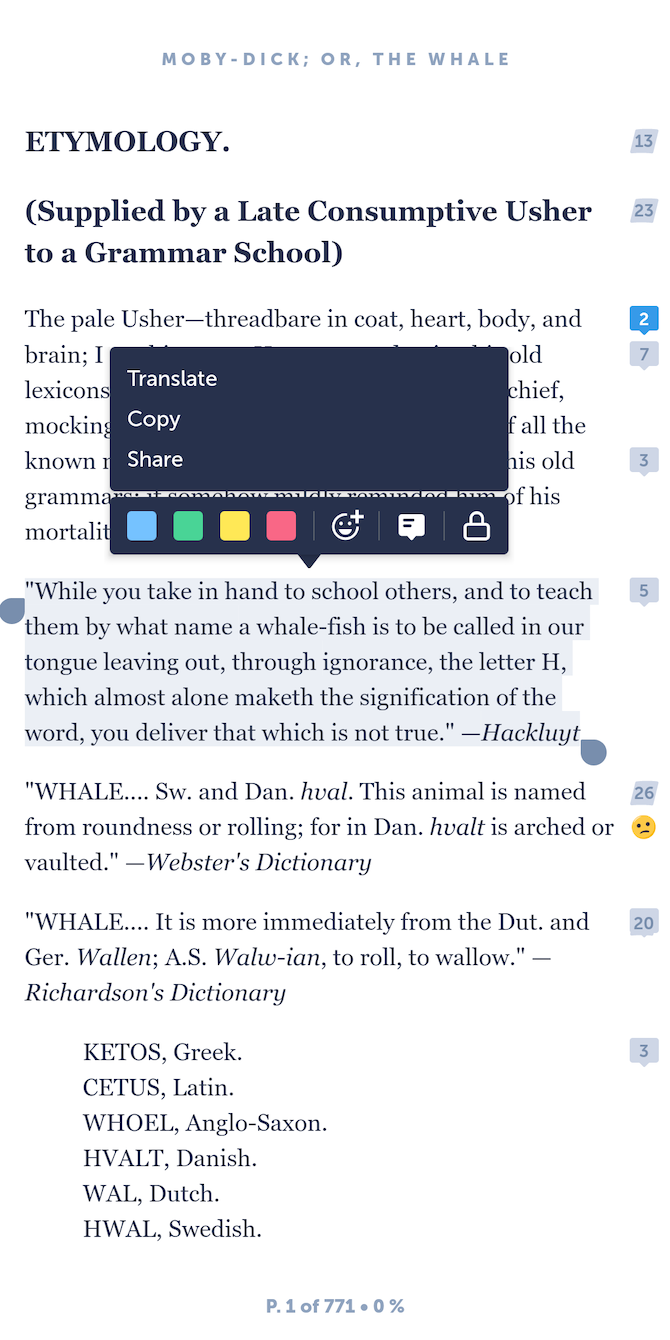
Goodreads is the most sophisticated social reading platform. It’s home to millions of readers and an endless database of books, reviews, and annotations.
When you first sign up for Goodreads, it asks you to create your virtual bookself. You can add the books you’ve read, titles you’re reading at the moment, and those you wish to read in the future. Based on this data, Goodreads recommends you new books and discussions to join.
Plus, the site has constantly updating challenges, trivia, and quizzes you can take. Being a social network, Goodreads allows you to chat with readers and follow their activity.
Since Goodreads is so popular, authors have an active presence on it as well. The site often runs sessions like Ask The Author, where anyone can pick their favorite author’s brains.
Due to its many features, the Goodreads app can feel a little overwhelming at first. However, once you get the hang of it, it’s a book lover’s paradise.
Zuster is a social reading app for web articles instead of books. It has a straightforward design that allows you to easily share and discuss stories with your friends. Aside from the mobile apps, you can add articles and comments on Zuster on your computer through its browser extension.
Zuster sports a quick-read option, which uses machine learning to extract and show you the most important bits from a post. Through the Activity tab, you have the ability to check what all your friends have been up to on Zuster.
At the time of writing, Zuster did not have an iOS app available, but the developer says it should be ready soon.
These apps prove that reading books can be both an isolated and social hobby. You can use them to talk to like-minded people, share your thoughts on a book you’ve read, and make the activity a lot more productive.
However, it can be difficult to keep up with new book releases and discussions. Follow our tips on how to read more if you can’t seem to find the time to read everything you want.
A conscientious shopper knows that monitoring Amazon’s price history is an essential part of getting a good bargain. Sellers are renowned for bumping their prices up so they can offer faux “discounts” a couple of weeks later, especially ahead of big events like Amazon Prime Day, Black Friday, and Cyber Monday.
Thankfully, it’s quite easy to see an Amazon item’s price history. Several different Amazon price trackers are available.
Here are five of the best Amazon price watch services that you should be using.
CamelCamelCamel is arguably the most popular Amazon price history tool. The free service lets you see the price history for any product listed on the local Amazon sites in the US, UK, Canada, Australia, France, Germany, Italy, Spain, Japan, and China.
To search for a product, you just need to paste its URL or Amazon Standard Identification Number (ASIN) into the search box. You can also perform a keyword search, enabling you to see how similar products’ prices have compared over time.
Displayed on each item’s page is a comprehensive price history chart, tracking not only Amazon’s price but also third-party new and used prices. You can tell the chart to display a range of one, three, or six months, or a year.
CamelCamelCamel also lets you create alerts. If a price hits a certain threshold, you can get a notification via email or on Twitter.
And its Firefox and Google Chrome extensions can put a Track Product button right on the pages of retailers for easy access to CamelCamelCamel’s price history charts. The extension is called The Camelizer.
The Keepa Amazon price history tracker lets you access data in a few countries that CamelCamelCamel does not support—namely, Mexico, India, and Brazil. It does not, however, let you check Amazon’s price history in China.
Keepa provides an Amazon price tracker extension for more browsers than CamelCamelCamel. In addition to Firefox and Chrome, there are also extensions for Microsoft Edge and Opera.
When you check the price history, you will see a graph plotting the changes over time. The graph also shows other important aspects, such as whether there was a Lightning Deal at the time, or whether shipping fees were included in the price of the product.
Another Amazon price history tracker worth checking out is The Tracktor. It works with local Amazon sites in the United States, United Kingdom, Canada, France, Germany, and Japan.
The Tracktor has a couple of unique features that help to differentiate it from the other price watch tools on this list.
Firstly, there’s the Movers tab. It lets you see which products on Amazon have seen the largest price increases and decreases over the previous day. You can filter by new or used products and can sort the products by price or by percentage change.
Secondly, check out the Trending tab. It shows the most popular products that other users have on their personal tracking lists. You can see which products are trending right now, and which are the most tracked overall.
Finally, The Tracktor provides an extension for Chrome and Firefox. At the time of writing, however, the Firefox extension is undergoing a complete overhaul and is unavailable for download. The developers do not offer a timescale for the expected completion date.
Honey is a popular browser extension for saving money online. Its primary purpose is to search for (and automatically add) coupon codes to your shopping baskets whenever you check out from more than 40,000 online retailers.
However, it also has a tool called Amazon Best Price. It has three features to help you make sure you’re always getting the best deal:
Seller Comparison: Popular Amazon products are often available from dozens of different sellers. Honey will scan all the sellers and let you know which one is offering the best deal. It can even take your Amazon Prime shipping benefits into account when performing the analysis.
Price History: Honey provides an Amazon price watch graph. It is available for 30, 60, 90, or 120 days.
Droplist: Droplist is a watchlist. Add items to it, and Honey’s Amazon price watcher will let you know if the cost moves up or down.
Honey is available on Chrome, Firefox, Safari, Opera, and Edge. Unfortunately for international users, it only works on the Amazon US version of the site.
According to Business Insider, Amazon prices change 2.5 million times every day. As such, a typical product will see its price change every 10 minutes, even if it’s only by a couple of cents.
Clearly, nobody has the time to track Amazon prices that often, so how do you make sure you never miss out on a bargain? Waatcher is one solution worth checking out. It’s an Amazon price tracker that can automatically purchase an item on your behalf whenever your target price is reached.
All you need to do is set the maximum amount that you’re willing to for a listing. Waatcher will then monitor the Amazon item’s price history and alert you as soon as the price is hit. If you allow it to, the tool will place an order immediately.
You probably won’t want to use a tool like this all year. In its literature, the company says it can take months to place some orders. It would be easy to forget that you set something up, then receive a nasty shock when your credit card bill arrives. Where Waatcher excels is for making sure you get the best possible deals on the big sales days of the year.
To start using Waatcher Amazon price tracker to bag bargains automatically, you need to grant the app access to your Amazon account. Some people might be uncomfortable with that situation from a privacy and security standpoint.
Use Amazon Price History to Find More Bargains
The five Amazon price trackers we’ve listed on this website will all help you to find better deals when you’re shopping online. Indeed, it’s always worth running a check on Amazon items’ price history before you hit the buy button.
If you’re new to PC gaming, you might not have ever explored video game graphics settings. Most people know that higher settings are better, but what do all those game settings actually do?
We’re here to explain the most common video game graphics settings. We’ll see how they work and how they affect your system and games.
1. Display Resolution
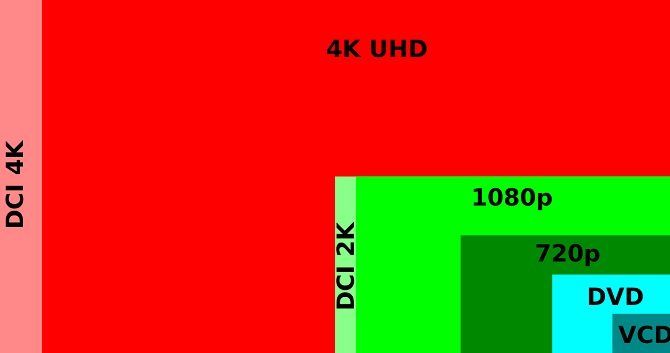
Image Credit: Wikimedia Commons
Resolution is the amount of pixels present on your screen, which dictates the overall quality of the image. You’ll see this expressed as two numbers, such as 1920×1080 (1080p) or 2560×1440 (1440p). The first number indicates the width of the screen in pixels, while the second is its height in pixels.
All monitors come with default resolution settings, which you can change. If you have a 1080p monitor, you can display in resolutions lower than 1920×1080, but not higher.
Independent of this, you can change a game’s display resolution. Setting a game to display higher than your monitor can handle is pointless, as you’ll lose the extra detail.
Higher resolutions bring a noticeable bump in image quality because there is more graphical information per frame. Of course, increasing the resolution will put more stress on your GPU. Increasing resolution is one of the simplest and largest quality upgrades you can make, so make sure you have a GPU that can handle high resolutions before cranking it up.
Below are two images, zoomed in 200x. One image was taken at 1440×900 resolution (roughly 720p); the other was taken at 1920×1200 (roughly 1080p). Note the added detail to the hair and lines around the eyes.
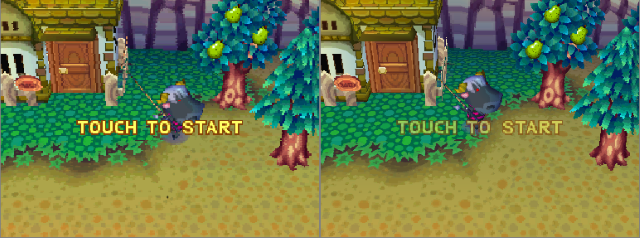
Some games and software tricks use special methods to render output at a higher resolution than is normally possible. For example, the image below shows the Nintendo DS game, Animal Crossing: Wild World.
The left side below displays the regular 256×192 resolution, while the right has the same game using 1024×768 resolution downsampled to the original 256×192 screen. You could achieve this effect using an emulator.
2. Refresh Rate
When you change your resolution in the game settings, you may see another number beside it. This represents the number of frames per second (FPS) the game sends to your monitor. The FPS that your monitor can display is known as the refresh rate, which is measured in hertz (Hz).
Most standard monitors have a refresh rate of 60Hz, which means that they can draw a new image on the screen 60 times per second. Your graphics card (and game) may be capable of sending a higher FPS than your monitor can display. However, your monitor’s refresh rate effectively acts as a cap on your game FPS, as a 60Hz monitor can’t display 144 frames per second.
60FPS is the generally accepted standard for smooth gaming. A higher refresh rate will produce smoother-looking images, which is more taxing on your GPU. If you’re not sure, you can check your monitor’s refresh rate at UFO Test. We’ve explained how to fix low FPS in Windows if you’re not satisfied with your results.
3. Texture Quality
Texture quality is just what it sounds like: how good elements of the in-game environment look. Textures are skins that sit on top of the basic blocks of the three-dimensional environment.
Increasing the texture quality will enhance the quality of the game’s graphics. Doing this is often rather intensive, as a texture quality change will usually adjust all the textures in-game. The results are sharper and less blurry images at the cost of a heavier load on your video card.
For example, a photograph on the wall might look blurry and indistinguishable on Low texture settings, but have enough detail to study clearly on High. See the below comparison of a shot in BioShock Infinite for an example:
All quality settings work in a similar fashion, so we won’t go over them individually. This includes shader quality, which adjusts how clear light and dark balance in the game.
The particular enhancements made through quality bumps are difficult to pinpoint, since they vary from game to game. You can typically adjust a single slider on levels like Low, Medium, and Ultra, or dive into advanced settings and tweak everything individually if you prefer.
For general use, medium settings are often a good idea, as they balance an immersive landscape with playable performance.
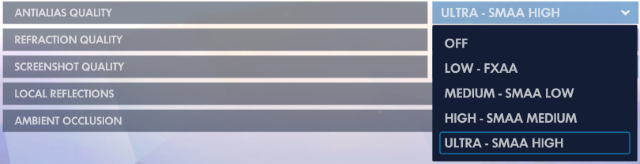
4. Anti-Aliasing
Before explaining anti-aliasing (AA), it’s helpful to understand what aliasing is in the first place. Aliasing occurs when low-resolution images produce pixelated (rather than smooth) lines and curves. This is a result of using square pixels to represent rounded real-life objects.
Anti-aliasing injects blocks of the same or similar color around the lines of an image, creating a smoother effect. This reduces the blocky look around the edges of items in your game. There are different kinds of anti-aliasing techniques; your GPU’s drivers decide which to use. However, you can often change the quality of anti-aliasing you want in your game options.
Depending on the AA methods used, it may tax the GPU a small or large amount. Try turning up the AA effect if you notice jagged edges all over the place, especially on elements like foliage and grass.
Anti-aliasing is more effective at lower resolutions. At higher resolutions, like 4K, the pixels are so small that any aliasing effect is negligible.
5. VSync
VSync (short for Vertical Synchronization) synchronizes the FPS output of your game with the refresh rate of your monitor in order to prevent screen tearing. Screen tearing (one of the most common PC gaming problems) occurs when your GPU outputs more frames per second than your monitor can handle. Thus, the card sends a new frame before your monitor has finished showing you the previous one.
You can see an example of screen tearing below. Notice how the image is split into three pieces that don’t line up. Although screen-tearing isn’t always obvious while playing a game, you’ll likely notice it if you watch slowed-down playback of recorded games.
Enabling VSync removes virtually all screen-tearing from your gameplay. However, it has two downsides. The first is that it can introduce input lag, which is when your button inputs don’t immediately take effect in the game.
The other problem is that if the game’s FPS falls below your monitor’s refresh rate, it locks the frame rate to a lower synchronized value, like 30FPS. This can lead to games stuttering unnecessarily—jumping between 30 and 60FPS is much more jarring than just staying at 59FPS.
To deal with this issue, GPU manufacturers have created separate modules for monitors which sync refresh rates dynamically with frame rates. These alternative syncing options, such as Nvidia’s G-Sync and AMD’s FreeSync remove any stuttering associated with VSync.
However, these alternative syncing methods do require a compatible monitor and GPU, which limits the exposure of this innovative technology. In most cases, unless screen tearing really bothers you, you’re better off disabling VSync and enjoying higher frame rates.
6. Tessellation
In-game textures are comprised of quads—polygonal shapes made of triangles—which form over the shape of objects. Tessellation allows graphics cards to repeat quads multiple times over any given surface. The repeated patterning allows for texture displacement, which creates bumps in landscapes.
You’ll notice this most clearly when looking at surfaces like brick walls. With high tessellation, these will have realistic bumps and curvatures. Without it, they’ll look smooth and less believable.
In most games, tessellation is not that taxing on your GPU. It’s worth a try to enable it and see if it improves your game without impacting performance, but it’s not the most vital graphical game setting.
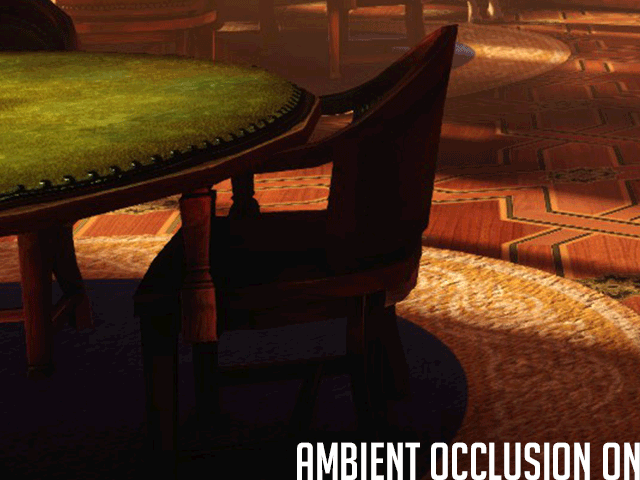
7. Ambient Occlusion
Ambient Occlusion creates realistic shadow transitions between different physical objects. Ambient occlusion in-game, while noticeable, will not dictate the shadow quality. This is why ambient occlusion is usually a separate option from shadow quality.
Instead, ambient occlusion will lighten or darken shadows in relation to other objects. In the example below, ambient occlusion darkens the shadow underneath the table to create a more realistic lighting effect in the room.
In a lot of cases, you probably won’t notice the effect too much. It makes light more realistic, but won’t blow you away with additional detail.
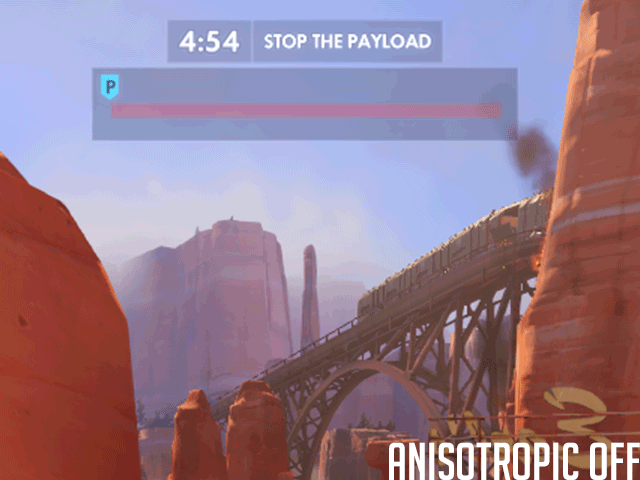
8. Anisotropic Filtering
Filtering allows games to smoothly transition between high-quality textures near the player, and low-quality textures farther away, where you can’t see them as clearly. A sudden change from clear to blurry looks terrible, so filtering is important.
Anisotropic filtering reduces the amount of texture blurring at far distances. These anisotropic filtering effects are best seen at oblique angles (angles that indicate far distances) rather than directly in front of your character.
Before anisotropic filtering, bi or tri-linear filtering was common. This type of filtering slowly degrades texture quality over distances. Anisotropic filtering, on the other hand, replicates similar texture quality at close and far distances alike.
You can see a sample below. Using it is not too demanding on your hardware, and many games nowadays even enable it by default so you don’t have to adjust it.
It may appear as though anisotropic filtering lowers shading effects at far-off distances. That is due to reduced blurring, which reduces the dark spots created with smoke and texture effects.
9. High Dynamic Range (HDR)
While it isn’t typically a setting you can change, HDR is an important graphical term you should know. Essentially, HDR improves the contrast between light and dark portions of your display. This makes the dark parts look darker, and the bright parts look brighter.
You’ll need an HDR-capable display to take advantage of it, so you might want to shop for an HDR monitor when it’s time to replace yours.
Bloom is an effect that attempts to make light in games “feel” brighter. Of course, your display can only get so bright, so bloom uses other visual methods to increase the effect. You’ll notice bloom when you see light spilling over the edges of objects, like characters and walls.
It’s supposed to replicate the feel of extremely bright light overwhelming your eye or a camera. Used in moderation it can be effective, but some games go overboard with it.
11. Motion Blur
This is a straightforward graphical effect. Motion blur introduces fuzziness to the image when rotating the in-game camera. Like bloom, it’s typically used for cinematic effect, as it mimics similar properties seen in movies.
Many people prefer to turn motion blur off, as it reduces the quality and adds to natural blurriness.
12. Field of View
Field of view, often abbreviated to FOV, defines how wide of an angle your character sees in a first-person game. Increasing this lets you see more of the world at once (essentially enhancing your peripheral vision), but can make aiming more difficult as it squishes more information into the same screen size.
Generally, you should increase the FOV to a level where you can see as much as possible, without it affecting the rest of your gameplay.
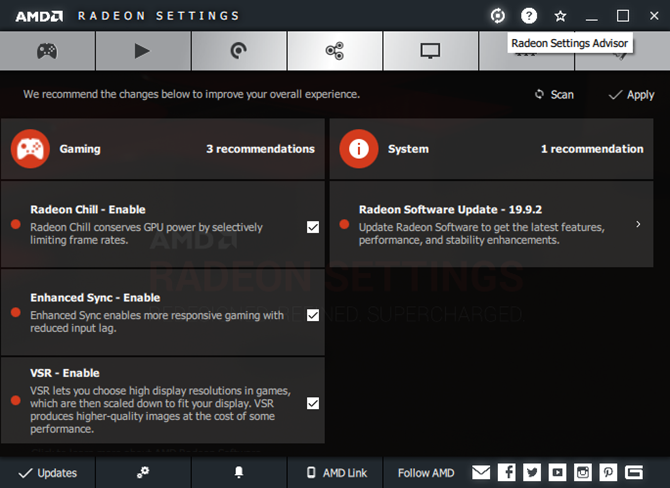
Using AMD Radeon Settings and Nvidia Settings
We’ve generally looked at settings you can adjust in individual games. However, you can also change many of these in your graphic card settings menu. Open the Nvidia or AMD app on your computer, and you can adjust some of them on a global level.
Whether you change them in-game or through your video card app, all of these (and more) graphical settings can be difficult to manage. If you don’t want to play around with them on your own, both Nvidia and AMD provide tools to optimize games for your available hardware.
Inside AMD’s Radeon software, you’ll find three AMD Radeon Advisor tools. You can run Game Advisor inside any game to get suggestions for better performance. Settings Advisor scans your system and provides recommendations based on your setup. Finally, the Upgrade Advisor will help you determine if you can play a particular game.
If you have an Nvidia GPU, Nvidia GeForce Experience provides similar functionality. You can use it to automatically apply the best balance of quality and performance for many games.
How to Get the Right Gaming PC Setup for You
Now you have a basic grasp on what PC graphics options mean and how they affect your game. In general, the more powerful hardware you have, the further you can afford to crank up these settings for a prettier game.
If you’re lost, try using the assist tools we mentioned above. Otherwise, a little experimentation can help you strike the best balance between performance and visuals. You definitely want your game to look pretty, but you shouldn’t sacrifice a smooth experience for looks. This is especially important in fast-paced multiplayer games.
Putting a bedsheet on and calling yourself a ghost for Halloween just doesn’t cut it anymore. Luckily, makeup artists on YouTube have made coming up with Halloween makeup ideas easier than ever.
From prosthetic-free ideas to special effects makeup, here are 29 scary Halloween makeup tutorials and ideas to inspire your next terrifying costume.
Halloween Makeup Tutorials (Without Prosthetics)
If you haven’t worked with special effects makeup like latex before, you don’t have to settle for a dull Halloween costume. In fact, shading and creativity can achieve wonderfully hideous effects by themselves.
Here are a few prosthetic and latex-free creepy Halloween makeup tutorials…
1. Pennywise The Clown Makeup
Thanks to the release of IT Chapter 2, there’s no doubt about how truly terrifying Pennywise The Dancing Clown is. While you may not be able to pull off his iconic smile, you can still channel the clown with the right makeup.
Madeyewlook’s Pennywise tutorial stands out as a great guide.
2. Game of Thrones White Walker
With the right shading, you can get the gaunt and ghostly look of the White Walkers. Paired with a white wig, face paint and a steady hand are all you need to achieve this look.
3. Disney Halloween Makeup—Cruella de Vil
We love Disney villains, but Halloween brings out the opportunity to make them even more devious. This tutorial by Evensya Xo shows you how to create a truly terrifying version of Cruella while representing her obsession with Dalmatian fur coats.
4. Easy Zombie Makeup Tutorial
There’s no shortage of zombies in today’s popular culture. If you want a simple yet effective look that doesn’t require prosthetics, then BodyFX has a tutorial demonstrating just how to do it.
5. Creepy Joker Halloween Makeup
It seems every few months there’s a new interpretation of the iconic Batman villain Joker. However, the comic versions of the Joker continue to be some of the most unsettling.
Jordan Hanz’ makeup tutorial captures this look and features the creepy, manic smile that we’ve come to know and love.
6. Shattered Face Makeup
Halloween is a great time to try out optical illusion makeup ideas. Dope2111’s tutorial on how to create a cracked face with makeup is particularly spooky, requiring no prosthetics.
7. Terrifying Vampire Makeup
There are tons of glam vampires out and about on Halloween. But if you want to bring out the terrifying nature of vampires and represent their bloodthirst, then Elijah Adson-Holmes’ tutorial will show you how.
The look uses makeup, fake blood, and fangs—a simple toolkit for people who don’t want to deal with latex or molds.
8. Detailed Skull Halloween Makeup
Skulls are a mainstay of Halloween costumes, but they sometimes come out as cartoonish. Alex Faction’s gets the scary look right, giving you a truly spooky skull tutorial.
9. Demon Halloween Makeup
Looking for inspiration for a creepy, black magic-inspired demon look for Halloween? Then Pompberry has the perfect tutorial.
While she uses a headdress with horns as part of her final costume, the horns-free look is still incredibly effective.
10. Creepy Jester/Clown Makeup
If you’re looking for a unique take on the killer clown or creepy jester look, Melvin Lozada has a perfect guide. He combines the creepy clown makeup with a Jack-in-the-box twist.
11. Bent-Neck Lady/Scary Ghost Makeup
The Haunting of Hill House reminds us that ghosts don’t need sharp teeth or gore to freak us out. Atleeeey’s ghost makeup tutorial draws inspiration from the Netflix series’ Bent-Neck Lady to create a truly haunting ghost look for Halloween.
12. Unique Frankenstein’s Monster Look
Frankenstein’s monster is another classic look for Halloween. However, painting yourself green and adding a few bolts to your head can get a bit boring over time.
If you want a unique spin on the classic monster, then Alex Faction provides a great option. You could always switch up the colors for your own costume, but this interpretation definitely adds a bit more interest to the traditional take.
13. Monster Mashup/Mixed Monster Makeup
Speaking of unique Frankenstein’s monster looks, AJ Kane takes this to a whole new level with her awesome makeup tutorial. Instead of just creating a stitched look, she also stitches together parts of her favorite horror movie characters.
Her makeup shows pieces of Jigsaw’s mask, Pinchead’s forehead, Jason Voorhees’ hockey mask, Twisty The Clown’s mouth, the Bride of Frankenstein’s eyes, and some more elements.
Special FX Halloween Makeup Tutorials
If you want to go further than face paint and makeup, there are plenty of Halloween tutorials that will show you how to create scary costumes with prosthetics. These range from liquid latex and gels, to plastic molds and other accessories.
Check out these tutorials for more advanced Halloween makeup ideas…
1. Voodoo Doll Halloween Makeup
Sydney Nicole creates a truly haunting look with her voodoo Barbie doll makeup. She combines liquid latex with her makeup and creates 3D wounds. She also incorporates some string, pins, and a button to complete the look.
2. The Purge Halloween Makeup
Madalyn Cline’s makeup tutorial for Lady Liberty is one of the scariest Purge-inspired costumes we’ve found. She completes most of her look using just face paint. However, the string and Lady Liberty crown are needed to finish the costume.
3. Trauma/Mauling Wound Victim
If you want to incorporate realistic-looking prosthetic wounds into your Halloween costume, then Elliemacs SFX Makeup’s tutorial on wounds will teach you how to do this. The wounds shown in the tutorial use latex paste to mold a prosthetic.
4. Rotting Zombie Halloween Makeup
RawBeautyKristi has a great tutorial showing you how to make a rotten zombie appearance using DIY plastic prosthetics. She even adds some moss to the wounds to create a unique look for your zombie’s face.
5. Undead Scary Mermaid Makeup
This story mermaid look from Jaclyn Forbes is one of our favorites, turning a typically mystical creature into something horrifying. She uses a silicone molding compound to give the skin tears and gills a 3D look.
6. Evil Swamp Fairy
Evil magical creatures are another popular choice for Halloween costumes—though Linda Hallberg Tutorials takes this to a whole new level with a swamp-inspired look that is truly creepy.
7. Rotting Mummy Makeup
Even though a mummy is quite a conventional Halloween costume, the use of some adhesives and household items can create a terrifying rotten look. LadyParadoxx shows you how to do this in her decaying mummy tutorial.
8. Scary Alien Halloween Makeup
Scary aliens are one of the most difficult Halloween looks to pull off—since they often appear strange or quirky instead. However, this tutorial shows you how to use prosthetics to achieve a very eerie effect.
9. Twisted Daenerys Dragon Makeup
Most of us now know how Game of Thrones ends. So if you want to embrace a twisted take on the Mother of Dragons, Keilidh Mua has a great guide. This Halloween getup melds Dany’s face with a dragon’s—which brings a literal interpretation to waking her inner dragon.
10. Missing Eyes
Using special effects makeup to create the illusion of one or two missing eyes is another popular choice on Halloween. Kait Nichole shows you how to create this effect while also still being able to see through your prosthetics.
11. Wendigo Makeup From Until Dawn
The ghastly wendigo monsters from Until Dawn are among the most chilling game creature designs out there. You can capture this scary take on the mythological monster using Madalyn Cline’s guide.
12. Unzipped Face
Another gruesome body horror makeup idea for Halloween is the unzipped face. There are a variety of takes out there, but Camilla Frederikke’s tutorial achieves a gory look with minimal effort.
13. Bride of Frankenstein
If you would rather dress up as the bride of Frankenstein’s monster, the good news is that you can bring forth a truly frightening creation. Onlinekyne goes a step further and not only provides a great makeup guide but also a guide on how to create a standout wig for your costume.
14. Evil Witch
If you want to induce more chills than your typical Wicked Witch of the West, Petite-Sue Divinitii shows you how to master a wrinkly, distorted visage with minimal prosthetics.
15. Terrifying Scarecrow Makeup for Halloween
When you dress up as a scarecrow for Halloween, you run the risk of looking goofy instead of scary. But with Elijah Adson-Holmes’ scarecrow makeup, you will creep your friends out. He shows you how to use cotton, latex, burlap sack fabric, and false individual teeth for a truly terrifying scarecrow.
16. Silent Hill Red Nurse Makeup (Weeping Blood)
Another simple yet effective look comes from Elliemacs SFX Makeup—this time, it’s the terrifying red nurse from the Silent Hill movie. This is one of the easiest prosthetic looks since it only uses 3D gel in addition to face paint and makeup.
Complete Your Look With Halloween Stores
Now that you have plenty of inspiration for your Halloween makeup, you might need to stock up on a few supplies and costume accessories. Start planning your Halloween party today.
Check out our guide on online Halloween stores and choose the perfect supplier for your spooky costume needs.
Don’t allow any liquids or foreign objects to enter it.
Don’t attach anything to the main screen, such as a screen protector.
So begins your journey. It’s the story of one of the most fascinating product releases in recent memory. It’s also the story of the most polarizing product I’ve ever reviewed…twice.
The Galaxy Fold is at once a hopeful glimpse into the future and a fascinating mess. It’s a product I can’t recommend anyone purchase, but it’s one I’m still glad Samsung had the guts to make.
What’s perhaps most frustrating are the glimpses you get using the device, those moments it transcends lovely and is legitimately useful. And when you leave the device at home, you actually start to miss the 7.3-inch display.
Two scenarios in particular have really highlighted the value of Samsung’s strong-headed approach to pushing boundaries.
First is the gym. Unfolding the device and propping it up on the control panel of a piece of exercise equipment is a beautiful thing. Full-screen Netflix, baseball games from MLB At Bat. Watch the minutes and the calories just fly away. The Fold also works great with the Galaxy Buds, which are legitimately one of the best hardware products Samsung has produced in ages.
Second is the subway. I’ve been prepping for interviews by reading Pocket stories on the train, with the Notes app open in a side window. This is great. Like a seriously awesome thing. And this is coming from someone who still has trouble embracing smartphones as serious productivity devices. There are just too many limitations to that small screen. When I want to get work done, the laptop comes out. I’m not suggesting the Fold completely changes the math here, but it does edge ever closer, blurring that line a bit in the process.
So there you go. That’s two distinct examples, covering both entertainment and productivity. The fact is the same as ever: big screens are good. The question is how we get there. It’s a true fact, of course, that plenty mocked Samsung with the first Note device. It seems hard to believe, but in 2011, 5.3 inches seemed impossibly large for a phone. By 2018, however, 5.5 inches was the most popular screen size for handsets. And that number appears to still be growing.
Clearly Samsung was right on that one, and the Note played an outsized role in pushing those boundaries.
After years of teasing flexible and foldable displays, the tech world was understandably excited when the Galaxy Fold finally arrived. Honestly, there were long stretches of time when it felt like the handset would never arrive. As such, it feels strange to suggest that the product was somehow rushed to market.
It’s important to remember, of course, that part of the mainstreaming of big phones has been the technologies supporting the large screen. Samsung, Apple, Huawei, et al. have done a good job consistently increasing screen to body ratios. The new Notes may have bigger screens than ever, but other breakthroughs in manufacturing means we’re not walking around with bricks.
Similarly, this decidedly first-generation device is big and thick. Anecdotally, reactions have been…mixed. The two separate rounds of review devices I’ve received from the company (round two, for reasons we’ll get into in a second involved two devices) have coincided with big TechCrunch-hosted events in San Francisco. First TC Sessions: Robotics in April and then Disrupt last week.
Take some of this with a grain of salt, because my co-workers can be pretty damn cynical about new technologies (and yes, I’ve been at this long enough to include myself in this). Reactions ranged from genuinely wowed to disappointed bafflement. There was also one co-worker who repeatedly threatened to eat the device because she said it looked like an ice cream sandwich, but that’s a story for another blog post.
There are plenty of things to be critical from a design standpoint. The “first-gen” feel runs very deep with the device. When closed it’s quite thick — like two phones stacked atop one another. The crease is visible, as has often been reported. And the front display isn’t particularly useful. I get why it’s there, of course. There are plenty of moments when you just want to check a quick notification, bit it’s incredibly narrow and sandwiched between two massive bezels.
None of those really matter much compared to the device’s fragility. The Fold will forever be the device whose release date was pushed back after multiple reviewers sent back broken devices. Mine worked fine. The company went back to the drawing board for several months and came back with a more robust device that patched up some holes and reinforced the folding mechanism. Mine broke.
After about 27 hours with the device, I opened it up in line at CVS and noticed something weird about the screen. Sitting between the butterfly wings was a mass of pixels I referred to as an “amorphous blob.” I’d been fairly gentle with the thing, but, as I put it in a followup, “a phone is not a Fabergé egg.” In other words, it’s understandable that the product isn’t designed to, say, survive a drop onto hard concrete or a dunk in the toilet.
While it’s true that many other modern phones have evolved over generations to withstand such accidental bumbles, it’s also understandable that the Fold is a little more fragile. We can’t say Samsung didn’t warn us, and I do appreciate that Samsung was able to go back to the drawing board before wide release, but there’s a pretty strong argument to be made that a smartphone that needs to literally ship with warnings like the ones stated up top isn’t fully ready for prime time.
CNET recently got its hands on a folding machine and found that the handset could withstand 120,000 fold. That’s a little more than half of the promised 200,000. Another third-party test found similar results. Not ideal, but not terrible. It’s about three years’ worth of folds. If you’re dropping $2,000+ on a phone, you may well want it to last closer to the promised five years — though if you have that sort of disposable income, who knows?
I would honestly be more concerned with the kind of day to day issues that could potentially result in damage like what I saw. It’s possible that mine had a defect. I’ve been using a replacement that Samsung dropped off after collecting mine to send back to Korea for testing. Granted, I’ve been using it even more gingerly than its predecessor, but so far, so good.
This morning I saw a report of a user experiencing what appears to be the same defect in the same spot. A commenter astutely pointed out the placement of a screw discovered during a recent teardown that could be the source of these issues. As ever, it will be interesting to see how this all…unfolds.
I’m not going to get too far into the other specs here. I wrote thousands of words in my original review. Nothing about the underlying technology has changed between versions one and two. All of the big updates have been to the folding mechanism and keeping the device more robust.
It’s fitting, I think that my model had 5G built-in. Both technologies feel like a glimpse into the future, but there’s little to recommend plunking down the requisite money to purchase either in 2019. The clear difference is that slow saturation of next-generation cellular technology is a bit more understood at this point. Telling someone that their fingernails can damage their $2,000 phone is a different conversation entirely.
I do think that Samsung’s committed to the Galaxy Fold long-term. And I do believe that there will eventually be a place for the products in the market.
The biggest short-term concern is all the negative press following the first wave of devices. The FlexPai felt more like a prototype than consumer device. The Fold feels like something of an extended public beta. And the Huawei Mate X, which, although incredibly promising, is still MIA, as the company does another pass on the product. Global availability is another question entirely — though, that’s due to…other issues…
Knowing Samsung, the company will return from all of this with a much stronger offering in generation 2. There are a LOT of learnings to be gleaned from the product. And while it offers a glimpse into the promise of foldable, you’re better off waiting until that vision is more fully realized.


