24 December 2019

Micro-angelo? This 3D-printed ‘David’ is just one millimeter tall


3D printing has proven itself useful in so many industries that it’s no longer necessary to show off, but some people just can’t help themselves. Case in point: this millimeter-tall rendition of Michaelangelo’s famous “David” printed with copper using a newly developed technique.

The aptly named “Tiny David” was created by Exaddon, a spin-off company from another spin-off company, Cytosurge, spun off from Swiss research university ETH Zurich. It’s only a fraction of a millimeter wide and weighs two micrograms.

It was created using Exaddon’s “CERES” 3D printer, which lays down a stream of ionized liquid copper at a rate of as little as femtoliters per second, forming a rigid structure with features as small as a micrometer across. The Tiny David took about 12 hours to print, though something a little simpler in structure could probably be done much quicker.

As it is, the level of detail is pretty amazing. Although obviously you can’t get recreate every nuance of Michaelangelo’s masterpiece, even small textures like the hair and muscle tone are reproduced quite well. No finishing buff or support struts required.

Of course we can create much smaller structures at the nanometer level with advanced lithography techniques, but that’s a complex, sensitive process that must be engineered carefully by experts. This printer can take an arbitrary 3D model and spit it out in a few hours, and at room temperature.

The CERES printer.

But the researchers do point out that there is some work involved.

“It is more than just a copy and downsized model of Michelangelo’s David,” said Exaddon’s Giorgio Ercolano in a company blog post. “Our deep understanding of the printing process has led to a new way of processing the 3D computer model of the statue and then converting it into machine code. This object has been sliced from an open-source CAD file and afterwards was sent directly to the printer. This slicing method enables an entirely new way to print designs with the CERES additive micromanufacturing system.”

Much smaller than that doesn’t work, though — Micro-David starts looking like he’s made of Play-Doh snakes. That’s fine, they’ll get there eventually.

The team published the details of their newly refined technique (it was pioneered a few years ago but is much better now) in the journal Micromachines.


Read Full Article

Google’s Year in Search: What You Googled in 2019


As it does every year, Google has revealed what you have been searching for over the past 12 months. Not you personally, but the internet as a whole. Obviously. Google’s Year in Search includes some interesting insights regarding what we Googled in 2019.

Unlock the "Top Google Search Keyboard Shortcuts" cheat sheet now!

This will sign you up to our newsletter

Enter your Email

Google’s Year in Search for 2019

Google has published lists of the top trending searches in 2019. Google’s Year in Search ranks the News, People, Movies, Songs, TV Shows, Actors, and more that people searched for in a big way during the year. Google also published a video summing up 2019…

We’re not going to list all of the most searched-for things in 2019 here. So, if you want to explore further then check out Google’s Year in Search 2019 site. You can see lists for the world as a whole as well as for each individual country (which is fascinating).

The Top 10 Google Searches of 2019

The Top 10 searches overall (globally) is dominated by the Cricket World Cup, with three entries. Which, given that cricket isn’t played in the US, will sail over the heads of many of our readers. Still, they should recognize everything else on the list.

  1. India vs South Africa
  2. Cameron Boyce
  3. Copa America
  4. Bangladesh vs India
  5. iPhone 11
  6. Game of Thrones
  7. Avengers: Endgame
  8. Joker
  9. Notre Dame
  10. ICC Cricket World Cup

Before you scour the lists to see if you Googled any of these things, it’s important to note that they’re “based on search terms that had the highest spike this year when compared to the previous year.” So, trending searches rather than the top searches overall.

A Valuable Snapshot Into What’s Trending

With Google being the go-to search engine for the majority of people, these lists provide a valuable snapshot into what people and events inspired and intrigued people in 2019. And for the sake of comparison, check out what people searched for in 2018.

Read the full article: Google’s Year in Search: What You Googled in 2019


Read Full Article

HyperCam 5 Makes It Easy To Record and Share Screencasts: Now 50% off


From capturing Skype calls to recording tutorials for work, there are many reasons why you might want to save a screencast. HyperCam 5: Home Edition for Windows makes the process quick and easy. This software has all the settings you need, packaged in a clear interface. Right now, you can download HyperCam for $19.95 at MakeUseOf Deals — that is 50% off the standard price.

Easy Screen Sharing

Unless you happen to be a professional YouTuber, you probably don’t need a million options for recording your screen. HyperCam 5: Home Edition keeps things simple, with one main control panel.

When you want to capture a screencast, you simply choose the area you want to record, select your frame rate and preferred codecs, and press record. HyperCam does the rest, running in the background.

This software can handle video calls, gaming, webinars, YouTube videos, and plenty more besides. You can trigger recording via hotkeys, and cursor movements are captured during recording — ideal for making tutorials.

HyperCam 5 also allows you to trim and crop videos, and save footage in multiple file formats. You can even send your screencasts directly to YouTube.

Now 50% Off

Normally priced at $39.95, HyperCam 5: Home Edition is now just $19.95 with this deal.

Read the full article: HyperCam 5 Makes It Easy To Record and Share Screencasts: Now 50% off


Read Full Article

5 Apps to Figure Out New Year’s Resolutions and Long-Term Goals


New Year Goals

The dawn of a new year is also the time we start setting new resolutions. These apps will help you discover what your goals should be, keep you on track, and help you achieve them.

Research on why goals fail shows it’s mainly because of two common errors. People tend to set a popular goal that others are choosing, rather than an objective that you want intrinsically. Once the goal is set, people don’t make a plan or actionable steps to achieve it, nor do they track their progress.

These apps will help you set a goal that is meaningful for you, and break it down into achievable and measurable steps.

1. Angstrom’s Life Goals (Web): Discover What You Really Want

Angstrom's life goals help you discover what you really want at the end of your life

The paid Angstrom web app is an excellent goal tracker. But before tracking goals and tasks, you need to figure out what they are. The developer, Kevin Angstrom, has made a free app to discover your life goals.

It starts by making you write your obituary in the future. Imagine what your best friend says about you when you die, as the app takes you through each part of the eulogy. You have to choose qualities that you wish your friend says about you in the future. That’s how you figure out who you want to be by the end of your life.

The app then questions you about each goal, making you introspect and think about why you actually want to achieve it. Next, you will visualize what would happen if you failed to achieve it, which is a great motivator as well as a good way to figure out how important a goal really is for you.

Finally, you have to set one milestone for your goal, one year away. That’s how you know that you’re on the right track to achieving those life goals, and have something short-term to work towards.

2. Exploratory Hero (Web): Break Annual Goals Into Smaller Steps

Exploratory Hero breaks your new year's resolution into smaller steps

If your new year’s resolution starts from January 1 and ends on December 31, then you need some planning. Exploratory Hero helps you break down annual goals into smaller tasks so that you can achieve them step by step.

The app first makes you write what you want to be, in the long-term. Through a series of questions, it helps you set realistic things to achieve in one year, six months, three months, one month, and the current week. As with most task lists, you’d do well to write these starting with an actionable verb.

At the end of the exercise, you’ll have a dashboard of your goal and its actionable periodic actionable steps. Take a screenshot and use it as a motivational guide. It’ll also fit perfectly as a phone screen wallpaper.

3. Timebug (Android, iOS): 3 Phases, 30 Steps, 13 Minutes Each

Entrepreneur and thought leader Arman Rousta’s 20/20 Life Vision Challenge aims to help you figure out your life’s purpose and aim. Timebug is a digital version of that path, breaking down your introspection into three phases and 30 steps.

The phases are discovery, self-assessment, and vision creation. The app guides you through the Rocking Chair meditation, where you imagine yourself to be 90 years old and looking back on your life. Based on the meditation’s visualization, the app will then ask you a series of questions to set your goals and plan.

The steps involve answering questions like who are your role models, what are the goals of others around you, who would be your 10 “board of advisors” in life, etc. Your answers will set goals for different categories like energy and time, achievements, health, material outcomes, and relationship qualities. All goals are tracked within the app, and you can break them into major steps with estimated deadlines.

The idea of Timebug is to go back to the app periodically to reflect upon these goals, which will keep you on track to achieve your higher purpose.

Download: Timebug for Android | iOS (Free)

4. Purpose Finder (Web): Guided Questionnaires to Find Your Path

Purpose Finder hosts guided questionnaires to help you find what you truly desire and your life's purpose

Purpose Finder hosts step-by-step personality quizzes to help you figure out who you are, and where you should be going. Each quiz called a “track”, gives you more data on yourself, all of which is collated and stored in your profile’s Insights dashboard.

The free account gives you five tracks, including personality traits, your values, and the RAISEC Holland Career Code, which is one of the best free quizzes to find your perfect career or profession. Before you start any quiz, a quick description tells you what you will get from it and how long it’s likely to take.

You should take all five free tests, but focus on the Inner Gold Projection track. This track helps you identify positive qualities that you find admirable in others. Once you know what they are, you can set goals and new year’s resolutions to imbibe those qualities.

5. Purpose Goals (Web): Free Goal Setting Worksheet

Purpose Goals offers a free goal-setting worksheet to figure out what you want to achieve

If you prefer to work offline with pen and paper instead of a keyboard, then the Purpose Goals course is for you. After a quick primer about what goals are and how to achieve them, you can download the free goal-setting worksheet as a PDF, and print it out.

The worksheet divides your life into seven areas: career and financial, physical, mental, social, spiritual, love and relationships, and general. For each aspect, you have to fill out what would you like to be, to do, and to have. There are blank spaces in each aspect, so fill them out as freely as you can, without restrictions. This is a private worksheet only for your eyes.

Through this exercise, you will figure out where your life is and where you want it to go. The worksheet will guide you to pick the top goals based on your responses. It then tells you how to set steps to achieve them, including the costs you might incur.

Fulfill Your New Year’s Resolutions

Now that you’ve figured out what you want to achieve, it’s time to get off your butt and go for it. The beginning of a new year provides a natural push to make you start afresh, so don’t waste the opportunity. With your goal in mind, use these five apps to stay on track and fulfill your resolution.

Read the full article: 5 Apps to Figure Out New Year’s Resolutions and Long-Term Goals


Read Full Article

Google Finally Ends Support for Google Glass


Google is ending support for the Explorer version of Google Glass. For the uninitiated, Google Glass is an augmented reality device which places a screen right in front of your eyeballs. And the Explorer Edition was the version aimed at ordinary consumers.

A Brief History of Google Glass

Cast your minds back to 2012. Google released a concept video for something called Project Glass. The video, simply titled “One Day…” showed a day in the life of some guy who was wearing an augmented reality device that went onto become Google Glass.

Google Glass was released in 2013, and our Google Glass review shows what we thought of it at the time. However, Google Glass quickly flopped as a mainstream consumer device, partly due to price and partly due to some well-founded privacy concerns.

In 2017, Google relaunched Glass for businesses. Google Glass Enterprise Edition is designed to help people in various industries do their job. However, the consumer version of Google Glass is now dead, with Google releasing one final software update.

How to Update Google Glass One Final Time

In an answer on Google Glass Help, Google announced it was releasing a final software update for Google Glass Explorer Edition. This update “removes the need and ability to use your Google account on Glass. It also removes Glass’ connection to backend services.”

Installing this update means you’ll still be able to “use the device paired to your phone, take photos and videos with Glass, and use sideloaded apps as normal.” However, from February 25, 2020, “Mirror apps, like Gmail, YouTube and Hangouts, will no longer work.”

Google states that this update “should be installed so you can continue using your device without issues.” It’s available right now, but needs to be installed manually. Full instructions, as well as a link to the signed image file, are available here.

Should Google Glass Be Branded as a Flop?

Google Glass will be talked about as one of the biggest technology fails of the decade. And rightly so. It was so hyped at launch that it was never going to be able to live up to its billing as the way we would be interacting with the internet (and each other) in the future.

However, look around you right now and you’ll see smartphone zombies everywhere. Which really isn’t any more desirable than having everyone walking around with headsets attached to their faces. Which makes me think Google Glass was a missed opportunity.

Image Credit: Loic Le Meur/Flickr

Read the full article: Google Finally Ends Support for Google Glass


Read Full Article

How to Take a Screenshot on Your Mac


mac-screenshot

When you want to capture the screen on macOS, you have both native and third-party tools to choose from. Let’s see how to make the best of the screenshot options on your Mac and explore some useful tricks along the way.

Unlock the free "Most Useful Mac Keyboard Shortcuts" cheat sheet now!

This will sign you up to our newsletter

Enter your Email

How to Take a Screenshot on a Mac With Keyboard Shortcuts

macOS has a few default keyboard shortcuts to help you capture the screen instantly. We’ll go through them one by one, as which one to use depends on what exactly you want to take a screenshot of.

(Having trouble with your Mac’s screenshot shortcuts? Ensure that you haven’t disabled them under System Preferences > Keyboard > Shortcuts > Screenshots.)

Capture the Entire Screen

For this, you need the shortcut Cmd + Shift + 3. It takes a snapshot of the entire screen and saves it to the desktop as a PNG image.

Want to copy the screenshot to the clipboard to paste it elsewhere instead of saving it automatically? Add the Control key to the keyboard shortcut—hit Control + Cmd + Shift + 3. For more on this basic copy-paste procedure, see how to copy and paste on your Mac.

Capture a Part of the Screen

Capture screen portion with keyboard shortcut on mac

You’ll need to hit Cmd + Shift + 4 if you want to snap a specific portion of the screen. This shortcut turns the cursor into a crosshair; you can then click and drag it across the part of the screen you want to capture.

While making the selection, hold down the Shift key if you want to limit your adjustments to either the X or Y axis. To resize your selection proportionally from the center, hold down the Option key. And if you want to move the selection, hold down Space instead.

(Changed your mind about taking the screenshot? No problem. Hit the Escape key to cancel the action.)

Once you’re satisfied with the selection, release the mouse. The screenshot then ends up on the desktop as a PNG file. As above, if you want to copy the captured image to the clipboard instead of saving it, you’ll need to tweak the shortcut a bit. Modify the shortcut to Control + Cmd + Shift + 4 to copy what you capture.

Capture an Application Window

capture application window with keyboard shortcut on mac

Want to take a screenshot of the active window? First hit Cmd + Shift + 4. Then hit Space, and you’ll see the crosshair turn into a camera.

The active window appears highlighted, and if you click the camera, you get a screenshot of the window. Before clicking, you can also choose to move the focus of the camera to a different window.

If you want to take a timed screenshot, you’ll need to open your Mac’s built-in screenshot utility. We’ll discuss this in the next section.

How to Take a Screenshot on a Mac With the Screenshot App

screenshot app on mac

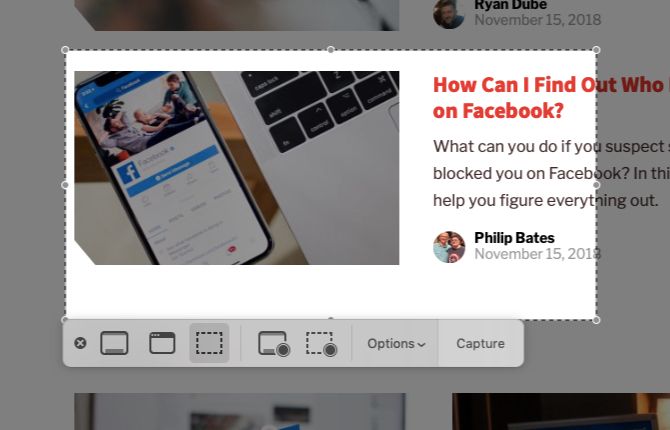
Under Applications > Utilities, you’ll find your Mac’s stock screen capture app, aptly named Screenshot. You can also bring up this app with the shortcut Cmd + Shift + 5.

(If your Mac isn’t running Mojave or later, look for the Grab app instead of Screenshot in the Utilities folder.)

With Screenshot, Apple has simplified the whole screen capture process. The app is useful if you prefer a more point-and-click approach over keyboard shortcuts.

Screenshot’s toolbar has three buttons that make screen capture on macOS quick and painless: Capture Entire Screen, Capture Selected Window, and Capture Selected Portion. (The app also has a couple of buttons for screen recording.)

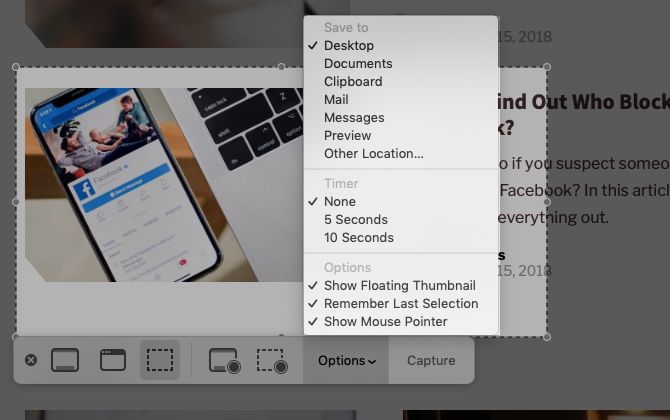
For timed selections, click on the Options button in the toolbar. You’ll find the timer options in the menu that shows up.

After you take a screenshot using any of the options above, you’ll see a tiny thumbnail preview at the bottom-right of the screen. Click on it to reveal a full-fledged preview window with tools to edit, annotate, and delete the screenshot. Here, you can add text, sketches, shapes, and even your signature to a screenshot.

The full-sized preview window also contains an option to open the screenshot with other Mac apps like Notes, Mail, and Reminders.

If you want to turn off the thumbnail feature, uncheck the Show Floating Thumbnail item in the Options menu from the screenshot toolbar.

options menu in screenshot app on mac

Configuring Screen Grab Settings on Mac

You might want to, say, change the default screenshot format or change where screenshots save to on your Mac. In such cases, you’ll need to execute a command from the Terminal app. Let’s take a look at three of the most useful commands.

We have appended each command with a second one that’s needed to cement the changes. It reads as follows:

killall SystemUIServer

To Change the Default Screenshot Format

You can save screenshots in other formats like JPG, BMP, and PDF. To do so, you’ll need to replace [file type] in the command below with the relevant three-letter format name:

defaults write com.apple.screencapture type [file type] && killall SystemUIServer

To Change Where Screenshots Get Saved

On Mojave and later macOS versions, you can change the default destination folder directly from the Screenshot app. To do this, click on the Options button in the screenshot toolbar and select a folder of your choice under the Save To section of the resulting menu.

On a pre-Mojave Mac, you’ll have to rely on this Terminal command:

defaults write com.apple.screencapture location [path] && killall SystemUIServer

Replace [path] with the new Finder save location that reads something like this:

/Users/[Username]/Pictures/Screenshots

You can either type the pathname into Terminal, or drag and drop the relevant folder into Terminal to paste its pathname.

Alternatively, you can also copy the pathname and then paste it into Terminal. You’ll find the Copy as Pathname command in the destination folder’s context menu or right-click menu. However, the command appears only when you hold down the Option key while right-clicking.

To Change the Default File Name for Screenshots

If you want to replace the default prefix (Screen Shot) in screenshot names with a different keyword, try this command:

defaults write com.apple.screencapture name [file name] && killall SystemUIServer

Be sure to replace [file name] in the command with the new keyword before execution.

If you’d rather not fiddle with the Terminal, install a utility that lets you tweak macOS settings without Terminal commands.

How to Take a Screenshot on a Mac With Preview

The Preview app on your Mac also allows you to take screenshots. It’s just one of the essential macOS Preview tricks you’ll want to know about.

The advantage of using Preview for screenshots is that you can specify a different file format and save location with each new capture. Of course, you can also instantly edit the screenshot in Preview before saving it.

You’ll find the screenshot tools in Preview under File > Take Screenshot. Unfortunately, a timed screenshot option is missing here.

The Best Screen Capture Apps for Your Mac

monosnap app for mac

Want advanced features that aren’t included in the in-built screen capture tools on your Mac? Try one of the three third-party tools below.
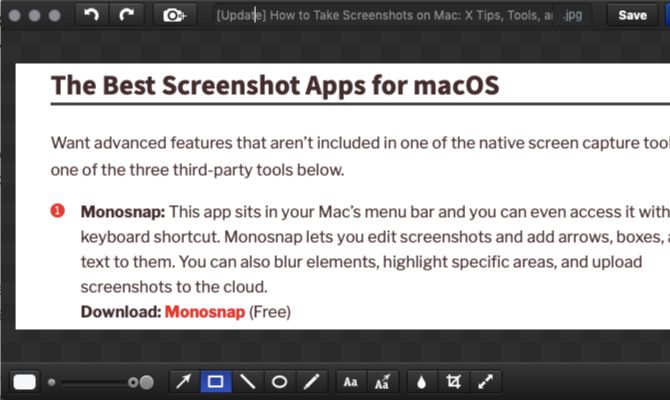
1. Monosnap

This app sits in your Mac’s menu bar and you can access it with a keyboard shortcut. Monosnap lets you edit screenshots and add arrows, boxes, and text to them. You can also blur elements, highlight specific areas, and upload screenshots to the cloud. Monosnap made it to our list of the top Mac menu bar apps.

Download: Monosnap (Free)

2. Skitch

This app lets you capture various onscreen elements and edit/annotate them without having to open another app. Skitch also supports timed screenshots.

Download: Skitch (Free)

3. Snappy

Get Snappy if your work involves collaborating on screenshots or “snaps” often. You can not only edit and annotate screenshots as usual, but also share them with ease. The sharing options include a password-protection feature and a self-destruct timer.

Download: Snappy (Free)

Take Screenshots on Other Apple Devices, Too

Now you know how to take a screenshot on your MacBook quickly and efficiently. macOS gives you the tools to capture whatever you need.

Why not master the basics of iPhone screenshots next?

Read the full article: How to Take a Screenshot on Your Mac


Read Full Article

How to Force Restart an iPhone and Enter Recovery Mode


iphone-force-restart-recovery

Starting with 2016’s iPhone 7 line, Apple dropped the old mechanical home button in favor of a capacitive touch panel. Since that home button relies on software, it’s no longer used for button inputs like taking a screenshot. Further complicating this, the iPhone X line of devices introduced yet different button combinations.

This means that you might have no idea how to enter iPhone recovery mode on your new device. We’ll show you how to put your iPhone (as well as iPad or iPod touch) in recovery mode, no matter which model you have.

Jump to your device:

Force Rebooting and Recovery Mode Explained

You’ll hopefully never need to hard reset your iPhone, but it’s a good tip to know about for those occasions when something goes wrong. For example, this can help you fix ghost touch on your iPhone.

When your device becomes completely unresponsive, you can choose between waiting for the battery to deplete and initiating a hard reset. A hard reset is basically the equivalent of pulling the power plug, forcing your iPhone to shut down and start up again.

Recovery mode takes this a step further, putting your device into a state where you can reinstall iOS by connecting your iPhone to a computer running iTunes (or by using Finder on macOS Catalina and newer). If your iPhone refuses to boot or crashes on startup, you’ll need to put the device into recovery mode in order to rescue it.

iPhone Recovery Mode

Note that when you reinstall iOS, you’ll lose all the data on your iPhone. This isn’t a problem if you make regular iPhone backups, which you can do using iCloud or locally in iTunes or Finder. Unfortunately, you can’t back up your device in recovery mode, since iTunes will only offer to restore the firmware.

As such, if you are stuck with an iPhone that won’t boot and you don’t have a backup to restore, there’s nothing you can do to save your data.

How to Enter Recovery Mode on iPhone 8, iPhone X, and Newer

iPhone X and iPhone 8

Apple changed the button combination to force restart on the iPhone 8 and later. The below steps will work with the iPhone 8/8 Plus, iPhone X, XS, and XR, and iPhone 11 line.

Note that you’ll need to perform these button combinations fairly quickly.

How to Force Restart the iPhone 8 and Newer

  1. Press then release the volume up button.
  2. Immediately press then release the volume down button.
  3. Hold the side button till you see an Apple logo. Let go of the button when you see this logo.

How to Put the iPhone 8 and Newer Into Recovery Mode

  1. Connect your iPhone to a computer.
    1. On a Windows PC or Mac running macOS Mojave or earlier, launch iTunes. On a Mac running macOS Catalina or newer, open Finder.
  2. Press then release the volume up button.
  3. Immediately press then release the volume down button.
  4. Hold the side button, and don’t let go when you see the Apple logo.
  5. Keep holding till you see the Recovery Mode screen.

How to Enter Recovery Mode on iPhone 7 and iPhone 7 Plus

iPhone 7 and 7 Plus

Both the iPhone 7 and larger iPhone 7 Plus model were released in September 2016. These were to first iPhones to lack a mechanical home button, which required Apple to change these shortcuts for the first time since the iPhone launched in 2007.

You’ll also need to follow these steps to force restart the 7th generation iPod touch, released in 2019.

How to Force Restart the iPhone 7 or 7 Plus

  1. Press and hold the side button and volume down buttons at the same time.
  2. Continue holding the buttons until you see the Apple logo, then let go.

How to Put the iPhone 7 or 7 Plus Into Recovery Mode

  1. Connect your iPhone to a computer.
    1. On a Windows PC or Mac running macOS Mojave or earlier, launch iTunes. On a Mac running macOS Catalina or newer, open Finder.
  2. Press and hold the side button and volume down button at the same time.
  3. Keep holding the buttons, even once you see the Apple logo.
  4. Release both buttons when you see the Recovery Mode screen.

How to Enter Recovery Mode on iPhone 6s and Older

iPhone 6 and iPhone SE

The iPhone 6s, released in 2015, was Apple’s last iPhone with a mechanical home button. The following advice is good for that device, as well as all iPhones that came before it. This includes the Plus models, iPhone SE, and iPod touch 6th generation and earlier.

How to Force Restart the iPhone 6s and Older

  1. Press and hold both the home and lock buttons.
    1. On the iPhone 6 or later, the lock button is on the right side. For the iPhone 5s and earlier, it’s on top of the device.
  2. Release the buttons once you see the Apple logo.

How to Put the iPhone 6s and Older Into Recovery Mode

  1. Connect your iPhone to a computer.
    1. On a Windows PC or Mac running macOS Mojave or earlier, launch iTunes. On a Mac running macOS Catalina or newer, open Finder.
  2. Press and hold the home and lock buttons as mentioned above.
  3. Keep holding the buttons even once you see the Apple logo.
  4. Release both buttons when you see the Recovery Mode screen.

How to Force Restart and Enter Recovery Mode on iPad

iPad Air 2

Need to force restart or use recovery mode on your iPad instead? The process is simple.

To do this on an iPad model with a Home button, follow the same instructions for force restarting the iPhone 6s and earlier described above. If you have an iPad with Face ID, follow the above steps to force restart an iPhone 8 or newer.

Just note that on iPad, the power button is on top, not on the side.

You’re Ready to Recover Your iPhone

When you put your device into recovery mode, you’ll have 15 minutes to begin reinstalling iOS before your device automatically exits Recovery Mode. You’ll need to repeat the combination of button presses in order to put it back into Recovery Mode if this happens.

Your device will not show up as normal in iTunes or Finder while in Recovery Mode, and you’ll see an error message like the one above. You can always choose to update the firmware, or simply restore the existing version.

iTunes Repair iPhone

Once your iPhone reboots as normal, you will need to log in with your credentials to remove Apple’s Activation Lock. This is a security feature that prevents someone from using your device if you reset it without signing out of iCloud.

Because of this, you should never buy an iPhone if the seller refuses to unlock it in front of you. A reset phone with Activation Lock still enabled will ask for the owner’s Apple ID before you can begin the setup process.

iPhone Recovery Mode Made Easy

We’ve seen how to force restart your device and enter recovery mode, no matter what iPhone, iPad, or iPod touch model you have. It’s a simple process once you know it, but the increasingly confusing button combinations are a bit obtuse.

For more on recovery, check out what to do if you forget your iPhone passcode.

Read the full article: How to Force Restart an iPhone and Enter Recovery Mode


Read Full Article

DJI patents an off-road rover with a stabilized camera on top


DJI is easily the leading brand when it comes to camera drones, but few companies have even attempted a ground-based mobile camera platform. The company may be moving in that direction, though, if this patent for a small off-road vehicle with a stabilized camera is any indication.

The Chinese patent, first noted by DroneDJ, shows a rather serious-looking vehicle platform with chunky tires and a stabilized camera gimbal. As you can see in the image above, the camera mount is protected against shock by springs and pneumatics, which would would no doubt react actively to sudden movements.

The image is no simple sketch like those you sometimes see of notional products and “just in case” patents — this looks like a fleshed-out mechanical drawing of a real device. Of course, that doesn’t mean it’s coming to market at all, let alone any time soon. But it does suggest that DJI’s engineers have dedicated real time and effort to making this thing a reality.

Why have a “drone” on the ground when there are perfectly good ones for the air? Battery life, for one. Drones can only be airborne for a short time, even less when they’re carrying decent cameras and lenses. A ground-based drone could operate for far longer — though naturally from a rather lower vantage.

Perhaps more importantly, however, a wheeled drone makes sense in places where an aerial one doesn’t. Do you really want to fly a drone through narrow hallways in security sweeps, or in your own home? And what about areas where you might encounter people? It would be better not to have to land and take off constantly for safety’s sake.

It’s likely that DJI has done its homework and knows that there are plenty of niches to which they could extend if they diversified their offerings a bit. And like so many situations where drones have become commonplace, we’ll all think of these robot-powered industries as obvious in retrospect. For instance the winner of our Startup Battlefield at Disrupt Berlin, Scaled Robotics, which does painstaking automated inspections of construction sites.

In fact DJI already makes a ground-based robotic platform, the RoboMaster S1. This is more of an educational toy, but may have served as a test bed for technologies the company hopes to apply elsewhere.

Whether this little vehicle ever sees the light of day or not, it does make one think seriously about the possibility of a wheeled camera platform doing serious work around the home or office.


Read Full Article

Fyre Festival meets Mr. Bone Saw


Social media influencers have been known to promote events around the world for the right price — decisions that sometimes prove to be mistakes. Bella Hadid, who’d promoted the failed Fyre Festival with a gaggle of other models who’d vacationed in the Bahamas for a video designed to help sell tickets, later apologized for her involvement.

Not everyone is apologizing for what’s widely seen as a new misstep in the world of influencer marketing: the paid attendance of celebrities and other social media influencers this past weekend to the three-day-long MDL Beast Festival in Riyadh, Saudi Arabia. The country billed the event as its largest arts, culture and music festival — one attended by “150,000 eager fans from across the region and further afield.”

Among those being called out for dropping onto the scene are models Alessandra Ambrosio and Romee Strijd; actors Ryan Phillippe, Wilmer Valderrama and Armie Hammer; DJ Steve Aoki; and social media stars Sofia Richie and Scott Disick, all of whom were photographed at the event and some of whom also posted pictures to Instagram and other social media outlets, singing the region’s praises and including the hashtag #mdlbeast.

The festival aims to promote the efforts of its de facto ruler, Crown Prince Mohammed bin Salman (known as MBS), to reform the conservative kingdom, which is well-known for its oppression of women’s rights and ethnic and racial minority rights. Indeed, the country has been aggressively trying to polish its image amid growing concern over the years-long, Saudi-led civil war in Yemen that has led to mass starvation and more than 100,000 fatalities; the gruesome, state-directed assassination of Saudi Arabian dissident and Washington Post columnist Jamal Khashoggi, who was reportedly dismembered with a bone saw; and the kingdom’s many other efforts to stifle dissent.

In just one example of how far the kingdom is willing to go, it staged the first-ever WWE women’s match in Riyadh on Halloween, an effort that Amnesty International’s advocacy director for the Middle East and North Africa called “sportswashing.” The MDL Beast Festival is another attempt to highlight how progressive Saudi Arabia has ostensibly come.

Some have pushed against the kingdom’s charm offensive. Hip-hop star Nicki Minaj canceled a planned performance in Saudi Arabia in July at a separate new international music festival there, after the nonprofit Human Rights Foundation asked her to back out of the gig.

At the time, Minaj issued a statement, saying, “I want nothing more than to bring my show to fans in Saudi Arabia, [but] after better educating myself on the issues, I believe it is important for me to make clear my support for the rights of women, the LGBTQ community and freedom of expression.”

Model Emily Ratajkowski also turned down a paid invitation to attend this past weekend’s festival, citing Saudi Arabia’s human rights record. “It is very important to me to make clear my support for the rights of women, the LGBTQ community, freedom of expression and the right to a free press. I hope coming forward on this brings more attention to the injustices happening there.”

Philippe is meanwhile defending on Instagram his decision to accept the trip to this past weekend’s extravaganza, writing: “i had a magical day with wonderful people. i love travel. i love different cultures. i love how we can find ways to connect through our human oneness, the pure desire for love and freedom. no matter where in the world. hoping those connections help to bring even more positive change and progress.”

It’s a decision that’s likely to earn Phillippe — and other high-wattage attendees — more bad publicity in the coming days. While more than a year ago, the CIA concluded that MBS ordered Khashoggi’s assassination, the kingdom has continued to deny any involvement in his murder, alleging instead that it was a last-minute decision by Saudi agents on the ground. (This narrative, notes The New York Times, “contradicts ample evidence that the agents came with an intent to kill and the tools to do so.”)

Now, in a court today in Saudi Arabia, following a trial that was shrouded in secrecy, five men were sentenced to death and three others to prison terms totaling 24 years over Khashoggi’s killing, while a former top adviser to MBS and a former deputy intelligence chief were both cleared.

The sentences are subject to appeal, notes the Times, which also notes that in Saudi Arabia, death sentences typically involve beheadings in public squares. Either way, the sentencing seems poised to further complicate Western relations with the kingdom, for influencers and a lot of others in the position of having to decide whether or not to accept its money. The verdict, said Lynn Maalouf, Amnesty International’s Middle East research director, in a statement, is a “whitewash.”


Read Full Article