12 September 2018

Apple’s new iPhones are powered by the industry’s first 7nm chips


Unsurprisingly, Apple today announced its newest generation of iPhones. And with that, it also announced its new chips: the A12 Bionic.

What makes the A12 Bionic stand out is that it’s built using a 7nm process. While it’s hard to compare these numbers given that every chip manufacturer seems to have its own way of measuring them, 7nm is very much the state of the art. Indeed, Apple claims this is the industry’s first 7nm chip. It features a total of 6.96 billion transistors.

more iPhone Event 2018 coverage

“What the team has done is truly, truly a breakthrough,” Phil Schiller, Apple’s SVP of Worldwide Marketing, said in today’s keynote. “The A12 bionic is the industry’s first 7nm chip.”

The A12 Bionic, which was designed by Apple, features a 6-core CPU and a 4-Core GPU, as well as Apple’s Neural Engine for running machine learning workloads. What’s interesting here is that the chip has 2 high-performance cores and 4 efficiency cores. The high-performance cores are up to 15 percent faster and use 40 percent less power than before, while the efficiency cores use up to 50 percent less power.

The GPU, too, got a speed boost and is now almost 50 percent faster. Rejoice, mobile gamers.

The Neural Engine is now an eight-core system that has gotten a speed boost as well as new smarts. Schiller noted that the chip can now figure out what the machine learning workload looks like and then decide whether to run it on the GPU, CPU or the Neural engine.

In total, the A12 Bionic’s Neural Engine can process 5 trillion operations per seconds. That’s up from 600 billion for the A11. I would take those numbers with a grain of salt, though, since Apple didn’t quite detail what operations we are talking about here. Either way, though, it’s a pretty fast chip.

more iPhone Event 2018 coverage


Read Full Article

7 Android Apps to Supercharge the Text Selection Menu

Apple watchOS 5 ships on September 17


Apple today formally introduced the next generation of Apple Watch devices, the Series 4. Alongside the new devices, the company announced the updated watchOS 5 mobile operating system will ship on September 17.

The new version of watchOS was first shown off at this year’s Worldwide Developer Conference keynote, where flagship features like the Walkie-Talkie mode, smart Siri watch face, updated Podcast app, support for Siri shortcuts, and a “Raise to Speak to Siri” feature were highlighted.

The company didn’t really spend time reviewing these features today, as the new devices themselves were the focus.

Series 4 Apple Watch devices will offer 30% more screen space thanks to an edge-to-edge display, as was previously leaked and today confirmed. To take better advantage of that extra room, watchOS 5 will debut a new watch face that lets you pack in a lot more complications.

more iPhone Event 2018 coverage

Now, you can add all kinds of extra complications to your Series 4 watch face – up to 8 on the new device. Among these, you can add photos of loved ones to the screen which you can tap to connect with, or if you’re traveling, you can customize a watch face that tracks different time zones. You could also use the extra space to create the ultimate health and fitness watch face, Apple says.

The modular face will get an update, too, with more graphical information from apps like stocks, heart rate and activity, and even those from third party developers. Debut developers include MLB At Bat, Qantas, and Life Zone nutrition app.

Other new watch faces designed to take advantage of the Series 4 display include a Breathe face, where the animation is timed around a deep breath, as well as a suite of motion faces (similar to live wallpapers), including Vapor, Liquid Metal, Fire and Water. These react uniquely with the curved edges of the case, Apple says.

WatchOS 5 also becomes a better workout companion with features like automatic workout detection which provides an alert to start a workout while giving retroactive credit, plus new dedicated workout types Yoga and Hiking. Runners will get extended battery life — which is increased to six hours — plus cadence for indoor and outdoor runs, pace alerts for outdoor runs, and rolling mile pace, which shows pace for the immediately preceding mile.

WatchOS 5 offers a ton of features, many of which Apple didn’t highlight today due to time constraints. But lists of new features found in beta builds are readily available, as are videos. They’re also available on Apple’s official watchOS 5 website here.

more iPhone Event 2018 coverage


Read Full Article

Apple Watch Series 4 can detect AFib and perform an ECG


Today at a special event at Apple’s headquarters, Apple’s COO Jeff Williams unveiled the next generation Apple Watch. It’s thinner, faster and has a larger screen than previous generations. But that’s too be expected. The Apple Watch Series 4 is packed with several features that use the built-in heart monitor for medical purposes.

The Apple Watch has always included a built-in heart rate monitor but it has been limited to basic, standard functions of tracking the wearer’s heart rate.

more iPhone Event 2018 coverage

The watch can now perform an ECG, detect atrial fibrillation, and detect when a person’s heart rate is too low. Apple even got the Watch certified by the FDA, a first, Williams said, among such a device as the Apple Watch.

It seems easy to use, too. According to Williams, who gave a demo on stage at the event, a person just needs to open the app, touch a finger to the digital crown, and the Watch performs the test using the electrodes built into the back of the watch. Because a person’s finger is touching the crown, the watch can detect electrical impulses from the heart and process the pulses with an algorithm built into the watch.

The entire process takes just 30 seconds.

Several companies and researchers have been using previous versions of the Apple Watch to detect AFib. The form factor and technical specs of the Apple Watch makes it a great device for such a test. But until now, the ability to detect AFib has been limited to these tests. Apple will soon make it available to all wearers of the Apple Watch 4.

All the health data is encrypted on the device and in the cloud, Williams said. AFib detection and ECG will be available later this year in the U.S. The company will then roll them out to other countries around the world.

The Series 4 starts at $399 for the aluminum version, and $499 for the aluminum version with cellular features. Pre-orders start on Friday and the device will be available on September 21st.

more iPhone Event 2018 coverage


Read Full Article

Apple introduces the iPhone XS


Another year, another set of brand spankin’ new iPhones. But this year, little has been left to the imagination as leaks have continued to spring up over the course of the past few months.

Today, however, the new iPhone becomes official. Apple has introduced a new models of the premium iPhone, the iPhone XS, which comes in three finishes, gold, silver and space grey.

So let’s take a look at the details.

Developing… Please refresh

more iPhone Event 2018 coverage


Read Full Article

Apple unveils the Apple Watch Series 4


Apple just unveiled an updated Apple Watch. And this year’s new Watch is all about the display. Thanks to thinner bezels and a slightly bigger casing, you’ll see more on your screen.

Apple Watch isn’t just the number one smart watch, it’s the number one watch in the world period,” Apple CEO Tim Cook said before introducing Apple COO Jeff Williams.

Williams framed the watch as a communication device, a fitness device and a health monitoring tool. For instance, the Apple Watch can notify you if you have an unusual heart rate. It’s clear that Apple has put aside the idea that the Apple Watch is an app platform.

“Everything about it has been redesigned and reengineered,” Williams said. The design still looks very familiar, but it’s clear that the screen is bigger. You don’t necessarily see it when there’s a dark watch face. But it’s striking in the Breath app for instance.

The small version has a 32 percent larger display, and the bigger version has a 35 percent larger display. Thanks to a brand new watch face, you can put up to eight complications at once. It looks busy but it works.

In order to put a bigger display, the company had to make the Watch slightly larger. The 38mm model is now called the 40mm model, and the 42mm model is now 44mm large.

According to Williams, the total volume of the Series 4 model is still smaller than the volume of the Apple Watch Series 3 thanks to a thinner design. So there you go — a larger watch in a thinner body.

The displays now has rounded edges just like on the iPhone X. The digital crown has been redesigned to give you haptic feedback. The speaker is 50 percent louder. I’m not sure who uses this speaker, but if you need to make a quick phone call or use the new walkie-talkie feature in watchOS 5, it’s now better.

The back of the device is now made of black ceramic and sapphire crystal, which should help when it comes to cellular reception. The new system-on-a-chip (the S4) is supposed to be twice as fast as the one in the Series 3. Thanks to a new gyroscope, the Watch can detect a fall, which could be particularly useful for elderly. If the device senses a fall and you don’t move for a minute, the Apple Watch will automatically call emergency services.

In addition to traditional heart beat data, the device will now track heart rhythm and notify you if you have atrial fibrillation. But you can even take a full ECG from the Watch now. You just have to open the app and hold your finger on the crown for 30 seconds. All your data is then stored in the Health app on your iPhone. You can then share the PDF of your ECG with a doctor.

Apple had already written patents about ECG on the Watch, but the fact that it’s already available is a surprise. You generally can’t buy an ECG device over the counter. And the Apple Watch has received FDA clearance for the Apple Watch’s ECG feature.

This is a developing post…

more iPhone Event 2018 coverage


Read Full Article

Apple unveils the Apple Watch Series 4


Apple just unveiled an updated Apple Watch. And this year’s new Watch is all about the display. Thanks to thinner bezels and a slightly bigger casing, you’ll see more on your screen.

Apple Watch isn’t just the number one smart watch, it’s the number one watch in the world period,” Apple CEO Tim Cook said before introducing Apple COO Jeff Williams.

Williams framed the watch as a communication device, a fitness device and a health monitoring tool. For instance, the Apple Watch can notify you if you have an unusual heart rate. It’s clear that Apple has put aside the idea that the Apple Watch is an app platform.

“Everything about it has been redesigned and reengineered,” Williams said. The design still looks very familiar, but it’s clear that the screen is bigger. You don’t necessarily see it when there’s a dark watch face. But it’s striking in the Breath app for instance.

The small version has a 32 percent larger display, and the bigger version has a 35 percent larger display. Thanks to a brand new watch face, you can put up to eight complications at once. It looks busy but it works.

In order to put a bigger display, the company had to make the Watch slightly larger. The 38mm model is now called the 40mm model, and the 42mm model is now 44mm large.

According to Williams, the total volume of the Series 4 model is still smaller than the volume of the Apple Watch Series 3 thanks to a thinner design. So there you go — a larger watch in a thinner body.

The displays now has rounded edges just like on the iPhone X. The digital crown has been redesigned to give you haptic feedback. The speaker is 50 percent louder. I’m not sure who uses this speaker, but if you need to make a quick phone call or use the new walkie-talkie feature in watchOS 5, it’s now better.

The back of the device is now made of black ceramic and sapphire crystal, which should help when it comes to cellular reception. The new system-on-a-chip (the S4) is supposed to be twice as fast as the one in the Series 3. Thanks to a new gyroscope, the Watch can detect a fall, which could be particularly useful for elderly. If the device senses a fall and you don’t move for a minute, the Apple Watch will automatically call emergency services.

In addition to traditional heart beat data, the device will now track heart rhythm and notify you if you have atrial fibrillation. But you can even take a full ECG from the Watch now. You just have to open the app and hold your finger on the crown for 30 seconds. All your data is then stored in the Health app on your iPhone. You can then share the PDF of your ECG with a doctor.

Apple had already written patents about ECG on the Watch, but the fact that it’s already available is a surprise.

This is a developing post…

more iPhone Event 2018 coverage


Read Full Article

How to Launch a Successful Patreon Page


patreon-success

Thanks to Patreon, the concept of the “starving artist” is one that may soon become a thing of the past.

Patreon is a way for people, whether they be fans, readers, or viewers, to “sponsor” your creative work every month. Your fans sign up to become a “patron” of your work by committing anything from one dollar to several hundred dollars, depending on the tier they choose.

In this article, we’ll help you set up a Patreon page and give you a few tips to make it successful.

How Patreon Works

Unlike the “donation” approach many creatives use, with Patreon your fans commit to donating a monthly payment to your cause. There are Patreon creators who make a few hundred dollars each month, while others tens of thousands of dollars each month.

The following are some of the popular creators who used Patreon to make over $150,000 in 2016.

  • Kinda Funny: A well known YouTube channel with over 200,000 subscribers, Kinda Funny creates special content for Patreon members.
  • Amanda Palmer: Amanda is an artist of many works, from performance art and music to podcasts and documentaries. Her eclectic mix of art has brought in over 11,000 patrons at the time of writing.
  • SciShow: This creator is proof that people enjoy educational art as well. SciShow creates YouTube videos about science, and their Patreon community currently brings in almost $20,000 a month.
  • Peter Hollens: A music creator who produces amazing a capella productions for his fans, Peter’s 4,000 patrons prove that you don’t have to be a starving artist to do what you love to do.
  • WaitButWhy: This is one of the first blogs that started using Patreon to offer readers an ad-free reading experience. The experiment was a glowing success. Tim Urban and Andrew Finn, the creators of WaitButWhy, are currently the most successful Patreon-funded bloggers to date.

These are people who have created a living income by starting a side hustle and removing the income middlemen like advertisers. Instead, they’re directly leaning on their fans to support their work.

If you’re a creator who wants to focus more on your creative art and less on trying to figure out where your next paycheck comes from, let’s take a look at how you can set up your own Patreon page.

Creating Your Patreon Page

The first step in creating your Patreon is to design and write your initial Patreon page. This should be a compelling writeup that will sell your fans on the idea of contributing to your cause.

When you first open your account, you’ll see a button to create your overview page.

edit-patreon-overview

This is just like writing a blog post, but remember that you’re essentially writing sales copy. So make a compelling case to your fans as to why they should contribute to your work.

A good approach to this is to review some of the overview pages for top-earning creators on Patreon. Use their overview page as a general format for your own.

Overview Page Outline

A good Overview page will have the following structure.

  • Introduction: Briefly tell your potential patrons who you are and the work that you do.
  • Explain the Why: Tell your story as to why you’re turning to a fan-supported approach.
  • Tell Them the How: If someone is going to financially support you, they’ll want to know where the money is going to go. Be honest and straightforward about the costs involved in doing what you do.
  • Thank Them: Close off with a thank you to those who are willing to support your work.

There is also the option to include an “Intro Video”. This is a great way to introduce yourself to your potential patrons and let them see the actual face of the person they’re supporting.

If you aren’t already one of the popular YouTube personalities with an existing fan base, this is a critical piece of your overview page.

A few other options you can include on your Overview page:

  • Links to your social profiles
  • A Google Analytics ID so you can monitor how many people visit your Patreon page
  • An RSS audio feed for you to post exclusive audio content to your patrons
  • Enable access to your Discord server to add roles for patrons to access your benefits

Once you’ve created your well-crafted overview page, it’s time to think about the contribution tiers. You’ll need to decide what rewards you want to give your patrons.

How Patreon Membership Tiers Work

On the right side of the Overview creation page, you’ll see a checklist. By this point you should have everything checked off in green up until Create membership tiers.

Click on this link to move on to the next step.

creator-page-checklist

When considering each tier for subscriptions, offer enough to entice subscribers. However, don’t offer so much that you can’t keep up with things.

Free products are great so long as the cost of the product and shipping is covered by the donation. The most popular tier rewards are exclusive access to content.

To create each tier, just click the Edit Tier link on the right side of the screen. Fill in a good description describing the benefits of that tier, and make sure to add the benefits to the list on the right side as well.

edit patreon tier

You could add contributors to a newsletter list and give them early access (or discounted access) to whatever work you create. Or you could produce exclusive content just for patrons donating at particular tiers.

Typical Patreon Membership Tier Structure

This gives your patrons a feeling like they are contributing to your work, or gaining some benefit from their monthly contribution. Without a reward that feels valuable to subscribers, it’s going to be much harder growing your patron community.

The most common tier structure looks like this:

  • The first tier is usually between $1 to $5 a month
  • Make the second tier $10 to $25 a month
  • Tier 3 might be something like $50 to $100 a month

Upper tiers can range anywhere from $300 upwards of $1000 a month. But the rewards for those should be substantial. Make sure you put a plan and some sort of automated solution in place to provide those rewards to the people who subscribe.

For example, you might add the emails for those top tier subscribers to a special email list where you regularly send high-value discounts, special gifts, and other valuable benefits. It’s important to make them feel like they’re getting value from those contributions. Otherwise they’ll cancel their contributions.

Don’t Forget to Send Thank You Emails

The next item on the checklist is to “Say Thanks”. This is where you craft an email saying thanks to every patron who has decided to contribute to your work. Give this email a lot of thought, because it’s the first personal response they’ll get from you once they’ve made their commitment.

patreon thanks email

The email entry form lets you format the email just like you normally would. Make sure to introduce yourself to make it appear as though it’s a personal one-to-one thank you letter.

Also promise to follow up. Each tier should have an individualized email that you’ll eventually send providing the subscriber with links to any special access forms or private web pages you’ve set up just for them.

How to Promote Your Patreon Page

While seeing others who are so successful using Patreon as a source of income is encouraging, replicating that success won’t come easy. Especially if you haven’t already built a fanbase on another platform.

Just creating your Patreon overview page and tiers isn’t going to bring in all of your patrons. You need to promote your new Patreon page using every channel at your disposal.

Here are a few ideas to accomplish that:

  • Create Patreon blog posts: It’s important to create frequent blog posts on Patreon. Make many of those accessible only to patrons. This will encourage people to at least commit to the minimum amount so they can read your posts.
  • Social Media: Promote your patreon page on every social platform you have an account on. Having existing followers there gives you access to a lot of people who’ve already expressed interest in your work.
  • Newsletter: If you’ve developed a large email subscriber list over time, this is one of your best sources for potential patrons. These are people who’ve already subscribed to your work, so committing a small financial donation every month is not a very big leap.
  • Blog Posts: If you already have a blog, take full advantage of that audience by posting regular blog updates about your Patreon campaign and the growing community there. Entice your readers to get involved.
  • Community: You’ll notice a community link on your Patreon page. This is where you can regularly engage with people who’ve signed up as patrons. Staying active here is critical to keeping and growing your patron community.
  • YouTube: If you don’t already have a YouTube channel, consider creating one to present yourself to the world. Seeing your face and hearing you talk about your work will encourage even more people to commit to supporting you.
  • Free Stuff: Marketers know that people love free stuff. The most powerful marketing campaigns are built on offering things like free eBooks. Offer this free eBook or other free content through any of the channels above. Also make sure to promote your Patreon page in that free content.

Stay Engaged With Patrons!

The most successful people on Patreon have built their audiences by knowing how to promote themselves. They’re not just active in their Patreon community, but also regularly encourage Patreon donations in everything they do. This is the only real way to build your list of Patreon contributors.

If you’re really serious about growing your list of patrons, you should consider supercharging your email marketing to boost your audience even faster. Every effort counts.

Read the full article: How to Launch a Successful Patreon Page


Read Full Article

Microsoft Warns People to Keep Using Edge


microsoft-edge

I think we can all agree that Microsoft Edge is better than Internet Explorer. However, whether Edge is better than Chrome and Firefox is down to personal preference and up for debate. For everyone, that is, except Microsoft itself.

Microsoft Edge is a solid web browser. And there are plenty of reasons why you should use Edge. But that’s your choice, and should always be your choice. And the last thing you want or need is Microsoft trying to dissuade you from switching to Chrome or Firefox.

Microsoft Annoys Windows 10 Insiders

Unfortunately that is exactly what Microsoft is now doing. As spotted by Beta News, in the latest Windows 10 Insider builds, Microsoft has starting warning users against switching away from Edge to Chrome or Firefox. And it’s very annoying.

If you use Edge to search for Google Chrome or Mozilla Firefox a banner will appear informing you that “Microsoft Edge is the faster, safer browser on Windows 10 and is already installed on your PC.” As if you didn’t already know you were using Edge.

If you dare to download Chrome or Firefox when you try to install them will result in Microsoft reminding you that “You already have Microsoft Edge – the safer, faster browser for Windows 10”. You’ll then be invited to “Open Microsoft Edge” or “Install Anyway”.

This is all due to Microsoft changing the default settings with this update. Previously, the default was to “Install apps from anywhere,” but it’s now, “Show me app recommendations”. The good news is it’s easy enough to change the settings back.

This Is Unlikely to Change Anyone’s Mind

It’s understandable that Microsoft wants to encourage people to use Edge, and therefore discourage them from switching to Chrome or Firefox. But in reality all this is likely to do is annoy Windows 10 users without actually changing anyone’s mind.

If you’re a fan of Microsoft Edge you may want to check out our quick guide to every setting in Edge or the best Edge browser extensions to try today. And if you’re a hater looking to confirm your world view here are the biggest problems with Microsoft Edge.

Read the full article: Microsoft Warns People to Keep Using Edge


Read Full Article

The clock is ticking for e-cig companies to block underage users


The FDA is giving makers of e-cigarettes sixty days to come up with a more effective, forceful plan to combat underage use of the products.

FDA Commissioner Dr. Scott Gottlieb is yet again moving the goal posts for e-cig companies. He now considers underage use of electronic nicotine delivery systems (ENDS) an epidemic, forcing the government to make a choice that we all knew was coming: save the smokers or save the kids?

“I believe in the power of American ingenuity to solve a lot of problems, including this one,” said Gottlieb in a statement. “I’m deeply disturbed by the trends I’ve seen. I’m disturbed by an epidemic of nicotine use among teenagers. So, we’re at a crossroads today. It’s one where the opportunities from new innovations will be responsibly seized on right now, or perhaps lost forever.”

E-cigarettes, like the Juul (which owns more than 70 percent of the market by revenue), offer a much less harmful alternative to cigarettes for folks who smoke. Smoking is the leading cause of preventable death, according to the CDC, with 6 million deaths per year worldwide, and that number is expected to rise to 8 million by 2030.

Public Health England says that e-cigarettes are 95 percent less harmful than combustible cigarettes. Addiction, which in this case is caused by nicotine, is always harmful, but not nearly as threatening as the harm caused by actual smoke from traditional cigarettes.

On the spectrum of risk, e-cigarettes should seem like a huge win in the decades-long battle against smoking.

But that was before teenagers started using e-cigarettes, including the Juul, at a surprisingly increasing rate. The FDA says more than 2 million middle and high school students were regular users of e-cigarettes last year. While nicotine isn’t all that harmful to a fully developed brain, the developing brain of a teenager is inordinately susceptible to addiction, and underage use of nicotine delivery systems may leave these users addicted to nicotine for life.

This dilemma obviously leaves e-cig makers in a tough spot, but it is also a sticky situation for the FDA. In July of last year, the FDA decided to extend the deadline for e-cigarettes to get FDA approval. This decision was made in part to give e-cig makers and the FDA itself the opportunity to thoughtfully and cooperatively figure out the ‘rules of the road’ in a budding new industry that Gottlieb himself believes is to the benefit of public health. As part of the extension, e-cig makers could leave their products on the market with the caveat that they were not allowed to bring new products to market.

In the wake of growing use by minors, the agency is now walking back some of those decisions. The FDA is keeping an even closer eye on offline and online retailers selling to minors, as well as watching for ‘straw purchases’ on the e-cig makers own online storefronts.

But the FDA is putting a good deal of the responsibility on the e-cig makers themselves. These companies, which include JUUL, Vuse, MarkTen, blu e-cigs, and Logic (97 percent of the market), will have sixty days to present the agency with a more comprehensive and effective plan to eliminate underage use of e-cigs, or the agency will have to re-evaluate its decision to extend the FDA deadline and leave these existing products on the market.

“JUUL Labs will work proactively with FDA in response to its request,” said Juul Labs spokesperson Victoria Davis. “We are committed to preventing underage use of our product, and we want to be part of the solution in keeping e-cigarettes out of the hands of young people. Our mission is to improve the lives of adult smokers by providing them with a true alternative to combustible cigarettes. Appropriate flavors play an important role in helping adult smokers switch. By working together, we believe we can help adult smokers while preventing access to minors, and we will continue to engage with the FDA to fulfill our mission.”

One of the trends that the agency has observed is minors attraction to flavors, particularly flavor-based cartridge devices, as opposed to open-tank vaping. The Juul happens to fall in the former category. If the FDA doesn’t see the response it’s hoping for in the next sixty days, flavors may well be the first piece to be taken off the market.

Juul Labs, in particular, has already done quite a bit to stymie underage use, from raising the age of purchase to 21+ on its website, removing everyone but real-life former smokers from its social media, investing $30 million into its own youth prevention plan, and working with online retailers to pull unauthorized listings of the product from their sites.

The letter from the FDA, then, suggests that the agency is looking for much more drastic action.

Big tobacco stocks are up on word of the news.


Read Full Article

How to Build a Photo Tweeting Twitter Bot With Raspberry Pi and Node.js


twitter-bot-raspberry-pi

Looking for a way to make Twitter more useful, if only for other people? One way is to create an automated Twitter bot that tweets images with useful descriptions. You could do this manually… or you could build it with Node.js and host it on a Raspberry Pi. Read on to find out how.

Why Build a Twitter Bot?

Tweeting photos with a bot

If you’ve ever been on Twitter and seen accounts that post photos, or facts, or cartoons, etc., then it’s overwhelmingly likely that these are automated. It’s a great way to build an audience of people interested in the same topic.

But there is another reason, beyond retweets and follows. Building a Twitter bot will teach you some useful programming skills. We’ve previously looked at how to build a basic Twitter bot with Python (also on a Raspberry Pi), but this time we’re taking a different approach.

In this project, we’re going to use Node.js to build a photo-tweeting bot on a Raspberry Pi. The photos will be photos from the First World War, accompanied by a short sentence and attribution). This information will be stored in an array, a basic database.

Get Started: Build Your Database

If you want to build a photo tweeting bot, you’ll need to start by collecting the images you want to share. These should either be your own images, or ones you’ve acquired under a Creative Commons or some other open source license.

You should also keep note of attribution and other information that you want to go with the images. We’ll come back to this information later, once the bot is up and running.

Install Node.js on Raspbian

Begin by installing Node.js. You should already have a Raspberry Pi up and running, with Raspbian installed. For this project, we recommend a Raspberry Pi 2 or later; the project was tested on the Raspberry Pi 3 B+.

In the terminal (or via SSH), update the system package list, and upgrade to the latest version:

sudo apt-get update
sudo apt-get dist-upgrade

Follow the on-screen prompt, and wait while your Pi updates. Once you’re done, reboot with

sudo reboot

When you’re done, use curl to download Node.js:

curl -sL https://deb.nodesource.com/setup_8.x | sudo -E bash -

Next, install it with

sudo apt-get install -y nodejs

When all is done, run a check to ensure the software was installed correctly. The easiest is to check for the version number:

node -v

The response should be something like v8.11.3 (or higher). If you see something like that, you can be confident that Node.js is ready to use.

Build Your Twitter Bot

The next stage is to input the code that will create the bot. Begin by creating a directory:

mkdir twitterbot

Then, change it to the new directory for your bot:

cd twitterbot

Here, create a file called server.js

sudo nano server.js

In this file, input a single line:

console.log('I am a Twitter bot!');

Press Ctrl + X to save and exit, then run the script:

node '/home/pi/twitterbot/server.js'

This should return the phrase “I am a Twitter bot!”. Now that you’ve confirmed this is working, it’s time to install the Twit library with npm (the Node Package Manager). Ensure this is installed by entering:

npm -v

Again, you should see a version number displayed.

Follow this with:

npm init

This begins by prompting you for information about the Node.js app you’re creating. Default options are displayed (like this) so you can just tap Enter to accept them. You can choose to input your own details too. Once this configuration is over, you’ll be asked to confirm the details with “yes”.

The next stage is to install the Twit module from the npm.

npm install twit --save

Wait while the files download into the node_modules subdirectory. Once that’s done, open the server.js file again in nano.

sudo nano server.js

Here, delete the command you entered earlier, replacing it with:

var fs = require('fs'),

    path = require('path'),

    Twit = require('twit'),

    config = require(path.join(__dirname, 'config.js'));

Save and exit as before.

Create a Twitter App

To build a working Twitter bot, you’ll need to create a Twitter app. This is a simple process, which requires you to first sign up for a new Twitter account. Note that this also requires a phone number to verify the account, and once this is done, head to developer.twitter.com to create the app.

If you don’t have a developer account, this may take some time, as there is a certain amount of form filling needed. This is a step Twitter has taken to avoid spam, so take your time and answer the questions accurately.

Click Create an App, and add the details as requested. At the time of writing, the developer system is undergoing an overhaul, so you may have to wait a few days (and answer some additional questions).

Create an app in Twitter

Next, switch to the Keys and Tokens tab, and under Permissions find the Access permission and ensure it is set to Read and Write (use Edit if not). Then switch to Keys and Tokens and make a note of the following:

  • Consumer Key
  • Consumer Secret

Under Access token, click Create to generate:

  • Access Token
  • Access Token Secret

These are the API keys which you’ll need for giving the bot access to your Twitter account.

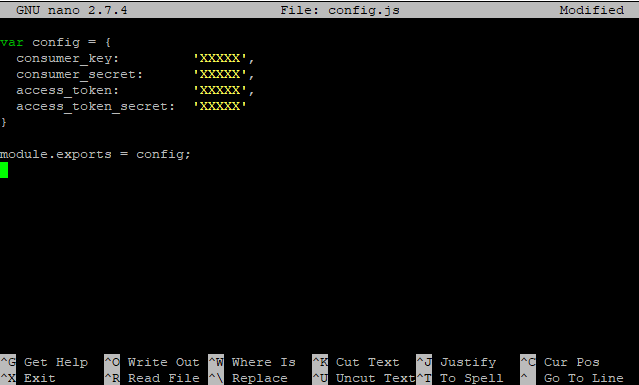
Back in the command line, create config.js in nano:

sudo nano config.js

Add the following

var config = {
 consumer_key:         'XXXXX',
 consumer_secret:      'XXXXX',
 access_token:         'XXXXX',
  access_token_secret:  'XXXXX'
}
module.exports = config;

Where it reads ‘XXXXX’, substitute your own corresponding API key details.

Add your key strings generated by Twitter into the config file

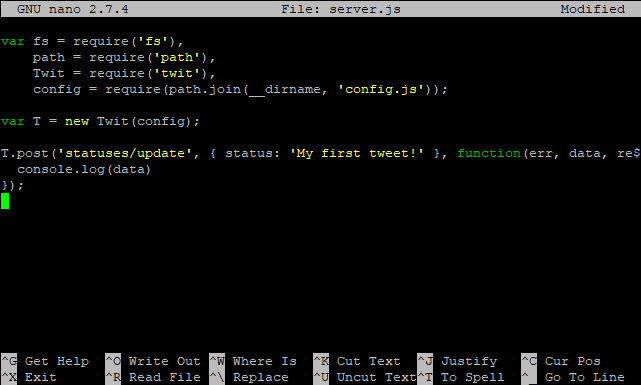
Save and exit, then open server.js.

sudo nano server.js

Here, append the following lines to the end of the file:

var T = new Twit(config);

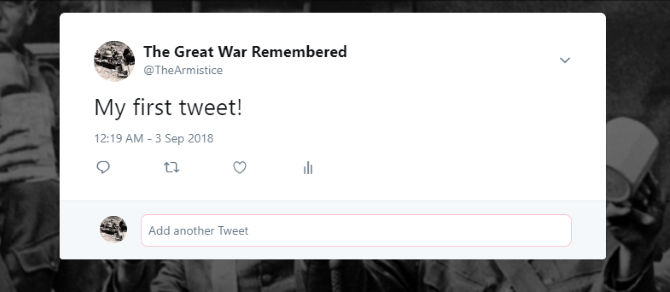
T.post('statuses/update', { status: 'My first tweet!' }, function(err, data, response) {
  console.log(data)
});

It should look like this:

This code will prompt a tweet to be sent.

Again, save and exit, then in the command line, enter

node server.js

Open your Twitter account in the browser to see the results:

A test tweet sent using Node.js code

You’ve confirmed the bot is tweeting, so it’s time to give it something to do!

Create Your Folder of Images

To tweet photos, copy the images you collected into a folder (typically named images). Start off with a dozen or so.

Next, return to the server.js document:

sudo nano server.js

Here, remove the code that sent the tweet, the line beginning T.post(‘statuses/update’).

Next, replace this with a function, called random_from_array. This will pick an image at random from the images folder.

function random_from_array(images){
  return images[Math.floor(Math.random() * images.length)];
}

Once you’ve done this, you’ll need to add a second function, upload_random_image:

function upload_random_image(images){
  console.log('Opening an image...');
  var image_path = path.join(__dirname, '/images/' + random_from_array(images)),
      b64content = fs.readFileSync(image_path, { encoding: 'base64' });

  console.log('Uploading an image...');

  T.post('media/upload', { media_data: b64content }, function (err, data, response) {
    if (err){
      console.log('ERROR:');
      console.log(err);
    }
    else{
      console.log('Image uploaded!');
      console.log('Now tweeting it...');

      T.post('statuses/update', {
          media_ids: new Array(data.media_id_string)
        },
        function(err, data, response) {
          if (err){
            console.log('ERROR:');
            console.log(err);
          }
          else{
            console.log('Posted an image!');
          }
        }
      );
    }
  });
}

This function picks an image at random from the images folder, and once selected is uploaded to Twitter using the media/upload API.

Next, add the following code. This will find the images directory, and take an image from it, posting one at random every 60 seconds. You can (and should) edit this timing, which is represented in the code with the figure 60000. Longer gaps are advisable.

    setInterval(function(){
      upload_random_image(images);
    }, 60000);
  }
});

Save this with Ctrl + X, then Yes to save. (You can find the full code for this project at GitHub).

A single use of the node server.js command will then prompt the photos to begin tweeting! (Should you need to end the posts, press Ctrl + Z to cancel the server.js script.)

Adding Text to Your Photo Tweets

If you need to add text to your images, this can be done using an array. The array will refer to the filenames of the images and list the text that should be added. For instance, you might add attribution to images that you didn’t take. Or you might add some facts or a quote.

A Twitter bot can post photos and text

Begin by creating images.js

sudo nano images.js

Here, add the following code. This is an array, with two elements, file, and source. These hold the file name of the image, and the attribution (typically a URL).

var images = [
  { 
    file: 'image0001.png',
    source: 'http://www.example.com/image0001.png'
  },
  { 
    file: 'image0002.png',
    source: 'http://www.example.com/image0002.png'
  },
]

Repeat as necessary for each image, then end the images.js file with:

module.exports = images;

Save and close the file, then open server.js again, and add this to the list of variables:

images = require(path.join(__dirname, 'images.js'));

Save and exit, then restart the Twitter bot with the node server.js command once again.

You might also use the “source” field to include some text, explaining the background of the picture. This can be included alongside the URL.

Your First Twitter Bot, Ready to Reuse!

By now, you should have an auto-posting Twitter bot up and running, sharing photos, facts, and attributes on your given topic.

To summarize, the process is:

  • Collect your photos
  • Install Node.js
  • Build your Twitter bot
  • Apply for developer status on Twitter
  • Create a Twitter app
  • Add an attribution array
  • Start tweeting!

Perhaps the best thing about this is that the code can be used to tweet photos, facts, and attributes on literally any subject.

Want to know what other bots you could run with a similar setup? Check our list of the best Twitter bot projects for the Raspberry Pi!

Read the full article: How to Build a Photo Tweeting Twitter Bot With Raspberry Pi and Node.js


Read Full Article