14 November 2018

No display for your Mac Mini? No problem.


Astropad’s Luna Display isn’t just for your MacBook. It turns out that you can take advantage of that tiny little red dongle to turn your iPad into your one and only Mac Mini display.

The Luna Display was designed to extend your laptop display. Many desktop users who travel tend to feel limited with a 13-inch or 15-inch display. That’s why the Luna Display turns any iPad into a second monitor. It works wirelessly and pretty well.

But the team behind the device tried a fun experiment. Many Mac Mini users tend to use the Mac Mini as a headless server. It sits below your TV, near your router or in a closet. In that case, there’s no display connected to your Mac Mini.

You can control it using screen sharing or a VNC client. And of course, you can also enable SSH access to control it using the command line or even an SSH app on your phone.

But it also works as expected with the Luna Display. After plugging the dongle into a Thunderbolt 3 port, you can launch the Luna app on your iPad and see what’s happening on your Mac. If your Mac Mini is connected to a Bluetooth keyboard and mouse, you’ll see your actions on the screen.

And because Luna’s dongle works over Wi-Fi, you can even control your Mac Mini from your couch. It’ll feel like you’re running macOS on an iPad. The Luna adapter was first released on Kickstarter and is now available for $80.

This isn’t the ideal setup if you plan on using your Mac Mini for multiple hours per day. But if you just need to quickly fix something, that could be enough.


Read Full Article

Evaluating Tech Things


Evaluating Tech Things

MacBook Pro with updated GPU is now available


Apple recently unveiled a bunch of new products during a press event in New York. But the company also quietly shared a press release with new configurations for the 15-inch MacBook Pro. Customers can now get a MacBook Pro with an AMD Radeon Pro Vega 16 or Vega 20 graphics processing unit.

Before this update, users could only get Radeon Pro 555X or 560X GPUs. Those options are still available, but you can now pay a bit more money to get much better GPUs.

As the name suggests, Vega is a new generation of graphics processors. The iMac Pro comes with desktop-class Vega processors — the Vega 56 and Vega 64. The Vega 16 or Vega 20 are less powerful than the iMac Pro GPUs. But they also fit in a laptop and consume much less power.

In particular, Radeon Pro GPUs use GDDR5 memory just like the PlayStation 4 and Xbox One X. But Vega GPUs now take advantage of HBM2 memory, which provides more bandwidth and consumes less power.

It leads to a direct bump in performance. Apple says you can expect as much as 60 percent faster graphics performance. But we’ll have to wait for the benchmarks to know that for sure.

Vega GPUs are only available on the most expensive 15-inch MacBook Pro configuration that starts at $2,799 with a Radeon Pro 560X. Upgrading to the Vega 16 costs another $250, while the Vega 20 is $350 more expensive than the base model.


Read Full Article

Google Assistant picks up a few new tricks


Google Assistant, the voice-driven AI that sits inside Google Home (plus Android phones, newer Nest cameras and a bunch of other devices) and awaits your “Hey, Google” commands, is already pretty clever. That doesn’t mean it can’t learn a few new tricks.

In a quick press briefing this week, Google told us a couple of new abilities Assistant will pick up in the coming weeks.

First, and perhaps most interestingly: routines can now be set to trigger the moment you dismiss an alarm on your phone. Routines are basically Google Assistant combo moves; you build them to trigger multiple actions at once. You can build a “Hey Google, I’m going to bed” command, for example, that turns off your smart lights, shuts down the TV and locks your smart locks. For a while now, you’ve been able to have routines triggered at specific times; now you can have them triggered by alarm dismissal.

The difference? If you snooze the alarm on your phone, the routine won’t go off just yet. So you can build a routine, for example, that turns on the lights and starts reading the news — but now it can go off when you’re really getting out of bed, roughly two snooze-buttons after when you probably should’ve gotten up. You’ll find this one hiding in Android’s Clock app.

Another feature, meanwhile, is getting an upgrade: broadcasts. If you’ve got multiple Google Home devices around your house, you can already “broadcast” to all of them to make house-wide announcements like “Dinner’s ready!” or “help I need toilet paper downstairs” (THE FUTURE!). Now you can broadcast messages back to your home while out and about via Google Assistant on your phone, and people inside the home can respond. You can say, “Hey Google, broadcast ‘Do we need milk?'” and anyone inside your house can say “Hey Google, reply ‘no but please get eggnog, come on, please, it’s basically December, you said we could get eggnog in December.’ ”

Broadcast replies will be sent back to your phone as a voice message and a transcription.

Google is also starting to introduce “character alarms” — which are, as the name implies, alarms voiced by popular characters. Right now they’re adding the heroes in a half shell from Nickelodeon’s “Rise of the Teenage Mutant Ninja Turtles,” and a bunch of LEGO animated series characters (alas, no LEGO Batman.) They’ll presumably expand this with more licenses if it proves popular.

And if you listen to podcasts or audiobooks on your Google Assistant devices, you can now adjust the playback speed by saying “Hey Google, play at 1.5x” or “1.8x” or whatever you want up to twice the speed. “Play faster” or “Play slower” also works if you’re not feeling specific.

Oh, and for good measure: Google Assistant can now silence all the phones in your house (or, at least, the Android phones tied to your Google account) with a quick “Hey Google, silence the phones” command.


Read Full Article

Night Sight: Seeing in the Dark on Pixel Phones


Night Sight is a new feature of the Pixel Camera app that lets you take sharp, clean photographs in very low light, even in light so dim you can't see much with your own eyes. It works on the main and selfie cameras of all three generations of Pixel phones, and does not require a tripod or flash. In this article we'll talk about why taking pictures in low light is challenging, and we'll discuss the computational photography and machine learning techniques, much of it built on top of HDR+, that make Night Sight work.
Left: iPhone XS (full resolution image here). Right: Pixel 3 Night Sight (full resolution image here).
Why is Low-light Photography Hard?
Anybody who has photographed a dimly lit scene will be familiar with image noise, which looks like random variations in brightness from pixel to pixel. For smartphone cameras, which have small lenses and sensors, a major source of noise is the natural variation of the number of photons entering the lens, called shot noise. Every camera suffers from it, and it would be present even if the sensor electronics were perfect. However, they are not, so a second source of noise are random errors introduced when converting the electronic charge resulting from light hitting each pixel to a number, called read noise. These and other sources of randomness contribute to the overall signal-to-noise ratio (SNR), a measure of how much the image stands out from these variations in brightness. Fortunately, SNR rises with the square root of exposure time (or faster), so taking a longer exposure produces a cleaner picture. But it’s hard to hold still long enough to take a good picture in dim light, and whatever you're photographing probably won't hold still either.

In 2014 we introduced HDR+, a computational photography technology that improves this situation by capturing a burst of frames, aligning the frames in software, and merging them together. The main purpose of HDR+ is to improve dynamic range, meaning the ability to photograph scenes that exhibit a wide range of brightnesses (like sunsets or backlit portraits). All generations of Pixel phones use HDR+. As it turns out, merging multiple pictures also reduces the impact of shot noise and read noise, so it improves SNR in dim lighting. To keep these photographs sharp even if your hand shakes and the subject moves, we use short exposures. We also reject pieces of frames for which we can't find a good alignment. This allows HDR+ to produce sharp images even while collecting more light.

How Dark is Dark?
But if capturing and merging multiple frames produces cleaner pictures in low light, why not use HDR+ to merge dozens of frames so we can effectively see in the dark? Well, let's begin by defining what we mean by "dark". When photographers talk about the light level of a scene, they often measure it in lux. Technically, lux is the amount of light arriving at a surface per unit area, measured in lumens per meter squared. To give you a feeling for different lux levels, here's a handy table:
Smartphone cameras that take a single picture begin to struggle at 30 lux. Phones that capture and merge several pictures (as HDR+ does) can do well down to 3 lux, but in dimmer scenes don’t perform well (more on that below), relying on using their flash. With Night Sight, our goal was to improve picture-taking in the regime between 3 lux and 0.3 lux, using a smartphone, a single shutter press, and no LED flash. To make this feature work well includes several key elements, the most important of which is to capture more photons.

Capturing the Data
While lengthening the exposure time of each frame increases SNR and leads to cleaner pictures, it unfortunately introduces two problems. First, the default picture-taking mode on Pixel phones uses a zero-shutter-lag (ZSL) protocol, which intrinsically limits exposure time. As soon as you open the camera app, it begins capturing image frames and storing them in a circular buffer that constantly erases old frames to make room for new ones. When you press the shutter button, the camera sends the most recent 9 or 15 frames to our HDR+ or Super Res Zoom software. This means you capture exactly the moment you want — hence the name zero-shutter-lag. However, since we're displaying these same images on the screen to help you aim the camera, HDR+ limits exposures to at most 66ms no matter how dim the scene is, allowing our viewfinder to keep up a display rate of at least 15 frames per second. For dimmer scenes where longer exposures are necessary, Night Sight uses positive-shutter-lag (PSL), which waits until after you press the shutter button before it starts capturing images. Using PSL means you need to hold still for a short time after pressing the shutter, but it allows the use of longer exposures, thereby improving SNR at much lower brightness levels.

The second problem with increasing per-frame exposure time is motion blur, which might be due to handshake or to moving objects in the scene. Optical image stabilization (OIS), which is present on Pixel 2 and 3, reduces handshake for moderate exposure times (up to about 1/8 second), but doesn’t help with longer exposures or with moving objects. To combat motion blur that OIS can’t fix, the Pixel 3’s default picture-taking mode uses “motion metering”, which consists of using optical flow to measure recent scene motion and choosing an exposure time that minimizes this blur. Pixel 1 and 2 don’t use motion metering in their default mode, but all three phones use the technique in Night Sight mode, increasing per-frame exposure time up to 333ms if there isn't much motion. For Pixel 1, which has no OIS, we increase exposure time less (for the selfie cameras, which also don't have OIS, we increase it even less). If the camera is being stabilized (held against a wall, or using a tripod, for example), the exposure of each frame is increased to as much as one second. In addition to varying per-frame exposure, we also vary the number of frames we capture, 6 if the phone is on a tripod and up to 15 if it is handheld. These frame limits prevent user fatigue (and the need for a cancel button). Thus, depending on which Pixel phone you have, camera selection, handshake, scene motion and scene brightness, Night Sight captures 15 frames of 1/15 second (or less) each, or 6 frames of 1 second each, or anything in between.1

Here’s a concrete example of using shorter per-frame exposures when we detect motion:
Left: 15-frame burst captured by one of two side-by-side Pixel 3 phones. Center: Night Sight shot with motion metering disabled, causing this phone to use 73ms exposures. The dog’s head is motion blurred in this crop. Right: Night Sight shot with motion metering enabled, causing this phone to notice the motion and use shorter 48ms exposures. This shot has less motion blur. (Mike Milne)
And here’s an example of using longer exposure times when we detect that the phone is on a tripod:
Left: Crop from a handheld Night Sight shot of the sky (full resolution image here). There was slight handshake, so Night Sight chose 333ms x 15 frames = 5.0 seconds of capture. Right: Tripod shot (full resolution image here). No handshake was detected, so Night Sight used 1.0 second x 6 frames = 6.0 seconds. The sky is cleaner (less noise), and you can see more stars. (Florian Kainz)
Alignment and Merging
The idea of averaging frames to reduce imaging noise is as old as digital imaging. In astrophotography it's called exposure stacking. While the technique itself is straightforward, the hard part is getting the alignment right when the camera is handheld. Our efforts in this area began with an app from 2010 called Synthcam. This app captured pictures continuously, aligned and merged them in real time at low resolution, and displayed the merged result, which steadily became cleaner as you watched.

Night Sight uses a similar principle, although at full sensor resolution and not in real time. On Pixel 1 and 2 we use HDR+'s merging algorithm, modified and re-tuned to strengthen its ability to detect and reject misaligned pieces of frames, even in very noisy scenes. On Pixel 3 we use Super Res Zoom, similarly re-tuned, whether you zoom or not. While the latter was developed for super-resolution, it also works to reduce noise, since it averages multiple images together. Super Res Zoom produces better results for some nighttime scenes than HDR+, but it requires the faster processor of the Pixel 3.

By the way, all of this happens on the phone in a few seconds. If you're quick about tapping on the icon that brings you to the filmstrip (wait until the capture is complete!), you can watch your picture "develop" as HDR+ or Super Res Zoom completes its work.

Other Challenges
Although the basic ideas described above sound simple, there are some gotchas when there isn't much light that proved challenging when developing Night Sight:

1. Auto white balancing (AWB) fails in low light.

Humans are good at color constancy — perceiving the colors of things correctly even under colored illumination (or when wearing sunglasses). But that process breaks down when we take a photograph under one kind of lighting and view it under different lighting; the photograph will look tinted to us. To correct for this perceptual effect, cameras adjust the colors of images to partially or completely compensate for the dominant color of the illumination (sometimes called color temperature), effectively shifting the colors in the image to make it seem as if the scene was illuminated by neutral (white) light. This process is called auto white balancing (AWB).

The problem is that white balancing is what mathematicians call an ill-posed problem. Is that snow really blue, as the camera recorded it? Or is it white snow illuminated by a blue sky? Probably the latter. This ambiguity makes white balancing hard. The AWB algorithm used in non-Night Sight modes is good, but in very dim or strongly colored lighting (think sodium vapor lamps), it’s hard to decide what color the illumination is.

To solve these problems, we developed a learning-based AWB algorithm, trained to discriminate between a well-white-balanced image and a poorly balanced one. When a captured image is poorly balanced, the algorithm can suggest how to shift its colors to make the illumination appear more neutral. Training this algorithm required photographing a diversity of scenes using Pixel phones, then hand-correcting their white balance while looking at the photo on a color-calibrated monitor. You can see how this algorithm works by comparing the same low-light scene captured using two ways using a Pixel 3:
Left: The white balancer in the Pixel’s default camera mode doesn't know how yellow the illumination was on this shack on the Vancouver waterfront (full resolution image here). Right: Our learning-based AWB algorithm does a better job (full resolution image here). (Marc Levoy)
2. Tone mapping of scenes that are too dark to see.

The goal of Night Sight is to make photographs of scenes so dark that you can't see them clearly with your own eyes — almost like a super-power! A related problem is that in very dim lighting humans stop seeing in color, because the cone cells in our retinas stop functioning, leaving only the rod cells, which can't distinguish different wavelengths of light. Scenes are still colorful at night; we just can't see their colors. We want Night Sight pictures to be colorful - that's part of the super-power, but another potential conflict. Finally, our rod cells have low spatial acuity, which is why things seem indistinct at night. We want Night Sight pictures to be sharp, with more detail than you can really see at night.

For example, if you put a DSLR camera on a tripod and take a very long exposure — several minutes, or stack several shorter exposures together — you can make nighttime look like daytime. Shadows will have details, and the scene will be colorful and sharp. Look at the photograph below, which was captured with a DSLR; it must be night, because you can see the stars, but the grass is green, the sky is blue, and the moon casts shadows from the trees that look like shadows cast by the sun. This is a nice effect, but it's not always what you want, and if you share the photograph with a friend, they'll be confused about when you captured it.
Yosemite valley at nighttime, Canon DSLR, 28mm f/4 lens, 3-minute exposure, ISO 100. It's nighttime, since you can see stars, but it looks like daytime (full resolution image here). (Jesse Levinson)
Artists have known for centuries how to make a painting look like night; look at the example below.2
A Philosopher Lecturing on the Orrery, by Joseph Wright of Derby, 1766 (image source: Wikidata). The artist uses pigments from black to white, but the scene depicted is evidently dark. How does he accomplish this? He increases contrast, surrounds the scene with darkness, and drops shadows to black, because we cannot see detail there.
We employ some of the same tricks in Night Sight, partly by throwing an S-curve into our tone mapping. But it's tricky to strike an effective balance between giving you “magical super-powers” while still reminding you when the photo was captured. The photograph below is particularly successful at doing this.
Pixel 3, 6-second Night Sight shot, with tripod (full resolution image here). (Alex Savu)
How Dark can Night Sight Go?
Below 0.3 lux, autofocus begins to fail. If you can't find your keys on the floor, your smartphone can't focus either. To address this limitation we've added two manual focus buttons to Night Sight on Pixel 3 - the "Near" button focuses at about 4 feet, and the "Far" button focuses at about 12 feet. The latter is the hyperfocal distance of our lens, meaning that everything from half of that distance (6 feet) to infinity should be in focus. We’re also working to improve Night Sight’s ability to autofocus in low light. Below 0.3 lux you can still take amazing pictures with a smartphone, and even do astrophotography as this blog post demonstrates, but for that you'll need a tripod, manual focus, and a 3rd party or custom app written using Android's Camera2 API.

How far can we take this? Eventually one reaches a light level where read noise swamps the number of photons gathered by that pixel. There are other sources of noise, including dark current, which increases with exposure time and varies with temperature. To avoid this biologists know to cool their cameras well below zero (Fahrenheit) when imaging weakly fluorescent specimens — something we don’t recommend doing to your Pixel phone! Super-noisy images are also hard to align reliably. Even if you could solve all these problems, the wind blows, the trees sway, and the stars and clouds move. Ultra-long exposure photography is hard.

How to Get the Most out of Night Sight
Night Sight not only takes great pictures in low light; it's also fun to use, because it takes pictures where you can barely see anything. We pop up a “chip” on the screen when the scene is dark enough that you’ll get a better picture using Night Sight, but don't limit yourself to these cases. Just after sunset, or at concerts, or in the city, Night Sight takes clean (low-noise) shots, and makes them brighter than reality. This is a "look", which seems magical if done right. Here are some examples of Night Sight pictures, and some A/B comparisons, mostly taken by our coworkers. And here are some tips on using Night Sight:

- Night Sight can't operate in complete darkness, so pick a scene with some light falling on it.
- Soft, uniform lighting works better than harsh lighting, which creates dark shadows.
- To avoid lens flare artifacts, try to keep very bright light sources out of the field of view.
- To increase exposure, tap on various objects, then move the exposure slider. Tap again to disable.
- To decrease exposure, take the shot and darken later in Google’s Photos editor; it will be less noisy.
- If it’s so dark the camera can’t focus, tap on a high-contrast edge, or the edge of a light source.
- If this won’t work for your scene, use the Near (4 feet) or Far (12 feet) focus buttons (see below).
- To maximize image sharpness, brace your phone against a wall or tree, or prop it on a table or rock.
- Night Sight works for selfies too, as in the A/B album, with optional illumination from the screen itself.
Manual focus buttons (Pixel 3 only).
Night Sight works best on Pixel 3. We’ve also brought it to Pixel 2 and the original Pixel, although on the latter we use shorter exposures because it has no optical image stabilization (OIS). Also, our learning-based white balancer is trained for Pixel 3, so it will be less accurate on older phones. By the way, we brighten the viewfinder in Night Sight to help you frame shots in low light, but the viewfinder is based on 1/15 second exposures, so it will be noisy, and isn't a fair indication of the final photograph. So take a chance — frame a shot, and press the shutter. You'll often be surprised!

Acknowledgements
Night Sight was a collaboration of several teams at Google. Key contributors to the project include: from the Gcam team Charles He, Nikhil Karnad, Orly Liba, David Jacobs, Tim Brooks, Michael Milne, Andrew Radin, Navin Sarma, Jon Barron, Yun-Ta Tsai, Jiawen Chen, Kiran Murthy, Tianfan Xue, Dillon Sharlet, Ryan Geiss, Sam Hasinoff and Alex Schiffhauer; from the Super Res Zoom team Bart Wronski, Peyman Milanfar and Ignacio Garcia Dorado; from the Google camera app team Gabriel Nava, Sushil Nath, Tim Smith , Justin Harrison, Isaac Reynolds and Michelle Chen.


1 By the way, the exposure time shown in Google Photos (if you press "i") is per-frame, not total time, which depends on the number of frames captured. You can get some idea of the number of frames by watching the animation while the camera is collecting light. Each tick around the circle is one captured frame.

2 For a wonderful analysis of these techniques, look at von Helmholtz, "On the relation of optics to painting" (1876).


Mozilla ranks dozens of popular ‘smart’ gift ideas on creepiness and security


If you’re planning on picking up some cool new smart device for a loved one this holiday season, it might be worth your while to check whether it’s one of the good ones or not. Not just in the quality of the camera or step tracking, but the security and privacy practices of the companies that will collect (and sell) the data it produces. Mozilla has produced a handy resource ranking 70 of the latest items, from Amazon Echos to smart teddy bears.

Each of the dozens of toys and devices is graded on a number of measures: what data does it collect? Is that data encrypted when it is transmitted? Who is it shared with? Are you required to change the default password? And what’s the worst case scenario if something went wrong?

Some of the security risks are inherent to the product — for example, security cameras can potentially see things you’d rather they didn’t — but others are oversights on the part of the company. Security practices like respecting account deletion, not sharing data with third parties, and so on.

At the top of the list are items getting most of it right — this Mycroft smart speaker, for instance, uses open source software and the company that makes it makes all the right choices. Their privacy policy is even easy to read! Lots of gadgets seem just fine, really. This list doesn’t just trash everything.

On the other hand, you have something like this Dobby drone. They don’t seem to even have a privacy policy — bad news when you’re installing an app that records your location, HD footage, and other stuff! Similarly, this Fredi baby monitor comes with a bad password you don’t have to change, and has no automatic security updates. Are you kidding me? Stay far, far away.

All together 33 of the products met Mozilla’s recently proposed “minimum security standards” for smart devices (and got a nice badge); 7 failed, and the rest fell somewhere in between. In addition to these official measures there’s a crowd-sourced (hopefully not to be gamed) “creep-o-meter” where prospective buyers can indicate how creepy they find a device. But why is BB-8 creepy? I’d take that particular metric with a grain of salt.


Read Full Article

6 Ways You Can Use Microsoft Office Without Paying for It

A Look at the Newest Features of Adobe XD


newest-adobexd-features

Adobe MAX, the company’s annual conference, has wrapped up. This year, the focus was on designing new and improved interfaces.

Because of this, Adobe XD received a lot of attention during the conference. Let’s take a look at what’s new with Adobe XD and why you should give this software a try.

What Is Adobe XD?

In case you’re not familiar, Adobe XD is the company’s user experience design software. It allows you to create interface wireframe mockups and turn them into prototypes instantly. You can use the Adobe XD mobile app to test your designs, too.

Whether you’re designing for a website or mobile app, Adobe XD has the tools to help you create the perfect interface. And best of all, it’s available free.

Download: Adobe XD for Desktop | Android | iOS (Free, subscription available)

Voice Commands

Designing for screens is common, but what about the increasing presence of virtual assistants? The latest version of Adobe XD features support for voice commands and speech playback.

Instead of a tap or click as a trigger in a prototype, you can now also add a voice command. This can help while mocking up a skill for the Echo Show, for example. Testing your design with the actual voice command the user will say lets you test more effectively than before.

Plugins, App Integrations, and UI Kits

Adobe XD Plugins

Chances are that you’re not working on your interface in a vacuum. To that end, the latest Adobe XD release includes lots of integrations with other apps to help you get even more out of it.

These include plugins like Trello and Google sheets that let you share assets between apps and import real data. For app integrations, you can connect XD with apps like Slack to share your project files with teammates, or project management app Jira to hand off to your developers.

Finally, the UI kits let you use official design elements for Apple iOS and macOS, Google’s Material Design for Android, and Microsoft’s UWP design. These let you create even more realistic mockups.

Linked Symbols

If you have icons that you use in many places across your design, it makes sense to keep one master sheet that you copy from. But you don’t want to have to re-do every icon if you make a change to the master.

That’s why the latest version of Adobe XD supports linked symbols. These allow you to make a change to a master icon and automatically apply those changes everywhere it’s used. And since you get a notification everywhere it changes, nobody is left in the dark.

Try Adobe XD Now

These aren’t the only new fresh features of Adobe XD. Responsive resizing lets you resize without manually adjusting everything, and it features smoother integration with other Adobe products like After Effects and Illustrator.

You can get Adobe XD free right now. If you need unlimited access, you can upgrade to the Creative Cloud Single App plan or the All Apps plan for all of Adobe’s offerings in one. Have a look at the Adobe XD Plans page for more info.

All UI designers should definitely take a look at this powerful software that’s regularly improving. Great interfaces are just a few clicks away!

Image Credit: Adobe

Read the full article: A Look at the Newest Features of Adobe XD


Read Full Article

How to Increase Dedicated Video RAM in Windows 10


increase-dedicated-video-ram

Seeing errors related to dedicated video RAM on your Windows PC? Struggling to run graphic-intensive programs like video editors and new video games? You may need more video RAM.

Unlock the "Windows Keyboard Shortcuts 101" cheat sheet now!

This will sign you up to our newsletter

Enter your Email

But what even is that, and how can you increase video RAM? Read on for everything you need to know about video RAM.

What Is Dedicated Video RAM?

Video RAM (or VRAM, pronounced “VEE-ram”) is a special type of RAM that works with your computer’s graphics processing unit, or GPU.

The GPU is a chip on your computer’s graphics card (or video card) that’s responsible for displaying images on your screen. Though technically incorrect, the terms GPU and graphics card are often used interchangeably.

Your video RAM holds information that the GPU needs, including game textures and lighting effects. This allows the GPU to quickly access the info and output video to your monitor.

Using video RAM for this task is much faster than using your system RAM, because video RAM is right next to the GPU in the graphics card. VRAM is built for this high-intensity purpose and it’s thus “dedicated.”

How to Check Your VRAM

Windows 10 Video RAM Information

You can easily view the amount of video RAM you have in Windows 10 by following these steps:

  1. Open the Settings menu by pressing Windows Key + I.
  2. Select the System entry, then click Display on the left sidebar.
  3. Scroll down and click the Advanced display settings text.
  4. On the resulting menu, select the monitor you’d like to view settings for (if necessary). Then click the Display adapter properties text at the bottom.
  5. In a new window, you’ll see your current video RAM listed next to Dedicated Video Memory.

Under Adapter Type, you’ll see the name of your Nvidia or AMD graphics card, depending on what device you have. If you see AMD Accelerated Processing Unit or Intel HD Graphics (more likely), you’re using integrated graphics.

How to Increase VRAM

The best way to increase your video RAM is to purchase a graphics card. If you’re using integrated graphics and suffer from poor performance, upgrading to a dedicated card (even a solid budget graphics card) will do wonders for your video output.

However, if this isn’t an option for you (like on laptops), you may be able to increase your dedicated VRAM in two ways.

Increase VRAM in the BIOS

The first is adjusting the VRAM allocation in your computer’s BIOS. Enter your BIOS and look for an option in the menu named Advanced Features, Advanced Chipset Features, or similar. Inside that, look for a secondary category called something close to Graphics Settings, Video Settings, or VGA Share Memory Size.

These should contain an option to adjust how much memory you allocate to the GPU. The default is usually 128MB; try upping this to 256MB or 512MB if you have enough to spare.

Not every CPU or BIOS has this option, though. If you can’t change it, there’s a workaround that might help you.

Faking a VRAM Increase

Because most integrated graphics solutions automatically adjust to use the amount of system RAM they need, the details reported in the Adapter Properties window don’t really matter. In fact, for integrated graphics, the Dedicated Video Memory value is completely fictitious. The system reports that dummy value simply so games see something when they check how much VRAM you have.

Thus, you can modify a Registry value to change the amount VRAM your system reports to games. This doesn’t actually increase your VRAM; it just modifies that dummy value. If a game refuses to start because you “don’t have enough VRAM,” upping this value might fix that.

Open a Registry Editor window by typing regedit into the Start Menu. Remember that you can mess up your system in the Registry, so take care while here.

Head to the following location:

HKEY_LOCAL_MACHINE\Software\Intel

Right-click the Intel folder on the left sidebar and choose New > Key. Name this key GMM. Once you’ve made it, select the new GMM folder on the left and right-click inside the right side.

Select New > DWORD (32-bit) Value. Name this DedicatedSegmentSize and give it a value, making sure to select the Decimal option. In megabytes, the minimum value is 0 (disabling the entry) and the maximum is 512. Set this value, restart your computer, and see if it helps a game run.

Windows Registry Editor GMM

These methods aren’t guaranteed to work, but they’re still worth a try if you run into issues. If you don’t have a lot of system RAM and are having trouble running games with integrated graphics, try adding some additional RAM for the integrated graphics to use. Like most tasks, this is usually next to impossible to upgrade on a laptop and simple on a desktop.

What Kinds of Tasks Need Video RAM?

Before we talk specific numbers, we should mention what aspects of games and other graphics-intensive apps use the most VRAM.

A big factor in VRAM consumption is your monitor’s resolution. Video RAM stores the frame buffer, which holds an image before and during the time that your GPU displays it on the screen. Better displays (such as 4K gaming) use more VRAM because higher-resolution images take more pixels to display.

Aside from your display, textures in a game can drastically affect how much VRAM you need. Most modern PC games let you fine-tune graphical settings for performance or visual quality. You may be able to play a game from a few years ago at Low or Medium settings with a cheaper card (or even integrated graphics). But High or Ultra quality, or custom mods that make in-game textures look even better than they normally do, will need lots of RAM.

Beautification features like anti-aliasing (the smoothing of jagged edges) also uses more VRAM due to the extra pixels. If you play on two monitors at once, that’s even more intensive.

Specific games can also require different amounts of VRAM. A game like Overwatch isn’t too graphically demanding, but a title with lots of advanced lighting effects and detailed textures like Shadow of the Tomb Raider needs more resources.

Conversely, a cheap card with just 2GB of VRAM (or integrated graphics) is sufficient for playing old PC shooters. Games back then had nowhere near 2GB of VRAM at their disposal.

Even if you’re not interested in gaming, some popular software requires a fair amount of VRAM too. 3D design software like AutoCAD, particularly intense edits in Photoshop, and editing high-quality video will all suffer if you don’t have enough video RAM.

How Much VRAM Do I Need?

It’s clear that there’s no perfect amount of VRAM for everyone. However, we can provide some basic guidelines about how much VRAM you should aim for in a graphics card.

1-2GB of VRAM: These cards are usually under $100. They offer better performance than integrated graphics, but can’t handle most modern games at above-average settings. Only purchase a card with this amount of VRAM if you want to play older games that won’t work with integrated graphics. Not recommended for video editing or 3D work.

3-6GB of VRAM: These mid-range cards are good for moderate gaming or somewhat intensive video editing. You won’t be able to use ultra-insane texture packs, but you can expect to play modern games at 1080p with few issues. Get a 4GB card if you’re short on cash, but 6GB is a more future-proof option if you can spare it.

8GB of VRAM and above: High-end video cards with this much RAM are for serious gamers. If you want to play the latest games at 4K resolution, you need a card with plenty of VRAM.

However, you should take the above generalizations with a grain of salt. Graphics card manufacturers add the appropriate amount of VRAM to a card depending on how powerful the GPU is.

Thus, a cheap $75 graphics card will have a small amount of VRAM, while a $500 graphics card will pack a lot more. If a weak GPU isn’t powerful enough to render video that takes 8GB of VRAM to store, it’s a waste to have that much VRAM in the card.

Extremes aren’t the concern with VRAM. You don’t need an $800, top-of-the-line card with 12GB of VRAM to play 2D indie platformers. Really, you only need to worry about how much VRAM to get when a card you want to buy is available in multiple VRAM options.

Common Video RAM Concerns

Remember that just like normal RAM, more VRAM doesn’t always mean better performance. If your card has 4GB of VRAM and you’re playing a game that only uses 2GB, upgrading to an 8GB card isn’t going to do anything noticeable.

Conversely, not having enough VRAM is a huge problem. If VRAM fills up, the system has to rely on standard RAM and performance will suffer. You’ll suffer from a lower frame rate, texture pop-ins, and other adverse effects. In extreme cases, the game could slow to a crawl and become unplayable (anything under 30 FPS).

Remember that VRAM is only one factor in performance. If you don’t have a powerful enough CPU, rendering HD video will take forever. A lack of system RAM prevents you from running many programs at once, and using a mechanical hard drive will severely limit your system performance too. And some cheaper graphics cards could use slow DDR3 VRAM, which is inferior to DDR5.

The best way to find out which graphics card and amount of video RAM is right for you is to talk to someone knowledgeable. Ask a friend who knows about the latest graphics cards, or post on a forum like Reddit or Tom’s Hardware asking if a specific card would work for your needs.

What’s Different With Integrated Graphics?

So far, our discussion has assumed that you have a dedicated graphics card in your PC. Most people who build their own computer or buy a pre-built gaming PC have a desktop with a video card. Some beefier laptops even include a graphics card.

But on budget desktop or off-the-shelf laptops don’t include video cards—they use integrated graphics instead.

An integrated graphics solution means that the GPU is on the same die as the CPU, and shares your normal system RAM instead of using its own dedicated VRAM. This is a budget-friendly solution and allows laptops to output basic graphics without the need for a space and energy-hogging video card. But integrated graphics are poor for gaming and graphic-intensive tasks.

How powerful your integrated graphics are depends on your CPU. Newer Intel CPUs with Intel Iris Plus Graphics are more powerful than their cheaper and older counterparts, but still pale in comparison to dedicated graphics.

As long as your computer is within a few years old, you should have no problems watching videos, playing low-intensity games, and working in basic photo and video editing apps with integrated graphics. However, playing the latest graphically impressive games with integrated graphics is basically impossible.

Now You Understand Video RAM

Now you know what video RAM is, how much you need, and how to increase it. In the end, though, remember that video RAM is a small aspect of your computer’s overall performance. A weak GPU won’t perform well even with a lot of VRAM.

So if you’re looking to increase gaming and graphical performance, you’ll likely need to upgrade your graphics card, processor, and/or RAM first—the VRAM will sort itself out.

Once you’ve fixed your video RAM issues, check out other ways to optimize Windows 10 for gaming.

Read the full article: How to Increase Dedicated Video RAM in Windows 10


Read Full Article

The Essential Amazon Fire Stick Channels List


amazon-fire-tv-channels

Amazon offers a huge range of apps that you can install on Amazon Fire TV devices, which includes the Amazon Fire Stick. These apps cover everything from live TV to utilities.

Unlock the "Essential Amazon Fire Stick TV Channels List" now!

This will sign you up to our newsletter

Enter your Email

But what are the best apps for watching videos and listening to music? In order to help you find something to watch, here is our comprehensive list of Amazon Fire Stick channels.

Amazon Fire Stick Channels Worth Watching

ENTERTAINMENT EDUCATION
Netflix TED TV
YouTube NASA
Twitch Popular Science
Dailymotion FOOD
Vimeo Jamie Oliver's Food Tube
NPR One Korean Food by iFood.tv
Red Bull TV Mediterranean Food by iFood.tv
TVC MAS Cake Recipes By iFood.tv
The Economist Films Vegan Life by Fawesome.tv
ARTE BestCooks
CNET TV Thai Food
TWiT Live Chinese Food
PGA TOUR Mexican Food
Nitro Circus Italian Food
Crunchyroll The Japan Food Channel
YuppTV ChefsFeed
FailArmy Grilling and Smoking
People Are Awesome Simply Vegetarian
TBN FOODYTV
Manchester City KIDS
The Relax Channel HappyKids.tv
Direct Sports Network Pokémon TV
Bill O'Reilly HappyKids2
Rakuten Viki Free Classic Cartoons
AT&T WatchTV LEGO TV
NRA TV Blippi
SnagFilms Just Go to Bed - Little Critter
Movies by Fawesome.tv Kids First
Country Road TV Baby By HappyKids.tv
Moodica Popcornflix Kids
GoUSA MUSIC
Orbitz Travel Guides Spotify Music
The United Kingdom Channel TuneIn Radio
TALK BUSINESS 360 Vevo
Hunt Channel Reggae TV
Halloween Flix Musica Latina
The Aviation Channel NEWS
Viewster NBC News
IndieFlix ABC News
SkyStream TV Fox News
kweliTV Fox Business
GLWiz TV BBC News
Surf USA TODAY
Rural TV Reuters TV
Farm and Ranch TV Bloomberg TV+
FITNESS Washington Post Video
Zen TV Al Jazeera
Yoga TV Euronews (English)
Yogaland Haystack TV
Pilates Newsy
FitYou DW-Deutsche Welle
Daily Workouts NHK WORLD TV
Daily Burn Newsmax TV
Simply Yoga Apex Sports
Free Fitness Videos The Weather Network
Unplug: Guided Meditation

Do More With Your Amazon Fire Stick

We’ve covered some of the channels listed above in more detail with our roundup of the best Amazon Fire TV apps that everyone should install.

And if you’d like to learn more about the Amazon’s streaming devices, you should also check out our articles detailing how to speed up your Amazon Fire Stick and how to install a mouse on an Amazon Fire Stick.

Read the full article: The Essential Amazon Fire Stick Channels List


Read Full Article

Fitbit Charge 3: Why Would You Want Any Other Wearable?

iPhone Photo Sync: iCloud vs. Google Photos vs. Dropbox

6 Great Android Networking Apps to Monitor, Ping, and More

8 Ways a Raspberry Pi Can Help You Learn Online Security Skills

IBM Buys Red Hat: What Does This Mean for Open Source?

Self-flying camera drone Hover 2 hits Kickstarter


Two years after launching the original Hover, Zero Zero Robotics has returned for the sequel. In spite of landing a $25 million Series A back in 2016, the startup is going to the crowdfunding well on this one, launching a $100K Kickstarter campaign to launch the latest version of the self-flying drone.

Hover 2, which the company expects to arrive in April 2019, will feature updated obstacle avoidance, improved visual tracking and some updated internals, including a new Snapdragon processor on-board.

There’s a two-axis gimbal with electronic image stabilization for smoother shots that houses a camera capable of capturing 4K video and 12-megapixel photos. There are a number of different shot models on-board as well, including movie-inspired filters and music and a battery that’s capable of going 23 minutes on a charge.

Of course, Hover’s chief competition, the DJI Mavic line, has made some pretty massive leaps and bounds in practically all of those categories since launching the first Pro back in 2016, so the company’s got some stiff competition. Even Parrot has gotten more serious about their videography-focused Anafi line.

At $399 for early-bird pledgers, the Hover 2 is priced around the same as the handheld DJI Spark. That price includes a small handheld remote.


Read Full Article

Uber launches rider loyalty Rewards like credits & upgrades 9 cities


Uber’s new loyalty program incentivizes you not to check Lyft or the local competitor. Riders earn points for all the money they spend on Uber and Uber Eats that score them $5 credits, upgrades to nicer cars, access to premium support, and even flexible cancellations that waive the fee if they rebook within 15 minutes.

Uber Rewards launches today in nine cities before rolling out to the whole US in the next few months, with points for scooters and bikes coming soon. And as a brilliant way to get people excited about the program, it retroactively counts your last six months of Uber activity to give you perks as soon as you sign up for free for Uber Rewards. You’ll see the new Rewards bar on the homescreen of your app today if you’re in Miami, Denver, Tampa, New York, Washington, DC, Philadelphia, Atlanta, San Diego, or anywhere in New Jersey, as Uber wanted to test with a representative sample of the US.

The loyalty program ties all of the company’s different transportation and food delivery options together, encouraging customers to stick with Uber across a suite of solutions instead of treating it as interchangeable with alternatives. “As people use Uber more and more in their everyday, we wanted to find a way to reward them for choosing Uber” says Uber’s director of product for riders Nundu Janikaram. “International expansion is top of mind for us” adds Holly Ormseth, Uber Rewards’ product manager.

As for the drivers, “They absolutely get paid their full rate” Ormseth explains. “We understand that offering the benefits has a cost to Uber but we think of it as an investment” says Janakiram.

So how much Ubering earns you what perks? Let’s break it down:

In Uber Rewards you earn points by spending money to reach different levels of benefits. Points are earned during 6 month periods, and if you reach a level, you get its perks for the remainder of that period plus the whole next period. You earn 1 point per dollar spent on UberPool, Express Pool, and Uber Eats; 2 points UberX, Uber XL, and Uber Select; and 3 points on Uber Black and Black SUV. You’ll see your Uber Rewards progress wheel at the bottom of the homescreen fill up over time.

Blue: $5 Credits

The only Uber perk that doesn’t reset at the end of a period is that you get $5 of Uber Cash for every 500 points earned regardless of membership level. “Even as a semi-frequent Uber Rewards member you’ll get these instant benefits” Janakiram says. Blue lets you treat Uber like a video game where you’re trying to rack up points to earn an extra life. To earn 500 points, you’d need about 48 UberPool trips, 6 Uber Xs, and 6 Uber Eats orders.

Gold: Flexible Cancellations

Once you hit 500 points, you join Uber Gold and get flexible cancellations that refund your $5 cancellation fee if you rebook within 15 minutes, plus priority support Gold is for users who occasionally take Uber but stick to its more economical options. “The Gold level is all about being there when things aren’t going exactly right” Janakiram explains. To earn 500 points in six months, you’d need to take about 2 UberPools per week, one Uber X per month, and one Uber Eats order per month.

Platinum: Price Protection

At 2,500 points you join Uber Platinum, which gets you the Gold benefits plus price protection on a route between two of your favorite places regardless of traffic or surge. And Platinum members get priority pickups at airports. To earn 2,500 points, you’d need to take UberX 4 times per week and order Uber Eats twice per month. It’s designed for the frequent user who might rely on Uber to get to work or play.

Diamond: Premium Support & Upgrades

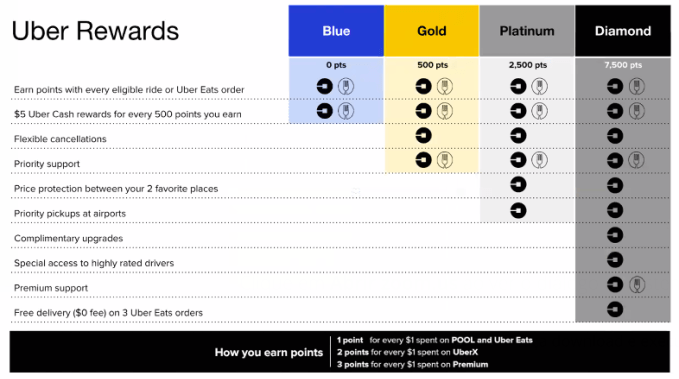
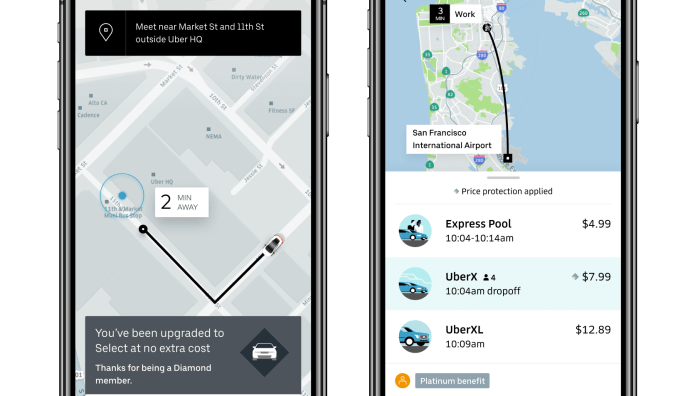
At 7,500 points, you get the Gold and Platinum benefits plus premium support with a dedicated phone line and fast 24/7 responses from top customer service agents. You get complimentary upgrade surprises from UberX to Uber Black and other high-end cars. You’ll be paired with Uber’s highest rated drivers. And you get no delivery fee on three Uber Eats orders every six months. Reaching 7,500 points would require UberX 8 times per week, Uber Eats once per week, and Uber Black to the airport once per month. Diamond is meant usually for business travelers who get to expense their rides, or people who’d ditched car ownership for ridesharing.

Uber spent the better part of last year asking users through surveys and focus groups what they’d want in a loyalty program. It found that customers wanted to constantly earn rewards and make their dollar go further, but use the perks when they wanted. The point was to avoid situations where riders says “Oh I’ve been an Uber user for years. When something goes wrong, I feel like I’m being treated like everyone else.” When riders think they’re special, they stick around.

Uber managed to beat Lyft to the loyalty game. Lyft just announced that its rewards program would roll out in December, allowing you to earn discounts and upgrades.

One risk of the program is that Uber might make users at lower tiers or who don’t even qualify for Gold feel like second class citizens of the app. “One thing that’s important is that we don’t want to make the experience for people who are not in these levels poor in any sense” Janakiram notes. “It’s not like 80% of people will suddenly get priority airport pickups, but we do want to monitor very closely to make sure we’re not harming the service more broadly.”

Overall, Uber managed to pick perks that seem helpful without making me wonder why these features aren’t standard for everyone. Even if it takes a short-term margins hit, if Uber can dissuade people from ever looking beyond its app, the lifetime value of its customers should easily offset the kickbacks.

[Disclosure: Uber’s Janakiram and I briefly lived in the same three-bedroom apartment five years ago, though I’d already agreed to write about the redesign when I found out he was involved.]


Read Full Article

UK watchdog has eyes on Google-DeepMind’s health app hand-off


The shock news yesterday that Google is taking over a health app rolled out to UK hospitals over the past few years by its AI division, DeepMind, has caught the eye of the country’s data protection watchdog — which said today that it’s monitoring developments.

An ICO spokesperson told us: “An ICO investigation and an independent audit into the use of Google Deepmind’s Streams service by the Royal Free both highlighted the importance of clear and effective governance when NHS bodies use third parties to provide digital services, particularly to ensure the original purpose for processing personal data is respected.

“We expect all the measures set out in our undertaking, and in the audit, should remain in place even if the identity of the third party changes. We are continuing to monitor the situation.”

We’ve reached out to DeepMind and Google for a response.

The project is already well known to the ICO because, following a lengthy investigation, it ruled last year that the NHS Trust which partnered with DeepMind had broken UK law by passing 1.6 million+ patients’ medical records to the Google owned company during the app’s development.

The Trust agreed to make changes to how it works with DeepMind, with the ICO saying it needed to establish “a proper legal basis” for the data-sharing, as well as share more information about how it handles patients’ privacy.

It also had to submit to an external audit — which was carried out by Linklaters. Though — as we reported in June — this only looked at the current working of the Streams app.

The auditors did not address the core issue of patient data being passed without a legal basis when the app was under construction. And the ICO didn’t sound too happy about that either.

While regulatory actions kicked off in spring 2016, the sanctions came after Streams had already been rolled out to hospital wards — starting with the Royal Free NHS Trust’s own hospitals.

DeepMind also inked additional five-year Streams deals with a handful of other Trusts before the ICO’s intervention, including Imperial College Healthcare NHS Trust and Taunton & Somerset.

Those Trusts are now facing being switched to having Google as their third party app provider.

Until yesterday DeepMind had maintained it operates autonomously from Google, with founder Mustafa Suleyman writing in 2016 that: “We’ve been clear from the outset that at no stage will patient data ever be linked or associated with Google accounts, products or services.”

Two years on and, in their latest Medium blog, the DeepMind co-founders write about how excited they are that the data is going to Google.

Patients might have rather more mixed feelings, given that most people have never been consulted about any of this.

The lack of a legal basis for DeepMind obtaining patient data to develop Streams in the first place remains unresolved. And Google becoming the new data processor for Streams only raises fresh questions about information governance — and trust.

Meanwhile the ICO has not yet given a final view on Streams’ continued data processing — but it’s still watching.


Read Full Article