23 March 2018

How to Hide Files and Folders From Prying Eyes on Linux


If friends or family members use your computer on a regular basis, it’s a good idea to create separate user accounts for them. But if someone you know wants to use your computer, you might want to hide some of your private files and folders.

We’ve covered how to hide files and folders on Windows and on a Mac. Here’s how to hide files and folders on Linux using the Terminal and the file manager, Nautilus, in Ubuntu. We’ll also talk about several ways to securely hide files and folders.

Hide Existing Files and Folders Using the Terminal

To hide an existing file or folder using the Terminal, press Ctrl + Alt + T to open a Terminal window.

Use the cd command to go to the file or folder you want to hide. For example, we’re going to hide our FilesToHide folder in the Documents folder. So we use the following commands:

cd Documents/
cd FilesToHide/

You can also change to a folder by putting the full path in a single cd command:

cd ~/Documents/FilesToHide/

The “~” character is a shortcut for your Home folder. The above path expands to /home/lori/Documents/FilesToHide/.

Then, we use the ls command to list all the unhidden files and folders in the current folder. We’re going to hide the HideThisFile.txt file. To hide a file or folder, add a dot (.) at the beginning of the name.

To add a dot at the beginning of the HideThisFile.txt file name, we’re going to use the mv command to rename the file:

mv HideThisFile.txt .HideThisFile.txt

Now when you use ls to list the files in the current folder, you’ll see the file you renamed is now shown.

Hide a file using the Terminal in Linux

View Hidden Files and Folders Using the Terminal

So how do you view files and folders in the Terminal once they’re hidden? The -a switch on the ls command lists all items, including hidden files and folders.

Use the cd command to go to the folder containing hidden items. Then, type the following command:

ls -a

Hidden items with a dot (.) at the beginning of the name are listed.

Sometimes it’s easier to view the items in a folder in a list format, like the Details view in File Explorer in Windows. The following command lists all files, hidden and not hidden, in a detailed list format:

ls -al

View hidden files in the Terminal in Linux

Create a New Hidden File or Folder Using the Terminal

You can also create new files and folders as hidden items. Use the mkdir command to create a new folder. To make that folder hidden, add a dot (.) at the beginning of the name, just like you would when renaming an existing folder to hide it.

mkdir .FilesToHide

Create a new hidden folder using the Terminal in Linux

The touch command creates a new blank file in the current folder. For example, the following command creates a new text file called MyFile.txt.

touch MyFile.txt

To create a new hidden file, add a dot (.) at the beginning of the name in the touch command.

touch .HiddenFile.txt

Create a new hidden file using the Terminal in Linux

View Hidden Files and Folders Using Nautilus

If you’re not comfortable using the Terminal to hide files and folders, you can use the file manager in your Linux system. Ubuntu is a commonly used version of Linux, so we’re going to show you how to view hidden items in Nautilus, Ubuntu’s file manager. File managers in other Linux systems may vary but likely operate similarly.

Go to Edit > Preferences.

Go to Edit > Preferences in Nautilus in Ubuntu

Make sure the Views tab is active. Then, check the Show hidden and backup files box in the Default View section. Close the dialog box.

You’ll see all items in the file manager now, including hidden items with a dot (.) at the beginning of their name.

Show hidden and backup files in Nautilus in Ubuntu

You can also press Ctrl + H to show and hide hidden files and folders.

Hide Files and Folders Using Nautilus

To create a new hidden folder in Nautilus, go to File > New Folder. If you’re creating a new hidden text file, go to File > New Document > Empty Document instead.

Go to File > New Folder in Nautilus in Ubuntu

The name of the folder (or file) becomes editable and is selected. Type a dot (.) and then the name you want. Press Enter.

Rename a hidden folder in Nautilus in Ubuntu

You can also easily rename a file or folder in Nautilus to hide the item. Right-click on the item and select Rename. The name of the item becomes editable and is selected. Add a dot (.) to the beginning of the name.

Rename a file in Nautilus in Ubuntu

How to Securely Hide Files and Folders on Linux

Hiding files and folders is not a secure way to protect them. Anyone else accessing your system, who knows how to view hidden files and folders, can gain access to your hidden data.

There are several ways you can hide your files and folders and secure them at the same time.

Change permissions

If you’ve set up user accounts for others so they can use your Linux computer, you can protect the files in your account by changing their permissions.

If a nosy tech-savvy friend or family member signs into their account, they may try to access your Home folder from their account and view your files. Changing permissions on a file prevents them from viewing that file. You can change permissions on hidden files as well as non-hidden files.

If someone temporarily uses your account, they can change the permissions and view your files. We provide three additional options for securely hiding files and folders in the following sections.

There are three triplets of permissions that can be set in this order: Owner, Group, and World. Permissions for each triplet are read (r), write (w), and execute (x), in that order. To turn off a permission, replace the letter (r, w, or x) with a dash. The first position indicates whether the item is a directory (d) or not (-).

Permissions on files and directories in Linux

For example, say you have a document you want to protect and you want to give read and write permissions to the owner (yourself), read-only permission to the group, and no permissions to the world. The permissions for your document would look like the following:

-rw-r-----

If the item is a directory, the permissions would be the following:

drw-r-----

For more information, see our article about permissions in Linux.

To change permissions on the command line, you use the chmod command. Here we’ll show you how to change permissions using Ubuntu’s file manager, Nautilus. File managers in other Linux systems most likely use similar options.

The permissions on files and folders are not shown by default in Nautilus. To show them, go to Edit > Preferences. Click the List Columns tab on the Files Preferences dialog box. Then, check the Permissions box under Choose the order of information to appear in the list view.

Check Permissions box in Files Preferences in Nautilus

You’ll see the Permissions column in Nautilus, which shows a set of letters and dashes. Basically, the last three spots are the permissions allowed on this file or folder for other users, or the World.

On the following image, other users can currently read the selected file because there is an “r” (read) in the first of the last three spots. We want all three of the last spots to be dashes.

To change the permissions on a file, right-click on the file and select Properties.

Open the properties for a file in Nautilus

Click the Permissions tab on the Properties dialog box. To prevent anyone else from viewing the file, select None from the Others (which is equivalent to World) dropdown list.

Change permission for Others to None in Nautilus

The last three spots in the Permissions column for the selected file are now all dashes. Other users do not have any access to this file or folder.

Permissions for Others removed in Nautilus in Ubuntu

Compressing Files and Folders With a Password

If you have some files and folders to protect that you don’t use often, but you want to keep on your computer, you can store these files in a ZIP file protected with a password. Then, you can hide the ZIP file by putting a dot (.) at the beginning of the file name.

Open Nautilus and find the file or folder you want to compress. Right-click on it and select Compress.

Compress a folder into a ZIP file in Nautilus in Ubuntu

On the Compress dialog box, enter the file name without the extension in the Filename box. Add a dot (.) at the beginning to hide the ZIP file.

Select .zip from the dropdown list to the right of the Filename.

Specify the Location where you want to save the ZIP file. Select Other from the dropdown list if the location you want is not listed.

Enter a Password to protect the ZIP file.

Click Create. You’ll see a dialog box saying the ZIP file was created successfully. Click Close.

Compress dialog box in Nautilus

You’ll now see a ZIP file that will be hidden when you press Ctrl + H to hide files in Nautilus.

Hidden ZIP file shown in Nautilus in Ubuntu

Creating an Encrypted Folder

If you want to protect a folder containing files you use often, you can encrypt the folder and mount it like a drive. This makes it easy to access your protected files and protect them when you’re not using them.

We’ve talked about how to use Gnome Encfs Manager to encrypt folders. To hide a folder encrypted using Gnome Encfs Manager, add a dot (.) to the beginning of the folder name. The folder will be hidden and secure at the same time.

Use Gnome Encfs Manager to encrypt a folder

Hiding a File Inside an Image

If password protecting ZIP files or creating an encrypted folder is overkill for your purposes, but hiding files and folders only using the dot (.) method too insecure, there is another way.

You can hide a file inside an image using a method called steganography. We’ve talked about how to do this using the Terminal and using a tool called Steg.

Hide a file inside an image using Steg in Ubuntu

Protect Your Data From Prying Eyes on Linux

Remember that hiding files and folders using the dot (.) method is not secure. But you can use some of the more secure options we provided along with the dot method to secure and hide your files and folders on Linux.

For extra protection, you can also secure Ubuntu with two-factor authentication.


Read Full Article

How to Use Lightroom Presets and LUTs in Adobe Premiere


A tip you’ll find in most articles about being successful on Instagram is to be consistent. This consistency can help you build a following, and it’s surprisingly easy to achieve.

If you’re looking to post consistent-looking photos and videos, all you need is a pair of Adobe programs along with a third-party app called LUT Generator to ensure that all your content has the same look and feel.

In this article we’ll explain how to use Lightroom presets and LUTs in Adobe Premiere.

The Importance of Consistency

There are several reasons you might consider putting in a little extra effort to ensure your photos and videos all look consistent.

If you’re trying to put together a portfolio that demonstrates who you are as an artist, consistency in your photos and videos is a great way to do this.

No matter where you’re sharing your content, a strong artist is one who creates something that others see and instantly say, “I know who created that!”

How to Find and Install Lightroom Presets

There are plenty of professional and popular photographers who offer free and paid Lightroom presets. A quick search online will reveal just how many Lightroom presets you can find out there.

Once you’ve downloaded a few presets, installing them in Lightroom is a simple four-step process.

  1. In Lightroom, go to Edit > Preferences in Windows or Lightroom > Preferences on a Mac.
  2. In the Presets tab, click Show Lightroom Presets Folder.
    lightroom presets folder
  3. In the Explorer/Finder window that opens up, open the following folders: Lightroom & Develop Presets.
  4. You can create new folders where you can then copy and paste downloaded presets, you can copy and paste entire folders you’ve downloaded, or copy individual presets into the User Presets folder. If you’re going to download a lot of presets, keeping them organized will help you maintain a semblance of sanity while in Lightroom.

How to Make Your Own Lightroom Presets

You can also easily create your own custom presets:

  1. Open the image you want to edit and go to the Develop tab.
  2. Apply the edits you want to make in Lightroom.
  3. Click the + button in the Presets panel.
  4. You can check and uncheck any of the edits you want included in the preset.
  5. Any presets you’ll be using in Premiere should not include any edits from Lens Correction, Detail, Effects, or Clarity.
    lightroom preset
  6. Click Create preset.

Creating your own presets to use in both Lightroom and Premiere gives you the added advantage of being able to create your own personal look for your work.

Why Use LUTs in Adobe Premiere?

Now that you have your favorite photography presets worked out, you can apply that same style to your videos by converting them to LUTs.

LUTs (“Look Up Tables”) allow you to apply color grading to your videos.

Just as you use Lightroom presets to change the color and feel of your photo, you can use LUTs to change the color and feel of your video.

You can use LUTs for either basic color correction or for applying a certain look or feel, such as the film effect, to your footage.

While LUTs can be used in various video editing apps like Adobe Premiere and Final Cut Pro, in this tutorial, we’ll be looking at how to use LUTs in Adobe Premiere. (They can also be used in Photoshop.)

How to Convert Lightroom Presets to LUTs

If you want to convert Lightroom Presets to Premiere LUTs in Mac (10.8 or greater) and Windows (7 or greater), you can do this using the free utility app LUT Generator.

If you’re feeling generous or plan to use it for commercial purposes, you should consider making a donation to the creator when downloading it.

Downloading and Installing LUT Generator

Either way, to download the app, you’ll have to put in your email address and a download link will be sent to your inbox. You get a maximum of five downloads using that link.

The zip file you download includes a few free LUTs, along with three versions of the LUT Generator: a Mac beta version, a Mac version, and a Windows version.

Each version is an executable file so you won’t actually have to install anything. Just double-click the EXE or DMG file to open the app. Mac users: you don’t have to copy the app into your Applications folder for it to work.

Converting the Preset File in LUT Generator

Now that you have the LUT Generator open, you’re going to see a very small app with two buttons: Generate a Hald and Convert to Cube.

lut generator

First, you’re going to generate a PNG image using the app, and then you’re going to import that PNG image into Adobe Lightroom to apply the preset to it.

Finally, you’re going to bring that edited PNG file back into the LUT Generator to convert it to a CUBE file.

Here is the exact step-by-step process:

  1. Click the Generate a Hald button. This will open up an explorer or finder window, where you can choose where to save the PNG file you’re about to generate.
  2. Select the folder location and click Open. It will seem like nothing happened and the window will close, but be assured your file has been generated.
  3. Navigate to the location where you chose to save the file. You should now see a PNG file called Neutral-512.png.
  4. Import the file into Lightroom.
  5. Double click the image in your library to open it and click the the Develop tab.
  6. In the presets panel, click on the preset you want to convert to a LUT to apply it to the image.
  7. Click File > Export or use the keyboard shortcut Shift + Ctrl + E (Cmd instead of Ctrl on Mac) to save the file to your computer as a JPG. Under File Settings set the Quality at 100 and the Color Space to sRGB. Under Image Settings set the Resolution at 72.
  8. Once the file is exported, go back to the LUT Generator and click Convert to Cube.
  9. In the window that opens up, navigate to where your exported file is saved and double-click the file.
  10. A dialog box will open indicating that your file has been converted.
    lut generated
  11. You should now see a file named Neutral-512.cube in the same folder as your PNG or JPG.

To see the process in action, check out the video below:

A few things to bear in mind:

  • When creating or exporting your presets for use in Adobe Premiere, the following settings should be disabled as they cannot be applied to LUTs: Detail, Lens Corrections, and Effects.
  • If you want to test the preset on your footage first, you can take a screenshot from your video and import it into Lightroom. This way you can apply presets to the footage and see which one works best before you convert the Preset to a LUT.

Applying LUTs to Video Footage in Adobe Premiere

Now that you have your LUT file, you can import it to Adobe Premiere and apply it to your video footage. There are several ways you can apply the LUT to your footage, but this is the easiest:

  1. Once you have your footage open in Adobe Premiere, go to Window > Lumetri Color to open the program’s LUTs panel.
  2. Under Basic Correction find the Input LUT option.
  3. Click the dropdown menu and select Browse.
  4. Navigate to your converted file and double-click it to apply it to your footage.
  5. If you have multiple pieces of footage, you’ll need to apply the LUT to each one.

You can see this process in the video below:

If you know you’re going to be using a LUT on a regular basis, you can copy it into a subfolder in the Adobe Premiere folder.

  1. Mac users can get to the folder by opening the Applications folder and opening the Adobe Premiere folder. Hold down Control and right click the Adobe Premiere app and click Show Package Contents. Windows users can get there by going to their C Drive/Program Files/Adobe/Adobe Premiere Pro folder.
  2. Once in there, both Mac and Windows users should open the following folders: Lumetri/LUTS/Creative.
  3. Copy and paste your LUT files into the Creative folder.
  4. If you have Premiere open, close it and reopen it, and now your LUTs should appear in your Lumetri Color dropdown list.

Why LUTs Matter

If you’re still on the fence and aren’t sure if LUTs are worth your time, here are a few more reasons you should consider using LUTs:

  • You can get a cinematic look in your work.
  • You can learn from other photographers and filmmakers you admire as you begin develop your own personal style.
  • You can create an adjustment layer (go to File > New > Adjustment Layer) and apply your LUT to that layer. Extend that layer over multiple clips, and you’ll get the same look across them all, saving you some time in your editing process.

Having successfully reached the end of this guide to using Lightroom presets and LUTs in Adobe Premiere you might want to check out these Lightroom shortcuts everyone should be using and this list of free Lightroom presets to suit all tastes.


Read Full Article

Tumblr confirms 84 accounts linked to Kremlin trolls

Elon Musk deletes own, SpaceX and Tesla Facebook pages after #deletefacebook


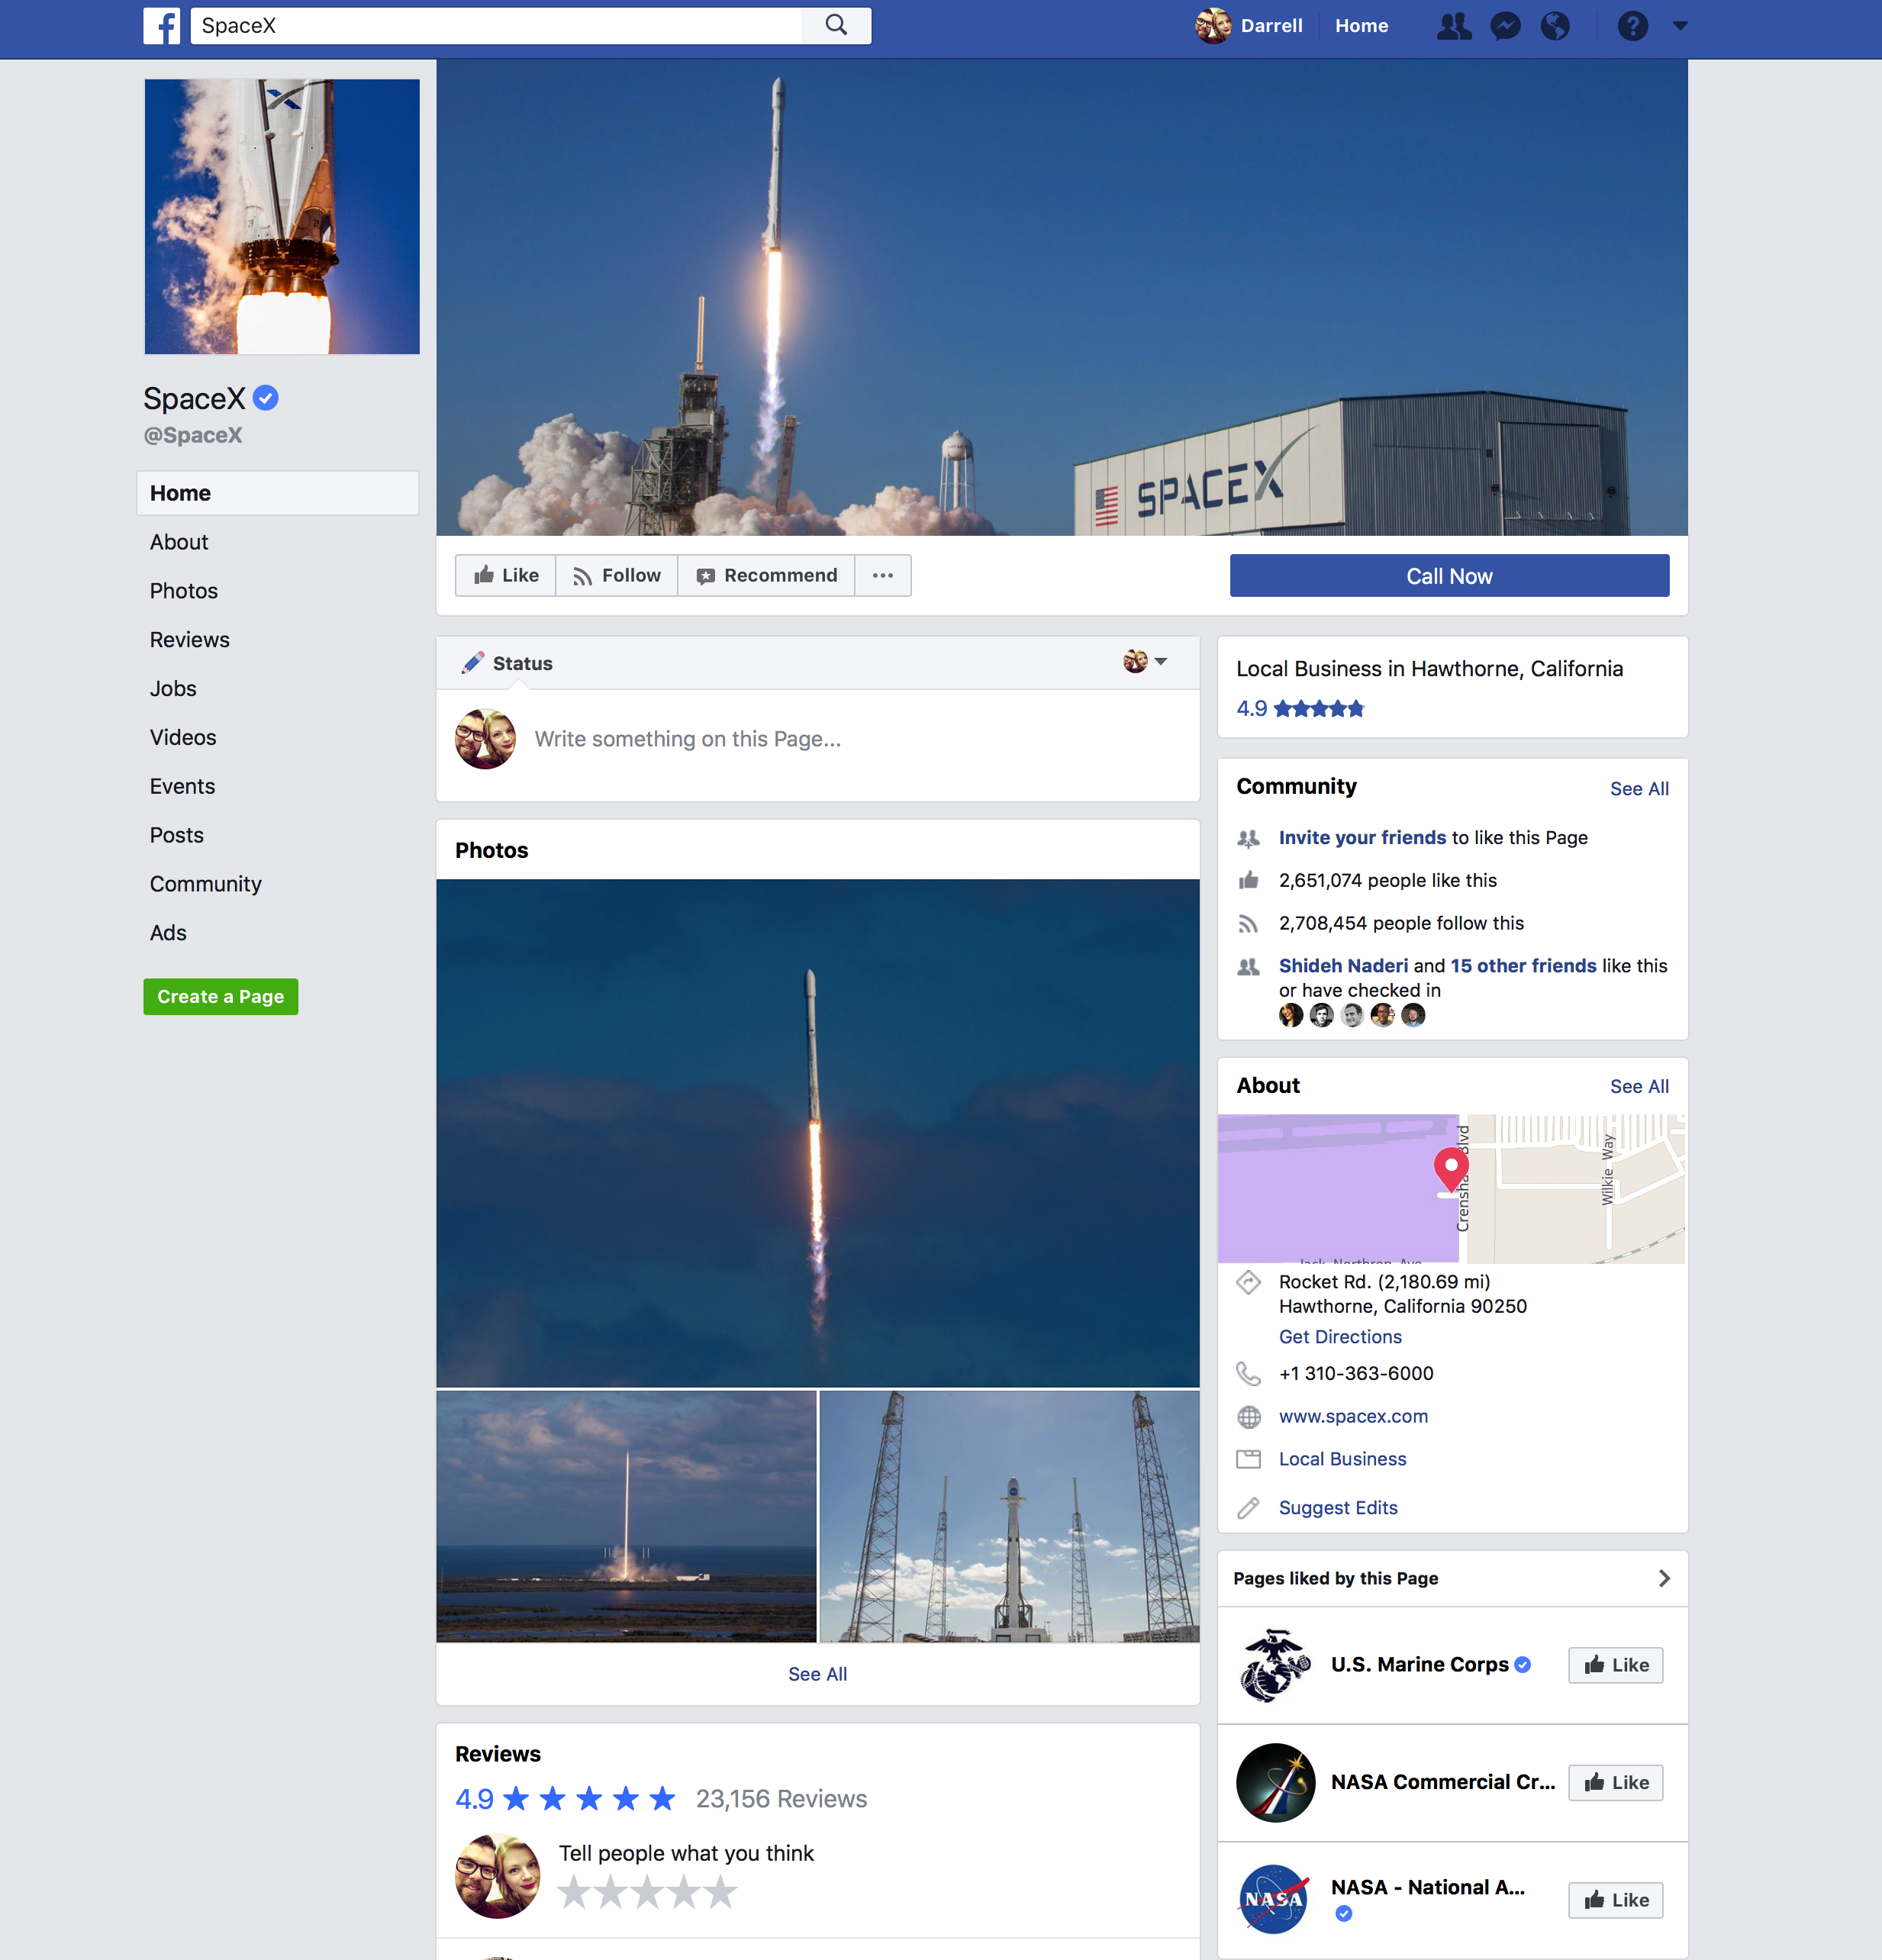
Elon Musk apparently wasn’t aware that his company SpaceX had a Facebook page. The SpaceX and Tesla CEO has responded to a comment on Twitter calling for him to take down the SpaceX, Tesla and Elon Musk official pages in support of the #deletefacebook movement by first acknowledging he didn’t know one existed, and then following up with promises that he would indeed take them down.

He’s done just that, as the SpaceX Facebook page is now gone, after having been live earlier today (as you can see from the screenshot included taken at around 12:10 PM ET).

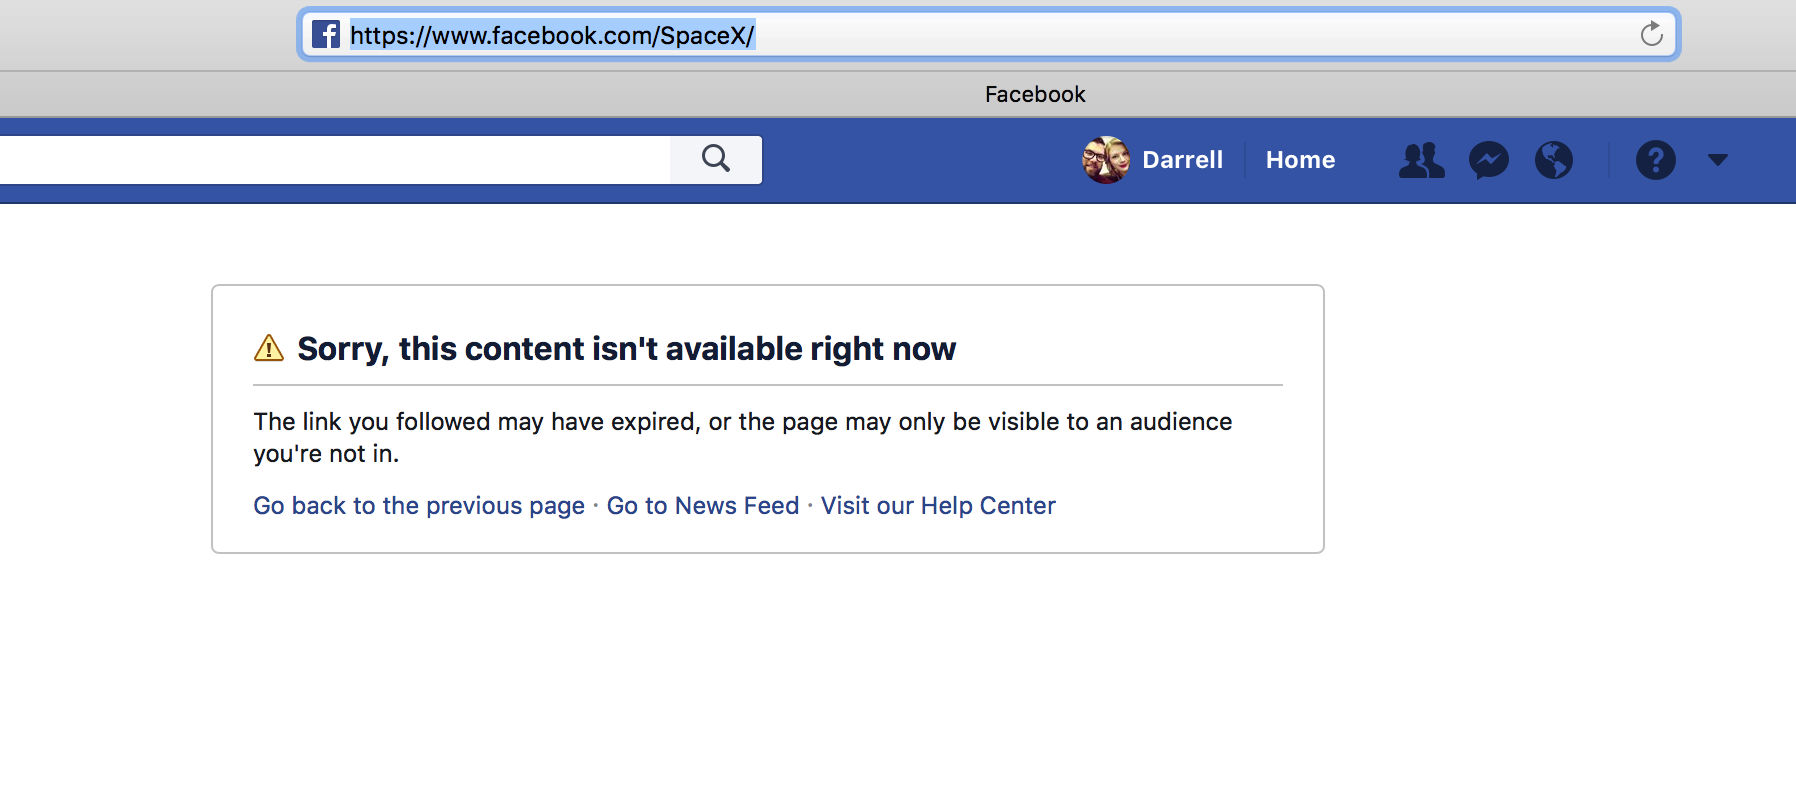
As of this publishing, going to any of the above pages directs you to a message saying “Sorry, this content isn’t available right now” instead. That’s a quick turnaround, since Musk seems only to have found out these pages existed about 20 minutes prior to his taking them all offline.

Musk also responded to another comment on Twitter regarding his own and his companies’ prolific use of Instagram, which is of course owned by Facebook. The prolific entrepreneur noted that Instagram was “borderline,” since FB’s “influence is slowly creeping in,” but it seems like he’s okay with maintaining that presence for now.

Prior to their deletion, both the SpaceX and Tesla pages had over 2.6 million Likes and Follows, and super high engagement rates. You have to wonder whether Musk’s social media management employees cried a little when these went down.

Developing…


Read Full Article

Google makes it easier to run high-performance workloads on its cloud platform


Hyperscale cloud platforms from the likes of Amazon, Microsoft and Google are great for running the kind of high-performance computing (HPC) projects that scientists in academia and the industry need for their simulations and analyses. Many of the workloads they run are, after all, easily parallelized across hundreds or thousands of machines. Often, though, the challenge is about how to create these clusters and how to then manage the workloads that run on them.

To make this easier for the HPC community, Google today announced that it is bringing support for the open source Slurm HPC workload manager to its cloud platform (which is different from this Slurm). That’s the same piece of software that the many of the users in the TOP500 supercomputer list use, including the world’s biggest and fastest cluster to date, including the Sunway TaihuLight with its over 10 million computing cores.
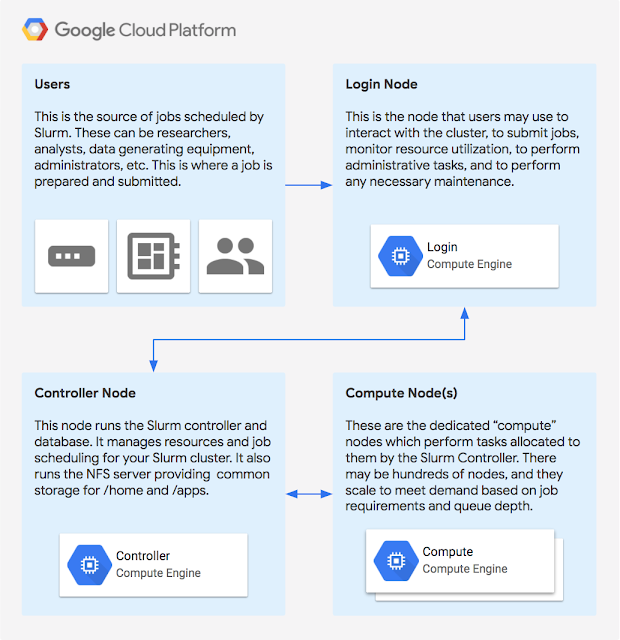
For this project, Google teamed up with the experts at SchedMD, the company behind Slurm, to make it easier to run Slurm on Compute Engine. Using this integration, developers can easily launch an auto-scaling Slurm cluster on Compute Engine that runs based on the developers’ specifications. One interesting feature here is that users can also federate jobs from their on-premise cluster to the cloud when they need a bit of extra compute power.

Compute Engine currently offers machines with up to 96 cores and 624 GB of memory, so if you have the need (and money), building a massive compute cluster on GCP just got a little bit easier.

It’s worth noting that Microsoft, too, offers a template for deploying Slurm on Azure and that the tool has long supported AWS, too.


Read Full Article

What Is Google Assistant and How to Use It


While Apple’s Siri started the mobile voice assistant craze, it’s easy to argue that Google Assistant has surpassed it. Combining a natural speaking format with the power of Google, using Assistant is one of the best perks of Android.

In this article, we’ll show you everything you need to know about Google Assistant, what it can do, and how to use it.

What Is Google Assistant?

Google Assistant is Google’s virtual assistant. It’s an evolution of Android feature known as Google Now, which provided you information without you even asking. It competes with Apple’s Siri, Amazon’s Alexa, and Microsoft’s Cortana.

Assistant launched in May 2016 as part of Google’s smart messaging app Allo. Shortly after, Assistant made the jump to Google’s Pixel phones. It was only available on the Pixel line for a while, but it’s now free to download for anyone using Android 5 Lollipop or above.

In addition to Android Wear support, there’s an Assistant app for iOS. And the Google Home line of smart speakers is powered by Google Assistant too.

Do I Have Google Assistant?

Use Google Assistant

If you’re using an Android device, you can summon Google Assistant by pressing and holding the Home button. Should you see Assistant appear, then it’s already built into your phone and ready to go. If you have it built-in but disabled it, you’ll see a prompt to enable it when you hold Home.

Some Android devices require the standalone Google Assistant app. Check to see if you have that installed if you didn’t see Assistant when you held Home.

On iOS, you can access Google Assistant if you have the Google Assistant app installed. And for Google Home devices, Google Assistant is built in.

How to Get Google Assistant

Went through the above steps and found that you don’t have Google Assistant installed? Here’s how to get Google Assistant on your device.

Android users: Download the Google Assistant app from the Play Store. For it to work, you must update the standard Google app on your device too.

You must have a phone with Android 5 Lollipop or higher, or Android 6 Marshmallow or higher on tablets. Additionally, your device must have at least 1.4GB of memory and a 720p screen. Note that you don’t need this app if Google Assistant is built into your device.

iPhone users: Download the Google Assistant app from the App Store. It requires iOS 9.1 or newer, which should be no problem for most users.

How to Use Google Assistant

To call up Google Assistant on compatible Android phones, press and hold the Home button or say OK Google. With some phones, you can also say Hey Google. On an iPhone or iPad, you’ll need to open the Google Assistant app and either say OK Google or tap the microphone icon.

If you don’t want to use your voice, you can also type out a question. Touch the keyboard button to enter text into Google Assistant. It will respond just as if you were talking.

Google Assistant Use Keyboard

What’s cool is that Google Assistant understands context quite well. For example, if you ask When was Denzel Washington born? and then say What movies is he known for?, Google knows you mean Washington when you say “he.”

Once you’ve pulled up Google Assistant, you can ask it anything you’d like. Assistant can interact with lots of apps and services, and it will pull up Google results if it can’t help with your question.

What Can Google Assistant Do?

Some of the most popular questions you can ask Google Assistant:

  • How’s the weather?
  • Find sushi restaurants near me.
  • Navigate home.
  • Call Sam.
  • Text Jim “I’ll be there in an hour.”
  • Wake me up at 8am.
  • Remind me to clean the bathroom when I get home.
  • Play some country music.
  • Did the Giants win their last game?
  • Define “vivacious.”
  • How do I say “You’re beautiful” in Japanese?
  • Decrease the brightness.
  • How old is Gal Godot?
  • Open Telegram.
  • Let’s play a game.

We’ve looked at some of the hidden Google Assistant features if you’re interested in more. And if you just want to have some fun, check out goofy questions to ask Assistant.

How to Set Up Google Assistant for Efficiency

Google Assistant Settings

Google Assistant doesn’t require any real setup to start working. But you can tweak a few options to make it work to your liking.

Open the Google app, then tap the three-bar Menu button. Select Settings, then tap Settings again under the Google Assistant header. From here, you can modify several settings. Here are a few important ones:

  • Personal Info: Add home and work address for traffic alerts. You can also use the Nickname settings to change what Assistant calls you or change how it pronounces your name.
  • Voice Match: Teach your Assistant your voice so it responds to you more reliably.
  • Music: Set your preferred music provider.
  • Routines: Allows you to set up groups of commands that run at once.
  • Shortcuts: Create custom commands for various tasks.

How to Turn Off Google Assistant

Turn Off Google Assistant

You can disable Google Assistant if you never use the feature or are concerned about Google listening.

Open the Google app, then tap the three-bar Menu button. Choose Settings, then look for the Google Assistant header. Tap Settings under this header. On the resulting page, tap the name of your device under Devices. Disable the Google Assistant slider to turn the feature off.

Once you’ve done this, you’ll see a prompt to turn Google Assistant back on if you hold the Home button. You can also follow these steps to turn the feature back on. If you tap Settings under Google Assistant, your phone will ask if you want to use it again.

Ready to Work With Google Assistant?

We’ve taken a look at some of the most popular questions about Google Assistant. Now you know what it does, whether you have it, and how to use it. Voice commands are super useful, so you’re in for a treat if you haven’t used Assistant yet.

To go further, try expanding Google Assistant with IFTTT applets.


Read Full Article

Netflix and Chill: The 11 Best Movies for a Great Date


Are you in the mood to Netflix and Chill with someone special? Then you’ve come to the right place. The streaming video service is a great place to watch romantic comedies, whether it’s Valentine’s Day or not.

In this article we have selected 11 movies perfect to watch with your significant other on a date night at home. And while there’s nothing here you couldn’t watch in front of your parents, the themes of love and romance could put you in the mood to Netflix and Chill.

What Does Netflix and Chill Mean?

Netflix and Chill means watching Netflix with someone and seeing where the night takes you. Which, for most of us, means cuddling up, sharing some kisses, and then having an early night. You’ll definitely get to do the Netflix part, but the Chill means different things to different people.

So, with that in mind, here are some films to help you Netflix and Chill.

1. 50 First Dates (2004)

This romantic comedy stars Adam Sandler and Drew Barrymore alongside Rob Schneider, Dan Aykroyd, and Sean Astin. Barrymore’s character suffers from a fictitious memory impairment, Goldfield’s Syndrome, which is similar to short-term memory loss and anterograde amnesia. Hence the name of the film.

50 First Dates, which won an MTV Movie Award, is the second film starring Sandler and Barrymore as romantic partners. They also starred in the 1998 hit, The Wedding Singer.

2. Adventureland (2009)

Jesse Eisenberg and Kristen Stewart star in this romantic comedy-drama set in a rundown amusement park in western Pennsylvania called Adventureland. The film also stars Ryan Reynolds, Kristen Wiig, and Bill Hader.

Besides being a brilliant coming of age comedy-drama, Adventureland also includes a lively soundtrack featuring songs mainly from the 1980s, when the film is set. You’ll also find several tracks from the late 1960s and early 1970s.

3. Beauty and the Beast (2017)

This Disney musical came to Netflix almost immediately after it left theaters. Which is why we think it’s time to subscribe to Netflix. It’s also one of the best date movies of recent years.

It stars Emma Watson and Dan Stevens as the eponymous characters. It also features Luke Evans, Kevin Kline, Josh Gad, Ewan McGregor, Stanley Tucci, Audra McDonald, Gugu Mbatha-Raw, Ian McKellen, and Emma Thompson in supporting roles. Beauty and the Beast was one of the biggest movies of 2017 and is based on the 1991 animated hit of the same name.

4. Begin Again (2013)

Keira Knightley and Mark Ruffalo star in this 2013 musical comedy-drama about a singer-songwriter and the struggling record label executive who discovered her. The film comes from John Carney, director of the 2007 musical film, Once, and also features Catherine Keener and James Corden.

Begin Again is an enjoyable film with an equally impressive soundtrack that features songs by Maroon 5’s Adam Levine who’s also in the film in his first acting role.

5. Breakfast at Tiffany’s (1961)

If you’re really looking for romance, you can’t do much better than one of the truly classic movies, 1961’s Breakfast at Tiffany’s. You can’t go wrong when you Netflix and chill with Audrey Hepburn and George Peppard.

This iconic film also features Patricia Neal, Buddy Ebsen, Martin Balsam, and Mickey Rooney. Breakfast at Tiffany’s was nominated for five Academy Awards including Best Actress for Hepburn. Ultimately, the film won the award for Best Original Score and Best Original Song for “Moon River”.

6. Can’t Buy Me Love (1987)

In the summer of 1987, teens invaded the movie theaters to see the delightful romantic comedy, Can’t Buy Me Love starring Patrick Dempsey (years before Grey’s Anatomy) and Amanda Peterson. In the film, a single nerd looking for love (Dempsey) pays a popular cheerleader (Peterson) $1,000 to pretend to be his girlfriend for a month. Not surprisingly, things don’t work out as planned. Can’t Buy Me Love takes its title from the famous Beatles song. It features choreography by Paula Abdul, who also stars in an uncredited role.

7. The First Time (2012)

For something completely different, consider the 2012 teen romantic comedy, The First Time, starring Britt Robertson, Dylan O’Brien, James Frecheville, and Victoria Justice. In the film, unexpected love blossoms between two students from different high schools.

The First Time doesn’t break any new ground, but it’s a charming little teen comedy, nonetheless. It’s another one of these great stories about falling in love for the very first time.

8. How to Lose a Guy in 10 Days (2003)

Kate Hudson and Matthew McConaughey star in this still-fresh 2003 romantic comedy that’s based on the short cartoon book of the same name by Michele Alexander and Jeannie Long.

In the film, Hudson’s character Andi Anderson plays an opinion writer for a fictional women’s magazine called “Composure”. When her best friend Michelle (Kathryn Hahn) suffers through another breakup, Andi decides to write an article, How to Lose a Guy in 10 Days. Mayhem and fun follow between Anderson and McConaughey’s character, Benjamin “Ben” Barry, an advertising executive.

9. Up in the Air (2009)

George Clooney and Vera Farmiga star in this 2009 comedy-drama directed by Jason Reitman. The film is based on the 2001 novel by Walter Kirn, and also stars Anna Kendrick and Danny McBride.

In Up in the Air, Clooney and Farmiga play star-crossed lovers who meet every few months for romance and companionship around the United States. Is the relationship between the two true love or merely a way to disconnect from the real world?

10. When We First Met (2018)

Three years ago, Adam DeVine’s Noah met Alexandra Daddario’s Avery for the first time. Though Noah felt that it was love at first sight, Avery thought otherwise. In the present day, at Avery’s engagement party with another guy, Noah thinks back to when the two of them met and wonders why they never dated and ended up together.

In the end, Noah finds love and happiness with someone. You’ll have to watch to see whether it’s with Avery or her photographer roommate Carrie, played by Shelley Hennig.

11. The Young Victoria (2009)

This 2009 period drama film is based on the early life and reign of Queen Victoria, and her marriage to Prince Albert of Saxe-Coburg and Gotha. The film stars Emily Blunt in the title role and Rupert Friend as the prince, alongside Paul Bettany, Miranda Richardson, Mark Strong, and Jim Broadbent.

The Young Victoria was nominated for three Academy Awards, winning the 2009 Academy Award for Best Costume Design. The film also won for the Best Make-Up and Hair and Best Costume Design at the 63rd British Academy Film Awards.

How Did Your Night Turn Out?

So there you have it. We’ve provided the Netflix, now all you have to do is Chill. There are lots of movies about love and romance on Netflix, with more added each month. The 11 films mentioned above should make you laugh, smile, and, if your night goes according to plan, get lucky.

Are you craving even more romance? Then take a look at these Valentine’s Day apps for a romantic date night or these romantic dating sim games.

Image Credit: AndreyPopov/Depositphotos


Read Full Article

The NEEO universal remote is a modern Logitech Harmony alternative


The advanced universal remote market is not a very crowded market. In fact, for a while now, Logitech’s Harmony line has been pretty much the only game in town. Newcomer NEEO wants to upset that monopoly with its new NEEO Remote and NEEO Brain combo ($369), which is a system that can connect just about any AV system, along with a smorgasbord of connected smart devices including Nest, Philips Hue, Sonos and more.

NEEO’s two-part system includes the Brain, which, true to its name, handles all of the heavy lifting. This is a puck-shaped device with 360-degree IR blasters dotting its outside perimeter, and which has one IR extender out (there’s one in the box) for connecting devices held within a closed AV cabinet, for instance. This central hub also connects to your Wi-Fi network, and setup requires plugging it into your router via Ethernet to get everything squared away, similar to how you initially set up Sonos speakers, if you’re familiar with that process.

Most of the setup work you need to do to get NEEO working happens on your phone, and that’s where it becomes apparent that this smart remote was designed for a modern context. Logitech’s Harmony software has come a long way, and now you can do everything you need to do from the iOS and Android app, but it’s still somewhat apparent that its legacy is as something you initially setup using a desktop and somewhat awkward web-based software. The NEEO feels at home on mobile, and it makes the setup and configuration process much better overall.

The other core component of the NEEO system is the NEEO Remote. This is a fantastic piece of industrial design, first of all. It’s a sleek rectangle crafted from aerospace-grade aluminum that oozes charm, in a way that nothing in the current Logitech Harmony lineup can come close to matching. The minimalist design still doesn’t suffer from the ‘which way is up?’ problem that the Apple Remote faces, because of subtle design cues including bottom weighting and the presence of ample physical buttons.

A NEEO Remote isn’t necessary for the system to work – you can just use the Brain along with the companion app for iPhone or Android, but the remote is a joy to hold and use, thanks to its unique design, and it features a super high density display that’s extremely responsive to touch input and pleasingly responsive to touch. NEEO took a lot of time to get this touchscreen experience right, and it pays off, delivering a clear and simple control interface that shifts to suit the needs of whatever activity you’re running at the time.

The NEEO Remote also has an “SOS” feature so that you can locate it if you happen to misplace it, and it can even be configured to recognize different hands if you want to set profiles for distinct members of the household, or set parental control profiles limiting access to certain content or devices. This kind of thing is where NEEO’s feature set exceeds the competition, and shows a particular attention to modern device use cases.

One NEEO Remote can also control multiple NEEO Brains, which is another limitation of the completion. That means you can set up NEEO Brains in each room where you have devices to control, and carry your remote from place to place instead of having to have multiple. The NEEO Brain is still $200 on its own, however, so it’s definitely still a barrier to entry.

NEEO otherwise does pretty much everything you’d expect a smart remote to do in 2018: You can set recipes on the deice itself, including with triggers like time-based alarms or motion detection (without using IFTTT). You can connect it to Alexa, though that functionality is limited at the moment, with more updates promised in future to make this better.

The bottom line is that NEEO offers a competent, intelligent alternative the big dog on the block, Logitech’s Harmony system. Logitech’s offering is still more robust and mature in terms of delivering Alexa and Google Assistant compatibility, as well as rock solid performance, but NEEO has some clever ideas and unique takes that will serve more patient and tech-forward users better over time.


Read Full Article

How to Install Adobe Photoshop on Linux


While many Adobe Photoshop alternatives exist, Photoshop remains at the forefront of image editing software. Although for many years Adobe’s ultra-powerful software was unavailable on Linux, it’s now easy to install.

Let’s learn about how to install Photoshop on Linux!

Adobe Photoshop vs. Alternatives on Linux

Linux is an incredible Windows and Mac alternative which comes in a variety of flavors. Likewise, you’ll find loads of Photoshop alternatives that run superbly on Linux, ranging from GIMP to Inkscape. Which is great if you don’t want to go through the process to install Photoshop on Linux.

Moreover, tons of these Illustrator, Lightroom, and Photoshop substitutes are freely available. So you may feel as though you don’t need Photoshop or Adobe Creative Suite.

However, many so-called Adobe Photoshop replacements aren’t up to scratch.

As tests show, many common surrogates provide similar features to Adobe Lightroom, not the full-fledged Photoshop. Largely, these develop RAW image files and catalog image libraries. For layering and correcting elements such as contrast and color, these software options fall short.

How to install photoshop on linux - multiple means

Therefore, Photoshop is the best, rather than a contender. Repeated tests have concluded that Adobe is the top choice for photo editing software. For starters, there’s an issue with Photoshop replacements reading Adobe XMP metadata for displaying RAW image files with Adobe settings. Similarly, Adobe doesn’t properly read proprietary files and metadata from competing software.

Thankfully, you can install Photoshop on Linux via two different methods: using a virtual machine or using Wine.

Install Photoshop on Linux Using a VM

Since Photoshop runs like a champ on Windows, Linux users may simply install a virtual machine. Then, Photoshop runs on Windows within Linux. To accomplish this, you’ll need:

First, install your preferred virtual machine.

Next, install a copy of Windows within your VM. With a copy of Windows running in your virtual machine on Linux, just launch the Adobe Photoshop CS6 installer.

In short, you’re running Photoshop on Windows, and running Windows within Linux. That’s about as easy as it gets!

Install Photoshop on Linux Using Wine

Alternatively, you may run Adobe Photoshop on Linux using Wine and PlayOnLinux.

As Yassen Dadabhay reveals, Photoshop CC 2014 runs on Linux. However, CC 2015 does not. You can also run Adobe Photoshop CS4, CS6, and Lightroom 5 on Linux using Wine. Among the biggest challenges when switching from Windows to Linux is software compatibility.

What you’ll need:

  • Wine (optional but recommended: PlayOnLinux front-end)
  • Adobe CS4, CS6, or CC 2014

The easiest means to install Adobe Photoshop on Linux is using Wine plus the PlayOnLinux front-end. Wine is an open-source compatibility layer which allows certain Windows programs to run on Unix-like operating systems.

PlayOnLinux provides a pretty front-end for Wine, which makes software installation a breeze. Also worth noting is that you can use Wine to run Windows apps on macOS as well as on Android devices.

For gamers, Wine delivers a simple means to run Windows games on Linux distros, from new releases to retro titles.

Download and Install PlayOnLinux

Head over to the PlayOnLinux download page and select the proper package or run the command. Because the generic installer is a tar.gz file you’ll need to download and extract it. Alternately, PlayOnLinux features installation methods for various Linux distros:

For Arch Linux, run:

pacman -Syu playonlinux

However, on Debian, simply download the appropriate DEB file. Note that Debian Wheezy users must install the package wine:i386 to properly get PlayOnLinux functioning. Enter:

wget -q "http://deb.playonlinux.com/public.gpg" -O- | apt-key add -
wget http://deb.playonlinux.com/playonlinux_wheezy.list -O /etc/apt/sources.list.d/playonlinux.list
apt-get update
apt-get install playonlinux

Meanwhile, if you’re running Debian Squeeze enter:

wget -q "http://deb.playonlinux.com/public.gpg" -O- | apt-key add -
wget http://deb.playonlinux.com/playonlinux_squeeze.list -O /etc/apt/sources.list.d/playonlinux.list
apt-get update
apt-get install playonlinux

Then, for Lenny, run:

wget -q "http://deb.playonlinux.com/public.gpg" -O- | apt-key add -
wget http://deb.playonlinux.com/playonlinux_lenny.list -O /etc/apt/sources.list.d/playonlinux.list
apt-get update
apt-get install playonlinux

Debian Etch users, use:

wget -q "http://deb.playonlinux.com/public.gpg" -O- | apt-key add -
wget http://deb.playonlinux.com/playonlinux_etch.list -O /etc/apt/sources.list.d/playonlinux.list
apt-get update
apt-get install playonlinux

Alternately, for Ubuntu download the DEB file. Again, if you’re on Ubuntu Precise or superior, you’ll need the wine:i386 package for PlayOnLinux to properly run. Like Debian, for previous Ubuntu releases, you’ll need to install PlayOnLinux via the command line.

Install on Trusty with:

wget -q "http://deb.playonlinux.com/public.gpg" -O- | sudo apt-key add -
sudo wget http://deb.playonlinux.com/playonlinux_trusty.list -O /etc/apt/sources.list.d/playonlinux.list
sudo apt-get update
sudo apt-get install playonlinux

If you’re using Saucy, run:

wget -q "http://deb.playonlinux.com/public.gpg" -O- | sudo apt-key add -
sudo wget http://deb.playonlinux.com/playonlinux_saucy.list -O /etc/apt/sources.list.d/playonlinux.list
sudo apt-get update
sudo apt-get install playonlinux

Then, for Precise use:

wget -q "http://deb.playonlinux.com/public.gpg" -O- | sudo apt-key add -
sudo wget http://deb.playonlinux.com/playonlinux_precise.list -O /etc/apt/sources.list.d/playonlinux.list
sudo apt-get update
sudo apt-get install playonlinux

Frugalware users run:

pacman-g2 -S playonlinux

Finally, Fedora users can install the Yum package.

Install Photoshop Using PlayOnLinux

With PlayOnLinux installed, run the program. Next, select Install a program from the left-hand side of the screen or from the top menu.

How to Install Adobe Photoshop on Linux - PlayOnLinux install a program

Now, in the search bar look for Photoshop. You’ll find options for Adobe Photoshop CS4, CS6, and Lightroom 5. Choose Adobe Photoshop CS6. After that, select Install.

How to Install Adobe Photoshop on Linux - PhotoShop CS6

Once you hit Install, you’re prompted for a PlayOnLinux warning which appears before every PlayOnLinux install. Accept this and proceed. Now, the PlayOnLinux wizard installation wizard begins.

How to Install Adobe Photoshop on Linux - PS Installer

Eventually, PlayOnLinux asks for you to select the installation file. Locate this on your hard drive.

How to Install Adobe Photoshop on Linux - Browse for your file

With your install file chosen, click Next.

How to install adobe photoshop on linux - POL install

Now, PlayOnLinux creates a virtual drive and proceeds to install several items including Adobe Air. You may see a notification that Microsoft fonts are not installed. Check I agree and click Next.

How to install adobe photoshop on linux - ms fonts

When the installation completes, you’re ready to install the actual Photoshop program. You’ll see a notification that installation may fail.

How to install adobe photoshop on linux - warning

If it does, wait a few minutes and try again. However, on my system, Adobe Photoshop on Linux installed flawlessly. After the initial set up, select either Install or Try if you don’t have the full version. Regardless, you’ll need to sign in with your Adobe ID. Once you’ve signed in, install Adobe Photoshop. Next, you’re ready to run Photoshop CS6 on Linux.

How to install adobe photoshop on linux - Photoshop CS6 on Ubuntu

You’ve Now Installed Adobe Photoshop on Linux!

Despite the plentiful alternatives for Linux, Adobe Photoshop remains the top pick for its excellent layering. Additionally, for long-time Photoshop users it’s tough to find a program that maintains compatibility with previous Photoshop files. While I used Photoshop for many years, I attempted to replace it with GIMP. However, GNOME failed to properly load my layers.

Installing Photoshop on Linux remedied this issue.

Moreover, many of the best Photoshop replacements require payment. Therefore, if you’re going to pay it’s best to simply shell out money for the genuine Photoshop rather than a substitute. Since Photoshop CS6 comes as a one-time payment, it’s more economical than the Creative Cloud subscription.

Whereas PlayOnLinux is a fantastic software option, you may use the standard Wine. Still, for those seeking a Wine frontend, Vineyard is a neat alternative to PlayOnLinux.

Meanwhile, if you find your Wine programs are malfunctioning, it’s time to learn how to properly troubleshoot them!


Read Full Article

Telegram chalks up 200M MAUs for its messaging app


Another usage milestone for messaging platform Telegram: It’s announced passing 200M monthly active users “within the last 30 days”.

The platform passed 100M MAUs back in February 2016, when it held a lavish party at the Mobile World Congress tradeshow in Barcelona to celebrate the metric. At the time it said it was adding 350k new users daily and that there were 15 billion messages generated daily.

Since then Telegram has kept its powder fairly dry on the usage metrics front — presumably waiting to be able to announce 200M.

Its blog post is not revealing of any other details about usage. Rather founder Pavel Durov uses the space to give thanks to Telegram users for getting the company to the milestone, and takes a sideswipe at other “popular apps” which he says — unlike Telegram — monetize via advertising and/or pass data on to third parties.

Safe to say, it doesn’t take much imagination to figure out who he might be thinking of

“Since the day we launched in August 2013 we haven’t disclosed a single byte of our users’ private data to third parties,” he writes (emphasis his). “We operate this way because we don’t regard Telegram as an organization or an app. For us, Telegram is an idea; it is the idea that everyone on this planet has a right to be free.”

We’ve reached out to Durov to see if he’ll give up any more Telegram usage tidbits and will update this post if so.

While he writes confidently now that “Telegram doesn’t… do deals with marketers, data miners or government agencies”, it’s not clear how much longer he’ll be able to stand up that claim — given the legal pressure being applied, for example, in Russia to hand over encryption keys or face being blocked. Telegram has also faced restrictions in Iran.

It told Bloomberg it plans to appeal the Russian ruling in a process that may last into the summer, according to company lawyer, Ramil Akhmetgaliev.

Durov also tweeted that: “Threats to block Telegram unless it gives up private data of its users won’t bear fruit. Telegram will stand for freedom and privacy.”


Read Full Article