26 June 2020

Leveraging Temporal Context for Object Detection


Ecological monitoring helps researchers to understand the dynamics of global ecosystems, quantify biodiversity, and measure the effects of climate change and human activity, including the efficacy of conservation and remediation efforts. In order to monitor effectively, ecologists need high-quality data, often expending significant efforts to place monitoring sensors, such as static cameras, in the field. While it is increasingly cost effective to build and operate networks of such sensors, the manual data analysis of global biodiversity data remains a bottleneck to accurate, global, real-time ecological monitoring. While there are ways to automate this analysis via machine learning, the data from static cameras, widely used to monitor the world around us for purposes ranging from mountain pass road conditions to ecosystem phenology, still pose a strong challenge for traditional computer vision systems — due to power and storage constraints, sampling frequencies are low, often no faster than one frame per second, and sometimes are irregular due to the use of a motion trigger.

In order to perform well in this setting, computer vision models must be robust to objects of interest that are often off-center, out of focus, poorly lit, or at a variety of scales. In addition, a static camera will always take images of the same scene unless it is moved, which causes the data from any one camera to be highly repetitive. Without sufficient data variability, machine learning models may learn to focus on correlations in the background, leading to poor generalization to novel deployments. The machine learning and ecological communities have been working together through venues like LILA BC and Wildlife Insights to curate expert-labeled training data from many research groups, each of which may operate anywhere from one to hundreds of camera traps, in order to increase data variability. This process of data collection and annotation is slow, and is confounded by the need to have diverse, representative data across geographic regions and taxonomic groups.
What’s in this image? Objects in images from static cameras can be very challenging to detect and categorize. Here, a foggy morning has made it very difficult to see a herd of wildebeest walking along the crest of a hill. [Image from Snapshot Serengeti]
In Context R-CNN: Long Term Temporal Context for Per-Camera Object Detection, we present a complementary approach that increases global scalability by improving generalization to novel camera deployments algorithmically. This new object detection architecture leverages contextual clues across time for each camera deployment in a network, improving recognition of objects in novel camera deployments without relying on additional training data from a large number of cameras. Echoing the approach a person might use when faced with challenging images, Context R-CNN leverages up to a month’s worth of images from the same camera for context to determine what objects might be present and identify them. Using this method, the model outperforms a single-frame Faster R-CNN baseline by significant margins across multiple domains, including wildlife camera traps. We have open sourced the code and models for this work as part of the TF Object Detection API to make it easy to train and test Context R-CNN models on new static camera datasets.
Here, we can see how additional examples from the same scene help experts determine that the object is an animal and not background. Context such as the shape & size of the object, its attachment to a herd, and habitual grazing at certain times of day help determine that the species is a wildebeest. Useful examples occur throughout the month.
The Context R-CNN Model
Context R-CNN is designed to take advantage of the high degree of correlation within images taken by a static camera to boost performance on challenging data and improve generalization to new camera deployments without additional human data labeling. It is an adaptation of Faster R-CNN, a popular two-stage object detection architecture. To extract context for a camera, we first use a frozen feature extractor to build up a contextual memory bank from images across a large time horizon (up to a month or more). Next, objects are detected in each image using Context R-CNN which aggregates relevant context from the memory bank to help detect objects under challenging conditions (such as the heavy fog obscuring the wildebeests in our previous example). This aggregation is performed using attention, which is robust to the sparse and irregular sampling rates often seen in static monitoring cameras.
High-level architecture diagram, showing how Context R-CNN incorporates long-term context within the Faster R-CNN model architecture.
The first stage of Faster R-CNN proposes potential objects, and the second stage categorizes each proposal as either background or one of the target classes. In Context R-CNN, we take the proposed objects from the first stage of Faster R-CNN, and for each one we use similarity-based attention to determine how relevant each of the features in our memory bank (M) is to the current object, and construct a per-object context feature by taking a relevance-weighted sum over M and adding it back to the original object features. Then each object, now with added contextual information, is finally categorized using the second stage of Faster R-CNN.
Context R-CNN is able to leverage context (spanning up to 1 month) to correctly categorize the challenging wildebeest example we saw above. The green values are the corresponding attention weights for each boxed object.
Compared to a Faster R-CNN baseline (left), Context R-CNN (right) is able to capture challenging objects such as an elephant occluded by a tree, two poorly-lit impala, and a vervet monkey leaving the frame. [Images from Snapshot Serengeti]
Results
We have tested Context R-CNN on Snapshot Serengeti (SS) and Caltech Camera Traps (CCT), both ecological datasets of animal species in camera traps but from highly different geographic regions (Tanzania vs. the Southwestern United States). Improvements over the Faster R-CNN baseline for each dataset can be seen in the table below. Notably, we see a 47.5% relative increase in mean average precision (mAP) on SS, and a 34.3% relative mAP increase on CCT. We also compare Context R-CNN to S3D (a 3D convolution based baseline) and see performance improve from 44.7% mAP to 55.9% mAP (a 25.1% relative increase). Finally, we find that the performance increases as the contextual time horizon increases, from a minute of context to a month.
Comparison to a single frame Faster R-CNN baseline, showing both mean average precision (mAP) and average recall (AR) detection metrics.
Ongoing and Future Work
We are working to implement Context R-CNN within the Wildlife Insights platform, to facilitate large-scale, global ecological monitoring via camera traps. We also host competitions such as the yearly iWildCam species identification competition at the CVPR Fine-Grained Visual Recognition Workshop to help bring these challenges to the attention of the computer vision community. The challenges seen in automatic species identification in static cameras are shared by numerous applications of static cameras outside of the ecological monitoring domain, as well as other static sensors used to monitor biodiversity, such as audio and sonar devices. Our method is general, and we anticipate the per-sensor context approach taken by Context R-CNN would be beneficial for any static sensor.

Acknowledgements
This post reflects the work of the authors as well as the following group of core contributors: Vivek Rathod, Guanhang Wu, Ronny Votel. We are also grateful to Zhichao Lu, David Ross, Tanya Birch and the Wildlife Insights AI team, and Pietro Perona and the Caltech Computational Vision Lab.

How to Use Conditional Fields in Email Templates


The Mail Merge and Document Studio add-ons let you send personalized emails with the help of template markers.

The markers automatically create a mapping between the column names in the Google Sheet and the variable fields in your email message. When the email is sent, the marker fields in the email message are replaced with the values from the respective columns of the sheet.

Let’s say you have a column titled First Name in your Google Sheet and your email message body has a marker that says Dear , (also notice the comma in the end).

Template Fields in Mail Merge

Fill-in Fields

If your Google Sheet rows has a value, say Alex, the text in the email message would read Dear Alex,. However, if the first name is not available for a particular row, the variable field would be replaced with a blank value and this first line in the email message would thus read Dear <space>, - something that you should totally avoid in personalized emails.

There are two ways to deal with this issue. You can either clean up your data before running merge, or you can use formulas in Google Sheets to offer an alternate value in case the original field doesn’t have a value. Let me explain:

  1. Add a new column in the Google Sheet title “Greeting”

  2. Add a formula in row #2 of the Greeting column.

=IF(ISBLANK(A2),"Hello",CONCATENATE("Dear", " ", A2))

The formula basically looks at the Name column, it is blank, the greeting is set to “Hello” else it uses the default “Hello FirstName” value.

  1. Now edit your email template and replace “Dear ,” with “,“.

You can either copy-paste the formula in the remaining cells of the column manually or use the ArrayFormula function to copy it down for you.

If..Then..Else

The technique can be extended to add more customization to your email message. For instance, you may choose a different greeting in your email subject based on the country of the recipient.

Email Greetings

If the country is in column B, the Greeting formula would be:

=IFNA(
  IFS(
   B2 = "USA", "Hello",
   B2 = "Spain", "Hola",
   B2 = "India", "Namaste"
  ), "Greetings")

Calculated Fields

The templates fields in the email message are dumb and merely get replaced by values in the Google Sheet. If you wish to include any logic or calculations in the template fields, it should be done in the sheet itself.

Let me give you another example.

Conditional Fields in Mail Merge

The Google Sheet records the invoice details and sends email reminders for payments. Using the magic of Google Sheet formulas and template markers, the text of the email message can be dynamically changed based on when the invoice is due. If the due date has already passed, we send a different message.

First add a new column (say, Days Left) that calculates the number days between now and the invoice due date. Add this formula in row #2 of the column. It will only fill values when the due date is available.

=ArrayFormula(IF(ISBLANK(C2:C),"", ROUND(C2:C-TODAY())))

Add a new “Invoice Status” column and again use the ArrayFormula function to get the text for the email message body and subject.

=ArrayFormula(
  IF(ISBLANK(C2:C), "" ,
     IF(D2:D>0, CONCAT("due on ",TEXT(C2:C,"mmmm dd, yyyy")),
                CONCAT(ABS(D2:D)," days past due"))))

See more Google Sheets solutions.


With feature updates and new accessories, the RODECaster Pro is a podcaster’s dream come true


You might have been considering – or have already started – picking up a new hobby this year, particularly one you can do at home. Podcasting seems to be a popular option, and RODE is a company that has done more to cater specifically to this audience than just about any other audio company out there. The RODECaster Pro ($599) all-in-one podcast production studio that they released in 2018 is a fantastic tool for anyone looking to maximize their podcast potential, and with amazing new firmware updates released this year, along with a host of great new accessories, it’s stepped up even further.

The basics

The RODECaster Pro is a powerful production studio, but it’s not overwhelming for people who aren’t audio engineers by trade. The deck balances offering plenty of physical controls with keeping them relatively simple, giving you things like volume sliders and large pad-style buttons for top level controls, and then putting more advanced features and tweaks behind layers of menus accessible via the large, high-resolution touchscreen for users who desire more fine-tuned manipulation.

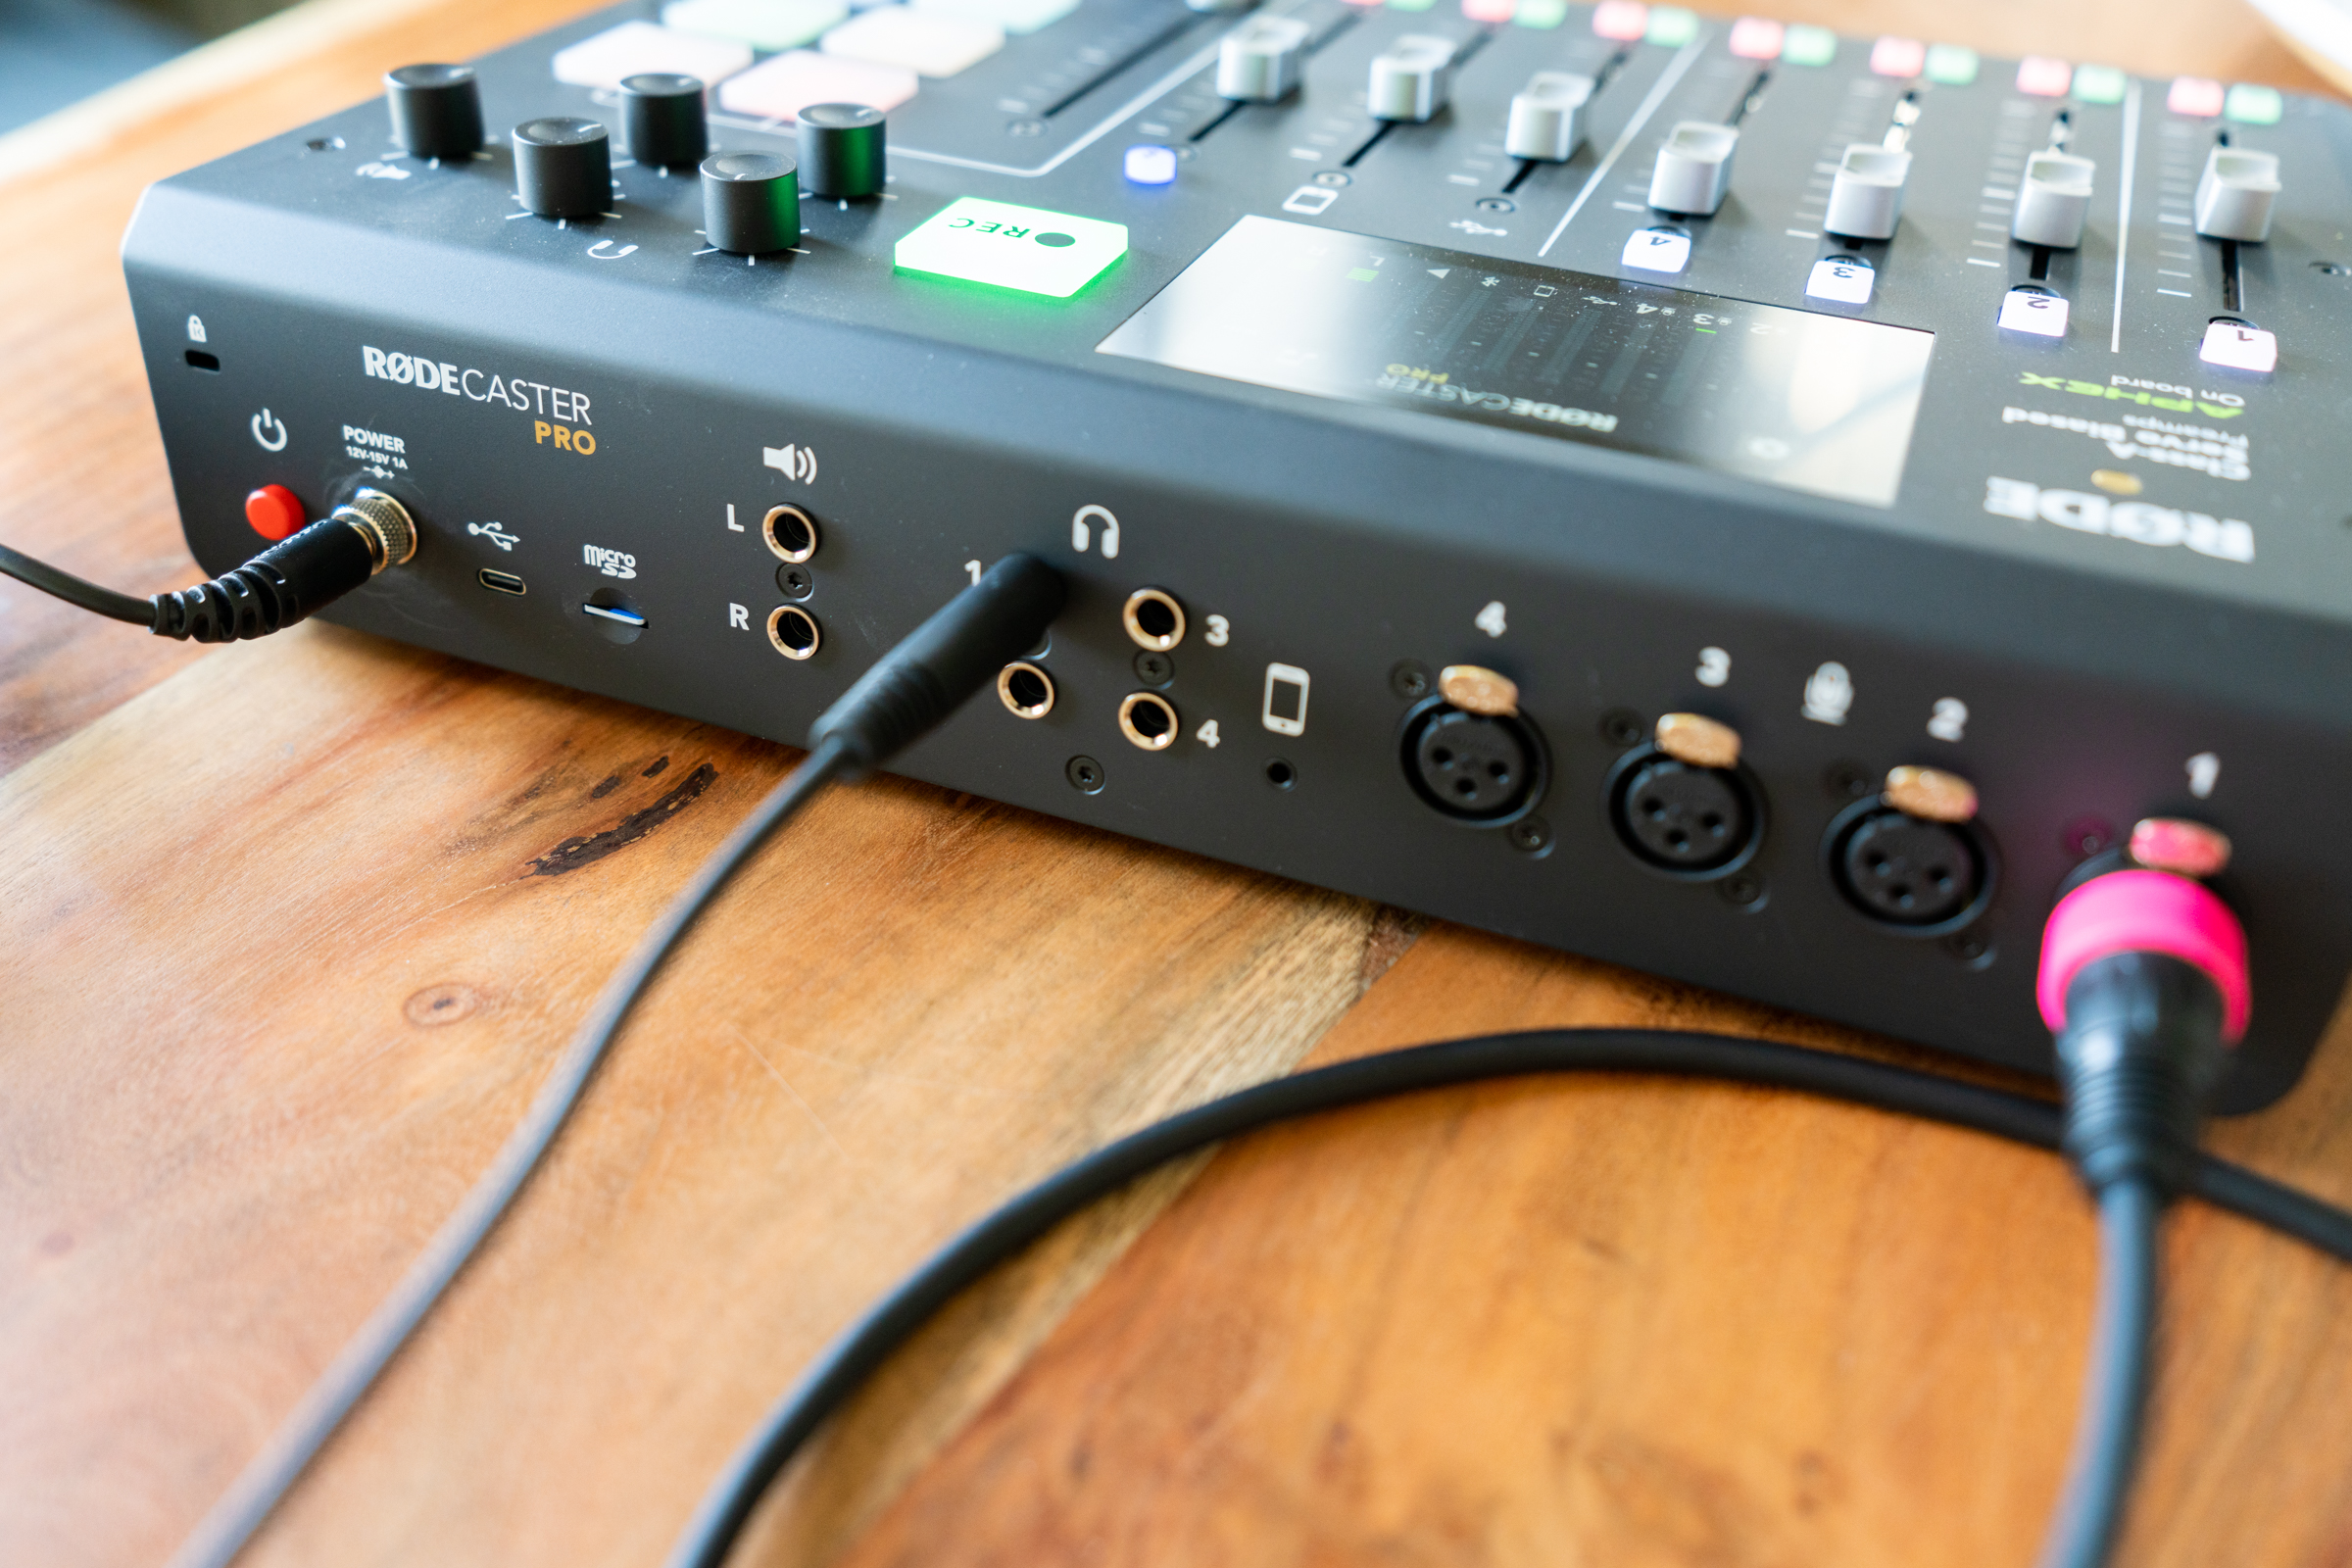
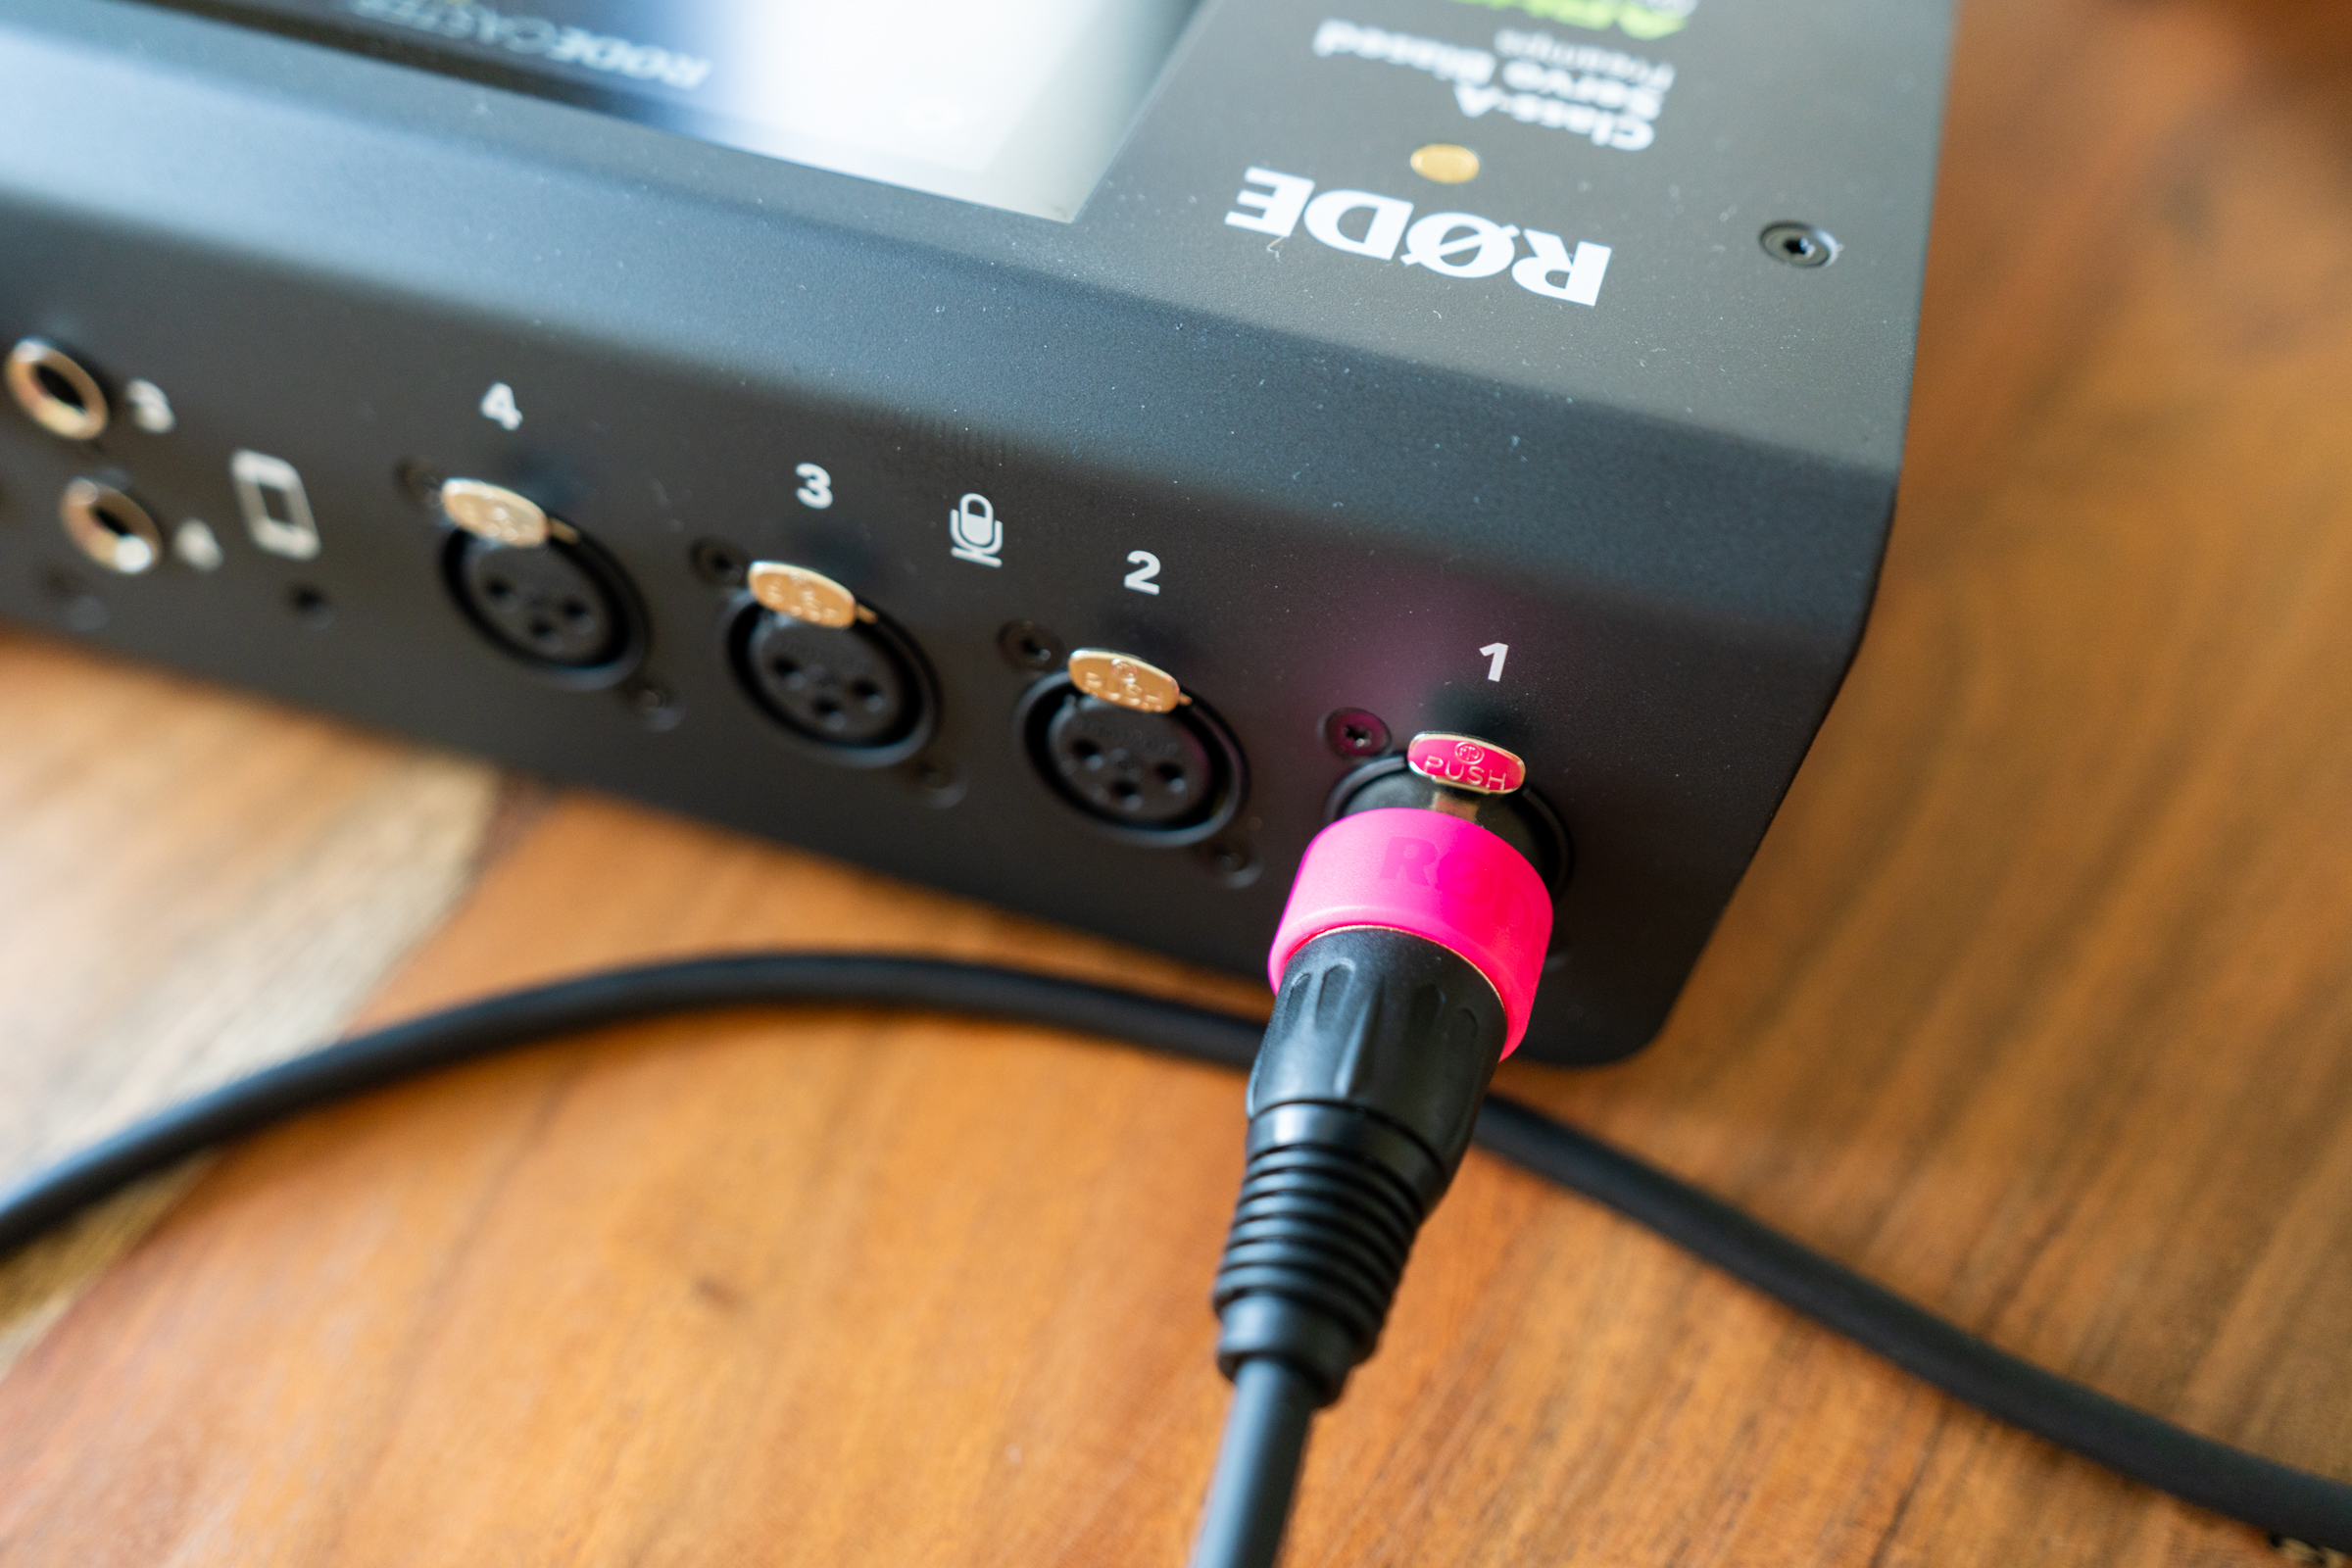
RODECaster Pro includes four XLR inputs, each of which can provide (individually selectable) phantom power for condenser mics, along with four 1/4″ headphone outputs for corresponding monitoring. That’s great because it means if you have guests used to recording podcasts and high-quality audio, they can listen to their own input, or you can opt to just have one producer keeping track of everything. There’s also a left and right 1/4″ audio out for a studio monitor speaker or other output, as well as a USB-C connector for plugging into a computer, and a 3.5mm in for connecting a smartphone or other external audio source. Smartphones can also be connected via Bluetooth, which is very handy for including a call-in guest via wireless.

Image Credits: Darrell Etherington

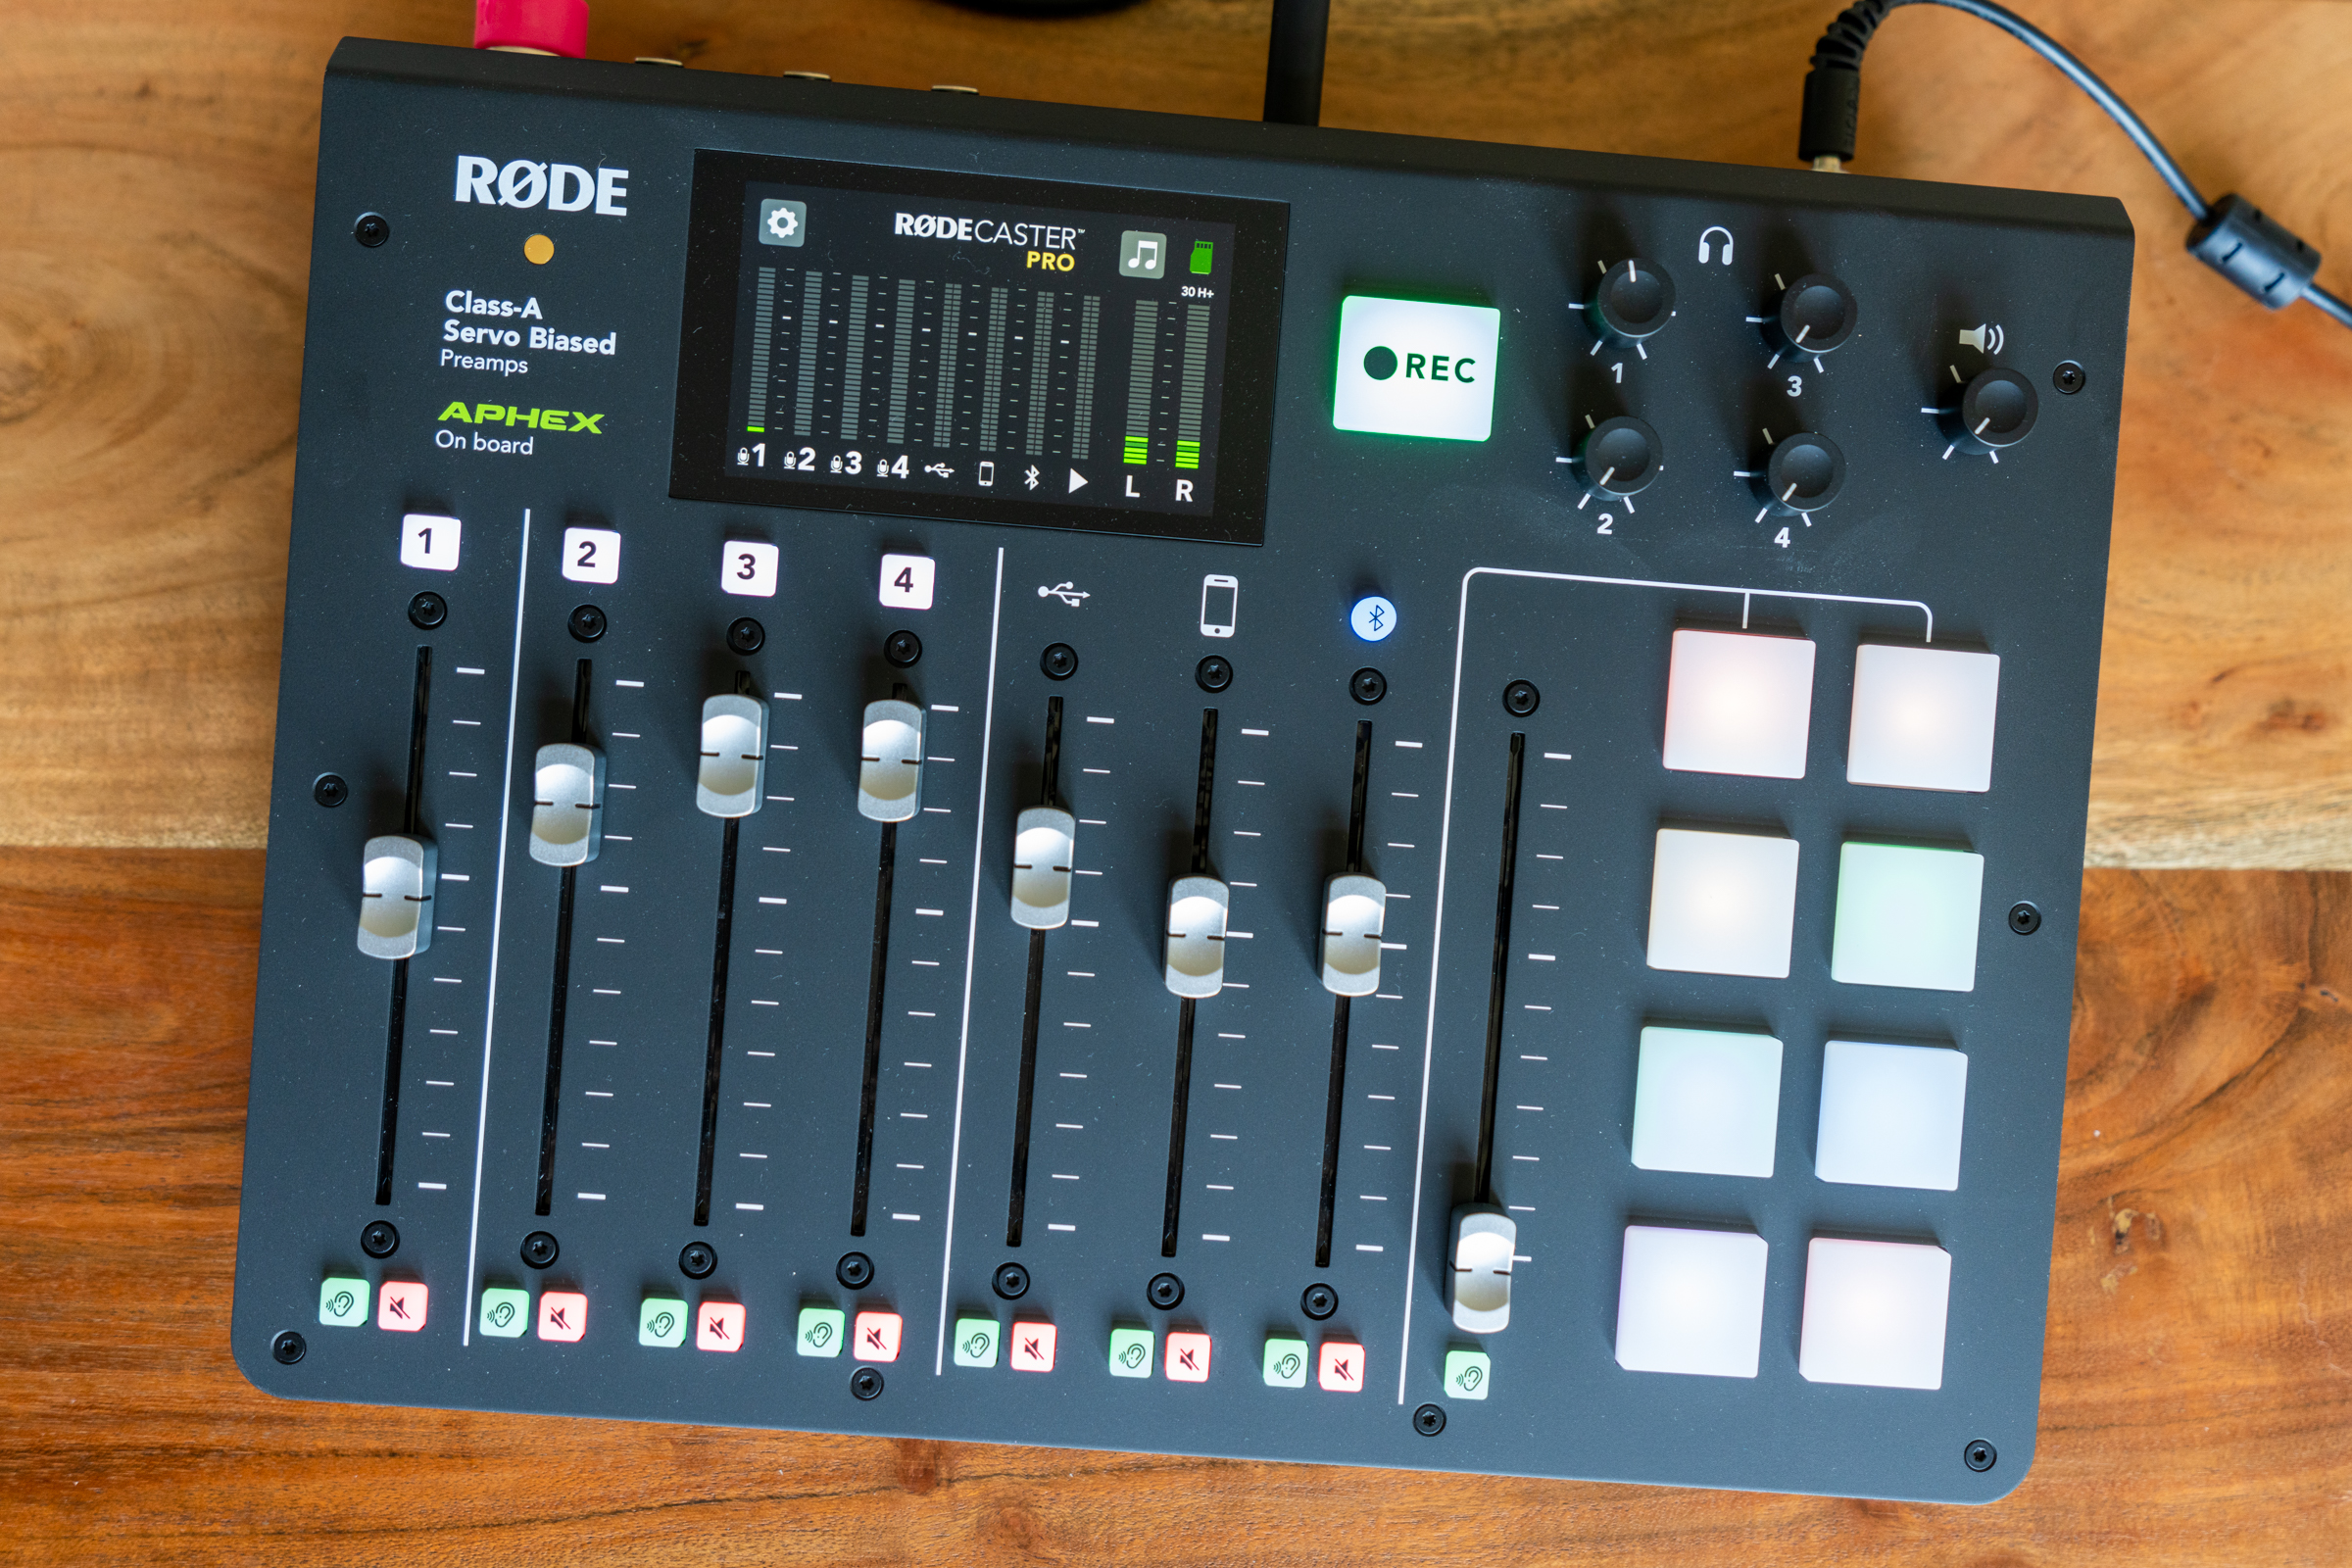
The main surface of the RODECaster Pro includes volume sliders for each available input and pre-set sound effects; volume knobs for each headphone and speaker output; buttons to activate and deactivate inputs; large buttons for playing back pre-set audio files and a large record button. There’s also a touchscreen which gives you access to menus and settings, and which also acts as a visual levels editor while recording.

RODECaster Pro is designed so that you can use it completely independently of any computer or smartphone – it has a microSD slot for recording, and you can then upload those files via either directly connecting the deck through USB, or plugging the card in to a microSD card reader and transferring your files. You can also use multitrack-to-USB or stereo USB output modes on the RODECaster Pro to effectively turn the studio hardware into a USB audio interface for your Mac or PC, letting you record with whatever digital audio production software you’d like, including streaming software.

Design

The RODECaster Pro’s design is a perfect blend of studio-quality hardware controls and simplicity, making the device accessible to amateurs and pros alike. I was up and running with the deck out of the box in just a few minutes, and without making any adjustments at all to the sound profile or settings, I had great-sounding recordings using the RODE PodMic, a $99 microphone that is optimized by RODE to work with the RODECaster Pro out of the box.

Image Credits: Darrell Etherington

All the controls are easy and intuitive to manage, and you shouldn’t need to read any instruction manuals or guides to get started. The eight button sound effects grid is likely the most complicated part of the entire physical interface, but even the default sounds that RODE includes can be useful, and you can easily set your own via the RODECaster companion app for Mac and PC, and in the box you’ll find guides that you can use to overlay the buttons and label them to keep track of which is which.

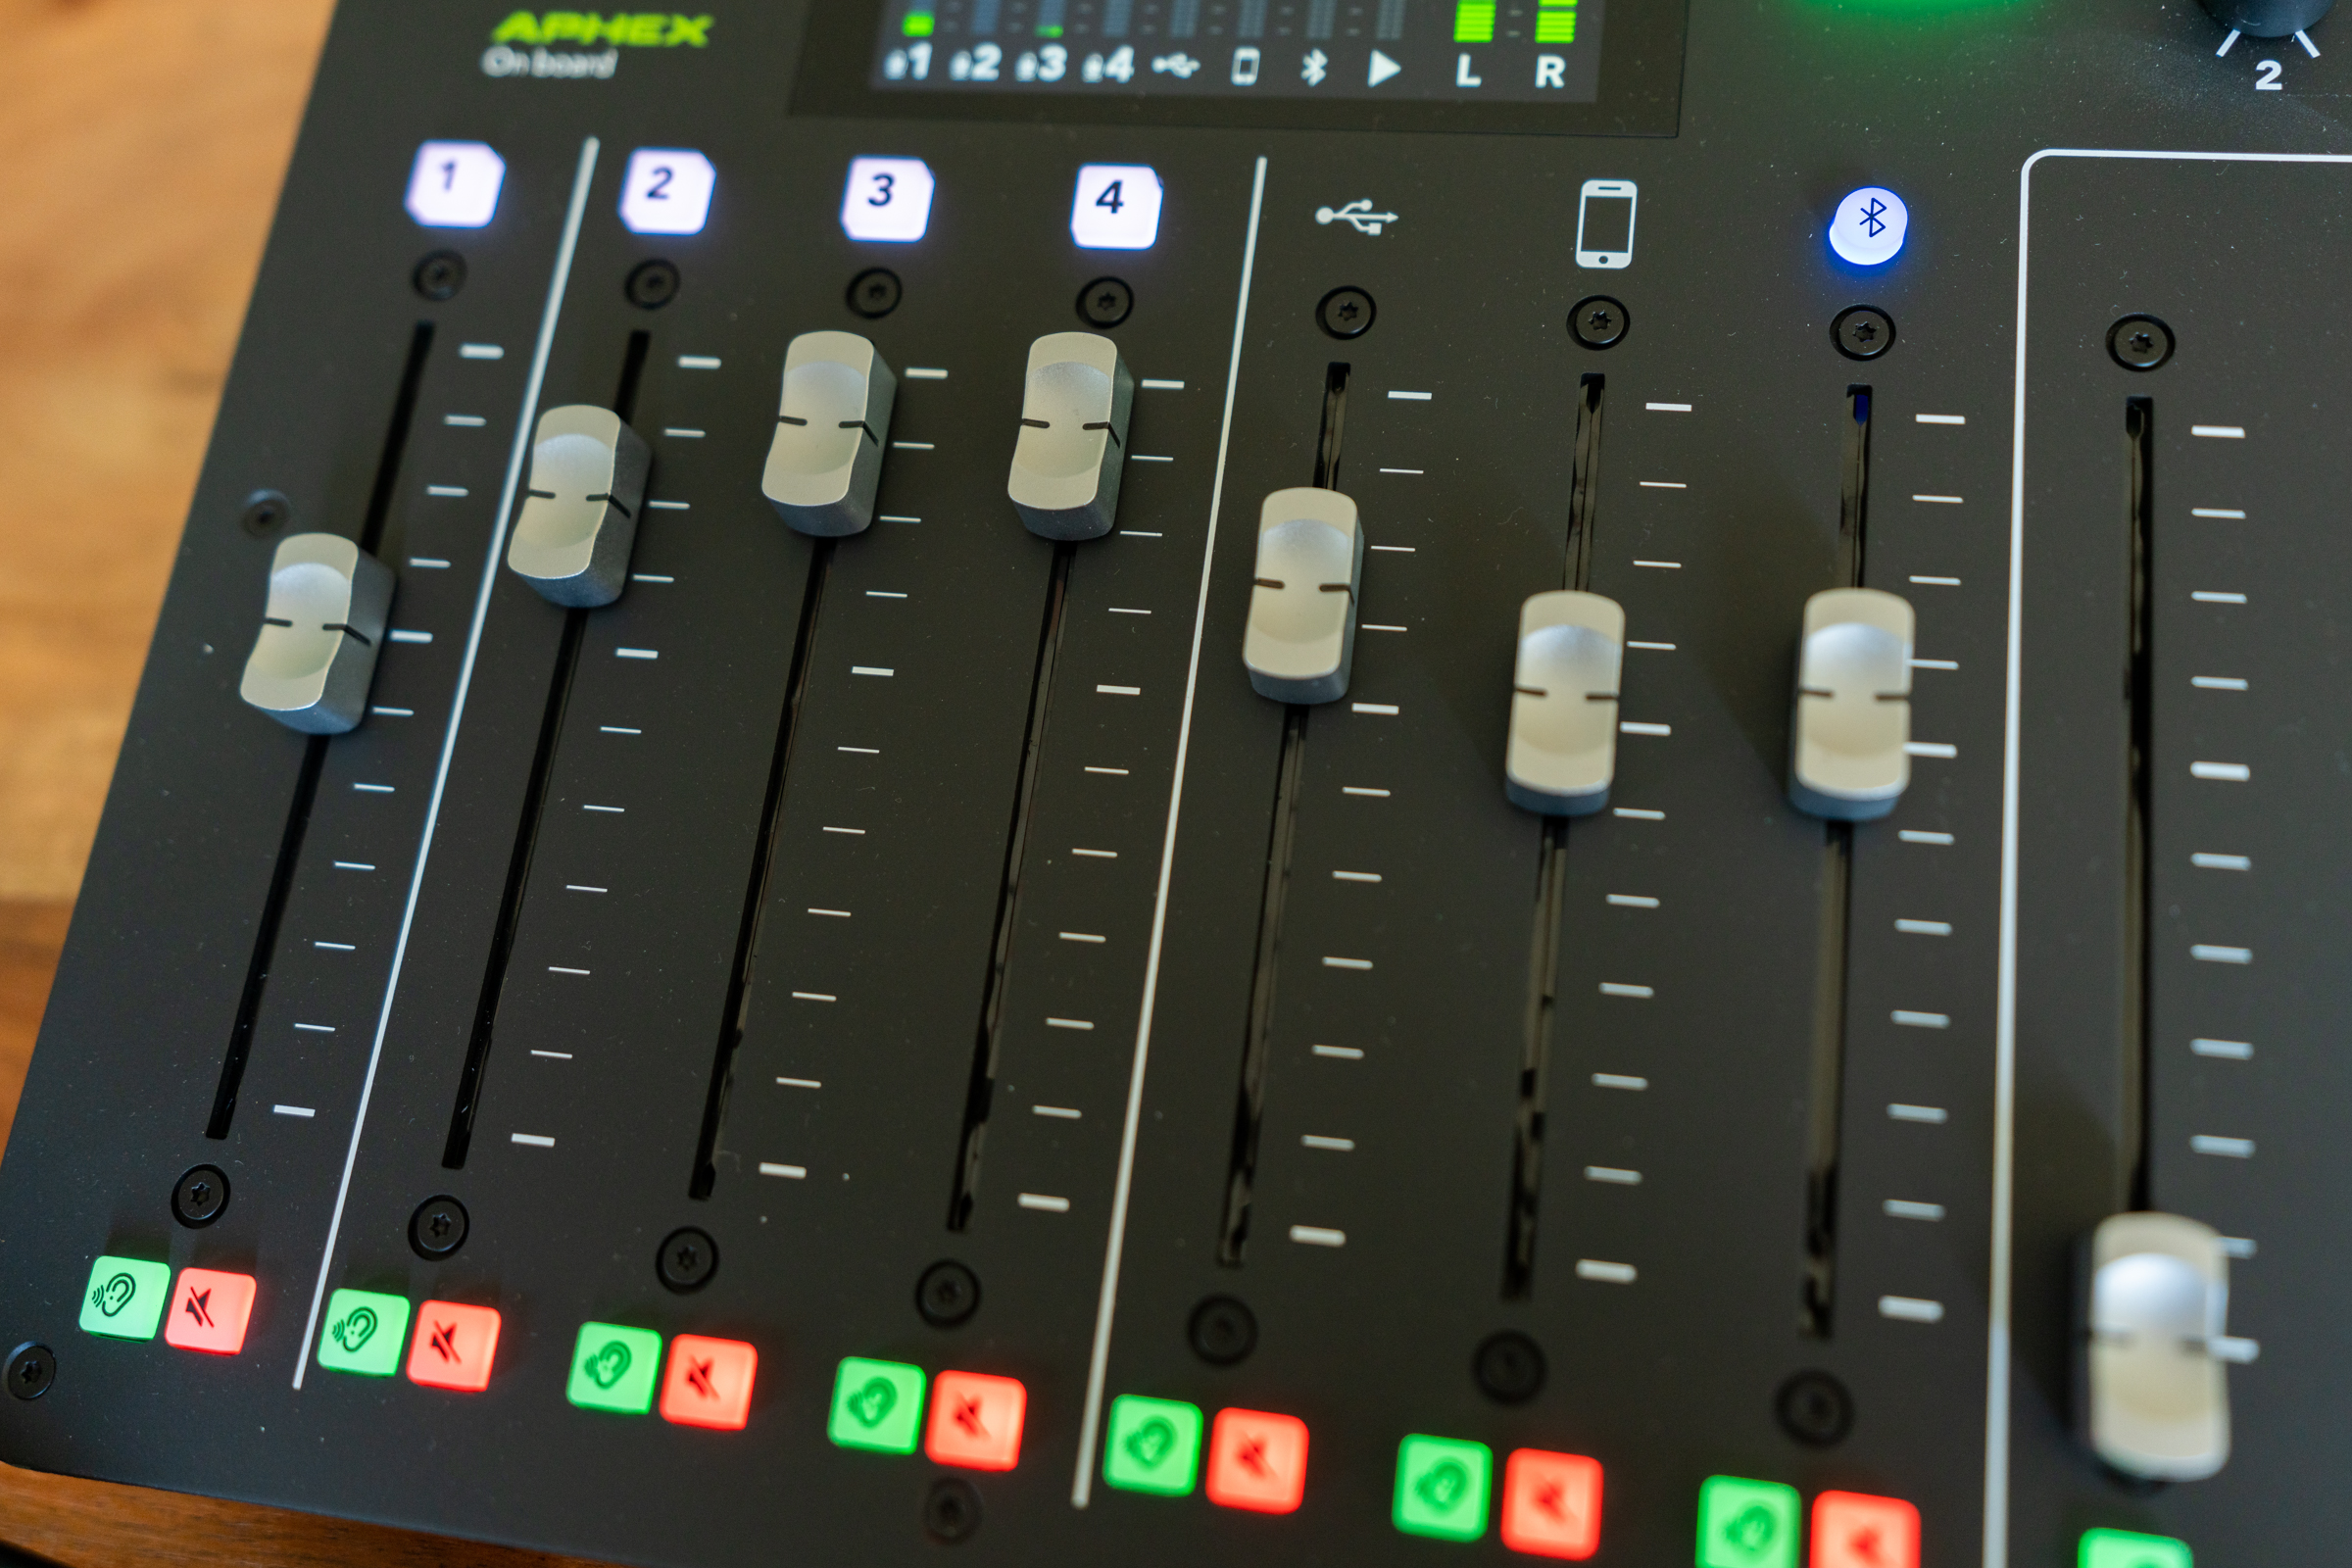
The sliders are smooth and great to use, making it easy to do even, manual fade-ins and fade-outs for intro and outro or pre-recorded soundbites. Backlit keys for active/inactive inputs, mute status and the large record button mean you can tell with a quick glance what is and isn’t currently active on the track.

RODE has smartly included a locking power adapter in the box, so that you won’t find the cord accidentally yanked out in the middle of a recording. Each of the XLR inputs also includes a quick release latch for secure connections. And while the RODECaster Pro definitely takes up a lot of space with roughly the footprint of a 13-inch MacBook Pro, it’s light enough to be perfectly portable in a backpack for on-location recordings.

Image Credits: Darrell Etherington

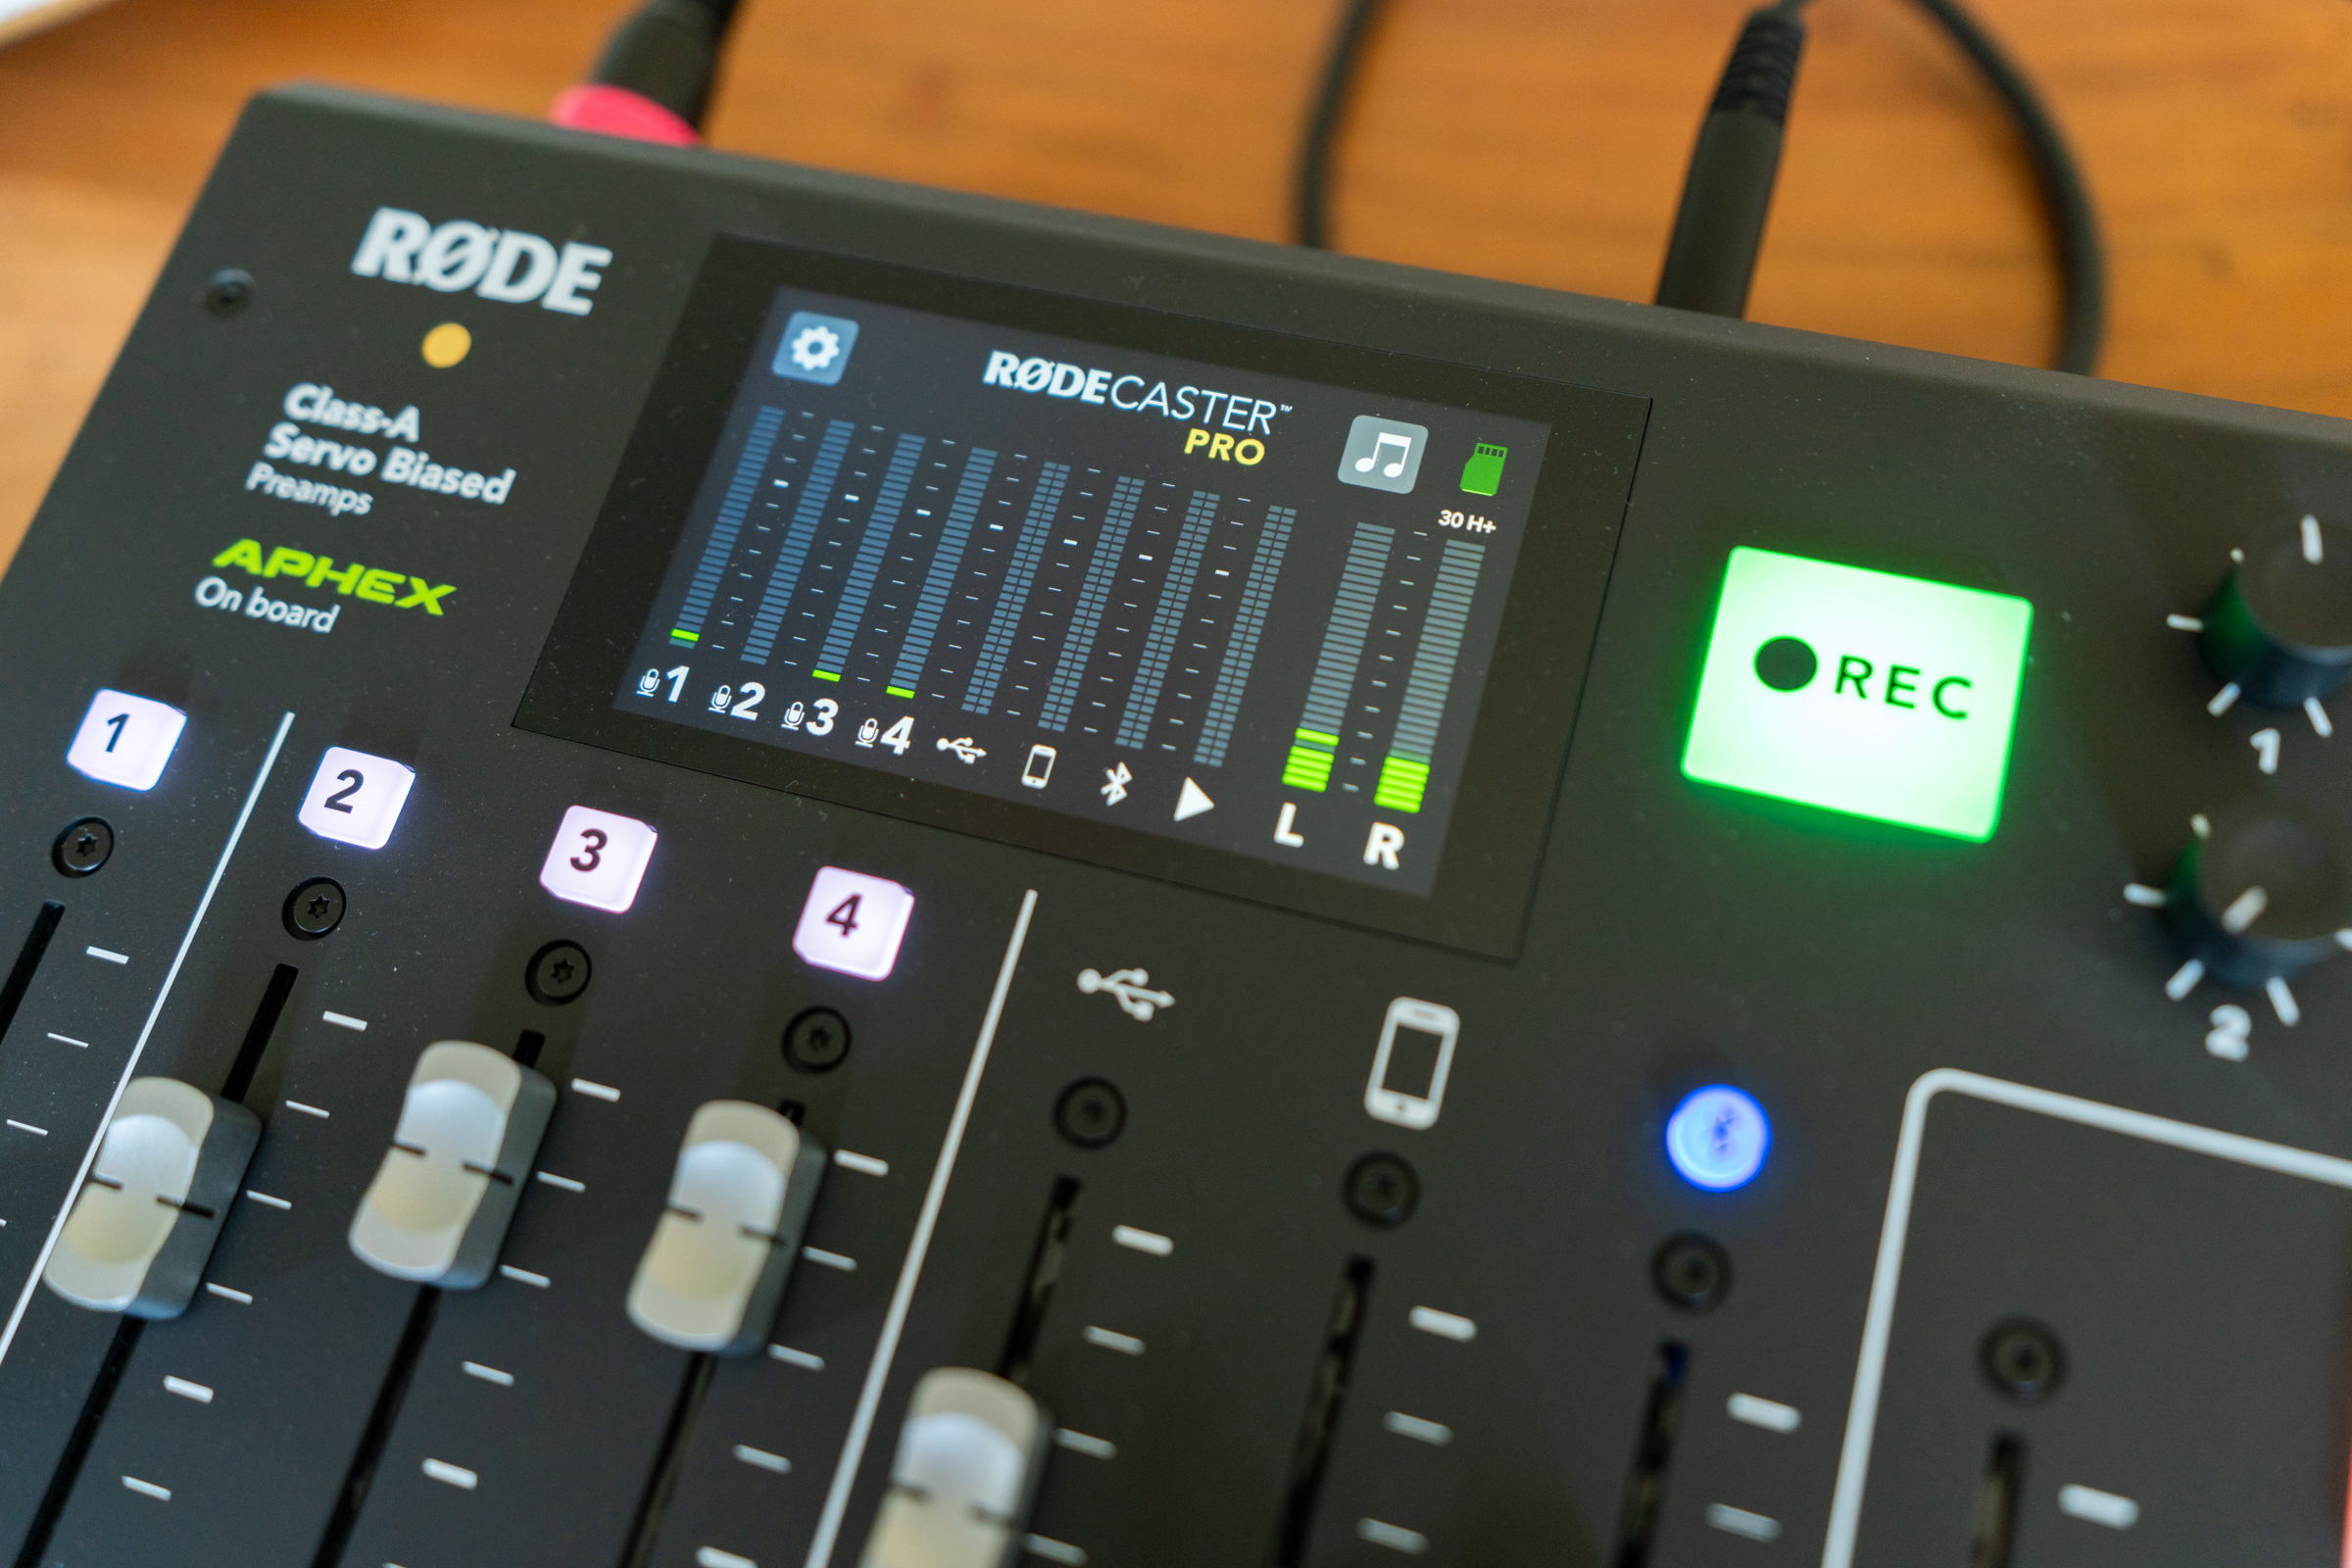
The touchscreen display is another design highlight, since it’s high-resolution, with a matte cover that makes it viewable in a wide range of light, and very responsive touch input, It’s a great way to extend the functionality of the deck through software, while still ensuring nothing feels fiddly or hard to navigate, which can be the case with hardware jog controllers like you’d find on a Zoom recorder, for instance.

Features

Balancing simplicity and power is the real reason RODECaster Pro works so well. If you’re just starting out, you can basically just begin using it out of the box without changing anything at all about how it’s set up to work. That’s especially true if you’re using any of RODE’s microphones, each of which has built-in profiles included for optimizing sound settings instantly.

I mentioned above that the RODE PodMic is optimized for use with the RODECaster Pro in this way, and the results are fantastic. If the price tag on the RODECaster Pro is a deterrent, it’s worth considering that the PodMic is a fantastically affordable dynamic podcasting mic, which produces sound way above its class when paired with the deck. so the overall cost of a RODE podcasting setup using both of these would actually be relatively reasonable vs. other solutions.

Image Credits: Darrell Etherington

If you’re ready to dive in and customize sound, you can toggle features like built-in compressor, de-esser and other audio effects. You can also manually adjust each of these effects since the release of Firmware 2.1 earlier this month – letting you adjust the processing of each included sound effect through the RODECaster Pro companion app for a totally custom, unique finally sound.

The ability to pre-load and call up sound effects and other audio tracks on demand on the RODECaster Pro is another killer feature. It’s true that you could achieve a lot of this in editing post-recording, but having it all to-hand for use in live recording scenarios just feels better, and it also enables genuine interactions with your guests that wouldn’t be possible otherwise. That 2.1 firmware update also brought the ability to loop clips indefinitely, which could be great if you want to place a subtle backing track throughout your recording.

One final feature I’ll highlight because it’s fantastic especially in a world where it might be hard to consistently get guests in-studio is the smartphone connectivity. You can either plug in via cable, or connect via low-latency Bluetooth for terrific call-in interactivity, using whatever software you want on your smartphone.

Accessories

RODE has done a great job building out an ecosystem of accessories to further extend the capabilities of the RODECaster Pro, and enhance the overall user experience. Among its recent releases, there’s the Rode PodMic, mentioned above, as well as colored cable clips that correspond to each input backlight color for easily keeping track of which hardware is which, 1/4″ to 3.5mm stereo jack adapters for using standard headphones as monitors, a TRRS-to-TRRS 3.5mm audio aux cable for smartphone connections, and a USB power cable to replace the adapter for easier plug-in power on the go.

Image Credits: Darrell Etherington

The small plastic cuffs for your XLR cables are simple but smart ways of keeping track of gear, especially when everyone’s using the same mic (as they likely should be for sound consistency) – and it helps that they enhance the look of your overall setup, too. And the USB power cable in particular is a great addition to any RODECaster Pro kit that you’re intending to use outside of your own recording studio/home, since you can use it with any USB charger you have to hand – so long as it can provide 5V/2.5A output.

The real must-have accessory for the RODECaster Pro, however, is the RODE PodMic. It’s a no-fuss, well-built and durable microphone that transports well and that can work flexibly with a wide range of mounting options, and in a wide variety of settings including open air and in-studio. Yes, you can get better sound with more expensive mics, but with the PodMic, you can afford a set of four to complement the RODECaster Pro for the same price you’d pay for one higher-end microphone, and most people won’t notice the audio quality difference for their podcasting needs.

Image Credits: Darrell Etherington

Bottom line

The RODECaster Pro is a fantastic way to upgrade your at-home podcasting game – and a perfect way to take the show on the road once you’re able to do so. Its high-quality hardware controls, combined with smart, sophisticated software that has improved with consistent RODE firmware updates to address user feedback over time, are a winning combo for amateurs, pros, and anyone along the spectrum in between.


Read Full Article

The beauty and complexity of finding common ground | Matt Trombley

The beauty and complexity of finding common ground | Matt Trombley

How can we disagree with one another, respectfully and productively? In this thoughtful talk, team builder Matt Trombley reflects on "agonism" -- the tendency to take a rigid stance on issues -- and shares why finding aspects of agreement can be the first step in resolving conflict. "When you can find even the smallest bit of common ground with somebody, it allows you to understand the beautiful wonder and complexity and majesty of the other person," he says.

Click the above link to download the TED talk.

Amazon launches ‘Smart Stores’ in India to win mom and pop


For Amazon, it’s never too late to try something in India. The e-commerce giant is exploring ways to further spread its tentacles in the largely offline, technology-free neighborhood stores in one of its key overseas markets.

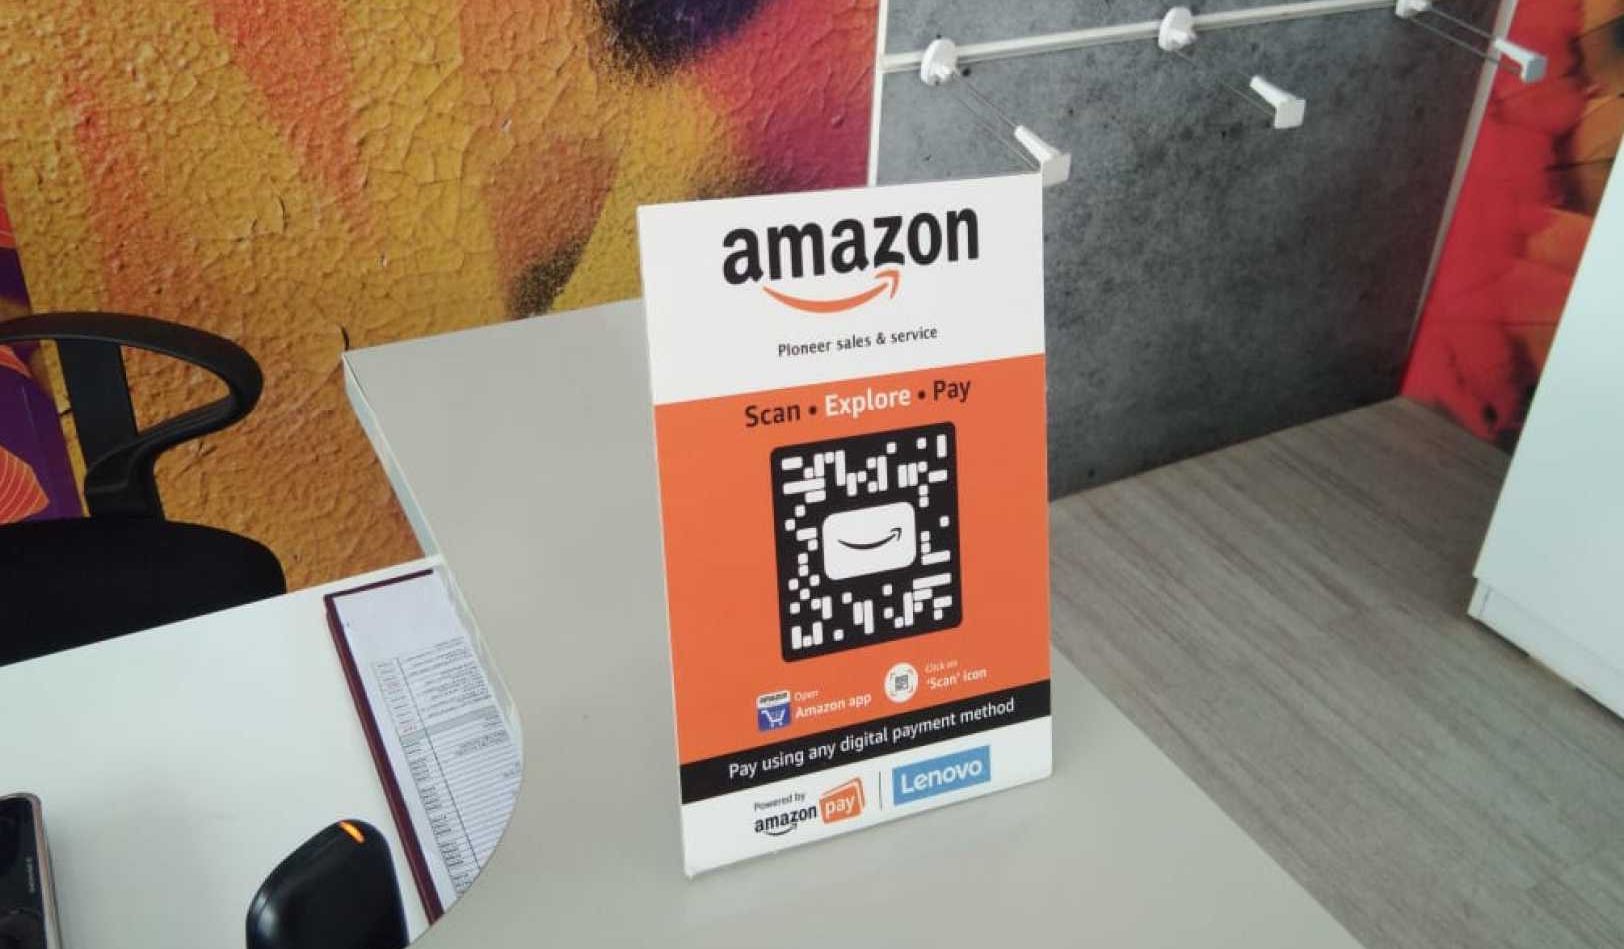
The American firm’s latest attempt is called “Smart Stores.” For this India-specific program, Amazon is providing physical stores with software to maintain a digital log of the inventory they have in the shop, and supplying them with a QR code.

When consumers walk to the store and scan this QR code with the Amazon app, they see everything the shop has to offer, as well as any discounts and past reviews from customers. They can select the items and pay for it using Amazon Pay. Amazon Pay in India supports a range of payments services including the popular UPI, and debit and credit cards.

Amazon told TechCrunch that it piloted this project two months ago and is formally launching it now after seeing the early feedback. More than 10,000 shops, ranging from mom and pop stores to big retail chains including Big Bazaar, MedPlus and More Supermarkets have deployed the company’s system, it said.

The company said these “digital storefronts” are a win-win for both consumers and shop owners. Consumers do not need to stay inside the store and worry about handling plastic cards or cash — that is, to maintain social distance  — and they will also get rewards for using Amazon Pay.

Amazon’s QR code at display at a store. Photo: Amazon

Customers also get the ability to use Amazon’s Pay Later feature that enables them to pay for their purchases in installments. All of this means that merchants, most of whom shut stores until recent weeks to comply with New Delhi’s lockdown order in late March, are seeing increased footfalls and improving their sales. Amazon said it is not taking any cut from merchants or customers.

The company has been aggressively engaging with physical stores in India in recent quarters, using their vast presence in the nation to expand its delivery network and warehouses and even just relying on their inventory to drive sales.

The company’s push in the physical retails, which accounts for the vast majority of sales in India, comes as Facebook, Flipkart, Google, and Reliance Jio Platforms, which recently raised $15.2 billion, also race to capture this market. On Thursday, Google said it plans to offer loans to merchants in India by the end of this year.

These mom-and-pop stores offer all kinds of items, are family-run and pay low wages and little to no rent. Since they are ubiquitous — there are more than 30 million neighborhood stores in India, according to industry estimates — no retail giant can offer a faster delivery. And on top of that, their economics are often better than most of their digital counterparts.

“Amazon Pay is already accepted at millions of local shops, we are trying to make customers’ buying experience at local shops even more convenient and safe through Smart Stores. Further, through EMIs, bank offers and rewards, we seek to make these purchases more affordable and rewarding for customers, and help increase sales for merchants.” said Mahendra Nerurkar, chief executive of Amazon Pay, in a statement.

Amazon’s tardy but increasingly growing interest in the Indian physical retails market is not surprising. The company has often taken longer than most firms in India to study the market and then adds its own spin to tackle those challenges. Another recent case in point: Its foray into food delivery market in India.

Despite ubiquitous interest in the physical retails market, one thing that that no company is talking about yet is just how they plan to commercially incentivize these merchants.

The technology solutions built by these companies is unarguably driving sales for them, but a significant number of these small businesses take cash and under report their revenues to pay less tax. That incentive is multifold of any other incentive for many of them. 


Read Full Article

The Most Commonly Asked Snapchat Questions, Answered


snapchat-faq

Snapchat is a social media platform that is designed to send pictures and videos that will automatically delete after a certain period of time. The temporary nature of these “snaps” has been the big selling point for the app.

While Snapchat has some really cool features beyond that, the ease of use when it comes to finding these features is kind of tricky. A lot of the time, Snapchat leaves people scratching their heads, and asking “how do I use it?”

Today, we’re going to make things easier by rounding up some simple answers to Snapchat’s most commonly asked questions.

How Do I Make a Voice or Video Call on Snapchat?

We have a separate article explaining how to make video and voice calls on Snapchat.

In a nutshell, as long as you and your friend(s) have access to data or Wi-Fi, you’ll be able to chat through voice or video just like you would with any other conferencing interface. Just press the “phone” or “video” buttons in the top right-hand corner of your screen, and you’re ready to go.

To learn more about voice and video calls, you can also check out Snapchat’s help page on the subject.

Your Questions About Snapchat Stories, Answered

While we can’t answer every question you may have about Snapchat Stories here, we’ll definitely tackle the most confusing.

1. Why Does Snapchat Keep Switching Between Friends When I’m Watching Stories?

One Snapchat update feature that caused users the most confusion when it first came out was the “auto-advance” option that kicked in while watching stories.

Although this feature has seen many subsequent improvements, it’s worthwhile to explain the basics:

  • When you’re watching a story, Snapchat moves you to the next story on your list once you’re finished watching (instead of returning to the homepage).
  • If you want to skip a story, just swipe across your screen with your thumb.
  • If you want to stop the autoplay, just pull down on your screen with your thumb. You’ll be returned to the main menu.

2. What Are Campus Stories on Snapchat?

Campus Stories are a type of Snapchat Story. They have been curated for select college campuses, and you will only be able to see them if:

  • You turn on your location services for the app.
  • You are currently on a college campus.
  • Or, you have been on a college campus within the last 24 hours.

If you’re using this feature, remember to protect your privacy, just as you would for any other public story. Snapchat has gotten some bad press for its “security risks.” Unfortunately, a few of those concerns are well-founded, as reported by Forbes in 2019.

When using Campus Stories:

  • Avoid using full names.
  • Avoid showing people where you live.
  • Don’t display anything you wouldn’t want to be used in a screenshot.
  • Understand that there are privacy risks involved.

It’s better to be safe than sorry.

3. How Do I Reply to a Snapchat Story?

To reply to a Snapchat story:

  1. Swipe up on a snap while viewing someone’s Snapchat story.
  2. Type your message in response.
  3. After you’ve finished typing, your message will be sent to that person.

What Do Emojis Mean on Snapchat?

Fortunately, we already have an article that explains what Snapchat emojis mean. We recommend that you check it out now.

However, you might have also noticed some Friend Emojis that sometimes appear next to other people’s usernames on Snapchat. If you have questions about them, we’re here to help.

1. What Does the Hourglass Emoji Mean on Snapchat?

The hourglass emoji means that your Snap Streak with your friend is about to expire. So you had better get snapping, and fast!

2. What Does the Cake Emoji Mean on Snapchat?

The cake emoji means that it’s your friend’s birthday. Snapchat is giving you a friendly reminder to wish them well on their special day.

3. How Do I Change the Emojis Next to My Friend’s Name?

If you don’t like Snapchat’s default emojis that it uses for your friends, you can actually change them to different symbols.

To change your friend’s emojis:

  1. Go to your profile.
  2. On iOS, click on the gear icon, then select Manage > Friend Emojis. On Android, scroll down to Customize Emojis.
  3. Switch out the default emojis for emojis of your choice.

To add emojis to your friend’s nickname directly:

  1. Select a name on your friend list to bring up your friend’s user profile.
  2. Once you’re on their user profile, click on the three dots in the top right-hand corner of your app screen, to expand the menu.
  3. Choose Edit Name from the menu.
  4. From there, you can make any modifications to your friends’ usernames that you want to add.
  5. Once complete, choose Save.

How Do I Make My Own Snapchat Geofilter?

Snapchat geofilters are filters that can be applied to your images when you are located within a particular geographic radius.

Snapchat has opened up its geofilter process so that you can create one for any area or event that you’d like. You just have to follow Snapchat’s community filter guidelines. You also need to leave enough time for them to approve your image.

How Can I Do a Face Swap on Snapchat?

How Do I Use Snapchat Face Swap

When it first came out, the Face Swap option on Snapchat took the world by storm. This feature is no longer new, but it’s still fun to try out.

If you still want to know how to access this lens:

  1. Turn on your front-facing camera, making sure that your face is visible and centered on the screen.
  2. In the app, tap on the smiley face icon next to your camera button. This will activate the lens carousel.
  3. Scroll through the carousel.
  4. If you can’t find the Face Swap option in the carousel, make sure you’re on the Browse option on the bottom of the screen, then type in “face swap” into the search bar at the top. Choose the Face Swap filter by Snapchat.

How Do I Put a Selfie in My Snapchat Icon?

Snapchat has heavily transitioned into the use of “bitmojis” for selfies. These bitmojis are customizable avatars of your real self.

If you want to put a bitmoji “selfie” in your Snapchat icon:

  1. First, make sure you have created a bitmoji. You can design one in the app itself.
  2. Once you have a bitmoji, go to your profile page, and scroll down to the Bitmoji section.
  3. Choose Select Selfie.
  4. Snapchat will allow you to change your profile picture to a selfie of this digital avatar. The avatar will be visible to anyone who knows your Snapchat username.

How Do I Enable Snapchat’s Dark Mode?

Honestly? You can’t yet!

For those unfamiliar with the term: Dark Mode is a screen setting used in many modern apps. It reduces eye strain while looking at your phone late at night, by switching out a white background to black. You can watch the video above for more information.

While there are hacks out there that can help you enable Dark Mode in Snapchat, there is no official update from Snapchat as of yet. As such, we recommend bookmarking our article on the new Snapchat features you need to know about. That way you can keep an eye out for recently introduced changes.

How Do I Make a Slow Motion Video in Snapchat?

Snapchat Slow Motion Video

While Snapchat is no longer the “king” of slow-motion video effects, it does have filters that can be used to alter the speed of your videos.

To find a slow-motion effect:

  1. Open the Snapchat app.
  2. Turn on the front-facing camera.
  3. In the app, tap on the smiley face icon next to your camera button. This will activate the lens carousel.
  4. Scroll through the carousel to find the filter effect that you need.
  5. If you can’t find the slow-motion option, make sure you’re on Browse in the camera screen. Type “slow” or “slow-motion” into the search bar.
  6. If there are any additional lenses that you can use with this effect, they will show up there.

Do You Have Any More Snapchat Questions?

Despite its constant updates and a myriad of sometimes-confusing choices, Snapchat never gets boring. The app has also helped to create a whole style of social media communication that is now popular with its competitors, too. However, this does mean users might have questions that need answering, on occasion.

We hope this article has answered all of your Snapchat questions, but if not, feel free to ask anything else in the comments below. Even if we cannot answer it directly, other Snapchat users may be able to help. And while you’re waiting for a response, check out our list of the best Snapchat filters and essential Snapchat lenses.

Read the full article: The Most Commonly Asked Snapchat Questions, Answered


Read Full Article

20 Quick Web Games to Play Online When You’re Bored


web-games-short

If you’re bored or have a bit of time to kill, playing a web game is the perfect way to keep you entertained. To help ease the boredom, we’ve put together a list of the best quick web games to play online when you’re sat twiddling your thumbs.

These addictive games are small and require no commitment or registration. While they’re so fun you won’t want to stop, they’re lightweight enough that you can move on from them at a moment’s notice if necessary.

Here are the best quick web games to play online when you’re bored.

1. QWOP

QWOP

QWOP is a legendary web game. The goal is simple: successfully run 100 meters. Except, doing that is anything but simple, as you have to manually control the thighs and calves of the runner. Don’t be surprised if it takes you a while to get off the start line, but at least you’ll have a laugh doing it.

2. Entanglement

Entanglement

Entanglement is the perfect game to play when you’re stressed, even if you don’t like puzzle games. The goal is to create the longest path through tiles you place down. These tiles are randomly generated, but offer enough options that it isn’t frustrating. Plus there’s some lovely soothing background music.

3. Gridland

Gridland

Gridland is a match-three game with a twist. There are two phases: day (where you match and gather resources to build your village) and night (where you match to fight off invading monsters). Time only progresses when you make a move, so it encourages smart planning and thoughtfulness. It’s extremely clever, but more importantly, a ton of fun.

For more like this, check out these cool puzzle games you can play in your browser.

4. Cookie Clicker

Cookie Clicker

The concept of Cookie Clicker is so banal, you can only truly understand it once you start playing. The ultimate aim is to produce as many cookies as possible. You do that by clicking a cookie. That’s it. You can then trade the cookies in at the store to buy power-ups to automate tasks, like a reinforced cursor or a grandma.

5. Threes

Threes

Threes is a popular mobile game that has been turned into a web game. You slide numbered tiles on a four-by-four grid to combine them into multiples of three. The aim is to earn the highest score by stacking and achieving rare tiles. Though it seems simple in concept, it’s delightfully difficult to keep games going more than a few minutes until no moves remain.

6. The Wiki Game

The Wiki Game

Wikipedia is a treasure trove of interesting information. And The Wiki Game makes use of the free online encyclopedia by challenging you to travel from one Wikipedia page to another by using the internal links on the page. It also times you based on how easy the challenge is.

For example, getting from the start page of The Pacific War to the end page of Sea is relatively easy. On the other hand, moving from Electric Chair to HTML is a bit trickier.

7. Line Rider

Line Rider

Line Rider is such a popular web game that it got turned into Nintendo DS and Wii titles. You don’t need those consoles though because it can be played directly in the browser. Use your cursor to create lines, which the little figure will then ride along. Get creative as you can by drawing loops, ramps, and insane jumps.

8. The Floor Is Lava!

The Floor is Lava

The Floor Is Lava! is exactly what it sounds like: there’s lethal lava below that you avoid by launching yourself towards your mouse cursor. But there are other players too, and it’s a bit like bumper cars; if you hit them, you bounce back. It’s tough to stay alive, but lots of fun! Each game lasts less than a minute, but you’ll want to keep playing again and again.

9. Quick, Draw!

Quick, Draw!

Quick, Draw! is not only a game, but also a way of training a neural network. You are presented with a word and then get a short amount of time to doodle it. As you draw, the system will try to guess what it is based on machine learning. Your drawing will then be used to help train the machine in the future.

10. Frogger

Frogger

Frogger is a classic 1980s arcade game. It’s had loads of sequels through the years, but the original still holds a lot of charm. This web game is a recreation of the original. If you’ve never played Frogger, you need to correct that. The object is to hop your frog to the other side, avoiding traffic on the road and a hazardous river.

11. Free Flow Colors

Free Flow Colors

Free Flow Colors has hundreds of levels to keep you entertained for many visits. In the game, you must pair colors together by drawing lines between them. You also need to have the entire board covered. The only problem is, if any of the lines cross then the move is invalid. Simple yet addictive.

12. Slime Volleyball

Slime Volleyball

Slime Volleyball is an old online game, but it stands the test of time. You can either play against the computer or a friend. You control a little blob—or slime—as you hit a ball back and forth across a net. Should the ball touch the ground on your side, it’s a point to the opponent. The Slime series expanded into other sports, but volleyball remains the best.

13. Cursors

Cursors

Cursors turns your mouse cursor into a character, and your aim is to escape the maze. But you aren’t alone! You share the world with everyone else playing the game, and some of the puzzles require cooperation and coordination.

14. Helicopter

Helicopter

In Helicopter, you use your mouse to control a chopper and dodge incoming obstacles. Click to let the helicopter rise, stop to let it fall. This is an endless game that speeds up and gets frantic. Since it records a score every play, it’ll give you that addicting “just one more turn” feeling as you try to beat yourself.

15. A Dark Room

A Dark Room

A Dark Room is one of the most notable clicker games because it isn’t just a clicker game. It’s infused with role-playing and narrative elements that elevate the experience into something greater. It starts off slow, but stick with it. It’ll be worth it.

16. Mackerelmedia Fish

Mackerelmedia Fish

If you like the weird and wonderful, Mackerelmedia Fish is for you. It’s an interactive experience that guides you through a fictional retro web. The aim of the game? Well, that’s one to discover for yourself. This is a hilarious and wonderfully animated game and the less you know about it before you go in the better.

17. Sinuous

Sinuous

In Sinuous, you are your mouse cursor. Avoid the endless torrent of red dots, touch the green dots for invulnerability, and see how long you can last. The game is highly replayable and excellent for short 5 to 10 minute bursts.

18. slither.io

slither.io

Slither.io is a fun and colorful online game where you control a snake in a neon landscape, sliding into glowing orbs to grow your length. The challenge is that you’re playing against others, some of whom are longer than you. They can envelop you and make themselves longer. Of course, you can do the same thing to smaller snakes. See how big you can get.

19. Books Tower

Books Tower

The objective of Books Tower is to stack as many books as possible without the tower topping over. Each new book glides from left to right and you need to click when you want it to drop. Time those clicks perfectly to align the books, otherwise it’s all going to come tumbling down.

20. The Jigsaw Puzzles

The Jigsaw Puzzles

The Jigsaw Puzzles is home to thousands of free online jigsaw puzzles, from categories like animals to nature, ranging in difficulty from 50 to 150 pieces each. Perhaps not as satisfying as completing a real puzzle, but it’s still an enjoyable way to spend 15 minutes.

Mobile Games to Play When You’re Bored

These are some of the best quick web games to play when you’re bored and want to pass the time. And the chances are you’ll find them so entertaining that you’ll come back to play them time and time again.

However, as fun as web games are, there are even more options on your smartphone. So, for some fun when you’re on the go, check out these addictive mobile games you can play for five minutes at a time.

Read the full article: 20 Quick Web Games to Play Online When You’re Bored


The New Google Photos Is All About Your Memories


Google has released a new version of Google Photos. And it’s all about your memories. The Google Photos redesign helps you relive the treasured moments you have captured on film. With a simpler UI, an expanded search function, and a new interactive map.

Google Taps Into Your Treasured Memories

Google Photos is a fairly simple app. You shoot photos and videos on your smartphone, and they’ll be stored in Google Photos. You can edit them in a few simple ways, but Google Photos is, at its core, all about storing your treasured memories.

In September 2019, Google added Memories to Google Photos. This used the stories format familiar to social media users to put “your memories front and center in Google Photos.” And now, Google is making it the focus of Google Photos.

How to Use the New Google Photos Features

Your memories are the key to the new Google Photos. Which is now focused on helping you save, find, view, and share those memories. This has helped shape everything from the user interface to the newest feature, which is a (much-requested) interactive map view.

First up is the UI, which has been simplified into a three-tab structure. There’s the main Photos tab containing all of your photos and videos, a Search tab allowing you to search for people, places, and things, and a Library tab with Albums, Favorites, etc.

The Memories feature has been expanded. So, as well as reminding you of where you were and what you were doing on this day years ago, Google Photos will now highlight the best photos of you and your friends, trips taken, and even highlights from last week.

Google has also added a new interactive map view to the Search tab. This, which Google claims to be one of its most-requested features, lets you explore your photos via a map. As you pinch and zoom around the globe, you’ll reveal your photos from different locations.

Even iOS Users Should Use Google Photos

Smaller changes to Google Photos include a new logo, which is a simplified form of the original pinwheel design, and the automated creations such as stylized photos and collages moving from the For You tab (which no longer exists) into Memories.

The new Google Photos is rolling out now on Android and iOS. So if you can’t yet see the new UI and features, keep an eye out for an update. And if you’re an iOS user who hasn’t yet made the switch, here are our reasons to use Google Photos over iCloud Photos.

Read the full article: The New Google Photos Is All About Your Memories


Read Full Article

How to Record Your Screen and Stream With OBS Studio


record-stream-obs

If you’re looking to record your screen or stream online, OBS Studio (formerly Open Broadcaster Software) is a great option. This tool makes it simple to capture screencasts, record your gameplay, stream to Twitch, and much more besides.

However, if you’ve never used it before, OBS Studio might seem a little daunting at first. In this guide, we’ll show you how to set up OBS Studio, what you need to start recording and streaming, and tips for getting the best results.

Download OBS Studio

To get started, you’ll want to download OBS Studio for Windows, macOS, or Linux. We’ll use the Windows version for this tutorial, but it’s similar across all platforms.

OBS Studio is truly free, so you don’t have to pay for any features. It’s also open source software, meaning anyone can look at the code and improve it. This is the case with a popular spin-off: Streamlabs OBS.

Download OBS Studio

Step through the standard installer. Once it completes, OBS Studio will offer to walk you through an auto-configuration wizard. You can do this if you like; we’ll review relevant settings below, though.

How to Use OBS Studio: The User Interface

The main OBS Studio interface allows you to set up everything you need to start streaming or recording. At the bottom of the screen, you’ll see several control elements.

OBS Main Window

Scenes

A Scene in OBS Studio allows you to collect and arrange certain Source elements in a specific way. You can have multiple scenes and switch between them at will.

This will make a bit more sense as we move on. For now, you can click the Plus button to create a new scene. Call it Default or something similar (you can change it later).

After you’ve added some elements, you can click on them in the preview to adjust as you wish. Click the Eye icon to hide an element, or the Lock to prevent accidental movement.

OBS Scenes

Sources

Sources are the video and audio inputs that you feed into OBS Studio. Click the Plus button to add a new one, and you’ll see several categories. The most important ones include:

  • Audio Input Capture: Record sound from a microphone or similar. (See the best microphones for podcasting if you need one.)
  • Audio Output Capture: Capture the sound coming out of your computer, so that your recording/stream includes game or desktop audio.
  • Display Capture: Allows you to capture an entire monitor, no matter what’s showing on it.
  • Game Capture: Choose a specific game to record.
  • Image: Display a static image.
  • Video Capture Device: Records footage from a webcam or similar. (We’ve listed the best budget webcams if you don’t have one already.)
  • Window Capture: Record a specific program window. This is like Game Capture, but works for any program.

Once you select an option, you can choose Create new or Add Existing. Since you just started, you’ll need to add a new item that you can reuse later. After you click OK, OBS Studio displays options depending on the source you chose.

As an example, click Audio Input Capture. Let’s say you’re going to use a headset microphone to record audio. Enter a descriptive name for the source (like Headset Mic) and click OK. On the resulting screen, pick your headset mic from the Device dropdown and click OK.

OBS Add Audio Source

Now, you have that input registered with OBS Studio and can easily add it again in the future. You’ll need to repeat this step to add your webcam, screen capture, and similar.

Audio Mixer

Once you’ve added all of your sources, the Audio Mixer tab lets you adjust the volume balance between them. The bars move in real-time to reflect levels. Drag the slider to adjust the mix, or click the speaker icon to mute one. You’ll find more options by clicking the Gear icon by a source.

OBS Audio Mixer Options

You should definitely test these ahead of time, as different sources can have vastly different volume levels. You wouldn’t want to complete a recording only to find out that the game volume overpowers your mic audio.

Scene Transitions

This simple section allows you to choose what happens when you swap between scenes. Choose between Fade and Cut in the dropdown box, or hit Plus to pick another option. You can choose how long the transition lasts using the Duration box.

Controls

OBS Transitions and Controls

Here, the Start Streaming and Start Recording buttons will let you start capturing footage with OBS Studio. You can see the current FPS and CPU usage below.

It also lets you enable Studio Mode for making changes to scenes on the fly, plus access to the many Settings of OBS Studio.

The Best OBS Settings to Use

Before your first recording or stream, you should tweak a few options. Click Settings in the Controls section of the interface to access them.

OBS Studio offers other options than what we explore here, but you shouldn’t need to worry about those until you’re more experienced with recording and streaming.

Video Settings

First, head to the Video tab. Here, check the Base (Canvas) Resolution and Output (Scaled) Resolution) options.

The first should match your screen resolution, while the second lets you choose the resolution of the final video. Leave Output the same as Base for a full-quality recording, or lower it to something like 1280×720 for a lower file size. Leave the Downscale Filter as Lanczos if you’re downscaling.

OBS Video Settings

Lastly, you’ll need to choose the FPS (frames per second) of the recording. For a smooth picture, choose 60. But if you desire a smaller file size or are recording something simple, 30 is suitable.

It’s also a good idea to open the Advanced tab and set Process Priority to High. This will give OBS Studio the most resources so it can create the best recording.

The Best OBS Settings for Recording

Switch to the Output tab to access options related to screen recording—make sure you’re looking in the Recording section, not Streaming.

At the top, you can set the Output Mode to Simple or Advanced. If you want a quick and solid preset, pick Simple and set the following under Recording:

  • Recording Quality to Indistinguishable Quality
  • Recording format to FLV, or MKV if you prefer
  • Encoder to Hardware (AMD) or Hardware (NVENC) if you have a powerful graphics card. Use Software (x264) if not (see below for more details).
  • Recording Path to a place of your choosing; this is where your completed OBS video will go.

OBS Output Options

Under Recording Format, you can choose the video file type to save in (see different video file types, explained for help). The default is FLV, which is fine in most cases. While MP4 is a popular video format, using it is risky because you’ll lose the whole file if OBS Studio can’t finalize it. Thus, a blue screen or power outage would destroy an MP4 recording, but merely cut it off if you’re using FLV.

Below this, you’ll need to choose an Encoder. The default is Software (x264), which uses your CPU. If you have a powerful dedicated graphics card (not integrated graphics), you should change this to Hardware (AMD) or Hardware (NVENC), depending on your card. Doing so will likely provide better results when recording, as it won’t put as much strain on your CPU.

Of course, Advanced gives you more options if you’re comfortable with that. Choose Advanced and swap to the Recording tab below to see them.

What Bitrate Should I Use?

If you switch to Advanced in the Recording panel, many of the additional options relate to the bitrate. This is a vital part of your recording setup. Essentially, a higher bitrate results in better-quality videos with larger file sizes. Setting bitrate too low will result in pixelated video, while setting it too high will generate a massive file.

Thankfully, if you’re using a graphics card encoder, OBS provides a few options to try using the Preset box. Try Recording if you don’t need particularly high quality, and up it to High Quality Recording if that’s not good enough. Indistinguishable Recording and Near Lossless Recording are useful if you need extremely high quality recordings, but be aware that the files will be huge.

If you’re using x264 encoding, you’ll need to set these values manually. There’s no one perfect setting, as the best bitrate depends on your screen size and setup. For 1080p recording at 60FPS, you can start with something like 40,000kbps and adjust from there.

It’s a good idea to try these options to see which provides the best balance of quality and file size. Try recording a minute of typical footage, then use that to estimate how large of a file you’ll end up with.

OBS Output Advanced Options

The Best Streaming Settings in OBS

The Output tab is also home to the Streaming section of options. In Simple mode, you’ll simply need to specify a bitrate, choose between software or hardware encoding, and set the Audio Bitrate.

Twitch recommends certain streaming bitrates depending on quality. 1080p at 60FPS should use a bitrate of at least 6,000, while 720p at 30fps can use something around 3,000. For the audio bitrate, 160 is a good baseline. You can increase this to 192 for better quality, or 320 if you need top-notch audio.

If you want to dive into the Advanced mode, you’ll find options similar to the Streaming tab as discussed above. Users with a graphics card encoder can pick Twitch Streaming from the Preset box as a baseline.

In case you’re using the software encoder, you’ll need to enter the bitrate manually. Use CBR (constant bitrate) for streaming, as VBR (variable bitrate) is inconsistent.

OBS Streaming Options

You may wish to lower the bitrate (as well as downscaling the resolution and lowering the FPS if needed) slightly for streaming. A stable, lower-quality stream that everyone can enjoy is better than streaming in maximum quality and having your internet connection struggle to keep up.

Helpful tips for fixing low FPS in games apply here, too. Check out Twitch’s broadcast requirements page for more information.

How to Record Your Screen With OBS Studio

Once you’ve set everything up, to begin screen recording, all you have to do is click Start Recording on the main OBS Studio page. The software will immediately start recording based on the current Scene. You can swap Scenes at any time, so make sure you’ve set them up beforehand.

When you click Stop Recording, OBS Studio will save your file to the directory you specified in Settings. As mentioned earlier, we recommend performing a short test recording first to make sure everything looks and sounds acceptable.

How to Stream Using OBS Studio

To stream with OBS Studio, you’ll first need to connect OBS with your streaming account. Do this by opening Settings and switching to the Stream tab. Under Service, choose your preferred site. You’ll find Twitch, YouTube Gaming, Mixer, and more.

OBS Streaming Account Connect

Next, you’ll need to generate a streaming key for the service. Click the Get Stream Key option in OBS to jump right to the appropriate page for your service. To do this with Twitch, for example, head to the Stream Key page in Twitch’s Settings (Settings > Channel and Videos) while logged in. Click Copy and paste this into the Stream Key field in OBS Studio.

Warning: Never give this stream key to anyone or show it on a stream! Anyone with access to this can stream to your account. If you accidentally share it, click Reset to generate a new one.

You’re Now Ready to Record and Stream With OBS Studio

Now you have a basic understanding of how to use OBS Studio. You can customize it a lot more to suit your own personal needs, but this overview is designed to prepare you to record gameplay locally and/or run your first stream.

If you don’t want to bother with OBS, here’s how to record your Windows screen without any extra software.

Read the full article: How to Record Your Screen and Stream With OBS Studio


Read Full Article