Meet Spot, a beautifully-designed mobile app to control your cryptocurrencies. Spot looks like a portfolio tracking app. But the company has built a strong foundation to add more features in the coming months. Spot wants to be your unique gateway to the world of cryptocurrencies.
“Spot’s vision isn’t to build a portfolio tracker — we went a bit overboard with this feature,” co-founder and CEO Edouard Steegmann told me. “Eventually, we want to become the app to manage all your cryptos, a sort of Revolut but with a crypto DNA.”
When you first install the app, you can connect it to your existing wallets by adding public addresses. Even if you store your tokens on a hardware wallet, Spot can read the public details of your wallet to show them in the app.
“We have our own nodes on Ethereum, Bitcoin, Litecoin, Stellar and others to recover the amount on your wallet,” Steegmann said. Data is also cross-checked with third-party services to make sure that everything is fine.
Spot also lets you connect to an exchange account using API keys. Right now, the app supports Binance, Kraken, Bitfinex and Poloniex, but the company already plans to add more exchanges.
The app then gives you a detailed overview of your holdings across all services and wallets. You can see detailed charts, discover which token is performing better than the rest. It’s also one of the most well-designed mobile app I’ve seen this year — animations and interactions are gorgeous.
But Spot doesn’t rely on an API to get pricing information for each token. “We’ve rebuilt CoinMarketCap from the ground up, and we’re one of few companies that have done it,” Steegmann said. The company stores pricing information for dozens of tokens across 150 exchanges. That’s a lot of pairings.
If you tap on the Spot logo at the top of the app, you can see the maximum value of your portfolio if you cash out on exchanges with the highest prices for your tokens. The company makes sure that there’s enough volume to show you coherent prices.
Spot thinks that controlling your own data is too important to rely on API calls. When you have your own data, you don’t have any API rate limits, you don’t have a major dependency and you can scale more calmly.
Up next, you’ll be able to trade directly in the app. The company isn’t going to build its own exchange, but you can expect to buy and sell tokens on a third-party exchange without having to visit the website.
“We think that many things will be tokenized and that there’s no user-friendly interface to transfer, receive, buy and sell,” Steegmann said.
The company raised a $1.2 million round (€1.056 million to be exact) from Kima Ventures and business angels, including Eric Larchevêque and Thomas France from Ledger, Jean-Daniel Guyot, Thibaud Elzière, Eduardo Ronzano, Nicolas Steegmann, Sébastien Lucas and Nicolas Debock.
Disclosure: I own small amounts of various cryptocurrencies.
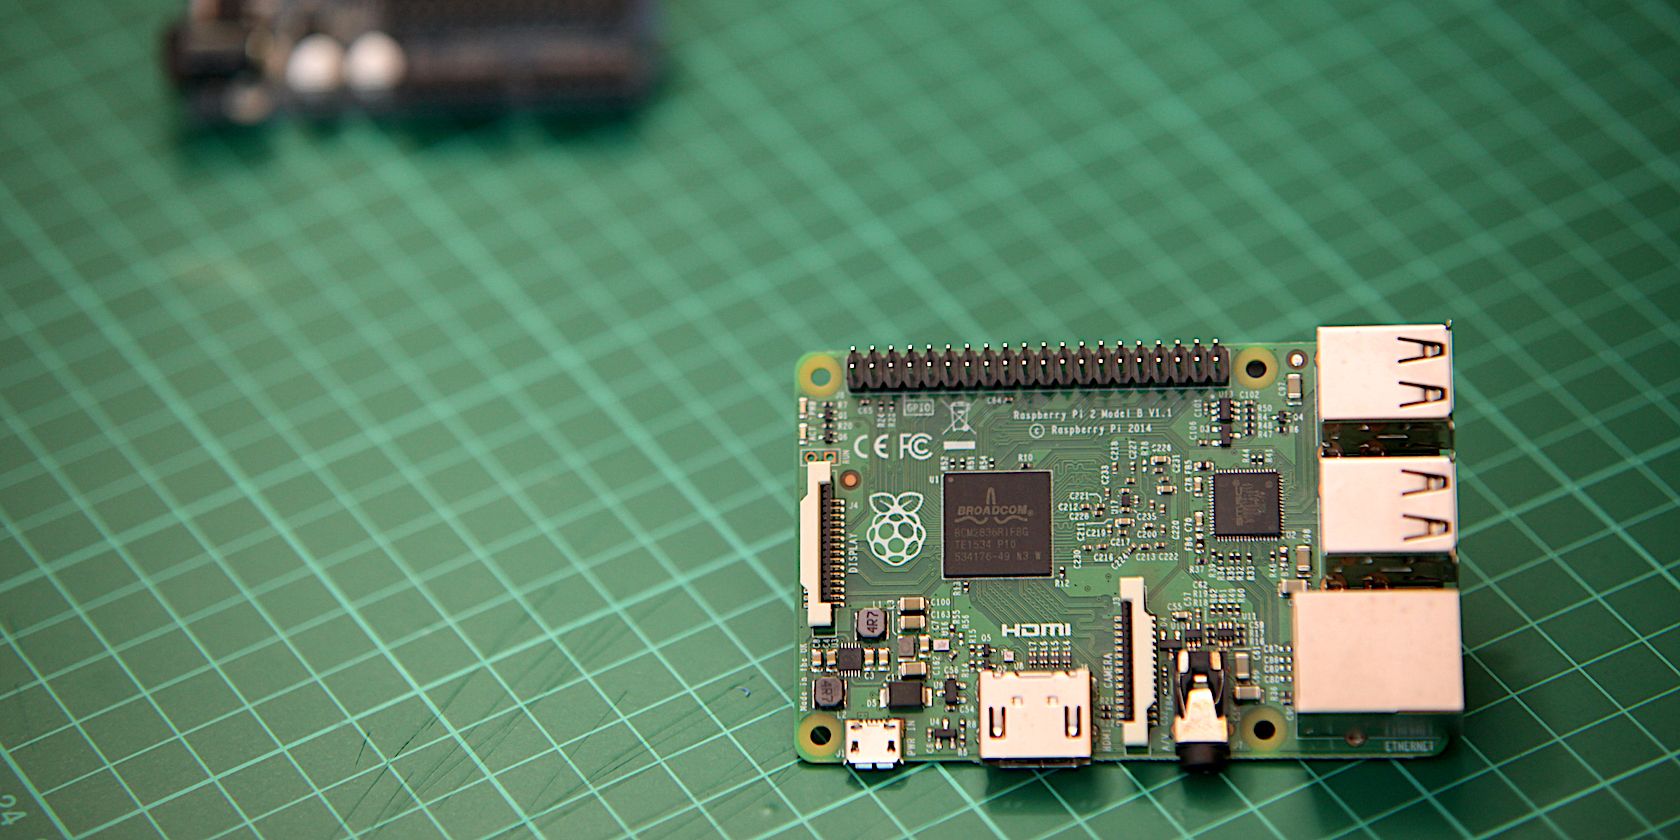
Costing just $40, the Raspberry Pi is cheap, versatile, and relatively powerful in a way its competitors are not. While most projects can be achieved with Raspbian, the Debian Linux fork, it isn’t the only option.
So many other operating systems can run on a Raspberry Pi. Just make sure you’ve got a monitor, mouse and keyboard to hand before you boot it up, and a fast microSD card to run your operating system of choice.
1. ARM-Based Linux Operating Systems
Let’s get this one out of the way first. It’s estimated that there are over 80 Linux-based distributions for the Raspberry Pi. These range from Raspbian to Linutop and even PiBang.
While Raspbian is the default option (and recommended by the Raspberry Pi Foundation), you might prefer Ubuntu MATE. To get away from the Debian-based distros, there’s a choice of Pidora (a Fedora-based distribution), and Arch Linux ARM.
Then there’s Kali Linux for pen testing, and a whole host of operating system images intended for the Pi, covering so many different purposes.
For youngsters, Kano OS is an education distro that is available for all Pi computers, not just those sold by Kano.
If you want to use your Raspberry Pi as a media center there is a good selection available. Although these operating systems are invariably built on Raspbian/Debian, they’re also based on Kodi, the popular media center software. What you get with these systems is a disk image to install, just as you would any other Raspberry Pi operating system.
So, what’s available? Well, versions of OpenELEC are available for all consumer models of the Raspberry Pi.
Meanwhile, OSMC is compatible with the Raspberry Pi 1, 2, 3 and Zero, with regular updates available via the dedicated admin screen. It’s also available as an option in NOOBS.
Finally, LibreELEC is also available, with the easiest installation thanks to an SD card creation tool for Raspberry Pi 2 and 3 users.
3. RISC OS Pi
The Cambridge-developed RISC OS was the first operating system for ARM processors, developed in the 1980s. It gained widespread use in the Acorn Archimedes, found in education institutions in the mid-1990s, eventually being replaced by Windows-based PCs.
However, RISC OS remains relevant and easy to setup.
For the best results, you’ll need a mouse with a clickable scroll wheel, as the RISC OS user interface requires a three-buttoned mouse. Once installed, you’ll find free applications in Packman, and commercial options in the Store app
If you’re looking for an alternative to desktop operating systems, the UNIX-like Plan 9 might be the answer. This is a barebones open source OS, designed by the same team behind the original UNIX.
The microSD card image can be written in the usual way, and booting will take you almost immediately into the Plan 9 OS.
In truth, a purely command line user interface may be difficult to get to grips with. However, if you have UNIX experience or want to sample that sort of computing, Plan 9 is a good place to start.
5. Retro Gaming Suites
Back to Linux, and there are a pair of retro gaming operating systems that you can install on the Raspberry Pi. These tools—both running on Raspbian/Debian—enable you to launch game ROMs and emulators and feature slick user console-inspired interfaces that can be browsed with a game controller.
Several retro suites are available for you to choose from.
RetroPie offers emulation of a wide collection of retro platforms from the 80s, 90s, and early 2000s. Its main rival is RecalBox, which supports for some later systems that RetroPie does not.
Prefer to steer clear of these? Other options are available.
Lakka is considered ” a lightweight Linux distribution that transforms a small computer into a full blown emulation console,” while the Pi Entertainment System (PES) is a collection of emulators based on Arch Linux.
PiPlay, meanwhile, is a compact alternative that squeezes emulation of 12 platforms plus ScummVM onto your Raspberry Pi.
Remember: when using an emulator, you will usually need boot and game ROMs. To use these legally, you should have previously purchased the original systems and the games.
BSD is not Linux, but it looks like Linux and works in much the same way. Descended from Research Unix via the Berkeley Software Distribution (hence “BSD”), FreeBSD (or large chunks of its code) is one of the most widely used operating systems in the world.
You’ll find FreeBSD code in macOS, the Nintendo Switch, and Sony’s PlayStation 3 and PlayStation 4.
Running on a Raspberry Pi is largely a command line-focused experience, albeit one with the ability to launch applications and games. A surprisingly large collection of software is available for FreeBSD, so if you haven’t checked it out already, now is the time—on your Raspberry Pi!
The dedicated RaspBSD operating system is available to download (visit the FreeBSD wiki for more information).
Based on the same code as Chrome OS, Chromium OS can be installed on netbooks, laptops… and the Raspberry Pi. With Chromium OS installed, you’ll have access to the same cloud-based tools found on Chrome OS.
In fact, there’s a project right here: build your own Chromebook with a Raspberry Pi! This project is in continuous development, so new features might be introduced (or removed) compared to the video above.
Several Chromium OS-based projects for the Pi are in progress. Perhaps the most polished is Flint OS, although you have a strong alternative in Chromium OS for All.
8. Windows 10 IoT Core
Let’s be clear: Windows 10 IoT Core for Raspberry Pi is not Windows 10 as you know it. Rather, it is a rebadged version of Windows Embedded, and has no desktop environment. Its purpose—as evidenced by “IoT”—is as an Internet of Things OS.
This means that the Pi can be used for IoT development purposes, but for the best results you’ll need to connect remotely to the Windows 10 IoT Core device from a different PC.
From here, you can deploy software from Visual Studio to it. A Raspberry Pi under Windows 10 IoT Core will also run Python apps.
Note, however, that it’s a bit of a development cul-de-sac. While useful for a specific set of tasks, Windows 10 IoT Core isn’t a Linux replacement for the Raspberry Pi.
9. Android and Android Things
Amazingly, it’s also possible to run Android on a Raspberry Pi. That shouldn’t come as much of a surprise—Android seems to run on just about anything these days, from PCs to set-top boxes.
Various versions of Android are available for the Pi, with the current versions based on Android 7.0 Nougat. Some Android TV builds are also in development at the time of writing.
As you might expect, installing Android on your Raspberry Pi gives you access to the vast collection of Android apps and games. There may be some compatibility issues, but overall stability is good. You can find a copy of the most up-to-date version at the Android Pi Wiki.
10. AROS: AmigaOS Remake
One of the most popular operating systems of yesteryear, AmigaOS is a closed source project currently owned by Amiga, Inc, and licensed exclusively and perpetually to Hyperion Entertainment. Several clones have been developed over the years (most notably MorphOS), but only AROS is available for the Pi.
As you can see from the demo, some games and applications are available, and you should find the modern Amiga-like experience worthwhile. Download it from the AROS website.
Note that you can also emulate an Amiga on your PC, and use any of the applications and games from its vast library.
11. IchigoJam BASIC RPi
Finally, IchigoJam BASIC has been ported to the Raspberry Pi.
Designed for the low-power, sub-Raspberry Pi single board IchigoJam computer from Japan, IchigoJam BASIC RPi is designed for low level, basic computing.
The operating system was designed to make programming in the BASIC language easy, and has support for digital I/O, PWM, I2C, and UART functions.
If you’re looking for a language to get to grips with and you’re new to programming, try IchigoJam BASIC RPi.
So Many Raspberry Pi Operating Systems!
You can do almost anything with a Raspberry Pi, from running a low budget space program to streaming PC games.
While the hardware is good, the Pi’s success rests in the wide selection of operating systems available.
With Linux-based operating systems, the legendary RISC OS and AmigaOS, and even Windows 10 IoT Core, you would be hard pushed to find so many choices for any of the Raspberry Pi’s competitors.
Protecting your computer with a strong, unique password remains incredibly important. You can protect your smartphone or laptop with a fingerprint, iris, and other biometric scanners. However, a strong single-use password is a vital layer of protection.
But what happens if you forget your Windows XP password? Are you locked out of your Windows XP account for good?
Luckily, that’s not the case. Here are five ways to reset the administrator password on your Windows XP laptop or computer.
1. Reset Windows XP Password Using Ctrl+Alt+Del
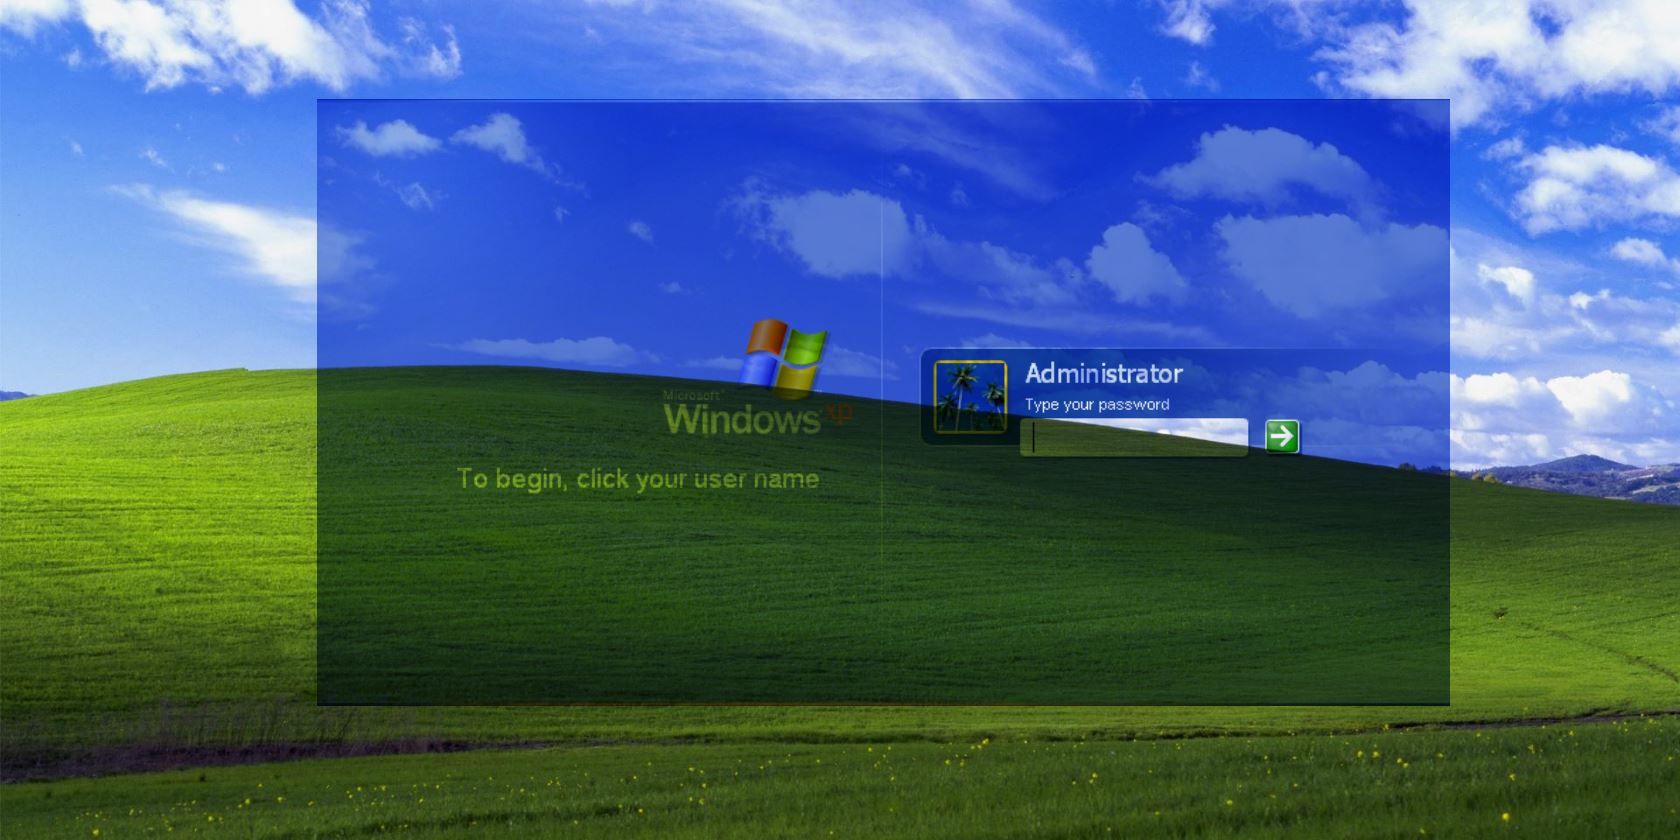
If your Windows XP system is set up to log in via the Welcome Screen, there is a chance you’ll be able to log in as the system administrator. Unfortunately, this is also dependent on there being no existing password on the Administrator account.
When you boot your system, it will load the Welcome Screen. Press Ctrl + Alt + Delete twice to load the user login panel.
Press OK to attempt to log in without a username or password. If that doesn’t work, try typing Administrator into the Username field and pressing OK.
If you’re able to log in, head straight to Control Panel > User Account > Change Account. Then, select the account that you’d like to change the password for, and follow the on-screen instructions.
2. Reset Windows XP Password Using Safe Mode and Command Prompt
If your Windows XP Administrator account remains frustratingly out of reach, you can attempt to reset the password using Safe Mode and the Command Prompt.
To access Windows XP Safe Mode, you need to restart your computer. Press F8 while the computer is booting. (Sometimes tapping F8 helps if you’re unsure.) Select Safe Mode with Command Prompt.
Once you enter Safe Mode, head to Control Panel > User Account > Change Account. Then, select the account that you’d like to change the password for, and follow the on-screen instructions.
Reset Windows XP Password Using the Command Prompt
There are times, however, when certain computer issues will obstruct you from changing user settings, e.g., a virus. In those cases, you can use the Command Prompt from within Safe Mode.
From within Safe Mode, press Windows Key + R to open the Run dialog. Type CMD and press Enter. This opens the Command Prompt. Now, type the following command:
net user [account name] [new password]
It should look like this:
The command selects your account and sets a new password. If you want to clear the password and set a new one at a later date, use the following command:
net user [account name] ""
3. Reset Windows XP Password via Another Account
Resetting your Windows XP password via an alternative account only works if you are using Windows XP Professional.
Start by right-clicking My Computer and selecting Manage.
Then, select System Tools > Local Users and Groups > Users. Find your user account, right-click, and select Set Password.
Reset Windows XP Password via Remote User Management
If you cannot access Computer Management using your own or an alternative account, you can use remote access instead.
On a different computer (it doesn’t have to be Windows XP, but it does have to be a Windows machine), in the Computer Management window, right-click Computer Management (Local). Select Connect to another computer, then select Another Computer.
Enter the IP address of the computer you want to connect to. If you’re on the same network, it will take the form of an internal LAN address, such 192.168.x.x. Alternatively, if you know the computer name, you can use that, e.g., \\DesktopPC.
If you’re unsure and connected to the same network, select Browse, then Advanced. Finally, select Find Now to scan your local network for computers on your network.
Once you gain remote access, you can change the password by heading to System Tools > Local Users and Groups > Users. Then, find your user account, right-click, and select Set Password.
4. Reset Windows XP Password Using a Linux LiveCD or USB
If you’ve made it this far and are still locked on, this is the Windows XP password reset fix for you.
Reboot the Windows XP machine. Press either F12, ESC, or Delete to choose your boot device. Select your CD or USB drive when prompted.
Press Ctrl + L to edit the Location Type computer:/// to see all your drives. Select your Windows installation, right-click, and select Mount.
Open the Linux Terminal by pressing Ctrl + Alt + T. Run the following command to install password reset utility chntpw: sudo apt-get install chntpw. (Ignoring the period.)
Change the working directory using the following command: cd /mnt/Windows/System32/config
Retrieve a list of Windows users using the following command: sudo chntpw -1 SAM. (Ignoring the period.)
Find your account username. Then, use the following command to select the account: sudo chntpw -u “USER NAME” SAM. Then, type 2to enter editing mode.
Type a new password, hit Enter to submit, and y to confirm.
Reboot into Windows and use the new password.
5. Reset Windows XP Password: Full Format and Reinstallation
If nothing, but nothing else works, and you’re still somehow locked out of your account, there is only one more option: fire. Okay, not fire. But you will have to remove your hard drive from its host machine, connect it to another machine to complete a backup, and then format the drive.
One of the tips and tricks we’ve covered should have helped you reset your Windows XP account password. Hopefully, you didn’t have to resort to a full system nuke and reinstall—that can be a real pain!
In the past few years, social media platforms have experienced tremendous growth. Social networks are more than happy to welcome new users. However, more users mean it’s harder to keep track of everyone’s behavior on the site.
When it comes to social media, if you don’t play by the rules, you don’t get to use the platform. This is made pretty clear to all users. However, there has been one practice that has been shrouded in mystery for years, so much so that users are confused as to if it actually exists or not.
We are, of course, talking about shadowbanning. So, what is shadowbanning? And what can you do to prevent a social media platform from shadowbanning you?
What Is Shadowbanning?
Social media platforms can ban users in a few different ways. Either you lose access to your account for a short period of time, or indefinitely. They can also ban you from making a new account if the offense was serious enough for an IP ban, which is when the platform shuts you out based on your IP address.
These bans have one thing in common, and that is that the users know that they have been banned. This is precisely what sets shadowbanning apart. Shadowbanning, also known as ghost banning, or stealth banning, is commonly defined as the practice of blocking a user or their content, fully or partially, in a way that it will not be obvious to the user.
This way, the user retains access to their account and can see posts from other users. They can even post as usual, but the social network partially or completely “shadows” the posts, making them invisible to other users. Shadowbanning is different from Facebook’s shadow profiles, which have also been in the news lately.
The practice dates back to the 1980s when the bulletin board services started employing toggles to grant different users different privileges. One of these toggles was called the “twit bit,” which restricted a user’s privileges for not following the rules. This was to ensure that the troublemakers either left or started following the rules.
This is pretty much the concept behind the modern day phenomenon of shadowbanning. However, the mystery is whether the practice actually really exists in a tangible form.
Are People Really Getting Shadowbanned?
In the last few years, there have been numerous claims of shadowbanning across different social media platforms. With the politically charged environment making it harder than ever to distinguish genuine news from fake news, social media platforms have been accused of having a bias. And using shadowbanning to silent the opinions they dislike.
Shadowbanning on Twitter
A large number of users have claimed that Twitter has shadowbanned them. The claims began in 2016, with accusations that Twitter was shadowbanning people that supported the Republican Party in the U.S.
However, the situation escalated in 2018, after Vice News claimed that Twitter was shadowbanning prominent Republican politicians, which was soon followed by a tweet from the President of the United States of America, Donald Trump.
Twitter “SHADOW BANNING” prominent Republicans. Not good. We will look into this discriminatory and illegal practice at once! Many complaints.
Twitter was quick to respond, and while Vice News said that Twitter had “fixed” the shadowbans, Twitter claimed in a blog post that they have never actually used the practice. The blog post said that Twitter instead used ranking, which ranked tweets from “bad-faith actors”.
Apparently, Twitter determines these according to several factors which have to do with the authenticity of the account, and how the one uses the account.
Twitter also claimed that political affiliation wasn’t one of these factors and that there was no shadowbanning happening, but rather just a bug which affected hundreds of thousands of accounts, not letting them appear in search auto-suggestions. Twitter resolved this issue, but the accusations continue.
Shadowbanning on Instagram
Instagram has had more than its fair share of complaints from users about how their posts reach only a few of their followers. The shadowban claims began in 2017. This happened after posts from some users stopped appearing for users that did not follow them, especially under the hashtag search.
Many users claimed that this was shadowbanning. Instagram responded with a Facebook post that essentially asked the users to make better content. The post didn’t even acknowledge the concept of shadowbanning.
We understand users have experienced issues with our hashtag search that caused posts to not be surfaced. We are…
However, this did not convince everyone. Instagram support has been notorious for not having any channels for its customers to reach out. If you follow some smaller accounts on Instagram with a few thousand followers, you might have seen them complain about low reach all of a sudden.
It could have happened to you, too, where an Instagram story posted by you had lesser views than you expected. This might not necessarily be shadowbanning. Instagram’s algorithm is known to be broken and difficult for users, and the number of complaints has only increased since Instagram last addressed it.
Shadowbanning on Facebook
Facebook is the world’s biggest social network. Users have accused the social media giant of prioritizing advertisers over users, for years. These concerns expanded into shadowbanning, especially in 2018. Many users complain about their posts and comments suddenly getting no reactions.
Facebook is also one of the biggest platforms for news sharing, which complicates this topic. The social media platform has the giant task of curating news content while filtering out the fake news. However, users claim that the social network has an inherent bias. Facebook has provided a clarification from their end.
Instead, we demote individual posts etc. that are reported by FB users and rated as false by fact checkers. This means they lose around 80% of any future views. We also demote Pages and domains that repeatedly share false news.
In 2018, Facebook co-founder and CEO Mark Zuckerberg testified in front of Congress, and said that Facebook supports free speech. He also claimed that Facebook is working on ensuring they flag only the fake news and not merely unpopular opinions. So if we are to believe Facebook, they don’t shadowban people. It’s only the flaws in its algorithm to battle harmful content that can accidentally restrict some users.
Zuckerberg has assured users that they are constantly working on the flaws. Facebook also revealed how to get banned from Facebook for breaking the rules, which offers a little more clarity.
How to Avoid Getting Shadowbanned
Every platform has a set of rules to follow, mostly referred to as community guidelines. Most of the guidelines are common sense at this point. However, there is a small chance one could accidentally violate these guidelines without realizing it.
The most important part is to not post explicit or offensive content or news from unverified sources. As far as comments go, for the most part, you just have to be nice.
Social Networks will also flag you for suspicious activity. That means you need to have your account details up to date, and your email verified. You also have to ensure that you aren’t posting in a manner that makes you look like a spammer or bot. Using banned hashtags is also a bad idea if you want to avoid being shadowbanned.
There is no real way to determine if social media networks are really trying to shut down opinions they don’t like, or just trying to ensure that the content users are putting out is safe for everyone. Either way, the onus is on us as users to be careful and stick to the rules, or we risk being silenced.
Your Mac has a built-in tool called Automator that allows you to save time by automating actions. It’s was around long before other automation tools like Workflow (now Siri Shortcuts) and IFTTT.
Using Automator is simple. You don’t have to know how to program to set up your own custom workflows that perform common actions on your Mac.
Today we’ll show you some useful, time-saving workflows you can set up on your own Mac.
Basics of Setting Up an Automator Workflow
When you open Automator from the Applications folder, you’re asked to select the type of document you want to create. Take a look at our Automator introduction for an explanation of each type and example workflows.
Two libraries appear at the far left of the Automator window. Click Actions or Variables to access the corresponding library.
Drag the actions (or variables) you want to use to the workflow on the right, putting them in the order you want them run. Actions and variables have settings you can adjust for your workflow.
Once you’ve set up your workflow, go to File > Save to save it in the document format you chose when you created it. If you chose the Workflow document type that runs inside of Automator, you can save it as an Application. And if you chose Application as your document type, you can convert that to a Workflow when saving it.
For each workflow we list here, you’ll always start by creating a new document. If you’re already in Automator, go to File > New Document. Or when you open Automator, click New Document on the initial dialog box.
Then select the type of document you want to create. We suggest a type for each workflow listed here, but you can choose a different one if you want. You may have to adjust the actions you use at the beginning of your workflow to get the input you need.
1. Batch Rename Multiple Files
If you often rename multiple files at once, there are several ways to batch rename files on a Mac, including creating an Automator workflow and saving it as an application.
You can also use Automator to create a Batch Rename service. This allows you to select files, right-click on them, and select the Batch Rename service from the Services menu. Be sure to select files or folders from the Service receives selected dropdown list and Finder.app from the in dropdown list above the workflow.
When you visit File > Save and enter a name for the Batch Rename service, it’s saved in the correct place and automatically added to the Services menu.
Again, you can also create a Convert and Resize Images service using Automator that allows you to select the files, right-click on them, and select the Convert and Resize Images service from the Services menu. Be sure to select files or folders from the Service receives selected dropdown list and Finder.app from the in dropdown list above the workflow.
When you open File > Save and enter a name for the Convert and Resize Images service, it saves to the correct place and automatically joins the Services menu.
3. Keep Your Downloads Folder Clean
The Downloads folder on your Mac can quickly become cluttered. But you can use Automator to automatically clean out old items by moving them to the Trash after a specific number of days.
While you work, you may not realize how many apps you have open. If your Mac doesn’t have much RAM, you might want to close some apps to free up memory. But closing each app separately is time-consuming.
You can close all apps at once and get a fresh start using an app created using Automator. Follow these steps:
Open Automator and create a new Application document.
Click Actions on the far left.
Go to Library > Utilities.
Drag the Quit All Applications action from the middle section to the workflow on the right.
If you want to see a confirmation box to save open documents before they close, check the Ask to save changes box at the top of the Quit All Applications action box.
To certain prevent apps from closing, click Add below the Do not quit box and select the app you don’t want to quit. Repeat this for each app you want to keep open.
Go to File > Save and save the application where you want to. You can also drag it to the Dock for easy access.
5. Open a Specific Set of Web Pages
Do you load the same set of pages every time you open your browser? You can do this automatically in your default browser by creating an application in Automator. We show you how to do this as one of the ways you can use Automator with your browser.
The Apple homepage may automatically add itself to the Address list. If you don’t want it, select it and click Remove.
6. Combine Multiple PDF Files
Do you often combine multiple PDFs into one file? Normally, you’d need an app or online tool to do that. But you can create a service using Automator that allows you to easily combine multiple PDF files into one.
Follow these steps to create a service that appears in Finder:
Open Automator and create a new Service document.
Select files or folders from the Service receives selected dropdown list and Finder.app from the in dropdown list at the top of the workflow pane.
Click Actions on the far left.
Go to Library > Files & Folders on the far left.
Drag the Get Selected Finder Items action from the middle column to the workflow on the right.
Go back to the Library on the left and click PDFs.
Drag the Combine PDF Pages action from the middle column to the bottom of the workflow. Select whether you want to combine the PDF files by Appending pages or Shuffling pages.
Go to Library > Files & Folders again on the left.
Drag the Move Finder Items action from the middle column to the bottom of the workflow. Select the folder you want to move the resulting PDF file to from the To dropdown list.
To replace an existing file with the one you create, check the Replacing existing files box in the Move Finder Items action box.
Go to File > Save and give the service a name. Your new service is automatically put in the correct place and added to the Services menu.
Now you can select multiple PDF files, right-click on them, and select your new service from the Services menu to combine them.
7. Create a Text File From the Clipboard’s Contents
If you often copy text and paste it into a text file to save it, you can create an application using Automator that will make this a snap.
Follow these steps:
Open Automator and create a new Application document.
Click Actions on the far left.
Go to Library > Utilities on the left.
Drag the Get Contents of Clipboard action from the middle column to the workflow on the right.
Go back to the Library on the left and click Text.
Drag the New Text File action from the middle column to the bottom of the workflow.
Modify the settings for your new text file in the action box, like choosing the File Format, entering the default file name (Save as), and Where to save the file.
Go to File > Save and give the service a name. Your new service is automatically put in the correct place and added to the Services menu.
To use it, select the text you want to save in a text file, then run your new Automator app.
8. Convert Text to an Audio File
If you have a lot of text to read, you might want your Mac to read it to you. You can create a service using Automator that converts selected text to an audio file.
Follow these steps:
Open Automator and create a new Service document.
Select text from the Service receives selected dropdown list. Leave the default of any application selected in the in dropdown list at the top of the pane.
Select Actions on the far left.
Go to Library > Utilities on the left.
Drag the Text to Audio action from the middle column to the workflow on the right.
Select the System Voice you want. Use the Play button to listen to the selected voice and see what you like.
Enter a file name for the audio file in the Save As box.
Now you can select text in any program, right-click on the selected text, and select your new service from the Services menu to convert the text to an audio file. The service automatically saves the audio as an AIFF file.
The icon on the file includes a Play button in the middle. Simply click the Play button to listen to the audio file.
Save Yourself Time With Automator on Mac
Automator is free and built into your Mac system. Why not take advantage of it to automate time-consuming and tedious tasks?
You can even create a desktop app from a website using Automator. Experiment with the different actions and variables to come up with your own Automator workflows. We’d love to hear about any useful workflows you create.
Ever wondered about what to sell on eBay? Or which are the best selling items on eBay? If you have some unwanted gifts or used items in good condition lying around, you might be able to make a few dollars.
Here is a roundup of the best sellers on eBay.
1. Everything iPhone
The shopping giant is tight-lipped when it comes to the bestselling categories, but there is data available regarding eBay best sellers on an item-by-item basis.
In 2018, the most popular item on eBay was a screen replacement for the iPhone 7 (it seems iPhone users would prefer to repair old tech and save money rather than pay for a new model). The replacement screen shifted almost 100,000 units at an average price of $17.95.
Indeed, any product linked to iPhones is popular. A silicon case for the iPhone 6, 6S, and 7 sold 55,000 units, a tempered glass screen protector for the same models saw 65,000 sales, and an in-car iPhone holder shifted 28,000 units.
Even a luxury leather case for the newer iPhone X was sold more than 20,000 times.
If you have any iPhone gear lying around, especially for iPhone models that are a couple of years old, you will be able to sell it in a flash.
2. Video Games
It should come as no surprise to learn that video games and video game consoles are also some of the best-selling items on eBay.
The market is huge. Whether you want to sell the latest AAA titles at a lower price than the high street stores or you have a back collection of retro consoles and classic titles that you want to get rid of, you will always be able to find a buyer.
And if you’re lucky enough to own a rare title, you might be able to earn megabucks. In the past, we’ve seen Super Ninja Boy and Final Fantasy 2 on the SNES each sell for $2,000, while Donkey Kong 3 on the NES sold for $5,350. The most expensive title was the Asian release of Super Mario Bros on the NES. The seller listed it for $25,000.
Video games also tick a few key boxes from the seller’s perspective: They are lightweight (for cheap shipping), they are well-understood by buyers (meaning fewer returns), and they have solid profit margins.
3. Beauty Products
Beauty products are a popular gift on birthdays and at Christmas. Perfume, makeup, hair straighteners, skin cleansing packs, hair dryers… you know the sort of thing we’re talking about.
Coincidentally, beauty items are also some of the best-selling items on eBay. It suggests a lot of people are receiving unwanted presents!
In June 2018, nine of the top 15 most-bought items on eBay fell into the beauty category. They included a Moroccan oil treatment kit, 200ml of bio-oil, a makeup mirror, and men’s razor blades. The combined sales revenue of the nine items exceeded $5 million.
4. Fitness Trackers
Just because you list an item on eBay, it doesn’t mean that someone is going to buy it. If you want to increase your chances of getting a sale, you should try and offer items with a high sell-through rate.
The category with the highest sell-through rate is (bizarrely) diabetic test strips. 87 percent of all the tests listed on eBay are bought by users.
However, not too many people will have unused diabetic test strips lying around their homes, so we suggest you turn your attention to the category with the second highest sell-through rate—fitness trackers. They have a sell-through rate of 82 percent. If someone buys you an unwanted or duplicate gadget, don’t waste any time in listing it on the platform.
For the record, in third place are Apple laptops (81 percent) and fourth is video game consoles (80 percent).
5. Bicycles
Also, people selling bikes on eBay: When you state “Never crashed this bike” I know you almost certainly have, very seriously.
Sticking with the fitness theme (of sorts), bicycles are also one of eBay’s best-selling items. On average, users in the U.S. search for bikes on eBay once every minute.
Bicycles tend to hold their value well, making them a great product to re-sell. And if you’re competent with a screwdriver and spanner, you can even buy run-down bikes at your local second-hand shop, give them a facelift, and sell them on eBay for a tidy profit.
The sweet spot for selling bikes is around $400; if you want to sell high-end performance units, you might not see as much success.
6. Home and Garden
While the most sold single items on eBay are all linked to Apple in some way, products in the home and garden category give Apple a good run for its money.
They are also one of the best things to sell on eBay from an accessibility standpoint. Everyone can find an old wall print, lamp, cushion, or plant pot that they no longer want.
In 2018, the top-selling item in the category was a set of Egyptian bed sheets. With 40,000 units sold, it netted the seller almost half a million dollars in revenue.
Also popular were waterproof LED light strips (20,000), a gas-powered generator for outdoor use (20,000), and a Dirt Devil vacuum cleaner (5,000).
7. The Most-Searched for Items
It stands to reason that the most-searched-for items on eBay are also some of the best-selling. The popular items tend to follow trends; sunglasses are more popular in summer, everyone wants big boots in winter, and so on.
Luckily, eBay provides data about the most-searched-for items at any given time. As 2018 drew to a close, the most common searches were for Yellies and Baby Shark merchandise. And, as if to prove what we’ve already told you, Apple AirPods, the Sony PlayStation Classic, and the Nintendo 3DS all made the top 10.
So, if you’re ever stuck for some cash, head to eBay’s trending page and see if you’ve got any unwanted items that match the most popular searches.
Things to Avoid on eBay
Conversely, there are some things you should never try and sell on eBay. The items with the worst sell-through rates are diamond rings (three percent), adult t-shirts (three percent), posters (four percent), and bridesmaid dresses (four percent).
And remember, the best-selling items aren’t always the most sensible items for you to sell. Competition is higher, and profit margins are smaller.
Wondering how to open the task manager on a Mac? You might not know where this important utility is located on macOS if you’re used to Windows, or perhaps you’ve never needed to open it before.
Either way, we’ll show you multiple ways to get to the task manager on your Mac.
Meet Activity Monitor
Before we proceed, if you’re a Mac newcomer arriving from Windows , you should know that the proper name for the macOS equivalent of the Windows Task Manager is the Activity Monitor. They perform similar functions, but they don’t actually have the same name.
With that out of the way, let’s see the ways to start the task manager utility on Mac and what it can do.
How to Open the Task Manager on Mac
The easiest way to open pretty much anything on your Mac is using Spotlight. This built-in search feature can find apps, files, and settings in just a few keystrokes.
To open Spotlight, just press Cmd + Space on your Mac. Then start typing Activity Monitor (the first few letters should bring it right up) and press Return. In a moment, you’ll see the Activity Monitor window.
Don’t want to use Spotlight for some reason? You can open the macOS task manager using the Launchpad icon on your Dock. In the list of apps, open the Other folder, and you’ll see an icon for Activity Monitor.
Finally, you’ll also find Activity Monitor if you open Finder and browse to Applications > Utilities.
Keep Activity Monitor in the Dock
Once you open Activity Monitor using any of the above methods, it will appear in the Dock at the bottom of your screen. However, this disappears once you quit the app.
If you’d like to keep the icon close at hand, right-click it and choose Options > Keep in Dock. Then the icon will remain even when the app is closed.
What Does the Task Manager Do on Mac?
You’ll find a lot of functionality similar to the Windows Task Manager in Activity Monitor. At the top, you can choose to view information about CPU, Memory, Energy, Disk, and Network usage.
Each one shows you the processes on your computer and various information about their impact.
Most of the time, the average user won’t have much reason to open the task manager on their Mac and poke around. The system should work just fine without micromanaging processes. However, it can prove useful if you have issues on your Mac.
For instance, if your system feels slow, you might be able to pinpoint it to an app using too much CPU or RAM. Weeding out apps with high energy consumption can provide better battery life for your MacBook. And you can get a handle on what apps access the internet most with the Network tab.
Now You Know About the Mac Task Manager
It’s not difficult to access Activity Monitor and see what’s happening on your Mac. We’ve shown you several shortcuts for opening it, and reviewed what information it provides.
We will be holding a small event during CES in Las Vegas and we want to see you! We’re looking to meet some cool hardware and crypto startups so the good folks at Work In Progress have opened up their space to us and 200 of you all to hold a meetup and pitch-off.
The event will be held at Work In Progress, 317 South 6th Street on Wed, January 9, 2019 between 6:00 PM – 9:00 PM PST.
There are only 200 tickets so if you want to come please pick one up ASAP. The meetup is open to everyone so head over if you’d like to talk tech. You can pick up a ticket here.
If you’d like to pitch at the event I’ll be picking ten companies who will have three minutes to pitch without slides. Since this is a hardware event I recommend bringing a few of your items to show off. If you’d like to pitch, fill this out and I will contact those who will be coming up on stage.
IBM today announced that it has developed a small sensor that sits on a person’s fingernail to help monitor the effectiveness of drugs used to combat the symptoms of Parkinson’s and other diseases. Together with the custom software that analyzes the data, the sensor measures how the nail warps as the user grips something. Because virtually any activity involves gripping objects, that creates a lot of data for the software to analyze.
Another way to get this data would be to attach a sensor to the skin and capture motion, as well as the health of muscles and nerves that way. The team notes that skin-based sensors can cause plenty of other problems, including infections, so it decided to look at using data from how a person’s fingernails bend instead.
For the most part, though, fingernails don’t bend all that much, so the sensor had to be rather sensitive. “It turns out that our fingernails deform — bend and move — in stereotypic ways when we use them for gripping, grasping, and even flexing and extending our fingers,” the researchers explain. “This deformation is usually on the order of single digit microns and not visible to the naked eye. However, it can easily detect with strain gauge sensors. For context, a typical human hair is between 50 and 100 microns across and a red blood cell is usually less than 10 microns across.”
In its current version, the researchers glue the prototype to the nail. Because fingernails are pretty tough, there’s very little risk in doing so, especially when compared to a sensor that would sit on the skin. The sensor then talks to a smartwatch that runs machine learning models to detect tremors and other symptoms of Parkinson’s disease. That model can detect what a wearer is doing (opening a doorknob, using a screwdriver, etc.). The data and the model are accurate enough to track when wearers write digits with their fingers.
Over time, the team hopes that it can extend this prototype and the models that analyze the data to recognize other diseases as well. There’s no word on when this sensor could make it onto the market, though.
There was countless gadgets released in 2018. It’s the end of the year so Brian and I rounded up the best of the best and the worst of the worst.
Some where great! Like the Oculus Go. Or the Google Home Hub. But some were junk like the revived Palm or Playstation Classic.
CES 2019 is a few weeks away where manufacturers will roll out most of their wares for the upcoming year. But most products will not be available for purchase for months. What follows is a list of the best and worst gadgets available going into 2019.
Google took its sweet time bringing an Echo Show competitor to market. When the Home Hub did finally arrive, however, the company lapped the competition. The smart screen splits the size difference between the Echo Spot and Show, with a form factor that fits in much more comfortable in most home decor.
Assistant still sports a much deeper knowledge base than Alexa, and the Hub offers one not so secret weapon: YouTube. Google’s video service is light years ahead of anything Amazon (or anyone, really) currently offers, and the competition shows no sign of catching up.
I wanted to dislike the Osmo Pocket. I mean, $349 for a gimbal with a built in screen is pretty steep by any measure — especially given the fact that the drone maker has much cheaper and more professional options. After an afternoon with the Pocket, however, I was hooked.
The software takes a little getting used to, but once you’ve mastered it, you’re off the races, using many of the same tricks you’ll find on the Mavic line. Time-lapse, FaceTrack and the 10 Story Mode templates are all impressive and can help novices capture compelling video from even the most mundane subject matter.
The most recent wave of VR headsets has been split between two distinct categories. There are the high-end Rift and Vives on one-side and the super low-cost Daydreams and Gear VRs on the other. That leaves consumers in the unenviable position of choosing between emptying the bank account or opting for a sub-par experience.
Oculus’ Go headset arrived this year to split the difference. In a time when virtual reality seems at the tail end of its hype cycle, the $199 device offers the most compelling case for mainstreaming yet.
It’s a solid and financially accessible take on VR that shows that the category may still have a little life left in it yet.
Granted, it’s not a gadget per se, but the Never Check is the best backpack I’ve ever owned. I initially picked it up as part of a Gift Guide feature I was writing, and I’ve since totally fallen for the thing.
As someone who spends nearly half of his time on the road these days, the bag’s space’s big volume and surprisingly slim profile have been a life saver. It’s followed me to a Hong Kong hostel and a Nigeria hotel, jammed full of all of the tech I need to do my job.
It’s also unassuming enough to be your day to day. Just zip up one of those waterproof zippers to compress its footprint.
Happy Hacking Keyboard Professional 2
Like most nerds, I have more keyboards than friends. In 2018 I gave mechanical keyboards a chance. Now, at the end of the year, I’m typing on a Happy Hacking Keyboard Professional 2. It’s lovely.
This keyboard features Topre capacitive 45G switches. What does that mean? When typing these switches provide a nice balance of smooth actions and tactile feel. There are a handful of mechanical switches available, and after trying most of them, this switch feels the best to me. The Topre capacitive switch is available in a handful of keyboards, but I like the Happy Hacking Keyboard the best.
The HHK has been around in various forms since 1996 and this latest version retains a lot of the charm including dip switches. Everyone loves dip switches. This version works well with Macs, has two USB ports and is compact enough someone could throw into a bag. Starting just last month, the keyboard is available in the US through Fujitsu so buyers do not have to deal with potentially shady importers.
The Palm is the kind of device you really want to like. And I tried. Hell, I took the thing to Africa with me in hopes that I’d be able to give it some second life as an MP3 player. But it feel short even on that front.
This secondary smartphone is a device in search of a problem, appealing to an impossibly thin slice of consumer demographics. It’s definitely adorable, but the ideal consumers has to have the need and money for a second display, no smartwatch and an existing Verizon contract. Even then, the product has some glaring flaws, from more complex user issues to simple stupid things, like a lack of volume buttons.
It’s easy to forgive a lot with a fairly well designed first generation product, but it’s hard to see where the newly reborn company goes from here. Palm, meet face.
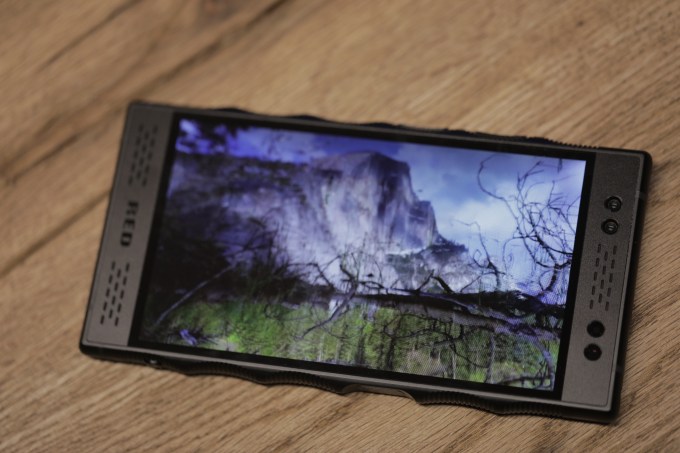
Where to start? How about the price? Red’s first foray into the smartphone space starts at $1,293 (or $1,595 if you want to upgrade your aluminum to titanium). That price will get you a middling phone with an admittedly fascinating gimmick.
After what seemed like years of teasers, the Hydrogen One finally appeared in October, sporting a big, metal design and Rambo-style serrated edges. The display’s the thing here, sporting a “nano-photonic” design that looks a bit like a moving version of those holographic baseball cards we had as kids.
I showed it to a number of folks during my testing period, and all found it initially interesting, then invariably asked “why?” I’m still having trouble coming up with the answer on that one. Oh, and a few told me they became a touch nauseous looking at it. Can’t win ‘em all, I guess.
Why? is really the overarching question in all of these worst devices. It’s not as if the Portal was a bad product. The design of the thing is actually pretty solid — certainly it looks a lot nicer than the Echo Show. And while it was initially lacking in features, Facebook has made for that a bit with a recent software update.
The heart of the question is more about what Portal brings to the table that the Echo Show or Google Home Hub don’t. It would have to be something pretty massive to justify bringing a Facebook-branded piece of hardware into one’s living room, especially in light of all of the privacy concerns the social media site has dealt with this year. There’s never been a great time for Facebook to launch a product like this, but somehow, no feels like the worst.
Portal delivers some neat tricks, including impressive camera tracking and AR stories, but it mostly feels like a tone deaf PR nightmare.
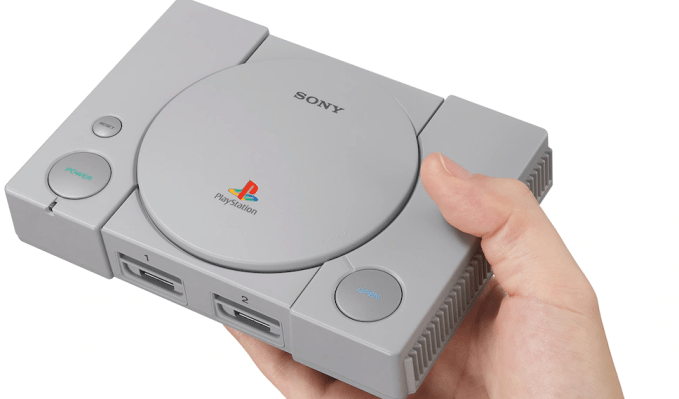
Playstation Classic
1: Half the games are PAL ports and do not run well on US TVs
2: Missing classics like Gran Turismo, Crash Bandicoot, and Tomb Raider
3: Doesn’t include a power adapter
4: Only one suspend point
5: This product makes me angry