
Versus Bracket
Microsoft’s Xbox Adaptive Controller was a breath of fresh air in a gaming world that has largely failed to consider the needs of people with disabilities. Now Logitech has joined the effort to empower this diverse population with an expanded set of XAC-compatible buttons and triggers.
Logitech’s $100 Adaptive Gaming Kit comes with a dozen buttons in a variety of sizes, two large analog levers to control the triggers, and a Velcro-style pad to which they can all be securely attached. It’s hopefully the start of a hardware ecosystem that will be at least a significant fraction of the diversity available to the able population.
The visibility of gamers with disabilities has grown both as the communities have organized and communicated their needs, and as gaming itself has moved towards the mainstream. Turns out there are millions of people who, for one reason or another, can’t use a controller or mouse and keyboard the way others can — and they want to play games too.
Always one of the more reliably considerate companies when it comes to accessibility issues, Microsoft began developing the XAC a couple years back — though admittedly after years of, like the rest of the gaming hardware community, failing to accommodate disabled gamers.
Logitech was an unwitting partner, having provided joysticks for the project without being told what they were for. But when the XAC was unveiled, Logitech was stunned and chagrined.
“This is something that, shame on us, we didn’t think about,” said Mark Starrett, Logitech G’s senior global product manager. “We’ve been trying to diversify gaming, like getting more girls to play, but we totally did not think about this. But you see the videos Microsoft put out, how excited the kids are — it’s so motivating to see that, it makes you want to continue that work.”
And to their credit, the team got in contact with Microsoft soon after and said they’d like to collaborate on some accessories for the system.

In some ways this wouldn’t be particularly difficult: The XAC uses 3.5mm headphone jacks as its main input, so it can accept signals from a wide range of devices, from its own buttons and sticks to things like blow tubes, so there’s no worries about proprietary connections, for instance. But when it comes to accessible devices and systems like this, there are often other rigorous standards in place that need to be upheld throughout, so it’s necessary to work closely with both the platform provider (Microsoft) and, naturally, the people who will actually be using them.
“This community, you can’t make anything for them without doing it with them,” said Starrett. “When we design a gaming keyboard or mouse, we engage pros, players, all that stuff, right? So with this, it’s absolutely critical to watch them with every piece.”
“The biggest takeaway is that everybody is so different: every challenge, every setup, everyone we talked to,” he continued. “We had a 70, 80 year old guy who plays Destiny and has arthritis — all we really needed to do was put a block on the back of his controller, because he couldn’t pull the trigger. Then we worked with a girl who has a quadstick, she was playing Madden like a pro with something you just puff and blow on. Another guy played everything with his feet. So we spent a lot of time on the site just watching.”
The final set of buttons they arrived at includes three very large ones, four smaller ones (though still big compared with ordinary controller buttons), four “light touch” buttons that can be easily activated by any contact, and two big triggers. Because they knew different gamers would use the sets differently, there’s a set of labels in the box that can be applied however they like.

Then there are two hook and loop (i.e. Velcro) mats to which the buttons can be attached, one rigid and the other flexible, so it can be draped over a leg, the arm of a couch, etc.
Even the packaging the buttons come in is accessible: A single strip of tape pulls out and causes the whole box to unfold, and then everything is in non-sealed reusable bags. The guide is wordless so it can be used in any country, by any player.
It’s nice to see such consideration at work, and no doubt the players who will benefit from these products will be happy to have a variety of options to choose from. I was starting to think I could use a couple of these buttons myself.
Starrett seemed very happy with the results, and also proud that the work had started something new at Logitech.
“The groups we talked to brought a lot of different things to mind for us,” he said. “We’re always updating things, but now we’re updating everything with an eye to accessibility. It’s helped Logitech as a company to learn about this stuff.”
You can pick up Logitech’s Adaptive Gaming kit here for $100.
Google Maps will soon begin testing a new feature that’s more common to social networks like Facebook, rather than a maps app: the ability to find and follow other users. In Google Maps’ case, it’s specifically rolling out the ability to follow top “Local Guides” — its community members who actively review business and share photos and other knowledge to Google Maps, as part of a larger rewards program.
The Local Guides program launched in 2015 as a way to take on Yelp Elites, by allowing the most active Maps contributors to earn status as a tastemaker of sorts for their own hometown. Guides write more in-depth business reviews and post photos in order to help other Google Maps users learn about the area.
In exchange, they receive a variety of perks like early access to new features, exclusive local meetups, free access to Google services, discounts and coupons, and more.

Now, Google says, it it’s kicking off a pilot program that will allow Google Maps users in select markets to follow top Local Guides by clicking a new “Follow” button on these users’ profile pages. By doing so, the Guides’ recommendations will be surfaced for you when you’re using Google Maps. In a new section on the “For You” tab in the app, you’ll find the area recommendations from the Local Guides.
Google is piloting the program in Bangkok, Delhi, London, Mexico City, New York, Osaka, San Francisco, São Paulo, and Tokyo, for the time being. Presumably, if all goes well, it would expand to more markets.
The feature is the latest move by Google Maps to take on Facebook as the first stop for discovering area businesses and keeping up with their news, events, sales, and more. Just over a year ago, Google rolled out a “Follow” feature for tracking businesses on the Maps app, which later expanded to iOS. This summer Google launched a host of tools for local businesses that allowed them to update their photos and profiles on Google Maps, claim a short URL, and send offers to customers — all features that challenge Facebook Pages.
But until now, Google’s focus has been on getting users to follow and interact with businesses themselves, not other users.

Of course, there’s one big caveat to the Local Guides program in terms of using it as a good source for business information: it’s crowdsourced info from regular people, not professional critics or reviewers. That means the quality of the Local Guides’ reviews can be fairly hit-or-miss. Meanwhile, Google seems more concerned with Local Guides’ engagement and quantity of reviews, rather than review accuracy or quality.
Often, the Local Guides’ reviews lack any criticism, but are simply non-detailed posts about the business in question. For example, many restaurant reviews don’t say much more than “the food is amazing! can’t wait to go back!,” or some variation of this with a few more words. They often read no better (and sometimes much worse) than the other user reviews on the Google Maps app. That’s not to say all Local Guides’ reviews are unhelpful — many do make an effort — but just seeing a review labeled as being from a “Local Guide” is no indication of the review’s quality.
However, the new recommendations feature coming to these 9 test markets will focus more on the Local Guides’ photos, rather than their words. On the “For You” tab of Google Maps, their recommendations will be on display in the form of photo collages — only by clicking through will you see what they wrote. The effect is one where there’s a bit of an Instagram-like feel to the Google Maps app.
The new feature was announced at Google’s annual Local Guides summit. Here, Google also shared how its Local Guides community has grown to around 120 million people across 24,000 cities and towns. But this is another confirmation that the company is celebrating user growth, but not necessarily with an eye on review quality. Unfortunately, if Local Guides can’t all be trusted to offer compelling, detailed and fair reviews, people will not consider them of interest, and won’t be compelled to “follow” anyone here for those sorts of recommendations.
Google didn’t say when the “Follow” feature would launch into pilot testing in these markets, just that it would be arriving “soon.”
BBQ legend Weber is getting into the connected cooking game with their new SmokeFire grill, which uses wood pellets for fuel and which incorporates technology developed by Weber in partnership with appliance startup June for WiFi-enabled smart cooking.
The SmartFire grill, which will be available for pre-order in the U.S. starting on Cyber Monday and which will star shipping early next year, is a first in more ways than one for Weber. Yes, it packs in connected smart cooking – but it’s also the first time Weber has made a pellet grill, a style of outdoor cooker popularized by Traegar, and useful for both low and slow smoking, as well as high-heat grilling like a more traditional coal, natural gas or propane BBQ.
Weber may not have a history of building pellet grills, but it does have a very strong reputation when it comes to outdoor cooking appliances. The business introduced its iconic Kettle Grill back in 1952, and consistency racks up top marks for its range of BBQs, known for their even, consistent temperatures and long-term durability.
[gallery ids="1913242,1913241,1913240,1913235,1913239,1913238,1913237,1913236"]
This legacy cooking industry heavyweight apparently decided to partner with June once word of the startup’s own Smart Oven started circulating around the office. June and Weber teamed up to test thousands of recipes in the development of the Weber Connect smart grilling software, which provides step-by-step directions ranging from prep through the entire cook, as well as a an ETA on whatever you’ve got on the grill, delivered to and controlled from your smartphone.
The SmartFire comes in two different sizes, with 24″ and 36″ grilling surfaces respectively, for $999 and $1,199 respectively. The design looks like what you’d expect from a pellet grill – with the interesting choice of locating the hopper wherein you feed said pellets to the back of a small prep shelf on the right side of the grill. If you’re new to pellet grills, they feed these processed wood pellets, which produce great smoke but very little ash because of their high-efficiency burn, in a controlled manner that keeps temperature inside the grill consistent where you set it.
Low and slow is a great way to grill, and having intelligent cooking features to guide you along the way should help alleviate rookie mistakes like over and undercooking. Plus, it’s just exciting to imagine what Weber can do withs its first pellet grill.

If you want to get around, your options used to be fairly limited. You could either drive, walk, skate or bike to your destination. The trouble with these manual modes of transportation is that they aren’t as quick as driving.
Electric transportation offers a great middle ground. You get the convenience of manual transport—less traffic, alternative routes, lower costs—but with increased speed. Then there’s the fact they are often quite fun, too. If you’re ready to get your first electric rideable, we can help.
Here are the best electric rideables you can buy today.
Segway is among the most well-known of all rideable brands. Founded in 1999, the company achieved international fame (and infamy) thanks to the original Segway PT two-wheeled device. These days, the company has a range of products, including the Segway Drift W1 electric roller skates.
You may hear these called hovershoes, but that is only a marketing term; these are an electric alternative to traditional roller skates. The shoes have self-balancing technology, allowing you to skate around on just a single foot, should you want to. They come with safety features like front and rear ambient lights and rubber bumpers. A single charge will last up to 45 minutes. The Drift W1 weigh just 7kg and can reach a top speed of 12km/h.

The Walnutt Spectra X is one of the best electric skateboards available today. The board looks more like a longboard, with its pointed nose, but its length marks it out as a skateboard. The Spectra X is striking, too, with a black exterior highlighted with light green accents.
The board comes with a replaceable battery pack that should last up to 20km. Should you run out of juice mid-ride, the board comes with an additional battery that only takes a moment to swap in. The Spectra X has a top speed of 30km/h and can tackle a 25 percent incline. The board is IP66 rated for water resistance as well, so you’ll never have to worry about a spot of rain ruining the fun.
If you’d like to know more about the board before you buy, check out our coverage of the Spectra X from IFA 2019.
Many people question the need for an electric bike. However, they have advantages over a traditional push bike—the most significant on which is speed. The SwagCycle B-5 EBike is an affordable entry-level foldable electric bike. Unlike a regular bike, the B-5 comes pre-assembled so that you can get on the road quicker.
It has 14-inch wheels and has a range of 15.5 miles on a single charge. Although anyone can make use of an electric bike, the SwagCycle B-5 is aimed at commuters. That’s why this bike has a top speed of 15MPH, has a reasonably short 15.5-mile range, and is foldable for portability. However, the low price makes it one of the best electric bikes available today.

Electric scooters have become increasingly popular, with new models released seemingly every day. If you’re looking for an affordable option, the Kugoo S1 Electric Scooter is a great choice. The scooter has a range of 30km on a single charge, has a top speed of 30km/h, and weighs just 11kg.
Despite being a cheap electric scooter, the S1 has a reasonably powerful 350W motor onboard, allowing it to achieve a torque of 13.3N.M and tackle 15-degree gradients. Interestingly, the S1 also uses a regenerative front brake, allowing it to recharge the battery as you come to a stop. As the non-pneumatic wheels don’t contain air, there are front and rear shock absorbers to smooth out the ride.
To find out more about this scooter, be sure to take a look at our review of the Kugoo S1 Electric Scooter.
Towards the end of 2017, hoverboards exploded in popularity. At the time, though, they seemed like a novelty. Coupled with reports of exploding batteries, and unsafe products, interest tailed off. However, some hoverboards are still worth buying, and that includes the Swagboard Outlaw T6.
First, to lay to rest any safety concerns, the Outlaw T6 is UL certified, making it among the safest hoverboards on the market. This heavy-duty board can be used around the home and for light journeys, but it is built with off-road travel in mind. The board has a 12-mile range, can support up to 420lbs, and has a top speed of 12mph. The Outlaw T6 also has a built-in Bluetooth speaker for listening to music while you ride.
Electric rideables offer the convenience and fun of manual transport but add some extra speed to your journey. From skateboards to scooters, bikes to rollerskates, there’s a rideable for everyone, no matter your needs.
However, there will be times when we have to rely on other modes of transport, too. Make sure to use these public transit tracker apps to help you arrive on time.
Read the full article: The 5 Best Electric Rideables and Hoverboards

TikTok is a treasure trove of bite-sized videos. And you may even have shared some TikTok videos with friends. But what if you’d like to download TikTok videos to watch later?
In this article, we’ll show you how to download TikTok videos on desktop and mobile. Which is a lot easier than you might think.
There are several reasons why you may want to download a TikTok video.
TikTok comes with an endless stream of unique and fresh entertainment. Since the apps don’t have a native offline mode, you can download the clips you like to watch them later when you’re without an internet connection.
In addition, you may just prefer sharing videos instead of links on messaging apps. TikTok isn’t merely about lip-syncing or silly videos either. It houses a wide range of videos such as cooking tutorials. Therefore, you can employ the download functionality to, for instance, save a food recipe you want to try at some point.
As we’ll discuss later in this article, TikTok does allow you to directly download other people’s videos. However, irrespective of TikTok’s policies, you should be mindful of people’s privacy and not misuse these methods for any illicit purposes.
TikTok offers a built-in download button on its Android and iOS apps. It instantly saves the video you’re watching on your phone’s local storage.
To download a TikTok video, you first need to launch its app. Log in if you haven’t already. The download option will only work as long as you’re signed in.
Next, navigate to the video you’d like to save, and tap it. There will be a handful of quick actions in the video player’s bottom right-hand corner. The feature you’re looking for is under the Share button. Select it, and then tap Save Video.
The app will begin downloading the video and pull up a carousel of social share links for forwarding the file immediately. Since the video is saved to your phone’s gallery, you don’t have to share it right away if you don’t want to. You can simply go back to discard the social icons and access the video from your camera roll.
It’s worth keeping in mind that when you share a video from TikTok, the app automatically sends it as a video instead of a link. Hence, you don’t have to manually hit the Save as Video button for when you just want to forward it on a social or messaging app.
You also have the choice to download a TikTok video as a GIF. The Share as GIF option is present on the far right of the same row as Save Video. When you tap it, TikTok lets you trim the clip to your liking as well. Hit Generate to save the resulting GIF on your phone.
Do note that TikTok users have the ability to make their videos private. In that case, the Save Video button won’t be available for viewers. As a workaround, you can record your phone’s screen as it’s playing.
On iOS, users can utilize the native screen recording option. To add it to the control center, go to Settings > Control Center > Customize Controls, and inside More Controls, tap the green plus button beside Screen Recording. Pull up the control center, touch the screen recording button, and off you go.
Android users, however, will have to rely on one of these third-party screen recorders for Android. To use it, launch the app, play the video, and tap the record button.
You can block users from downloading your TikTok videos by heading to Settings > Privacy and Safety and turning off the Allow Download option.
Unlike its mobile apps, TikTok’s download option is not available on its website. So you will have to use a third-party service to download TikTok videos on your computer.

A website called TikTok Videos Downloader is one of these third-party services. It allows you to save any TikTok video in its original resolution. All you need to do is enter the clip’s link.
To grab a TikTok video’s link, open it in your web browser, and copy the page’s URL from the address bar at the top.
Once you have the link, head over to TikTok Videos Downloader. Paste the URL in the giant text box in the center. Click Download and choose the format. You can either download it as a video or an MP3 audio file. The video will be stored in your computer’s Downloads folder.

Alternatively, you can install a Google Chrome extension titled Instant and avoid the copy-pasting process. Instant enables you to bookmark and download videos from both Instagram and TikTok.
When you’ve installed Instant, you will see a new flash icon at the top right corner of Google Chrome. Visit the TikTok video you’d like to download. Click the Instant button to bookmark the clip.
Right-click it again and select Options. Instant will launch a new dashboard-like page where you will find all your saved TikTok or Instagram videos. To download them to your computer, hover over a video’s thumbnail and click the orange arrow button.
If you don’t want this to be a two-step process, you can change it in Instant’s settings. In the top-right corner of Instant’s dashboard, click the Preferences button and switch on the “Automatically download saved videos to your computer” option. Now, Instant will download the video locally to your desktop as soon as you save a TikTok clip.
Instant is not yet available for any other browser. However, Mozilla Firefox users can try an add-on called TikTok Downloader.
TikTok is home to some of the internet’s funniest videos today. And using these methods you can easily save your favorite TikTok videos to your phone or computer.
If you’re new to TikTok and want to understand what it is and how it works, here’s our beginner’s guide to using TikTok.
Read the full article: How to Download TikTok Videos on Desktop and Mobile

Using a Raspberry Pi is great fun. With so many projects to choose from, the $50 computer will keep you busy for months. But setting up a Raspberry Pi can be time consuming.
If you’re not plugging in a keyboard to set up Wi-Fi, you’re struggling to find the right display configuration. Or some other trivial setup option that shouldn’t really take this long to sort out.
But in many cases, you can make these changes easily, and quickly. Here’s how to tweak your Raspberry Pi in the /boot/ partition before you even boot it up.

When you set up a Raspberry Pi, you need to install an operating system. This isn’t done in same was on a PC or laptop. Instead, an operating system is installed on a Raspberry Pi by writing it to an SD card.
During this process, the card is split into two or more partitions. One of these has the operating system, formatted with the EXT4 filesystem.
The other is always called “boot” and referred to as /boot/. This features a host of boot data, configurations, and other options, and is formatted with the FAT filesystem. Note that the /boot/ partition is required for every Raspberry Pi distro.
Beyond the fact that you can use /boot/ to tweak the Raspberry Pi’s hardware settings, it’s notable in another way. The /boot/ partition can be accessed on any computer with a card reader. This contrasts with the main OS, which can almost always only be read on a Linux computer.
As such, you can access /boot/ in Windows, macOS, Linux, anything. Importantly, you can also browse to it from the installed operating system on your Raspberry Pi.
So, the /boot/ partition is useful. But what can you do with it? Insert your Raspberry Pi’s SD card in your PC, open /boot/, then read on to find out.
Running multiple projects on your Raspberry Pi can be a little confusing. For example, I maintain a spreadsheet, so I know what each Pi is doing. I also note what hardware is connected, such as a camera, or touchscreen, and which case the Pi is in.
But you might only have one Pi, with multiple microSD cards for easy switching between projects. Even then, however, you might find it difficult to recall what is on each card.
Simply create a text file in the /boot/ partition with a useful name, such as “security cam.txt” or “print server.txt.” You might add more details about the project to the body of the file.
Doing this lets you quickly identify the SD card without booting.
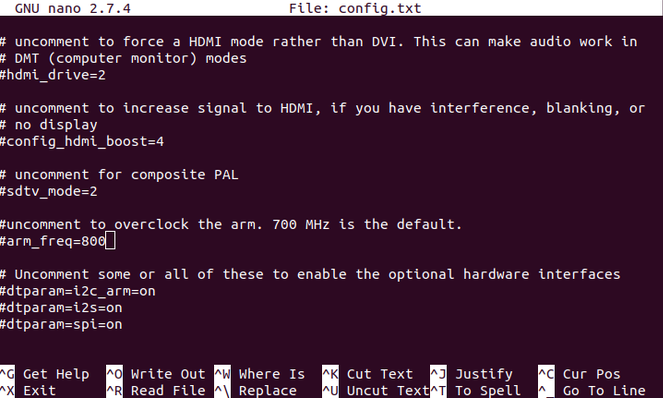
While the Raspberry Pi has no system BIOS as such, it does have the config.txt file, found in /boot/.
This is the home of tweaks for the Raspberry Pi, with options for almost everything you can imagine. The file features a list of settings using the format “property=value” (without quotes), one per line. Note the lack of spaces. Comments can be added using the # character to start a line.
Each section of the config.txt file is clearly marked, with commented lines explaining what each setting does. While this file should only be edited with care, there’s enough information to stop you making changes with serious consequences.
The sort of tweaks you make here will depend on your hardware setup. For example, you might wish to enable the camera module at boot:
start_x=1Meanwhile, if you’re struggling to get a picture via HDMI out, use
hdmi_safe=1This setting combines various HDMI settings to create a general, catch-all fix that should force HDMI to work.
One more notable config.txt tweak is rotating the display, using display_rotate. For example, rotate 90 degrees with
display_rotate=1A 180-degree rotation, meanwhile is
display_rotate=2And so on.
As you will have gathered, the config.txt is the single most important hardware configuration feature on the Raspberry Pi. While raspi-config is significant, config.txt has a greater impact, allowing for considerable pre-boot configuration.
Consult the elinux.org wiki for more comprehensive details about the config.txt file.
Using SSH to remotely access your Raspberry Pi saves a lot of time. For example, you might wish to update the operating system, but be unable to connect the Pi to a TV. The answer is to remotely access your Raspberry Pi and SSH is the quickest way to do this.
However, later versions of the Debian-based Raspberry Pi operating system have SSH disabled by default. This is a security measure that can prove inconvenient to regularly users.
There is a workaround, however. Simply create a special file in the /boot/ partition to enable SSH.
Open the /boot/ partition on your computer and create a new file. Label it ssh and remove the file extension. It’s as simple as that! As quick as it may be, it’s worth keeping an ssh flag file on your PC. This way, all you need to do is drag and drop the file into the /boot/ partition each time you install a Raspberry Pi OS.
This file acts as a flag when the Pi boots up, instructing the operating system to enable SSH.
Note that you’ll be prompted to change the default “pi” user password when you first login.
Another time sink with setting up a Raspberry Pi is getting the device on your wireless network. While plugging it directly into the router can save time here, you may not have enough ports. Or you have the Pi situated too far away.
The answer is wireless networking, which means logging into the Pi’s desktop environment. Setting up with a mouse and keyboard doesn’t take too long. You might set it up in the command line, by editing the wpa_supplicant.conf file, but you can also edit this before the Pi boots.
In the /boot/ partition, create a new file wpa_supplicant.conf. Open it in your PC’s text editor (e.g., Notepad on Windows, or you may prefer Notepad++). Copy and paste the following lines:
ctrl_interface=DIR=/var/run/wpa_supplicant GROUP=netdev

update_config=1

country=US

network={

ssid="SSID"

psk="PASSWORD"

key_mgmt=WPA-PSK

}
Some edits are required. First, change the country as appropriate (for example, GB for the United Kingdom).
Following this, set the SSID and PASSWORD fields to match those of your wireless network. Save the file, then close it and boot your Pi. The device should shortly connect to your local Wi-Fi. Access your router’s administration page to view the IP address for the Pi.
You should then be able to remotely access the Raspberry Pi over SSH. As with ssh, it’s worth keeping a copy of the wpa_supplicant.conf file on your PC for quick set up.

The release of the Raspberry Pi 4 in 2019 featured three iterations with different RAM specifications. While the 1GB and 2GB models run fine, the 4GB Raspberry Pi 4 has a bug. Specifically, this concerns USB port detection in Ubuntu.
The bug prevents the ports from being detected in the 4GB version of the Pi 4, but there is a workaround. Until an official fix is rolled out, you can tweak the amount of RAM available to the OS.
Open /boot/firmware and find the usercfg.txt file. Launch this in a text editor and add:
total_mem=3072This changes the available RAM from 4GB to 3GB.
Save the file and close, then boot your Raspberry Pi 4. The USB ports should now work. A future update should resolve this fault, so be sure to remove the line in usercfg.txt when this happens.
If you need to quickly copy data from your PC to your Raspberry Pi, you can use the /boot/ partition. Simply copy the data into a new directory and it will be accessible when you boot the Pi. Note that the size of the /boot/ partition is limited, however.
As such, this is only suitable for small files, like MP3s or images, rather than video files. It’s not an ideal solution, but it works.
Here are more ways to copy data between a PC and a Raspberry Pi.
With so many options for configuring your Raspberry Pi in the /boot/ partition, you’ll save time on your next project. To recap, you can do the following in the /boot/ partition:
Many of these tweaks speed things up, but you can streamline your Raspberry Pi setup further. Here’s how to save time configuring your Raspberry Pi with PiBakery.
Read the full article: 6 Ways to Hack a Raspberry Pi via the Boot Partition

Black Friday and Cyber Monday promise to give you the biggest discounts across the entire shopping year. There are, without doubt, attractive discounts. But at times, you might feel like the discounts aren’t quite what they could be. Black Friday deals can feel overwhelming.
Here are several tips you need to make sure you bag a great Black Friday deal.

The first thing you need to check is your Black Friday deal price history. One of the accusations leveled at stores and online retailers is that they ramp up prices before Black Friday and Cyber Monday. Once the higher price is established, the retailer drops the price and advertises the large discount.
It is an easy win-win strategy for retailers.
You can beat manipulated prices using a price history tracking website. Price history sites track the price of a product across a long period. You head to the price checker site and search for your product, then figure out if the Black Friday deal is as good as it seems.
One of the most popular price checker sites is CamelCamelCamel, which tracks price changes on Amazon.
Alternatively, check out PriceRunner for a more extensive range of prices from a wider range of sites.
Visit: Camelcamelcamel
Visit: PriceRunner

With so many Black Friday deals popping up, figuring out who has the best price is difficult. Websites and other retailers will tell you that their deal is best. Understandably, they want a sale. However, it doesn’t take long to complete a quick internet search to figure out if the deal on offer is what it seems.
You don’t need any special tools to check Black Friday prices. The easiest option is to search for the product online and compare the prices between websites.
As part of this, do not consider any Black Friday discount or deal before you check. It only takes a moment but could stop you from paying over the odds for a discounted product.

One of the first things you should check on any deal is the RRP. That’s the Recommended Retail Price. It can also be mentioned as List Price by sites like Amazon.
The RRP of any product is the sale price that the manufacturer recommends. The RRP gives retailers the opportunity to twist the appearance of a sale price in their favor.
In some cases, the Black Friday RRP is drastically out of date. The website might display a higher RRP than the regular price to give any discount a higher percentage.
For example, if a product RRP is $100 and the site advertises $90, that’s a 10% saving. However, if the site regularly sells the product at $90 regardless of the sale, you are not receiving a discount. The site is manipulating the price to make it appear as a discount.
The MSRP is the Manufacturer’s Suggested Retail Price. An MSRP is analogous to an RRP.
Another key price point differentiator is a Qualifying Offer. Some advertisers will display a fantastic price that you just cannot say no too. However, on closer inspection, you realize that the price is only available if you also purchase another product, deal, subscription, or otherwise.
A qualifying offer can quickly strip back any potential discount. Some websites are notorious for displaying an amazing discount price, only to reveal that massive discounts are only available for long term members. Or that the discount miraculously reduces after you sign up for the service.
Qualifying offers are open to abuse. Depending on your country, advertisers may manipulate figures to make the qualifying deal an intriguing proposition.
The other thing to check as part of qualifying offers is the small print. Retailers and manufacturers rely on you not checking the small print on Black Friday.
If you don’t read the small print, you could sign up for something or service (or stop yourself from using one!) without realizing it.
It is easily done. The length and depth of the fine print for many sites, services, and products means that many people skip through the details. As consumers believe most sites and services won’t cause them harm or otherwise, they breeze through the small print without considering the implications.
One common Black Friday tip is to set targets. Don’t head into the Black Friday and Cyber Monday sales without taking a moment to figure out what you’re looking for.
If you head into Black Friday without a purpose, you will come home without the hardware and the deals you want.
You don’t have to know exactly what you want—but it does help. However, if you want to buy a specific product on Black Friday, make sure you understand the current price for your product so you can understand if your Black Friday deal is really a deal.
Another thing to consider is the type of product you’re buying. Some products attract consistently higher discounts than others; here are the best things to buy on Black Friday with those extra discounts.

Tying into your Black Friday price and product targets are price alarms or deal alerts. Even if you don’t use a price alarm for the rest of the year, it is a great idea to use a Black Friday price alarm.
The price of a product can change so rapidly on Black Friday or Cyber Monday that you can miss a quick deal. If you’re tracking the price, you’ll understand if the Black Friday discount is a real bargain.
Use a product price alarm or a deal alert to keep your eyes on the Black Friday prize. Most price alert websites or services will drop you an alert straight to your inbox. If you set alerts for the products you want most, you’ll pick up a Black Friday Bargain.
Some Black Friday deal alert tools to consider include:
Everyone is out for a Black Friday deal. The allure of massive discounts on a huge range of products before the holiday period is enticing. Make sure that you don’t fall for a Black Friday pricing trick ahead of the big day using these tips.
If you’re a regular Amazon shopper, check out the best Amazon bargain hunting sites to get yourself a deal.
Read the full article: How to Make Sure Your Black Friday Deal Is a Massive Bargain

Today’s video games take up so much space that you’ll probably run out of room on your PlayStation 4’s included hard drive before long. Thankfully, the PS4’s support for external storage means you can expand this without much trouble.
We’ve collected the best external hard drives for PS4 below. Whether you’re looking for an affordable option or maximum storage, you’ll find something suitable. We’ll also show you how to start using your external storage.
If you’re looking for a respectable amount of PS4 storage at a great value, the WD 2TB Elements drive is a great choice. It’s USB 3.0 compatible, so it can keep up with the demands of PS4 games. The slim form factor, measuring just 4.35 x 3.23 inches, means it can sit comfortably on top of your PS4.
2TB is enough for plenty of games, so it will be some time before you need to upgrade again. Those who have a ton of data on their system should consider getting more storage, but this is an affordable option for most players.
Need a massive amount of storage space for games? The PS4 supports external drives of up to 8TB, so the Seagate Expansion Desktop 8TB gets you as much storage as possible. It’s a desktop drive, so it’s not as portable as the WD Elements option.
This one measures 6.93 x 4.75 inches and is almost three times as deep. Because it’s not powered over USB, you’ll need to plug in the dedicated power cable. 8TB is a load of space, so only those who download dozens of games need choose this drive.
Not everyone needs a ton of space. If you have a more modest game collection, consider the Seagate Portable 1TB for some additional storage. Early PS4s came with 500GB of space included; modern models have a 1TB drive in the box. This means 1TB will either double or triple what your system came with.
Like the WD drive, this is a portable unit, so there’s no separate power cable required. It measures 4.6 x 3.15 inches. You might see a version of this drive that’s marked as an “officially licensed product” for the PS4. We recommend avoiding this, as it costs more than the above but is essentially the same product. You’ll get better value by avoiding the overpriced official drive.
250GB is the minimum size for PS4 external storage. However, 250GB isn’t much space for games, and buying an external HDD of that size isn’t cost-effective. Thus, we recommend you buy a 500GB drive at a minimum. Most 500GB external drives available today are from lesser-known companies, so you take a small risk buying them.
But if you want additional storage at the lowest possible cost, the KESU 500GB Ultra Slim is a solid offering. It’s about the same physical size as the other portable drives we’ve looked at. This 500GB drive won’t give you loads of space for games, but it’s the cheapest option worth considering.
If you can stretch your budget a bit, we definitely recommend looking at a 1TB drive from a trusted manufacturer like WD or Toshiba. You’ll get additional storage and better reliability for just a bit more cash. Plus, bear in mind that you can only connect one external drive to the PS4 at a time. It’s wise to buy a large enough device for your needs the first time to avoid data transfers down the road.
If you often travel with your PS4, you don’t want to have to leave any games behind. The Silicon Power 4TB Rugged is an option that’s built for travel and packs plenty of storage. This drive is a bit larger at 7.3 x 6.1 inches but has rugged features that make it worth a look for those on the go. Silicon Power’s drive includes shock and water resistance, so you don’t have to worry about bumps or splashes.
It’s cased in rubber to prevent slipping and features an anti-scratch surface. The unit also helpfully includes a slot for easily stowing the cable while traveling. Keep in mind that these durability features means it costs a bit more than other 4TB drives. It’s also available in a 1TB option if you don’t need as much storage.
If you’re interested in the fastest loading speeds possible, an external solid-state drive (SSD) is the way to go. SSDs are more expensive than HDDs but offer much faster performance. We recommended the SanDisk 500GB Extreme Portable External SSD, although it is available in sizes from 250GB to 2TB.
In this case, 500GB is a good balance of cost and size. This is also a rugged drive, featuring water, dust, and shock resistance. The device measures 3.8 x 1.9 inches. We suggest this for people who don’t have a ton of games installed but want them to run quickly.
500GB isn’t a whole lot of extra space, but the games you run from the external drive will have a noticeable improvement. Remember that this won’t speed up the PS4’s operating system, though, since that’s still installed on the internal hard drive.
We’ve picked out the best external hard drives for PS4, but maybe you’re interested in something else or want to use one you already have. Thankfully, the requirements for a PS4-compatible external hard drive are pretty straightforward.
Any external drive that uses USB 3.0 or later and is between 250GB and 8TB will work with the PS4. Make sure it uses a USB-A connection and not the newer USB-C standard, which isn’t compatible with the PS4.
Once you’ve got your PS4 external hard drive ready, it’s easy to get it configured. Your PS4 must have system software version 4.50 (which was released in early 2017) or newer to use an external drive.
First, connect your external drive to the PS4. Sony states that you must plug it in directly to the system, so avoid using any USB hubs. Once connected, you’ll need to format it (unless you bought a drive that was pre-formatted for the PS4).
To do this, turn on your system and go to Settings > Devices > USB Storage Devices. Select your device and choose Format as Extended Storage. Hit the Options button on your controller to show this option if it doesn’t appear automatically.

That’s it; you’ve successfully added external storage to your PS4. The system lets you keep games, apps, downloadable content (DLC), and game updates on the external drive.
However, save data, themes, and captured screenshots/video clips will always save to the internal drive. The system will use your new storage automatically, but you can make a few changes per your preferences too.
It’s important to disconnect your external drive properly when you want to remove it. Disconnecting while it’s in use could damage your data. The system assumes the drive is connected, even when you power off the PS4, until you tell it to disconnect using the below steps.
Hold the PlayStation button on your controller to open the quick menu, then visit Sound/Devices. Select Stop Using Extended Storage here, and hit OK to confirm. Now it’s safe to disconnect your external drive.

If you like, you can choose where games install to by default. You can’t change this while games are downloading, so it’s smart to set this up as soon as you’ve connected your drive.
Visit Settings > Storage and hit the Options button on your controller to show a new menu. Select Application Install Location here, and set it to Extended Storage. This will configure your external drive as the default save location.

To move a game between your storage drives, go to Settings > Storage and select the device that contains the game you want to relocate. Choose Applications from the data types.
Now press Options on your controller and select Move to Extended Storage (or Move to System Storage). Check all the games you want to move, then hit Move and confirm.

Now you have a great selection of PS4 external drives to choose from and know how to get extended storage set up. External drives are a great way to add more storage without much hassle, which is super helpful for anyone with a big game collection.
You might consider replacing your PS4’s internal hard drive as well. It’s not difficult and can give you even more storage. Consider pairing a modest internal SSD with a large external HDD for the best of both worlds.
Read the full article: The 6 Best External Hard Drives for the PS4
Looks like there’s still money to be made in news aggregation — at least according to the investors backing the news app SmartNews.
The company is announcing the close of a $92 million round of funding at a valuation of $1.2 billion. The funding was led by Japan Post Capital Co. and ACA Investments, with participation from Globis Capital Partners Co., Dentsu, and D.A. Consortium.
This includes the $28 million that SmartNews announced in August, and it brings the startup’s total funding to $182 million.
News aggregation apps seemed to everywhere a few years ago, and while they haven’t exactly disappeared, they didn’t turn into unicorns, with many of them acquired or shut down.
However, Vice President of U.S. marketing Fabian-Pierre Nicolas told me that SmartNews has a few unique advantages. For one thing, it uses machine learning rather than human curation to “thoughtfully generate a news discovery experience” that’s personalized to each user.

Secondly, he said that many news aggregators treat the publishers creating the content that they rely on “like a commodity,” whereas SmartNews treats them as “true partners.” For example, it’s working with select publishers like Business Insider, Bloomberg, BuzzFeed and Reuters on a program called SmartView First, where articles are presented in a custom format that gives publishers more revenue opportunities and better analytics.
Lastly, he said SmartNews has focused on only two key markets — Japan (where the company started) and the United States. And it sounds like one of the main goals with the new funding is to continue growing in the United States.
Nicolas also suggested that there are some broader trends that SmartNews is taking advantage of, like the fact that the shift to mobile news consumption is still underway, particularly for older readers.
And then there’s “the loss of trust in some news sources — political news, especially” which makes SmartNews’ curated approach seem more valuable. (It also recently launched a News From All Sides feature to show coverage from different political perspectives.)
As for monetization, he said SmartNews remains focused on advertising.
Yes, there’s a growing interest in subscriptions and paywalls, which is also reflected in subscription news aggregators like Apple’s News+, but Nicolas said, “Eighty-five to ninety percent of Americans are not subscribing to news media. We believe those 85 to 90 percent have a right to have quality information as well.”
He’s reportedly not going to take over WeWork, but John Legere is definitely on his way out of the CEO role at T-Mobile, the carrier that is currently merging with SoftBank-controlled Sprint. Today the carrier and Legere confirmed that Mike Sievert — currently T-Mobile’s COO — will succeed Legere as CEO on May 1 of 2020. Legere will stay on the board.
Neither Legere nor T-Mobile commented on what his next move will be, and specifically if this will pave the way for him to take over the top job at WeWork. There had been reports that Legere — something of a turnaround specialist — was being lined up for the job at the very troubled office-space startup, which had to shelve its IPO earlier this year after showing poor financials amid questionable management that not only led to the departure of its founder Adam Neumann as CEO, but a strong devaluation of the company that resulted in SoftBank, as a major creditor, taking control.
The reports of Legere coming in to fix things at WeWork seemed to get refuted quite swiftly. However, the same “sources” that quashed that story also insisted he had “no plans” to leave T-Mobile. With elements of the report in doubt, that could put the WeWork rumors (or thoughts of other SoftBank roles, for that matter) back on the table. We’ve asked Legere directly and will update this post if he replies.
Legere has been with T-Mobile since 2012, where he used his irreverent personality to directly spar with the industry while at the same time position the carrier — which has long trailed bigger competitors like AT&T and Verizon (which owns us) in size — as a growth story and different from the pack (hence the “un-carrier” marketing strategy). The stock price has over that time gone up, and the carrier is currently valued at around $65 billion. (Notably, the stock is down about 1.5% today on the back of this news.)
Sievert will be tasked with continuing the route that Legere set, T-Mobile said, “demonstrating that T-Mobile will remain a disruptive force in US wireless marketplace to benefit consumers.”
“I hired Mike in 2012 and I have great confidence in him. I have mentored him as he took on increasingly broad responsibilities, and he is absolutely the right choice as T-Mobile’s next CEO,” said Legere in a statement. “Mike is well prepared to lead T-Mobile into the future. He has a deep understanding of where T-Mobile has been and where it needs to go to remain the most innovative company in the industry. I am extremely proud of the culture and enthusiasm we have built around challenging the status quo and our ongoing commitment to putting customers first.”
“The Un-carrier culture, which all our employees live every day, will not change,” Sievert said in a separate statement. “T-Mobile is not just about one individual. Our company is built around an extraordinarily capable management team and thousands of talented, committed, and customer-obsessed employees. Going forward, my mission is to build on T-Mobile’s industry-leading reputation for empowering employees to deliver an outstanding customer experience and to position T-Mobile not only as the leading mobile carrier, but as one of the most admired companies in America.”
Regardless of whether this is a sign that SoftBank indeed has a job lined up for Legere at one of its other portfolio companies, such as WeWork, the changing of the guard makes some sense, since the merger with Sprint would leave a question mark over who would lead the combined business. The two companies were reportedly close to releasing a management line-up for the merged business earlier this year, but that has yet to happen. The merger is due to be completed early next year.
Last year at Dreamforce, Salesforce’s enormous annual customer conference, Apple and Salesforce announced the beginnings of a partnership where the two organizations would work together to enhance Salesforce products running on Apple devices. Today, as this year’s Dreamforce conference begins, the companies announced the fruits of that labor with general availability of two new tools that were first announced at last year’s event.
For starters, Apple has been working with Salesforce to redesign the Salesforce Mobile app to build in Apple iOS features into the app like being able to use Siri shortcuts to get work done faster, using your voice instead of typing, something that’s sometimes awkward to do on a mobile device.
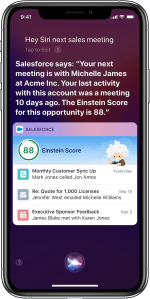
Photo: Salesforce
For instance, you could say, “Hey Siri, next sales meeting,” and Siri can interact with Salesforce CRM to tell you who your meeting is with, the name of his or her company, when you last met and what the Einstein opportunity score is to help you predict how likely it is that you could make a sale today (or eventually).
In addition, the Mobile App takes advantage of Apple’s Handoff feature to reflect changes across devices immediately, and Apple’s Face ID for easy log on to the app.
Salesforce also announced a pilot of Einstein Voice on Salesforce Mobile, allowing reps to enter notes, add tasks and update the CRM database using voice. Einstein is Salesforce’s general artificial intelligence layer, and the voice feature uses natural language understanding to interpret what the rep asks.
The company reports that over 1000 companies participated in piloting the updated app, which constitutes the largest pilot in the history of the organization.
Salesforce also announced its new mobile development platform SDK, built specifically for iOS and iPadOS using the Swift language. The idea is to provide a tool to give Salesforce developers with the ability to build apps for iPad and iPhone, then package them up with a new tool called Swift UI and Package Manager.
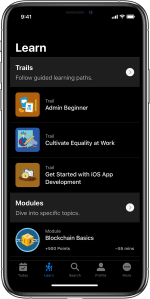
Photo: Saelsforce
Trailhead Go is the mobile version of the company’s online learning platform designed specifically for iPad and iPhone. It was built using the new Mobile SDK, and allows users to access the same courses they can on the web in a mobile context. The new mobile tool includes the ability to Handoff between devices along with support for picture-in-picture and split view for multi-tasking when it makes sense.
Salesforce Mobile and Trailhead Go are available starting today for free in the iOS App Store. The Salesforce Mobile SDK will be available later this year.
As this partnership continues to develop, both companies should benefit. Salesforce gets direct access to Apple features, and can work with Apple to implement them in an optimized way. Apple gets deeper access to the enterprise with help from Salesforce, one of the biggest enterprise software vendors around.