07 June 2019

Audi proves two little screens are better than one big screen


I’m spending some time in the new Audi Q8, and the car company equipped the crossover with its latest infotainment system. I love it, fingerprints, dust and all.

The fingerprints are part of the story. I could have cleaned up the screens for the photos, but I thought it was essential to show the screens after a couple of weeks of use.

There are two screens placed in the center stack of the Q8. The top one features controls for the radio, mapping system, and vehicle settings. The bottom screen is for climate controls and additional controls like garage door opener and the vehicle’s cameras. Both have haptic feedback, so the buttons feel nearly real.

Both screens are tilted at the right angle, and the shifter is built in a way that provides a handy spot to wrist your wrist, steadying it as you hit the screens.

Car companies are, turning to touchscreens over physical buttons. It makes sense on some level, as screens are less expensive and scalable across vehicles. With screens, car companies do not need to design and manufacture knobs, buttons, and sliders but instead create a software user interface.

Tesla took it to the next level with the debut of the Model S in 2012. The car company stuck a massive touchscreen in the center stack. It’s huge. I’m not a fan. I find the large screen uncomfortable and impractical to use while driving. Other car companies must agree as few have included similar touchscreens in their vehicles. Instead of a single touchscreen, most car makers are using a combination of a touchscreen with physical knobs and buttons. For the most part, this is an excellent compromise as the knobs and buttons are used for functions that will always be needed like climate control.

Audi is using a similar thought in its latest infotainment system. The bottom screen is always on and always displays the climate control. There’s a button that reveals shortcuts, too, so if the top screen is turned off, the driver can still change the radio to a preset. The top screen houses buttons for the radio, mapping, and lesser-used settings.

The user interface uses a dark theme. The black levels are fantastic even in direct sunlight, and this color scheme makes it easy to use during the day or night.

The touchscreens have downsides but none that are not present on other touchscreens. Glare is often an issue, and these screens are fingerprint magnets. I also found the screen to run hot to the touch after a few minutes in the sun.

Apple CarPlay remains a source of frustration. The Q8 has the latest CarPlay option, which allows an iPhone to run CarPlay wirelessly. It only works sometimes. And sometimes, when it does work, various apps like Spotify do not work in their typical fashion. Thankfully, Apple just announced a big update for CarPlay that will hopefully improve the connectivity and stability.

The infotainment system is now a critical component. Automakers must build a system that’s competent and feels natural to the driver and yet able to evolve as features are added to vehicles through over-the-air updates. It’s a challenging task made harder by the YEARS BETWEEN HARDWARE REVISIONS. Automakers must build a system that works today and continues to work years from now.

Audi latest infotainment system is impressive. It does everything right: it’s not a distraction, it’s easy to use, and features fantastic haptic feedback.


Read Full Article

A Google Walkout organizer just left the company, saying ‘if they won’t lead, we will’


Claire Stapleton, a longtime Google employee who helped organize a 20,000-person walkout of Google employees last November over the company’s handling of sexual harassment allegations, announced today on Medium that she has left the outfit.

She cites her health, saying she is having another child this fall. But she also says the move ties to retaliation she has alleged she faced after helping stage the walkout, writing: “I made the choice after the heads of my department branded me with a kind of scarlet letter that makes it difficult to do my job or find another one. If I stayed, I didn’t just worry that there’d be more public flogging, shunning, and stress, I expected it.”

Stapleton — who joined Google in 2007 to work in global communications, later joining the Google Creative Writing Lab for just shy of two years before moving on to YouTube, where she has spent the last five years —  said in April that she and fellow organizer Meredith Whittaker had faced retaliation from Google management following the walkout.

For her part, Stapleton posted on numerous internal Google mailing lists that two months after the protest, she was told she’d be demoted from her marketing manager job at YouTube and lose half her reports. She said she then turned to human resources but that rather than find relief, the retaliation worsened.

“My manager started ignoring me, my work was given to other people, and I was told to go on medical leave, even though I’m not sick,” Stapleton wrote to her colleagues. A lawyer hired by Stapleton prompted the company to conduct an investigation and reverse her demotion, she said, but she added in writing that her work environment remained hostile and that “I consider quitting nearly every day.”

In leaving, Stapleton says she remains fond of Google, adding she still believes “this place is magic.” But she also traces how she arrived at such a public resignation”

I have such a simple, pure nostalgia around the years I spent at Google in Mountain View, 2007–2012, that it almost figures in my mind like a childhood — a blur of grass and sun. I used to go out of my way to check out a weekly dodgeball game (that was a thing then). I whizzed around campus on those primary-colored bikes. I dabbled in veganism. But the most potent sense-memory I have comes from five years’ worth of Fridays standing at the side of the stage in Charlie’s, half a beer deep, watching Larry and Sergey and TGIF in a kind of (half-a-beer-buzzed) state of rapture. Google’s lore, its leadership, its promise — the whole thing lit me up, filled me with a sense of purpose, of inspiration, of privilege to be here.

Fast forward a few years and I’d moved to New York, cycled through Creative Lab and landed at YouTube. As I neared the ten-year mark, my first boss, Sally Cole, who’d left Google many years before, joked that I was surely due for an existential crisis. But when I got back to work after having my son Malcolm in 2017, it wasn’t me who was having an existential crisis. It was Google itself. The world had changed, dramatically altering the context of our work and the magnitude of our decisions, especially at YouTube. Google’s always had controversies and internal debates, but the “hard things” had intensified, and the way leadership was addressing them suddenly felt different, cagier, less satisfying. It was the way that management answered the TGIF questions about the Andy Rubin payout–the sidestepping, the jokes, the total lack of accountability–that inspired me to call for the Walkout.

The walkout, which involved Google employees around the globe, was effective. One week later, Google said it would end its practice of forced arbitration for claims of sexual harassment or assault. CEO Sundar Pichai further told employees Google would overhaul its reporting processes for harassment and assault to provide more transparency about reported incidents, and that it would ratchet up the pressure on employees who do not complete mandatory sexual harassment training by dinging them in their performance reviews.

The protest followed an explosive New York Times investigation last year that reported Google had protected Android co-founder Andy Rubin after he had been “credibly accused of sexual harassment.” Instead of fire him, said the Times, the company handed him a $90 million exit package, paid in installments of about $2 million a month for four years.

Rubin has strongly denied the claims.

Google has more recently said it will no longer force employees to settle disputes with the company in private arbitration, expanding on that earlier pledge to do away with the practice in cases relating to sexual harassment or assault.

In closing her Medium post, Stapleton writes that it is her “greatest hope in leaving that people continue to speak up and talk to each other, stand up for one another and for what’s right, and keep building the collective voice. I hope that leadership listens. Because if they won’t lead, we will.”


Read Full Article

Introducing Google Research Football: A Novel Reinforcement Learning Environment


The goal of reinforcement learning (RL) is to train smart agents that can interact with their environment and solve complex tasks, with real-world applications towards robotics, self-driving cars, and more. The rapid progress in this field has been fueled by making agents play games such as the iconic Atari console games, the ancient game of Go, or professionally played video games like Dota 2 or Starcraft 2, all of which provide challenging environments where new algorithms and ideas can be quickly tested in a safe and reproducible manner. The game of football is particularly challenging for RL, as it requires a natural balance between short-term control, learned concepts, such as passing, and high level strategy.

Today we are happy to announce the release of the Google Research Football Environment, a novel RL environment where agents aim to master the world’s most popular sport—football. Modeled after popular football video games, the Football Environment provides a physics based 3D football simulation where agents control either one or all football players on their team, learn how to pass between them, and manage to overcome their opponent’s defense in order to score goals. The Football Environment provides several crucial components: a highly-optimized game engine, a demanding set of research problems called Football Benchmarks, as well as the Football Academy, a set of progressively harder RL scenarios. In order to facilitate research, we have released a beta version of the underlying open-source code on Github.

Football Engine
The core of the Football Environment is an advanced football simulation, called Football Engine, which is based on a heavily modified version of Gameplay Football. Based on input actions for the two opposing teams, it simulates a match of football including goals, fouls, corner and penalty kicks, and offsides. The Football Engine is written in highly optimized C++ code, allowing it to be run on off-the-shelf machines, both with GPU and without GPU-based rendering enabled. This allows it to reach a performance of approximately 25 million steps per day on a single hexa-core machine.
The Football Engine is an advanced football simulation that supports all the major football rules such as kickoffs (top left), goals (top right), fouls, cards (bottom left), corner and penalty kicks (bottom right), and offside.
The Football Engine has additional features geared specifically towards RL. First, it allows learning from both different state representations, which contain semantic information such as the player’s locations, as well as learning from raw pixels. Second, to investigate the impact of randomness, it can be run in both a stochastic mode (enabled by default), in which there is randomness in both the environment and opponent AI actions, and in a deterministic mode, where there is no randomness. Third, the Football Engine is out of the box compatible with the widely used OpenAI Gym API. Finally, researchers can get a feeling for the game by playing against each other or their agents, using either keyboards or gamepads.

Football Benchmarks
With the Football Benchmarks, we propose a set of benchmark problems for RL research based on the Football Engine. The goal in these benchmarks is to play a “standard” game of football against a fixed rule-based opponent that was hand-engineered for this purpose. We provide three versions: the Football Easy Benchmark, the Football Medium Benchmark, and the Football Hard Benchmark, which only differ in the strength of the opponent.

As a reference, we provide benchmark results for two state-of-the-art reinforcement learning algorithms: DQN and IMPALA, which both can be run in multiple processes on a single machine or concurrently on many machines. We investigate both the setting where the only rewards provided to the algorithm are the goals scored and the setting where we provide additional rewards for moving the ball closer to the goal.

Our results indicate that the Football Benchmarks are interesting research problems of varying difficulties. In particular, the Football Easy Benchmark appears to be suitable for research on single-machine algorithms while the Football Hard Benchmark proves to be challenging even for massively distributed RL algorithms. Based on the nature of the environment and the difficulty of the benchmarks, we expect them to be useful for investigating current scientific challenges such as sample-efficient RL, sparse rewards, or model based RL.
The average goal difference of agent versus opponent at different difficulty levels for different baselines. The Easy opponent can be beaten by a DQN agent trained for 20 million steps, while the Medium and Hard opponents require a distributed algorithm such as IMPALA that is trained for 200 million steps.
Football Academy & Future Directions
As training agents for the full Football Benchmarks can be challenging, we also provide Football Academy, a diverse set of scenarios of varying difficulty. This allows researchers to get the ball rolling on new research ideas, allows testing of high-level concepts (such as passing), and provides a foundation to investigate curriculum learning research ideas, where agents learn from progressively harder scenarios. Examples of the Football Academy scenarios include settings where agents have to learn how to score against the empty goal, where they have to learn how to quickly pass between players, and where they have to learn how to execute a counter-attack. Using a simple API, researchers can further define their own scenarios and train agents to solve them.

Top: A successful policy that runs towards the goal (as required, since a number of opponents chase our player) and scores against the goal-keeper. Second: A beautiful way to drive and finish a counter-attack. Third: A simple way to solve a 2-vs-1 play. Bottom: The agent scores after a corner kick.
The Football Benchmarks and the Football Academy consider the standard RL setup, in which agents compete against a fixed opponent, i.e., where the opponent can be considered a part of the environment. Yet, in reality, football is a two-player game where two different teams compete and where one has to adapt to the actions and strategy of the opposing team. The Football Engine provides a unique opportunity for research into this setting and, once we complete our on-going effort to implement self-play, even more interesting research settings can be investigated.

Acknowledgments
This project was undertaken together with Anton Raichuk, Piotr Stańczyk, Michał Zając, Lasse Espeholt, Carlos Riquelme, Damien Vincent‎, Marcin Michalski, Olivier Bousquet‎ and Sylvain Gelly at Google Research, Zürich. We also wish to thank Lucas Beyer, Nal Kalchbrenner, Tim Salimans and the rest of the Google Brain team for helpful discussions, comments, technical help and code contributions. Finally, we would like to thank Bastiaan Konings Schuiling, who authored and open-sourced the original version of this game.

Daily Crunch: Facebook’s cryptocurrency is coming


The Daily Crunch is TechCrunch’s roundup of our biggest and most important stories. If you’d like to get this delivered to your inbox every day at around 9am Pacific, you can subscribe here.

1. Facebook plans June 18 cryptocurrency debut. Here’s what we know

Facebook is finally ready to reveal details about its cryptocurrency, codenamed Libra. It has currently scheduled a June 18 release of a white paper explaining its cryptocurrency’s basics, according to a source.

It sounds like Facebook’s cryptocurrency will be a stablecoin, transferable with zero fees via Facebook products including Messenger and WhatsApp.

2. NASA declares International Space Station ‘open for business,’ including private astronaut visits

NASA’s plan also includes allowing private business activities to take place on the ISS, including “in-space manufacturing,” marketing activities, healthcare research “and more,” NASA says.

3. How Amazon’s delivery robots will navigate your sidewalk

In Amazon’s current trial, the robots are always accompanied by human assistants — who probably look like robot dog walkers as they trot through the neighborhood.

4. HTC launches Vive Pro Eye stateside, costs four times as much as Rift S

HTC’s Vive Pro Eye headset is its latest enterprise play, integrating an eye-tracking camera to give users an additional input mode and a way for users to signal attention. It’s available in a bundle with SteamVR 2.0 base stations and Vive controllers for $1,599.

5. Depop, a social app targeting millennial and Gen Z shoppers, bags $62M, passes 13M users

Depop is a London startup that’s built an app for individuals to post and sell (mostly resell) items to groups of followers.

6. Walmart to launch in-home grocery delivery in three cities, starting this fall

The service will allow the retailer to deliver items directly to a customer’s fridge or freezer, even when that customer isn’t home.

7. Why identity startup Auth0’s founder still codes: It makes him a better boss

An interview with Eugenio Pace, who founded Auth0 in 2013. (Extra Crunch membership required.)


Read Full Article

Weighing Peloton’s opportunity and risks ahead of IPO


Exercise tech company Peloton filed confidentially for IPO this week, and already the big question is whether their last private valuation at $4 billion might be too rich for the appetites of public market investors. Here’s a breakdown of the pros and cons leading up to the as-yet revealed market debut date.

Risk factors

The biggest thing to pay attention to when it comes time for Peloton to actually pull back the curtains and provide some more detailed info about its customers in its S-1. To date, all we really know is that Peloton has “more than 1 million users,” and that’s including both users of its hardware and subscribers to its software.

The mix is important – how many of these are actually generating recurring revenue (vs. one-time hardware sales) will be a key gauge. MRR is probably going to be more important to prospective investors when compared with single-purchases of Peloton’s hardware, even with its premium pricing of around $2,000 for the bike and about $4,000 for the treadmill. Peloton CEO John Foley even said last year that bike sales went up when the startup increased prices.

Hardware numbers are not entirely distinct from subscriber revenue, however: Per month pricing is actually higher with Peloton’s hardware than without, at $39 per month with either the treadmill or the bike, and $19.49 per month for just the digital subscription for iOS, Android and web on its own.

That makes sense when you consider that its classes are mostly tailored to this, and that it can create new content from its live classes which occur in person in New York, and then are recast on-demand to its users (which is a low-cost production and distribution model for content that always feels fresh to users).


Read Full Article

Answers to your burning questions about how ‘Sign In with Apple’ works


One of the bigger security announcements from Apple’s Worldwide Developer Conference this week is Apple’s new requirement that app developers must implement the company’s new single sign-on solution, Sign In with Apple, wherever they already offer another third-party sign-on system.

Apple’s decision to require its button in those scenarios is considered risky — especially at a time when the company is in the crosshairs of the U.S. Department of Justice over antitrust concerns. Apple’s position on the matter is that that it wants to give its customers a more private choice.

From a security perspective, Apple offers a better option for both users and developers alike compared with other social login systems which, in the past, have been afflicted by massive security and privacy breaches.

Apple’s system also ships with features that benefit iOS app developers — like built-in two-factor authentication support, anti-fraud detection, and the ability to offer a one-touch, frictionless means of entry into their app, among other things.

For consumers, they get the same fast sign-up and login as with other services, but with the knowledge that the apps aren’t sharing their information with an entity they don’t trust.

Consumers can also choose whether or not to share their email with the app developer.

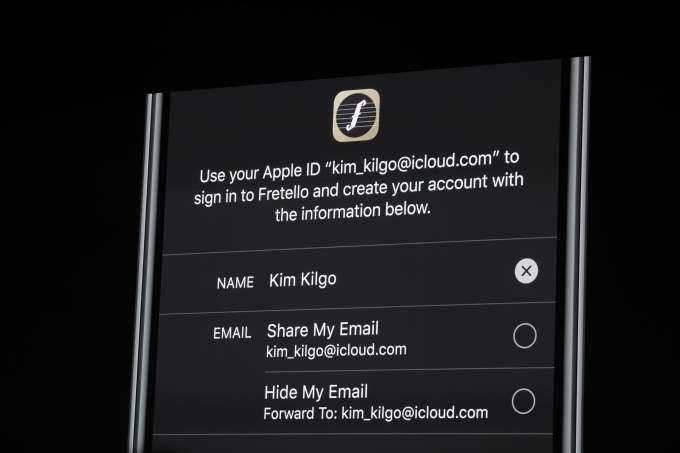
If customers decide not to share their real email, Apple will generate a random — but real and verified — email address for the app in question to use, then will route the emails the app wants to send to that address. The user can choose to disable this app email address at any time like — like if they begin to get spam, for example.

The ability to create disposable emails is not new — you can add pluses (+) or dots (.) in your Gmail address, for example, to set up filters to delete emails from addresses that become compromised. Other email providers offer similar features.

However, this is the first time a major technology company has allowed customers to not only create these private email addresses for sign-ins to apps  — but to also disable those addresses at any time if they want to stop receiving emails to them.

Despite the advantages to the system, the news left many wondering how the new Sign In with Apple button would work, in practice, at a more detailed level. We’ve tried to answer some of the more burning questions to common questions. There are likely many more questions that won’t be answered until the system goes live for developers and Apple updates its App Review Guidelines, which are its hard-and-faste rules for apps that decide entry into the App Store.

1) What information does the app developer receive when a user chooses Sign In with Apple?

The developer only receives the user’s name associated with their Apple ID, the user’s verified email address — or the random email address that routes email to their inbox, while protecting their privacy — and a unique stable identifier that allows them to set up the user’s account in their system.

Unlike Facebook, which has a treasure trove of personal information to share with apps, there are no other permissions settings or dialog boxes with Apple’s sign in that will confront the user with having to choose what information the app can get access to. (Apple would have nothing more to share, anyway, as it doesn’t collect user data like birthday, hometown, Facebook Likes or a friend list, among other things.)

2) Do I have to sign up again with the app when I get a new iPhone or switch over to use the app on my iPad?

No. For the end user, the Sign In with Apple option is as fast as using the Facebook or Google alternative. It’s just a tap to get into the app, even when moving between Apple devices.

3) Does Sign In with Apple work on my Apple Watch? Apple TV? Mac? 

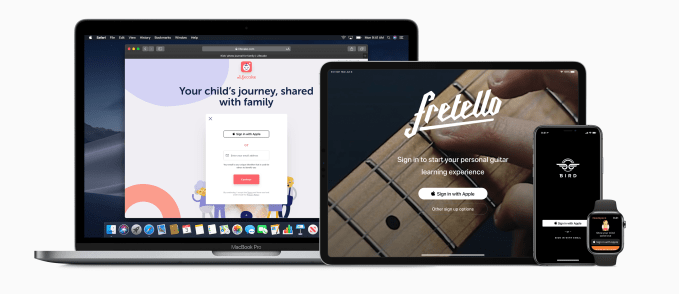
Sign In with Apple works across all Apple devices — iOS/iPadOS devices (iPhone, iPad and iPod touch), Mac, Apple TV, and Apple Watch.

4) But what about Android? What about web apps? I use my apps everywhere!

There’s a solution, but it’s not quite as seamless.

If a user signs up for an app on their Apple device — like, say, their iPad — then wants to use the app on a non-Apple device, like their Android phone, they’re sent over to a web view.

Here, they’ll see a Sign In with Apple login screen where they’ll enter their Apple ID and password to complete the sign in. This would also be the case for web apps that need to offer the Sign In with Apple login option.

This option is called Sign In with Apple JS as it’s Javascript-based.

(Apple does not offer a native SDK for Android developers, and honestly, it’s not likely to do so any time soon.)

5) What happens if you tap Sign In with Apple, but you forgot you already signed up for that app with your email address?

Sign In with Apple integrates with iCloud Keychain so if you already have an account with the app, the app will alert you to this and ask if you want to log in with your existing email instead. The app will check for this by domain (e.g. Uber), not by trying to match the email address associated with your Apple ID — which could be different from the email used to sign up for the account.

6) If I let Apple make up a random email address for me, does Apple now have the ability to read my email?

No. For those who want a randomized email address, Apple offers a private email relay service. That means it’s only routing emails to your personal inbox. It’s not hosting them.

Developers must register with Apple which email domains they’ll use to contact their customers and can only register up to 10 domains and communication emails.

7) How does Sign In with Apple offer two-factor authentication?

On Apple devices, users authenticate with either Touch ID or Face ID for a second layer of protection beyond the username/password combination.

On non-Apple devices, Apple sends a 6-digit code to a trusted device or phone number.

8) How does Sign In with Apple prove I’m not a bot?

App developers get access to Apple’s robust anti-fraud technology to identify which users are real and which may not be real. This is tech it has built up over the years for its own services, like iTunes.

The system uses on-device machine learning and other information to generate a signal for developers when a user is verified as being “real.” This is a simple bit that’s either set to yes or no, so to speak.

But a “no” doesn’t mean the user is a definitely a bot — they could just be a new user on a new device. However, the developer can take this signal into consideration when providing access to features in their apps or when running their own additional anti-fraud detection measures, for example.

9) When does an app have to offer Sign In with Apple?

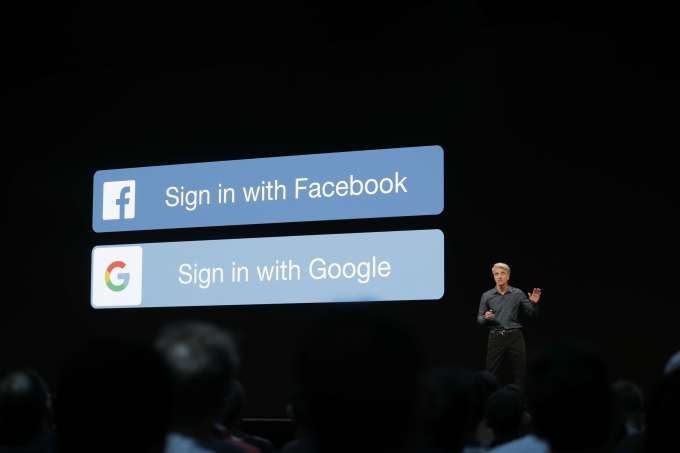
Apple is requiring that its button is offered whenever another third-party sign-in option is offered, like Facebook’s login or Google. Note that Apple is not saying “social” login though. It’s saying “third-party” which is more encompassing.

This requirement is what’s shocking people as it seems heavy-handed.

But Apple believes customers deserve a private choice which is why it’s making its sign-in required when other third-party options are provided.

But developers don’t have to use Sign In with Apple. They can opt to just use their own direct login instead. (Or they can offer a direct login and Sign In with Apple, if they want.)

10) Do the apps only have to offer Sign In with Apple if they offer Google and/or Facebook login options, or does a Twitter, Instagram or Snapchat sign in button count, too?

Apple hasn’t specified this is only for apps with Facebook or Google logins, or even “social” logins. Just any third party sign-in system. Although Facebook and Google are obviously the biggest providers of third-party sign-in services to apps, other companies including Twitter, Instagram and Snapchat have been developing their own sign-in options, as well.

As third-party providers, they too would fall under this new developer requirement.

11) Does the app have to put the Sign In with Apple button on top of the other options or else get rejected from the App Store?

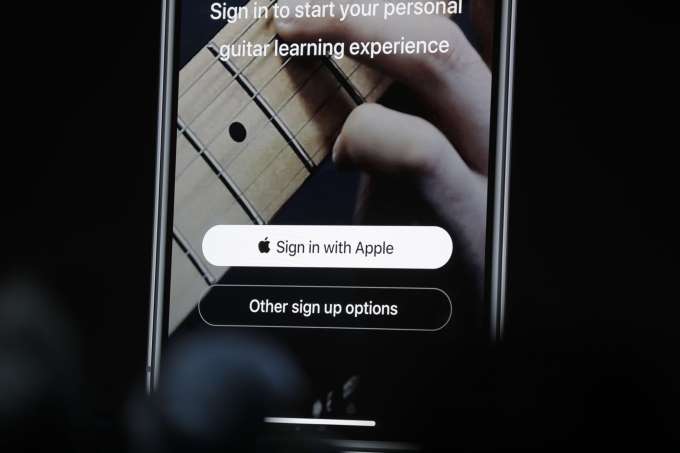
Apple is suggesting its button is prominent.

The company so far has only provided design guidelines to app developers. The App Store guidelines which dictate the rules around App Store rejections won’t be updated until this Fall.

And it’s the design guidelines that say the Apple button should be on the top of a stack of other third-party sign-in buttons, as recently reported.

The design guidelines also say that the button must be the same size or larger than competitors’ buttons, and users shouldn’t have to scroll to see the Apple button.

But to be clear, these are Apple’s suggested design patterns, not requirements. The company doesn’t make its design suggestions a law because it knows that developers do need a degree of flexibility when it comes to their own apps and how to provide their own users with the best experience.

12) If the app only has users signing up with their phone number or just their email, does it also have to offer the Apple button?

Not at this time, but developers can add the option if they want.

13) After you sign in using Apple, will the app still make you confirm your email address by clicking a link they send you?

Nope. Apple is verifying you, so you don’t have to do that anymore.

14) What if the app developer needs you to sign in with Google, because they’re providing some sort of app that works with Google’s services, like Google Drive or Docs, for example? 

This user experience would not be great. If you signed in with Apple’s login, you’d then have to do a second authentication with Google once in the app.

It’s unclear at this time how Apple will handle these situations, as the company hasn’t offered any sort of exception list to its requirement, nor any way for app developers to request exceptions. The company didn’t give us an answer when we asked directly.

It may be one of those cases where this is handled privately with specific developers, without announcing anything publicly. Or it may not make any exceptions at all, ever. And if regulators took issue with Apple’s requirement, things could change as well. Time will tell.

17) What if I currently sign in with Facebook, but want to switch to Sign In with Apple?

Apple isn’t providing a direct way for customers to switch for themselves from Facebook or another sign-in option to Apple ID. It instead leaves migration up to developers. The company’s stance is that developers can and should always offer a way for users to stop using their social login, if they choose.

In the past, developers could offer users a way to sign in only with their email instead of the third-party login. This is helpful particularly in those cases where users are deleting their Facebook accounts, for example, or removing apps’ ability to access their Facebook information.

Once Apple ID launches, developers will be able to offer customers a way to switch from a third-party login to Sign In with Apple ID in a similar way.

Do you have more questions you wish Apple would answer? Email me at sarahp@techcrunch.com


Read Full Article

Ken Burns Theory


Ken Burns Theory

What Is Reddit Premium and How Does It Work?

4 Ways to Avoid Facial Recognition Online and in Public


avoid-facial-recognition

A heated debate continues to rage about the legality of facial recognition software, which is increasingly being used by governments and law enforcement. Not to mention the number of private companies that use some kind of facial recognition.

Many people are concerned about facial recognition software being used to track their movements and the threat to civil liberties that this software poses. While this issue is being debated, there are steps you can take to avoid some facial recognition software, both online and in person.

Why Is Facial Recognition a Concern?

Avoid Facial Recognition - why facial recognition is a concern

Facial recognition works by analyzing images from photos or videos. Software runs though millions of images to identify features related to human faces. These features can then be measured, such as the distance between a pair of eyes. This means the software is becoming more and more adept at not only recognizing faces in general, but also recognizing specific faces.

This has worried many people who consider it an invasion of their privacy for the government or private companies to be able to track where they go in public places. Plus there are security concerns about whether this information could be leaked or misused in another way.

The city of San Francisco has effectively banned the use of facial recognition software, including by the police. And now similar measures are being considered in the UK as well.

The Accuracy of Facial Recognition Software

There are also concerns about the accuracy of facial recognition software. As the technology is new, it can still make mistakes. That means you could be identified as someone else. Or you could find yourself accused of a crime actually committed by another person.

This is a particular problem for people of color and women. The majority of the training data used for the software so far has been images of white men. So the software is most accurate at recognizing white male faces.

Facial recognition is accurate 99% of the time for white men, but can be prone to errors up to 35% of the time for darker-skinned women.

This means people of color and women have more reason to be wary of facial recognition and to worry about its misuse.

How to Avoid Facial Recognition Online

Avoid Facial Recognition - tagged photos
The first step to avoiding facial recognition online is to take care of where photos of you are uploaded.

Social media sites like Facebook have facial recognition algorithms which analyze photos uploaded to the site to make suggestions for who should be tagged in them. When someone tags you in a photo, they are training the algorithm to identify your face more accurately.

You can untag photos of yourself on Facebook, and also ask your friends not to tag you. It’s a good idea to learn about Facebook photo privacy settings to find out who can see photos of you. You may also want to make your Instagram account private so your photos aren’t widely shared.

1. Disabling Facial Recognition on Facebook

You should be able to disable automatic face recognition on Facebook.

To disable the feature, go to the Facebook website or app and head to Settings. Then check the left-hand menu, where you should find Face recognition just under Languages.

In this menu, click on Edit. From the option Do you want Facebook to be able to recognize you in photos and videos select No from the drop-down menu, then hit Close. This should save your settings and prevent people from tagging you.

However, according to Consumer Reports, not all Facebook users have access to this feature. If it’s not available for you, you will have to send a complaint to the Facebook support team.

2. Use FaceShield When Uploading Photos

You might still want to share photos online, but not to have them visible to facial recognition software. In that case, you can use the FaceShield tool.

FaceShield is a filter that you apply to your photos before you upload them to a website. It makes only minor changes to the photo to the human eye, but the developers say that it makes faces less visible to facial recognition software. It is currently only available as an online tool, but an app is planned for launch soon.

This will help protect your images from some kinds of facial recognition software, but not all of them. It works on software which has been trained on publicly accessible data sets, like those sold to various security companies. But it won’t work for companies like Facebook which use their own proprietary software.

Still, it’s a useful tool to have to somewhat mitigate how visible your photos are to facial recognition.

How to Avoid Facial Recognition In Person

Avoiding facial recognition online is only half the battle, however. You also need to be aware of all the places where facial recognition is happening in person.

Facial recognition software is commonly used for security at large events. Law enforcement use software to monitor protests and demonstrations. It’s also often found in airports and other high-security locations.

The simplest way to avoid facial recognition in person is to obscure your face with a scarf or balaclava. However, this may be against the law in some places and also has the downside of being very conspicuous. There are few better ways to draw attention to yourself in a crowd than covering your face.

3. Use Hair and Makeup to Fool Facial Recognition

Avoid Facial Recognition - CV Dazzle

An ingenious way to avoid facial recognition is to use a technique like CV Dazzle. This approaches uses bold hair and makeup forms which confuse facial detection software and act as camouflage for your face.

The looks use high contrast makeup, with dark colors on light skin and light colors on dark skin. The hairstyles often partially or completely obscure the nose bridge region between the eyes, which is key to facial identification. The looks are also asymmetrical, as facial recognition software are used to symmetry between the sides of the face.

Applying these techniques takes skill (not to mention a willingness to sport an unusual look) so it’s not for everyone. But if you’re interested, you can download test patterns from the CV Dazzle website or look at online tutorials to learn how to create the effect.

4. Use Clothing to Distract Facial Recognition

Avoid Facial Recognition - HyperFace

Another option is to distract software by overwhelming it with images that look like faces, so it can’t see your face. This is the approach taken by the HyperFace project.

Hyperface uses prints for clothes and other textiles which create “false faces”. Software sees these prints are struggles to differentiate your real face from the simulated faces, making it harder to track you.

These prints aren’t publicly available yet, but in the future they could be a tool against facial recognition.

Avoid Facial Recognition to Protect Your Privacy

Facial recognition technology is a concern to many people. Not only is it a threat to civil liberties in principle, but it is also a new and relatively immature technology. It is not fully accurate and reliable, so it is sensible to be wary of its use by governments, law enforcement, and private companies.

Learn more about how facial recognition is invading your privacy and use these tips to avoid it both online and in person.

Read the full article: 4 Ways to Avoid Facial Recognition Online and in Public


Read Full Article

How to Create and Use Custom Gradients in Google Slides


custom-gradients-slides

Google Slides is a great, easy way to make a presentation. This is especially true if you don’t have access to other slideshow programs like Microsoft PowerPoint.

One neat trick you can do in Google Slides is to add a custom gradient, color fill, or wallpaper image to the background area of your presentation. Here’s how to create one.

Step 1: Open Up Your Document

Custom Gradient Google Slides Open up Document

The first thing you’ll want to do is open up your Google Slides document. For this tutorial I’m going to open up a file I started for another tutorial: How to Create a Presentation in Google Slides.

To add a gradient or solid color, click on the thumbnail in your left-hand preview window that you want to change. If it’s highlighted yellow, that means it’s active.

Next, go to the top of your workspace and click on Background, seen here in red.

Note: When you mouse over it, it might say “Change Background”. This is Google Slides’ way of telling you what this button does in detail.

Step 2: Learn Your Background Tool

Custom Gradient Google Slides Background Color Tool

Once you click on Background, your Background window will pop up.

Next to Image you’ll see a button that says Choose image. By clicking on this, you can add an image to your slide’s background.

Beside Color, seen here in red, you’ll discover two categories for your background color fill: Solid and Gradient.

Solid is how you add a basic color fill. By clicking on one of these swatches, you can add that swatch to the background.

If you want to add the same image or color to every slide in your presentation, click Add to theme. Google Slides will apply that image to every slide that has a matching background.

Custom Gradient Google Slides Background Color Tool Gradient

If you click on the Gradient option, you’ll see another set of color fills. These swatches have the same pre-made options as the Solid menu, but the difference here is that they’re gradients.

The first two rows contain your greyscale gradients. Beneath that are your color gradients.

At the very bottom, you’ll see Custom. This option allows you to create custom gradients, and it’s this tool that we’ll be working with the most.

Step 3: Set Up Your Custom Gradient

Custom Gradient Google Slides Pick a Gradient

To set up a custom gradient, click on a color swatch that you want to include. In this case, I’m going to use a nice, soft yellow.

Custom Gradient Google Slides Go to Custom

After you choose the color you want, click on Custom. This will take you to your Custom Gradient settings.

Step 4: Learn Your Custom Gradient Tool

Google Slides Custom Gradient Tool

In your Custom Gradient settings, you’ll see a bunch of different options. You’ll also see a live Preview window that shows you what your gradient will look like before you officially apply it to the slide.

At the top of your settings are the dropdown menus Type and Center.

Type allows you to pick which type of gradient you want to apply to your background.

Center allows you to change the position of your gradient and how the color flows across the page.

Beneath these two dropdown menus, you’ll see Gradient Stops. This section allows you to add stops, remove stops, and change the color of those stops in your gradient. There’s also the gradient stop slider beneath that, where you can adjust the balance of each individual color in relation to one another.

At the bottom, you’ll see the option to Cancel your changes. You can also accept them by pressing OK.

Step 5: Change a Pre-Existing Gradient Stop

Custom Gradient Google Slides Change Gradient Stop

It’s important to note that you must always have two color stops in your gradient. They are located along the right and left sides. You cannot get rid of these stops, but you can change their color.

Let’s say we want to change the outer color of this gradient to bubblegum pink. To do this, make sure that the corresponding stop—seen here in red—is highlighted. You’ll know it’s highlighted by the faint blue fuzz around it.

Next, go to your Gradient Stops color circle. Click on it. Then, choose a color swatch.

Google Slides Gradient Custom Color Stop

We don’t have a bubblegum pink shade to add to this gradient, but we can create one by clicking on a color that’s close.

Once you choose a color, scroll down and click on Custom.

Custom Gradient Google Slides Color Picker

When you click on Custom, you’ll be taken to the color picker screen. Here, you can choose any color you want. You can also adjust the transparency and brightness of the color you selected.

Once you have your color selected, click OK. You can also cancel these changes and keep the old color by pressing Cancel.

Step 6: Add a Gradient Stop

Custom Gradient Google Slides Add a Color Stop

As mentioned, you’ll need at least two stops in order to make a gradient. You can definitely add more than that, however, especially if you want to make your gradient complex.

To add a stop, click on the Add button. Google Slides will automatically generate a new stop in the center of your gradient bar. It will take on the color that is already in the center: in this case, a light pink.

Custom Gradient Google Slides Change Color Stop

To change the color of this new stop, once again make sure the gradient stop is active.

Then go to your color swatch dropdown menu, and pick a color of your choosing. You can either use a pre-made swatch or a custom color.

Custom Gradient Google Slides Move Color Stop

For this tutorial I’ve picked a soft blue. Unlike the far right and left stops, the middle stop is not locked in place. You can move it back and forth across the slider to get the exact mix that you want.

In this case, I want more blue and yellow, but less pink. To achieve this, move the blue stop towards the pink side. This gives it less room.

If you don’t like this new gradient stop at all, make sure it’s active, then click Remove. Google Slides will discard both the stop and its color.

Step 7: Adjust a Static Stop Without Moving It

Custom Gradient Google Slides Move Second Color Stop

Because your left and right stops can’t be removed, this also means you can’t adjust the amount of color they produce. This might be frustrating, especially if you want more of one color than the other.

Fortunately, there’s a quick workaround for this.

To extend the range of your yellow gradient stop, for example, click on it so it’s active. Then click on Add.

This will create another yellow color stop right next to it, seen here highlighted in blue. You can then move this new stop across your gradient bar to adjust the output of yellow.

An easy way to remember which stops you can move and which ones you can’t is by their overall shape: circles roll. Squares stay in place.

Step 8: Finishing Touches

Custom Gradient Google Slides Change Gradient Position

After you’re done fixing your color, you can go to Type and Center to adjust your gradient’s direction. If you’re not happy with your Radial gradient, you can change it to a Linear through Type.

If you want to change the focus of your gradient—or where the color radiates from—you can change its position through Center.

For this gradient, I’m going to keep the Radial, but I want to change the direction of the Center to Top left. This makes it look similar to a Linear gradient, but it still gives it a bit of a curve.

Once you’re done adjusting your gradient, click OK.

Step 9: Check Your Work

Custom Gradient Google Slides

After you click OK, Google Slides will exit the Gradient Editor and take you back to your slideshow. And there you have it! Your new gradient is done.

If you want the gradient on this page only, no more action is needed.

If you want to apply this gradient to all the slides in your presentation, click Background > Add to theme. This will apply your new gradient to all pages in your slideshow that had a previously matching background.

Kick Your Google Slides Presentations Up a Notch

This is just one small way that you can make your presentation look unique. Once you get started you can play around with the settings some more, to see what kinds of gradients you can come up with.

You can design a master slide with a gradient and apply it across all slides and presentations. This is just one of the timesaving tricks you should know before your next Google Slides presentation.

Read the full article: How to Create and Use Custom Gradients in Google Slides


Read Full Article

Sennheiser debuts its first wireless gaming headset, the GSP 670


During Computex last week, Sennheiser gave media a sneak peek at its first wireless gaming headset, the GSP 670, slated to ship starting at the beginning of next month.

The GSP 670 retails for €349 (about $393), significantly pricier then other popular wireless gaming headsets (as well as its wired predecessor, the Sennheiser GSP 600, priced at $249.95). Sennheiser is hoping its features, as well as the company’s reputation for excellent sound quality and comfortable headsets, will convince gamers to take the plunge. (When I tried on a pair at Computex, it delivered on wearability, connection speeds and audio quality, but of course it is hard to tell how headsets will feel and sound after hours of gaming, versus a few minutes of testing).

Despite the freedom afforded by wireless, many gamers stick with wired headsets to avoid reductions in sound quality and connection speeds or having to worry about battery levels, issues that Sennheiser addresses with the GSP 670’s features. Like other wireless headsets, the GSP 670 needs to be connected to a wireless dongle. Each one comes with a GSA 70 compact USB dongle with proprietary technology that Sennheiser developed to ensure a low-latency connection it promises transmits sounds with “near-zero delay.” The USB is compatible with PCs and the Sony Playstation 4. The GSP 670 also has Bluetooth, so users can pair it with their smartphones and tablets as well.

The GSP 670’s microphone is noise-cancelling and can be muted by raising the boom arm. The headset has two volume wheels to allow users to control chat audio and game audio separately. Gamers can also adjust the audio on the GSP 670 with Sennheiser’s Gaming Suite for Windows, a software tool that lets users switch between audio presets or customize sound levels, and also includes surround sound modes and an equalizer.

In terms of battery, Sennheiser claims the GSP 670’s quick-charging battery can run for two hours after a seven minute charge. When fully charged, it says the battery can last for up to 20 hours on Bluetooth and 16 hours when connected via the GSA 70 dongle. The headset has automatic shutdown to save power.

The GSP 670 is currently available for pre-order on Sennheiser’s website and will ship beginning on July 1.


Read Full Article

Google Reveals Stadia Launch Date, Pricing, Games


Google has revealed more about Stadia, its cloud gaming platform that some are calling the “Netflix for games”. We now know when Google Stadia is going to launch, how much Stadia is going to cost, and what games you can expect to play on Stadia.

In March 2019, Google announced Stadia. Google revealed that Stadia was a cloud gaming platform which would let you stream games anywhere and everywhere on multiple devices. However, details beyond that were thin on the ground. Until now.

Google Stadia Launch Date and Pricing

Google Stadia is set to launch in November 2019. It will be available in 14 countries. These being the USA, the UK, Canada, Belgium, Finland, Denmark, France, Germany, Ireland, Italy, the Netherlands, Norway, Spain, and Sweden.

What’s launching in November is Stadia Pro. This costs $9.99/month, which buys you access to a catalog of free games (starting with Destiny 2), 4K, 60fps streaming with HDR and 5.1 surround sound. However, that will require a 35Mbps internet connection.

In 2020, Google will launch Stadia Base, which will be available for free. However, you’ll have to buy games separately, just as you would with Steam. Streaming will also be pegged at 1080p, but that means you’ll get away with a 10Mbps internet connection.

Google Stadia Hardware and Games

At launch, you’ll be able to play Stadia games using a Chromecast Ultra, the Chrome web browser, or Pixel smartphones. More devices will be added at a later date. Stadia Controllers are priced at $69, but you can use a PS4 or Xbox One controller instead.

In terms of games, Destiny 2 is available for free to Stadia Pro subscribers. Google revealed 31 titles from 21 different publishers which will be available to buy. Titles include DOOM Eternal, GRID, Baldur’s Gate 3, Final Fantasy XV, and Assassin’s Creed Odyssey.

The only thing you can do today is pre-order the Stadia Founder’s Edition from the Google Play Store. This buys you a Chromecast Ultra, a Stadia Controller, three months of Stadia Pro, a three-month Buddy Pass, and first dibs on securing a name. All for $129.99.

Will Google Stadia Succeed or Fail?

It’s fair to say that this announcement has split opinion amongst gamers. The catalog of games is small, the range of mobile devices supported is lacking, and most games will need to be bought seperately on top of the $9.99/month subscription.

However, Google Stadia has huge potential to succeed over the longterm. Mainly because there’s no need to buy hardware upfront. Putting $0 down rather than $400-plus on a console means gamers can spend more money on games to feed their addiction.

Read the full article: Google Reveals Stadia Launch Date, Pricing, Games


Read Full Article

10 Dad Movies to Watch on Netflix This Father’s Day


netflix-fathers-day

Father’s Day is the perfect time for an indulgent meal, awesome gifts, and, if you’re a family of film buffs, a movie marathon.

If you’ve exhausted your Blu-rays of Die Hard, Taken, and—admit it—Sharknado, Netflix is here to save the day. Grab a couple of drinks, settle down on the sofa with your dad, and enjoy these movies perfect for Father’s Day.

1. Boyhood

For Dads With Teenage Children.

This 2014 film was an experiment: writer and director, Richard Linklater, set out to make a movie across 12 years, shot as the cast grew up. It even began with an uncompleted script, so the production could evolve to reflect social changes between 2002 and 2013.

Each segment would be written after reviewing the footage from the previous year, so there’s a fresh and adaptive feel. Linklater further considered how the actors were changing, allowing them to work on the screenplay, meaning this is a lovely drama about a family living through the 2000s.

2. Guardians of the Galaxy Vol. 2

For Dads Who Love Superheroes.

The original Guardians of the Galaxy film was a surprise hit. Marvel had hot properties on its hands like Iron Man, Captain America, and Thor. But the studio took a punt and gave the world Star Lord, Gamora, Drax, Rocket, and Groot.

This follow-up sees Peter Quill discover his heritage, as an egomaniac, aptly named Ego (Kurt Russell) claims he’s his father. And things all look great… for a while.

It’s a surprisingly emotional (and nonetheless thrilling) instalment in the Marvel Cinematic Universe. What’s more, it’s filled with fantastic songs. If your dad doesn’t hum along to ELO’s Mr. Blue Sky, he’s worse than Ego.

If you’re eager for more comic book content, we recommend Netflix’s original Marvel shows.

3. Harry and the Hendersons

For Dads Who Are Big Kids At Heart.

This isn’t the best-reviewed movie on Netflix, but I’ll wager it’s better than you remember (as long as any wagers are purely metaphorical). In fact, it’s an ideal way to while away a Sunday afternoon following a nice slap-up meal.

It’s fun, it’s suitable for the whole family, and it’s got both John Lithgow and David Suchet in it. Seriously, what more could you want?

4. The Imitation Game

For Dads Who Love Moving True Stories.

This is one of the most beautiful and stirring movies you’ll find on Netflix. It’s a tough tale to sit through—because it’s true.

Benedict Cumberbatch (Sherlock) plays Alan Turing, the troubled genius who fought alongside a dedicated team at Bletchley Park to crack the code used by German cyphers. Turing was a key part in the Allies winning World War II. The Imitation Game is so hard-hitting because few realize how the cryptanalyst was subsequently treated in return for his heroics.

This chilling story will stay with you long after the credits roll.

5. Coco

For Dads Who Still Love Disney.

You’re never too old for a Disney film, and this is an uplifting tale… about death.

Miguel (Anthony Gonzalez) wants to be a musician, but it’s against the wishes of his whole family. He hopes that an accidental journey to the Land of the Dead will mean he gets the approval of his great-great-grandfather, the legendary singer, Ernesto de la Cruz (Benjamin Bratt).

It’s as visually stunning as you’d expect from a Pixar movie, and packs a surprising emotional punch. It’s an especially important piece for those with elder relatives with dementia.

6. Indiana Jones and the Last Crusade

For Dads Who Love A Classic Quest.

Harrison Ford’s iconic archaeologist has to find the holy grail of treasures: The Holy Grail. Also, familial love and understanding.

In this charming conclusion to the original Indiana Jones trilogy, Sean Connery plays Professor Henry Jones, Indy’s grouchy yet enigmatic father. The pair have great chemistry and Connery makes you like an otherwise gruff character. Steven Spielberg’s productions often mull over estranged parental relationships, notably in E.T.: The Extra Terrestrial and Hook, and this is one of his finest.

It’s also the best Indiana Jones film, but let’s keep that between ourselves, eh?

7. Christopher Robin

For Dads in Touch With Their Emotional Side.

Everyone gets in a rut now and then, and needs reminding of the small joys in life. That’s what this 2018 movie is all about.

The titular character (Ewan McGregor) is now a middle-aged businessman whose childhood dreams have long-since fallen by the wayside. That’s when he gets a visit from someone special who he promised he’d never forget: Winnie the Pooh. Together, they must find their friends in Hundred-Acre-Wood and rediscover the small things that make life special.

8. Bean

For Dads With Young Children.

Rowan Atkinson returns to one of his best-known roles: the bumbling, accident-prone, but well-meaning Mr. Bean. Seconded to Los Angeles, Bean overlooks the transfer of Whistler’s Mother to the Grierson Art Gallery. It starts a chain of events which includes a museum robbery, a fraught family drama, and laxatives.

This is 90 minutes of feel-good slapstick fun that will make kids (and big kids) of all ages smile.

9. Saving Mr. Banks

For Dads Who Enjoy Biopics.

Mary Poppins is a classic Disney film that perennially gets shown on TV. But you don’t even need to be a fan of Mary Poppins to enjoy Saving Mr. Banks. It’s the affecting true (-ish) story of P.L. Travers, creator of the magical nanny, and the journey to get Mary Poppins on the silver screen.

This 2013 film details Walt Disney’s initial misunderstanding of Mary Poppins, as Travers’ troubled past and love for her father is slowly revealed.

10. Like Father

For Dads Looking for a Relaxed Afternoon.

Starring Kristen Bell (Veronica Mars) and Kelsey Grammer (Frasier), this is an easy-going Netflix production that’s far from taxing but nonetheless provides a good laugh.

Bell plays Rachel, who decides to still go on her honeymoon, despite being left at the altar. By a quirk of fate, she finds her estranged father (Grammar) there too, and the pair spend their holiday getting to know each other again. There are some great Netflix Originals available to watch, including Netflix Originals that have since been cancelled, and while Like Father isn’t a shining example, it’s a fun way to pass a couple of hours.

What Movies Will You Watch on Father’s Day?

No matter what you watch, it’s important you put aside some quality time to spend with your dad this Father’s Day.

You don’t necessarily need to watch a film that’s all about fatherhood either—just find Netflix movies you will love and chill for a few hours.

Read the full article: 10 Dad Movies to Watch on Netflix This Father’s Day


Read Full Article

How to Make a USB Installation Disk for Windows 7 Without Extra Software


windows-7-upgrade

Want to install Windows 7 on your computer but the device doesn’t have an optical drive? Perhaps you’re using a laptop without a built-in DVD drive, or even an old netbook or Windows tablet. Whatever the case, you’ll need to make a USB installation disk.

You can do this without any extra software, or you can use tools provided by Microsoft and third parties.

Two Ways to Make a Bootable USB Windows 7 Installation Disk

You have two choices for making a bootable USB drive that can install Windows 7.

  1. Create a bootable disk using Windows tools: this requires no additional software
  2. Download the install from Microsoft: this is a far simpler solution

Let’s take a look at each option.

What You’ll Need to Install Windows 7 from USB

Without an optical drive on the target computer, installing Windows 7 as your preferred operating system is impossible. But if you have the original installation media and a USB flash drive, you can make it work.

To get started, you’ll need:

  • A working Windows 7 computer with a DVD drive and administrator rights
  • A Windows 7 installation DVD
  • 4GB USB flash drive or larger

This will also work with external USB hard drives instead of a USB thumb drive. However, all the data on the drive will be formatted and deleted.

The following steps can be completed on a Windows 7 computer. However, they’re almost the same whatever operating system you’re using, including Windows 10.

Open an Elevated Command Prompt

To start, insert your USB flash drive in your main PC—the one with the optical drive. You should also insert the Windows 7 installation DVD.

Click Start > All Programs > Accessories and right-click on Command Prompt. Select Run As Administrator. Of course, you need to be able to authenticate as the administrator on the PC you’re using.

On Windows 10, click Start then type “command”. Right-click the first result and select Run as administrator.

In the black command prompt window, open the disk partitioning tool with the command:

diskpart

This will open in a new command prompt window. Here, call up a list of disks attached to your PC.

list disk

One of the drives listed will be your USB drive. You’ll probably be able to spot it based on the drive’s capacity. Make a note of the disk number of the USB drive.

List the disks attached to your PC

This is important to get right; otherwise, you’ll end up losing data on other drives.

Next, partition the disk. Begin by selecting the disk and cleaning it.

Where you see the # sign, substitute it with the disk number of your USB device.

select disk #

clean

You can then create a new partition.

create partition primary

select partition 1

Make the partition active, then format as NTFS:

active

format fs=ntfs quick

Make your USB disk bootable

Next, issue the single command to set the disk as drive E:

assign letter e

Finally, exit the DiskPart tool.

exit

The USB flash drive is now ready for Windows 7’s installation files.

Make Your Windows 7 USB Bootable

The format step may take some time, depending on your computer’s specification.

In the command prompt type

d:/boot/bootsect.exe /nt60 e:

(This assumes D: is your DVD drive with the install DVD inserted, and you named E: your USB drive. This may differ on your PC, so check before entering the command.)

This will make your USB drive bootable.

Copy Windows 7 Installation Files to USB

The final step can be done from My Computer. Just open the installation DVD, highlight everything, and drag it across to the USB drive.

This can also take a while. When complete, you should be all set. Insert the USB disk into your new PC, then enter the BIOS to adjust the boot order. Your target computer may even have the Choose Boot Device option during start up.

Use Microsoft’s Windows 7 USB Installer Tool

If you want a simpler solution to installing Windows 7 from a bootable USB drive, try Microsoft’s dedicated, downloadable tool.

Download: Windows 7 USB Download Tool

The main download is just 2.8MB in size, so this should complete quickly. While you wait, insert your USB flash drive into your main PC. A 4GB drive should be large enough.

Meanwhile, you’ll also need an ISO version of Windows 7. You can download it from Microsoft with a valid product key.

Download: Windows 7

While you wait for the download, install the installer tool, then launch from the Start menu.

You’ll be prompted to find the ISO image file for Windows 7. Find the ISO file on your hard disk drive, then click Next.

USB installer for Windows 7

Here, select USB device for the media type you plan to create. In the next screen, use the dropdown menu to select the USB drive, then Begin Copying. Wait while the process completes.

When the bar reaches 100%, you’ll spot some status information. Any problems that occurred are listed here. If you need another bootable USB Windows 7 installation disk, click Start Over to repeat the process.

Otherwise, click the X in the top-right corner to close, before safely ejecting your USB disk. It is now ready to install Windows 7 on a suitable computer of your choice.

It’s Easy to Create a Windows 7 USB Installation Disk

If you’ve been stuck trying to get an operating system set up on your old laptop or netbook, you’ll be relieved to see how simple it really is. Indeed, Windows 7 and later already have the tools built in to help you make a bootable USB installer.

Failing that, you can take the simple option by grabbing Microsoft’s own USB installer tool for Windows 7 and later.

Afterwards, check out these portable apps you can run from USB.

Read the full article: How to Make a USB Installation Disk for Windows 7 Without Extra Software


Read Full Article