01 November 2018

How to Find a Song Title Just by Humming the Lyrics


Have you ever found yourself in one of those tip of the tongue moments when you’ve fallen in love with a new song but you can’t remember the title or the lyrics?

There are a number of solutions for this scenario when you need to find a song by partial lyrics. Even if you don’t know the title of the song or any of the lyrics, you can use these solutions to find the song by humming!

Voice Recognition Technology

There are a number of cutting edge computer technologies these days that enter into the realm of artificial intelligence. Two of those include image recognition and voice recognition.

There are a number of online apps that let you sing, hum or whistle a tune and it can accurately guess the title of the song. Images of science fiction movies, where starship crew members seek the help of the ship’s AI computer system come to mind. Well, it’s no longer science fiction—these exciting online apps will help you find a song by humming!

1. Midomi

Midomi itself isn’t exactly a very special or unique website. Just like every other website where you can search for and purchase music online, Midomi lets you research music, bands, and more.

You can watch music videos, listen to music clips or even join the Midomi community to record your own music. However, what makes Midomi so useful is the little box at the top of the first page that reads, “Click and Sing or Hum.”

Does it really work?  We tested the accuracy of this online application by humming Boulevard Of Broken Dreams, by Green Day. After clicking the text box, the recording began.

midomi find song by humming

This test included just humming 16 seconds or so of part of the song, no words whatsoever (and a terrible rendition). When done, click on the red microphone to start the search for results. This is what came up for us.

midomi found song by humming

One of the “guesses” was a perfect match. Pretty impressive. To test that this wasn’t just a lucky guess, we tried it again with a more difficult tune that wasn’t so modern—the first 15 seconds of “Over the Rainbow”, sung by Judy Garland in the “Wizard of Oz”.

After 15 seconds of forcing the recorder to suffer through a horrible rendition of the song, the app processed the recording and then provided the following results.

midomi found music by humming

If anything is convincing, this is it. You only need to know the general tune of a song, no title and no lyrics required. This amazing little Midomi web app will remind you of the title after just a few seconds of humming, whistling, or singing.
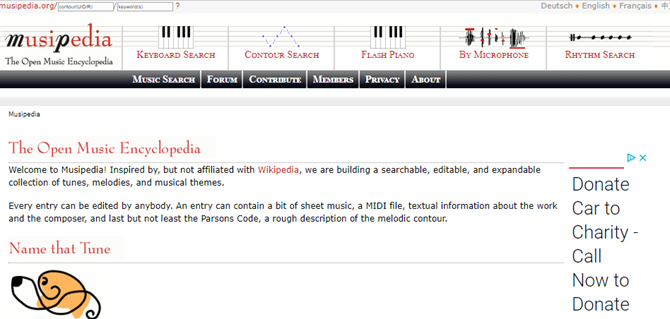
2. Musipedia

If you are a musician, then you probably know most of the notes for a song, rather than just humming the tune. If that describes you, then Musipedia may be the perfect song-finder service for you.

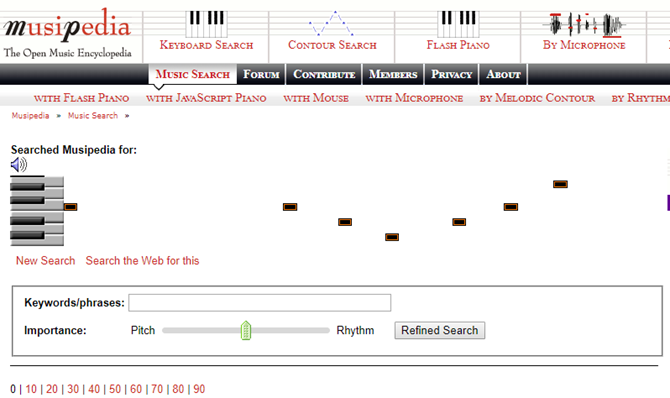
The website offers the ability to import music through your microphone (even singing or humming if you wish).

Also, the site gives you the ability to play the tune with several note-related searches. These include a keyboard search (strictly notes), a contour search (the general note pattern of the song), using a flash piano, or a rhythm search which you can use to hunt for a song by rhythm alone.

musipedia song finder by sound

When you use any of these search features, the Musipedia engine will convert it into a general “note-contour” line, and algorithmically run through its library of music looking for a match.

musipedia song finder by sound

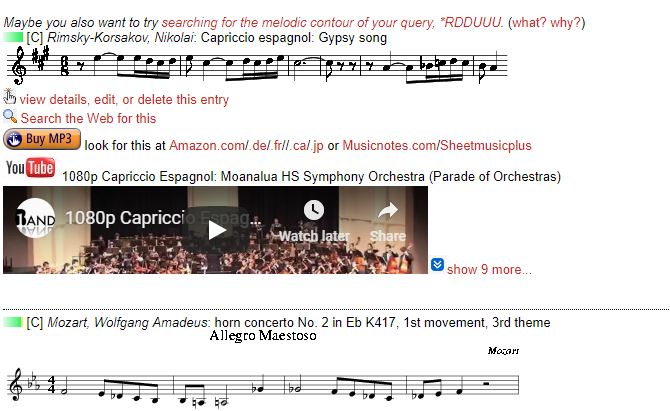
When it finds matches, you’ll see a listing of all of the songs in the results.

Each result includes the portion of the musical pattern that matched the tune you played. The listing also includes an embedded play button so you can hear it, a YouTube link to the video, and even a button you can use to buy the song or album on Amazon.

musipedia song finder by sound

The “with microphone” feature requires Flash, so you’ll need to enable flash in your browser for this site, and it can be a little flaky at times. So this web app is best used if you know how to play the notes on a piano.

The website itself isn’t exactly a work of art by web development standards, but aesthetics aside it does do the job well!

3. AudioTag

The next site that allows you to find a song title just by humming is AudioTag.info. This is another very basic site, but it offers a pretty handy service.

Yes, the audio recognition feature is fully automated, so you don’t have to wait for someone to figure out your song title. However, the method of uploading the music is a little bit different than other sites listed in this article. You have to record and upload your own audio file.

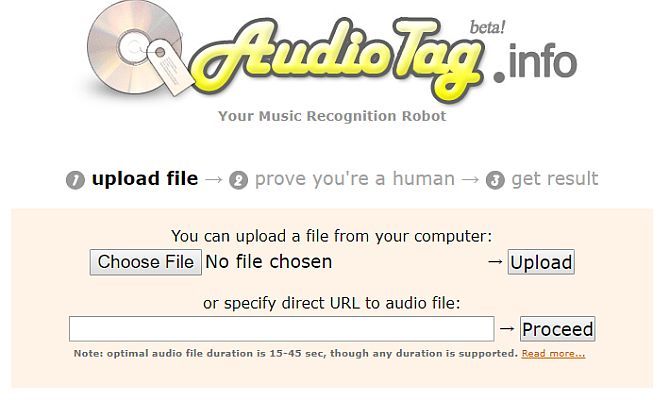
You can hum, sing, or play the tune on your guitar. So long as you have something similar to the original song recorded, it should work.

We tested the feature by playing a song from Spotify and recording it through a microphone. Use the Choose File button on the page to select your file and upload it to the site. (You can also link to an online audio file if you have the URL).

When you’re ready just click Proceed.

In our case, the site came back in less than 60 seconds with the exact song title, the artist, the album, and the year of release.

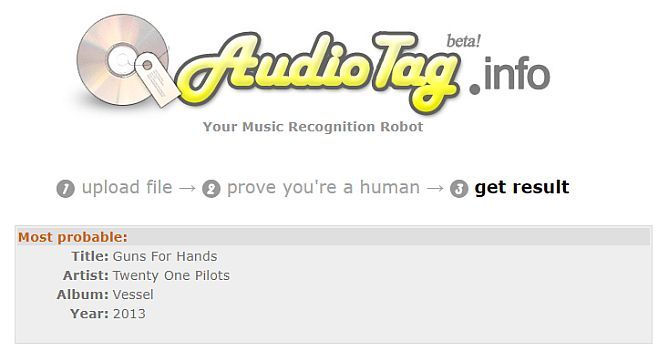
Not too surprising considering we recorded the exact song. But why not give it a try by humming or singing that tune stuck in your head. See if the site can name that tune!

4. AHA Music Extension

Another solution to identify a song by humming or singing is to install the AHA Music Identifier Chrome Extension.

The way it works is very simple. If you’re watching a video, movie, TV show, or anything else that’s playing music, just click on the AHA Music icon in your browser.

aha music identifier

The app will listen to the song and then identify it for you. You can click on the Spotify icon to open the song on the Spotify website.

Using this extension to find a song by lyrics or humming is a two-step process. First, you can use a site like Online Voice Recorder to record your humming or singing.

online voice recorder

Then, when you play it back you can trigger the AHA Music extensions and it’ll identify the song for you.

What’s nice about this solution is that it’s handy to identify songs you hear while watching something on Netflix or Amazon. Quickly identify that song and discover new music more often.

What Is That Song? Hum It and Find Out

There is nothing quite as frustrating as walking around all day with a tune stuck in your head. Well, the next time this happens, you know from where you can get an answer just by humming or singing the song!

If you love everything about music, then you’ll want to review our brilliant gift ideas for music lovers. Or if you want to give your family and friends some ideas for you, share the link with them!

Read the full article: How to Find a Song Title Just by Humming the Lyrics


Read Full Article

PCIe vs. SATA SSDs: Which Type of Data Drive Is Best for You?

5 Mac Outliners to Help You Organize Your Projects and Ideas


mac-outliners

Outlining is a smart way to take ideas from the scrambled mess that is your brain and arrange them and purpose. And yes, there’s an app for that.

While you can use note-taking apps like Evernote and Simplenote as outliners, you might want to give dedicated outliner apps a shot instead. Right on cue, here are our top five picks for macOS-based outlining software.

1. OutlineEdit

sample-outline-in-outline-edit-on-mac

OutlineEdit allows your ideas and words to take center stage. You can create, structure, and rearrange your outlines, plus search through them with ease. You also have options to turn items into checklists, add notes to items, and display statistics like word count and time elapsed.

If you want to color code items for quick visual identification, create and assign categories for them. Categories come with colorful markers; you can customize the color for each category or pick from one of the preset color schemes.

sample-outline-with-categories-highlighted-in-outline-edit-on-mac

To keep the OutlineEdit window handy, you have few options to customize window behavior. You can dock the app window, keep it floating over other apps, or even make it appear translucent.

If you like your Mac apps lean and uncluttered, you’ll love OutlineEdit.

Download: OutlineEdit (Free)

2. Outlinely

sample-outline-in-outlinely-on-mac

Outlinely is a self-contained app. This means all your outlining takes place within the app window, and you don’t need Finder to access or save your outlines. The app’s three-pane layout is reminiscent of the one you’ll find in the popular writing app Ulysses.

Apart from creating outlines in Outlinely, you can customize how you work with them. Outlinely gives you themes, folders, versioning, word counts, and Markdown highlighting. You also have the much-in-demand Focus mode that fades out all text except the current line.

Outlinely sets you up with a folder full of sample outlines to begin with. These walk you through a few highlights of the app and some Markdown syntax you should get familiar with.

Of course, you can jump right in and start creating outlines. But we recommend that you go through the sample ones first to get a better idea of what’s possible with Outlinely.

Download: Outlinely ($40, free trial available)

3. TaskPaper

sample-outline-in-taskpaper-on-mac

TaskPaper, from the developers of the much-loved distraction-free writing app Writeroom, is as simple and beautiful as it gets. Your projects, tags, and custom searches line the sidebar, while your outline contents go in the right-hand pane.

Adding tasks, filtering by tags, and folding/unfolding items are all intuitive tasks that you’ll have no trouble with. In any case, each new document comes with a Welcome project to give you an overview of TaskPaper actions. Once you’ve got the hang of the app, you can prevent this sample project from showing up via the app settings.

Do you have a Setapp subscription? TaskPaper is available as part of the service!

Download: TaskPaper ($25, free trial available)

4. Cloud Outliner

sample-outline-in-cloud-outliner-on-mac

Cloud Outliner looks simple enough on the surface, but is quite flexible. You start off with a blank two-pane view and build up outlines and folders as you need them.

The toolbar buttons make it easy to create, structure, indent, and delete outlines. Thanks to the font customization options, you can highlight items in various colors for visual clarity.

It might take you a while to get used to the keyboard shortcuts in Cloud Outliner. If you’d rather use customized shortcuts, you’re in luck—the app allows for those.

The free version of CloudOutliner is robust, but if you want advanced options, you’ll need to get Cloud Outliner Pro. It brings features like PDF export and Evernote sync, and also gives you an ad-free experience. The Pro version is also available on Setapp.

Keep in mind that you’ll find the free version of Cloud Outliner only in the Mac App Store.

Download: Cloud Outliner (Free) | Cloud Outliner Pro ($10)

5. OmniOutliner

sample-outline-in-omnioutliner-on-mac

The Omni Outliner starter edition, Essentials, has all the basic ingredients you need in an outliner app. Its interface is easy enough to navigate and interact with.

You can begin outlining with one of the ready-made themes-cum-templates that OmniOutliner provides. Of course, you can just as easily create outlines from scratch.

Apart from the usual checklist and notes features of outlining software, you get a typewriter mode and a distraction-free mode.

If you’re on the lookout for an advanced outliner app, OmniOutliner Essentials will probably fall short of your expectations. That’s where Omni Outliner Pro comes in. The professional edition of OmniOutliner brings smart columns, scripting, custom themes and shortcuts, audio recording, and saved searches, among other advanced features. It will cost you $60.

Download: OmniOutliner ($10, free trial available)

More Ways to Organize Your Projects and Ideas

If you want to get your thoughts in order, dumping them into an outliner app is a good place to start. You can use outliners for taking notes, capturing ideas, or planning a trip. Pretty much any activity that needs an organized, hierarchical approach will benefit from the use of an outliner.

That’s because outlining puts your ideas in a digestible format and gives you a roadmap of sorts to start taking action.

Read the full article: 5 Mac Outliners to Help You Organize Your Projects and Ideas


Read Full Article

What Is the “LoJax” UEFI Rootkit Developed by Russian Hackers?


lojax-rootkit

A rootkit is a particularly nasty type of malware. A “regular” malware infection loads when you enter the operating system. It is still a bad situation, but a decent antivirus should remove the malware and clean up your system.

Conversely, a rootkit installs to your system firmware and allows for the installation of a malicious payload each time you reboot your system.

Security researchers have spotted a new rootkit variant in the wild, named LoJax. What sets this rootkit apart from others? Well, it can infect modern UEFI-based systems, rather than older BIOS-based systems. And that is a problem.

The LoJax UEFI Rootkit

ESET Research published a research paper that details LoJax, a newly discovered rootkit (what is a rootkit?) that successfully re-purposes a commercial software of the same name. (Although the research team christened the malware “LoJax,” the genuine software is named “LoJack.”)

Adding to the threat, LoJax can survive a complete Windows re-installation and even replacement of the hard drive.

The malware survives by attacking the UEFI firmware boot system. Other rootkits might hide in drivers or boot sectors, depending on their coding and the intent of the attacker. LoJax hooks into the system firmware and re-infects the system before the OS even loads.

As yet, the only known method to completely remove the LoJax malware is flashing new firmware over the suspect system. A firmware flash isn’t something most users have experience with. While easier than in the past, there is still a significant that flashing a firmware will go wrong, potentially bricking the machine in question.

How Does the LoJax Rootkit Work?

LoJax uses a repackaged version of Absolute Software’s LoJack anti-theft software. The original tool is meant to be persistent throughout a system wipe or hard drive replacement so the licensee can track a stolen device. The reasons for the tool burrowing so deep into the computer are fairly legitimate, and LoJack is still a popular anti-theft product for these exact qualities.

Given that, in the US, 97 percent of stolen laptops are never recovered, it’s understandable users want extra protection for such an expensive investment.

LoJax uses a kernel driver, RwDrv.sys, to access the BIOS/UEFI settings. The kernel driver is bundled with RWEverything, a legitimate tool used to read and analyze low-level computer settings (bits you normally do not have access to). There were three other tools in the LoJax rootkit infection process:

  • The first tool dumps information about the low-level system settings (copied from RWEverything) to a text file. Bypassing system protection against malicious firmware updates requires knowledge of the system.
  • The second tool “saves an image of the system firmware to a file by reading the contents of the SPI flash memory.” The SPI flash memory hosts the UEFI/BIOS.
  • A third tool adds the malicious module to the firmware image then writes it back to the SPI flash memory.

If LoJax realizes that the SPI flash memory is protected, it exploits a known vulnerability (CVE-2014-8273) to access it, then continues and writes the rootkit to memory.

Where Did LoJax Come From?

The ESET Research team believe that LoJax is the work of the infamous Fancy Bear/Sednit/Strontium/APT28 Russian hacking group. The hacking group is responsible for several major attacks in recent years.

LoJax uses the same command and control servers as SedUploader—another Sednit backdoor malware. LoJax also has links and traces of other Sednit malware, including XAgent (another backdoor tool), and XTunnel (a secure network proxy tool).

Additionally, the ESET research found that the malware operators “used different components of the LoJax malware to target a few government organizations in the Balkans as well as Central and Eastern Europe.”

LoJax Isn’t the First UEFI Rootkit

The news of LoJax certainly caused the security world to sit up and take note. However, it isn’t the first UEFI rootkit. The Hacking Team (a malicious group, just in case you were wondering) was using a UEFI/BIOS rootkit back in 2015 to keep a remote-control system agent installed on target systems.

The major difference between The Hacking Team UEFI rootkit and LoJax is the method of delivery. At the time, security researchers thought that The Hacking Team required physical access to a system to install the firmware-level infection. Of course, if someone has direct access to your computer, they can do what they want. Still, the UEFI rootkit is especially nasty.

Is Your System at Risk From LoJax?

Modern UEFI-based systems have several distinct advantages over their older BIOS-based counterparts.

For one, they’re newer. New hardware isn’t the be all and end all, but it does make many computing tasks easier.

Secondly, UEFI-firmware has a few additional security features, too. Particularly of note is Secure Boot, which only allows programs with a signed digital signature to run.

If this is turned off and you encounter a rootkit, you’re going to have a bad time. Secure Boot is a particularly useful tool in the current age of ransomware, too. Check out the following video of Secure Boot dealing with the extremely dangerous NotPetya ransomware:

NotPetya would have encrypted everything on the target system had Secure Boot been turned off.

LoJax is a different kind of beast altogether. Contrary to earlier reports, even Secure Boot cannot stop LoJax. Keeping your UEFI firmware up to date is extremely important. There are some specialized anti-rootkit tools, too, but it is unclear if they can protect against LoJax.

However, like many threats with this level of capability, your computer is a prime target. Advanced malware predominantly focuses on high-level targets. Furthermore, LoJax has the indications of nation-state threat actor involvement; another strong chance LoJax won’t affect you in the short term. That said, malware has a way of filtering out into the world. If cybercriminals spot the successful use of LoJax, it might become more commonplace in regular malware attacks.

As ever, keeping your system up to date is one of the best ways to protect your system. A Malwarebytes Premium subscription is a great help, too.

Read the full article: What Is the “LoJax” UEFI Rootkit Developed by Russian Hackers?


Read Full Article

How to Record or Stream Your Computer Screen Using OBS Studio


record-stream-obs

If you’re looking to record your screen or stream online, OBS Studio (formerly Open Broadcaster Software) is a great option. This tool makes it simple to capture screencasts, record your gameplay, stream to Twitch, and much more.

But if you’ve never used it before, OBS Studio might seem a little daunting at first. In this article, we’ll walk you through how to set up OBS Studio, what you need to start recording and streaming, and tips for getting the best results.

Download OBS Studio

To get started, you’ll want to download OBS Studio for Windows, macOS, or Linux. We’ll use the Windows version for this tutorial, but it’s similar on all platforms.

OBS Studio is truly free, so you don’t have to pay for any features. It’s also open source software, meaning anyone can take a look at the code and improve it.

01-Download-OBS-Studio

Step through the standard installer. Once it completes, OBS Studio will offer to walk you through an auto-configuration wizard. You can do this if you like; we’ll review related settings below.

The OBS Studio Interface

The main OBS Studio interface allows you to set up everything you need to start streaming or recording. At the bottom of the screen, you’ll see several control elements.

02-OBS-Main-Window

Scenes

A Scene in OBS Studio allows you to collect and arrange certain Source elements in a specific way. You can have multiple scenes and switch between them at will.

This will make a bit more sense as we move on. For now, you can click the Plus button to create a new scene. Call it Default or something similar (you can change it later).

After you’ve added some elements, you can click on them in the preview to adjust as you wish. Click the Eye icon to hide an element, or the Lock to prevent accidental movement.

03-OBS-Scenes

Sources

Sources are the video and audio inputs that you feed into OBS Studio. Click the Plus button to add a new one, and you’ll see several categories. Some of the most important ones include:

  • Audio Input Capture: Record sound from a microphone or similar. (See the best budget microphones if you need one.)
  • Audio Output Capture: Capture the sound coming out of your computer, so your recording/stream includes game or desktop audio.
  • Display Capture: Allows you to capture an entire monitor, no matter what’s showing on it.
  • Game Capture: Choose a specific game to record.
  • Image: Display a static image.
  • Video Capture Device: Records footage from a webcam or similar. (We’ve listed the best budget webcams if you don’t have one already.)
  • Window Capture: Record a specific program window. Like Game Capture, but works for any program.

Once you select an option, you can choose Create new or Add Existing. Since you just started, you’ll need to add a new item that you can reuse later. After you click OK, OBS Studio displays options depending on the source you chose.

As an example, click Audio Input Capture. Let’s say you’re going to use a headset microphone to record audio. Enter a descriptive name for the source (like Headset Mic) and click OK. On the resulting screen, pick your headset mic from the Device dropdown and click OK.

04-OBS-Add-Audio-Source

Now you have that input registered with OBS Studio and can easily add it again in the future. You’ll need to repeat this step to add your webcam, screen capture, and similar.

Mixer

Once you’ve added all your sources, the Mixer tab lets you adjust the volume balance between them. The bars move in real-time to reflect levels. Drag the slider to adjust the mix, or click the speaker icon to mute a source.

05-OBS-Mixer-Section

Play around with these ahead of time, as different sources can have vastly different volume levels. You wouldn’t want to complete a recording only to find out that the game audio overpowers your mic.

Scene Transitions

This simple section allows you to choose what happens when you swap between scenes. Choose between Fade and Cut in the dropdown, or hit Plus to pick another option. You can choose how long the transition lasts using the Duration box.

Controls

06-OBS-Transitions-and-Controls

Here, the Start Streaming and Start Recording buttons will let you start capturing with OBS Studio. You can see the current FPS and CPU usage below.

It also lets you enable Studio Mode for making changes to scenes on the fly, plus access to the many Settings of OBS Studio.

Tweaking OBS Studio Settings

Before your first recording or stream, you should tweak a few options. Click Settings in the Controls section of the interface to access them.

OBS Studio offers other options than what we explore here, but you shouldn’t need to worry about those until you’re more experienced with it.

Video Settings

First, head to the Video tab. Here, check the Base (Canvas) Resolution and Output (Scaled) Resolution) options.

07-OBS-Video-Settings

The first should match your screen resolution, while the second lets you choose the resolution of the final video. Leave Output the same as the above for a full-quality recording, or lower it to something like 1280×720 for a lower file size. Leave the Downscale Filter as Lanczos if you’re downscaling.

Lastly here, you’ll need to choose the FPS (frames per second) of the recording. For a smooth picture, choose 60. But if you desire a smaller file size or are recording something simple, 30 is suitable.

It’s also a good idea to open the Advanced tab and set Process Priority to High in order to give OBS Studio the most resources to create the best recording.

Recording Settings

Switch to the Output tab to access options to screen recording.

At the top, you can set the Output Mode to Simple or Advanced. If you want a quick and solid preset, pick Simple and set the following under Recording:

  • Recording Quality to Indistinguishable Quality
  • Recording format to FLV, or MKV if you prefer
  • Encoder to Hardware (AMD) or Hardware (Nvidia) if you have a powerful graphics card, or Software (x264) if not (see below for more details).

08-OBS-Simple-Recording-Settings

Of course, Advanced gives you more options. Choose Advanced and swap to the Recording tab below to see them.

Choose where you’d like your completed video to save using the Recording Path field.

Under Recoding Format, you can choose the video filetype to save in. The default is FLV, which is a fine default. While MP4 is a popular format, using it is risky because you’ll lose the whole file if OBS Studio can’t finalize it. Thus, a Blue Screen or power outage would destroy an MP4 recording but merely cut off an FLV.

Below this, you’ll need to choose an Encoder. The default is x264, which uses your CPU. If you have a powerful dedicated graphics card (not integrated graphics), you can change this to H264 (for AMD cards) or NVENC (for Nvidia cards). Doing so will likely provide better results when recording, as it won’t put as much strain on your CPU.

09-OBS-Advanced-Recording-Options

Feel free to try both and see which is best for you.

Bitrate

Perhaps the most important part of your recording options is the Bitrate field. Essentially, a higher bitrate results in better-quality videos with larger file sizes. Setting bitrate too low will result in pixelated video, while setting it too high will generate a massive file.

If you’re using x264, choose CBR (constant bitrate) and enter a value for bitrate below. 50,000 is a good starting point for 1080p recordings at 60FPS. The CPU Usage Preset lets you tweak how much of the CPU the software uses to encode video. The default is veryfast, but you can up this to superfast if you get a High CPU Usage Warning while recording or streaming.

10-OBS-Advanced-Recording-x264

Those using a graphics card encoder can choose a Preset, or set the bitrate values below similarly to above.

Try different values here with a few test recordings to find the best balance of video quality and file size for your purposes. Record around a minute of typical footage and you can use that to estimate how large of a file you’ll end up with.

Streaming Settings

You’ll find Streaming on the Output tab as well. In Simple mode, you’ll simply need to specify a bitrate, choose between software or hardware encoding, and set the Audio bitrate.

Twitch recommends some streaming bitrates depending on quality. 1080p at 60FPS should use a bitrate of at least 4,500, while 720p at 30fps can use something around 2,500. For the audio bitrate, 160 is a good baseline. You can increase this to 192 for better quality, or 320 if you need top-notch audio.

In the Advanced mode, you’ll find very similar options on the Streaming tab as discussed above. You may wish to lower the bitrate (as well as downscaling the resolution and lowering the FPS) slightly for streaming, as a stable stream that everyone can enjoy is better than streaming in maximum quality that few can enjoy.

11-OBS-Streaming-Settings

The tips for fixing poor FPS in games apply too. Check out Twitch’s broadcast requirements page for more info.

How to Record Your Screen With OBS Studio

To begin screen recording, all you have to do is click Start Recording on the main OBS Studio page. The software will immediately start recording based on the current Scene. You can swap Scenes at any time, so make sure you’ve set them up beforehand.

When you click Stop Recording, OBS Studio will save your file to the directory you specified in Settings. As mentioned earlier, we recommend performing a short test recording first to make sure everything looks and sounds acceptable.

How to Stream Using OBS Studio

To stream with OBS Studio, you’ll first need to authorize OBS Studio with your streaming account. Do this by opening Settings and switching to the Stream tab. Under Service, choose your preferred service. You’ll find Twitch, YouTube Gaming, Mixer, and more.

12-OBS-Streaming-Key

Next, you’ll need to generate a streaming key for the service. To do this for Twitch, head to the Stream Key page in Twitch’s Settings (Settings > Channel) while logged in. Click Copy and paste this into the Stream key field in OBS Studio.

For YouTube Gaming, open the Live Streaming > Stream now tab in YouTube’s Creator Studio. At the bottom of the page in the Encoder Setup section, reveal and copy your Stream name/key.

Warning: Never give this stream key to anyone or show it on a stream! Anyone with access to this can stream to your account. If you accidentally share it, click Reset to generate a new one.

You’re All Set With OBS Studio

Now you have a basic understanding of how to use OBS Studio. You can customize it a lot more to suit your own personal needs, but this article is designed to prepare you to record gameplay locally or run your first stream.

Now you can focus on building an audience for your streams.

Read the full article: How to Record or Stream Your Computer Screen Using OBS Studio


Read Full Article

12 Creative Layouts to Organize Your iPhone Home Screen

The 4 Best True Wireless Earbuds for Going Cord-Free

7 Demanding PC Games to Test Your Graphics Card


pc-games-test-graphics

PC games are demanding. Every year, new games hit the market that stretch hardware capabilities. There are ground-breaking games whose graphics alter the course of gaming forever. Myst, Doom 3, Crysis, World of Warcraft, BioShock, Half-Life 2, The Witcher 3, and many more spring to mind. That’s not even close to an exhaustive list, either.

They share a common theme though. At the time of their release, the game could push your system hardware to its limits.

So, what games should you reach for to stress test your new graphics card right now?

1. The Witcher 3: Wild Hunt (2015)

The Witcher 3: Wild Hunt was released in 2015 to plaudits across the board. Years later, and people are still blown away by the beauty of its extensive RPG world. Even now, The Witcher 3 is still one of the best ways to max out your system.

In fairness, The Witcher 3 is impressively resourceful regarding GPUs. To achieve maximum beauty, you do need a powerful modern card. However, even older cards like the Nvidia GTX 770 or an AMD Radeon R9 290 can still bring the world to your monitor. The recommended system specification for The Witcher 3 is:

  • Processor: Intel Core i5-3770 or AMD FX-8350
  • Memory: 8 GB RAM
  • Graphics Card (NVIDIA): NVIDIA GTX 770
  • Graphics Card (AMD): AMD R9 290

The Witcher 3: Wild Hunt will definitely max out those GPUs, even on Medium settings. Those with Nvidia graphics cards such as the 1070, 1070 Ti, 1080, or 1080 Ti (or the AMD equivalents) can take their settings all the way to Ultra, depending on the rest of your system hardware.

The awesome Logical Increments gives you a much better idea of what hardware you need to experience The Witcher 3: The Wild Hunt at its best. Also, you can see where your current hardware might get you regarding graphics.

2. Far Cry 5 (2018)

Far Cry 5 takes the state of Montana and pops it into your computer. You can wander around the vast open world exploring every mountain, creek, glade, and river. I spent more time looking at the scenery than playing through the storyline. (In fact, that’s true of several games on this list.)

Far Cry 5 is a slight misnomer on this list. You can still experience Montana, and its religious cults using similar hardware to series predecessors Far Cry 4 and Far Cry Primal. However, if you want constant 60+ FPS at 1080p on Ultra settings, you definitely need a top-tier GPU. Moreover, the only way to hit a constant 60+ FPS at 1440k on Ultra is using two GPUs in CrossFire or SLI configuration.

3. Final Fantasy XV (2018)

Final Fantasy XV is the latest entry in one of the most popular gaming series of all time. Square Enix is known for creating detailed, expansive environments, and the world of Eos delivers in multitudes.

Final Fantasy XV does require a high-performance GPU to see it at its best. The drop off in graphical fidelity between its Low, Medium, High, and Highest settings are notable, especially between Low and Medium. Furthermore, the world truly bursts with life at Ultra, especially if you can support Ultra settings at 1440p.

4. Kingdom Come: Deliverance (2018)

Crytek’s CryEngine has long carried a reputation as a system hardware destroyer. The original Crysis (2008) was used as a system benchmarking tool for years. (Some free Windows benchmarking tools for you to try.) Crysis 3 (2013) was much the same, and at the time of its release, only the most up to date hardware could run it on its highest settings.

Kingdom Come: Deliverance licenses a heavily modified version of CryEngine 5, named Dunia Engine. The Dunia Engine first came to prominence in Far Cry 2 but was still powering Far Cry 5 and its amazing visuals. So, Kingdom Come: Deliverance has similar graphics and hardware requirements to Far Cry 5, as well as a similarly spectacular game world.

In fact, Eurogamer tested Kingdom Come: Deliverance using an i5-8600K CPU with a Nvidia GTX 1080 Ti on Ultra, and struggled to hit a solid 60 FPS. Dropping draw distance, shadows, and lighting to High brought Deliverance to a steady 60+ FPS. But you can see the level of hardware you need to experience Kingdom Come: Deliverance at its absolute finest.

5. Arma III (2014)

You’re thinking, “How can a four-year-old game still push modern hardware to its very limits?” Well, Arma III has such extensive graphics customization that you can still use it in an attempt to melt your computer.

As one of the best tactical shooters Arma III has a few features that push your hardware to its limits. Notably, the game environments are colossal. The largest Arma III map, Altis, covers 270 square kilometers. Obviously, you’re not looking at or rendering the entire map at one time. However, you can set your view distance to 25 kilometers, take a helicopter into the skies, and marvel at the sheer scale of the world. And that takes some serious processing power.

Processing the number of units on a map throughout a large multiplayer game is also resource intensive, especially once the bullets start flying overhead. However, this is an older game, so there are some allowances. Those with extremely new hardware could use Arma III mods to add more graphical fidelity to the game to maximize their experience.

6. Fallout 4 VR (2017)

The world of VR gaming is growing from strength to strength. The first iterations of VR headsets were clunky, running at relatively low resolutions, and many users suffered from motion sickness due to inconsistent frame rates.

The Nvidia GTX 10xx series (particularly the GTX 1070, 1080, and their respective Ti models, which make our list of the best graphics cards to buy) make VR gaming a pleasure rather than a nauseating sad time. If your system hardware can handle it, Fallout 4 VR is one of the most entertaining and expansive virtual reality experiences available at the time of writing.

7. Destiny 2 (2017)

Destiny 2 is another game where you will stop to stare at the majestic world around you. The sheer scale of Destiny 2 is phenomenal, regularly fusing soaring intergalactic vistas with intricate detailing. Detailing that you might miss unless you take time to enjoy it. Another thing Destiny 2 does extremely well is lighting. Each location feels unique and has its own color schemes, while developer, Bungie, has worked hard to make transitions between zones both simple and dramatic.

Destiny 2 is actually optimized really well. Those with older hardware can certainly still enjoy battling the brutal Red Legion. Those with new hardware can crank the dial up to 11 to experience a visually stunning space story (the actual narrative is so-so) that maximizes everything your system can give.

Go and Test Your System’s Hardware!

I haven’t included Deus Ex: Mankind Divided or Quantum Break because, while requiring some serious hardware to run, that’s also down to them being poorly optimized games. Which, in turn, gives them a false position in the hardware requirements list. Also, while Forza Motorsport 7 really pushes the boundaries of system hardware, Forza Horizon 4 runs with similar specs.

CD Projekt RED’s Cyberpunk 2077 and CryTek’s Hunt: Showdown are set to push everyone’s hardware to its absolute limits. Other gamers are keeping tabs on Red Dead Redemption 2. A PC version of Red Dead Redemption 2 would offer another beautiful open world game that would see more than a few gamers’ scrambling for PC hardware upgrades.

Read the full article: 7 Demanding PC Games to Test Your Graphics Card


Read Full Article

The Autoblow A.I. brings machine learning to your lap


Dearest Martha,

I write to you from the cold wastes of Earth on the first day of the New Year, 2023, the third year of war, and so close to your own child’s decanting date that it pains me to think on thee. The machines have been unkind to this planet and I hope you are well situated on Mars where it is safe. The men in the platoon – Dutch, Brooklyn, Dandy, and French – all send a cheerful “Hello.” I think they are jealous that you are human.

I must tell you something, dearest Martha, as I feel I’ve been remiss in maintaining our marriage smart contract. I met here a machine, an Autoblow A.I., with which I had the briefest of dalliances. The robot, made by humans in the last century, approached me in a time of great pain. Zimmerman had just been destroyed by an ion cannon and I saw his flesh burn and his lungs become a meaty particulate. I could still taste him when the Autoblow offered me a night of solace and, Martha, I’m sorry to say I took it.

It was more human than human, Martha, but my shame will never end. The product, which cost $129 in original Earth dollars, came with two sleeves that simulated different parts of human anatomy. The robot had a unique system that grasped and pulled at my turgidity in ways that simulated real human contact. My body wracked with fear, pain, and guilt, I let it stroke me to issue with its A.I.-powered smarts. Then, face burning, I escaped back to barracks and slept fitfully, exhausted and morally broken.

And so I pray, Martha, that you will forgive me. I know that the robots killed your parents and that your hatred for them knows no bounds. But Martha, dear, understand that in that moment, on the streets of Old Singapore where the lights flicker with each cannon blast and the radiation rises like steam from the old sewers, I did not think of anything but my own loss and the deep sadness I feel for having left you and our embryo. This war will be over soon and we will soon return to each other’s arms. I will forget this scandalous experience and I hope you will be able to as well. Until then, Martha, look to this far blue star and think of me as I was before this disgusting behavior. I dream of the happiness we will share. The Autoblow meant nothing to me and you mean everything.

Your husband,
Miso Kale Post Malone


Read Full Article

Tool up for the midterms with this Facebook junk news aggregator


With the US midterms fast approaching purveyors of online disinformation are very busy indeed spreading their hyper-partisan junk on Facebook.

Their goal: Skewing democratic outcomes by putting out misleading, deceptive or incorrect information that’s packaged as real news about politics, economics or culture — yet presented in a way that panders to prejudices and is more likely to get virally spread on mainstream social media platforms where it has the chance to influence people’s views.

This has happened before; is still happening; and will keep on happening unless or until social media platforms get properly regulated.

In the meanwhile, what’s to be done? Arming yourselves and your friends with smart digital and news literacy tools to help shine a light on the kind of ridiculously over-inflated political nonsense that’s being passed around on all sides (albeit, not necessarily equally) seems like a good place to start.

Step forward, Oxford University’s Oxford Internet Institute (OII), which has just launched an aggregator tool which tracks what it terms “junk” political views being shared on Facebook — doing so in near real-time and offering various ways to visualize and explore the junk heap.

What’s “junk news” in this context? The OII says this type of political content can include “ideologically extreme, hyper-partisan, or conspiratorial news and information, as well as various forms of propaganda”.

This sort of stuff might elsewhere get badged ‘fake news’, although that label is problematical — and has itself been hijacked by known muck spreaders. (So ‘online disinformation’ tends to be the label of choice in academic and policy circles, these days.)

The OII is here using its own political propaganda content categorization — i.e. this term “junk news” — which is based on what it describes as “a grounded typology” derived through analyzing a large amount of political communications shared by US social media users.

Specifically it’s based on an analysis of 21.8 million tweets sent during the 2016 Presidential campaign period up til the 2018 State of the Union Address in the United States — applying what the Institute dubs “rigorous coding and content analysis techniques to define the new phenomenon”.

This involved labelling the source websites of shared links based on “a grounded typology that has been tested over several elections around the world in 2016-2018”, with a content source getting coded as a purveyor of junk news if it failed on 3 out of 5 of criteria of the typology.

(Examples of sources that are being judged junk via this method include the likes of Breitbart, Dailycaller and Dailywire to name just a few.)

Now to the tool itself:

The Visual Junk News Aggregator does what it says on the tin, aggregating popular junk news posts into a bipartisan thumbnail wall of over-inflated (or just out and out) BS.

Complete with a trigger warning for the risk of graphic images and language. Mousing over the thumbnails brings up any title and description that’s been scraped for the post in question, plus a date stamp and full Facebook reaction data.

Another tool — the Top 10 Junk News Aggregator — shows the most engaged with English language junk news stories posted to Facebook in the last 24 hours, in the context of the 2018 US midterm elections. (With engagement being based on total Facebook reactions per second of the post’s life.)

While the full aggregator tool supports keyword searches of the junk heap (by content and/or publisher), and also by time — allowing for sifting of junk posts published to public Facebook pages as recently as the last hour or up to a full month old.

Returned search results can be further sorted by time and reaction — across all eight types of possible Facebook reactions.

“The Junk News Aggregator is an interactive tool for exploring junk news stories posted on Facebook, particularly useful right now in the lead-up to the US midterms,” the Institute writes. “It is a  unique tool for systematically studying misinformation on Facebook in real time. It make visible the depth of the junk news problem, displaying the quantity and the content of junk news, as well as the levels of engagement with it.

“Junk news content can be sorted by time and by engagement numbers, as well as via keyword search (such as for a candidate, district, or specific issue). It also offers a visual overview and a top-10 snapshot of the day’s most engaged-with junk news.

“Our goal is to help shed light on the problem of junk news on social media, to make this issue more transparent, and to help improve the public’s media literacy. It also aims to help journalists, researchers, policy-makers, and social media platforms understand the impact of junk news on public life.”

It sent us a case study example to help demonstrate the “functionality and usefulness” of the tool (based on a search it conducted at 11:00am GMT, October 31, 2018).

For this example it used the search keyword “caravan”, selecting posts from the last day and filtering for the most shared posts — which served up several posts.

The most shared post was this one, below, from junk news source Chicks on the Right:

The Institute doesn’t make any comment on why it chose to track junk news on Facebook, specifically, vs other social media platforms (e.g. Twitter) — though there’s little doubt that Facebook’s platform remains the kingpin where skewing political views is concerned, given its massive user-base.

Meanwhile the company’s ongoing attempts to dampen the virality of democracy-denting junk shared on its platform continue — and continue to yield underwhelming results, given the size and gravity of the problem.

Also unconvincing: Facebook’s extremely recent attempts to install systems that verify the actual identity of political advertisers on its platform. Yet these self-imposed checks look to be off to a terrible start — as Facebook has just been shown hosting (and spreading) yet more fake information… ouch…

Putting your faith in Facebook to sort its shit out on the political front — and fast — looks about as sensible as trusting your pet turtle to a shark to babysit.

Much better to tool up and seek to stay on top of the junk heap yourself — at least until the world’s political representatives sort their shit out and get a proper handle on regulating social media.

In the meanwhile, don’t forget to vote.


Read Full Article

Google employees across the globe are walking out now to protest sexual harassment


Google employees are fed up with the search giant’s lack of transparency when it comes to handling sexual harassment and misconduct allegations.

This morning, thousands of Googlers from San Francisco to Dublin are walking out in hopes of bringing real change to the company. The protest follows a New York Times report last week that revealed Google had provided Android co-creator Andy Rubin a $90 million payout package despite credible allegations of sexual misconduct made against him.

The protestors have five key asks:

  1. An end to forced arbitration in cases of harassment and discrimination.
  2. A commitment to end pay and opportunity inequity.
  3. A publicly disclosed sexual harassment transparency report.
  4. A clear, uniform, globally inclusive process for reporting sexual misconduct safely and anonymously.
  5. Elevate the chief diversity officer to answer directly to the chief executive officer and make recommendations directly to the board of directors. And appoint an employee representative to the board.

Plans of the walkout emerged earlier this week, just days after the bombshell NYT report was released. According to BuzzFeed, some 200 Googlers began staging the protest; the group quickly grew to thousands, including non-U.S. Googlers. Google CEO Sundar Pichai had reportedly condoned the protest in an internal e-mail to employees Tuesday.

“Earlier this week, we let Googlers know that we are aware of the activities planned for today and that employees will have the support they need if they wish to participate,” Pichai said in a statement provided to TechCrunch today. “Employees have raised constructive ideas for how we can improve our policies and our processes going forward. We are taking in all their feedback so we can turn these ideas into action.”

Pichai also responded to the NYT report with a letter co-signed by vice president of people operations Eileen Naughton, admitting that 48 people had been terminated at the company for sexual harassment in the past two years alone, including 13 senior employees.

We’ll be at the San Francisco protest, which begins at 11:10 a.m. PST. Here’s a look at protestors around the globe this morning.


Read Full Article

Sonos delays Google Assistant integration until 2019, private beta to launch in 2018


Sonos today announced that Google Assistant will not be available on its products until at least 2019. The service was supposed to launch in 2018 but the company said in a blog posting it needs a bit more time. Additional information about timing will be released in early 2019, Sonos says.

Eager customers can sign-up for a private beta as long as they agree to use the service extensively and respond to surveys within a few days.

Sonos products already have access to Amazon Alexa. Given Sonos’s long-standing notion of supporting all platforms, it makes sense that the company would want customers to have access to both Alexa and Google Assistant. That’s what makes Sonos compelling: They provide the hardware, and owners use whatever software platform they want.

This is clearly critical for Sonos. For a long time, Sonos provided the best-sounding smart speaker system on the market but Amazon, Google and traditional speaker brands are quickly introducing speakers that provide similar sound quality. To keep up and justify the higher price of its hardware, Sonos needs to offer owners the best sound and the best software, and offering Google Assistant on its products is a key part of that goal.


Read Full Article

Defakto releases the stunning Mitternacht minimalist watch


Last year, Defakto released the limited edition Stille Nacht (Silent Night) in collaboration with artist Friederike Bellman. The watch featured a hand-painted star field throughout the dial. Now, the independent German watchmaker is back with the successor to the original: the Mitternacht (or in English, the Midnight). It’s even better than the original.

Like the original each time piece features a star field airbrushed by hand making each watch unique. But this time, the dial is even darker allowing the stars, painted in Superluminova, to shine even brighter. The new version’s hands are now also coated in lume to make it easier to read in the dark of midnight.

The watch features a 40mm face, a sapphire crystal and a Swiss-made Ronda 712 Quartz movement. It retails for around $400 US after conversion from EUR, without import duties.

As detailed in John’s excellent piece on the modern state of timepieces, traditional watches have survived the smart watch onslaught and some brands are seeing sales increase. Defakto is among the growing number of independent watch makers emerging without the massive might behind the biggest names in watches. While technology has paved the way for a smartwatch, it has also allowed independent companies to access parts and services traditionally guarded by legacy watchmakers.


Read Full Article

Access 100 Premium Mac Apps on Demand for $69 with Setapp


You probably use a small group of apps every day: Chrome or Safari, Mail, Word, and so on. But what about the software you use less often? Many apps are essential for a specific task, but you might only need them twice a year. That’s where Setapp comes in. This subscription service gives you unrestricted access to 100 top quality Mac apps for a fixed price. Right now, you can get a year-long subscription for $69 via MakeUseOf Deals.

100 Apps on Demand

You can think of Setapp as your personal app library. Instead of buying software off the shelf, you simply install whatever you need.

As a subscriber, you get access to a range of great creative apps, developer tools, useful utilities, and more. There are no restrictions on what you use — this is an all-you-can-download buffet.

For instance, you could build a personal website at the weekend with Rapidweaver or download Ulysses and start writing your first novel. Journey could help you keep your travel diary, while MoneyWiz will track your personal finances.

Setapp also lets you edit videos with CameraBag Pro, code apps in Espresso, and find the perfect audio mix via Boom 3D. You get the latest version of every app, and there are no in-app purchases or annoying ads.

Unlimited access for $69

It’s worth $119, but you can currently grab one year of Setapp for $69 — that’s a huge 42% off.

Read the full article: Access 100 Premium Mac Apps on Demand for $69 with Setapp


Read Full Article