15 August 2018

How to Become a Blockchain Programmer and Start Making Big Bucks


blockchain-programming

We are in the early days of blockchain technology, and if you take the initiative to learn how to program on the blockchain, you stand to have a very lucrative career in the future.

The situation is not unlike the early days of the internet, where programmers who had the foresight to learn web programming, found new and growing opportunities to earn impressive incomes into the future.

What do you need to learn to position yourself for that future, and where can you get started learning?

The Potential of the Blockchain

When most people think of the “blockchain”, they immediately think of Bitcoin. However, there’s a big difference, as the following Google Trend graphs reveal.

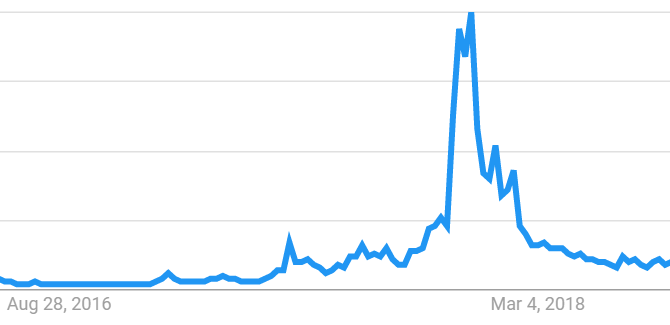
The following is the search trend over the last two years for “bitcoin”.

This next chart is the search trend for “blockchain” over the same period.

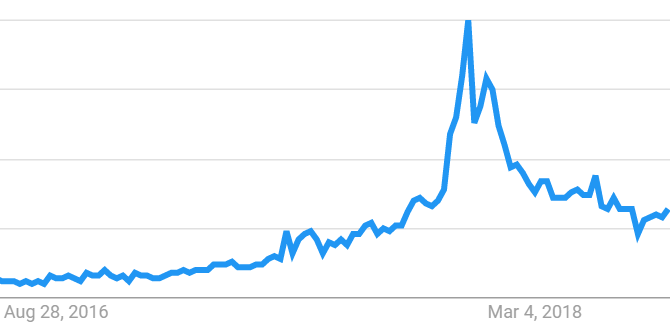
You can see that both saw a tremendous spike in interest over the last half of 2017. After the novelty of Bitcoin’s tremendous rise in price wore off, interest in Bitcoin waned back to and slightly below the end of 2017.

Interest in the blockchain remains higher than the end of 2017 and will likely continue to rise as new innovations are built on top of it.

The difference between Bitcoin and the blockchain is significant. Bitcoin is only an initial application of blockchain technology. But the real star of the show, regardless what happens to Bitcoin, is the blockchain.

The Massive Demand for Blockchain Programmers

Blockchain technology is so new that universities haven’t quite caught up to it with their curricula. For this reason, companies seeking to develop blockchain technologies are turning to freelance developer talent.

Evidence of this was revealed in Upwork’s first quarter report in 2018. According to Upwork, the growth in demand for blockchain skills has been exponential:

“Its growth exceeded 2,000% for three quarters in a row on Upwork.com, and in Q1 it experienced more than 6,000% year-over-year growth, making it the fastest-growing skill out of more than 5,000 skills on the site.”

Gartner predicts the business “value-add” of blockchain will exceed $3.1 trillion in the next twelve years.

IBM has been on the cutting edge of blockchain development initiatives, operating various pilot projects. In early 2017, the company conducted a poll of 200 government leaders across 16 countries and found that 9 out of 10 of those leaders said they planned to invest in some aspect of blockchain use across government functions.

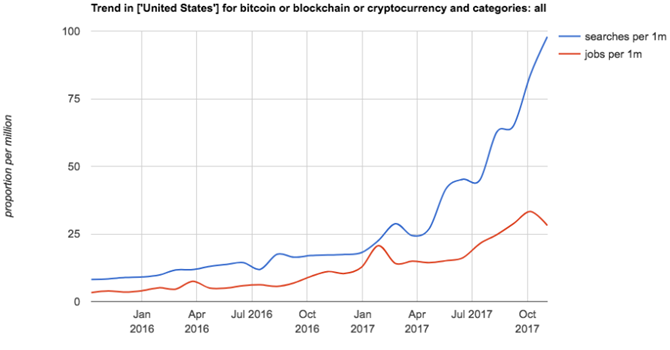
According to Coindesk, the surge in interest in blockchain is directly resulting in a steady growth of new jobs.

This means that pay rates for this skill are enormous. Glassdoor reports that the average salary for a principle blockchain engineer is between $138,000 to $152,000 as of May 2017.

Blockchain Programming Skills

If you’re hoping to break into this booming field, the next obvious question is what skills you need to land one of these lucrative jobs?

Your next steps depend on where you already are with your skillset. Blockchain programming isn’t a place where you can start learning. You’ll need to know a number of core computer science fundamentals—and know it well—to achieve success as a blockchain developer.

If you think about it, Bitcoin itself was programmed with C++. Ethereum uses C++ and Python. Other popular blockchain applications support Java, Python, NodeJS, and C#. All of these are core programming languages that will make you a much-desired developer throughout every tech industry, not only blockchain.

What this means is that if you’re only in high school and you have a strong interest in technology and programming for a future career, then aiming for a Computer Science degree in college is a great first step. Start learning programming skills immediately.

The progression of skill development looks something like this.

  1. Learn core computer science and programming competencies
  2. Focus on understanding networking and security skills
  3. Understand core web technologies like HTML5, CSS3, Javascript, and full stack applications
  4. Start diving into learning how the blockchain works (see resources below)
  5. Start developing your own blockchain programming skills through online or college based courses (see resources below).

Conceptually, it can be difficult to understand how a technology doesn’t have a specific set of programming languages you need to learn to utilize it.

But the beauty of the blockchain is that it’s more of a framework than it is an actual technology. It’s how transactions are communicated over a distributed, decentralized network rather than over a centralized one.

One of the best videos I’ve seen that really helps hammer this concept home is this YouTube video on how to build a blockchain in under 15 minutes:

You can see after watching this that it isn’t the programming language you use that matters, but the method you use to build and utilize a blockchain.

University Blockchain Learning Resources

If you already have a Computer Science degree, or you’re an experienced programmer, then you’re ready to start advancing your blockchain programming skills.

There are numerous resources available that will help you understand blockchain programming concepts, and start to develop your own blockchain applications.

If you’re going into college soon, you may see blockchain sources start showing up in the curriculum. Major universities are also now opening up special labs and project to explore blockchain applications.

A clear sign that a disruptive technology is making inroads into major industries is when you see universities like these increasing research funding in those areas.

Interested in a career in blockchain technology and shopping around for a college to attend? Make sure to ask whether the school you’re considering offers courses on the topic, and whether they have research labs devoted to it as well.

Those research labs could become a great place for you to develop your own blockchain programming skills.

Blockchain Programming Online Learning

For skilled programmers looking for a career change, university resource are limited. If local universities near you don’t offer blockchain curricula, then you’re limited to using online blockchain resources.

That isn’t a terrible thing, because there are already a lot of great resources online to learn blockchain programming. There should be even more as interest and development in blockchain advances and becomes more mainstream.

The following are some of the best resources online to learn more about blockchain programming.

Online Blockchain Courses

To develop your own blockchain apps in any programming language, you’ll want to work your way through one or more courses. Most free courses are introductory. So, if you want to get to an advanced level, plan to invest money into a few really solid blockchain courses.

The following are online sites that offer some valuable courses for learning about blockchain and application development on the blockchain.

  • Blockgeeks Crash Course
    This crash course is a full guide that’ll teach you the basic code to develop your own very simple blockchain application.
  • Edx
    You’ll find a frequently updated list of courses to learn blockchain programming here. There are even certification programs offered by Berkeley and the Linux Foundation.
  • Udemy
    This growing list of blockchain courses are mostly highly-effective courses that’ll help you go from beginner to advanced level. They’re not free, but if you want to land a blockchain developer job, these are a good investment.
  • Class Central
    If your budget is tight, Class Central tracks and lists free blockchain courses across the web.
  • Coursera
    This well-known resource of online courses is starting to develop a collection of blockchain courses.
  • B9Lab Blockhain Academy
    This is collection of courses intended to help you develop the skills and certifications you need to launch your career as a blockchain developer.

Online Blockchain Practice

If you are a software developer and you already have all of the foundational programming skills described above, you can dive right into learning blockchain programming today. The following resources provide online platforms and environments to help you practice developing your own blockchain applications.

  • IBM Blockchain for Developers
    IBM has been leading the charge in blockchain development. In early 2018, IBM and Walmart collaborated on a supply chain blockchain pilot. IBM recognizes the need for more blockchain expertise and offers an entire platform to help developers learn and practice blockchain programming. Under Learn, in the Developer section, you can sign up for a starter plan to test your own blockchain application. It isn’t free but you get $500 is starting credits.
  • BitDegree Tutorial
    This introductory course will introduce you to blockchain. Specifically, you’ll learn about the programming language built by the Ethereum developers called Solidity. By learning this language and practicing it through game-development simulations like Space Doggos and CryptoZombies, you’ll become a Solidy expert in no time. This is a great place to start if you want to work toward developing smart contracts.

Since the entire blockchain development community is all about using open source software and resources, you don’t necessarily have to use any of the above platforms. You could just start using your own favorite programming language to being developing a blockchain application right now.

Blockchain programming isn’t a simple concept by any stretch of the imagination. However, if you’re already a programmer, then you have the foundation required to learn blockchain programming.

If you’re still not certain that you’re interested in this new technology, take some time to learn a little more about these decentralized apps and what they can do. If the technology described there sounds exciting to you, then a blockchain career may be in your future.

Read the full article: How to Become a Blockchain Programmer and Start Making Big Bucks


Read Full Article

Square it can now process chip cards in two seconds


If you’ve made any payments with a chip card, you’ve probably had awkward moments — those long seconds after you’ve inserted the card and everyone behind you is (literally or metaphorically) tapping their foot, waiting for the card to be processed.

Well, Square has been working on this problem for a while now. Last fall, for example, CEO Jack Dorsey said the company had gotten the processing time down to under three seconds.

Today, the company is announcing that it’s shaved even more time off, and that Square Readers can now process chip cards in two seconds. To achieve this, it says it’s worked closely with payment partners — and it’s also streamlined the process so that you can remove your card as soon as it’s read, without waiting for the response from the card issuer.

In contrast, when the Wall Street Journal timed chip cards in over 50 transactions a couple years ago, it found that the average processing time was 13 seconds. Those extra seconds might not sound like much in theory, but again, if you’re in a hurry or you’ve got a line of people behind you, the wait can be painful.

Plus, it sounds like this can make a real difference for businesses. In the announcement, Regan Long, co-founder and brewmaster at Local Brewing Co., said that with his brewery’s location near the Giants’ AT&T Park in San Francisco, there’s usually “a rush of customers all ready to close out their open beer tabs at the same time.”

“With Square’s chip card reader update, we’ve cut processing time in half — helping us keep customers happy and on their way to catch the first pitch,” he added.

In addition to faster chip card processing, Square is making another speed-related announcement: With the latest update, Square’s free point-of-sale app will allow sellers to skip collecting signatures if they choose.


Read Full Article

5 Reasons to Update Your Raspberry Pi and Raspbian Regularly


update-raspi

You’ve owned a Raspberry Pi for some time, but find that it doesn’t quite work right. Things are slow, apps are missing or have stopped working… it’s a bit of a mess. But why? Maybe because you haven’t updated it!

Lagging behind on Raspberry Pi updates can cause a lot of frustrations in the long run. Here are five major reasons why you should keep your Raspberry Pi up-to-date.

1. Get the Latest Software

Launch the terminal to upgrade Raspbian

Without updating to the most recent version of Raspbian, you won’t get to enjoy the latest Raspberry Pi software.

A wide selection of tools are pre-installed in Raspbian, enabling you to perform a wide variety of tasks. Whether you’re word processing or programming, tools are updated all the time.

Then there’s the new software. For instance, Raspbian originally shipped with the Midori browser, but in recent years this has changed. Now, Chromium ships on the Raspbian Stretch operating system (for all models but the first generation Raspberry Pi), bringing a whole new browsing experience.

Without the latest software, you risk being left behind with your projects. Your Raspberry Pi deserves the best, so update Raspbian to get your hands on the newest utilities and applications!

2. Improvements to the Raspbian Desktop

If you want a better desktop experience in Raspbian, then upgrading is vital.

When first released, the Raspbian desktop was a little lo-fi and drab, in keeping with the low specification of the original Raspberry Pi models. Over the years, however, this has been improved.

For instance, with the release of Raspbian in Jessie in 2015, the Raspberry Pi would boot directly to desktop, rather than requiring the startx command. Similarly, the desktop-based Raspberry Pi Configuration Tool was introduced, a mouse driven alternative to raspi-config.

Meanwhile, the arrival of the PIXEL update introduced a login box, refreshed icons and fonts, a collection of stunning desktop backgrounds, and much more.

The PIXEL desktop proved so successful that the Raspberry Pi Foundation has released an x86/x64 variant. Looking for a Raspbian-style desktop to refresh your old Windows or macOS computer? PIXEL for PC and Mac is worth a look.

3. New Features Are Included

Updating Raspbian almost always results in some new features for your Raspberry Pi.

The first PIXEL update included some detailed appearance settings, a built in VNC application (RealVNC), the Chromium browser, Python 3, and more. Since then, however, we’ve had regular updates, with the June 2018 update of Raspbian Stretch including a setup wizard. This lets first timers navigate through Raspbian’s initial setup, much as other operating systems do.

Then there’s the surprising removal of several apps that don’t get regularly use, placing them instead in the new software tool. Recommended Software is a long-awaited replacement for the short-lived Pi Store.

Other new features to the Raspbian OS include network booting with PXE and booting from a USB flash or hard disk drive. Our list of the latest Raspbian OS features provides a more detailed look at these improvements.

4. Get Security Fixes

Keep your Raspberry Pi safe online

You might not think that a Raspberry Pi is particularly prone to security issues, but just think of its uses. Whether it’s a desktop replacement, or a Kodi media center, there’s a security risk (particularly for Kodi). Then there is the device’s use in smart home systems, and the potentially poor security of other devices on that system.

In short, if the Pi itself isn’t prone, then the devices connected to it could be.

Meanwhile, there’s the firewall, security certificate management, SSH implementation, and other things that need to be perfect. Updates for Linux systems regularly include fixes for any issues with online connectivity and security.

And then there’s Spectre and Meltdown. These flaws have proved damaging for chip manufacturers, but thankfully the Raspberry Pi isn’t susceptible.

5. Your Project Demands It

Install LAMP on a Raspberry Pi

Running Kodi, or something a bit more complicated? Perhaps your project needs to run as a server, and requires MySQL, PHP, and Apache. Maybe you need to be using the latest version of Python to get things running.

Perhaps there is a driver fix that you need on your Raspberry Pi to enable the correct use of the camera, or a connected display.

In short, whatever your Raspberry Pi project is, for it to work correctly, you’ll need to ensure that Raspbian has been updated. Making sure you’ve got the latest drivers for the hardware you connect, and the Pi itself, will help considerably here. Keeping project software up to date will save a lot of frustration later on.

How to Update Your Raspberry Pi

By this stage, you should be convinced: you need to update and upgrade your Raspberry Pi right now. But how?

It’s surprisingly straightforward, with options for both upgrading your current system, and starting from scratch with the latest release. Both require an internet connection, so this isn’t something you might do in the field. When it’s time to update, you need to bring your Raspberry Pi home.

With the many enhancements and improvements to the Raspbian operating system over the years, it is worth updating right away.

Ready? Everything you need to know can be found in our dedicated guide to updating and upgrading your Raspberry Pi.

Not Only Raspbian: Always Update Your Devices

You need to upgrade Raspbian when updates are available, but look beyond your Raspberry Pi as well. All devices need regular updates, from your PC to your smartphone to your tablet.

If updates are available, install them, and keep your hardware safe from driver failure, and security breaches, as well as enjoy new features.

Need help with your Raspberry Pi? Get started with a look at our downloadable Raspberry Pi setup tutorial.

Read the full article: 5 Reasons to Update Your Raspberry Pi and Raspbian Regularly


Read Full Article

Repair or Replace


Repair or Replace

5 Reasons to Ditch Evernote Today (And How to Migrate Your Notes Elsewhere)


ditch-evernote

I use Evernote on an almost daily basis. While the service is clearly doing some things right, I’m getting increasingly fed up with some of the limitations. What’s more, the company isn’t doing much to make me want to upgrade my account.

So I’m thinking about switching to something else. I don’t make great use of some of the app’s most powerful integrations, and a simpler solution could offer more flexibility in the areas I value most.

Today I’m going to take a look at some of those frustrations, and how they stack up against the competition.

1. Evernote Free Is Severely Limited

When I use a service for free, I don’t expect the world. But when Evernote cracked down on free accounts back in 2016, they neutered the service for a large number of lightweight users. The company is well within their rights to do this, but whichever way you spin it the free option is no longer competitive.

Evernote Basic Option

Microsoft’s OneNote is free for all users. Apple Notes, should you be using iPhones and Macs, has improved exponentially since the company started revamping the app in 2017. Simplenote might be, well simple, but it’s always been free and there’s an app for just about every platform out there.

Evernote has clearly positioned itself as a premium product. That means it’s no longer a convincing choice for free users. The free version feels more like a free trial than a longterm solution. The biggest issues for those unwilling to cough up are:

  • An app limit of two devices per account. For example, your Mac and your iPhone, but not your Android tablet.
  • No access to your notes while browsing offline. Better hope your mobile reception doesn’t drop out!
  • A 60MB upload limit per month. Not an issue for those who use only text, but if you’re archiving PDFs, images, business cards and so on you’ll fill it up fast.
  • No email forwarding into Evernote. Previously a standout feature of the Web 2.0 era.

2. Evernote Premium Is Expensive

There are two tiers available to Evernote users: Basic and Premium. Basic is free and includes all the limitations above. It’s fine for very light users, but there are some glaring omissions from the feature list that Evernote used to throw in for free.

Premium is an $89.99 per year (or $9.99 per month) service. For that you’ll get 10GB of new uploads every month, no device restrictions, the ability to search inside attached documents, offline access to your notes, email forwarding, PDF annotation, a presentation wizard, and a business card digitizer.

Evernote Pricing

Many of those features, like PDF annotation and presentation mode, are completely lost on me and do not make compelling upgrades. Similarly, I could get a year’s subscription to Office 365 for $10 more ($99.99 yearly), shared with up to five family members while bathing in 1TB of OneDrive storage each. Evernote just doesn’t seem worth it by comparison.

The company used to offer an intermediate plan called Evernote Plus for around half the price, but that option is now absent. It’s all or nothing if you want to use Evernote now, and I’m being pushed in favor of “nothing.”

3. Evernote Still Lacks Some Premium Features

For its premium price tag, Evernote is still missing a few obvious premium features. Top of the list for me (and you may disagree) is markdown support. I don’t do any writing in my note-taking software, but I probably would if I could. Markdown support would help immensely in this regard.

It’s also not possible to lock individual notes. You can apply a lock to your mobile apps, which required a passcode or TouchID authentication on an iPhone, every time you return to the app. You can’t passcode protect notes across all platforms, on a per-note basis. Apple Notes has had this feature for a long time, so why hasn’t Evernote followed suit?

The seems to have put a lot of effort into developing features that I’m not interested in instead. There are separate apps for scanning documents, annotating screenshots, and creating handwritten notes with your iPad. There’s a web clipper which I never use, and Work Chat which serves no purpose for the solitary note-taker.

I’d be far more inclined to plump for the premium option if the company was focusing on improving the core functionality of the service with note-taking features, rather than widening the ecosystem. Of course, this is a reflection of how I use the service so your own mileage may vary.

4. Evernote Apps Are Frustrating to Use

I’ve noticed the Mac app slow down considerably in the time I’ve been using the service. Despite this, the iPhone app is what causes me the most frustration. After reinstalling the app on multiple occasions in a bid to fix it, Evernote seems to constantly fall out of memory on iOS.

As an example, switching between Evernote and two or three other apps causes the note I was browsing to disappear entirely. I’m dumped back into the search engine, where I have to find the note all over again. This doesn’t happen with Apple Notes, nor does it happen with anywhere near as much frequency in other apps.

Lastly, I’ve had to revoke microphone permission from Evernote on iOS purely because the “record voice note” button is so easy to tap by mistake. It’s right there above my home button, and it destroys your free upload quota if the file gets sent to the server.

Evernote Microphone Access

If it sounds like I’m grumbling, you’re right. I’ve used the service for long enough that I now audibly sigh when I have to search for a note again, delete a voice recording I never wanted, or have the Mac app slowly chug its way through a search.

5. Free Evernote Alternatives Are Plentiful

Maybe you don’t share any of my frustrations. That doesn’t mean Evernote is the be-all and end-all of note-taking. Well, not anymore anyway. There are plenty of convincing Evernote alternatives to choose from, many of them premium products also.

Microsoft OneNote is probably the closest thing you’ll get to an Evernote clone. It’s free for everyone, with no Office 365 subscription required. You get a total of 5GB storage shared with your OneDrive account and no device restrictions. There’s a web clipper, integration with services like WordPress and IFTTT, and an app for all platforms.

Note added to OneNote using Cortana

Simplenote will satisfy you if you’re a text-only purist. There are no storage limits, no device limits, and no fees to pay whatsoever. You can’t attach media, so you’re going to have to find another way to organize your receipts and expenses.

Apple Notes is another worthy competitor, but you’ll need Apple devices in order to make decent use of it. There is no Apple Notes app for Windows or Android, but you can use it via the web at iCloud.com. It’s a simple note-taking app, with attachments, folders, locking, and built-in document scanning to boot.

Bear Notes Tags

Bear is a compelling option for Mac and iOS users who are displeased with Apple’s free option. The core service is free or you can pay $15 every year to lift device restrictions, data exporting, and new themes. It looks like a cleaner version of Evernote, it’s fast, it includes markdown support and a focus on typography that will please writers.

But there’s more to it than this small selection. We’ve rounded up unique note-taking apps for Apple users, the best free Android note-taking apps, and productivity solutions for Linux users too.

How to Export Your Evernote Contents

You can export your Evernote contents using a desktop version for Mac or Windows. Ultimately the app you’re replacing Evernote with will determine how best to go about this. The best way is to export notes notebook-by-notebook by right-clicking an individual notebook and choosing Export Notes in the ENEX format.

Evernote Export

If you’re switching from Evernote to OneNote, there is a process to migrate from Evernote to OneNote. For Evernote to Apple Notes, we have this guide to help you switch. Since rival apps want to make it as easy as possible for you to make the switch, each should provide a relatively simple way of doing this in the relevant documentation.

Evernote Is Still a Powerhouse

If I’ve not convinced you that the grass is greener, that’s great. You clearly value some of the features I never look twice at. Maybe you’re happy to pay a small amount each month because you prefer Evernote’s way of doing things. More power to you.

But simply using a service because you’re used to it, missing out on better functionality, as a result, is doing yourself a disservice. It’s always a good idea re-evaluate your tools and habits in the name of increased productivity.

Read the full article: 5 Reasons to Ditch Evernote Today (And How to Migrate Your Notes Elsewhere)


Read Full Article

Google One is now open to all


A few months ago, Google announced Google One, its new subscription program for getting more Google Drive storage and other perks. Over the course of the last few weeks, Google slowly rolled existing Drive subscribers over to a Google One membership and starting today, new users can sign up for a One subscription, too.

Google One plans start at 100 GB for $1.99. There’s also a 200 GB tier for $2.99 and a 2 TB option for $9.99. If you need even more storage space, Google will happily sell you 10 TB, 20 TB and 30 TB plans for between $99.99 and $299.99 per month.

One nice feature of these new plans is that you can share your storage allotment with up to five family members.

While storage is the main feature here, Google also promises additional perks. The most important of these may be access to live 24/7 support. These Google experts at the other end of the line will help you with figuring out any question you may have about a Google product.

Another perk here is that you get deals on hotels when you search for them in Google Maps. Recently, Google also gave all One members credits on Google Play and the company today said that it’ll soon offer members deals for purchases in the Google Store and through Google Express, too.

It’s worth noting that One is very much a consumer product. For businesses, Google’s G Suite remains the way to get additional service and features.

For now, Google One is only available in the U.S., but it’ll roll out to more countries soon.


Read Full Article

5 Ways to Turn Any Website Into a Desktop Mac App


turn-website-into-mac-app

No matter how good a web app is, sometimes you wish you could have it on your Mac desktop. That’s especially true when it comes to the apps (and websites) you use often.

Sure, if the app has a macOS version, you can install that. But if it doesn’t, or if the desktop client is poorly made, what are your options?

We’ve lined up five apps that can turn websites into Mac apps.

1. Fluid

makeuseof-fluid-app-mac

For a long time, Fluid was really the only app that let you turn web apps into real Mac apps. Now it has some competition, but Fluid continues to do its job well. It even gained a spot on our list of must-have apps for users who spend all day on a Mac.

After you install Fluid, creating a new desktop app is straightforward. First, grab the URL of the website you want to turn into a Mac app and paste it into Fluid. Next, type in a name for your new desktop app.

If you want to throw in a custom icon for the app, you can add that too. (By default, Fluid uses the source website’s favicon). Now hit the Create button to set up the app. You’ll then find it in the Applications folder unless you have changed its location during setup.

create-fluid-app-mac

Fluid gives you several customization options once you’ve created a desktop app. These appear in the app’s settings or Preferences section, like they do for any regular Mac app.

You don’t have to worry about a limit on the number of desktop apps you can create with Fluid—the app is free. You’ll need a Fluid license ($5) only if you want to pin Fluid apps to the menu bar or customize them with Userstyles and Userscripts. Using full screen mode for apps created with Fluid is also a premium feature.

Download: Fluid (Free, premium version available)

2. Applicationize

applicationize-whatsapp

Applicationize lets you turn web apps into Chrome apps. You can create a Chrome app at applicationize.me/now. There, enter the URL of a website or web app you want to add to your desktop and hit the Generate and Download Chrome Extension button. The downloaded app appears as a CRX extension file.

create-applicationize-extension

Before you generate the app, you can also configure a few settings for it with the Advanced Options link. For example, you can customize the app to receive notifications and open links within popups.

applicationize-advanced-options

Now let’s see how to install your new app extension in Chrome.

To begin with, type chrome://extensions into the address bar and hit Enter. On the Extensions page that opens up, turn on the Developer mode switch at the top-right.

After you restart Chrome, drag and drop the CRX file onto the Extensions page. Then click on the Add app button when Chrome asks you if you want to install the extension.

Once you do, the app appears within the app launcher at chrome://apps. It’s now ready for you to launch as a standalone app. If you want to drag the app out to the Dock, you can do that via the Create Shortcut option within the app’s context menu.

Download: Applicationize (Free)

3. Web2Desk

web2desk-mac-app

This website gives you a ready-made interface to generate desktop apps, with bo installation required.

Start by grabbing the URL of the website you want to turn into a Mac app and paste it into the field provided. Add a name for your new desktop app and a custom app icon if you want one. After you type in the email address where you want to receive the download link, hit the Create Now button.

create-web2desk-mac-app

Once you download the app, you can move it to the Applications folder or add it to a separate folder.

If you want to see the results of Web2Desk before you convert a web app into a desktop app, try one of the sample apps featured on the website.

Of all the apps listed here, Web2Desk is the only one that generates a heavy app (it takes up a few hundred megabytes of space). The rest create apps that hover in the 1-10MB range. To save space, it’s best to use this if you want to generate only a handful of apps.

Download: Web2Desk (Free)

4. Unite

unite-mac-app

Like Fluid, Unite lets you create native Mac apps. This means that each app gets a browser of its own, complete with separate cookies and settings.

As you can see in the screenshot below, creating a new app is as straightforward as Fluid and Web2Desk we discussed above. A website address, a name for the new app, and a favicon are all you need to get started.

create-unite-mac-app

Unite also has many customization options hidden in the settings of the new desktop app. There, you’ll see that Unite lets you pin apps to the menu bar and tweak the appearance of app windows. It also allows you to configure how tabs, cookies, and notifications work for the active app.

unite-settings-mac

If you want a versatile solution with plenty of options to tweak how your new desktop apps behave, Unite is a good bet.

Download: Unite (Free trial, $5 license required)

5. Automator

automator-mac-app

You don’t really need a dedicated service to turn websites into standalone Mac apps. Your Mac’s Automator app will do just fine. Let’s see how to create a desktop app with it. (That’s just one way to use Automator with your browser.)

To begin with, open Automator, select Application as your document type, and click on the Choose button. Now look for the action item Get Specified URLs and drag it to the right-hand panel. (You can use the search box to find the action faster.)

automator-action-1

You’ll see that the default address in the panel is Apple’s homepage. Double-click on that address and replace it with the address of the website you want to turn into a desktop app.

Next, grab the Website Popup action and drop it onto the right-hand panel below the first action. Here you’ll find options to customize the look and feel of the desktop app.

automator-action-2-mac

Once you save this new Automator application, your desktop app is ready for launch.

A Few Important Pointers

Here are a few more similar apps you might want to check out:

While these apps look lovely, their behavior seems unreliable. Still, you might want to give them a shot; your results may vary.

Before you begin your app search, ask yourself:

  • Do you mind using a website wrapper or do you need a “real” app?
  • Is the lack of notifications a deal-breaker?
  • Do you plan to generate several desktop apps, and in that case, do you need the most lightweight ones?
  • Do you need multiple sign-in for Gmail or any other account?

Getting clear on what you consider must-haves will help you find the perfect solution.

Web Apps vs. Desktop Apps: Which Do You Prefer?

Sometimes it’s better to choose web apps over native Mac apps, but not always. And when you need those desktop apps, sometimes you have to resort to makeshift ones using the apps we’ve mentioned above.

But don’t worry. Progressive Web Apps (PWAs) that promise to bridge the gap between web apps and native apps are gaining more traction. Let’s look forward to that.

Read the full article: 5 Ways to Turn Any Website Into a Desktop Mac App


Read Full Article

XYZPrinting announces the da Vinci Color Mini


XYZPrinting may have finally cracked the color 3D printing code. Their latest machine, the $1,599 da Vinci Color Mini is a full color printer that uses three CMY ink cartridges to stain the filament as it is extruded, allowing for up to 15 million color combinations.

The printer is currently available for pre-order on Indiegogo for $999.

The printer can build objects 5.1″ x 5.1″ x 5.1″ in size and it can print PLA or PETG. A small ink cartridge stains the 3D Color-inkjet PLA as it comes out, creating truly colorful objects.

“Desktop full-color 3D printing is here. Now, consumers can purchase an easy-to-operate, affordable, compact full-color 3D printer for $30,000 less than market rate. This is revolutionary because we are giving the public access to technology that was once only available to industry professionals,” said Simon Shen, CEO of XYZprinting.

The new system is aimed at educational and home markets and, at less than a $1,000, it hits a unique and important sweet spot in terms of price. While the prints aren’t perfect, being able to print in full color for the price of a nicer single color 3D printer is pretty impressive.


Read Full Article

How to Emulate the Commodore Amiga on a Raspberry Pi Using Amibian


commodore-amiga-raspi

Love retro gaming but not sure where the best games are found? Looking for some retro gaming gold? Then why not take a look at Amibian, the Raspbian-based Amiga emulator for the Raspberry Pi?

Emulating the Commodore Amiga has never been easier or more satisfying than this.

Amiga: One of the Most Loved Home Computers Ever

Amazing graphics, unique physical design, and the antonym of the bland IBM/PC compatible market. No, I’m not talking about an Apple computer, but the Commodore Amiga. Capable of audio, graphics, video, standard office tasks, and an awesome video gaming platform, the Amiga dominated home computing in the USA and Europe between 1985 and its final appearance in 1994.

Commodore Amiga 1200

(In the UK and Europe in particular, the decline of the Amiga lead to the rise of game consoles and home-based PCs.)

However, the Amiga is not dead. Remnants of the Amiga’s legacy can be found on modern platforms, such as Android and iOS, although only a few games have been re-released on mobile.

You can even buy old Amigas online, although you should know that they’re surprisingly expensive. Most also require new capacitors, as the originals have probably leaked, or are yet to do so. This means an additional expense that you might prefer to avoid.

Meanwhile, some fan projects are attempting to revive the Amiga as a device. But why pay for a device that boots into an emulator if you can just emulate it yourself on the Raspberry Pi you already own?

Here’s what you need to know and how to do it.

What You Need to Emulate an Amiga on Raspberry Pi

If you want to turn your Raspberry Pi into an Amiga, you will need:

Put this lot together with the right Kickstart ROM, and you’ve got the closest thing to an original Amiga!

Finding Amiga Kickstart ROMs

Copy Amiga Kickstart files to USB

To use Amibian, you’ll need to first get hold of a Kickstart ROM for your preferred Amiga model (or all of them). The easiest option here is to purchase Kickstart from Cloanto via amigaforever.com.

However you get hold of the ROM, you’ll need to add it to a USB flash drive, along with the game or application ROMs you plan to use.

With all of these things gathered together, you’ll be ready to start your trip into the past. Ready to revisit the golden age of 16-bit gaming? Here’s what you need to do.

Installing Amibian OS on Your Raspberry Pi

To get started, begin with a freshly formatted microSD card. You should have downloaded and installed Etcher, and the Amibian operating system. This archive should be unpacked, so you have the IMG file ready to use.

Burn the Amibian OS to SD card with Etcher

Insert the microSD card into your card reader and launch Etcher. Click Select Image to browse to the Amibian IMG file.

Check the middle panel of the app, where the microSD card should be detected. Confirm this is the correct card (check the drive letter in your file manager), then click Flash to proceed with writing the image.

Wait while this completes; Etcher will inform you when the writing has completed, so close the app.

Booting and Configuring the Amibian System

At this stage you should ensure that all of the peripherals are connected to the Raspberry Pi, including the display. Safely remove the microSD card from your PC, and insert it into your Raspberry Pi, then connect the power cable to boot up.

The Amibian settings menu

The main user interface will appear, which offers a tantalizing collection of menus and options; however, you cannot use your Amibian system yet. Instead, you’ll need to make some configuration changes. Quit the UI, and in the command line menu, enter:

raspc

This will open the Raspberry Pi’s familiar raspi-config screen. Here, use the arrow keys to select Expand filesystem, then select OK, and Finish. You might also change the computer’s Localization Options while you’re using raspi-config.

Expand the file system on Raspberry Pi

Choose Yes when prompted to reboot. You now have the full capacity of the microSD card available for your Amiga ROMs!

Copying Amiga ROMs and Data to Raspberry Pi

When your Pi reboots, insert the USB flash drive.

In the menu, again select Quit, then find Midnight Commander in the command line menu. This tool is a file manager, and you can use it to access the files. Launch this using the command

mc

Here, use the arrow keys to select the USB drive in the left hand pane, and in the right hand pane, browse to /root/amiga/kickstarts. Select the Kickstart ROM(s) here, and press F5 to copy to the kickstart subdirectory.

Once this is done, browse to /root/amiga/floppies in the right pane, and copy your Amiga games, again using F5.

Everything is now in place to emulate an Amiga on your Raspberry Pi!

Launching Amiga Software in Amibian

To use Amiga software, you need to first tell the emulator where the Kickstart ROM is, select a configuration (several versions of the Amiga were released), and load up the virtual floppy disk (the game ROM).

Select a configuration for your Amiga emulation

Do this by tapping 3 from the main Amibian menu to Start Amiga, and selecting one of the Configurations. This will depend on which Kickstart ROM you have (you’ll need to check online for the specifics), but for instance if you’re using Kickstart 1.3, you’ll need to choose one of the basic A500 configurations. Select this, then click the ROM tab, and browse for the correct Kickstart version (in our example, this would be Kickstart 1.3).

Next, go to the RAM tab, where you’ll find the option to set a 1MB RAM chip. This would emulate the expansion card that shipped with many Amiga 500’s 1989-92, upgrading the basic 512kB RAM to a full megabyte (gasp!).

Add ROM files to your Amiga emulator

With this done, go to the Floppies tab, and browse for the game ROM you want to use. Amiga ROMs are in ADF format; the initial disk is labelled DF0:, so use this for single disk applications and games. If your game has multiple disks, simple load them into each virtual drive in order.

Click Save to remember the configuration (giving it a name and description), then Start. Moments later, your emulated Amiga will boot your chosen ROM file. Time to game like it’s 1990!

Enjoy Classic Amiga Software on Your Raspberry Pi

It’s remarkable how straightforward it is to use your Raspberry Pi as an Amiga. Better still, you can still use Linux, as it provides the underlying code for running your computer.

Run Turrican and other classic games on your Raspberry Pi with Amibian

To turn your Raspberry Pi into an Amiga, all you need to do is:

  1. Connect a USB keyboard and mouse to your Raspberry PI
  2. Install the Amibian distro to your SD card
  3. Copy the Kickstart ROM and game ROMs to a USB flash drive
  4. Boot up your Raspberry Pi
  5. Expand the filesystem
  6. Copy the ROMs to the correct directories in Amibian
  7. Tell the configuration tool where to find Kickstart
  8. Load up your game ROM, click Start, and enjoy!

Better still, this project is particularly suited to older models of the Raspberry Pi. Didn’t find anything useful in our list of great ways to use an old Raspberry Pi? This might be just what you’re looking for!

Read the full article: How to Emulate the Commodore Amiga on a Raspberry Pi Using Amibian


Read Full Article