Welcome back to This Week in Apps, the Extra Crunch series that recaps the latest OS news, the applications they support and the money that flows through it all.
The app industry saw a record 204 billion downloads and $120 billion in consumer spending in 2019, according to App Annie’s “State of Mobile” annual report. People are now spending 3 hours and 40 minutes per day using apps, rivaling TV. Apps aren’t just a way to pass idle hours — they’re a big business. In 2019, mobile-first companies had a combined $544 billion valuation, 6.5x higher than those without a mobile focus.
In this Extra Crunch series, we help you keep up with the latest news from the world of apps, delivered on a weekly basis.
This week, we’re continuing our special coverage of how the COVID-19 outbreak is impacting apps and the wider mobile app industry as more COVID-19 apps appear — including one from Apple built in partnership with the CDC, among others. We also take a look at the gains made by social and video apps in recent weeks as people struggle to stay connected while stuck at home in quarantine. In other headlines, we dig into Instagram’s co-watching feature, the Google for Games conference news, Apple’s latest releases and updates, Epic Games expansion into publishing and more.
Coronavirus Special Coverage
Social video apps are exploding due to the COVID-19 pandemic
You’ve seen dark web in the movies. You’ve heard about it in the news. You know the hackers are down there, planning attacks. But is the dark web really that bad?
Why not take a look for yourself? With this free ebook, we’ll safely guide you into the hidden depths of the internet to show you what you’ve been missing.
If you’re curious to learn more about the dark web, this guide will give you a solid introduction to the subject.
Are you ready to explore? To learn the tricks, tips, and secrets of the deep and dark web, click here to download The Deep and Dark Web Guide from TradePub. You will have to complete a short form to access the ebook, but it’s well worth it!
You don’t need to go to the gym or jog around the park to maintain your fitness. These stay-at-home workouts keep you healthy while being indoors, without any fancy equipment.
When you are forced to not move out, you don’t need to stop moving around. In fact, health officials say that staying fit and healthy will ensure your immune system can better fight any virus. It’s in your best interest to regularly exercise even at home.
Trainers, celebrities, and tech geeks are making apps and routines to workout at home. Here’s a quick roundup of five of the best indoor workouts, which includes Arnold Schwarzenegger and something for your kids.
That’s right, The Terminator himself shared an exercise routine for everyone to stay fit at home. Arnold Schwarzenegger wrote a long Reddit post about how he started his own training without any equipment and continued that even after achieving fame.
In total, there are nine exercises. Schwarzenegger recommends different sets of repetitions for beginner and advanced, depending on your fitness level.
The workout mostly depends on your own body weight, aided at times by items you’ll have at home, like a chair, book, or a cane. He has also shared an Imgur gallery of photos demonstrating the various exercises.
You should actually read the full Reddit post. Schwarzenegger’s words are not only motivational, he also warns you about the pitfalls in working out alone.
He also advises how to track your progress and incrementally increase your capacity, with several commenters piping in with their own tips.
Workout Sesh is a collection of different timed workout routines for the home or gym. Each workout clearly states which part of the body it trains, and how long the entire routine takes. Click any session to find a quick write-up and the exercises of the workout. You’ll see a list of all the exercises and how many seconds you’re supposed to do them for.
Workout Sesh presents a GIF for each exercise. Once you start the session, follow along to the speed of the GIF, and continue with it for the recommended time. The website sends audio alerts to start, stop, rest, and restart.
All of the routines on Workout Sesh are completely free and you can use them as many times as you want. Several routines have celebrity names to them, but don’t fall for that, there doesn’t seem to be any real backing by those celebs. Do them to get fit, not for the fake allure of the famous.
Workout Sesh is a progressive web app that works in a browser on your phone, laptop, or TV. There is no app to install , but it requires an active internet connection. If you want offline workouts, check out these other bodyweight exercise apps for fitness anywhere.
Runner’s World magazine published a 28-day workout for runners stuck in their living rooms. But the magazine is quick to note that this isn’t only for runners, as it will help anyone get fit at home.
It divides the 28 days into four weekly workout plans. Each week’s routine is more difficult than the previous one. Every routine has five basic exercises, with illustrations that guide you on the correct form. Do each exercise for 30 seconds, and three circuits of all five, with 2-3 minute rest breaks between circuits.
Runner’s World also has instructions that speed up the workout routines at home depending on your fitness levels. For example, if you aren’t a beginner, you can skip directly to the second week’s exercise plan. The third and fourth week’s workout routines require dumbbells.
If you want to keep up with weight training at home but don’t have any weights, you can make your own. GymPerson offers five different DIY ways to make your own dumbbells or other exercise weights with objects and items you probably already have.
In step-by-step guides, the website instructs how to build homemade weights with water bottles, milk jugs, sand, concrete, and a backpack. Some of the guides are more explicit and clear than others.
For example, the DIY water bottle dumbbells weigh 10 pounds or 27 pounds, depending on the size of the bottle. Meanwhile, you’ll have to weigh the backpack on a scale to make it as heavy as you want.
The weights you make will depend on the equipment you have at home, but the website is pretty good at guiding you with different permutations.
You should also check out GymPerson’s DIY section for other equipment you can make at home, such as a pull-up bar, battle ropes, parallettes, and an exercise stepper.
5. P.E. With Joe (YouTube): Free Fitness Class for Kids From The Body Coach
Schools are shut so there are no Physical Education (PE) classes. Plus the kids can’t go out to play. So how do children stay fighting fit in these times? Personal trainer Joe Wicks, a.k.a The Body Coach, is hosting daily PE classes for kids on YouTube.
Wicks does a live class at 9am UK time every weekday, but the videos stay on so your kids can do a workout at timings ideal for them. Start from the first video, there is no pressure to catch up with the live classes.
Each session lasts 30 minutes and doesn’t require any equipment. While they’re meant for kids, they’re perfectly helpful for adults to keep in shape as well, and a fun family activity too. Wicks says he intends to be Britain’s PE teacher for now, promising to get kids “moving, feeling, energized, positive, optimistic.”
The Oldest and Greatest Home Workout
These workout routines and apps are only the tip of the iceberg. The internet is filled to the brim with suggestions for exercises that you can do at home, or without any equipment. For example, Darebee is one of the favorites here at MakeUseOf for its 300 free routines.
But you should also check out a cool, not-so-well known exercise routine. Gymnast J. P. Muller’s 1904 workout takes only 15 to 20 minutes, but it has several loyal supporters over the last century, including doctors, kings, and personalities like Franz Kafka. Find out more about it in our collection of the best free no-equipment workouts to get fit anywhere.
Microsoft Teams is one of Slack’s top competitors and has exploded in popularity of late.
Once you get past its confusing sign-up process, Teams proves to be a robust solution for hosting your virtual office. Its free tier includes unlimited messages, audio/video calling features, and screen sharing. You’ll also find real-time integration with Office Online apps like Word, Excel, and OneNote.
If a Microsoft Teams workspace is where you head to work every morning, the cheat sheet below is for you. It contains keyboard shortcuts for using Microsoft Teams on web and desktop. With the shortcuts listed you can, for starters, display the commands list and switch between various tabs in your workspace.
The cheat sheet also includes shortcuts for calls and messaging. With these, you can start new chats, reply to threads, attach files, manage calls, and toggle audio and video.
FREE DOWNLOAD: This cheat sheet is available as a downloadable PDF from our distribution partner, TradePub. You will have to complete a short form to access it for the first time only. Download The Microsoft Teams Keyboard Shortcuts Cheat Sheet.
The Microsoft Teams Keyboard Shortcuts Cheat Sheet
Shortcut
Action
Web Shortcuts
Navigation
Ctrl + E
Move focus to search box
Ctrl + /
Display command list
Ctrl + Shift + G
Go to…
Ctrl + Shift + 1
Open Activity tab
Ctrl + Shift + 2
Open Chat tab
Ctrl + Shift + 3
Open Teams tab
Ctrl + Shift + 4
Open Calls tab
Ctrl + Shift + 5
Open Files tab
Left Option + Up Arrow
Go to previous list item
Left Option + Down Arrow
Go to next list item
Ctrl + Shift + F6
Go to previous section
Ctrl + F6
Go to next section
Ctrl + . (Period)
Show keyboard shortcuts
Ctrl + F1
Open Help section
Messaging
Ctrl + N
Start new chat
C
Move focus to Compose box
Ctrl + Shift + X
Expand Compose box
¹Ctrl + Enter
Send message
Ctrl + Shift + O
Attach file
Shift + Enter
Start new line
R
Reply to thread
Meetings and Calls
Ctrl + Shift + C
Start audio call
Ctrl + Shift + S
Accept audio call
Ctrl + Shift + U
Start video call
Ctrl + Shift + A
Accept video call
Ctrl + Shift + D
Decline call
Ctrl + Shift + M
Mute/unmute audio
Ctrl + Shift + F
Toggle full screen mode
Ctrl + Shift + Space
Go to sharing toolbar
²Desktop Shortcuts
Navigation
Ctrl + E
Move focus to search box
Ctrl + /
Display command list
Ctrl + G
Go to…
Ctrl + 1
Open Activity tab
Ctrl + 2
Open Chat tab
Ctrl + 3
Open Teams tab
Ctrl + 4
Open Calls tab
Ctrl + 5
Open Files tab
Left Option + Up Arrow
Go to previous list item
Left Option + Down Arrow
Go to next list item
Ctrl + Shift + Up Arrow
Move selected team up
Ctrl + Shift + Down Arrow
Move selected team down
Ctrl + Shift + F6
Go to previous section
Ctrl + F6
Go to next section
Ctrl + . (Period)
Show keyboard shortcuts
F1
Open Help section
Messaging
Ctrl + N
Start new chat
C
Move focus to Compose box
Ctrl + Shift + X
Expand Compose box
¹Ctrl + Enter
Send message
Ctrl + O
Attach file
Shift + Enter
Start new line
R
Reply to thread
Meetings and Calls
Ctrl + Shift + C
Start audio call
Ctrl + Shift + S
Accept audio call
Ctrl + Shift + U
Start video call
Ctrl + Shift + A
Accept video call
Ctrl + Shift + D
Decline call
Ctrl + Shift + M
Mute/unmute audio
Ctrl + Shift + O
Toggle video
Ctrl + Shift + F
Toggle full screen mode
Ctrl + Shift + Space
Go to sharing toolbar
¹The shortcut Enter also works when you haven’t expanded the Compose box.
²On macOS, replace Ctrl with Cmd and Alt with Option in shortcuts.
We have all the tips, tricks, tutorials, and guides you’ll need to become a full-fledged master of Plex Media. Newbies and veterans, welcome!
Have you ever wanted to run your own personal Netflix-type service within your own home? Imagine if you could load up all of your digital movies, TV shows, music, and more onto a single device, then be able to stream it on any device on the same internet network.
Well, Plex lets you do that—and so much more. Plex is one of the best home media solutions available today. And the best part? It’s free to use! There are some non-essential convenience features that do require a paid subscription, but they’re truly non-essential. The best bits of Plex are, indeed, all free.
If you’ve never even heard of Plex before, you’ll want to check out our complete newbie’s guide to Plex. It’s long, it’s comprehensive, and it’s everything you need to get started even with zero knowledge.
Choosing a Device as Your Plex Media Server
The beauty of Plex is that it can run on many devices: most computers, certain gaming consoles, network-attached storage (NAS) drives, and even some routers. Perfect for an always-on home media streaming solution!
If you just want to stream Plex off of your laptop or computer, check out our Plex newbie guide that was linked up above!
Configuring Your Plex Media Server
Once the Plex software is installed and running on your device of choice, you’ll want to get it properly set up for your needs. Check out these tips and tricks that we’ve compiled over the years:
The general idea of Plex is simple—you select what you want to stream, and stream it—but you can take things up another level with some of the tips and tricks below:
The default Plex software is pretty great right out of the box. However, you can definitely improve the experience using third-party software, apps, and plugins that Plex fans have created over the years:
Plex is arguably the best at what it does, but there are several alternatives out there in case you find that Plex isn’t exactly the right solution for you:
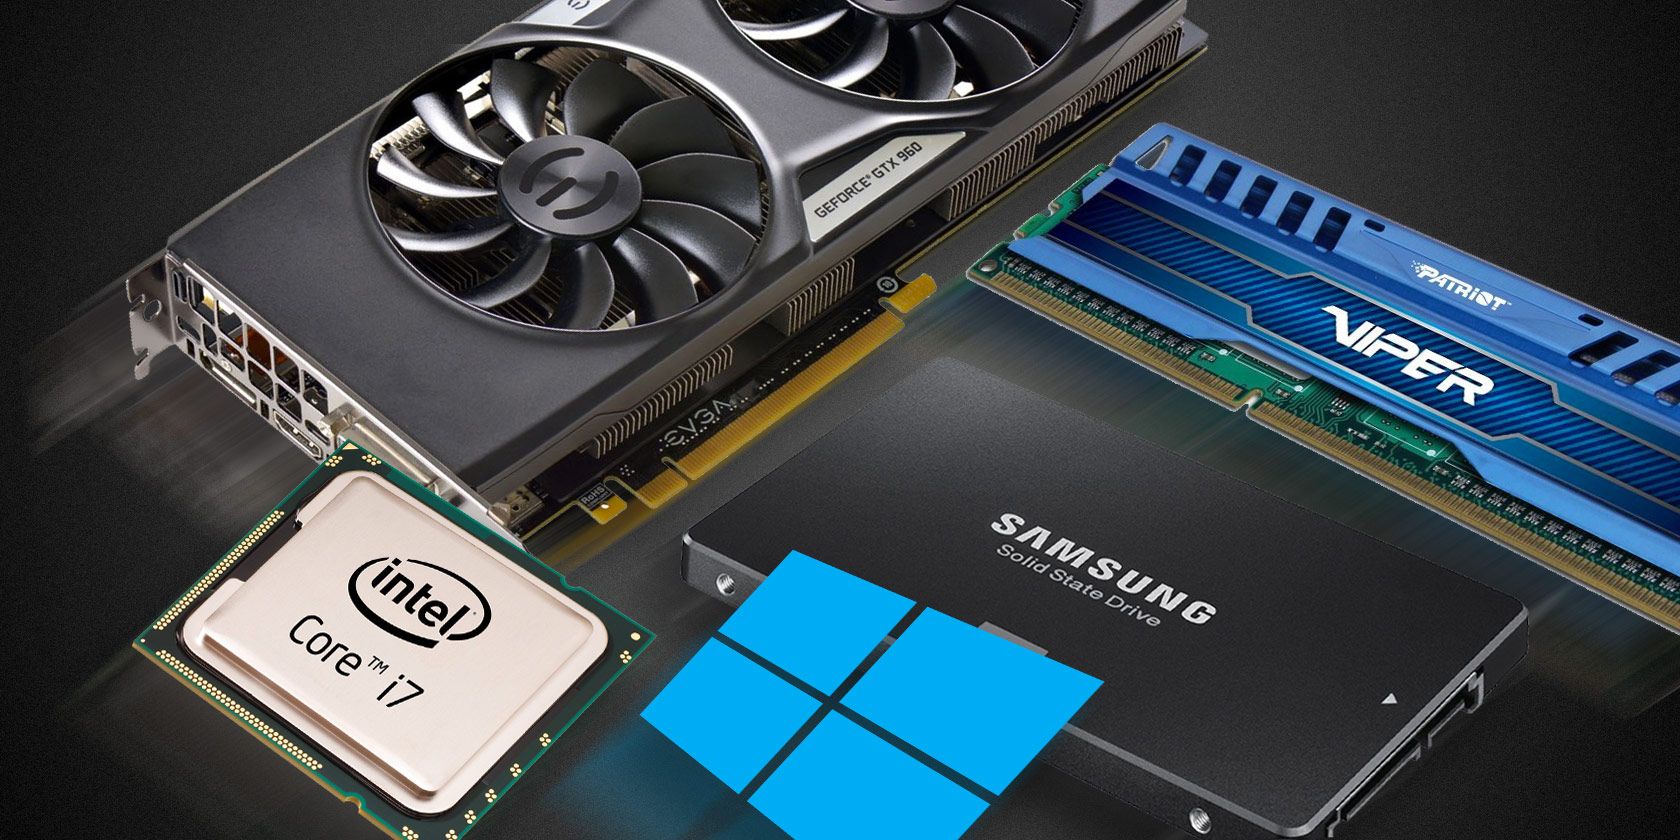
Is your PC fast enough for the things you want to do? Does it take forever to boot, or grind to a halt when you try to use Photoshop? If so, it’s probably time to upgrade your hardware.
But now you’re wondering, “What should I upgrade on my PC?” What gives the best bang for buck, and which upgrades are a waste of time? Here’s our guide to the best PC upgrades you can make.
Adding more memory is the easiest and most accessible way to upgrade your PC. It’s affordable, you can do it on almost any computer, and it doesn’t require much tech know-how. It’s also one of the best laptop upgrades, if your machine allows it.
If you’ve never cracked open your PC case before, this is the place to start.
A RAM upgrade delivers an instant performance boost to almost all PCs that are running slow. For resource hungry tasks—like video editing or gaming—the more RAM you’ve got, the better.
Even for casual use, extra RAM will enable you to have more apps running in the background or keep a greater number of tabs open in your browser.
So how much RAM do you need?
4GB is the minimum amount. It’s fine for general use, with up to around 10 browser tabs, a little photo editing, and video streaming.
You’ll notice a significant improvement if you upgrade to 8GB. This is good for serious multi-tasking, browsing with up to 30 tabs open, editing RAW photos, and even some mid-range gaming.
For heavier tasks, you should look to 16GB for best results. Serious gaming, media editing, or any pro-level tasks will be best with this much memory.
If you need to know what RAM is compatible with your computer, memory maker Crucial has a PC upgrade advisor tool that helps you identify the type of memory you need.
We’ve got this second on the list, but if you’re a serious gamer then it should probably be the first thing you upgrade. If you aren’t a serious gamer, 3D modeler, or 3D animator, then you might not ever need to upgrade it at all.
Skimping out on graphics is an easy way to save on costs, so PC manufacturers tend to go with integrated graphics cards rather than dedicated graphics cards.
And on modern systems integrated graphics is good enough for most users. It’ll let you do some Photoshop work, or watch 4K video. Around 10 percent of users on Steam are even gaming with integrated graphics.
But if you do need superior graphics performance, for gaming or VR work, then upgrading to something like a Radeon RX 5700-XT will give you a big boost. You can compare the performance of dedicated cards against your current option at gpu.userbenchmark.com.
There are two reasons to upgrade your hard drive: you’re running out of space or you want faster performance.
If you’ve done everything you can to free up your hard disk storage and still regularly run out of space, then you will need to swap it out for a larger one. Not only does a full hard drive make it impossible to save new data, but it can also impact performance. At the very least, try to keep 10GB of free space for the operating system to use.
For hard disk drives, consider upgrading the physical speed. If your PC currently has a 5400RPM drive, then upgrading to a 7200RPM model will give you a nice speed boost.
But one of the most useful computer upgrades is to switch to a solid state drive. These use flash memory instead of a spinning disk and are many times faster than a typical hard disk drive.
On average, a 5400RPM drive might achieve write speeds up to 100Mbps, a 7200RPM drive up to 150Mbps, and a solid state drive over 500Mbps. Higher end SSDs like the Samsung 970 EVO Plus have incredibly high write speeds of 3300Mbps and more.
Ultimately, a faster data drive impacts your entire system. It means faster boot times, faster program loading times, faster speeds for launching games, and more responsiveness in programs that use large files (like video editing or RAW photo editing).
The big complaint about solid state drives used to be that they had much smaller capacities and were more expensive than hard disk drives. While this is still technically true, it’s much less of an issue today.
1TB SSDs are now pretty common, and very affordable—take a look at the SanDisk SSD Plus as a great example. That should be big enough for many people, but if you need more space you could consider a hybrid drive. This combines both technologies to give you a balance between speed and size.
Upgrading your PC’s processor is a far more advanced task than the other upgrades we’ve covered so far. Not only is it physically trickier to install, it’s one of the more expensive upgrades and there are compatibility issues to worry about, too.
More importantly, a processor upgrade isn’t always a good thing and may not bring you the performance improvement you’re looking for.
The benchmark tests at cpubenchmark.net can help you compare the relative performances of different processors. In general, these tests show that modest updates don’t deliver big improvements.
A processor is only worth upgrading if the upgrade is significant, like moving from an i3 to an i5, or from an older generation to a newer one. Don’t go for something just because it has a faster clock speed.
Processors are expensive and may require you to upgrade your motherboard (and that might require you to buy new RAM). Even if your motherboard is compatible with a new processor on paper, it may need a BIOS update to work. It can be a pain, so check before you buy.
Ultimately, if your processor is the speed bottleneck in your system, you might want to consider buying a whole new system altogether.
5. How Upgrading Software Can Improve Performance
Chances are that the programs on your PC are set to update automatically. If not, you probably click the Update button as soon as you’re alerted to the release of new program versions.
In most cases this is the right thing to do. But not always. For a lot of software, the version number is depicted in the form of Major.Minor.Revision. So, if an update is 0.0.1, then it’s likely to be bug fixes. If it’s 0.1.0, then it likely includes optimizations and small new features. Minor and Revision updates should be installed right away.
But Major updates—a change in the full version number—are a different matter. It’s almost a given that new versions of programs will use more resources than old versions, so if your PC’s hardware is already being stretched to the max, you should deal with that first.
The same goes for operating system updates. The regular incremental updates are essential for performance and security reasons, but whole new versions aren’t. They will almost certainly have bugs and may run slow on your system.
If your PC is running fine, it’s worth holding off on operating system upgrades until you’re absolutely sure they won’t turn out to be downgrades.
Software tweaks are often a good way to make your computer feel faster without needing to spend any money. Our guide on how to make Windows 10 faster is a good place to get started.
What Else Should You Upgrade?
The motherboard is the most difficult of all upgrades since all of the other PC parts attach to it. It’s only worth considering if you’re dead set on a new processor that’s not compatible with your current setup. It won’t give you much of a speed boost on its own.
There are other components to consider, too.
A keen photographer, for instance, would surely benefit more from having a better monitor than from making Lightroom run a little quicker. Equally, a writer could become more productive with a mechanical keyboard.
Instead of focusing purely on performance, think about how you can upgrade your PC experience. Speed is important, but it’s not the only thing that matters.
The Best PC Upgrades for You
When you’re deciding how to upgrade your PC, we recommend RAM, SSDs, and graphics cards as the main areas to focus on.
Make sure you buy parts that are compatible with your existing kit. A good PC upgrade checker is PC Part Picker, which helps you identify and shop for the right components.
Ideally, you should always tailor your upgrades to your precise needs. If you aren’t sure where your computer’s bottlenecks are, check out our guide to the Windows diagnostics tests you can use to help you pinpoint them.
Over the past few years, ebooks have gone from a novel idea to a broadly embraced alternative to print literature. Devices like the Nook and the Kindle have become commonplace—but they’re not the only option if you’re looking to see what ebooks have to offer. Today, there are several worthy ebook readers for Windows.
If you would like to learn more, keep reading. We’re going to look at some of the best PDF book readers and ebook readers on the Windows platform.
1. Kindle
The Kindle app for Windows is a well-designed ebook reader—but to get the most out of it, you’ll need to be an Amazon customer. If being able to easily open and read a range of different file formats from different ebook stores is important to you, there are better options available.
Kindle’s interface is excellent. Open the app and you’ll be presented with the books you have stored in the cloud and/or on your device. A single click will put you right where you last left the book, regardless of the device you were reading on previously. The rest of the app is clutter-free; there are no ads and no unnecessary tools to dilute the experience.
If you want to use the Kindle app to access books that weren’t bought via the Kindle store, you will first need to convert them into a supported format, then upload them to your Amazon cloud. You can convert ebooks using Calibre, or you can use one of many online ebook conversion tools.
Bookvisor’s design is different from the other Windows ebook apps we have recommended. Whereas as most apps opt for flat colors and distraction-free UIs, Bookvisor tries to replicate the experience of reading a physical copy.
Some of the app’s most notable other features include automatically changing themes depending on the time of day, customizable margins, spacing, and fonts, a brightness slider, and importable bookmarks.
The app is free to use, but a premium version is available. The best feature of the paid version is the text-to-speech. It’s ideal if you want to “read” an ebook while you are on-the-go.
Download:Bookvisor (Free, premium version available)
3. Cover
While the occasional reader of comics might be able to get by with their standard ebook reader, a tailor-made app is a must for anyone serious about their comic books. Comic books and graphic novels are read a different way to traditional text-based books, so they require different features. Cover offers many of those necessary extra features. For example, you can zoom in on particular panels with a pinch, or swipe between pages with a simple gesture.
A comic book ereader also needs to support many file types, and Cover does not disappoint. The app supports most major formats, including CBZ, ZIP, CBR, RAR, 7Z, CB7, CBT, PDF and EPUB, as well as standard image formats like JPEG, PNG, GIF, and BMP.
Other notable features include customizable shelves, read/unread status, page counts, and support for ebook storage in local folders, network drives, and cloud storage drives.
Sumatra is one of the best PDF readers for Windows, so it naturally doubles as one of the top PDF ebook readers as well. However, it can also handle many other common ebook formats, including EPUB, MOBI, XPS, DJVU, CHM, CBZ, and CBR.
The app also earns praise for its tiny footprint. PDF readers can sometimes be bloated and run slowly, but that’s not the case here. Your files will load quickly and you’ll be able to flick through them without any stuttering. There’s even the option to download a portable version so you can run it from a memory stick without installing.
Another great feature that Sumatra offers is tabbed browsing. This might not serve the purpose if you’re reading a novel for pleasure, but it does make cross-referencing texts and documents a breeze. It’s particularly for anyone who has reason to read ebooks or PDF documents for academic or professional purposes.
One drawback is that to tinker with any advanced settings, you’ll have to make manual edits to a text file, which isn’t user-friendly. Most users will likely have no reason to tweak these options, but if you do, the interface can be quite off-putting.
Calibre is the go-to ebook library management tool for Windows. It is perfect for organizing your collection of ebooks and transferring them to your ereader. A lot of people don’t realize, however, that Calibre is also one of the best ebook readers for Windows.
The reading interface is not as aesthetically pleasing as the Kindle and Nook apps, Calibre offers a very functional environment to read in. There’s a broad range of options for customizing how the book appears in your screen, and when you’re in full-screen mode you’ll be free from any distractions.
Nonetheless, Calibre is still at its best when it’s supplementing your use of a dedicated eReader. The app is not a great solution if your reading is going to take place exclusively on your computer, however, if you’re using your Windows PC as well as another device, it’s a great way of consolidating your ebook reader and ebook management tool into a single interface.
The Freda ebook reader for Windows serves two purposes.
Firstly, you can use it to read any ebooks you own in the five supported file types (EPUB, MOBI, FB2, HTML, and TXT) as long as your books are DRM-free. Secondly, the app lets you read more than 50,000 classic titles that are now in the public domain. It pulls the free ebooks from well-known free ebook sites on the web like Gutenberg and Feedbooks.
If you dig into the app’s settings menu, you can customize the controls, fonts, colors, and more. You can also annotate your ebooks, use the app’s built-in text-to-speech reading tool, and create bookmarks and highlights.
Notably, Freda is also one of the only ebook readers for Windows that offers dyslexia-friendly settings and the OpenDyslexic font.
Not everyone needs a fancy app with endless bells and whistles. If you’d prefer a more minimalist experience, you should check out Icecream Ebook Reader.
The app supports seven ebook formats, EPUB, FB2, MOBI, PDF, CBR, CBZ, and TXT. There’s a library tool to help you manage your collection, a search tool, an annotation tool, and little else.
Icecream Ebook Reader does not support cloud syncing, but it does have a useful archive and export feature. It’s useful if you need to access your ebook library on lots of different machines.
If you’re a bookworm, one ebook reader on your Windows machine is not going to suffice. You will probably also want an app on your tablet, phone, and more.
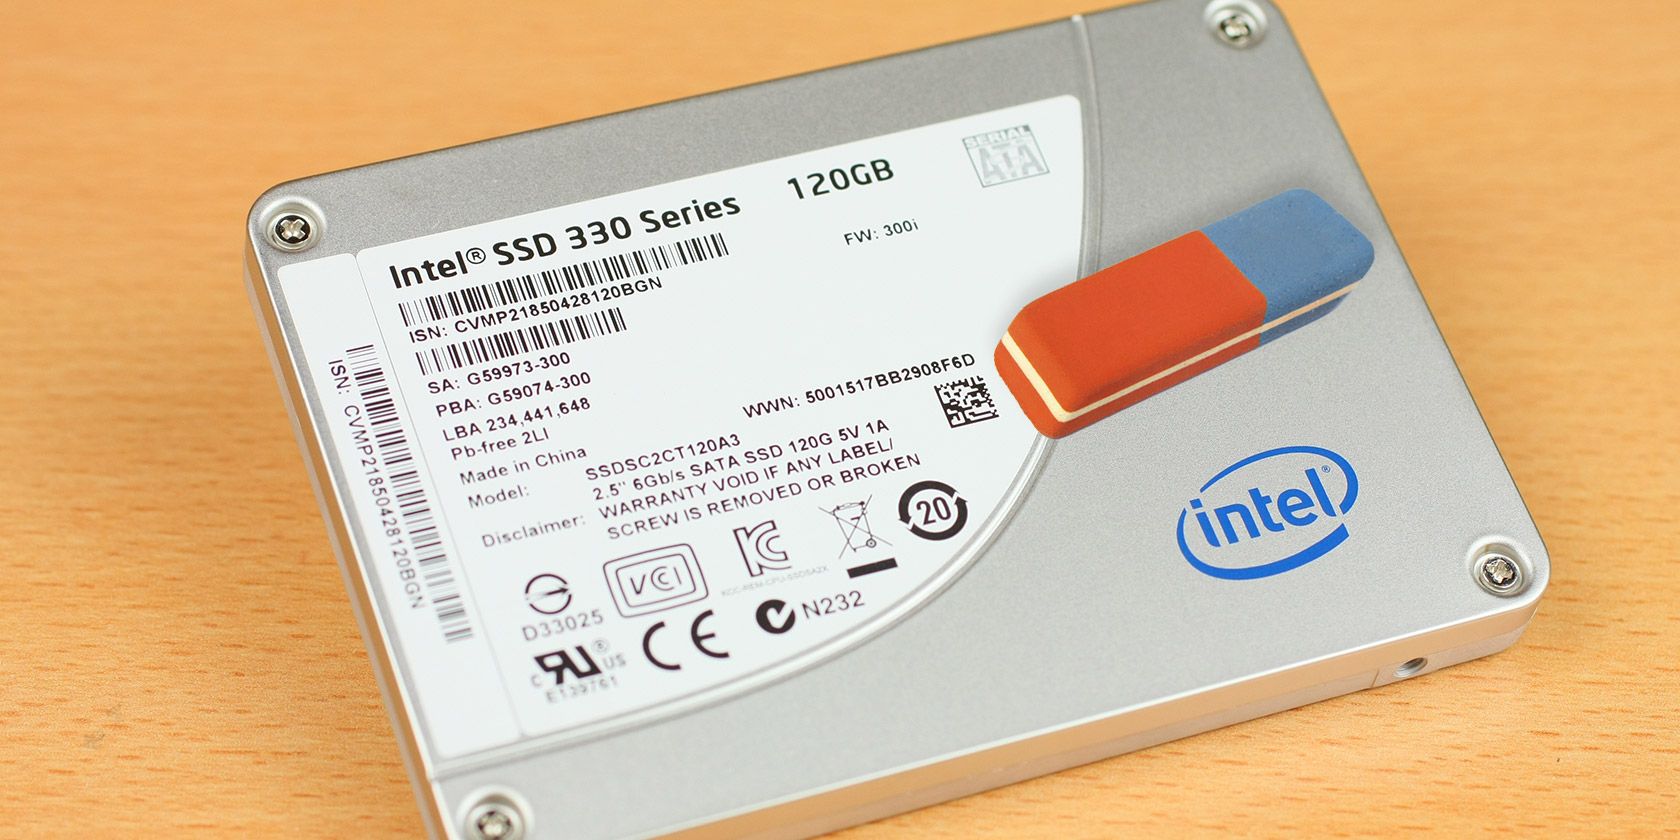
A solid-state drive (SSD) is one of the best upgrades you can make to your PC. An SSD was once a trade-off between disk space, cost, and the speed boost, but large capacity SSDs are now cheaper than ever.
Like other types of flash memory, you can only write to an SSD so many times, which presents an issue if you want to wipe the solid-state drive clean. Using a regular tool can damage the SSD, reducing its lifespan.
So, how do you securely erase an SSD without damaging the drive?
Does Secure Erase Damage Your SSD?
Generally speaking, you should never have to perform any maintenance on your solid-state drive. SSDs are designed with self-sufficiency in mind, using a series of algorithms and fail-safes that the manufacturer puts in place to maximize drive life and ensure data is discarded correctly.
What Is SSD Wear Levelling?
The first protection comes in the form of wear leveling, designed to evenly distribute stored data between SSD blocks to ensure even wear. Wear leveling is one of the major differences between a regular magnetic hard drive and a solid-state drive.
A traditional hard drive stores files in physical locations on a magnetic platter. The operating system indexes the file locations in a file system and accesses the data using a mechanical arm. Whereas, a solid-state drive is a form of flash memory, like a USB thumb drive—but with a much larger capacity.
Instead of writing to a location on a physical disc, an SSD writes the data to a block. Each write process causes the memory to degrade, or “wear.”
While the SSD uses a file system to communicate data storage locations to the host system, it also re-shuffles the data to ensure even wear across all memory blocks. Changes made for wear leveling record to a separate file map.
In other words, SSDs do not use any physically indexable locations, and software cannot specifically target sectors on the disk. Basically, your computer has no way of telling “where” that information was just copied to.
What Is SSD Trim and Should You Use It?
Your SSD constantly moves data around to comply with wear leveling, ensuring all blocks wear at an even rate. What that does mean, however, is that some common secure file deletion methods don’t work as you would expect. At least, not how they work on a magnetic hard drive.
Solid-state drives use a specific command to keep on top of file deletion, known as TRIM. The TRIM command marks the blocks of data the SSD is no longer using, ready for wiping internally. In basic terms, this means when you delete a file in your operating system, the TRIM command wipes the space and makes it available for use.
The next time your operating system attempts to write something to that space, it can do so immediately. Simply put, your SSD manages your discarded data.
The difference in how an SSD handles data deletion and the use of wear levelling is why regular secure drive wiping programs are not recommended for an SSD. You will eventually write 1s and 0s to the drive, but it will cause a significant amount of wear to the drive memory in the process.
Because the drive writes all new incoming data to various blocks, depending on its needs, only the drive knows where this data is written. So, secure deletion tools actually harm SSDs by performing an unnecessary number of additional writes.
Right now, you’re probably thinking, “How do I securely wipe my SSD, then?” Thankfully, it is still possible to securely wipe your SSD using software, and without damaging the drive. The difference is that instead of securely wiping all data from the drive, an SSD “resets” to a clean memory state (not factory, which implies there is no drive wear!).
The “ATA Secure Erase” command instructs the drive to flush all stored electrons, a process that forces the drive to “forget” all stored data. The command resets all available blocks to the “erase” state (which is also the state the TRIM command uses for file deletion and block recycling purposes).
Importantly, the ATA Secure Erase command does not write anything to the SSD, unlike a traditional secure wipe tool. Instead, the command causes the SSD to apply a voltage spike to all available flash memory blocks in unison. The process resets every available block of space in a single operation, and the SSD is “clean.”
Using the ATA Secure Erase command does use a whole program-erase cycle for your SSD. So yes, it does cause a small amount of wear, but it is negligible in comparison to a traditional secure wipe tool.
Secure Erase Your SSD Using a Manufacturer Tool
Most manufacturers supply software to use with their SSD. The software usually includes a firmware update tool and secure erase tool, and perhaps a drive cloning option. While it’s impossible for MakeUseOf to check the software of every manufacturer, you can find a list of tools for the major SSD manufacturers below.
The SSD manufacturer’s management app is the first place to check for a secure erase tool. However, some manufacturers do not include the ATA Secure Erase command as an option. Furthermore, in some cases, your SSD model may not support the command. If that is the case with your SSD, move onto the next section.
Secure Erase Your SSD Using Parted Magic
Although the SSD manufacturer tool may come with a secure erase tool, many experts advise using Parted Magic instead. Indeed, Parted Magic features as an essential tool to keep in your PC repair USB toolkit.
Parted Magic is a whole Linux distribution featuring all manner of disk erasing and partition managing tools. The tool does cost $11, but you have access to the suite forever, whenever you need it.
Boot the drive and choose option 1, Default Settings.
Once booted head to Start (bottom-left) > System Tools > Erase Disk.
Choose the Internal:Secure Erase command writes zeroes to entire data area option, then confirm the drive you want to erase on the next screen.
If you are told the drive is “frozen,” you will need to click the Sleep button and repeat this process until you can proceed further. If your drive indicates a password requirement, leave the password as “NULL.”
Confirm that you have read and understood the risks, then hit Yes to erase your drive.
Secure Erase Your SSD Using PSID Revert
There is a third method to erase your SSD securely. The Physical Security ID (PSID) revert effectively cryptographically erases the content of your SSD, then resets it to the erase state. However, this method only works if you cannot securely erase the drive due to full disk encryption.
A PSID Revert wipes the entire drive. This process also works if the drive is hardware encrypted but not encrypted using third-party software. Find out if your drive supports PSID Revert by completing an internet search for “[your drive name] PSID Revert.”
Securely Erasing an SSD for Mac Users
Attempting to boot Parted Magic on a Mac can cause some issues. The issues relate to the method you use to create the Parted Magic bootable USB drive. Some burning programs work fine, while other options never seem to work.
A forum post on the Apple Stack Exchange provides details on how to boot Parted Magic on a Mac, with some handy pictures, too. You should also check out our guide on how to create a bootable USB for a Mac—but remember, your mileage may vary!
Other forum posts advise that if you experience issues with your Mac SSD and it is still under warranty, you should let Apple take a look.
You Can Wipe Your SSD Clean
Wiping an SSD clean requires different tools to a regular hard drive. Now you know the options, you can securely erase your SSD before selling or donating it. Manufacturer secure erase options are handy, but the Parted Magic secure erase option is best.
Remember, if you’re not selling or donating the drive and just want to destroy the data, you can always smash it up with a giant hammer. Of course, this will obliterate your data, as well as the drive itself. But you will securely erase your data in the process.
If you ever find yourself skipping through a YouTube timeline trying to find a punchline or a specific part of a tutorial, this article is for you.
It can be time-consuming and mind-numbing to try and find a specific moment in a YouTube video. However, you don’t need to do this manually.
In this article, we show you how to search for words in a specific YouTube video, as well as how to find words across all YouTube videos.
How to Search for Words in a Specific YouTube Video
It’s easy to find the exact spot in any YouTube video by using your browser’s search function, in conjunction with YouTube’s closed caption feature.
Most YouTube videos come with captions—either manually added or automatically generated. However, if a video doesn’t then it won’t be possible to follow these steps.
Navigate to the YouTube video you want to search.
Beneath the video, click the More icon (three horizontal dots).
Click Open transcript. This will open a timestamped list of captions to the side of the video.
Press Ctrl + F to open your browser’s search function. Input the word or term you want to search. If it’s found in the transcript, it will be highlighted.
You can click that caption line to jump to the part in the video where your search term is spoken.
Remember, this relies on the accuracy of the captions. It isn’t guaranteed that the captions are all correct, especially if they have been automatically generated.
How to Search for Words Across Many YouTube Videos
This method is useful for when you want to find any YouTube videos that contain a specific word or phrase.
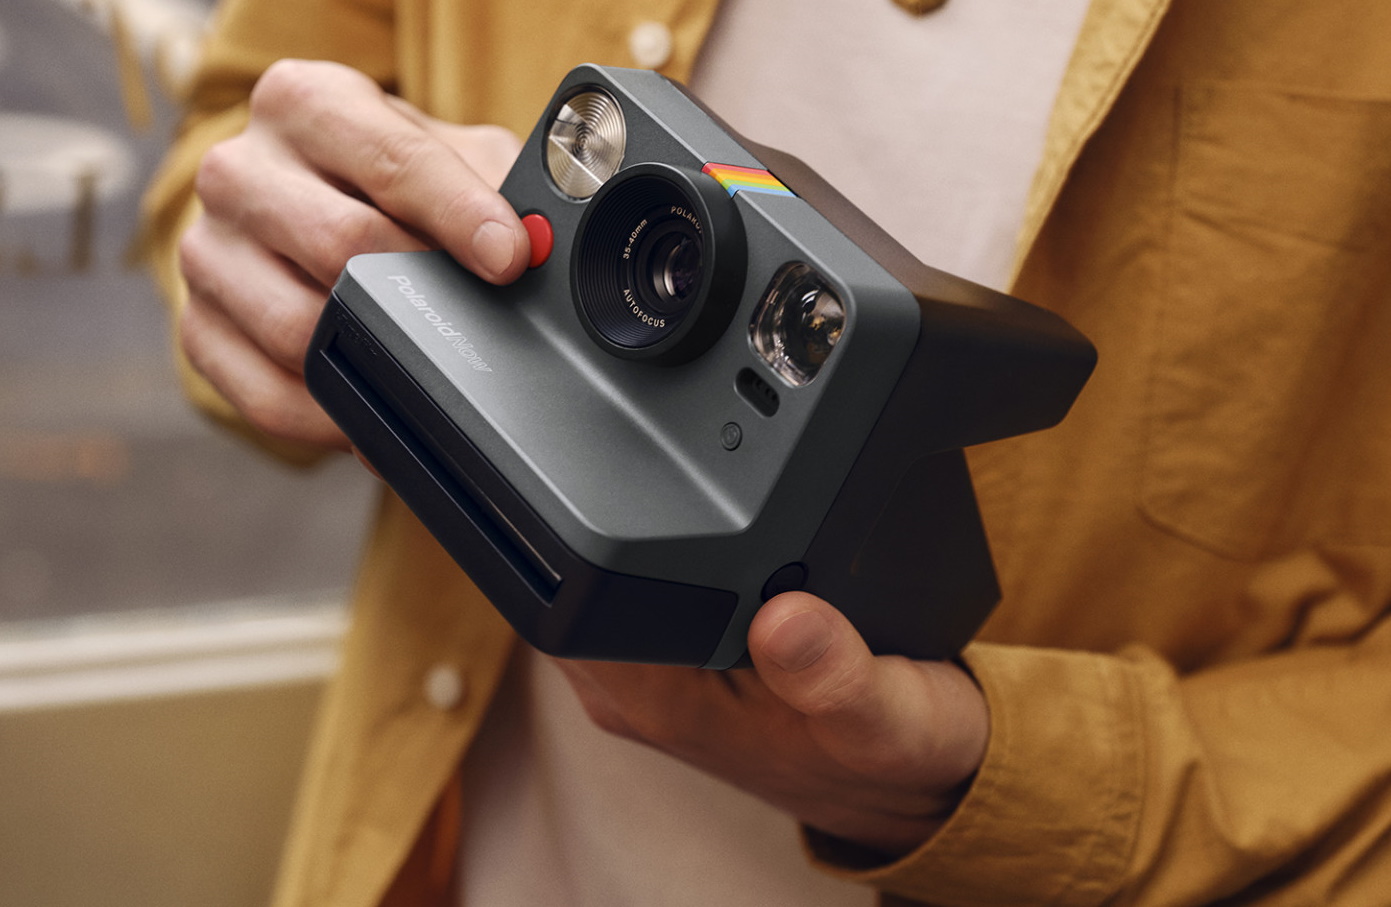
More than a decade after announcing that it would keep Polaroid’s abandoned instant film alive, The Impossible Project has done the… improbable: It has officially become the brand it set out to save. And to commemorate the occasion there’s a new camera, the Polaroid Now.
The convergence of the two brands has been in the works for years, and in fact Impossible Project products were already Polaroid-branded. But this marks a final and satisfying shift in one of the stranger relationships in startups or photography.
I first wrote about The Impossible Project in early 2009 (and apparently thought it was a good idea to Photoshop a Bionic Commando screenshot as the lead image) when the company announced its acquisition of some Polaroid instant film manufacturing assets.
Polaroid at the time was little more than a shell. Having declined since the ’80s and more or less shuttered in 2001, the company was relaunched as a digital brand and film sales were phased out. This was unsuccessful, and in 2008 Polaroid was filing for bankruptcy again.
This time, however, it was getting rid of its film production factories, and a handful of Dutch entrepreneurs and Polaroid experts took over the lease as The Impossible Project. But although the machinery was there, the patents and other IP for the famed Polaroid instant film were not. So they basically had to reinvent the process from scratch — and the early results were pretty rough.
But they persevered, aided by a passionate community of Polaroid owners, continuously augmented by the film-curious who want something more than a Fujifilm Instax but less than a 35mm SLR. In time the process matured and Impossible developed new films and distribution partners, growing more successful even as Polaroid continued applying its brand to random, never particularly good photography-adjacent products. They even hired Lady Gaga as “Creative Director,” but the devices she hyped at CES never really materialized.
Gaga was extremely late to the announcement, but seeing the GL30 prototype was worth it.
In 2017, the student became the master as Impossible’s CEO purchased the Polaroid brand name and IP. They relaunched Impossible as “Polaroid Originals” and released the OneStep 2 camera using a new “i-Type” film process that more closely resembled old Polaroids (while avoiding the expensive cartridge battery).
Polaroid continued releasing new products in the meantime — presumably projects that were under contract or in development under the brand before its acquisition. While the quality has increased from the early days of rebranded point-and-shoots, none of the products has ever really caught on, and digital instant printing (Polaroid’s last redoubt) has been eclipsed by a wave of nostalgia for real film, Instax Mini in particular.
But at last the merger dance is complete and Polaroid, Polaroid Originals, and The Impossible Project are finally one and the same. All devices and film will be released under the Polaroid name, though there may be new sub-brands like i-Type and the new Polaroid Now camera.
Speaking of which, the Now is not a complete reinvention of the camera by far — it’s a “friendlier” redesign that takes after the popular OneStep but adds improved autofocus, a flash-adjusting light sensor, better battery, and a few other nips and tucks. At $100 it’s not too hard on the wallet, but remember that film is going to run you about $2 per shot. That’s how they get you.
It’s been a long, strange trip to watch but ultimately a satisfying one: Impossible made a bet on the fundamental value of instant film photography, while a series of owners bet on the Polaroid brand name to sell anything they put it on. The riskier long-term play won out in the end (though many got rich running Polaroid into the ground over and over) and now with a little luck the brand that started it all will continue its success.
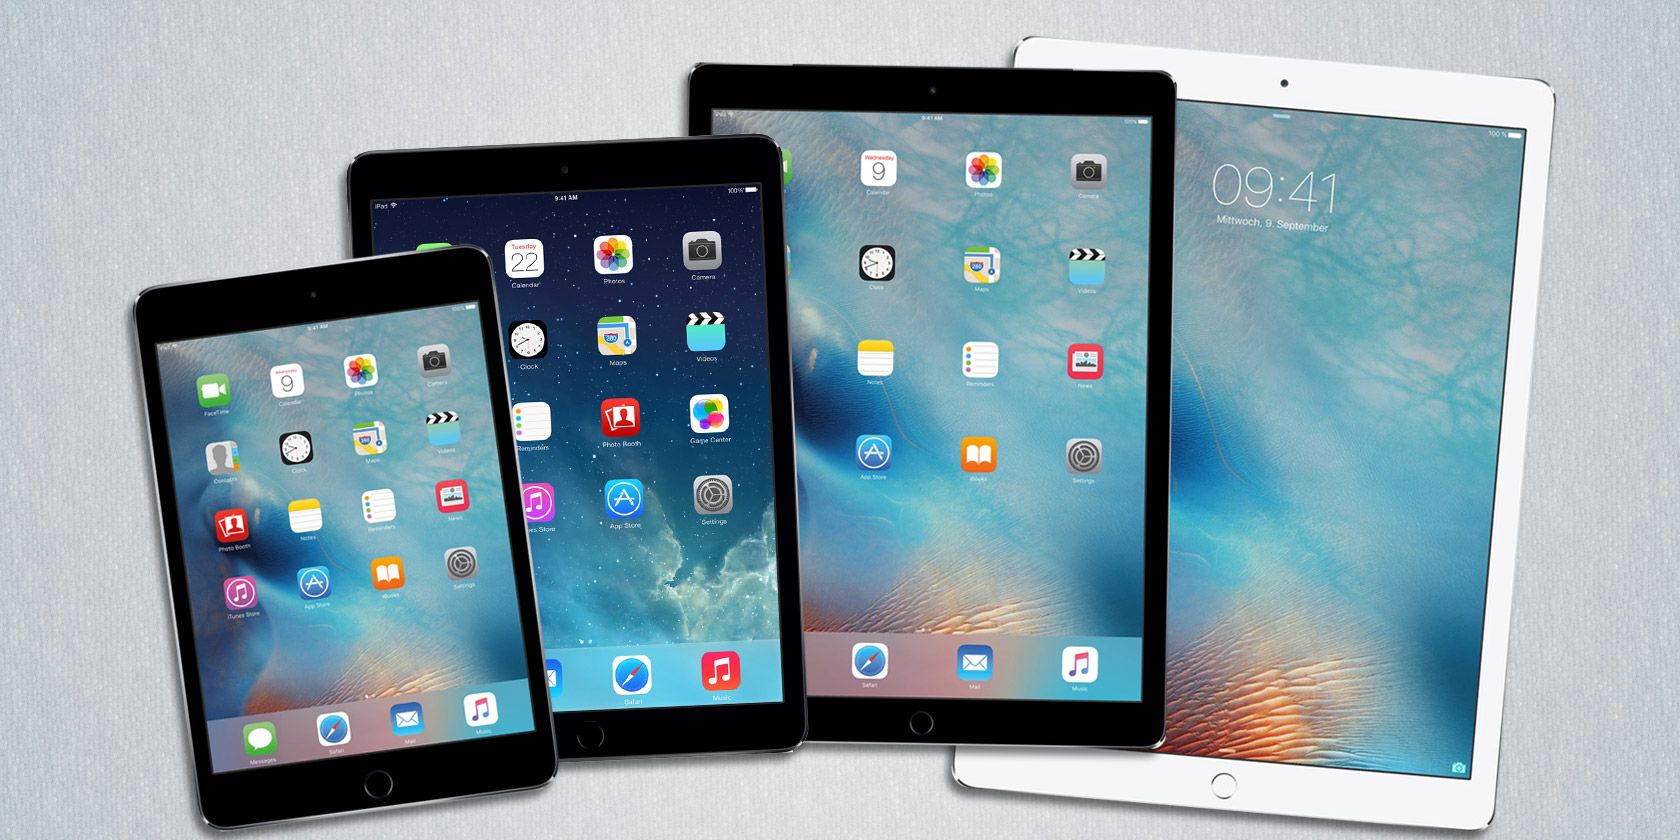
When the iPad first launched in 2010, there was only one model available. Now, there are five different iPad models to choose from, each with their own benefits and drawbacks to consider.
What makes the iPad Pro different to the iPad Air? Which is the most affordable iPad? Which iPad should you buy? Let’s take a look at the lineup and help you find the best iPad for you.
The iPad Air is the Apple tablet with the broadest appeal. The iPad Air provides the right balance between value and power to suit most users. It features a 10.5-inch display and is powered by Apple’s A12 Bionic chip which was first introduced alongside the iPhone XS and XR in late 2018.
That means the Air can handle most tasks you throw at it, including demanding 3D games and resource-intensive digital audio workstations. The 10.5-inch display is large enough to provide clear benefits over a smaller smartphone display, without being so large that it’s unwieldy.
Compatibility with Apple’s Smart Keyboard attachment is a bonus for students or anyone who anticipates using their tablet for writing purposes. There’s also support for the first generation of Apple Pencil which is perfect for handwritten notes, annotating PDFs, or doodling and sketching.
There are some limitations placed on the Air that defies its broad appeal. It uses a dated chassis that first appeared when the original iPad Air was released in 2013. You can unlock it with the slightly outmoded Touch ID fingerprint sensor, and it’s only available in capacities of up to 256GB.
Anyone considering the pricier iPad Pro should first look at the iPad Air. Its A12 Bionic chip doesn’t quite meet the dizzying heights of its more expensive counterparts, but overall the iPad Air provides a tremendous amount of bang for your buck in a neat little package.
By virtue of the larger screen, it’s hard not to recommend the iPad Pro 12.9-inch to anyone looking at using their tablet for artistic purposes. Coupled with the second-generation Apple Pencil, the iPad Pro is a force to be reckoned with for digital artists who want to sketch, paint, and refine their ideas on a tablet.
The 2020 edition of the iPad Pro is equipped with a 10MP Ultra Wide camera, 12MP Wide lens, studio-quality mics, and a LiDAR Scanner. The latter addition is an entirely new feature for Apple’s tablet lineup. The scanner measures the distance to surrounding objects up to five meters away. Coupled with the iPad Pro’s other sensors, this allows for a more professional video and photo editing workflow, as well as improved AR performance.
But for most other users, the 12.9-inch iPad Pro will likely feel a bit big. It’s too large to hold with one hand comfortably, so it’s not ideal for browsing Facebook on the couch. Its size also makes it a little harder to transport in a small bag. One of the reasons consumers turn to tablets is for their superior portability, so this is worth keeping in mind.
The brains of the operation is Apple’s A12Z Bionic processor, making the device more powerful than many Windows computers. In essence, this means the iPad Pro will be able to handle more intensive processes, though much of the extra grunt is put to use simply driving the larger display. This includes capturing and editing 4K video, for example.
When you buy an iPad Pro, you’re paying for a flagship user experience. The redesigned iPad Pro features the smallest bezel on any Apple tablet ever and also incorporates Face ID biometrics first seen on the iPhone X.
The iPad Pro 11-inch might be able to replace your laptop when coupled with the Smart Keyboard Folio. While iPadOS isn’t as powerful as macOS or Windows, the vast selection of apps available helps make up for it. The iPad Pro costs as much as a mid-range laptop—a price that doesn’t include the optional keyboard or stylus accessories.
The latest iteration of the iPad Pro is designed with iPadOS 13.04 in mind. This revision of the iPad’s operating system brings with it the ability to use a trackpad with your Apple tablet. Not only has this feature been explicitly designed for the iPad, rather than directly importing the Mac experience, but there’ll also be a new detachable keyboard—the Magic Keyboard—to go alongside the update.
While your own experience may vary, typing on the Smart Keyboard Folio is a pleasant experience. Despite sitting almost flat against the desk, the keyboard is comfortable and allows you to type at speed as a comparably-sized MacBook would. This wasn’t the case with Apple’s original 9.7-inch iPad Pro folio, which felt cramped.
Furthermore, the A12Z Bionic chip found inside the iPad Pro outshines many laptops in terms of raw power and overall system performance. You’ll have no problems editing 4K videos in iMovie, playing intensive 3D games, or using two apps side-by-side with all that power at your disposal. Fortunately, aside from the size, both the 12.9-inch and 11-inch models of the iPad Pro come equipped with the same hardware and software.
The iPad Pro has a redesigned chassis and tiny bezel. It includes Face ID for unlocking your tablet with a glance, rather than a fingerprint. It also comes in sizes of up to 1TB, compared to the iPad Air’s 256GB.
Apple’s entry-level tablet is known simply as the iPad. The main attraction here is the iPad’s price; it is significantly cheaper than Apple’s other tablets. The iPad received a refresh in 2019, evolving the iconic device to its seventh generation.
The iPad comes with a 10.2-inch display and is powered by Apple’s A10 Fusion chip. This was first introduced in 2016 alongside the iPhone 7. However, despite not being a cutting edge device, the iPad is still a capable tablet for everyday tasks. It will give you no problems browsing the web, checking social media, responding to email, streaming videos and music, and even playing most games.
The seventh-generation iPad was also the first device to ship with Apple’s latest tablet-specific operating system, iPadOS. In many other respects, the iPad is similar to the iPad Air, albeit 0.07 pounds heavier. They both feature an eight-megapixel rear-facing camera and have up to 10-hour battery life. The iPad is somewhat lacking in the front-facing camera, taking 1.7-megapixel photos compared to the iPad Air’s 7-megapixel captures.
The tablet is compatible with the first-generation Apple Pencil and also supports the Smart Keyboard, as well as third-party Bluetooth keyboards. While Face ID is available for iPhone and iPad Pro users, the iPad ships only with Touch ID. Like many Apple products, the iPad is available in a variety of storage capacities up to 128GB.
In March 2019, Apple updated the iPad mini line which hadn’t seen a refresh since 2015. The updated tablets feature the same A12 Bionic chip found in the iPad Air and iPhone XS. That means they’ve got enough power under the hood to chew through most apps and processes.
But the main reason to choose the iPad mini is its form factor. With a 7.9-inch display, the iPad mini can fit into a small handbag or large pocket. Its width and height resemble many hardback books, and so it makes a compelling e-reader too.
Apple’s smallest tablet fits inside the same chassis as its predecessor. There’s also a Touch ID fingerprint scanner for unlocking and making purchases. You can get the iPad mini in sizes of up to 256GB. Ultimately, the main reason to pick up a Mini is that you want a very small tablet.
Which iPad Should You Buy?
You might think the best iPad would be the most expensive; the iPad Pro. However, the iPad Air is probably the best tablet on this list. Not only is it compatible with the first generation Pencil and Smart Keyboard folio, it’s decent value too.
Whatever you buy, make sure you buy with future use in mind because Apple tablets tend to last. By far one of the most important things to consider is how much storage you need. Chose the wrong size, and you’ll be locked into a battle of creating free space on iOS.
In the current era, where most of our correspondence is digital, it makes sense that cards have also made the jump online. Now, whether you’re sending a card to someone across the world or you just remembered someone’s birthday is today, you can send a card to anyone at any time.
Here are the best ecard maker websites for that special occasion.
Adobe Spark is an in-depth online media creator. You can use Spark for a lot more than just greeting cards; it’s also perfect for pamphlets, posters, and portfolios.
As such, Adobe Spark isn’t good for generating a quick and easy card. It is, however, great for designing one that fits your needs best. You can use the templates to design a physical card that you can print and fold, or use it to create your own ecard to save and send to your loved ones.
Because Adobe Spark focuses on professional usage, there’s a lot locked behind paywalls. As such, if you decide on using Spark, be ready to sift through the paid options to get to the free ones.
If you want a professional-looking free ecard maker, try Canva. It’s one of the more interesting options on this list, as it allows you to create cards and share them as a video instead of an image.
You can use Canva to create a traditional card to print out; however, its real power comes from using videos in your cards. You can use the premade videos that Canvas has in its library, or upload one of your own from your desktop. This makes it a great way to share a special video that encapsulates the occasion.
When you’re done placing videos, you can download your card as either a video or a gif. Whichever option you pick, the end result will go through each of the pages you designed for the card, including playing any videos you embedded. If you chose the video download option, it’d even play the sound in each clip.
If you’re after an ecard generator that’s a little silly, try JibJab. JibJab’s main attraction is the ability to upload faces for their premade cards. The result is a funny card personalized with you or your friend’s faces on it.
The card generator is surprisingly robust. You choose a card you want to send, then upload the faces of the people you want to star in it. JibJab will then let you line up the jaw tool, so the card knows where the face’s mouths are. This is because the actors in the card can speak and sing, with animated mouths like something out of South Park.
Befunky is a useful ecard maker that speeds up the process. It comes with a selection of different premade templates for you to choose from. Once you’d picked out a model, you can edit the text on it to customize it to your needs.
Unfortunately, while Befunky does have a beautiful collection of templates, you’ll find the majority of them require a monthly fee of $6.99 to unlock.
Befunky also requires Flash to run, which modern-day browsers will have a problem with allowing. As such, you may need to learn the steps to enable Flash in Chrome.
Someecards is an odd entry on this list. There is no way to build your own card; the ability to make your own Someecard vanished in 2018.
As such, there’s no real room for personalization here and isn’t the ideal choice for people who want to tailor the card to their needs. Instead, you can browse images and memes that relate to different occasions and share them.
The main forte for Someecards is that you can share the cards via a link. While over card services need an email address to send your card, or require you to upload and share a file, Someecards can be shared by copy-pasting the link wherever you need it.
Smilebox makes it very easy to make a card. You can select a template to suit your needs, then quickly add photos to your design. To make it extra flashy, you can add music to play while the card’s animation slowly reveals the details.
Unfortunately, Smilebox is very restrictive if you want to use it for free. You’re only allowed to share your creation via Facebook or Twitter, and the card will have Smilebox’s watermark on it. However, if you’re willing to pay for premium, Smilebox can be an excellent source for professional-looking cards for any occasion.
If you want to tie a gift to your ecard, why not try an Amazon eGift card? These are like an ecard and a gift card combined, allowing you to choose from a pre-set selection of cards to fit the occasion.
You can choose from regular cards, animated ones, or upload a photo to personalize the card. Then, select the amount of money you want to send. You can send the card via email or text message, whichever works best for you.
When your recipient receives the card, they’ll see your design, name, and gift card redemption code all in one. It’s a very convenient way to celebrate an occasion when you’re unsure what to get the person in question.
Celebrating a Special Occasion With Style
Thanks to their personalization, ease of use, or their speedy delivery, digital ecards are a useful way to celebrate an occasion. Now you know some of the best websites out there for making a card of your own, so you can commemorate an event with style.
If you’re celebrating a birthday, why not accompany your card with a happy birthday meme?