11 April 2020

5 Ways to Focus on Work at Home and Avoid Distractions


Focus on Work at Home and Avoid Distractions

When you’re working from your home instead of an office, there are more distractions than normal. But with a few apps and strategies, you can focus on the job and stay productive.

Hopefully, by now you are familiar with some of the best work from home resources that will teach you the tricks of the trade. Once you have a workspace set up in your house, it’s still not easy to deal with the many interruptions that pop up throughout the day.

Here are some of the best apps, tools, and techniques to avoid distractions and maintain focus.

1. Hide Feed (Chrome, Firefox): Deal With Distractions Without Blocking Sites

Hide Feed browser extension deals with online distractions without blocking sites

You get a link to watch a YouTube video or a message on Facebook, and pretty soon, you’ve lost half an hour through distractions. By design, these websites pull your attention and want you to spend more time there.

But the solution isn’t to block them, as several extensions to avoid distractions suggest. You do need these sites as part of work too. Hide Feed has a better idea.

This browser extension lets you use some features while restricting some distractions. For example, on Facebook, you can message friends but you can’t see your wall. On YouTube, you can search for a video, but you won’t see other recommendations. It has similar restrictions for Gmail, Reddit, Twitter, Instagram, LinkedIn, Amazon, and Netflix.

Instead of the feeds or distractions, you’ll see a random wallpaper with one focus task for the day. You can change that task any time. You can set a schedule for Hide Feed to automatically turn on during work hours. It also tracks how much time it has saved you from distractions.

Download: Hide Feed for Chrome | Firefox (Free)

2. Matter (Web): Visually Sort Tasks by Importance

Matter is a great daily to-do list app that prioritizes tasks by visual indicators

The easiest way to maintain focus is to have a task list for the day. You need a simple system, it should look good, and you need to prioritize the tasks easily. Matter ticks each box to deserve a place as your New Tab page in a browser.

You can add only text tasks, and there are no deadlines. But to prioritize the tasks, you need to add resize the red circle next to each. The bigger the circle, the more important the task. Add and resize as you go, click the finish button when you’re done, or delete the task from your list.

You can sort the list by priority or by when you added it, but obviously priority is the way to go here. You can also view finished tasks, switch between light and dark themes, and change the font type and size.

Matter is wonderfully minimalist and remembers your data, which is what makes it ideal for a daily to-do list. With such daily lists, it’s best to start afresh every day.

3. Cleverest (Android, iOS): Pomodoro Timer and Focus Keeper for Phones

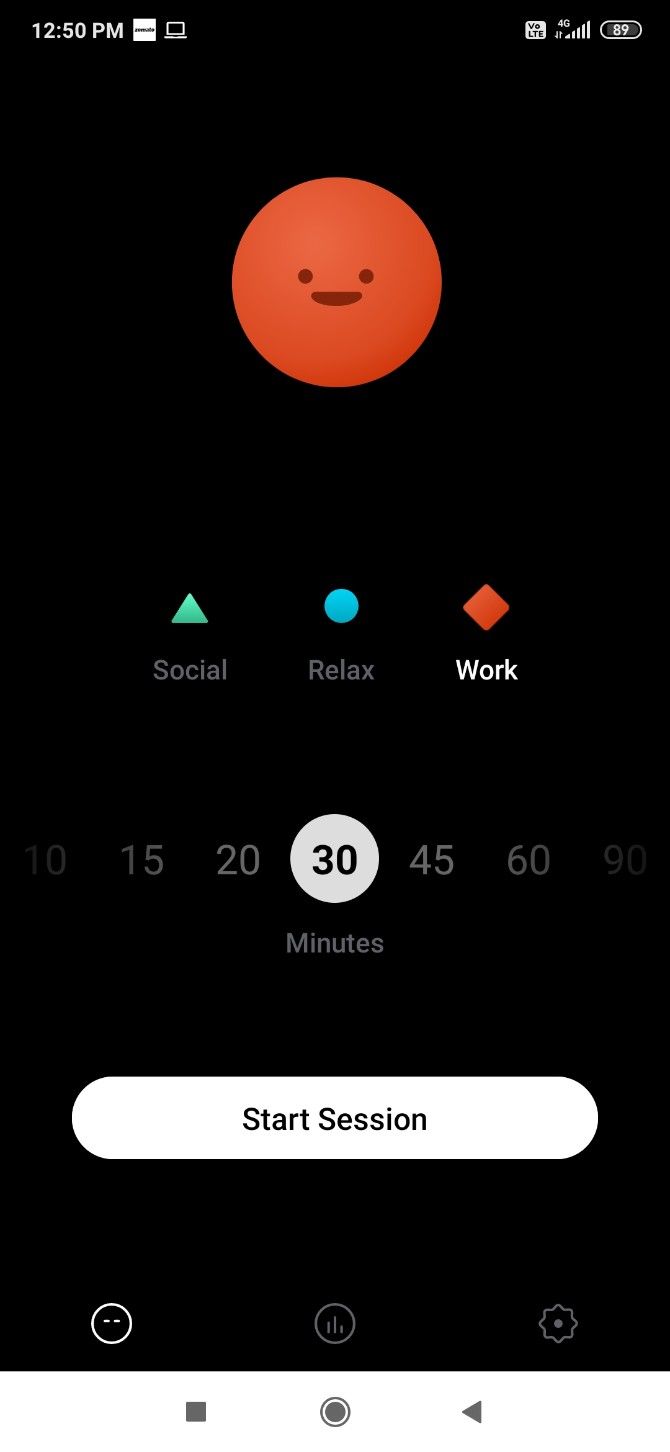
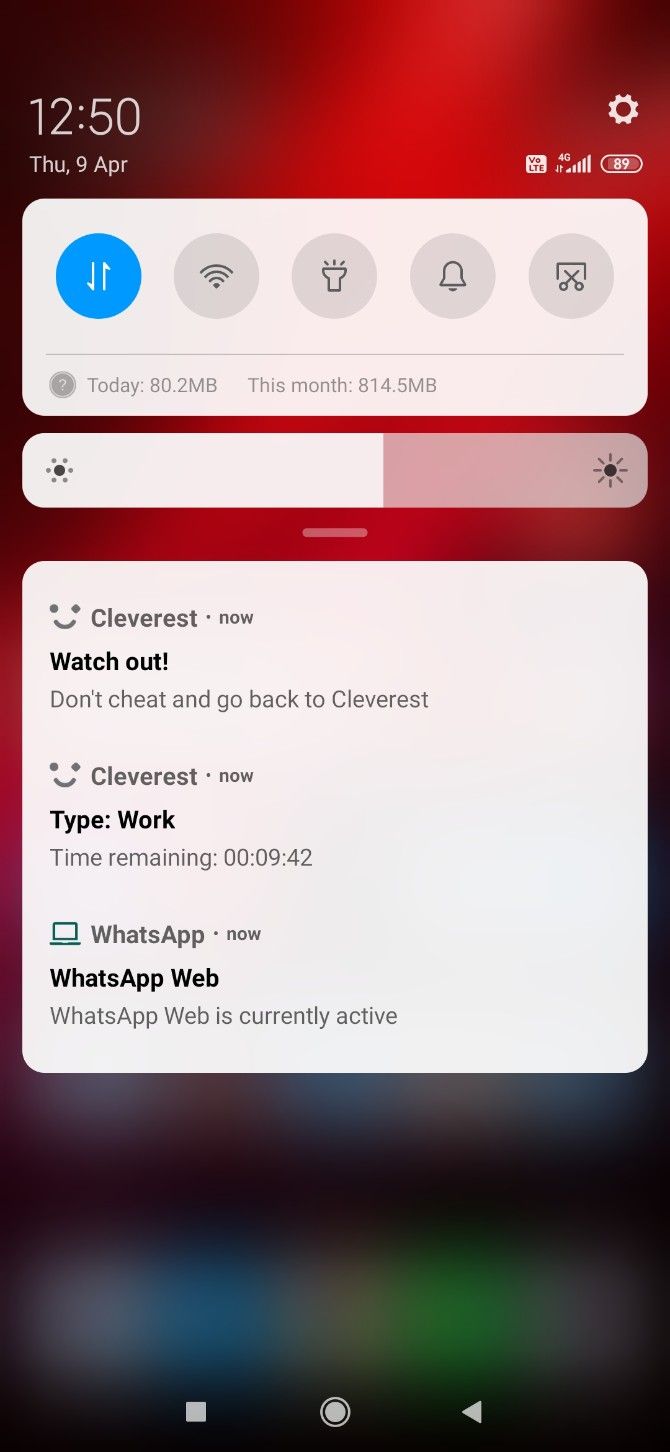
Just ten seconds checking out a text message on your phone can derail your concentration. Cleverest tests how easily you can be distracted by notifications on your mobile. Yet, this smart little app is not too strict about it and allows some leeway.

Choose from three categories: social, work, or relax. Then set a session based on how many minutes you want to focus and not look at your phone. Cleverest will start the session and keep track of whether or not you change to something else on your screen.

This is where the app lives up to its name. There are certain notifications that you can’t ignore, like a text message. Flip to it if it’s important, but that triggers a 10-second countdown. If you don’t come back to Cleverest in that time, you lose the session (since you’ve lost focus anyway).

It’s an effective strategy to stay focussed without putting on blinders. Cleverest also tracks all your sessions (from 10 minutes to eight hours) and presents a daily data chart. This is both a timer for the Pomodoro productivity technique, as well as a digital detox app.

Download: Cleverest for Android | iOS (Free)

4. I Miss The Office (Web): Background Sounds of Working in an Office

I Miss The Office simulates common office sounds for background noise while working from home

For those who aren’t used to it, the eerie silence of working alone can be a distraction too. A few research studies have shown that moderate ambient noise, like that of a coffee shop, can boost creative thinking and focus. If you did your best work in the low and comforting sounds of an office, this app is for you.

I Miss The Office is a web app that simulates the sounds of an average workplace. There is the low drum of central air conditioning and a few other elements. In the bottom-right corner, you can add or delete how many colleagues (up to 10) you want moving around in there.

You’ll hear muffled conversations and even laughter in the distance, the movement of people, and the kinds of sounds that go in any occupied office.

These “colleagues” also interact with elements in the virtual office, like a printer-copier, watercooler, computer, etc. Click an element to activate or deactivate it. So even when you’re working remotely from home, set it up for that comfortable feel of what it’s like in your office.

5. Create Distraction Journals and Passes

Create distraction journals and distraction passes to boost your focus and concentration

This last one isn’t an app, it’s a combination of distraction-busting techniques from two of our favorite productivity blogs. You see, distractions are inevitable. You need ways to minimize them and their impact, but you can’t escape them entirely.

Work Awesome suggests giving yourself a few “Distraction Passes” every day. The suggested number is three passes per work day. You can use them how you want, but that’s the amount of distractions you’re allowed, so choose wisely.

Instead of a hard no to all distractions, this puts you in charge of how to spend your time. Instead of your willpower, you’re using a different part of your brain, and that can be the difference in staying focused.

The Financial Diet advises keeping a distraction journal. When you feel the temptation to stop what you’re doing and turn your attention elsewhere, write it down in the journal first. That act alone can be enough to quell that impulse. Plus, it doubles up as a list of tasks to do later instead of breaking your concentration right now.

Both these systems are about reducing the mental load of staying focused. It’s a lot easier to concentrate when you work around distractions rather than try to fight them.

Control the Noise to Control Your Focus

These apps and techniques should help you deal with the notifications from a screen and your mind’s propensity to wander. But the one thing that snaps anyone’s concentration is an odd sound or noise.

Did you know there are different types of noises to boost productivity? Learn about brown noises, pink noises, and other sounds in our guide to stay focused by controlling the noise around you.

Read the full article: 5 Ways to Focus on Work at Home and Avoid Distractions


Read Full Article

Bored During Self-Isolation? 100+ Tips for Staying Entertained and Engaged


clone-github-repo

Trapped inside and going stir-crazy due to quarantine? You aren’t the only one! Here are all kinds of things you can do to stay sane while self-isolating and social distancing!

The novel coronavirus and COVID-19 have turned the entire world upside-down. We’re stuck at home without much to do, and there’s only so much Netflix you can watch before you start feeling cabin fever.

It might be months, or even years, before society goes back to normal—if it ever does—so we have no choice but to get used to how things are now. And that means finding ways to keep ourselves entertained without leaving the house.

Is your well running dry? We’ve compiled a master list of ideas for you! In between staying up-to-date with trustworthy COVID-19 news, check out the following things you can do from the comfort of your home.

Doing Stuff With Friends Remotely

The hardest thing about self-isolation and social distancing is… the distance! We miss interacting with our friends and family. But while physical meetings might be off the table, that doesn’t mean we can’t hang out virtually.

Here are several fun activities you can do with others, even while you all stay within the confines of your own respective homes!

Watch movies and TV shows in sync together:

Pass the time by playing lightweight games together:

Or just get together as a virtual group and shoot the breeze:

Keeping Yourself Occupied When Alone

check-movies-stream

While it’s certainly possible to do stuff with others remotely during self-isolation, you’ll need to find ways to keep yourself mentally stimulated and engaged during those times when you’re alone. Fortunately, we have a LOT of great ideas for you!

But before you dive into all the different distractions we have for you, it’s important to stay mentally centered. If you’re feeling overwhelmed by anxiety during this stressful time, we recommend the following apps that may help relieve some of your nervous energy:

Movies

TV and Anime

YouTube

Video Games

Browser Games

Mobile Games

Ebooks

Comics and Manga

Audiobooks

Podcasts

Learning Something New With Your Extra Time

learn-mandarin-chinese

With so much free time on our hands, now’s the opportunity to learn that new skill or hobby that you’ve always wanted to try but couldn’t. There are plenty of things you can learn from home—like programming, photography, digital art, and more—so why not give it a go? You’d be surprised at how quickly time flies when you’re doing something you’ve never done before.

Programming

Music Production

Photography

Digital Art and Design

New Languages

Read the full article: Bored During Self-Isolation? 100+ Tips for Staying Entertained and Engaged


Read Full Article

How to Back Up, Restore, and Transfer Text Messages to a New Android Phone


manage-text-messages-android

If you often communicate via SMS, it makes sense to back up your Android text messages. That way, you’ll have a copy in case something goes wrong. It also makes transferring text messages to new phone simple.

We’re going to walk you through SMS backup on Android using the default option, as well as a selection of popular third-party apps. Each of them allows you to easily restore those text messages later.

1. Built-in Google Drive Backup

As long as you’re signed into your Google account on your phone, your data automatically back up to Google Drive. To make sure that the backup is working, head to Settings > Google > Backup or Settings > System > Advanced > Backup.

To perform a manual backup, hit Back up now. You can also check what the feature has already backed up by tapping on your phone’s name. Here, you should see the last time that a backup ran for your app data, SMS, device settings, call history, and contacts.

Unfortunately, old backups get deleted after 57 days, and this doesn’t support MMS (unless you have a Google One plan). You also can’t view your backups whenever you want—they’re only available when you get a new phone or perform a factory reset on your current device.

This is one of the many ways to back up everything on your Android device.

2. SMS Backup & Restore

You can back up your messages directly on your phone using an app called SMS Backup & Restore.

To get started, open up the app and tap Back Up Now. You can choose to back up all call logs, SMS messages, and/or selected SMS conversations. Make sure there’s a check next to the items you want to back up.

You can then choose a backup location: Google Drive, Dropbox, OneDrive, or locally on your phone. If you choose to save it locally, you can choose the exact location of the backup. However, this isn’t a wise option, as the backup file will be lost if you lose or break your phone.

You can also use SMS Backup & Restore to schedule automatic backups, repeating them by the hour, day, or week. This feature is particularly handy as you can set it and forget it, knowing that your messages will be safely backed up.

If you want to create or edit a schedule, navigate to the app’s home screen and tap Set Up a Backup. After selecting the frequency of the backup and the backup storage location, the app will schedule the job. And when you need to get them back, open the left menu and tap Restore to import your backup file.

Download: SMS Backup & Restore (Free)

3. SMS Backup+

SMS Backup+ allows you to conveniently back up your messages to your Gmail account. However, because a change to Google’s API broke the way SMS Backup+ used to function, you’ll have to do a few extra steps to get it working correctly.

Setting Up SMS Backup+ in Gmail

Before you download SMS Backup+, head to your Gmail settings on a desktop or laptop by clicking the Gear icon and choosing Settings. Click on the Forwarding and POP/IMAP tab, scroll down, and select Enable IMAP. Don’t forget to click Save Changes before you leave.

Backup Android Messages Gmail

From here, go to your Google account’s security settings by clicking your profile picture at the top-right of any Google page and clicking Manage your Google Account. In the Security section, find the heading that reads Signing in to Google and click App passwords.

If you don’t see App passwords, make sure to enable the 2-Step Verification setting first. Follow our guide to two-factor authentication if you’re not familiar with this.

Backup Android Messages Google Security Settings

Once you open the App passwords section, you’ll see a page with two dropdown menus. On the one labeled Select app, click Other (Custom name) and type in SMS Backup+. Hit Generate, and you’ll get a 16-digit code to use in place of your normal password.

Once you close this page, you can’t access the code again (though you shouldn’t need it after the initial setup). Make sure to write it down, or just keep the page open until you’re done setting up the app.

Google Security Settings App Passwords

Using SMS Backup+

Now, you can finally download SMS Backup+ on your phone. Open the app, then tap Advanced Settings > Custom IMAP server. Select Authentication at the top of the screen, followed by Plain text.

After you input your email address, you can then enter the 16-digit password without spaces in the Password section of the page. Ensure that the Security option is toggled to TLS and you can finally return to the app’s home screen.

You can now back up your phone’s text messages to your Gmail account! Click Backup at the top of the page to begin backing up your messages. You can also set automatic backups by enabling the Auto backup option. If you choose to do this, you can always edit the backup frequency under Auto backup settings.

Like the other apps, use the Restore option within SMS Backup+ on your new device to get your texts back.

Download: SMS Backup+ (Free, in-app purchases available)

4. SMS Organizer

If you want an all-in-one messaging and SMS backup app, SMS Organizer is for you. This app is a Microsoft Garage project that’s currently in early access. Despite this, it’s still a reliable alternative SMS app that also doubles as a backup service.

The organization aspect of this app is what draws in most people—it automatically categorizes your texts into four sections: personal, transactions, promotions, and starred.

To start backing up your messages, click the three-dot menu in the top-right corner and navigate to Settings > Backup & Restore. Here, you can connect your Google Drive account and back up or restore your phone on-demand.

You can change the frequency of automatic backups by selecting Auto backup. This lets you stick to manual backups as well as opting to do daily, weekly, or monthly backups.

When you want to transfer text messages to a new phone, all you have to do is download the SMS Organizer app on your new phone, add your Google account, and hit Restore.

Download: SMS Organizer (Free)

Keeping Your Messages Safe With SMS Backups

Learning how to save text messages is especially useful when you need to transfer them to a new phone, as well as keeping a spare copy if your phone suddenly breaks. Keeping a backup of these conversations, which could have major sentimental value, is a smart idea.

If you didn’t back up before it was too late, take a look at how to restore deleted text messages on Android.

Read the full article: How to Back Up, Restore, and Transfer Text Messages to a New Android Phone


Read Full Article

10 Safari Settings You Should Tweak for Better Browsing on Mac


safari-settings-better-experience

A lot of Mac enthusiasts prefer using Safari over Chrome, thanks to its lower battery consumption. Nowadays, Safari is better than ever before, but as with all browsers it has some quirks that need fixing.

Fortunately enough, you can smooth out most of the browser’s rough edges by making a quick visit to Safari’s settings. Some need a little more work, but we’ll cover those step by step.

Ready to upgrade the Safari browsing experience on your Mac? Let’s go!

1. Enable a Link Preview in the Status Bar

When browsing around the web, you come across all sorts of hyperlinks. Some links take you exactly where you want, while other links can redirect you to phishing websites that could steal your personal information. Thus, it’s a good idea to preview links before actually going to the websites behind them.

Safari doesn’t show link previews by default, but you can enable this with just a couple of clicks. Click on View in the menu bar and select Show Status Bar to do so.

Showing the status bar in Safari via the View menu

Once enabled, you should see link previews at the bottom-left of the window.

2. Show the Entire URL in the Address Bar

By default, Safari shows only the main domain name in the address bar. While this makes Safari look a more minimalist, it also hides useful information including your exact location on a website.

To always show the full URL, open Safari > Preferences and switch to the Advanced tab. Check the Show full website address box there. Now, Safari should display the full URL so there’s no doubt.

Safari Show Full Website Address

3. Use Reader View Automatically for All Websites

Whenever you come across a messy webpage in Safari, you can simply click on the Reader view icon to declutter the webpage and view it in an easy-to-read format. What if you’re spoiled with the simplicity of Reader view and want to use it on all websites automatically?

That’s possible with the following steps:

  1. Open Safari > Preferences.
  2. Switch to the Websites tab and select Reader from the left pane.
  3. Configure the currently open websites to use Reader view automatically by clicking On in the dropdown menu. To set this for all other websites, select On in the dropdown menu at the bottom beside When visiting other websites.

Safari Use Reader View All Sites

Once enabled, all supported websites will load in Reader view automatically.

4. Stop Plugins to Save Power

Browser plugins like Flash and Java aren’t common on the modern internet. However, you might still come across some sites that use them for videos, ads, or other content.

To avoid wasting battery power and resources on these plugins, you can tell Safari to use plugins only when you need them. To do this, open Safari > Preferences and switch to the Advanced tab. Check the Stop plug-ins to save power box and your browser will automatically suspend unnecessary plugins.

Safari Stop Plugins

5. Block Auto-Playing Videos

Don’t you hate it when you’re browsing a website and a video starts playing automatically without your consent? It’s a pain to fumble around your open tabs to find the offending page and close it. You could mute that tab, but the video will keep playing, which wastes resources.

To resolve this problem, Safari lets you block all auto-playing videos. To do so, open Safari > Preferences and head to the Websites tab. Here, select Auto-Play from the sidebar on the left.

On this page, you can configure websites to either Stop Media with Sound or Never Auto-Play videos.

Safari Disable AutoPlay

6. Disable Website Notifications

Sometimes, browser notifications can be useful. For instance, when you have Gmail open, the site can send you a push notification to alert you of new messages. But some pages abuse this feature to deliver ads or other unwanted content. If you feel bombarded with unnecessary notifications from websites, Safari provides an easy way to get rid of them.

Open Safari > Preferences, switch to the Websites tab, and choose Notifications on the left. Here, you can check out all the websites that have asked for permission to show alerts in the Notification Center.

You can choose to Allow or Deny permission for these existing websites. If you’d like to disallow all websites from sending you push notifications, uncheck the Allow websites to ask for permission to send notifications box.

Safari Notifications Allow or Deny

7. Enable Picture-in-Picture for Videos

Did you know that the handy picture-in-picture (PiP) feature is available in Safari? This lets you pop out a video to a small window that you can move anywhere while keeping it on top of other windows.

To use PiP in Safari, start playing a video, such as something on YouTube. Then click and hold the volume button in the Safari address bar and select Enter Picture in Picture.

Safari Enter Picture In Picture

To exit this mode, click the Exit button next to the Pause/Play button and the video will pop back into Safari.

While the feature works well, the only problem is that it doesn’t work with all online video services. For shows from Amazon Prime Video, for instance, you’ll need a little help.

PiPifier is a native Safari extension that lets you use PiP mode on almost any HTML5 video. Once you download it from the App Store, open Safari > Preferences > Extensions and check PiPifier button.

PiPifier for Safari on Mac

After it’s enabled, you should see a pop-out button in your toolbar. When you’re playing an HTML5 video, just click on this button to play it in PiP mode. Make sure to play and pause a video once before you click on the button.

Download: PiPifier (Free)

8. View Favicons in the Tab Bar

You’d probably agree that it’s easier to identify tabs by their favicons instead of just the page title. This is especially the case when you’ve got lots of tabs open. In macOS Mojave, Apple finally brought the ability to display icons in tabs.

To enable them, open Safari > Preferences and select Tabs. Check the box for Show website icons in tabs.

Safari Show Icons In Tabs

9. Utilize Quick Website Search

Quick website search in Safari

Safari’s address bar lets you search many websites directly. For instance, you can search Wikipedia by typing “Wikipedia [query]” in the address bar. This helps you save a few clicks and navigate faster. Even better, this supports a range of websites.

To check out a list of all supported sites, open Safari > Preferences > Search. Click on Manage Websites to take a look.

10. Set the Default Search Engine

Not everyone is a Google fan. Since you probably use the search function in Safari every day, setting up the default search engine is another minor change that can make a big difference.

You can choose from Google, Yahoo, Bing, or DuckDuckGo as your default. To modify this, open Safari > Preferences and select the Search tab. Next to Search engine, select an option from the dropdown menu.

Safari Set Default Search Engine

From then on, when you enter a search term into the Safari address bar, your results will display from your chosen search engine.

More Safari Tips to Improve Your Browsing Experience

Major features often hog the limelight, which leaves room to discover for small, nifty features to be discovered. We hope these cool Safari settings helped you get more out of your Mac’s browser.

Interested in more? Have a look at essential Safari tips and tricks, along with more ways to customize Safari that you might like.

Read the full article: 10 Safari Settings You Should Tweak for Better Browsing on Mac


Read Full Article

Why Can’t I Download Certain Apps on the Play Store?


cant-download-apps-playstore

Can’t download some apps on Google Play? This is frustrating, especially when other apps work just fine.

Whether you can’t even see an app, found it but can’t download it, or the app won’t install, we’re here to help. Let’s look at why you can’t download certain apps from the Play Store and how to fix the problem.

1. Device Incompatibility

Google Play Incompatible App

The most common explanation for why you can’t download certain apps is that the app’s developers have marked it as “incompatible” for your device. For example, you’ll see this message if the app was deigned for tablets and you have a smartphone.

However, this doesn’t necessarily indicate that the app has zero chance of working on your device. Developers may choose to mark it as incompatible due to unfixable glitches or bugs with your particular model. Alternatively, you might have a rooted device that’s not compatible with certain apps.

One way around this is to download the APK from an alternative site and force it to install. Do this at your own risk, however, because if there are actual incompatibility issues, they could potentially harm your device. Most likely, though, you won’t be able to access certain features in the app.

2. Region Restrictions

Google Play Region Not Available

Another common explanation when you can’t find an app on Google Play is that it doesn’t work in your region of the world. This could be due to government restrictions, but more than likely, it’s a decision by the developers to filter out people who can’t use their app anyway.

For example, there’s little point to installing an app for a US-only bank if you live in Australia. Even if you force the app to install by sideloading it, you won’t be able to create an account or use the bank’s services anyway. Another example is Hulu, which is only available in the US.

In other cases, an app may only service certain locations in its early stages, so the owner decides to limit who can download it. This prevents negative reviews from confused users and makes sure they’re testing with the right people. If you’re not sure why an app is region-restricted, it’s worth reaching out to the developers to ask.

If you’ve moved recently, you may need to update your region setting in the Google Play Store to access compatible apps.

3. Missing Device Features

No AR mode in Pokemon Go

As long as your device is from the last several years, it probably includes the latest hardware features. Gyroscopes, accelerometers, ambient sensors, proximity sensors, and other functions allow your device to pick up data from the world around it.

Some app require these tools. If your phone is really outdated and missing a component that an app requires, then you can’t install it from the Play Store. Budget phones are more likely to skip out on these features than flagships, of course.

An app also might require more powerful hardware than your phone has. Apps that need a lot of resources might demand a certain amount of RAM, for example. This was a big problem when Pokemon Go launched—many people were left out when the game didn’t run on their phones due to insufficient hardware.

The only real solution here is upgrading to a more modern device. It’s frustrating, but it’s probably time anyway if you run into this problem.

4. You’re Running an Outdated Android Version

Google Play Requires Android

In addition to the hardware requirements discussed above, many apps also have software requirements in the form of your phone’s Android version. To check this, visit the app’s page on Google Play’s web interface. Scroll down, and you’ll find it as Requires Android in the Additional Information section.

Every new major version of Android comes with a handful of new features and improvements that apps can take advantage of. If an app relies on one of these features that you don’t have, it may not work at all. There’s no point in allowing you to install the app if that’s the case.

Much more common, however, is the developer deciding on the oldest version of Android the app will support as a cutoff point. Like desktop software, it’s difficult to keep Android apps backwards-compatible for versions released many years ago. Almost nobody uses ancient Android versions (such as Jelly Bean) anymore, so it makes no sense for developers to keep supporting them.

Unfortunately, Android’s fragmentation means that your old device will probably never see another update. Consider the best Android manufacturers for timely updates to avoid this issue when you buy your next phone.

5. Insufficient Storage Space

Apps take up a surprising amount of storage space. If your device has a small amount of storage, you may be unable to install any more apps until you make some room. This can even prevent you from installing app updates, in some cases.

You should thus free up space on your Android device to make room for the new app. You can do this by uninstalling old apps, removing local photos and videos that you’ve saved to cloud storage, and similar. If this becomes a recurring problem, you should look at getting a new phone with more storage space.

6. Google Play Store Glitches

If you run into an app that appears to be compatible with your device, yet the download doesn’t work for some reason, the problem may lie elsewhere. Chances are that you have an issue with the Google Play Store app.

When a download or installation from Google Play doesn’t work right, you should first reboot your phone. If that doesn’t work, read our full troubleshooting guide to fixing Play Store issues.

7. Unavailable Manufacturer-Specific Apps

Google Play Samsung Music Unavailable

A less common reason you can’t find an app in the Play Store is that it’s intended only for devices from certain manufacturers. Some apps are (supposedly) designed to take advantage of features that are only available on that company’s devices. As an example, the Samsung Music app is on the Play Store, but won’t install on a Pixel 4.

If the app has a manufacturer name in its title, it might not be compatible with other devices. The good news is that most of these manufacturer-specific apps have alternatives that are often better anyway. You shouldn’t bother forcing an install or switching to a new device unless you really want a particular app.

Resolving Play Store App Issues

Now that we’ve explained why some apps don’t show in the Play Store or let you download them, you should understand why the app you want to download is incompatible with your device. Hopefully it’s an easy fix, but a lot of the time, the app won’t work until you get a new device.

Note that when you search the Play Store on your phone, it will only show apps compatible with your device. However, if you search the Play Store’s web interface, you’ll see all available apps on the platform. Knowing this will help you check on an app’s availability.

Don’t fret if the Play Store fails you, though. It’s easy to download Android apps from alternative app stores.

Read the full article: Why Can’t I Download Certain Apps on the Play Store?


Read Full Article

Amazon Fire Stick vs. Roku: Which One Is Better?


amazon-roku

The popularity of cord-cutting continues to gather pace. Collectively, cable TV companies are losing millions of subscribers every year, with no sign of that stopping.

If you have recently ditched your TV subscription, there’s a good chance you’re trying to decide between an Amazon Fire TV Stick and one of the many Roku devices.

Unlock the list of "Essential Amazon Fire Stick TV Channels" now!

This will sign you up to our newsletter

Enter your Email

In this article, we pit the Amazon Fire Stick vs. Roku devices, determining which is best in order to help you decide.

A Complicated Comparison

Unfortunately, it’s impossible to make a like-for-like comparison between all Amazon Fire TV devices and Roku devices.

Instead, we need to focus on two Amazon products: The Fire TV Stick and the Fire TV Stick 4K. On the Roku side, there are three devices that can be thought of as Fire TV Stick competitors: the Roku Express, Roku Premiere, and Roku Streaming Stick+.

NB: The Roku Ultra costs $100 and is more of an alternative to the Amazon Fire TV Cube, so we will not include it in this analysis of Fire Stick vs. Roku.

Amazon Fire Stick vs. Roku: Cost

Before we get into the features and the technical specifications, let’s deal with the elephant in the room—the cost of the devices.

Amazon’s entry-level Fire TV Stick costs $40. The 4K model will set you back a further $10, coming in at $50.

The cheapest Roku model is the Roku Express. At $30, it’s more affordable than the Fire TV Stick. At the other end of the scale, the top Roku model (Ultra excluded) is the Roku Streaming Stick+, which costs $50.

So, for the sake of simplicity we’re going to pit the Amazon Fire TV Stick and Fire TV Stick 4K vs. the Roku Express ($30), the Roku Premiere ($40), and the Roku Streaming Stick+ ($50)

Amazon Fire Stick vs. Roku: Specifications

This is where things get confusing. Let’s try and make sense of all the different models on offer from the two companies.

First, the Amazon devices. The basic Fire TV Stick has a Quad-core ARM 1.3 GHz processor, 8GB of internal memory, and support for Bluetooth 4.1. It plays videos in 720p or 1080p resolution at up to 60 frames-per-second (FPS).

The 4K model is a notable improvement. You’ll find a Quad-Core 1.7GHz processor, support for Bluetooth 5.0, and 2160p video resolution. The internal storage stays at 8GB and there’s 1.5GB of RAM.

The Roku Express only supports 1080p resolution. The other Roku options support 4K.

Amazon Fire Stick vs. Roku: Controls

All Roku and Amazon Fire TV devices ship with a dedicated remote control.

Both Amazon controllers support Alexa. If you want to control your Roku with your voice, you will need to buy a Streaming Stick+.

Roku and Amazon have both developed an accompanying remote control smartphone app.

And remember, if you have an Amazon Echo speaker, you can sync it with your Fire TV Stick and use it to control your content.

Amazon Fire Stick vs. Roku: Interface

Image result for amazon fire tv home screen

Visually, the Amazon platform is more modern and feels more polished. However, critics have argued that it pushes Amazon’s own content too aggressively.

It’s a valid viewpoint. You’ll only see one row of your own apps at the top of the screen.

The rest of the homescreen is taken up by content from Amazon Prime Video. Even if you don’t subscribe to the service, you will still see it.

Roku’s interface is more customizable. All of your channels are displayed in a scrollable list and you can create shortcuts for your most-used channels. If you install third-party add-ons, you can even place your channels into groups for easier navigation.

Amazon Fire Stick vs. Roku: TV Shows and Movies

If you’re looking for a provider-agnostic device, Roku offers the best streaming sticks on the market. They’re not only better than Amazon Fire TV sticks; they’re also better than Android TV, Apple TV, and Chromecasts.

You’ll find apps for just about every on-demand video and music streaming app, including Netflix, Hulu, YouTube, Google Play Movies, Spotify, and TuneIn Radio. Roku also offers its own ad-supported streaming channel providing access to a large number of free movies and TV shows.

Roku also offers a vast library of private channels. You need to enter a code in the Roku web portal to install them on your device. Be warned—many of the private channels reside in a gray area of legality.

The Amazon Fire TV Stick run a highly modified version of Android. Which means you can sideload any app as long as you have its APK file. There are several safe and secure APK download sites you can use. Just remember that most Google Play Store apps are not designed for Fire Sticks, meaning you will also need to install a mouse app.

Amazon Fire Stick vs. Roku: Web Browsing

Only the Amazon products let you easily surf the web. Two Fire TV browsers are available—Amazon’s own Silk Browser and Firefox. You can control them both easily using the Fire TV remote. We’ve compared Silk and Firefox to find the best browser for the Amazon Fire TV Stick if you’d like to learn more.

There are web browsers that work on Roku devices, but they are not suitable for regular browsing.

Amazon Fire Stick vs. Roku: Gaming

roku games store

Roku devices and Amazon Fire TV Sticks both offer games on their platform.

However, hardcore gamers might find Fire TV devices are more suitable for their needs. Generally speaking, Roku games are a bit “cutesy”. Sure, they’ll keep you entertained for half an hour, but they don’t offer longevity.

The games on Amazon’s devices are beefier. You’ll find titles such as Minecraft, Badland, and Star Wars.

Of course, if the ability to game on your streaming device is high on your list of priorities, neither a Roku or a Fire TV Stick can hold a candle to the Nvidia Shield. You can stream titles from your PC using Nvidia GameStream, download a host of local games from Nvidia and Google Play, and install emulators for classic consoles.

We have written about the best games on Amazon Fire TV and the best games on Roku if you’d like more information before making a purchase.

Amazon Fire Stick vs. Roku: Screen Mirroring

Roku devices have Miracast technology built-in. If you’re not aware, Miracast is like a wireless version of an HDMI cable. Most Android and Windows devices are Miracast-compatible. Apple devices are not.

Some older Amazon Fire TV models also support screen mirroring. Oddly, it’s not available on the Amazon Fire Stick or Fire Stick 4K.

Roku vs. Fire TV Stick: Which Is Best?

It’s really difficult to choose a clear winner between the Roku and Fire Stick. Much depends on how you plan to use your device, which gadgets you already own, and which streaming service you subscribe to.

All else being equal, we’d recommend either the Amazon Fire Stick 4K or the Roku Streaming Stick+. And remember, you could even buy a Chromecast or Android TV.

We have pitted the Chromecast vs. Roku and the Android TV vs. Amazon Fire TV if you want to learn more.

Read the full article: Amazon Fire Stick vs. Roku: Which One Is Better?


Read Full Article