29 November 2018

YouTube rolls out Stories to creators with over 10K subscribers


A year ago, YouTube launched its own take on Stories, with the addition of a new short-form video format called Reels. The feature, which was rebranded as “YouTube Stories” at last year’s VidCon, was initially available only to select YouTube creators. But in June, YouTube said it would expand Stories to all creators with over 10,000 subscribers later in the year. Today, it has done just that.

Now, YouTube is beginning to roll out Stories to a wider set of creators, giving them access to the new creation tools that include the ability to decorate the videos with text, stickers, filters, and more.

The feature is very much inspired by rival social apps like Snapchat and Instagram – except that,  in YouTube’s case, Stories disappear after 7 days, not 24 hours.

The idea behind YouTube Stories is to give creators any easy way to engage with their fans in between their more polished and produced videos. Today’s creators are no longer simply turning a camera on and vlogging – they’re creating professional content that requires editing and a lot of work before publication, for the most part.

Stories let YouTube’s creators engage with fans in between videos or while on the go, offering behind-the-scenes access to their creation process, updates, sneak peeks at upcoming videos, and more.

Some early adopters of the format include FashionByAllyColin and SamirDR Oficial, ChannelFrederator, and Cassandra Bankson. The test group before today was small, and only included creators with over 70,000 subscribers, we understand.

Once enabled, YouTube creators can film a new Story by opening the YouTube app, tapping on the video camera icon, then selecting “Create Story.”

Also new today is the ability for fans to comment on the Stories.

Viewers can thumbs up and thumbs down comments and heart comments, as well. The same comment moderation tools that are available on YouTube’s video uploads are also available on Stories, the company says. Plus, creators can choose to respond directly to fans comments with photos or videos that the whole community can see.

During the week they’re live, YouTube Stories will show up to subscribers on the Subscriptions tab and non-subscribers on Home and in the Up Next list below videos.

Many YouTube creators point their fans to their Instagram for their short-form content and behind-the-scenes action – something that YouTube likely hopes to stem with its launch of Stories.

Today’s expansion brings Stories to a much wider group of creators than before, but YouTube hasn’t said if or when the feature will roll out to its entire user base.


Read Full Article

Koo! is a social network for short-form podcasts


Alexandre Meregan says that music, and audio in general, has always been core to his life. But one day on his five-minute commute to work, trying to listen to a podcast for the first time, he realized that by the time he arrived at work he had only heard an introduction and a commercial jingle.

He immediately went to work on Koo!, a short-form podcast app aimed at young people. Koo! lets users record up to one minute of audio, add “sound stickers” like a drum roll or a poop sound, and share the “Koo” in a feed with their friends and followers.

Meregan believes that some young people are hesitant to share their thoughts on social media, which is mostly picture or video-based, because of the quantification of their self-worth through Like counters. With Koo! users can simply speak their thoughts without having to share a picture or video.

“At Koo! we believe a lot of great content is being held back by teenagers due to insecurities that comes with photo and video,” said Meregan onstage at TechCrunch Disrupt Berlin on the Startup Battlefield. “We feel that what you say should be more important than how you look.”

Like most social networks, Koo! is primarily focused on acquiring new users before focusing on a revenue model. Ad-supported revenue is the most obvious option to make money, but Meregan says that the team has been floating around a few other ideas, as well.

[gallery ids="1752074,1752075"]

One user-acquisition tactic, according to Meregan, is to target YouTube content creators and give them a complimentary service to share their thoughts and voice.

A handful of startups have tried their hand at audio-based social networks, but few have managed to gain much traction.

Koo! is backed by Sweet Studio, though Meregan declined to share the amount of funding the company has received to date.


Read Full Article

Spike Diabetes applies social pressure to keep patients safe


It can be tough for diabetes patients to keep a constant eye on their glucose levels. Spike Diabetes lets family and doctors lend a hand by sending them real-time alerts about the patient’s stats. And the app’s artificial intelligence features can even send helpful reminders or suggest the most diabetes-friendly meals when you walk into a restaurant.

Today onstage at the TechCrunch Disrupt Berlin Startup Battlefield, Spike Diabetes is launching its Guardian Portal so loved ones with permission can get a closer look at a patients’ data and coach them about staying healthy.

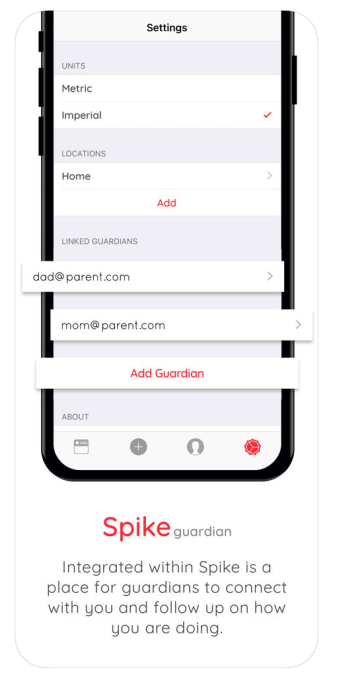
“Diabetes is an incurable chronic disease that forces diabetics to live a life of carb-counting and insulin injections. Since diabetics are forced to do those mundane tasks for the rest of their lives, they tend to fall off the tracks sometimes simply because of how demanding those tasks can be,” says Spike co-founder Ziad Alame. “As for guardians and parents, they are left in the dark about their loved ones.” With doctors often only getting data during quarterly or semi-annual checkups, patients are often left on their own. A lifetime of management is very stressful, especially if your life depends on it.”

The startup faces stiff competition from literally hundreds of apps claiming to help patients monitor their vitals. MySugr, Diabetes Connect and Health2Sync are amongst the most popular. But Alame says many require users to track their levels through complex spreadsheets. Spike offers customizable mobile charts, and will even read users their stats out loud to make staying safe an easier part of daily life. Spike is invite-only and just on iOS, but it also touts an Apple Watch app plus optimized engineering to minimize battery usage.

“Spike started off as a personal project to help myself adhere better to my medication after reaching critical times in my diabetic life,” Alame tells me. Now he’s bringing to the problem his experience as CTO of the GivingLoop charity platform, TeensWhoCode summer camp and Zoomal crowdfunding site for the Arab world. Alame has assembled a team of diabetics, engineers and PhDs, plus $200,000 in seed funding from MEVP, Cedar Mundi and Phoenician Funds. They hope to see the premium paid version of Spike’s freemium app overtake longstanding competition through word-of-mouth triggered by bringing loved ones and doctors into the loop.

One of the app’s most interesting features is the proactive info it delivers. “For example, you walk into McDonald’s around 2 PM. Spike would automatically know it’s lunch time for you and suggest the top three options you can have with approximate carb counts,” Alame tells me. “After some time (~25 minutes) Spike automatically reminds you of your insulin and syncs with your diabetic devices to log all the details. With time, as the app gets to know the diabetic’s taste more, Spike would be able to suggest small behavioral tweaks to enhance lifestyle such as walking routes suggestions or new places similar to the diabetic’s taste but with a lower insulin consumption rate.”

Alame jokes that “The biggest risk [to Spike] is the best thing that can happen — which is finding a cure for diabetes.” But even if that happens, he believes Spike’s app for tracking and actively coaching users could be relevant to other diseases, as well. For now, though, it will have to convince users that an app could make managing diabetes simpler rather than more complex.


Read Full Article

What Is USB OTG? 5 Cool Ways to Use It on Android

3 Linux Smartphone Operating Systems You Can Install Today


linux-mobile-os

Sick of Android? Don’t want to be part of a proprietary ecosystem? Security and privacy are becoming increasingly important for smartphone users, but what is the answer?

Is it possible to abandon Android and iOS for another mobile operating system?

When you want an alternative operating system, Linux is usually the answer. But what Linux smartphone operating systems are available to install today?

1. Ubuntu Touch

Originally released by Ubuntu developers Canonical, Ubuntu Touch is currently being maintained by UBports. This means that Ubuntu’s abandoned mobile operating system lives on.

Ubuntu Touch’s approach to smartphones is intelligent, dealing with the lack of apps by providing social, news, and photo tools natively. This is done in the guise of Scopes, different pages of the Home screen that provide customized news, weather, apps, and social networks.

It works well, too, although there is always a time when apps are needed.

Perhaps Ubuntu Touch’s greatest strength, however, is Convergence.

This is a system, much like Microsoft’s Continuum and Samsung DeX, in which the mobile device is connected to a wireless HDMI device, keyboard, and mouse, and used as a desktop computer. The only real difference between this and your desktop Linux device is that the phone has an ARM processor.

Currently supported devices include the handsets where Ubuntu Touch came pre-installed, along with the OnePlus One, Fairphone 2, and Nexus 5 (Hammerhead). Many more are in active development, such as the OnePlus 2 and OnePlus 3.

2. Sailfish OS

Jointly developed by Jolla, Mer (a middleware stack developer), the Sailfish Alliance (a group of corporations) and community members, Sailfish OS is a continuation of abandoned operating system MeeGo, itself based on Maemo and Moblin.

The latest version of Sailfish OS is known as Sailfish X, which runs on Sony Xperia X devices. Unfortunately, Sailfish OS is not open source, and the free version is a time-limited trial.

The full version of Sailfish X will set you back around $50, and it’s only available within the European Union, Norway, and Switzerland. As noted on the website:

“…the use of our website and services to purchase Sailfish X outside of the Authorized Countries is prohibited.”

Sailfish OS has Android app support, so if that appeals, this OS is worth trying out.

3. Plasma Mobile

Perhaps the most exciting option on the table is Plasma Mobile, a smartphone-focused spin on the popular Plasma, the latter deemed one of the best Linux desktop environments.

Having gained a lot of attention during 2017 (mostly due to Ubuntu abandoning Ubuntu Touch), Plasma Mobile’s aim is to become a “complete and open software system for mobile devices.”

Currently compatible with the Nexus 5 (Hammerhead) and OnePlus One, Plasma Mobile (based on Kubuntu) is also available for Intel-based PCs and tablets, thanks to an Arch Linux-based version.

There’s also multiROM support for the Nexus 5 (Hammerhead), enabling you to run Plasma Mobile alongside your preferred custom Android ROM.

Perhaps the best thing about the Plasma Mobile project is that you’re able to run desktop Plasma apps and widgets, as well as Ubuntu Touch apps. This gives the project a wider selection of apps than Ubuntu Touch.

Other Linux Mobile Projects

As of this writing, three other notable Linux mobile projects are underway:

Halium

Intended as a system to improve future Linux mobile projects, Halium’s aim is to “unify the Hardware Abstraction Layer for projects which run GNU/Linux on mobile devices with pre-installed Android.”

There’s also an intention to standardize other software and improve Linux access to audio, camera, GPS and other hardware.

As you may imagine, if successful, this will make it far easier to install Linux on smartphones.

PureOS

A more complete project is coming in the shape of a mobile version of PureOS, the privacy and security-focused Linux distro from Purism.

Currently there is no way to download PureOS for mobile, but Purism’s first phone, the Librem 5, will be released in 2019. This will be the most secure and private mobile device yet, and much of this will rely on the PureOS operating system.

postmarketOS

Describing itself as “a real Linux distribution on the phone” postmarketOS (pmOS) is a version of Alpine Linux for smartphones.

Currently in early development, the aim of pmOS is to create a sustainable mobile OS, one with long-term support.

A wide number of devices can run pmOS, including the Amazon Fire HDX, Google Nexus devices, and Samsung Galaxy phones and tablets.

At this early of pmOS development, however, few of these devices have a full set of features. However, in offering multiple desktop environments, the pmOS project looks well-placed to fulfill its aim of creating a long-term sustainable mobile operating system based on Linux.

Apps That Install Linux on Android

If you’re desperate to have Linux in your pocket but don’t have any of the devices listed above, there are alternatives.

These enable you to run Linux (or give the appearance of running Linux) from the comfort of your Android device as an app. A rooted phone is necessary in most cases, but these are mostly offering emulation.

KBOX

A tool that doesn’t require root, KBOX is described as “a project to create a miniature Linux distribution for non-rooted (i.e., unmodified) Android devices, providing a Linux-like console environment.”

As such, it features many command line utilities, but is unavailable in Google Play. Instead, you’ll have to visit the website to download and install the APK. Make sure you understand the pitfalls of installing apps from third party sites beyond Google Play before proceeding.

Download: KBOX (free)

Linux Deploy

Rather than a command line environment with some Linux tools, you may prefer something like Linux Deploy, from Google Play. Requiring both a terminal emulator and a VNC client to be installed—as well as a rooted phone—Linux Deploy enables you to choose from several different distros. These are installed in a disk image on your device storage.

Once installed, however, you’ll be able to access a Linux desktop environment on your phone or tablet.

Download: Linux Deploy (free)

Your Smartphone Deserves Linux

In short, Linux is available for many smartphones already. But there’s a long way to go. Linux distros on mobile devices are rare but need your support.

If you have one of the devices mentioned or linked to above, please try out a compatible Linux mobile distro.

Spend a few days with it to see how it works out for you. Then let the project community concerned know how it went. Let them know what worked, and what didn’t.

If you can code, why not offer the benefit of your experience to one of the development projects? Better still, you could even start developing your own mobile version of Linux using the Halium project.

Have you tried a Linux mobile operating system? Found it too hard to install? Well, don’t worry too much, you can run Linux on any Android smartphone.

Read the full article: 3 Linux Smartphone Operating Systems You Can Install Today


Read Full Article

How to Install Windows 10 on Mac: A Step-by-Step Guide


Installing Windows 10 on your Mac isn’t as straightforward as you might think. Boot Camp Assistant doesn’t work very well, particularly when it comes to creating bootable USB installation media.

Fortunately, help is at hand. You can create your own bootable USB installer, grab the drivers you need, and let macOS take care of the partitioning for you. Then it’s a case of sitting back and waiting for the installation to complete.

The Problem With Boot Camp Assistant

Boot Camp Assistant is Apple’s own dual-boot helper tool. It comes bundled with macOS, and is meant to help you create a bootable USB drive, download the necessary drivers, and re-partition your internal drive for use with Windows.

Due to the size of the latest Windows 10 disk images, this helper no longer works. Boot Camp Assistant formats your USB installation media to the FAT32 file system. The problem with FAT32 is that it can’t store files larger than 4GB.

Boot Camp Assistant

The latest Windows 10 disk images are around 5GB in size, and contain a single install.wim file that clocks in over 4GB. Microsoft offers tutorials for splitting this file into multiple parts, but they require Windows. On a Mac, you’re out of luck.

If you try to create a regular USB installer using Boot Camp Assistant, you’ll receive an error telling you there’s not enough space on the disk. This is a confusing error that doesn’t make a lot of sense if, like me, you’re using a 32GB USB stick.

The solution is to create your own USB installer and ditch FAT32 entirely.

Download Everything You Need

First, grab yourself a legitimate copy of Windows from Microsoft. You can download Windows 10 on Microsoft’s Software Download website. For security reasons, you should only ever download Windows from Microsoft.

You’ll also need Apple’s drivers for Windows. The downloads available on Apple’s own website are out of date, so download them using your Mac:

  1. Launch Boot Camp Assistant.
  2. In the menu bar click Actions > Download Windows Support Software.
  3. Select a location to save the file, then wait for the download to complete.

Boot Camp Assistant Download Drivers

Now you’re ready to move on and create an installer. If this sounds like too much for you, check out other ways to run Windows apps on macOS without a full install.

Create Your Own Bootable USB Installer

Microsoft recommends an install medium of 5GB or larger. Some users recommend using an 8GB USB 2.0 drive. I used a 32GB USB 3.0 drive with no problem, but your mileage may vary.

Insert your USB drive and launch Disk Utility. Select your drive from the list on the left and click Erase (make sure there’s nothing on it you haven’t backed up). From the dropdown box, select exFAT as your file system. Give your USB drive a name like WININSTALL and click Erase.

Disk Utility Formatting

Next, double-click the Windows ISO you downloaded to mount it. The image you mounted should open automatically (otherwise look in your Finder sidebar). Click and drag to select all the Windows 10 installation files, then copy them (Cmd + C).

Now paste those files onto the USB drive you just created (Cmd + V). Navigate to the drivers that you downloaded earlier. Copy the contents of the WindowsSupport folder to the root directory of your USB installer. Don’t just drag the WindowsSupport folder to the drive—copy the contents instead.

Copy to USB

Your Windows 10 installation USB is now ready. If you run into issues, check out our Windows 10 installer troubleshooting guide.

Prepare Your Mac’s Internal Drive

With your USB drive still connected, launch Boot Camp Assistant again. Click Continue to begin the process, then uncheck Create a Windows 7 or later install disk and Download the latest Windows support software from Apple. You’ve already done both of these.

Configure Boot Camp Assistant

Leave Install Windows 7 or later version checked, then click Continue. On the next screen you’ll be asked to assign space to your Windows partition. Click and drag the slider (or click Divide Equally) to decide how this space is shared between your macOS and Windows partitions.

Boot Camp Assistant Partition

Click Continue when you’re ready to start the process, then input your administrator password. macOS will start partitioning your drive. Input your administrator password one more time, then your Mac will restart and begin the Windows installer.

Boot Camp Assistant Password

If you receive an error about missing Windows support software, make sure you’ve copied the contents of the WindowsSupport folder you downloaded to the root of your USB drive. If folders like $WinPEDriver$ and BootCamp aren’t in the root USB folder, Boot Camp Assistant will refuse to repartition your drive.

Now Install Windows on Mac

Your Mac should restart and launch the Windows installer automatically. If it does not, or you canceled for some reason, you can restart the process:

  1. Insert your Windows 10 USB installer.
  2. If your Mac is running, restart it.
  3. While your Mac boots, press and hold Option on your keyboard to reveal the boot menu.
  4. Select EFI Boot and click on the arrow to begin the installer.

Be patient while the installer loads. When prompted for a product key, you can click I don’t have a product key to install Windows 10 regardless. You’ll also need to select a version of Windows to install. Find out how to choose the right version of Windows 10 for you.

Eventually, you’ll need to specify where you want to install Windows. You should see a partition called BOOTCAMP in the list. Click on it, then click Format and proceed. Once you’ve formatted the partition, you should be able to click Next and continue installing Windows.

The installer will restart your Mac a few times while the installation takes place. Make a cup of coffee and sit back while it completes.

Configure Windows and Install Drivers

Eventually Windows 10 will restart and you’ll be asked for some more information, including your region and keyboard layout. It’s likely your wireless adapter won’t work with Windows natively, so when you’re prompted to connect to a network, click Skip for now.

Now create a user account, select a password, add a few security questions, and wait for Windows to finish configuring your desktop. After a few restarts, Windows will be ready for use. The first thing you should see is the Boot Camp installer.

Boot Camp Drivers Installation

Click Next followed by Install to begin the driver installation process. Its normal for your screen to flicker during this installation process. Once the drivers have installed, you’ll see a prompt to restart Windows.

By the time you’ve rebooted Windows, everything should work as expected. You’ll be able to connect to a wireless network, scroll with two fingers on the touchpad, use the media keys to adjust screen brightness, and so on.

Windows 10 on Mac: The Best of Both Worlds

Many Mac users buy Apple computers primarily because of the macOS user experience, but the convenience of having both Windows and macOS is undeniable. It’s a shame that Boot Camp Assistant doesn’t work quite like it should, but there’s almost always a workaround to any such issues.

Now that you’ve got Windows 10 up and running, why not check out some of the best Windows software to install right away?

Read the full article: How to Install Windows 10 on Mac: A Step-by-Step Guide


Read Full Article

Xiaomi Roborock S50: The Smartest Vacuum Yet

How to Scan Documents Into Your Mac Using an iPhone

What Is WireGuard? The Future of VPN Technology

How to Learn C Programming With This Beginner Project


learn-c

Learning to program is a cumulative experience. Alongside learning the syntax of your chosen language, you must also learn the general principles that all programming languages use.

Understanding and learning C programming can be daunting, but there are a few basic ideas worth familiarizing yourself with when starting. A simple project is a great way to learn the fundamentals of C.

So where should you start? By saying hello!

1. Hello, World!

The first part of almost every coding course is the hello world program. Going over it in detail highlights some of the ways C differs from other languages. To begin with, open up a text editor or IDE of your choice, and enter this code:

#include <stdio.h>
/* this is a Hello World script in C */
int main(void)
{
  printf("Hello, World! \n");
  return 0;
}

This short piece of code prints to the console before ending the program. Save it somewhere easy to remember as hello.c. Now you need to compile and build your file.

Making It Run

Usually, you won’t need to install any additional software on your computer to run C scripts. Open up a terminal window (or command prompt if you are running Windows) and navigate to the directory you saved your script in.

The way you compile and run your file varies from system to system:

  • Windows Users: Make your file executable by typing cl hello.c and pressing enter. This will create hello.exe in the same folder, which you can run by typing hello.
  • Linux and macOS users: Type gcc -o hello hello.c and press enter to make it executable, and run it by typing ./hello.

Whichever method you use, running your script should show you this:

Output showing the results of a Hello World! sketch in C

If it didn’t work on Windows, make sure you run the command prompt in administrator mode. For macOS, you may need to install Xcode from the App store and follow these steps from StackOverflow.

Now, let’s look at the program line by line to see how it works, and improve it!

Under the Hood: Understanding the C Language

Preprocessors

The script you just created starts with the inclusion of a library.

#include <stdio.h>

The first line in the script is called a preprocessor. This is carried out before the rest of the script is compiled. In this case, it tells the script to use the stdio.h library. There are a huge number of preprocessors available for different tasks.

Stdio.h takes care of getting input from the program’s user, and outputting information back to them.

/* this is a Hello World script in C */

This next line is a comment. The slash and star tell the compiler to ignore everything between it and the closing star and slash. While this may seem pointless, being able to leave yourself and others clear notes about what your code does is an essential habit to get into.

The Main Function

int main(void)

Every C program must have a main function. Main is a function which returns an integer, denoted by int. The brackets after main are for its arguments, though in this case, it takes none, which is why you use the void keyword.

You write the code to be carried out between two curly braces.

{
  printf("Hello, World! \n");
  return 0;
}

Inside the function, you call the printf() function. Just like main(), printf is a function. The difference is, printf is a function in the stdio library you included at the start.

Printf prints anything in the brackets, between the quotation marks, to the console. The \n is an escape sequence called newline, telling the compiler to skip to the next line in the console before continuing.

Note that these lines end in semicolons, which the compiler uses to split one task from the next. Pay close attention to these semicolons—missing them out is the number one cause of things not going right!

Finally, the function returns with the number 0, ending the program. The main() function must always return an integer, and return = 0; signals to the computer that the process was successful.

Understanding each step of this script is a great start in learning both C syntax, and how the language works.

2. Creating Your Own C Functions

You can create your own custom functions in C. Instead of printing Hello World in the main function, create a new function to do it for you.

void print_for_me()
{
  printf("Hello, World! \n");
}

Let’s break this down.

void is a keyword meaning the following function will not return anything.

print_for_me() is the name of the function, and the empty brackets show it does not require arguments to work. An argument is any piece of information to pass on to a function to make it work—later you will be adding an argument of your own to change the output! Note: This is not the same as the main() function above which used void. That function cannot take arguments, while this one can (but in this case, doesn’t have to).

The code block should be familiar to you—it’s just the print statement from the original main function.

Now, you can call this function from your main function.

int main(void)
{
  print_for_me();
  print_for_me();
  return 0;
}

You can see here a benefit of using your own function. Rather than typing printf(“Hello, World! \n”) each time, you can call the function twice.

Right now this might not seem so important, but if your print_for_me function contained a lot of lines of code, being able to call it so easily is a great time saver!

Hello world outputting twice through multiple function calls

This is a fundamental idea of programming you will come across throughout your education. Write your own function once, rather than write the same big chunks of code over and over.

3. Using Function Prototypes in C

Prototypes are one of the major ways beginner C differs from other languages. In short, a prototype is a like a preview of a function defined later. If you write the print_for_me() function after the main function, you may get a warning when compiling:

Composite Image showing code with no prototype and the warning the c compiler gives

The warning message is telling you that the compiler ran into the print_for_me function before it was declared, so it couldn’t be sure that it would work correctly when the program runs.

The code would still work, but the warning can be avoided altogether by using a prototype.

#include <stdio.h>

void print_for_me();

int main(void)
{
  print_for_me();
  print_for_me();
  return 0;
}

void print_for_me()
{
  printf("Hello, World! \n");
}

By looking at the full program you can see the prototype for print_for_me() exists at the start of the program, but contains nothing. The prototype function shows the compiler how the function should look, and whether it requires arguments or not.

This means that when you call it in the main function, the compiler knows if it is being called correctly and can throw a warning or error if it is needed. This may be something that seems strange now, but knowing about them now will help in future.

Hello world outputting twice through multiple function calls

This program still works without a prototype, but they are good practice to use. The output still looks the same for now, lets change it to make it more personal!

4. Passing Arguments to C Functions

Changing the Script

For this final step, you will ask for the user’s name, and record their input. Then you’ll use it in the function you created before. In C, words are not known as strings like in other programming languages.

Instead, they are an array of single characters. The symbol for an array is [] and the keyword is char. Begin by updating your prototype function at the start of your script:

#include <stdio.h>

void print_for_me(char name[]);

Now, the compiler will know that the function later in the script takes an array of characters called name. So far, this character doesn’t exist. Update your main function to create it, and use it to store the user input:

int main(void)
{
  char name[20];
  printf("Enter name: ");
  scanf("%s", name);

  print_for_me(name);
  print_for_me("Everyone!");
  return 0;
}

The first line in main creates a character array with 20 possible spaces called name. Next, the user is prompted to enter their name using printf. The next line uses a new function called scanf which takes the next word the user types.

The “%s” tells the function that it should store the data as a string, and call it name.

Modifying the Function

Now when you call print_for_me, you can include name in the brackets. On the next line, you will see you can also pass other characters as long as they are between quotation marks. Both times, what is in the brackets gets passed to the print_for_me function.

Modify that now to use the new information you are giving it:

void print_for_me(char name[])
{
  printf("Hello, ");
  puts(name);
}

Here you can see that the brackets have been updated just like the prototype at the start of the script. Inside, you still print hello using printf. A new function here is puts. This is a more advanced version of printf.

Anything put in the brackets will be printed to the console, and a newline (the \n you used earlier) gets added automatically.

Save and compile your code the same way you did earlier—note that you can name the program something different if you do not want to overwrite your earlier program. I named mine hello2:

The finished program in C

As you should see, the program takes the input and uses it in the function, before sending the preset greeting of “Everyone!” again giving two separate outputs to the same function.

The ABCs of C Programming

This program is simple, but some of the concepts in it are not. More advanced C code must be written very well to prevent crashes. This is why many think it is an excellent language to learn first as it instills good habits into new programmers.

Others think learning C++ is a better idea, as it builds on C while retaining its lower system control. One thing is sure: languages like Python are much more beginner friendly. For an old language, C is still used everywhere, but Python may be the language of the future!

Read the full article: How to Learn C Programming With This Beginner Project


Read Full Article

How to Multitask Like a Pro on Chromebooks: 8 Tips and Tricks


multitask-chromebook

Google wants to replace your computer with an operating system that, on the surface, might seem like just a web browser. But when you want to get work done, you need those desktop-grade multitasking tools, and easily switch between multiple apps and windows.

And in spite of what you may believe, Chrome OS has good multitasking support.

1. Check Open Apps With Overview

Chrome OS Overview

The Overview screen, as its name suggests, is a way for you to look at all the active apps. From there, you can quickly locate and jump to another window or close the ones you think are no longer required.

In laptop mode, there are two methods for firing up the Overview page. You could either perform the three-finger swipe down gesture on the touchpad or press the dedicated key available on your Chromebook. It’s usually the sixth button from the left on your keyboard’s top row.

(New to Chromebook? Check our Chromebook beginners guide to get started.)

When your Chromebook is in the tablet position, the Overview screen can be accessed by swiping down at the top of your screen. Switching to the tablet mode also brings a special button at the extreme right on the taskbar for triggering Overview.

2. Manage Two Apps or Windows With Split-Screen

Chrome OS Split-Screen

The split-screen tool is the cornerstone of the Chrome OS multitasking capabilities. For the uninitiated, split-screen essentially means you can place two apps or windows side by side and work on them in parallel.

In tablet mode, split-screen can be accessed by swiping down from the top of your screen and placing the window on either side. Then, you can select which one of the available (and compatible) windows goes on the other side.

In addition, there’s also a line at the center which you can drag in any of the two directions to adjust their sizes.

To put apps in split-screen when your Chromebook is in the laptop position, drag the window to one of the sides and it will automatically occupy half of the screen. Repeat the same gesture to place the second window.

Alternatively, you can employ the keyboard combination, Alt + ] or Alt + [ for docking apps in split-screen. The same can be also done by pressing and holding an app window’s maximize button and dragging it to either side of the screen.

3. Switching Between Apps and Tabs

To instantly hop between apps on Chrome OS, use the universal Alt + Tab shortcut. For doing the same with browser tabs, however, you can use either the Ctrl + Tab combination or swipe left or right with three fingers on the touchpad.

In the tablet mode, unfortunately, you don’t have any options other than going to the Overview screen or pulling up the shelf.

4. Quickly Go Back and Forth in Chrome

Chrome OS Back Gesture

If you’re a Chromebook owner, chances are you spend the majority of your time in the browser juggling between numerous pages and tabs. And if you find yourself reaching for back or forward buttons way too often, here’s how to do it with the touchpad or the touchscreen.

When you’re in the laptop mode, you can go back and forward on Google Chrome by swiping with two fingers to the left or right on the touchpad.

The gesture remains the same for tablets as well except there, you need to swipe with one finger and of course, do it on the display rather than the trackpad.

5. Mastering the Shelf in Chrome OS

Chrome OS App Shortcuts

Customizing the taskbar (labeled “the Shelf”) is equally important as well. There are a couple of personalization options available when you long-press it, such as changing its position, or deciding whether you’d like it to be always shown.

One other Shelf function that can come in handy is app shortcuts. Whenever you long-press an app pinned to the Shelf, you’ll find a couple of quick actions you can quickly perform. For instance, Google Docs has three—New Doc, Templates, and Search.

6. Quickly Preview Files on a Chromebook

Chrome OS Preview Shortcut

You’re probably accustomed to the Files app on Chrome OS but one nifty feature most users overlook is the preview shortcut.

Instead of double-clicking, you can quickly glance over a document or an image on Chrome OS by selecting it and pressing the space bar, similar to macOS. The preview screen will even display additional details such as the file size, resolution, and more.

Chrome OS offers several privacy tools, so don’t forget to secure those files.

7. Turn Web Pages Into Apps

Chrome OS Turn Web Pages into Apps

If there’s a website you often visit, you should create a shortcut for it which lets you launch it in a dedicated window right from the shelf.

First, load the website and in the overview menu, under More Tools, select create a shortcut.The site will then be added to the shelf.

To make sure the site launches in a dedicated window, double-click its icon on the shelf and in the first list, select New Window.

8. Enable the Floating Keyboard

Chrome OS Floating Keyboard

Virtual keyboard taking up too much space in tablet mode? Make it float.

The virtual keyboard on Chrome OS has an option to shrink and turn into a floating one just like its Android counterpart. All you need to do is click the icon in the middle. To return to the original size, press it again.

Switch to the Chrome OS Dev Channel

With more users learning about Chrome OS and its advantages over traditional operating systems, Google has been on an update spree releasing features left and right.

And if you’d like to experience them before anyone, try switching to the developer channel. Understand all the developer channels and their downsides before jumping the gun, though.

Read the full article: How to Multitask Like a Pro on Chromebooks: 8 Tips and Tricks


Read Full Article

Plex teams with TIDAL to bring a discounted streaming music subscription to its media app


Media center app Plex today announced a partnership with streaming music service TIDAL, offering discounted access to TIDAL’s 60 million tracks and 244,000+ music videos for Plex Pass subscribers. The Plex Pass is the media center app’s own subscription program, which adds support for watching and recording from live TV as well as other premium features and advanced controls.

Now, Plex Pass holders will be able to add TIDAL into the mix for $8.99 per month, instead of its usual $9.99 per month price. It’s not a steep discount, but one that could prove compelling for serious Plex users who have already centralized their access to entertainment within the Plex app.

Over the past year or so, Plex has doubled down on its mission to become a one-stop show for all your media, having added support for podcasts, streaming TV (by way of a digital antenna) and a DVR, personalized news, and, most recently, web shows. This is in addition to the software’s ability to organize your home media collections of movies, TV shows, personal video, music, and photos.

The company’s goal is to capitalize on its expansive entertainment library in order to offer better recommendations across media types. That is – it could suggest podcasts or web shows based on the TV or music you enjoy, for example.

Plex customers who add TIDAL will have access to the streamer’s entire music catalog, along with artist recommendations for those who aren’t already in your media library, as well as a feature that will display the missing albums from artists in your library. The service also offers artist radio, discovery radio for finding new tunes from those not in your library, new release recommendations, music videos, and more.

Universal search and playlists features will combine results from Plex’s library and TIDAL, allowing you to locate tracks from your local library alongside TIDAL tracks, and add both to the same playlist.

“An incredible music and media experience is something that matters to both TIDAL and Plex users, and the addition of TIDAL’s music streaming service within Plex makes it the only solution that organizes and curates all major media types in one place,” said Keith Valory, CEO of Plex, in a statement. “It’s another step closer to making all the media that matters to you accessible from one app, on any device, anytime.”

TIDAL will also point its subscribers to Plex as a part of the deal, giving them access to Plex’s music features and mobile app, or, in the case of Tidal HiFi subscribers ($19.99/mo), they get a Plex Pass for free.

Once signed up for TIDAL, Plex users can quickly merge their subscription to Plex from here.

The TIDAL subscription is available on Plex mobile and web to start, with expansion to other TV platforms expected to follow.


Read Full Article

Facebook exempts news outlets from political ads transparency labels


Facebook pissed off journalists earlier this year when it announced that ads run by news publishers to promote their articles involving elected officials, candidates, and national issues would have to sport “paid for by…” labels and be included alongside political campaign ads in its ads transparency archive that launched in June, albeit in a separate section. The News Media Alliance representing 2000 newspapers including the New York Times and NewsCorp plus other new organizations sent a letter to Mark Zuckerberg in June protesting their inclusion. They claimed it would blur the lines between propaganda and journalism, and asked Facebook to exempt news publishers.

Now Facebook has granted that exception. Next year once Facebook has figured out more ways to verify legitimate news organizations who publish with bylines and dates, cite sources, and don’t have a history of having stories flagged as false by third-party fact checkers, they’ll no longer have their US ads appear in the Ads Archive. They also won’t have to carry a “Paid for by…” label when they appear in the News Feed or Instagram. News organizations will still have to verify their identity, but not through the political ads process. This exemption will roll out today in the UK.

The change will also allow news outlets to run “dark post” ads that target specific users but don’t appear on their Pages. This will allow them to secretly test different ad variants without being exposed to potential criticism or competitors looking to copy their ad strategies.

Facebook’s political ads archive of campaign ads will no longer include publications promoting articles about politics or issues

Facebook will be using its recently built news publisher index that outlets can apply to to decide which ad buyers are exempt. That index is up and running in the US and will expand to other countries, but Facebook still wants to build more safeguards against fake news outlets before starting the exemption in the US. For now Facebook is using a third-party list of legitimate UK news outlets who’ll be exempted starting today. Jason Kint of publishers association Digital Content Next tells TechCrunch “We are pleased that Facebook understands and values the important role of news organizations. We have worked cooperatively with Twitter who understood this from the beginning. We look forward to working in a similar fashion with Facebook.”

Facebook’s “Paid For By…” labels will no longer appear on news publishers’ ads on Facebook or Instagram

The change comes as Facebook rolls out enforcement of its political ads transparency rules in the UK today. “Now political advertisers must confirm their identity and location, as well as say who paid for the ad, before they can be approved to run political ads on Facebook and/or Instagram” Facebook tells TechCrunch. These ads will also feature the “Paid for by…” label. Facebook hoped that by self-regulating ads transparency, it might avoid more heavy-handed government regulation, such as through the US’s proposed Honest Ads Act that would bring internet political advertising to parity with transparency rules for television commercials.

The hope is that by determining who is paying for these ads, properly labeling them, and exempting journalists, Facebook will be able to better track foreign misinformation campaigns and election interference. Meanwhile, users will have a better understanding of who’s funding the political and issue ads they see on Facebook.

[Update: This story has been updated to reflect that the news publisher exemption won’t roll out for US outlets until next year.]


Read Full Article

Rolling, hopping robots explore Earthly analogs of distant planets


Before we send any planet-trotting robot to explore the landscape of Mars or Venus, we need to test it here on Earth. Two such robotic platforms being developed for future missions are undergoing testing at European Space Agency facilities: one that rolls, and one that hops.

The rolling one is actually on the books to head to the Red Planet as part of the ESA’s Mars 2020 program. It’s just wrapped a week of testing in the Spanish desert, just one of many Mars analogs space programs use. It looks nice. The gravity’s a little different, of course, and there’s a bit more atmosphere, but it’s close enough to test a few things.

The team controlling Charlie, which is what they named the prototype, was doing so from hundreds of miles away, in the U.K. — not quite an interplanetary distance, but they did of course think to simulate the delay operators would encounter if the rover were actually on Mars. It would also have a ton more instruments on board.

Exploration and navigation was still done entirely using information collected by the rover via radar and cameras, and the rover’s drill was also put to work. It rained one day, which is extraordinarily unlikely to happen on Mars, but the operators presumably pretended it was a dust storm and rolled with it.

Another Earth-analog test is scheduled for February in Chile’s Atacama desert. You can learn more about the ExoMars rover and the Mars 2020 mission here.

The other robot that the ESA publicized this week isn’t theirs but was developed by ETH Zurich: the SpaceBok —  you know, like springbok. The researchers there think that hopping around like that well-known ungulate could be a good way to get around on other planets.

It’s nice to roll around on stable wheels, sure, but it’s no use when you want to get to the far side of some boulder or descend into a ravine to check out an interesting mineral deposit. SpaceBok is mean to be a highly stable jumping machine that can traverse rough terrain or walk with a normal quadrupedal gait as needed (well, normal for robots).

“This is not particularly useful on Earth,” admits SpaceBok team member Elias Hampp, but “it could reach a height of four meters on the Moon. This would allow for a fast and efficient way of moving forward.”

It was doing some testing at the ESA’s “Mars Yard sandbox,” a little pen filled with Mars-like soil and rocks. The team is looking into improving autonomy with better vision — the better it can see where it lands, the better SpaceBok can stick that landing.

Interplanetary missions are very much in vogue now, and we may soon even see some private trips to the Moon and Mars. So even if NASA or the ESA doesn’t decide to take SpaceBok (or some similarly creative robot) out into the solar system, perhaps a generous sponsor will.


Read Full Article

Facebook exempts news outlets from political ads transparency labels


Facebook pissed off journalists earlier this year when it announced that ads run by news publishers to promote their articles involving elected officials, candidates, and national issues would have to sport “paid for by…” labels and be included alongside political campaign ads in its ads transparency archive that launched in June, albeit in a separate section. The News Media Alliance representing 2000 newspapers including the New York Times and NewsCorp plus other new organizations sent a letter to Mark Zuckerberg in June protesting their inclusion. They claimed it would blur the lines between propaganda and journalism, and asked Facebook to exempt news publishers.

Now Facebook has granted that exception. Legitimate news organizations who publish with bylines and dates, cite sources, and don’t have a history of having stories flagged as false by third-party fact checkers will no longer have their ads appear in the Ads Archive. They also won’t have to carry a “Paid for by…” label when they appear in the News Feed or Instagram. The change will also allow news outlets to run “dark post” ads that target specific users but don’t appear on their Pages. This will allow them to secretly test different ad variants without being exposed to potential criticism or competitors looking to copy their ad strategies.

Facebook will be using its recently built news publisher index that outlets can apply to to decide which ad buyers are exempt. That index is up and running in the US and will expand to other countries, but for now Facebook is using a third-party list of legitimate UK news outlets who’ll be exempted.

Facebook’s political ads archive of campaign ads will no longer include publications promoting articles about politics or issues

The change comes as Facebook rolls out enforcement of its political ads transparency rules in the UK today. “Now political advertisers must confirm their identity and location, as well as say who paid for the ad, before they can be approved to run political ads on Facebook and/or Instagram” Facebook tells TechCrunch. These ads will also feature the “Paid for by…” label. Facebook hoped that by self-regulating ads transparency, it might avoid more heavy-handed government regulation, such as through the US’s proposed Honest Ads Act that would bring internet political advertising to parity with transparency rules for television commercials.

Facebook’s “Paid For By…” labels will no longer appear on news publishers’ ads on Facebook or Instagram

The hope is that by determining who is paying for these ads, properly labeling them, and exempting journalists, Facebook will be able to better track foreign misinformation campaigns and election interference. Meanwhile, users will have a better understanding of who’s funding the political and issue ads they see on Facebook.


Read Full Article