02 April 2018

Google is banning all cryptomining extensions from its Chrome Web Store


Google today announced that it will ban any and all browser extensions that mine crypto from its Chrome Web Store.

Mining cryptocurrencies in the browser isn’t the most efficient way for individuals to get rich, but if you are a developer and you get thousands of machines to mine for you, that equation changes in your favor. For the longest time, Google’s Chrome Web Store allowed for single-purpose mining extensions. That is, developers could publish extensions in the store that clearly stated their purpose and that had no other purpose than to mine.

As it turns out, 90 percent of extensions that mine crypto don’t comply with those rules. The lure of cheap Monero is simply to great for some developers, to they try to smuggle their mining scripts into what look like legitimate extensions. Some of those get detected and removed outright and some actually make it into the store and have to be removed later on. Google is obviously not happy with that, since it’s not a great user experience. Those extensions tend to use a good amount of processing power, after all.

So starting today, Google won’t allow any extension that mines cryptocurrencies into the Chrome Web Store and starting in late June, all of the existing extensions will be removed. It’s worth noting that Google will still allow for blockchain-related extensions that don’t mine.

“The extensions platform provides powerful capabilities that have enabled our developer community to build a vibrant catalog of extensions that help users get the most out of Chrome,” writes James Wagner, Google’s product manager for its extensions platform. “Unfortunately, these same capabilities have attracted malicious software developers who attempt to abuse the platform at the expense of users. This policy is another step forward in ensuring that Chrome users can enjoy the benefits of extensions without exposing themselves to hidden risks.”


Read Full Article

Quintacorn Robinhood’s free crypto trading rolls out in Cali, 3 more states


Robinhood is rolling out its Coinbase-killer that’s already helped the fintech startup’s valuation grow 4X in a year. Zero-fee trading of Bitcoin and Ethereum is now available to all investors in California, Massachusetts, Missouri, and Montana. Everyone else is still on the waitlist. Robinhood users everywhere can already track 16 crypto coins including BTC, ETH, Litecoin, and Ripple, as well as trade traditional stocks with no transaction commission.

Announced in January, Robinhood Crypto vastly undercuts Coinbase’s U.S. fees that range from 1.5 to 4 percent. Four million users waitlisted for Robinhood Crypto in the first 5 days after it was announced. It’s lack of fees is proving to be a way to lure both veteran and rookie crypto investors to Robinhood, though it lacks support for trading as wide of a range of coins as Coinbase. Rather than charging per trade, Robinhood earns money from interest on money in users’ accounts and its Robinhood Gold subscription service. For for $6 to $200 a month in subscription fees, users can borrow between $1,000 and $50,000 to trade with.

Robinhood Gold’s success, adding options and web trading, and the new Robinhood Crypto helped the startup attract a $350 million Series D round led by Russian fund DST Global, which a source confirms will value it at $5.6 billion and bring it to $526 million in total funding. That’s up from the $110 million Series C at a $1.3 billion valuation it raised last year.

That massive valuation will put a ton of pressure on Robinhood’s co-CEOs Vlad Tenev and Baiju Bhatt to keep it growing, build out its subscription and interest revenue, and invade the space of competitors. [Disclosure: I know the founders from college] Those include traditional brokers like Scottrade and E*Trade that can charge $7 or more per trade, crypto-specific exchanges like Coinbase, and news sources like CoinDesk.

Robinhood risks a down round if the heightened societal and regulatory skepticism about cryptocurrencies curtail investments from the public. Robinhood’s historical focus on younger, less wealthy investors who aren’t “accredited” could make it especially vulnerable to crypto backlash if users see the space as too volatile or scammy for amateur investors to join. There are also heightened cybersecurity concerns, as users might bail on the app if they fear their cryptocurrency could be stolen.

Robinhood might do well to get more serious about how it offers crypto education. It’s promised to provide a feed of crypto news to keep people informed about why markets are moving, but the crypto journalism space is rife with integrity violations and reporters with questionable expertise. If Robinhood bought or built a truly neutral crypto news source, it could use that to attract investors to its crypto trading platform.

[Disclosre: The author of this article owns small positions in Bitcoin and Ethereum but does not day trade. Detailed disclosures can be found here.]


Read Full Article

How to Capture, Share, and Edit Live Photos on iPhone


“Say cheese” takes on a new meaning with Apple’s Live Photos. Originally introduced with the iPhone 6s in 2015, this feature combines a still image with 1.5 seconds of moving video with sound before and after the shot.

The end result brings a new look to the usual photograph and something reminiscent of Harry Potter, as you can see a brief moment before and after the shot.

While you can capture and view a Live Photo with any modern iPhone or iPad, you can view the results on a number of different devices, including a Mac. We’re taking a closer look at Live Photos and are highlighting how you can use them, how to edit them, how to turn the feature off, and much more.

Taking a Live Photo With an iPhone

To capture a Live Photo with an iPhone, or even an iPad, just start up the built-in Camera app.

After making sure that it’s set to photo mode, you’ll need to confirm that you have Live Photos turned on. To do that, look at the top bar above the main photo viewfinder. The Live Photos icon is two solid circles surrounded by a dotted circle and appears in yellow.

iPhone Live Photos Icon

To turn Live Photos off and just capture a normal image, hit that icon and it will turn white with a circle through it.

If you want your device to remember your Live Photos preference, go to Settings > Camera > Preserve Settings. You can toggle Live Photo on or off and the camera app will remember your preference instead of enabling it every time.

When you’re ready to take a Live Photo, just tap the shutter button like a normal photo. Live will appear above the image viewfinder when capturing.

To take the best Live Photo possible, make sure to keep your device steady for approximately three seconds. While it might take a bit of practice and some coordination with the subject of the photo, you should be able to capture a great Live Photo in no time.

Viewing and Using Live Photos on iPhone

On the iPhone and iPad, viewing Live Photos is easy. You can head to the Live Photos album in the Photos app. Select the photo you want to view and then 3D Touch it (press firmly) to see it come to life.

When using the Photos app on a Mac, there’s a specific Live Photos folder available to view. Double-click a photo to bring it up on your screen, then hover your cursor over the Live text and icon in the bottom-left corner to view the video portion.

If you’d like to share a Live Photo with someone from your iPhone or iPad, just hit the Share icon at the bottom-left of the Photos screen. That will bring up the Share Sheet with a number of different options.

iPhone Live Photo Sharing

The best way to preserve the image and video is to share it with other iOS or Mac users via Messages. As long as they’re running iOS 9 or later, they can see the Live Photo by simply pressing the thumbnail. As a word of warning, if you email a Live Photo, it will only send the still image.

A great way to show off a Live Photo is to set it as your lock screen wallpaper. From the Share Sheet of an image, select Use as Wallpaper and then select Set Lock Screen. Now on your lock screen, 3D Touch the image and it will come to life.

Anyone with an Apple Watch can make a Live Photo into their watch face and fully customize the complications and other information for quick viewing. Watch wearers can simply raise their wrist to see the Live Photo face animate.

Sharing Live Photos With Non-Apple Devices

The situation gets a bit tricky when you’re ready to share a Live Photo to social networks or to non-Apple users.

Most social networks offer limited compatibility for the format. For example, any Live Photo you upload to Facebook can only be viewed by other iOS users in the app. On Instagram, Live Photos convert to the social network’s Boomerang format.

As another option, there are a wide variety of apps that can easily convert a Live Photo into a GIF. The major downside of that format is that you’ll lose both the still image and any sound, but you should be able to share the results almost anywhere.

A great choice is Google’s Motion Stills. The free app can easily convert Live Photos into GIFs and even video collages.

Download: Motion Stills (Free)

Add Effects and Edit Live Photos on iPhone

Just like any photo or video, you can also edit and add fun effects to Live Photos on your iPhone or iPad.

You can select the Live Photo from your photo gallery to begin. To start editing, select Edit on the top- right portion of the screen. From there, you can crop, add filters, adjust the brightness, trim the video portion of the Live Photo, and more.

In the Edit screen, it’s also easy to change the key photo—the frame that appears in your photo library. Move the slider near the bottom of the page to select your key photo. Once your finger moves off the screen, select Make Key Photo.

Select the Live text and icon near the top of the edit screen to turn off the Live Photo effect or just disable the sound.

Starting with iOS 11, Apple has added a trio of fun effects specifically for Live Photos. After opening up a Live Photo, swipe up to see the Effects menu. You have three different options to try out.

As you could probably guess by the name, Loop can turn a Live Photo into a video loop that keeps playing. With Bounce, a Live Photo will play forward and then in reverse for a fun rocking effect. And perfect for situations like fireworks, the Long Exposure option creates an interesting and unique blur effect that you might have seen with DSLR cameras.

Live Photos: A New Way to Capture the Moment

As you can see, Live Photos help bring a fun spark of life to iPhone photography. By just adding a few seconds of video and sound to a still image, the result is something more than just a photo, and an amazing keepsake of a moment in time.

And if you’re inspired to keep improving your photography skills, take a look at our complete guide to digital photography.


Read Full Article

Airplane Mode on Android: Tips, Tricks, and Hacks You Need to Know


Grab any Android phone and you’ll see an airplane mode toggle in the Quick Settings menu. You’ve probably seen this option on every mobile device you’ve owned.

But what does airplane mode actually do? How can you use it to your advantage on your phone? We’ll answer these questions and more.

What Is Android’s Airplane Mode?

Airplane mode is a setting available on nearly all smartphones, laptops, and similar devices. When you activate it, airplane mode stops all signal transmission from your device. You’ll see an airplane icon in your phone’s status bar when it’s on.

The feature is known as airplane mode because many airlines prohibit wireless devices on their planes. There’s some debate on whether phones could interfere with the radio equipment in planes, but most think it’s best to err on the side of caution.

What Does Airplane Mode Do?

Airplane mode disables all wireless functions of your phone, including:

  • Cellular connection: You can’t make calls, send text messages, or use mobile data to access the internet.
  • Wi-Fi: Your phone will drop any existing Wi-Fi connections and won’t connect to any new ones.
  • Bluetooth: Bluetooth is a short-range connection that lets you link your phone to speakers, headphones, and more. Airplane mode disables it.

GPS is a bit different. It doesn’t transmit any radio waves, so depending on your phone, airplane mode may or may not turn off GPS. While apps like Google Maps work without an internet connection, features like live traffic won’t work in airplane mode.

How to Turn Airplane Mode On or Off

Android Enable Airplane Mode

To enable or disable airplane mode on your Android device, follow these steps:

  1. Swipe down from the top of the screen two times to open the Quick Settings panel. Alternatively, you can swipe down once using two fingers.
  2. Look for the Airplane mode toggle in the grid.
  3. Tap it, and your phone enters airplane mode.

Repeat these steps to disable airplane mode. Note that it may take your phone a moment to reconnect to Wi-Fi and cellular data after leaving airplane mode.

If your phone doesn’t have this shortcut for some reason, you can toggle airplane mode at Settings > Network & internet > Airplane mode.

Does Airplane Mode Save Battery?

Yes, airplane mode definitely helps your device save battery life. The various radios in your phone take up a lot of power, as they’re regularly pushing app notifications over Wi-Fi, communicating with Bluetooth devices and cell towers, and checking your location. That all drains a lot of power, so disabling them all at once is a great way to keep your phone alive. Because your phone doesn’t do as much work in airplane mode, it will also charge faster.

Can You Use Wi-Fi on Airplane Mode?

This depends on your device, but most modern phones allow you to use Wi-Fi even when in airplane mode. When you enable airplane mode, Wi-Fi shuts off, but you can enable it again manually.

With airplane mode on, swipe down from the top of the screen twice to open Quick Settings again, then tap Wi-Fi. Give it a few seconds, and you’ll see Wi-Fi turn on and connect if your phone allows this.

Many airline providers now offer in-flight Wi-Fi, so you can enable this feature to enjoy that if applicable. If you’re not sure, you should check with an airline employee before you try connecting. Planes only allow Wi-Fi above 10,000 feet, however, so take care to keep Wi-Fi turned off during takeoff and landing. Even on the ground, this is useful if you’d like to block incoming calls and texts but still want to get online.

Does Bluetooth Work in Airplane Mode?

This is a similar scenario to Wi-Fi. Enabling airplane mode disables Bluetooth, but on most phones you can turn it back on with the shortcut toggle. Airlines don’t care much about Bluetooth, because its range is so short.

Enabling Bluetooth lets you pair your Bluetooth earbuds, keyboard, or similar devices. Even when you’re not in a plane, you can do this to save battery while listening to offline music through Bluetooth headphones.

Does Airplane Mode Use Data?

No, because enabling airplane mode prevents your phone from connecting to your provider’s cell network. You won’t use any data in airplane mode, but it’s an overkill solution for using less data.

How Does Airplane Mode Help With Games?

If you love playing games on your phone but hate the ads, airplane mode can help. Because it disables all internet connections, enabling airplane mode will hide ads in mobile games. However, this won’t work for games that are always-online, so you’ll have to give it a try with your favorites.

Do Alarms Work in Airplane Mode?

Yes, alarms will sound as normal, even in airplane mode. They don’t rely on any kind of internet connection. Open the Clock app and switch to the Alarms tab to set your alarm as normal.

While it can’t return internet results in airplane mode, Google Assistant can still set alarms for you via voice commands.

Does Snapchat Work in Airplane Mode?

No. Because Snapchat relies on an internet connection, it won’t work at all in airplane mode.

Can You Receive Calls and Texts in Airplane Mode?

No, because your phone has no connection to cellular service. If someone calls you and your phone is in airplane mode, they’ll reach your voicemail just like if your phone was turned off. You’ll see texts received when you were in airplane mode once you disable it.

How to Listen to Music on Airplane Mode

Android Listen to Spotify Offline

Since you don’t have an internet connection in airplane mode, music streaming apps like Spotify, Google Play Music, and similar won’t work. This means you have two options for listening to music in airplane mode.

First, if you subscribe to the paid versions of these services, like Spotify Premium or Google Play Music All Access, you can download music to your mobile device. This lets you listen to it even in airplane mode.

If you don’t want to pay for a premium streaming subscription, you can still listen to local music you own. You’ll need to sync your music to your phone, then download one of the best non-streaming music players to enjoy it.

Flying High With Airplane Mode

We’ve answered some of the most common questions about airplane mode on Android. In short, it lets you cease all wireless activity on your phone, which is required on some flights and handy even on the ground.

If you’ve got a long flight coming up, we recommend downloading your media to your phone so you aren’t reliant on an internet connection. And if you’re interested in some science, check out how airplane mode affects your sleep.


Read Full Article

What’s the Difference Between Ubuntu and Ubuntu-Based Distros?


Linux Mint and elementary OS are both popular alternatives to Ubuntu—but they’re also based on Ubuntu. If you’re new to Linux, this can be confusing. Let’s try to clear up what this means and why it matters to you.

The Ubuntu Desktop

Linux Distro, Ubuntu

Ubuntu is a free and open source alternative to commercial, proprietary operating systems such as Windows and macOS. There’s a panel across the top that shows the time, system indicators, and a way to open an overview screen or dashboard that lets you access your apps. There you can also switch between windows and virtual desktops.

There’s a company behind Ubuntu called Canonical. Unlike Microsoft and Apple, Canonical doesn’t make most of what goes into its operating system. Instead, Ubuntu is made of free and open source components that come from individuals and teams from all over the world.

The kernel, which enables software to talk to your computer’s hardware, is Linux. The interface I described above isn’t unique to Ubuntu. It’s actually a desktop environment known as GNOME.

Canonical uses these components to create a functional desktop experience that anyone is free to download. You can use Ubuntu for your general computing, office work, software development, gaming, and running servers.

The Ubuntu Infrastructure

Linux Distro, Ubuntu

Ubuntu is much bigger than the desktop you download from ubuntu.com. It’s a community of developers and users. It’s also a collection of apps and programs gathered from many sources and used in different ways.

Most of the code that powers Ubuntu doesn’t come from Canonical. Ubuntu is based on Debian, a massive project that does the same thing Ubuntu does, only in a way that’s a little less accessible. To clear things up, we’re going to have to establish a few terms.

  • Packages: The way developers distribute software for Linux. Apps, system components, drivers, codecs, and other software come in the form of packages.
  • Package Formats: Different versions of Linux organize packages using different formats. As of yet, there’s no single format that’s compatible with every version of Linux.
  • Repositories: Instead of downloading installers from a website, Linux software is usually found in a repository. Repositories are large collections of packages that you may access and download as needed. Linux App Stores provide software from repositories in an experience similar to what you encounter on Android and iOS. More traditional tools are known as package managers. You can also download software via the command line.
  • Distributions: A distribution is a collection of software packaged in a way that provides a functioning operating system, along with the accompanying community and repositories.

Ubuntu and Debian are both Linux distributions, and Ubuntu uses the same DEB package format as Debian, though software isn’t always compatible between the two. Ubuntu provides its own repositories, but it mostly fills them with packages from Debian.

The Ubuntu Ecosystem

Linux Distro, Ubuntu

Ubuntu comes in many forms. The default desktop utilizes the GNOME desktop environment. There are different “flavors” that use different desktop environments. Kubuntu, for example, uses the KDE Plasma desktop. Xubuntu uses a different interface known as Xfce.

Canonical doesn’t work on these variants, but it does host them and all of their software. They use the same repositories as the default Ubuntu desktop.

There are many distributions based on Ubuntu that Canonical has no relationship with (similar to the way Ubuntu is based on Debian). Linux Mint and elementary OS are two of the most popular examples. They both come from different teams and have their own unique experiences. Linux Mint’s default layout, for example, has much more in common with Windows.

Looks can be deceiving. Underneath, the infrastructure is the same that powers Ubuntu. Likewise, when you open up an app store on Linux Mint and elementary OS, most of the software is the same as what you would get on Ubuntu.

What Does This Mean?

It means when you see a program that mentions Ubuntu support, that support isn’t limited to the Ubuntu desktop. That software will also run on official flavors of Ubuntu and unrelated projects that happen to share the underlying Ubuntu infrastructure. Steam says it works on Ubuntu, but you can run the same installer on Pop!_OS (another Ubuntu-based distro).

If you choose to install elementary OS instead of Ubuntu, you need to know that most of what applies to Ubuntu also applies to you. If Ubuntu doesn’t work on your computer, elementary OS likely won’t either. Similarly, if a game controller isn’t compatible with Ubuntu, chances are it isn’t compatible with your system. When you run into bugs, you may have more luck searching for Ubuntu-related solutions than searching for elementary OS.

Linux Distro, Ubuntu

But things (usually) don’t go in the opposite direction. Ubuntu cannot easily run software designed specifically for elementary OS. To explain this relationship, the Linux community uses the metaphor of a stream. Ubuntu is upstream relative to elementary OS (pictured below). Software runs downstream from Ubuntu. Water only flows one direction.

The further away you get from the source, the more chances to introduce bugs. Debian takes the source code for programs and packages them up into DEBs. Ubuntu restructures these packages and, for some, introduces its own tweaks; elementary OS then adds in a few more changes on its own. When something goes wrong, you now have multiple points on the chain to consider. Does the problem lie with the original source code, Debian, Ubuntu, or elementary OS?

Should You Use an Alternative to Ubuntu?

That depends on your needs and expectations. Here are some questions to consider:

  • Are you happy with Ubuntu? If you’re happy with the default Ubuntu desktop, then stay with what you have.
  • Do you like Ubuntu but not the interface? You can swap out the desktop environment without reinstalling your distro. Or you can choose to install a different flavor of Ubuntu.
  • Do you like the Ubuntu infrastructure but not how it’s managed? If you have problems with Canonical, it may help to use an Ubuntu-based distro provided by a different community. Linux Mint, elementary OS, and Pop!_OS use the Ubuntu infrastructure, but they’re not as impacted by Canonical’s decisions as the official Ubuntu flavors.

If you don’t like the Ubuntu infrastructure, then it may be worth leaving the ecosystem entirely. There are plenty other Linux distros out there with different strengths and weaknesses. They may completely change your impression of Linux.


Read Full Article

5 Essential Tips and Apps for Better iPhone Screenshots


Screenshots have turned into a preferred form of communication. We use them to share a funny conversation or relevant parts of an article. And we use annotated screenshots to point out the craziness that’s happening on our iPhone’s screen.

You might be used to the circle of iPhone screenshots by now. You take a screenshot, go to an app, share the image, and then forget about it while the image takes up space on your iPhone. There’s a better way. And there’s so much more you can do with your iPhone screenshots.

iPhone Screenshot Basics

If you’re using an iPhone with a physical Home button, just press the Home and Sleep/Wake button together to take a screenshot. If you’re using an iPhone X, press the Side button and Volume Up button together for the same effect.

If you don’t want to use the physical buttons to take a screenshot, you can use the AssistiveTouch feature to take a screenshot using an on-screen button. Go to Settings > General > Accessibility > AssistiveTouch to get started.

1. Quickly Share a Screenshot

iPhone Screenshot Preview

If you’re running iOS 11 on your iPhone, you’ll see a little preview of screenshots in the bottom-left corner. Tapping on it will take you directly to the Markup view. Instead, try tapping and holding on the preview.

This will bring up iOS’s traditional share sheet. From here, you can send the screenshot to any of the apps or services using the extensions you’ve enabled. For instance, you can send it to a conversation in WhatsApp, or add it to a note using the Notes app.

2. Quickly Markup and Share

iPhone Markup Screenshots

When you see that screenshot preview in the bottom-left corner, tap on it. It will instantly take you to iOS’s new Markup feature. Here, you can use various tools to annotate the screenshot (more on that below). You can even start doodling on the screenshot using your finger.

Once you’re done, tap on the Share button to share the screenshot to any extension or a nearby device. When you tap on Done, you’ll get two options: Save to Photos and Delete Screenshot. If you’ve already sent the screenshot along to someone, you can choose the Delete Screenshot option. This will help you declutter your Photos library.

Crop

Cropping is the easiest task to do in the Markup feature. When you’re in the editing view, just drag in from the edge of the image, from any corner that you like.

Highlight

When you’re in the Markup view, tap on the Plus (+) button and then select the square or circle button from the bottom row.

This will bring up a box on the screen. By default, it will be black. Tap on the color box to change the color. You can also change the thickness of the box.

Arrows

From the Plus (+) menu, tap on the Arrow button. You can change the thickness and the style of the arrow from the menu button below. To resize it, simply drag from either end of the arrow.

Add Text

From the Plus (+) menu, select Text. Then tap on the box and select Edit to edit the text. Touch the Aa button to change the font style, font size, and alignment.

Zoom In

Markup has a pretty cool zoom feature. From the Plus (+) menu, select the Magnifier option. You’ll see a circle show up in the center of the screen that you can drag around as needed. This tool provides two round icons on the edge. Swipe on the blue icon to change the size of the magnifier; the green icon lets you change the zoom level.

3. The Best Third-Party Annotation App: Annotable

iPhone Annotable Annotations

While iOS 11’s Markup feature is super easy to use, it lacks a plethora of useful tools. Annotable fills in the gaps.

Using this third-party app, you can quickly pixelate parts of the image or highlight them. But the app has an even cooler trick up its sleeve. If you’ve got text in the screenshot that you want to highlight, just select the abc tool and swipe on the text. Doing so will magically highlight the words. Similarly, you can retract only text from the images using the Retract tool.

However, the app’s UI isn’t the best in the world. When you tap the tools icon in the bottom-right corner, you’ll be greeted with a potentially overwhelming five lines of tools (this depends on which tools you’ve paid for).

Download: Annotable (Freemium)

4. Stitch Screenshots

iPhone Stitch Screenshots Tailor

Using Tailor, you can stitch multiple iPhone screenshots together to create one long screenshot. This is especially helpful when you want to take a screenshot of an IM conversation, a website, or a task list. Instead of sharing multiple small screenshots, you can just share one long, all-encompassing image.

Tailor app is smart enough to recognize bottom navigation bars and it removes them automatically. Just take multiple screenshots, making sure that there’s a little overlap with each, and open Tailor. The app will automatically scan your screenshots, find the related screenshots, and stitch them for you. All you have to do is tap on the Share button.

Download: Tailor (Free)

5. Create Your Own Screenshot Workflows

iPhone Combine Screenshots Workflow

The Workflow app (which was recently acquired by Apple and is now free to use) is a great way to create your own iPhone screenshot workflows. Workflows lets you stitch together a series of actions.

So you can, for example, create a workflow that takes multiple images, stitches them together side-by-side with a gutter of 10 pixels, converts the image to JPG or resizes it to a particular resolution, then shows you the end result. And once it’s set up, the whole process takes only a few seconds.

Let’s create a simple workflow for stitching two images side-by-side:

  1. After opening the Workflow app, tap on the Plus (+) icon and swipe right to reveal a list of all available actions.
  2. Drag in the Select Photos action (turn on the Select Multiple option).
  3. Then add the Combine Images action. Here, stick with the Side-by-Side and Horizontal options. If you want, you can add a 10px spacing between the images.
  4. Lastly, add the Save to Photo Album action so that the generated photo is automatically saved to your Camera Roll.

Now, tap on the Play button at the top to start the workflow. You’ll be asked to select multiple photos, then the app will stitch them and save them to your photo library. You’ll see a preview of the final image at the bottom. Tap on the Gear icon to give the workflow a name, and you can even add it to the Home screen for quick access.

Download: Workflow (Free)

This was just a simple example. There’s a lot more that Workflow can do. We recommend spending some time exploring the iPhone Screenshot Preview library. By the way, you don’t need to write your own workflows for doing simple actions! You’ll find entire libraries of workflows that you can easily import into the app.


Read Full Article

Music app Genius launches its own take on Stories, aided by YouTube


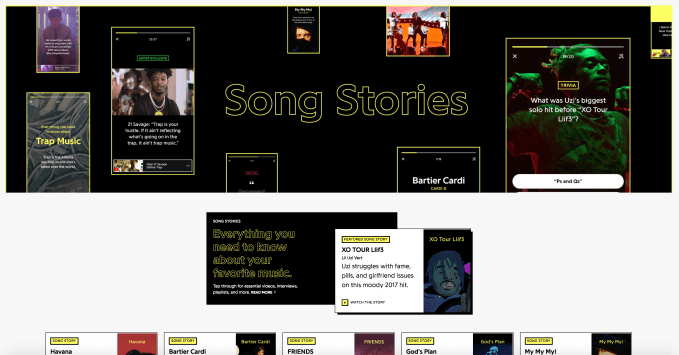
Genius, the big database of song lyrics and musical knowledge, is today launching its own version of “stories,” the Snapchat and Instagram-like short form sharing format that’s been rapidly spreading to a number of sites and apps, including Facebook, Messenger, Skype, and even Google. Genius’ “Song Stories,” as the new product is called, combine Genius artist interviews with YouTube content like concert footage, music video clips, and playlists.

As the user moves through the story, they’ll see the sort of behind-the-music details that Genius is known for, but in a more interactive format.

If you’re already familiar with Instagram Stories or Snapchat Stories, you’ll find Song Stories easy to use as well.

As you listen to the song, you can tap to advance through the cards in the Story, tap and hold to pause a card, or do nothing and watch the story advance automatically, appropriately synced with the music.

On some of the cards, you’ll also be able to swipe up to access additional YouTube content directly.

For example, a Song Story might point you to other YouTube videos to watch, like concerts, covers, interviews with the artist, themed playlists, and more.

The collaboration between Genius and YouTube is notable, given YouTube’s plans to launch a revamped premium subscription service in the near future. A deeper integration with Genius could be a competitive advantage for YouTube.

And while nothing was announced in terms of a YouTube product today, this launch signals a closer and productive working relationship between two companies – despite the fact that Genius already works with YouTube Music’s competitor Spotify to power its “Behind the Music” feature.

“At YouTube we’re working every day to push the envelope and find new ways to enhance the overall music experience by better connecting artists and fans,” said Lyor Cohen, YouTube’s Global Head of Music, in a statement. “This project with Genius provides a more immersive way to explore music—it’s the perfect example of innovating in pursuit of this goal.”

“Genius and YouTube, the two biggest sources of musical deep cuts and rabbit holes on the planet, are natural collaborators on this mission,” added Ilan Zechory, Genius’s co-founder and president.

Not all bands and artists have been given the Song Story experience, however.

At launch, there’s a Gallery of Stories available on the Genius website, featuring artists like Lil Uzi VertCardi B feat. 21 SavageJoy DivisionTroye Sivan, and others. It remains to be seen how widely the Story format will roll out across the Genius database of song info going forward.


Read Full Article

YouTube launches a shorter, skippable ad format


YouTube today is introducing a new ad format that will allow viewers to skip even shorter ads. Called “TrueView for reach,” the format arrives around two years after YouTube’s introduction of the six-second bumper, which the company says advertisers have learned how to best use to raise brand awareness, despite having only a few seconds to tell their story. Now, advertisers will have the option to build ads as short as 6 seconds, which can be skipped after 5.

However, most advertisers will build ads a bit longer than that, though under the 30-second mark required by TrueView in-stream ads.

With the existing TrueView in-stream ads, which air before or during a video, advertisers only pay when the viewer watches at least 30 seconds or to the end of the video, or they take action by clicking on a card or other elements of the creative to learn more.

TrueView for Reach, meanwhile, is meant to combine the best of both worlds – the short-form bumper ads, and the user choice offered through the in-stream format.

“TrueView for reach brings our popular in-stream format built on user choice together with the simplicity of CPM buying,” says YouTube, in an announcement. “Optimized for efficient reach, this format can help you to raise awareness among a broad set of customers — and do so within our 95% viewable and 95% audible environment.”

The company says that during beta testing the format across 84 campaigns, 9 out of 10 drove a significant lift in ad recall, with average lift of nearly 20 percent.

Samsung Electronics America said it was able to reach 50+ percent more people at half the CPM with TrueView for Reach, when it tested the format, while Pepsi France said that format helped deliver high reach, but also high completion rates for its 10-second video.

“Moreover, CPMs proved to be more competitive: we saw 30% lower CPMs on average compared to previous campaigns. This ultimately drove lower average costs on incremental reach points: -46% versus TV on specific target audiences,” explained Vanessa Tsangaratos, Digital Marketing Manager at Pepsi France.

The expansion of ad format options for YouTube is becoming even more critical to brands and advertisers, given the continued rise in cord cutting and adoption of subscription video on demand services, like Netflix, which are ad-free.

As YouTube notes in a blog post, advertising was simpler in the TV era – you’d just find the most popular shows, and place your brand there in the commercial breaks. Now advertisers are trying to find a place to gain attention for their brand in a far more complex landscape – there are video ads not only on streaming services like Hulu, but also on live TV services, on YouTube and even on social media, like Facebook and Instagram.

The goal is to now find a place to advertise where you can actually capture users’ attention.

YouTube claims it’s that place, of course. It cites a recent Ipsos study that found people are 3 times more likely to pay attention to online video ads compared with TV ads.

TrueView for reach is not the only TrueView option for YouTube advertisers. The newer TrueView for action is also available for those advertisers who want to customize a call-to-action that’s important to their business, like leads or referrals.


Read Full Article

How to Check Your Kodi Box for Electrical Safety


Kodi boxes come in many different shapes and sizes. In fact, there are so many it can be difficult to choose the right Kodi box. Often, people make their decision purely based on cost.

The desire to save money creates problems. Many users just opt for a cheaply manufactured device (usually made in China). After all, there’s nothing special about a Kodi box, it’s just a set-top box running the Android TV operating system. So, why not?

Sadly, the low-cost boxes from the Far East are frequently riddled with electrical issues. They’re just not safe to use.

How can you ensure you’re not going to send your home up in flames? We’re going to explain why many Kodi boxes aren’t safe, and then show you how to check your Kodi box for electrical safety. Keep reading to find out more.

Kodi Boxes Aren’t Always Safe

Unless you have a top-of-the-range Android TV device—such as the Nvidia Shield,
the ultimate tool for cord-cutters
—there’s a reasonable chance that your Kodi box is not safe from an electrical perspective.

The discovery was uncovered by a non-profit group in the United Kingdom called Electrical Safety First. It’s a sub-division of the country’s Electrical Safety Council and is responsible for campaigning around issues about the topic.

The group tested nine of the most common Kodi boxes found in the UK. Amazingly, it found that all nine failed its safety tests.

For balance, it’s important to note that the tests were a joint venture between Electrical Safety First and the Federation Against Copyright Theft (FACT). However, given the results, we don’t think there’s anything conspiritorial at play here.

Here’s what Steve Curtler, the Product Safety Manager at Electrical Safety First, told the The Independent after the results became public:

“Given the nature of the safety issues we found, the worst-case result of one of the devices malfunctioning would be for a fire to break out, causing severe property damage and even fatalities, and of course fatalities from electric shock […] We urge anyone with one of these devices to unplug it and stop using it immediately.”

Kieron Sharp, Director General of FACT, added his voice, saying “It should now be clear that the dangers these illegal devices pose far outweigh any benefit of buying them.”

Some recall notices have already gone out. In June 2017, the European Union issued a recall for a Chinese-made Android TV box amid reports its design left users at risk of electric shock. The OTT TV Box 4K had a faulty power unit which did not comply with the E.U.’s Low Voltage Directive.

What Are the Electrical Safety Regulations?

Electrical safety regulations vary around the world. Usually, they are based on one of two standards: The National Electric Code or the International Electric Code.

The United States

In the United States, the National Electrical Code (NEC) is the document that outlines electrical safety and best practices. It attempts to codify the minimum requirements for safe electrical equipment. It is updated every three years.

The code is not law at the federal level. Instead, it is up to individual states to implement it. If a state has applied the NEC, it is illegal not to follow the rules. At the time of writing, only Arizona, Kansas, Mississippi, and Missouri have not implemented the code.

The code’s rules are complex and beyond the scope of this piece. If you’d like more information, check out the full document on the National Fire Protection Association website.

us electrical code

The United Kingdom

Most of the rest of the world, including the United Kingdom and the European Union, uses the International Electrical Code.

The British parliament has also passed various pieces of legislation to govern electrical equipment on a national level. The most recent update to the rules happened in 2016.

If you’d like to learn more, you can download the Electrical Equipment Safety Regulations 2016: Guidance document from the government’s website.

How to Check Your Kodi Box’s Safety

Okay, so now you know that some—if not most—Kodi boxes are potentially dangerous. However, that doesn’t help if you already have one in your home. So, how can you tell whether your device is safe?

Just follow these five tips from the Electrical Safety First group.

1. Check for a Brand Name

Lots of cheap Kodi boxes you find online—especially fully-loaded ones—will not have a brand name. This is because they’re white label products that are being manufactured for mere cents-per-unit in Far Eastern factories.

Schedule 3 in the Electrical Equipment (Safety) Regulations 1994 states that a manufacturer’s brand name or trademark must be visible on the device for it to be sold legally.

2. Look for a CE Mark or FCC Label

The CE (Conformité Européenne) marking is a certification mark. It indicates a product is safe to sell in the European Economic Area from a health, safety, and environmental standpoint. The FCC Label is the US equivalent.

Many products made outside the E.U. and United States have the markings, especially if they’re going to be sold within the respective markets.

A failure to see one of the two marks means that either a) the product failed the country’s electrical safety tests, or b) the product was never supposed to be sold in the respective locations and the seller is breaking the law in doing so.

Note: There have been cases of forged CE and FCC marks. Don’t assume that your device is safe just because you see one. Complete all the other recommended checks.

3. Check Output Voltage and Current Ratings

Countries use a wide array of voltage and currents in their electric supply. Voltage can range from 110V to 240V, and plugging the wrong device into the wrong supply can cause problems.

Even if the box works at first, you will have to deal with overheating, excessive workloads, and an over/under supply of power, all of which are a fire hazard.

You also need to make sure the output voltage and current ratings on the box’s power supply unit and the box itself are the same.

4. Measure the Pin Plugs

Ideally, you need at least 9.5mm between the edge of the plug’s pins and the edge of the charger. If the gap is less, you risk getting an electric shock when connecting and disconnecting the device.

Note that 9.5mm is about the width of a ballpoint pen.

5. Documentation

Lastly, try to remember whether your device came with full documentation.

By law, all products sold in the European Union and North America all need to come with instructions about safe use, the limitations of use, and how to dispose of the device safely.

Is the Research Legitimate?

We know a few of you will have immediately groaned as soon as you read that FACT were involved in the study.

And while there could be an ulterior motive to the research, the facts remain true. The group tested nine of the most common Kodi boxes in the UK and all nine failed.

We’re not going to debate the rights and wrongs of using Kodi for illegal purposes, but you would be wise to pay heed to the findings, especially if you have a cheap fully-loaded Kodi box sitting in your home. The risk of not doing so is just not worth it.

If you’d like to learn more about the legality of streaming content on Kodi, check out our list of online resources explaining copyright law.


Read Full Article
Zuckerberg fires back at Tim Cook, opens up about fake news


Zuckerberg has been on a bit of a publicity tour following the Cambridge Analytica scandal and a generally tough year for the social media behemoth.

This morning, an interview with Zuck was published on Vox. In it, the Facebook CEO waded through some of the company’s most pressing issues, including how to deal with fake news and help support good journalism and how to deal with governing a community of 2 billion people. Zuck also clapped back at Tim Cook who has criticized Facebook’s model of generating revenue through advertising.

Fake News

On the problem of Fake News and transparency in the past:

It’s tough to be transparent when we don’t first have a full understanding of where the state of some of the systems are. In 2016, we were behind having an understanding and operational excellence on preventing things like misinformation, Russian interference. And you can bet that that’s a huge focus for us going forward.

On how Facebook is trying to serve up content, including news content, that is meaningful to users:

The way that this works today, broadly, is we have panels of hundreds or thousands of people who come in and we show them all the content that their friends and pages who they follow have shared. And we ask them to rank it, and basically say, “What were the most meaningful things that you wish were at the top of feed?” And then we try to design algorithms that just map to what people are actually telling us is meaningful to them. Not what they click on, not what is going to make us the most revenue, but what people actually find meaningful and valuable. So when we’re making shifts — like the broadly trusted shift — the reason why we’re doing that is because it actually maps to what people are telling us they want at a deep level.

Zuck was also asked about supporting news organizations, as some slice of Facebook’s revenue comes from users consuming news on the platform:

For the larger institutions, and maybe even some of the smaller ones as well, subscriptions are really a key point on this. I think a lot of these business models are moving towards a higher percentage of subscriptions, where the people who are getting the most value from you are contributing a disproportionate amount to the revenue. And there are certainly a lot of things that we can do on Facebook to help people, to help these news organizations, drive subscriptions. And that’s certainly been a lot of the work that we’ve done and we’ll continue doing.

He also addressed that subscriptions might not work for local news, which the CEO believes are equally important:

In local news, I think some of the solutions might be a little bit different. But I think it’s easy to lose track of how important this is. There’s been a lot of conversation about civic engagement changing, and I think people can lose sight of how closely tied that can be to local news. In a town with a strong local newspaper, people are much more informed, they’re much more likely to be civically active. On Facebook we’ve taken steps to show more local news to people. We’re also working with them specifically, creating funds to support them and working on both subscriptions and ads there should hopefully create a more thriving ecosystem.

In Reaction to Tim Cook

In an interview last week, the Apple CEO said that tech firms “are beyond” self-regulation. When asked what he would do if he was in Zuckerberg’s position, Cook said “I wouldn’t be in this situation.” The CEO has long held that an advertising model, in which companies use data around users to sell to brands, is not what Apple wants to become.

“They’re gobbling up everything they can learn about you and trying to monetize it,” he said of Facebook and Google in 2015. “We think that’s wrong. And it’s not the kind of company that Apple wants to be.”

Zuck was asked about Cook’s statements in the interview:

You know, I find that argument, that if you’re not paying that somehow we can’t care about you, to be extremely glib. And not at all aligned with the truth. The reality here is that if you want to build a service that helps connect everyone in the world, then there are a lot of people who can’t afford to pay. And therefore, as with a lot of media, having an advertising-supported model is the only rational model that can support building this service to reach people.

That doesn’t mean that we’re not primarily focused on serving people. I think probably to the dissatisfaction of our sales team here, I make all of our decisions based on what’s going to matter to our community and focus much less on the advertising side of the business.

Zuck even took the opportunity to clap back at Cook a bit, saying we shouldn’t believe that companies trying to charge us more actually care about us.

But if you want to build a service which is not just serving rich people, then you need to have something that people can afford. I thought Jeff Bezos had an excellent saying on this in one of his Kindle launches a number of years back. He said, “There are companies that work hard to charge you more, and there are companies that work hard to charge you less.” And at Facebook, we are squarely in the camp of the companies that work hard to charge you less and provide a free service that everyone can use.

I don’t think at all that that means that we don’t care about people. To the contrary, I think it’s important that we don’t all get Stockholm Syndrome and let the companies that work hard to charge you more convince you that they actually care more about you. Because that sounds ridiculous to me.

The Government of Facebook

Vox’s founder and Editor-at-Large Ezra Klein brought up something Zuck said in an earlier interview, that Facebook was more like a government than a traditional company. Zuck explained that disputes over what content is admissible on Facebook has grown to a scale that requires a certain level of governance.

But I think it’s actually one of the most interesting philosophical questions that we face. With a community of more than 2 billion people, all around the world, in every different country, where there are wildly different social and cultural norms, it’s just not clear to me that us sitting in an office here in California are best placed to always determine what the policies should be for people all around the world. And I’ve been working on and thinking through, how can you set up a more democratic or community-oriented process that reflects the values of people around the world?

That’s one of the things that I really think we need to get right. Because I’m just not sure that the current state is a great one.

On how Facebook could prepare for its own overwhelming scale:

One is transparency. Right now, I don’t think we are transparent enough around the prevalence of different issues on the platform. We haven’t done a good job of publishing and being transparent about the prevalence of those kind of issues, and the work that we’re doing and the trends of how we’re driving those things down over time.

And on long-term goals for governance:

But over the long-term, what I’d really like to get to is an independent appeal. So maybe folks at Facebook make the first decision based on the community standards that are outlined, and then people can get a second opinion. You can imagine some sort of structure, almost like a Supreme Court, that is made up of independent folks who don’t work for Facebook, who ultimately make the final judgment call on what should be acceptable speech in a community that reflects the social norms and values of people all around the world.

You can read the full interview at Vox.com.


Read Full Article

How to Remove the Unity Desktop After Upgrading to Ubuntu 17.10

The 3 Most Important Ways to Tag Someone on Facebook


Wondering how to tag someone on Facebook? Tagging is an important part of using the social media service as it allows you to notify others that you’ve mentioned them, among other uses.

Let’s take a quick look at some of the most important ways you can tag others on Facebook. Note that your friends’ privacy settings may affect some of these.

1. Tagging in Status Updates

Whenever you post a status update, you can tag your friends by typing an @ symbol followed by their name. As you type, a small window appears and updates automatically to show the best match for the text you’ve entered. Click someone’s name and it will appear highlighted in blue on your post. This means you’ve successfully tagged them.

You can actually tag people other than friends by doing this, including friends of friends, businesses, and more. And this works for tagging others in comments, too. Just be aware that tagging someone will make your post visible to their friends.

2. The “Who Are You With?” Feature

Facebook allows you to add several elements to your posts, including polls, requests for recommendations, and moods. Click the Tag Friends option, and you’ll see a new With box below your post. Enter one or more names here and your post will include them at the end of your post.

While the above method lets you tag anyone in a post, this lets you tell your audience that you were with specific people. Thus, it only allows you to tag your friends.

3. Photo Tagging

Tagging friends in photos lets others easily identify them. It also adds those photos to the Photos of You section for anyone in the picture. Open any Facebook photo and if there’s a face inside, Facebook will add a show a box when you mouse over it. Click in the text field below and enter the person’s name to tag them.

If the box doesn’t show up, click Tag Photo at the bottom of the screen and drag a box over the person’s face. Then enter their name to tag them.

Take a look at our beginner’s guide to Facebook to learn more.

Image Credit: Mactrunk/Depositphotos


Read Full Article

How to See Your Entire Windows Upgrade History as a List


Have you ever wanted to refer back to an old Windows upgrade you installed? It’s easier said than done.

You can see the most recent handful of updates in the Settings app (go to Update and Security > Windows Update > View Installed Update History), but it doesn’t show system-wide upgrades (such as moving from Windows 7 to Windows 10 or installing the Fall Creators Update).

So what options do you have?

Well, there are actually two ways you can see all the upgrades that you have installed on your system. They’re just very well hidden and not so well known. In this quick article, we’re going to show you both methods. Keep reading to find out more.

Method 1: Use the Windows Registry

To see you update history using the Windows Registry, follow the step-by-step guide below.

  1. Press Windows + R.
  2. Type regedit.
  3. Press Enter.
  4. Navigate to Computer\HKEY_LOCAL_MACHINE\SYSTEM\Setup.
  5. Check the SourceOS keys.

As you can see from the image above, my last upgrade was on 21st October 2017, I installed build number 15063, and installed it in the C:\Windows path.

Warning: The Registry Editor is a powerful tool. Making incorrect changes could have serious consequences for your system. Proceed with caution and always make sure you back up your Windows registry before making any changes.

Method 2: Use PowerShell

You can also use PowerShell to find similar information. To begin, launch PowerShell by pressing the Windows key and running a search.

When you’re looking at the PowerShell screen, enter the following code and press Enter:

$AllBuilds = $(gci "HKLM:\System\Setup" | ? {$_.Name -match "\\Source\s"}) | % { $_ | Select @{n="UpdateTime";e={if ($_.Name -match "Updated\son\s(\d{1,2}\/\d{1,2}\/\d{4}\s\d{2}:\d{2}:\d{2})\)$") {[dateTime]::Parse($Matches[1],([Globalization.CultureInfo]::CreateSpecificCulture('en-US')))}}}, @{n="ReleaseID";e={$_.GetValue("ReleaseID")}},@{n="Branch";e={$_.GetValue("BuildBranch")}},@{n="Build";e={$_.GetValue("CurrentBuild")}},@{n="ProductName";e={$_.GetValue("ProductName")}},@{n="InstallTime";e={[datetime]::FromFileTime($_.GetValue("InstallTime"))}} };

Now enter the following code and once again press Enter:

$AllBuilds | Sort UpdateTime | ft UpdateTime, ReleaseID, Branch, Build, ProductName

The results will show you all the previous Windows versions that were installed on your machine in a table. You’ll see both Windows 10 upgrades and upgrades from Windows 7 or 8 to the current release.

If you’re still not sure whether upgrading to Windows 10 is right for you, check out some the operating system’s most overlooked features. You’ll definitely be impressed.


Read Full Article

What Apple’s education announcements mean for accessibility