17 August 2018
Google gives its AI the reins over its data center cooling systems
The inside of data centers is loud and hot — and keeping servers from overheating is a major factor in the cost of running them. It’s no surprise then that the big players in this space, including Facebook, Microsoft and Google, all look for different ways of saving cooling costs. Facebook uses cool outside air when possible, Microsoft is experimenting with underwater data centers and Google is being Google and looking to its AI models for some extra savings.
A few years ago, Google, through its DeepMind affiliate, started looking into how it could use machine learning to provide its operators some additional guidance on how to best cool its data centers. At the time, though, the system only made recommendations and the human operators decided whether to implement them. Those humans can now take longer naps during the afternoon, because the team has decided the models are now good enough to give the AI-powered system full control over the cooling system. Operators can still intervene, of course, but as long as the AI doesn’t decide to burn the place down, the system runs autonomously.
[gallery ids="1693037,1693038,1693039,1693040"]The new cooling system is now in place in a number of Google’s data centers. Every five minutes, the system polls thousands of sensors inside the data center and chooses the optimal actions based on this information. There are all kinds of checks and balances here, of course, so the chances of one of Google’s data centers going up in flames because of this is low.
Like most machine learning models, this one also became better as it gathered more data. It’s now delivering energy savings of 30 percent on average, compared to the data centers’ historical energy usage.
One thing that’s worth noting here is that Google is obviously trying to save a few bucks, but in many ways, the company is also looking at this as a way of promoting its own machine learning services. What works in a data center, after all, should also work in a large office building. “In the long term, we think there’s potential to apply this technology in other industrial settings and help tackle climate change on an even grander scale,” DeepMind writes in today’s announcement.
Read Full Article
How to Stop Switching To-Do Apps (And Find the One You’ll Love Instead)

The list of to-do list apps on the market is endless. Both major app stores are crammed full of task management software that claims to solve your to-do list woes.
For first-timers, there’s a healthy selection to choose from. But for those who have a habit of switching to-do apps, the problem only adds complexity.
Switching to-do list apps on a whim has become a routine for many, and that’s not good for our productivity. Let’s explore the downsides to switching apps and how you can find the perfect to-do list application for yourself.
Do You Have Shiny New Toy Syndrome?
Chances are if you’ve installed a to-do list application it won’t have been your first.
Popular task management solutions include TickTick, Todoist, Wunderlist, Microsoft To-Do, Any.DO, Things 3, 2Do and many more. Switching to-do list applications isn’t a crime. But it must be regulated.
Regular switches for the sake of a feature can be damaging to your workflow. Many people compare moving to a new application to a house move. Bringing all of your details, information, and tasks with you. And once you’re in, changing all the rooms to your liking. Moving apps can be time-consuming!
It can stall your productivity. By stopping and starting you can put pressure on your time. But it’s not all doom and gloom. Many people have switched with hugely successful results. And in some cases, it’s needed!
It’s all about evaluating your need to switch. From here, you can decide whether switches are needed and suitable for your work. And that’s valuable as you move forward with any productivity software.
How Do I Find My Perfect To-Do List App?
Helping productivity app fans on a daily basis with their app decisions is one part of our routine.
When it comes to task managers, I’ve seen people commit to paying for expensive software, just then a week later, seeing a flaw and switching applications. It’s scary when money is spent. With the majority of cases, the decisions tend to be rushed. The right decisions can save money.
You need just three keys to find your idea to-do list app:
The first key is patience. Patience can help when it comes to decision-making. The number one mistake is impulsive experimenting before you explore the full feature set.
The second key is your needs. What are your needs? Why are you looking for a new to-do list application? Is it for work or personal, or both? Shortlisting based on your needs will pay dividends.
The third and final key is testing. Light testing of your application across a one week period will give you a better insight. Spending hours setting up your optimum layout won’t solve anything. It should all be about your process, not anything else. This will prove whether your solution stands the test of time.
Step 1: Get to Know Your Needs
Determining what type of resource you need is a good starting point. These four types help distinguish the style of features. There’s no ideal target here, it’s about what’s working for you in this current scenario in time.
- Light Personal: Perfect for simple list taking and no sharing needs.
- Light Professional: Perfect for basic task management with sharing with team members.
- Heavy Personal: Perfect for advanced users, with no sharing abilities.
- Heavy Professional: Perfect for project management purposes with teams.
This breakdown will help to confirm what you are looking for before you jump in. Of course, you’ll change over time as you expand or downsize your use of your task management software.
Let’s explore examples for each style of application, with a few other notable recommendations.
Light Personal: Google Tasks
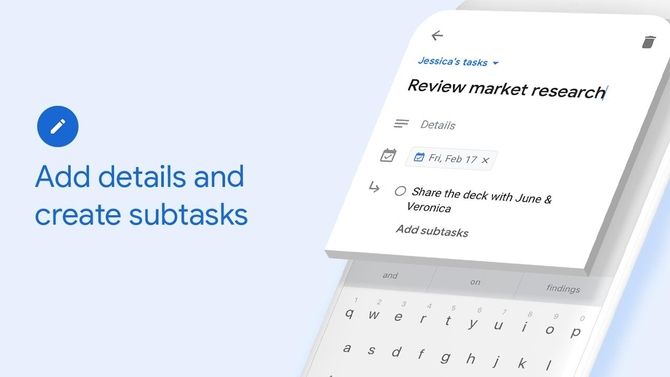
Google Tasks provides all you need for adding simple tasks. Add due dates, sub-tasks and task notes. It makes a great light personal thanks to its simplicity. You can access Tasks via the iOS and Android app, or on Gmail for Web. If you’re looking for a dead-simple task manager, this is one of your best bets!
Other recommendations for light personal task managers:
Light Professional: Trello

Trello is a favorite productivity application used by millions every day. The great thing about Trello is the way you can manage any task in your life. Organize them into “cards” and then easily create boards for your projects. Then when comes to sharing with teams, simply share your board.
Other recommendations for light professional task managers:
Heavy Personal: Things 3
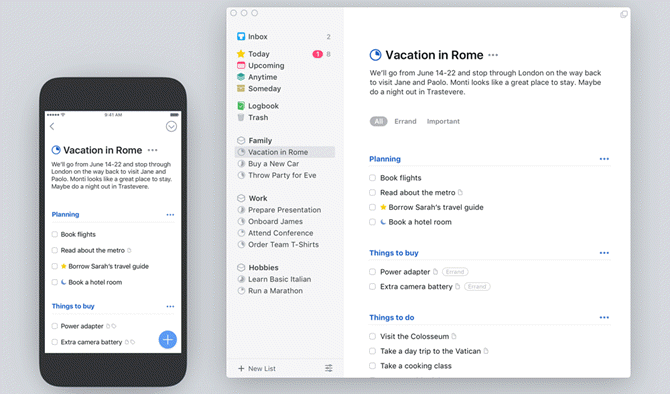
Things 3 is one of the most well-designed to-do list applications on the market. Things 3 springs to life with its reactive design and range of features. It has won the hearts of many Mac and iOS users as a great way to organize tasks. With the ability to implement things like GTD it’s a favored tool for boosting personal productivity.
Other notable recommendations for “heavy personal” task managers include:
Heavy Professional: Todoist
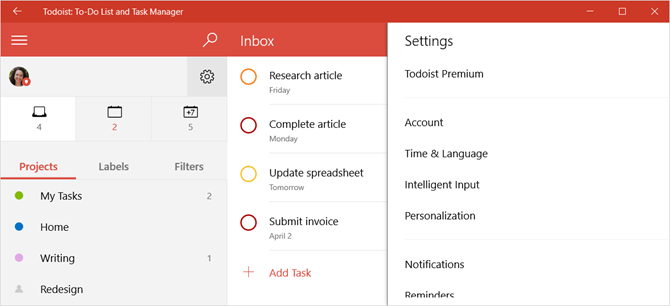
Todoist is one of the more advanced to-do list applications out there. The features range from due dates, sub-tasks, projects, labels and even filters. You can share tasks with colleagues, really easily! It’s actually my to-do list app of choice. It’s a very versatile solution ideal for a range of professionals and even students.
Other recommendations for “heavy professional” task managers:
Step 2: It’s Time to Shortlist
Once you’ve found your type of resource. Next up is the actual features inside of the tools. This is very much dependant on what features you need to get things done. Do you traditionally work well with kanban boards? Or even labels to help organize tasks?
One person might be interested in one feature, whilst others prefer another. It’s totally open to discussion.
First things first, take some time to shortlist the top five applications that match the features you need. Use some paper totally the top five pros and cons for your needs, for each application.
This exercise will help you to draw out the initial flaws from your website research scramblings.
- Examples of Pros: Strong design, Pomodoro timer included, labels, sub-tasks ability, cheap premium.
- Examples of Cons: Works only on Android, locked under premium, bad support reviews, lacks priority tags, fixed menu.
From this analysis, you should get a well-rounded opinion of the advantages and drawbacks. Time to pick.
Step 3: Try It for One Full Week
Picking the resource with the best pros and the weakest cons might be harder than it looks.
Once you’re there, it’s time to trial for one full working week.
The working week will help put your application into the spotlight. Bringing your attention to game-changing flaws or struggles. This full 5-day period should help gather your thoughts on the application without committing to the resource.
Most major to-do list applications have some form of trial for their premium, giving you enough time to run this small experiment. Use the application until the full week wraps up.
Exercise time.
Grab a pen and paper and re-write your pros and cons based on your week-long experience.
After this, move onto your next application in the top five list. After another week, write the pros and cons for this application. Place these two applications against each other to determine what you’ll be going for.
Determining between these two will only help put things in perspective. If these two don’t make the cut, only explore one more application. If you’ve been into three of your top five, chances are you’ll need to repeat your research into what type works for you.
Getting the Best Results From Your Search
The more time invested in research, the better.
Spending the time beforehand investigating the pros and cons will curb your impulsive streak, help you improve decision-making and lead to a longer-term solution. The time saved from pausing to research will save your hours in the future changing resources.
These final tips and recommendations should help when you commence the search:
- YouTube: Visually seeing an application saves time. There are countless videos online covering apps and software. A lot of them give opinions and insights into personal experiences, which is perfect.
- Pen and paper: If you’re not with a to-do list application before you start. Keep tallying your task list on paper. This non-bias service will help you to keep focused and avoid
- Colleagues: After that first working week with the application, ask your friends and colleagues for their experiences with the application, if they’ve had any. This will help to round-off any issues or notes.
Changing your mindset on switching is the most important element of this process. Switching should be done only when you are certain and have done your research. This will pay off in the long-term. From someone who’s been with his to-do list application for five years, it’s paid off evaluating in such detail.
And the end of the day, hopping from to-do list app to to-do list app is nothing more than a time-wasting habit that you need to kill. Find one that works for you, then stick with it!
Read the full article: How to Stop Switching To-Do Apps (And Find the One You’ll Love Instead)
Read Full Article
Google said to be releasing its own smart display this year
Back at CES in January, Google put on a big show with the launch of a new product category designed to take on Amazon’s Echo Show and Spot. Three companies — LG, Lenovo and JBL — were waiting in the wings with their own take on the screen-powered smart speaker.
Google itself, on the other hand, was conspicuously absent. The company seemed content to rely on third-party hardware makers to do the heavy lifting in taking on Amazon. According to a new report from Nikkei Asian Review, however, the company is planning a screen sporting Home device before year’s end.
Lenovo’s Smart Display — the best looking of the original trio — launched late last month. Google, meanwhile, has been actively courting hardware makers to develop their own take on the product. At I/O, the company even handed out prototyping kits to attendees.
The strategy seemed a bit surprising, given the success Google has had with its own Home line. A recent report from Canalys shows a 449 percent year over year growth in global shipments, putting the company comfortably ahead of Amazon. If nothing else, however, letting manufacturers go first here was a vote of confidence that Google would continue to support third-party use of Google Assistant, even as it expands its own Home line.
Given the expected launch of the Pixel 3 in October, Google could well have the perfect platform to showcase new Home products just in time for the holidays.
Read Full Article
Google updates Location History language after tracking backlash
Four days after admitting that it continues to track users even after the Location History tracking has been disabled, Google has updated its website to more accurately reflect the nature of its location policy.
“This setting does not affect other location services on your device, like Google Location Services and Find My Device,” the updated Google Account Help page now reads. “Some location data may be saved as part of your activity on other services, like Search and Maps. When you turn off Location History for your Google Account, it’s off for all devices associated with that Google Account.”
The update was noted by the Associated Press, which first brought the tracking issue to light earlier this week in a report. Google initially denied its own inaccurate reporting, but later backtracked, adding that it had added clarifying language.
The company told TechCrunch earlier this week,
Location History is a Google product that is entirely opt in, and users have the controls to edit, delete, or turn it off at any time. As the story notes, we make sure Location History users know that when they disable the product, we continue to use location to improve the Google experience when they do things like perform a Google search or use Google for driving directions.
Google further clarified that it had tweaked the language to offer more insight into continued tracking. The company told AP, “We have been updating the explanatory language about Location History to make it more consistent and clear across our platforms and help centers.”
Of course, fixing the language on a Help page isn’t the same as addressing the issue of continued tracking. Nor does it fully clarify the company’s tracking policy. And let’s be honest, most users will never see the Help page with that information listed. Transparency on the issues goes a long way when it comes to maintaining consumer trust.
Read Full Article
The 5 Best Windows 10 Sound Equalizers to Improve Your PC Audio

If you’re an audiophile, a heavy gamer, or simply enjoy customizing the sound on Windows 10, you’re probably looking for a sound equalizer app.
An equalizer can adjust the loudness of specific audio frequencies—called bands—to suit both the listener’s preferences and the acoustics of the environment. For example, an equalizer will let you boost the bass when listening to dance music or increase the treble in a room that responds to low-frequency sounds.
1. Windows 10 Sound Equalizer
Windows includes a native sound equalizer. However, it’s very basic. You can’t adjust the various bands or create your own profiles. For anyone who’s serious about their audio, it will not suffice.
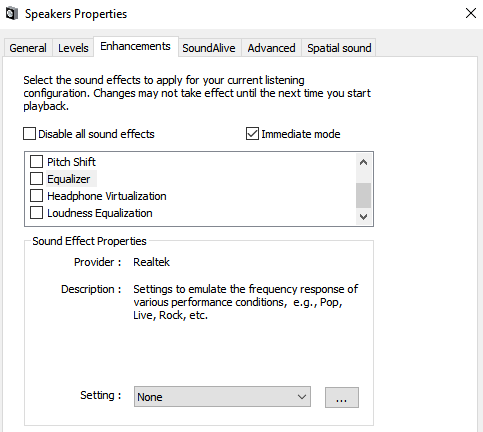
If you’d like to check it out anyway, right-click on the speaker icon on your taskbar and go to Sounds > Playback. Next, right-click on your speakers and choose Properties.
In the new window, open the Enhancements tab and mark the checkbox next to Equalizer. You can choose one of the default sound profiles from the drop-down menu in the Sound Effect Properties section.
2. Equalizer APO
So, we’ve established that the native sound equalizer in Windows 10 is disappointing. Which apps should you use instead?
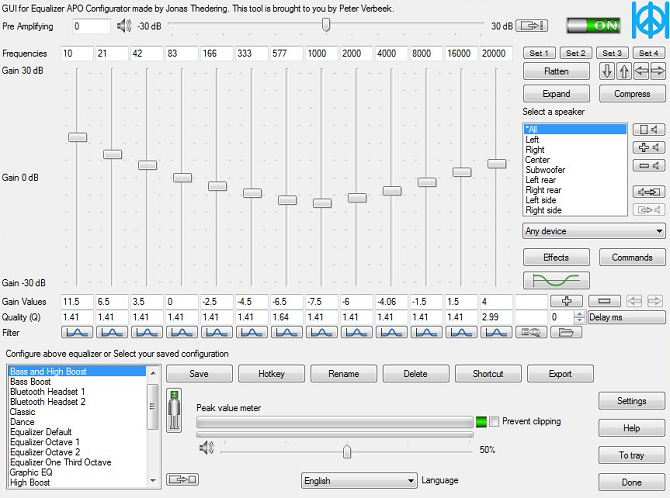
Our first recommendation is Equalizer APO. It’s the most powerful, customizable, and full-featured free sound equalizer that you’ll find.
The app operates as an Audio Processing Object (APO), so if your audio uses APIs like ASIO or WASAPI, it will not work.
Equalizer APO’s best features include an unlimited number of filters, multi-channel use, support for 3D surround sound, and very low CPU usage. You can also create multiple profiles (perhaps for your external speakers and your headphones) and hop between them in a flash.
The big drawback is the lack of a graphical user interface (GUI). You need to edit the filters in a TXT file. Thankfully, several third-party GUIs are available. We recommend Peace Equalizer.
Download: Equalizer APO (Free)
3. Equalizer Pro
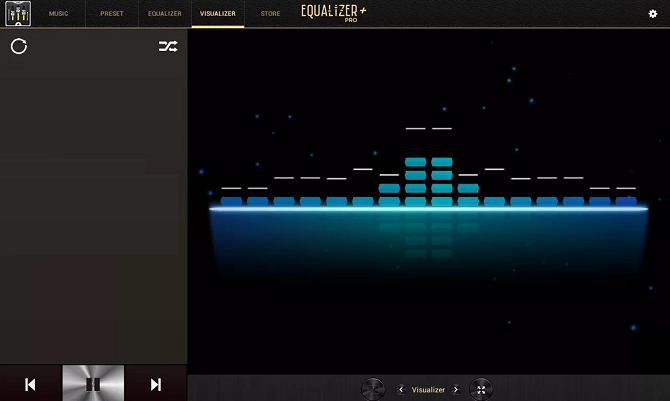
Equalizer Pro is another popular choice. It’s much more user-friendly than Equalizer APO thanks to its clean and clutter-free interface.
The app offers a ten-band equalizer. That’s not as many as some of the other sound equalizers in this list and way behind professional music equipment which might provide 30 or more. However, it’s more than adequate for all but the most dedicated audiophiles.
Equalizer Pro comes with 20 equalizer presets, a system-wide bass boost feature, and the ability to save your own equalizer profiles. The app also offers a preamp volume control. It means you can adjust a single band to boost low tones with needing to tweak each band individually.
Equalizer Pro is not free. You can enjoy a seven-day trial, but thereafter you will need to pay $19.95 for the license.
Download: Equalizer Pro ($19.95)
4. Viper4Windows
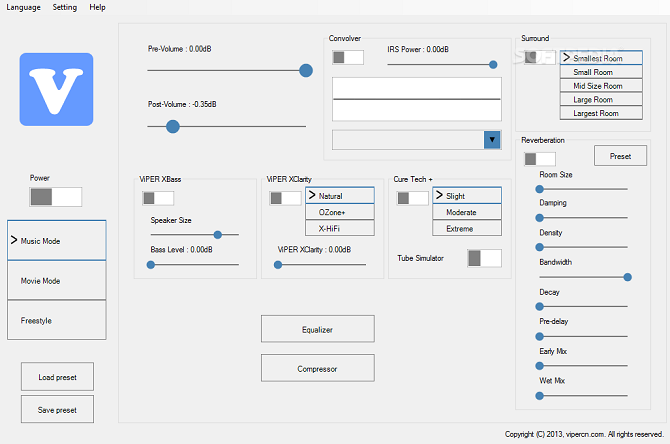
Viper4Windows is an open-source sound equalizer for Windows 10. It also works with Windows Vista, 7, and 8.1.
The equalizer offers an impressive 18 bands; it’s as many as you can hope to find on a consumer-level computer-based equalizer. The bands’ ranges run from -120dB to 13dB. As you’d expect, you can create your own profiles or use one of the many available presets.
Viper4Windows also offers some features beyond sound equalization. They include:
- Room Size: You can set the size of the room you’re listening in, and Viper4Windows will adjust the surround sound settings accordingly.
- Bass Boost: The app offers a customizable extra boost to the low-end sounds.
- Distortion Control: You can choose from three presets or use the slider to tweak the control in decibels.
- Reverberation Settings: Viper4Windows offers settings to control audio damping, density, bandwidth, decay, and more.
Note: Make sure you set Viper4Windows to run in administrator mode. Right-click on the app’s file and go to Properties > Compatibility > Settings > Run this program as administrator. Doing so ensures the equalizer will still work if another app runs the software.
Download: Viper4Windows (Free)
5. FXSound
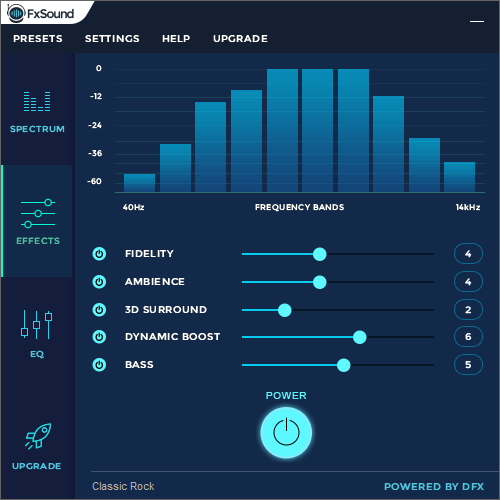
The FXSound app is two tools in one. There’s the equalizer (and its associated effects) and the real-time audio processing feature.
Firstly, let’s look at the equalizer. It comes with 10 bands that go from 110Hz to 15KHz. There are also customizable sliders for fidelity (to reduce the muffled sound in compressed audio), ambiance (to add extra stereo depth), surround sound, dynamic boost (to increase the loudness with increasing the dynamic range), and bass boost.
The preset profiles include Rap, Alternative Rock, Dialog Boost, Country, Techno, and countless more.
The real-time processing excels when you’re listening to audio on the web. internet audio is only 16-bit, but FXSound uses a 32-bit processor. The processor automatically adjusts the fidelity, ambiance, and surround sound of the audio, then re-dithers it into 16-bit. This allows the app to improve significantly on the theoretical limits of the web’s 16-bit output.
FXSound offers a seven-day free trial. The full app costs a one-off payment of $49.99.
Download: FX Sound ($49.99)
Bonus: Voicemeeter Banana
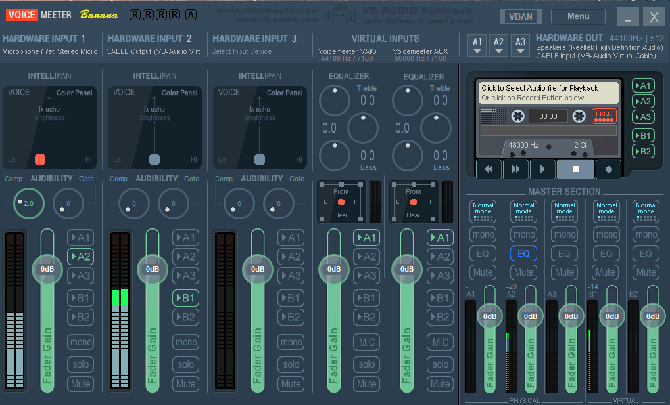
If you do a lot of work with a microphone—perhaps because you’ve started your own podcast or upload a lot of videos to YouTube—you should try Voicemeeter Banana.
The app’s main feature is the advanced audio mixer. It lets you control your computer’s audio for any kind of streaming or recording.
From an equalizer perspective, the mixer lets you adjust audio input as well as output. Therefore, if you’re casting your screen via Twitch, speaking to the family on Skype, or recording a podcast with your friends, you can make up for any microphone deficiencies by making the sound crisper and less distorted.
You can play with the equalizer settings in the app’s Master Section.
Voicemeeter Banana is donationware. You can pay what you like for the software, and you don’t have to pay anything at all.
Download: Voicemeeter Banana (Free)
Learn More About Sound on Windows 10
Using a sound equalizer in Windows 10 is just one part of the battle. There are lots of ways to tweak the operating system’s audio output to your liking.
For example, did you know it’s possible to set the sound output devices on a per-app basis? Or use a hidden feature to give yourself virtual surround sound?
And remember, if anything ever goes wrong, we’ve got you covered. Just check out our article on how to fix audio issues on Windows 10.
Read the full article: The 5 Best Windows 10 Sound Equalizers to Improve Your PC Audio
Read Full Article
The 5 Best Windows 10 Sound Equalizers to Improve Your PC Audio
If you’re an audiophile, a heavy gamer, or simply enjoy customizing the sound on Windows 10, you’re probably looking for a sound equalizer app.
An equalizer can adjust the loudness of specific audio frequencies—called bands—to suit both the listener’s preferences and the acoustics of the environment. For example, an equalizer will let you boost the bass when listening to dance music or increase the treble in a room that responds to low-frequency sounds.
1. Windows 10 Sound Equalizer
Windows includes a native sound equalizer. However, it’s very basic. You can’t adjust the various bands or create your own profiles. For anyone who’s serious about their audio, it will not suffice.
If you’d like to check it out anyway, right-click on the speaker icon on your taskbar and go to Sounds > Playback. Next, right-click on your speakers and choose Properties.
In the new window, open the Enhancements tab and mark the checkbox next to Equalizer. You can choose one of the default sound profiles from the drop-down menu in the Sound Effect Properties section.
2. Equalizer APO
So, we’ve established that the native sound equalizer in Windows 10 is disappointing. Which apps should you use instead?
Our first recommendation is Equalizer APO. It’s the most powerful, customizable, and full-featured free sound equalizer that you’ll find.
The app operates as an Audio Processing Object (APO), so if your audio uses APIs like ASIO or WASAPI, it will not work.
Equalizer APO’s best features include an unlimited number of filters, multi-channel use, support for 3D surround sound, and very low CPU usage. You can also create multiple profiles (perhaps for your external speakers and your headphones) and hop between them in a flash.
The big drawback is the lack of a graphical user interface (GUI). You need to edit the filters in a TXT file. Thankfully, several third-party GUIs are available. We recommend Peace Equalizer.
Download: Equalizer APO (Free)
3. Equalizer Pro
Equalizer Pro is another popular choice. It’s much more user-friendly than Equalizer APO thanks to its clean and clutter-free interface.
The app offers a ten-band equalizer. That’s not as many as some of the other sound equalizers in this list and way behind professional music equipment which might provide 30 or more. However, it’s more than adequate for all but the most dedicated audiophiles.
Equalizer Pro comes with 20 equalizer presets, a system-wide bass boost feature, and the ability to save your own equalizer profiles. The app also offers a preamp volume control. It means you can adjust a single band to boost low tones with needing to tweak each band individually.
Equalizer Pro is not free. You can enjoy a seven-day trial, but thereafter you will need to pay $19.95 for the license.
Download: Equalizer Pro ($19.95)
4. Viper4Windows
Viper4Windows is an open-source sound equalizer for Windows 10. It also works with Windows Vista, 7, and 8.1.
The equalizer offers an impressive 18 bands; it’s as many as you can hope to find on a consumer-level computer-based equalizer. The bands’ ranges run from -120dB to 13dB. As you’d expect, you can create your own profiles or use one of the many available presets.
Viper4Windows also offers some features beyond sound equalization. They include:
- Room Size: You can set the size of the room you’re listening in, and Viper4Windows will adjust the surround sound settings accordingly.
- Bass Boost: The app offers a customizable extra boost to the low-end sounds.
- Distortion Control: You can choose from three presets or use the slider to tweak the control in decibels.
- Reverberation Settings: Viper4Windows offers settings to control audio damping, density, bandwidth, decay, and more.
Note: Make sure you set Viper4Windows to run in administrator mode. Right-click on the app’s file and go to Properties > Compatibility > Settings > Run this program as administrator. Doing so ensures the equalizer will still work if another app runs the software.
Download: Viper4Windows (Free)
5. FXSound
The FXSound app is two tools in one. There’s the equalizer (and its associated effects) and the real-time audio processing feature.
Firstly, let’s look at the equalizer. It comes with 10 bands that go from 110Hz to 15KHz. There are also customizable sliders for fidelity (to reduce the muffled sound in compressed audio), ambiance (to add extra stereo depth), surround sound, dynamic boost (to increase the loudness with increasing the dynamic range), and bass boost.
The preset profiles include Rap, Alternative Rock, Dialog Boost, Country, Techno, and countless more.
The real-time processing excels when you’re listening to audio on the web. internet audio is only 16-bit, but FXSound uses a 32-bit processor. The processor automatically adjusts the fidelity, ambiance, and surround sound of the audio, then re-dithers it into 16-bit. This allows the app to improve significantly on the theoretical limits of the web’s 16-bit output.
FXSound offers a seven-day free trial. The full app costs a one-off payment of $49.99.
Download: FX Sound ($49.99)
Bonus: Voicemeeter Banana
If you do a lot of work with a microphone—perhaps because you’ve started your own podcast or upload a lot of videos to YouTube—you should try Voicemeeter Banana.
The app’s main feature is the advanced audio mixer. It lets you control your computer’s audio for any kind of streaming or recording.
From an equalizer perspective, the mixer lets you adjust audio input as well as output. Therefore, if you’re casting your screen via Twitch, speaking to the family on Skype, or recording a podcast with your friends, you can make up for any microphone deficiencies by making the sound crisper and less distorted.
You can play with the equalizer settings in the app’s Master Section.
Voicemeeter Banana is donationware. You can pay what you like for the software, and you don’t have to pay anything at all.
Download: Voicemeeter Banana (Free)
Learn More About Sound on Windows 10
Using a sound equalizer in Windows 10 is just one part of the battle. There are lots of ways to tweak the operating system’s audio output to your liking.
For example, did you know it’s possible to set the sound output devices on a per-app basis? Or use a hidden feature to give yourself virtual surround sound?
And remember, if anything ever goes wrong, we’ve got you covered. Just check out our article on how to fix audio issues on Windows 10.
Read the full article: The 5 Best Windows 10 Sound Equalizers to Improve Your PC Audio
Read Full Article
Twitter Cripples Third-Party Apps Like Tweetbot and Twitterific

Twitter is no longer allowing developers to access its old APIs. This means that some key features of third-party Twitter apps such as Tweetbot, Twitterific, Talon, and Tweetings no longer work. Which has rather annoyed the people using those apps for obvious reasons.
A Longstanding Love-Hate Relationship
For many years, Twitter has enjoyed endured a love/hate relationship with third-party apps. A lot of Twitter’s best features were born on these apps, but Twitter would really rather they didn’t exist.
Everyone who uses a third-party Twitter app isn’t using Twitter’s own apps. Which means Twitter loses control over their experience, which just won’t do for a company already struggling to make ends meet. And so Twitter has now taken the nuclear option.
Twitter Makes Third-Party Apps Worse
Twitter has rescinded access to the old APIs, which means third-party apps can no longer deliver push notifications or automatically refresh timelines. The result is broken apps, with the likes of Tweetbot and Twitterific having to disable some of their core features.
Today, our User Streams, Site Streams, and legacy Direct Message endpoints will begin a brief period of degraded service before being retired entirely.
Developers using these services can learn more and find migration guides on the forum: https://t.co/hedzTXO6as
— Twitter API (@TwitterAPI) August 16, 2018
Twitter has defended its actions, with Rob Johnson, the Senior Director of Data Enterprise Solutions, saying this is the company “removing support for some outdated developer tools” in order to “deliver the best Twitter for you”.
Essentially, Twitter wants to focus on servicing its own apps, with these third-party apps a distraction. Developers can switch to using Twitter’s Account Activity API, but doing so isn’t cheap, which is why so many have held back from switching so far.
Twitter Gave Developers Ample Warning
No one, including the developers of the third-party apps affected and their users, should be surprised by any of this. Twitter has been planning this move for a long time, and developers have known Twitter was planning to shut down the old APIs since April 2018.
However, none of this actually matters when it comes down to it. Developers have seen their ability to keep their apps working pulled out from under them, and users are discovering that most third-party Twitter apps are now not as good as they used to be.
Image Credit: Andreas Eldh/Flickr
Read the full article: Twitter Cripples Third-Party Apps Like Tweetbot and Twitterific
Read Full Article
How to Link PayPal to eBay

When making purchases on eBay, one of the safest methods of transactions is to use PayPal.
Both buyer and seller are protected, and you’ll find that a lot of sellers will only accept PayPal as a method of payment. And as a buyer, there’s no cost to using the service.
How to Link PayPal to eBay
Linking your PayPal and eBay accounts is a very simple process:
- Click My eBay in the top right corner of the page.
- Click the Account tab.
- Scroll down to Paypal Account information and click Link My Paypal account.
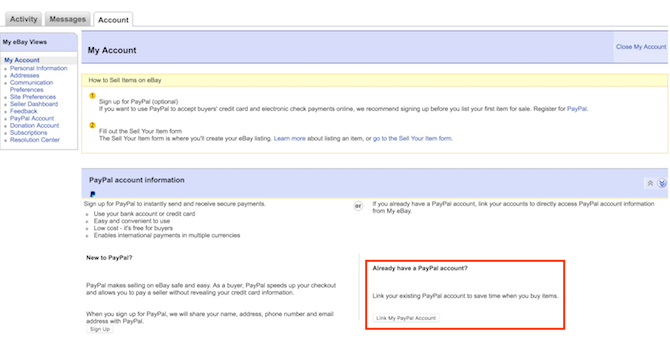
- You may be prompted to sign in to your eBay account again. Enter your credentials and click login.
- You’ll then be prompted to sign in to your PayPal account. Enter your credentials and click login.
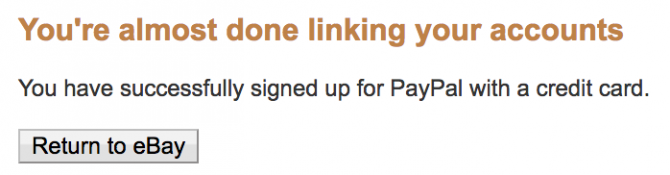
- When you see the message that you’re almost done linking your accounts, click Return to eBay.


How to Disconnect PayPal From eBay
Unlinking your PayPal account from eBay is a one-click process:
- Click My eBay in the top right corner of the page.
- Click the Account tab.
- Scroll down to Paypal Account information and click Unlink accounts and your PayPal information will be removed from eBay.
You can also revoke access through your PayPal account:
- Go to Settings > Security > Permissions you’ve given and click Update.
- You’ll see a list of the sites or services you’ve granted access to your PayPal account. Find eBay and click Remove.
Using PayPal on eBay is one of many great tips for first-time buyers on eBay, including carefully researching both the seller and the item you’re purchasing, and using automatic bidding.
Image Credit: prykhodov/Depositphotos
Read the full article: How to Link PayPal to eBay
Read Full Article
How to Automatically Add Copyright EXIF to Images From Your Camera

Even amateur photographers need to copyright their photos. Imagine you took the perfect group photo of your family and it ended up in a blog without your permission. There’s little you can do about brazen theft.
But if there were some copyright information on the photo, you could check the violation. Fortunately, it’s easy to add a copyright to the EXIF data on images straight from the camera. So why not turn it into a good photography habit?
How to Add Copyrights to Images From Your Camera
Adding the copyright information to the EXIF data does not mar the original photo with an ugly logo. If someone crops the original or modifies it in an image editing program, the data stays intact. Most medium to high-end cameras of all brands have the feature—and all you have to do is enable it in the camera’s settings.
The screens are from a Canon 7D camera. You can find the copyright setting in other brands somewhere on the Menu/Setup screen as well. The symbol is commonly a spanner.
- Press the Menu button.
- Use the Multi-controller to navigate to the Camera Settings 4 tab.
- Again, use the Multi-controller or the Quick Control dial to highlight Copyright Information and then press the Set button.
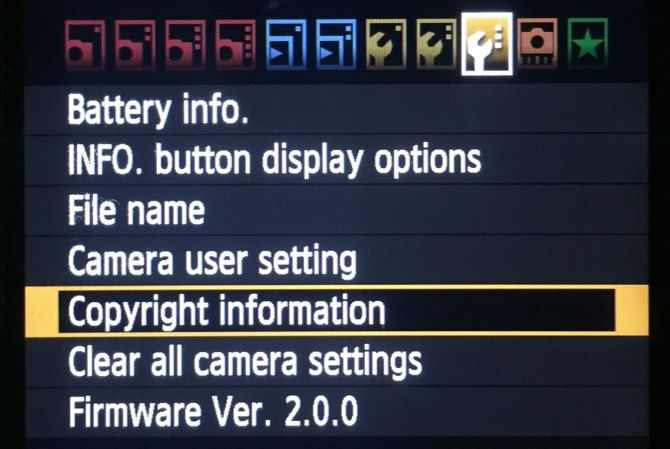
- The Copyright Information will display four options. Go through them with the Quick Control Dial:
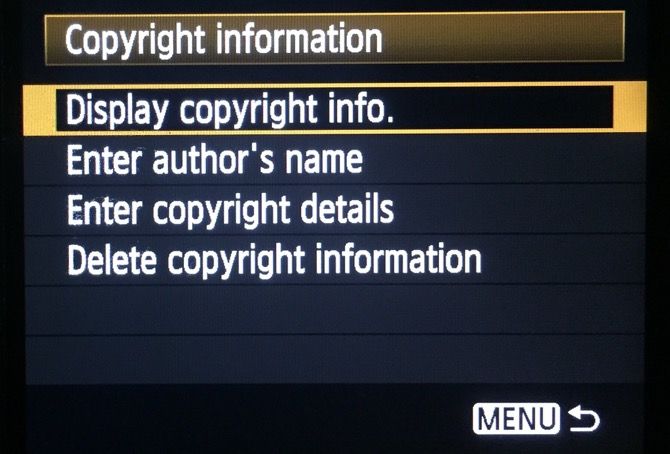
Select Display copyright info to check the data that is currently set.
Select Delete copyright information if you want to erase and enter new details.
Select Enter author’s name. Alternatively, you can also select Enter copyright details. - In both cases, a text entry dialog box will be displayed with a complete character set below it.
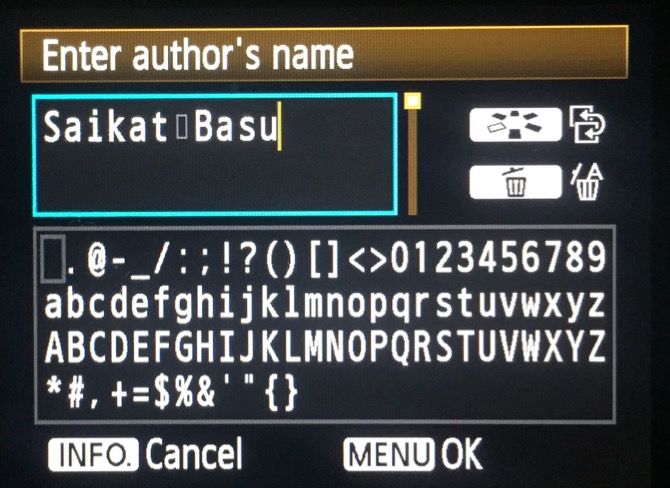
- Use the Picture Style selection button (in Canon) to toggle to the character section of the dialog box. Use the Multi-controller to select an uppercase or lowercase letter, and then press Set to add the letter to your copyright information. Continue to highlight and add each letter until you complete the text. Use the Delete icon to cancel a letter.
- Press the Menu button to exit the dialog screen and finalize the copyright information.


Remember: This isn’t a watermark. It is a part of the EXIF information that is hard-coded into the photos. You might want to remove this EXIF data if you ever sell or loan your camera.
Read the full article: How to Automatically Add Copyright EXIF to Images From Your Camera
Read Full Article
How to Delete Your eBay Account

Fed up with eBay? Whether you’ve been burned by eBay’s security issues or just can’t seem to win any auctions, it’s easy to become frustrated with the service.
If you never use eBay anymore, you can delete your account for closure. It’s not difficult! Here’s how it works.
Before You Delete Your eBay Account
Before you delete your account, you should consider a few points to make sure it’s right for you. Keep these in mind:
- When you close your account, you’ll lose your feedback and history.
- You need to have all fees paid and an account balance of zero.
- You shouldn’t have any open bids out.
- You can’t close if your account doesn’t meet eBay’s seller performance standards.
How to Delete Your eBay Account
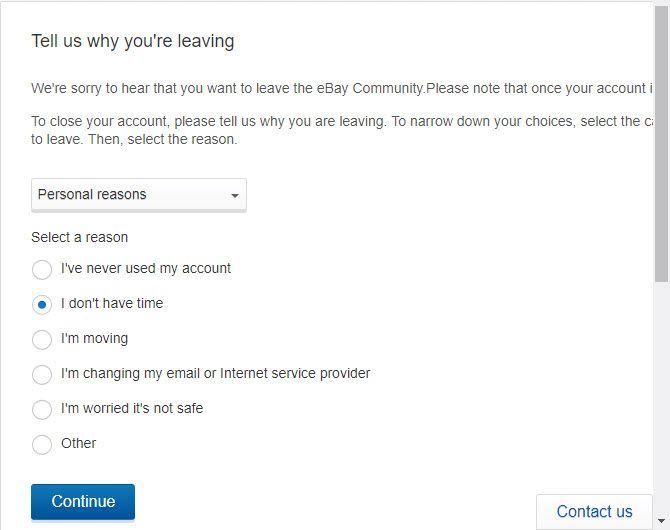
Visit eBay’s Close Account page and sign in if needed. Here, eBay will ask you for a reason why you’re closing your account. Choose a category from the dropdown like Security concerns or Personal reasons, then select a specific reason from the bullets.
After you click Continue, eBay will display some advice based on what you chose. It wants you to keep your account open, so it will suggest that you take a different action. You can select whether this resolved your issue and you’d like to keep your account, or if you still want to close it.
Once you proceed and submit a request to close your account, you’ll get an email and won’t be able to use your account anymore. eBay says it usually takes 30 days to to close an account, but it will keep your account open for 60 days if you’ve bought or sold an item recently.
You can contact eBay if you change your mind during the 30/60 day period. If you just want to stop selling on eBay, you don’t have to close your account. Simply removing auto-payment methods will let you keep your account open without costing you anything.
Since you’re done with eBay, why not check out some of the other best bargain websites?
Image Credit: bernardojbp/Depositphotos
Read the full article: How to Delete Your eBay Account
Read Full Article

Google and GN Hearing partner to stream audio from Android devices directly to hearing aids
Denmark’s GN Hearing broke new ground in hearing aid technology five years ago when it inked a deal with Apple to develop a hearing aid that would integrate seamlessly with an iPhone, with no need for an intermediary device. And today it announced a significant, new milestone expansion in that technology: it has partnered with Google to bring the same functionality to Android handsets.
Google has published a specification for audio streaming for hearing aids using Bluetooth Low Energy (BLE) and connection-oriented channels which, in the words of Google, relies on “an elastic buffer of several audio packets to maintain a steady flow of audio, even in the presence of packet loss. This buffer provides audio quality for hearing aid devices at the expense of latency.” GN Hearing will be the first to develop these hearing aids using Google’s specifications, which it helped to write.
“Google is working with GN Hearing to create a new open specification for hearing aid streaming support on future versions of Android devices,” said Seang Chau, Vice President of Engineering at Google, in a statement.
This will mark the first time that Android smartphones will stream audio directly to hearing aids, and, since Android devices account for a majority of smartphones in use today, it is a big step up in helping people who use hearing aids be more integrated with the “smartphone revolution” and the wave of services and applications that come with using mobile devices.
Up to now, because of how hearing aids are designed to amplify sounds, those who used one, and also wanted to use an Android device, would either have to use a supplementary piece of hardware to use the two together, or remove the hearing aid altogether and have a poor quality conversation.
In addition to using the specification to stream audio from calls and phone apps directly to the hearing aid, users will also be able to monitor their hearing aids and modify their volumes using an app on their phones.
Anders Hedegaard, the CEO of GN Hearing, tells TechCrunch that he “cautiously” estimates that the first hearing aids with live Android integrations will hit the market in 2019. And while his company does not have exclusivity on this — and the specification, like others on Android, is open source for anyone else to use — GN Hearing is likely to be the first because it has been working on the specification.
Hearing loss has been on the rise, in part because people are living longer, and in part because of environmental factors (like headphones that people use with loud volumes). The World Health Organization estimates that there are some 466 million people with disabling hearing loss, up from about 360 million in 2013, and that will grow to 900 million by 2050.
But despite the growth of the issue, both the hearing aid industry and its users have been relatively slow to embrace wireless technology, although things have been changing. Hedegaard said that when his company first announced its partnership with Apple in 2013, the idea of a connected hearing aid was relatively new, and it took until 2016 for any one of its competitors to add the iPhone integration that GN Hearing pioneered. “Today, data connectivity is a core part of hearing aids,” he said, “and 90% of our devices have it.”
Similarly, the amount of hearing aid users actually employing the connected functionality is also going up.
“We have seen the percentage of people using connectivity going up dramatically,” he said. In 2013/14, he estimated that only about 10 percent of people who had connected hearing aids actually used the service with apps and other devices. Now “the majority” download apps and take advantage, he said. It helps that with each year, the gap between the ageing population and those who have spent years using computers and mobile phones and apps is shrinking. “Time is going our way,” he said.
Read Full Article
Google One is more proof of commoditization of consumer cloud storage
We have long known that the price of cloud storage services like Dropbox, Google Drive and Microsoft OneDrive have been getting cheaper over time. Yesterday’s launch of Google One in the U.S. dropped the price for Google storage even further, cutting the cost per terabyte per month in half, driving this point home even more clearly.
As Frederic Lardinois pointed out in his post, 2 terabytes of storage now costs $9.99 a month. Consider that without joining Google One, that was the same price for 1 terabyte of storage. By signing up for Google One, you could double your storage without paying one penny more, and let’s face it this was a ton of storage before the change.
Let’s compare that with some of the other players out there. Each one is a little different, but the storage costs tell a story.
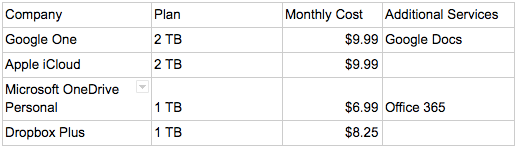
Google One’s shift to 2 TB for $9.99 a month puts it in line with Apple’s pricing, which surprisingly had given you the most storage bang for your buck out of these four companies before Google One came along. Who would have thought that Apple was giving its users the best price on anything? Of course, you get access to Office 365, including Word and PowerPoint, with your terabyte of Microsoft OneDrive storage, which is going to add a fair bit of value for many users over and above the pure storage being offered.
Regardless, if you consider Apple and Google’s pricing, the price of a terabyte of cloud storage has dropped to $5.00 a month. That’s pretty darn cheap and it shows just how commoditized online storage has become and how much scale you require to make money.
Alan Pelz-Sharpe, principal analyst at Deep Analysis, who has been watching this space for years says that consumer cloud storage pricing has always been a race to the bottom. “You can only make a margin with mass scale. That’s why firms who are not Microsoft, Amazon or Google are pushing hard for business and enterprise customers. Google One just brings that message home,” he said.
If you get enough scale, as Dropbox has with an estimated 500 million users, if you can get a percentage to pay $8.25 a month for a terabyte of storage, it can add up to real money. When Dropbox filed its S-1 to before it went public earlier this year, it reported more than $1 billion in consumer revenue. It would be difficult if not impossible for a startup launching today to compete with the existing players, but the ones out there continue to compete with one another, driving the cost down even further.
Today’s announcement is just another step in that downward price pressure of consumer cloud storage, and when you get double the storage from one day to the next for the exact same price, it shows just how true that it is.
Read Full Article
DoorDash raises another $250M, nearly triples valuation to $4B
Food delivery startup DoorDash announced this afternoon that it has raised $250 million, just five months since the company announced a $535 million round.
Why raise more money so soon? CEO Tony Xu told Axios that he wasn’t actively looking for additional investment, but was open to investor interest because it could help the company expand more quickly. (Maybe he’ll have more to say about those plans at Disrupt SF next month.)
The new funding was led by Coatue Management and DST Global. It sounds like the terms were pretty appealing too, with the valuation growing from $1.4 billion to $4 billion.
In a blog post, the company said it’s had a good 2018, with deliveries increasing 250 percent year-over-year, restaurant chains like Chipotle and IHOP signing up and last week’s launch of the DashPass subscription service, where you can pay $9.99 per month to get unlimited free deliveries.
“As we grow, we will stay true to our values and our mission of connecting people with possibility — and, trust us, we’re just getting started,” DoorDash wrote.
Read Full Article
Google Search Adds More Featured Snippets
If you have ever searched for something on Google, which we’d guess is everyone reading this, then you’ll have seen Google’s featured snippets. These being the little snippets Google places front and center in an attempt to provide the best answer to your query.
In January, Google published “A reintroduction to Google’s featured snippets” in an effort to remind everyone what they’re for. And since then Google has made a number of improvements to the way Search, and featured snippets in particular, operates.
The latest update is now rolling out, and it adds more featured snippets to Google Search…
Featured Snippets Galore
Google’s new format for featured snippets adds more options based on context. So now, rather than one featured snippet that tries to answer your search query and fails, Google will provide multiple featured snippets based on the different connotations of your search.
I feel like whenever I google search something wildly random it takes just a little longer than usual to get results
As if it’s taken off guard
— Matt Will Post (@MattPostSaysHi) August 14, 2018
In The Keyword blog post, Google gives the example of “Quartz Vs Granite”. The main featured snippet offers a geologist’s perspective on the differences. However, if you’re looking to remodel your kitchen that might not be what you’re looking for.
So, now, underneath the main featured snippet, Google offer alternatives. In the “Quartz Vs Granite” example Google offers options for Cost, Benefits, Weight, and Durability. Click on one of these and you’ll get a new featured snippet with a link to the source.
This isn’t the biggest change in the world, but it’s Google trying to offer more options to make Search even more essential than it is already. The only problem being it pushes other sites, which haven’t nabbed the featured snippets, further down in the results.
Is Google Fallible?
Google’s featured snippets are a useful tool which most of us take for granted. Sure, they don’t always provide the best answer to our searches, but even Google is fallible on occasion. And perhaps this article will provide the featured snippet for “Is Google fallible?”
If you feel like you spend half your waking life Googling stuff, here are eight Google Search tips to keep handy at all times. But never forget that there are plenty of solid alternatives to Google Search, some of which are actually pretty good.
Image Credit: Frankieleon/Flickr
Read the full article: Google Search Adds More Featured Snippets
Read Full Article
How to Safely Install Fortnite on Android: A Quick Sideloading Guide

The world’s most popular 100-player PVP battle royale is coming to Android at long last. That’s right: you can finally play Fortnite on your Android device. Time to rejoice, grab your mats, and get ready to ride the storm.
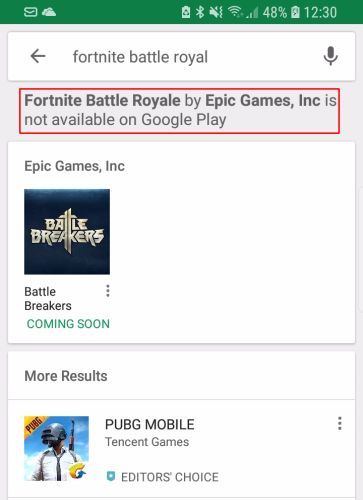
That is until you realize that Fortnite isn’t available on the official Google Play Store. Fortnite developer, Epic Games, wants you to use a specialized launcher, but that means turning off third-party download restrictions and sideloading the app—and this can come with risks.
Here’s how to safely install Fortnite on Android, and what precautions you should take.
Why Isn’t Fortnite on the Google Play Store?
Epic Games recently confirmed that their insanely popular Fortnite battle royale would finally make its way onto Android devices.
However, at the same time, Epic Games also confirmed rumors that Fortnite would use an individual launcher downloaded straight from the developer, rather than the long-established and potentially more secure Google Play Store.
The decision appears to boil down to two main reasons:
- Epic Games doesn’t want Google to take their customary 30 percent cut for using the Google Play Store.
- Epic Games founder, Tim Sweeney, believes “competition among services gives consumers lots of great choices and enables the best to succeed based on merit.” Sweeney also said that the same choice would have been made if the option was available to iOS devices.
The first point is massive, especially when you consider the phenomenal revenue Fortnite already rakes in on Windows and macOS. Want an idea of how much? Fortnite players spent $318 million in May 2018 alone and allegedly over $1 billion in total on in-app purchases.

It stands to reason, as battle royale games are currently the most popular by far, and free-to-play Fortnite is the most popular within the genre.
In July 2018, Fortnite had over 820,000 concurrent viewers on video game streaming platform Twitch, streaming over 151 million hours of content. Remember, that’s just for July 2018. Over the same period, direct competitor PlayerUnknown’s Battlegrounds (PUBG) brought in over 580,000 concurrent viewers, for a total of 44.1 million hours of streaming content.
Mind-blowing figures, but it illustrates just how popular Fortnite is as well as why Epic Games decision to cut Google out of the loop is financially imperative.
How to Install the Fortnite Launcher on Android
At the time of writing, the Android version of Fornite is in beta testing. If you already have an Epic Games account, there is a strong chance you will have beta access. Check out the video below for a short tutorial on how to install the Fortnite launcher on your Android device. I’m using a Samsung Galaxy S8, but your experience may vary.
- On your Android device, head to the Fortnite homepage. Select the Epic Games link to begin the download, then hit Open when it finishes.
- When the “install unknown apps” warning appears, hit Settings. Then toggle Allow from this source and head back to the Fortnite Installer.
- Press Install. Wait for the installation to complete, then press Open.
- Let the Epic Games launcher initialize.
- Select Continue to accept the “Game Storage Required” prompt, then Allow the Fortnite Launcher access to your media and storage.
- The download and installation process launches automatically. Let it complete; then you can launch the Fortnite for Android beta.
- Remember to turn off installation access for unknown sources. Head to Settings > Lock Screen and Security > Install unknown apps > Chrome > Allow from this source.
The menu structure and names may vary depending on your Android device.
What Devices are Compatible with Fortnite on Android?
Epic Games are running an exclusive beta period deal for Samsung devices. So those readers with a Samsung Galaxy S7, S7 Edge, S8, S8+, S9, S9+, Note 8, Note 9, Tab S3, or Tab S4 have immediate access, as well as a flashy exclusive outfit to strut your stuff in, too.
Other compatible Android devices include:
- Google: Pixel | Pixel XL | Pixel 2 | Pixel 2 XL
- Asus: ROG Phone | Zenfone 4 Pro | 5Z | V
- Essential: PH-1
- Huawei: Honor 10 | Honor Play | Mate 10 | Pro | Mate RS | Nova 3 | P20 | Pro | G5 | G6 | G7 ThinQ | V10 | V20 | V30 | V30+
- Nokia: 8
- OnePlus: 5 | 5T | 6
- Razer: Phone
- Xiaomi: Blackshark| Mi 5 | 5S | 5S Plus | 6 | 6 Plus | Mi 8 | 8 Explorer | 8SE | Mi Mix | Mi Mix 2 | Mi Mix 2S | Mi Note 2
- ZTE: Axon 7 | 7s | Axon M | Nubia | Z17 | Z17s | Nubia Z11
When the full version launches, Epic Games will announce more compatible devices.
Security Considerations for Fortnite on Android
For many, the first thought to Epic Games’ Google Play Service refusal was security. Despite the potential for an admittedly massive 30 percent cut on Fortnite’s earnings, Google has drastically improved the Google Play Store in recent years.
And while malware, fraud, phishing, and security issues won’t ever disappear, the introduction of Google Play Protect has ramped up protection for the billions of Android users.
In fact, Google reports that it “took down more than 700,000 apps that violated the Google Play policies, 70 percent more than the apps taken down in 2016. Not only did we remove more bad apps, we were able to identify and action against them earlier. In fact, 99 percent of apps with abusive contents were identified and rejected before anyone could install them.”
However, the malware variants that did get through are savage, consisting of banking trojans, botnet malware, malicious crypto-mining apps, and other fraudulent and credential stealing campaigns.
The Fortnite for Android beta launcher is hosted solely on the Epic Games site and is the only place you will find the official download. Once you install the Fortnite launcher and app, it automatically updates to deliver both game and security patches without the Google Play Store.
Nonetheless, as with other popular games, there are always malicious imitators waiting in the sidelines. Fortnite will not be the exception to that rule. On the other hand, it hasn’t made a difference for other popular games that do use the Google Play Store.
Furthermore, Google isn’t going to allow Fortnite imitators take Epic Games place on the Google Play Store.
So, is there a risk? Yes, of course. A potential user could click through to a site mocked up to mimic the Epic Games site, download a malicious APK, and install malware on their device.
Is there more of a risk than with other games? On this, I’m not so sure. You only have to complete an internet search for “FIFA 18 APK” and scroll down a little to find some more nefarious looking installation folders.
So long as Epic Games continues their vocal approach to their Fortnite on Android launcher, the overwhelming majority of users should remain safe.
That’s not to say there won’t be a sudden explosion in Fortnite-related Android malware. Malicious Fortnite for Android links were found alongside videos on YouTube as early as June—so pay attention to what you are downloading, and where you’re downloading it from.
Read the full article: How to Safely Install Fortnite on Android: A Quick Sideloading Guide
Read Full Article
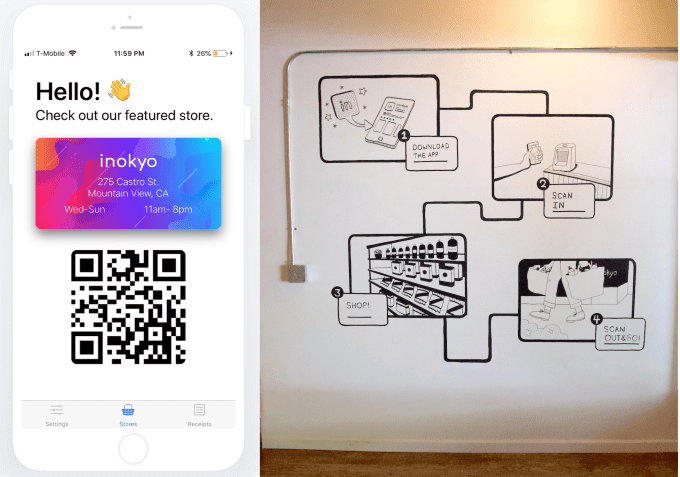
Autonomous retail startup Inokyo’s first store feels like stealing
Inokyo wants to be the indie Amazon Go. It’s just launched its prototype cashierless autonomous retail store. Cameras track what you grab from shelves, and with a single QR scan of its app on your way in and out of the store, you’re charged for what you got.
Inokyo‘s first store is now open on Mountain View’s Castro Street selling an array of bougie kombuchas, snacks, protein powders, and bath products. It’s sparse and a bit confusing, but offers a glimpse of what might be a commonplace shopping experience five years from now. You can get a glimpse yourself in our demo video below:
“Cashierless stores will have the same level of impact on retail as self-driving cars will have on transportation” Inokyo co-founder Tony Francis tells me. “This is the future of retail. It’s inevitable that stores will become increasingly autonomous.”
Inokyo (rhymes with Tokyo) is now accepting signups for beta customers who want early access to its Mountain View store. The goal is to collect enough data to dictate the future product array and business model. Inokyo is deciding whether it wants to sell its technology as a service to other retail stores, run its own stores, or work with brands to improve their product’s positioning based on in-store sensor data on custom behavior.
“We knew that building this technology in a lab somewhere wouldn’t yield a successful product” says Francis. “Our hypothesis here is that whoever ships first, learns in the real world, and iterates the fastest on this technology will be the ones to make these stores ubiquitous.” Inokyo might never rise into a retail giant ready to compete with Amazon and Whole Foods. But its tech could even the playing field, equipping smaller businesses with the tools to keep tech giants from having a monopoly on autonomous shopping experiences.

It’s About What Cashiers Do Instead
“Amazon isn’t as ahead as we assumed” Francis remarks. He and his co-founder Rameez Remsudeen took a trip to Seattle to see the Amazon Go store that first traded cashiers for cameras in the US. Still, they realized “This experience can be magical”. The two had met at Carnegie Mellon through machine learning classes before they went on to apply that knowledge at Instaram and Uber. The two decided that if they jumped into autonomous retail soon enough, they could still have a say in shaping its direction.
N ext week, Inokyo will graduate from Y Combinator’s accelerator that provided its initial seed funding. In six weeks during the program, they found a retail space on Mountain View’s main drag, studied customer behaviors in traditional stores, built an initial product line, and developed the technology to track what user are taking off the shelves.
Here’s how the Inokyo store works. You download its app and connect a payment method, and you get a QR code that you wave in front of a little sensor as you stroll into the shop. Overhead cameras will scan your body shape and clothing without facial recognition in order to track you as you move around the store. Meanwhile, on-shelf cameras track when products are picked up or put back. Combined, knowing who’s where and what’s grabbed lets it assign the items to your cart. You scan again on your way out, and later you get a receipt detailing the charges.
Originally, Inokyo actually didn’t make you scan on the way out, but it got the feedback that customers were scared they were actually stealing. The scan-out is more about peace of mind than engineering necessity. There is a subversive pleasure to feeling like “well, if Inokyo didn’t catch all the stuff I chose, that’s not my problem.” And if you’re overcharged, there’s an in-app support button for getting a refund.

Inokyo co-founders (from left): Tony Francis and Rameez Remsudeen
Inokyo was accurate in what it charged me despite me doing a few switcharoos with products I nabbed. But there were only about three people in the room with at the time. The real test for these kinds of systems are when a rush of customers floods in and that cameras have to differentiate between multiple similar-looking people. Inokyo will likely need to be over 99 percent accurate to be more of a help than a headache. An autonomous store that constantly over- or undercharges would be more trouble than it’s worth, and patrons would just go to the nearest classic shop.
Just because autonomous retail stores will be cashier-less doesn’t mean they’ll have no staff. To maximize cost-cutting, they could just trust that people won’t loot it. However, Inokyo plans to have someone minding the shop to make sure people scan in the first place and to answer questions about the process. But theirs also an opportunity in reassigning labor from being cashiers to concierges that can recommend the best products or find what’s the right fit for the customer. These stores will be judged by the convenience of the holistic experience, not just the tech. At the very least, a single employee might be able to handle restocking, customer support, and store maintenance once freed from cashier duties.
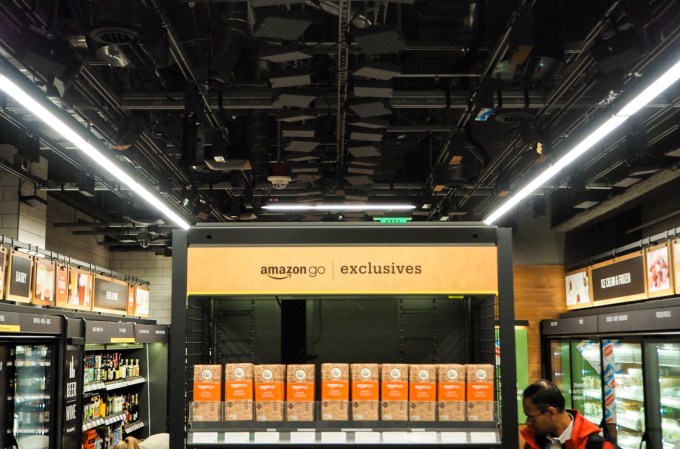
The Amazon Go autonomous retail store in Seattle is equipped with tons of overhead cameras.
While Amazon Go uses cameras in a similar way to Inokyo, it also relies on weight sensors to track items. There are plenty of other companies chasing the cashierless dream. China’s BingoBox has nearly $100 million in funding and has over 300 stores, though they use less sophisticated RFID tags. Fellow Y Combinator startup Standard Cognition has raised $5 million to equip old school stores with autonomous camera-tech. AiFi does the same, but touts that its cameras can detect abnormal behavior that might signal someone is a shoplifter.
The store of the future seems like more and more of a sure thing. The race’s winner will be determined by who builds the most accurate tracking software, easy-to-install hardware, and pleasant overall shopping flow. If this modular technology can cut costs and lines without alienating customers, we could see our local brick-and-mortars adapt quickly. The bigger question than if or even when this future arrives is what it will mean for the millions of workers who make their living running the checkout lane.
Read Full Article