18 May 2018

How to View and Recover Your Microsoft Outlook Password


Microsoft Outlook is one of the most popular email clients around, regularly ranking among the top clients. It’s only beaten by Apple’s integrated mail solution and Gmail for global email opens. Most people use Outlook at some time in their lives.

Given those millions of users, it is understandable that at some point, someone will forget their Outlook password. And in those moments, you need a tool that can retrieve the password while keeping your data intact.

Here are three tools to help with Outlook password recovery. But first, we need to understand the difference between PST and OST files and how they store and password-protect your mail in Outlook.

Differences Between Outlook PST and OST Files

The way Outlook stores, manages, and secures your data depends on the type of account you are using. There are two main types of Outlook data files:

  • PST: A Personal Storage Table is the storage system Outlook uses for POP and IMAP accounts. Your email is delivered to and stored on the mail server, and is only accessible while online. You can take backups of your email to work on, but this also creates a new PST file. When you move to a new computer, PST files transfer easily between systems.
  • OST: You can use an Offline Storage Table file when you want to keep an entire local backup of an email account. All the data is stored on your computer as well as the mail server. This means the entire user account email database is accessible, regardless of network connection. Changes sync when the user establishes a connection with the mail server.

There are two more vital differences between the two file types.

By and large, PST data files store vital information, such as passwords, to the local machine. This password locks unauthorized users out of the Outlook account, protecting emails and user data in the process. The OST data file also uses local storage but doesn’t contain any passwords. As such, the PST file is open for password retrieval. (Do note that OST passwords aren’t much more secure.)

The second difference is a bug in Microsoft Outlook’s password protection that relates to password storage.

The Microsoft Outlook PST Password Protection Bug

When you enter a password on a website, the site (hopefully) doesn’t store it in plaintext. Plaintext is what you’re reading now, so you can see why storing a password in this form isn’t so wise. The website takes your password and creates a hash.

A hash is a long string of alphanumeric characters that represent your password and is tied to your username. When you type your username and password combination, the database returns a positive response, and you enter your account. But if an attacker enters the database, all they see is a long list of confusing hash values.

Here’s the problem with Outlook: Instead of using a complex hashing algorithm (ideally with a salt), Microsoft appears to have cut some security corners using the basic CRC32 algorithm.

The bad news is that each CRC32 hash has a lot of matching values, meaning there’s a strong chance a password retrieval program will unlock your file. This is great if you need your PST file unlocked, but utterly terrible if you want to keep it secure.

This is where Outlook password recovery tools come in.

PST Tools for Outlook Password Recovery

There are several tools you can use to retrieve PST passwords and unlock your data file.

1. PstPassword

microsoft outlook password recovery tools

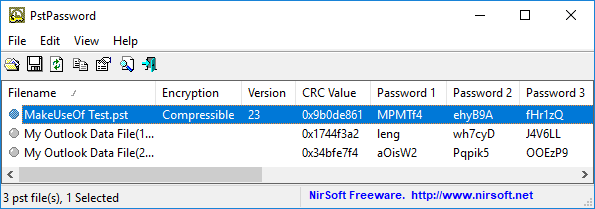
Nirsoft’s PstPassword is a great free utility that automatically retrieves PST passwords for local data files. PstPassword displays three potential passwords due to the encryption bug. If the first option fails, you have two more choices. (In fact, PstPassword generates a long list of CRC32 hashes that might unlock the data file.)

PstPassword doesn’t require installation, either. However, your system might detect it as a malicious file (as it is harvesting passwords, something that you don’t want at other times).

2. Kernel Outlook PST Password Recovery Tool

Kernel Outlook PST Password Recovery Tool is a limited free utility. The major limitation is the size of the PST file the tool will unlock. Kernel’s tool will unlock PST files up to 500MB for free. However, if your data file size surpasses that you will need to upgrade to the Home License for $39.

The tool quickly analyzes your PST files, providing a hash value for you to enter. Unlike PstPassword, Kernel only grants a single password hash to try. However, if that doesn’t work, Kernel also has the option to remove the password protection from the PST file (as well as adding a new one if you desire).

3. Recovery Toolbox for Outlook Password

Recovery Toolbox

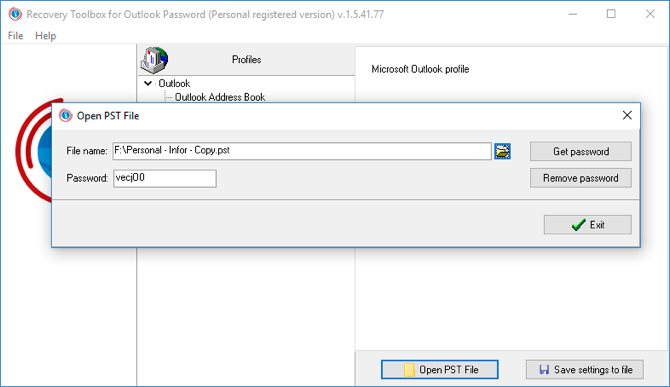
Our final tool is Recovery Toolbox for Outlook Password. Recovery Toolbox costs $19 but comes with a few more options than either free option. For example, Recovery Toolbox can:

  • Recover and show passwords for PST data files
  • Reset PST data file passwords
  • Recover and remove some passwords for OST data files

The major difference is support for OST files. The paid version of Recovery Toolbox shows and removes OST passwords, too, giving it a slight advantage. That said, other free online tools will uncover even the most secure Outlook OST data file passwords, too.

Testing the PST Password Protection Bug

You can check the password protection bug out for yourself using PstPassword.

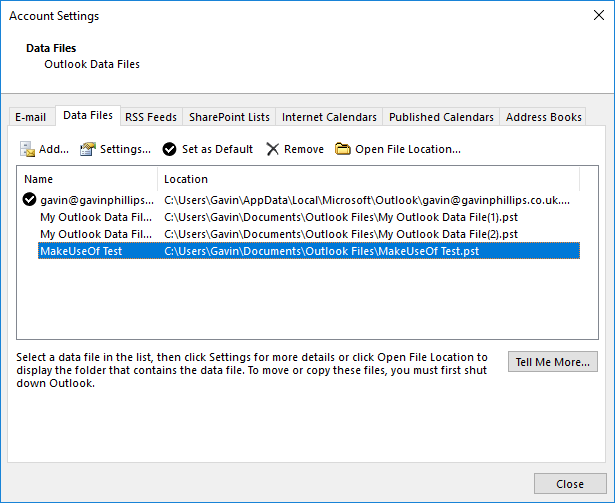
Open Outlook and head to File > Account Settings > Data Files. Press Add to create a new data file, giving it a temporary name. Next, head to Settings > Change Password. Leaving the “Old password” field empty (as it is a new data file), enter a strong new password in the “New password” and “Verify password” fields. (In fact, I’m using a Secure Password Generator to create a super-strong 16-character password.)

microsoft outlook password recovery tools

You might note that despite the 16-character password, Outlook only accepts 15-characters. Regardless, press OK, close the panel, then close Outlook.

Download, then open PstPassword. It should automatically detect your newly created PST file, as well as any existing data files, too. Now, alongside your test file, there are three potential passwords. Because the password is over a certain amount of characters, PstPassword displays the hash values.

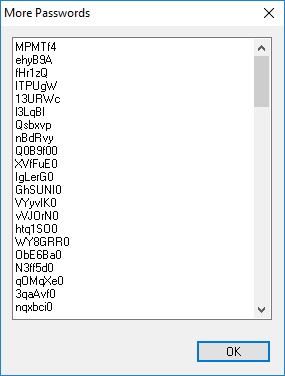
Open Outlook again and enter one of the hash values. If it doesn’t work, try the next one. In the event the first three don’t work, right-click the test data file and select Get more passwords.

microsoft outlook password recovery tools

Mail PassView is another free password viewing and recovery tool from Nirsoft. Mail PassView uncovers OST data file passwords, rather than PST data files. However, as OST data file passwords are usually set via mail server rather than in Outlook itself, the tool cannot remove passwords or offer alternatives.

Still, Mail PassView is a useful free tool for recovering your Outlook password.

Outlook Password Recovery Complete!

One of these tools will grant you access to your Microsoft Outlook PST data file. Some Microsoft Office programs have strong integrated encryption. However, you have seen the Outlook password protection bug and how you can easily uncover a lost password.


Read Full Article

What we know about Google’s Duplex demo so far


The highlight of Google’s I/O keynote earlier this month was the reveal of Duplex, a system that can make calls to set up a salon appointment or a restaurant reservation for you by calling those places, chatting with a human and getting the job done. That demo drew lots of laughs at the keynote, but after the dust settled, plenty of ethical questions popped up because of how Duplex tries to fake being human. Over the course of the last few days, those were joined by questions about whether the demo was staged or edited after Axios asked Google a few simple questions about the demo that Google refused to answer.

We have reached out to Google with a number of very specific questions about this and have not heard back. As far as I can tell, the same is true for other outlets that have contacted the company.

If you haven’t seen the demo, take a look at this before you read on.

So did Google fudge this demo? Here is why people are asking and what we know so far:

During his keynote, Google CEO Sundar Pichai noted multiple times that we were listening to real calls and real conversations (“What you will hear is the Google Assistant actually calling a real salon.”). The company made the same claims in a blog post (“While sounding natural, these and other examples are conversations between a fully automatic computer system and real businesses.”).

Google has so far declined to disclose the name of the businesses it worked with and whether it had permission to record those calls. California is a two-consent state, so our understanding is that permission to record these calls would have been necessary (unless those calls were made to businesses in a state with different laws). So on top of the ethics questions, there are also a few legal questions here.

We have some clues, though. In the blog post, Google Duplex lead Yaniv Leviathan and engineering manager Matan Kalman posted a picture of themselves eating a meal “booked through a call from Duplex.” Thanks to the wonder of crowdsourcing and a number of intrepid sleuths, we know that this restaurant was Hongs Gourmet in Saratoga, California. We called Hongs Gourmet last night, but the person who answered the phone referred us to her manager, who she told us had left for the day. (We’ll give it another try today.)

Sadly, the rest of Google’s audio samples don’t contain any other clues as to which restaurants were called.

What prompted much of the suspicion here is that nobody who answers the calls from the Assistant in Google’s samples identifies their name or the name of the business. My best guess is that Google cut those parts from the conversations, but it’s hard to tell. Some of the audio samples do however sound as if the beginning was edited out.

Google clearly didn’t expect this project to be controversial. The keynote demo was clearly meant to dazzle — and it did so in the moment because, if it really works, this technology represents the culmination of years of work on machine learning. But the company clearly didn’t think through the consequences.

My best guess is that Google didn’t fake these calls. But it surely only presented the best examples of its tests. That’s what you do in a big keynote demo, after all, even though in hindsight, showing the system fail or trying to place a live call would have been even better (remember Steve Job’s Starbucks call?).

For now, we’ll see if we can get more answers, but so far all of our calls and emails have gone unanswered. Google could easily do away with all of those questions around Duplex by simply answering them, but so far, that’s not happening.


Read Full Article

7 Tips for Making Your Instagram Stories Stand Out


It’s hard to imagine anything easier than posting a story on Instagram. After all, it only takes a few seconds and three taps to take a photo or video and immediately share it on your profile. Especially as Stories are often seen as the unpolished antidote to many users’ curated Instagram feeds.

But there’s more to Instagram Stories than meets the eye. When used properly, they are an incredible tool for driving engagement with your followers, building connections with other users, and sharing your life with the people you care about.

When used improperly, however, Stories can quickly become annoying and over-long monologues that are confusing to anyone but their creator. Here are our best Instagram Stories tips to help your posts stand out from the crowd.

What Are Instagram Stories?

In case you’re still unfamiliar with the Stories feature (pioneered by Snapchat and quickly integrated into Facebook and Instagram), here’s what you need to know.

Essentially, an Instagram story is a sequential collection of photos and videos that is visible on your Instagram profile to any of your followers for 24 hours. After 24 hours, the story disappears.

Instagram Stories fill a variety of purposes. They can tell the behind-the-scenes story of an impressive Instagram post, provide insider information about a promotion, or can be a fun way to share an event in your life that doesn’t warrant a formal post.

Posting a story is easy: open Instagram, and tap the camera icon in the top left. Take a photo, and hit Send To, then press Share next to the contact labelled “Your Story”.

Of course, there’s a whole lot more to know, including Instagram mistakes you should avoid making.

1. Post Quality Photos and Videos

While this Instagram Story tip may seem like common sense, it’s often overlooked by Instagram users. Instagram stories are less formal than official Instagram posts, and leave some room for unedited photos or videos that sound more like a casual conversation.

However, if you are looking for social media success, everything you post needs to be worth your audience’s attention.

Here’s a quick checklist:

  • Photos and videos should be in focus and interesting
  • Simple editing (such as straightening horizons, cropping, and color correction) can go a long way
  • Text should be readable, and not overly long
  • Videos with voiceovers shouldn’t cut off at awkward times or in the middle of a sentence
  • Standard strategies for making your Instagram photos stand out still apply—you can never go wrong with a little extra editing!

Also, just because Stories gives you the freedom to post as many photos or videos as you want doesn’t mean that you should post every photo or video you take. Your complete story shouldn’t last longer than two or three minutes—and that’s an absolute maximum. Stories are designed to give people a quick and exclusive look “behind the scenes” of your social media; lengthy commentary is better suited to a blog post or YouTube video.

2. Give Context for Your Instagram Stories

One of the biggest mistakes Instagram users make is posting stories that don’t make any sense. But, you also don’t want to spend your time typing out lengthy explanations that no one will read, or offering voice overs that no one will listen to.

Instead, Instagram offers simple stickers (found in the top right of the photo-editing screen) for each image or video. Use these stickers to identify your location, provide a time stamp, tag the people you’re with, or to add a relevant hashtag.

Paired with a sentence or two on Instagram Stories’ “Type” screen (swipe all the way left after opening the Stories camera), your story will make sense to everyone who views it.

3. Be Interesting

Instagram has a ton of great features specifically for Stories. And since one of the main purposes of Instagram Stories is to show off a more personal (and fun!) side of your social media, you should take full advantage of these features whenever possible!

Great Instagram Stories features include:

  • Taking and sharing Boomerangs
  • A Focus filter that ensures your face stands out from the background
  • A “Superzoom” filter that can be paired with different sound clips (including “bounce”, “TV show”, “dramatic”, and “beats”) to help emphasize a key item or person in your story
  • Playing a video in rewind
  • A “Hands Free” mode that lets you take video clips without holding down the shutter button
  • A “Stop Motion” mode that lets you create short, looping videos out of still photos
  • Your choice of a changing selection of live filters (press and hold on someone’s face or tap on the smiley face at the bottom right of the screen) that can give you silly accessories, distort your face in funny ways, or even work some Photoshop magic
  • A huge variety of stickers, GIFs, and emojis that you can add anywhere on your image/video

Have fun exploring these Instagram Stories tricks to make your Instagram Stories stand out from the crowd.

4. Ask Questions on Instagram Stories

One easy way to get viewers invested in your Instagram Story is to ask them to share their opinion. Instagram offers two easy tools to get input from the people watching your story.

First, you can choose to create a poll. Simply select the “Poll” sticker, type in your question, and then enter two options for viewers to choose between. As people select either option the poll will constantly update its percentage.

Want something a little less polarizing? Choose the slider sticker instead. You can customize both the question you ask and the sticker you use to label the slider. Viewers can then drag the slider to the intensity of their reaction to your question.

5. Cultivate a Community on Instagram

One of the potential downsides to Instagram Stories is that your followers can’t respond publicly to your posts through comments. And while the polls and sliders shown above are fun, they don’t allow for a lot of nuance. Many successful Instagram accounts address this shortcoming by posting screenshots of thoughtful responses that have landed in their direct messages.

This strategy can be a great way to build a community around your Instagram account—but be careful to respect your followers’ privacy. It’s always best to ask before tagging someone’s username or showing identifying information in a screenshot. You can also always draw over any identifying information using the marker tool.

6. Think Outside the Box

Instagram has a ton of great features that are native to the app. But you can also add to your stories from any photos (or screenshots of photos) that you’ve saved to your phone over the last 24 hours. This feature opens up a world of possibilities , especially when paired with awesome third-party Instagram apps.

When it comes to Instagram Stories, the only limits are your creativity and your audience’s attention span. Stories offer a truly unique method of telling stories and sharing information, and third-party apps and editing features can go a long way towards helping you to achieve any effect you want.

7. Branch Out

While they may seem gimmicky at first, Instagram Stories are a powerful way of reaching followers. Whether you’re promoting a brand on Instagram, establishing a business, or just sharing what you had for breakfast, it’s important to use Instagram Stories as a way to link viewers in to your other social media accounts.

Don’t be afraid to direct viewers to other social media accounts through your Stories.

For example, after showing a behind-the-scenes interview, you can ask viewers to go view the final product on YouTube, enter a contest on your blog, or visit a specific site with a coupon code.

If you have over 10,000 followers (or are a verified account) you can even include a link directly in your story. If you have fewer followers than that, you can always use the old “link in bio” trick!

Instagram Stories are also key for promoting other accounts that you enjoy, building hype for a promotion, or helping viewers to feel more connected to you as an individual.

What’s Your Instagram Story?

Stories on platforms like Instagram and Snapchat have been one of the biggest recent shifts in social media. Their flexibility is a key component of that—the way you make your stories can be completely different than anyone else’s.

That being said, it’s important to make sure that what you are doing is working. Be sure to monitor who’s viewing your Instagram Story and adjust your strategies as needed until you reach the audience you want to reach!


Read Full Article

Bell & Ross releases a new watch for travelers


In my endless quest to get geeks interested in watches I present to you the Bell & Ross BR V2-93 GMT 24H, a new GMT watch from one of my favorite manufacturers that is a great departure from the company’s traditional designs.

The watch is a 41mm round GMT which means it has three hands to show the time in the 12-hour scale and another separate hand that shows the time in a 24 hour scale. You can use it to see timezones in two or even three places and it comes in a nice satin-brushed metal case with a rubber or metal strap.

B&R is unique because it’s one of the first companies to embrace online sales after selling primarily in watch stores for about a decade. This means the watches are slightly cheaper – this one is $3,500 – and jewelers can’t really jack up the prices in stores. Further B&R has a great legacy of making legible, usable watches and this one is no exception. It is also a fascinating addition to the line. B&R has an Instrument series which consists of large, square watches with huge numerals, and a Vintage series that hearkens back to WWII-inspired, smaller watches. This one sit firmly in the middle, taking on the clear lines of the Instrument inside of a more vintage case.

Ultimately watches like this one are nice tool watches – designed for legibility and usability above fashion. It’s a nice addition to the line and looks like something a proper geek could wear in lieu of Apple Watches and other nerd jewelry. Here’s hoping.


Read Full Article

The New Google News: 6 Striking Changes You Should Know About

5 Cool Custom Data Dashboards You Can Make With Google Sites


Google Sites is one of the most convenient ways to create and publish a website with the least amount of effort. With the tools available in Google Sites, you can actually create very useful personal dashboards that can boost your organization and productivity.

In this article, you’re going to see how you can use Google Sites to create some very cool dashboards that can:

  1. Monitor your email
  2. Analyze your website performance
  3. Create a time management system
  4. Stay informed with live news
  5. Save your favorite locations

1. Email Monitoring Dashboard

One of the most annoying things about email is that you need some kind of email client to know when a new email has arrived in your inbox.

If you have a Google email account, that might be your preferred online Gmail inbox, or any of the desktop email clients out there.

But with Google Sites, you could actually build a custom data dashboard to display all incoming emails in one place. With a single dashboard, you can just glance to see all the new incoming emails for the day.

This requires syncing Gmail to a Google Sheets and then displaying those sheets in a Google Sites page.

Display Timestamp of Latest Email

It’s possible to sync Gmail with Google Sheets using IFTTT. But with IFTTT you can only do this with one Gmail account. This is why I usually turn to Zapier to sync multiple Gmail accounts to multiple Google Sheets. However, keep in mind that Zapier isn’t free.

With Zapier, you just create a “Zap” with an input for the Gmail account you want to monitor and choose it to trigger with every new incoming email. Then choose Google Sheets as the output.

You should create a Google Sheet called “Incoming Emails” ahead of time.

cool dashboards with google sites

Zapier lets you choose the spreadsheet by name and the worksheet inside it where you want your email information to go.

In this first example, you’ll create a widget on your dashboard that shows each account.

Something like this:

cool dashboards with google sites

Every few minutes, the script will run and update the second column, of the row you specify.

So to update the MakeUseOf row with the timestamp of the latest email in the inbox, I’d choose row three. Then select the email data you want to import.

In this case, I’m importing the received date of the latest email.

cool dashboards with google sites

Once an individual “Zap” is created for each gmail account, the dashboard widget will look something like below.

cool dashboards with google sites

You can import this widget into your Google Sites web page (dashboard) by clicking on Sheets under the Insert menu on the right side of the page.

Display All Incoming Email

To add a widget that’ll show you all the incoming emails for the day, create the same kind of Zap. Also, create three columns in the sheet: Name, Date, and Subject.

Then, when you add the Sheet action in the Zap, you’ll choose the same workbook, but choose the sheet you created for that email account.

Then fill out the fields with the email data you want to import.

cool dashboards with google sites

This will bring all new incoming emails into your new Google Sheet. Here’s what the widget will look like when you import it into your new dashboard.

cool dashboards with google sites

Of course, you don’t want to just let this sheet keep filling up. The widget’s purpose is to show you incoming emails for the day, so you’ll want to add a Google Script to the sheet to clear out the sheets every day at midnight.

This is very easy to do. In the Google sheet, just click on the Tools menu, and select Script editor.

Paste a new function called “ClearAll” into this script editor.

function ClearAll() {
var start, end;
var sheet = SpreadsheetApp.getActive().getSheetByName('Makeuseof');
start = 2;
end = sheet.getLastRow() - 1;//Number of last row with content
      //blank rows after last row with content will not be deleted
sheet.deleteRows(start, end);
var sheet = SpreadsheetApp.getActive().getSheetByName('IAMMarketing');
start = 2;
end = sheet.getLastRow() - 1;//Number of last row with content
      //blank rows after last row with content will not be deleted
sheet.deleteRows(start, end);
var sheet = SpreadsheetApp.getActive().getSheetByName('Gmail');
start = 2;
end = sheet.getLastRow() - 1;//Number of last row with content
      //blank rows after last row with content will not be deleted

sheet.deleteRows(start, end); 
}

You’ll want to edit the “getSheetByName” section with the actual name of your sheets that contain the emails.

To run this script every day at midnight, in the Script Editor, save your script by clicking on File and then Save. Then click on Edit and Current project’s triggers.

Set the events to Time-driven, Day timer, and Midnight to 1am. Then click Save.

cool dashboards with google sites

This will clear all sheets at midnight, so every morning you’re dashboard will start with a fresh sheet, displaying only the latest incoming emails for the day.

2. Website Performance Dashboard

Another useful data dashboard is a performance display if you own or operate a website.

To create a dashboard that shows you data about your website performance, you’ll need that data in a location that automatically updates. Since Google Sites lets you import charts from Google Sheets, you’ll want to set up Google Sheets to automatically receive data from Google Analytics.

That’s outside of the scope of this article, but we’ve got you covered. There are two ways you can accomplish this. Either set up an IFTTT applet that sends Google Analytics data via email to Google Sheets, or build your own spreadsheet using the Google Core Reporting API.

The reporting API is much more powerful and gives you access to nearly all of the data Google Analytics collects about your website, but it has a slightly steeper learning curve.

Once your spreadsheet is receiving data and you’ve created a few charts that plot your traffic or demographics, you’re ready to build your dashboard.

In Google Sites, just click the Insert menu and select Charts. Browse to the spreadsheet in Google Drive where you’ve saved your spreadsheet, and Google Sites will give you the option to select any of the charts that exist in that spreadsheet.

cool dashboards with google sites

Build your website dashboard by clicking each of the charts you want to include, and place them on the page where you’d like them to go.

In just a few clicks you’ll have a beautiful web performance monitoring dashboard.

cool dashboards with google sites

You don’t need an individual Google Site for these different dashboards. You can create sub-pages on the site for each individual dashboard.

This way there’s just one URL to access everything you want to monitor.

3. Time Management Dashboard

If you have several Google Calendars, you can use a time management dashboard that displays three formats of your calendar: Agenda, The Week, and The Month.

Unlike Google Calendar where you have to flip between these views, you can create a Google Sites dashboard that displays them all at once.

Even better, you could embed all the calendars from all of your Google accounts on a single dashboard. Here’s how you do it:

In Google Sites, under Insert, click on Calendar.

This gives you the option to select which Google Calendar you want to insert.

cool dashboards with google sites

When you select the calendar you want to embed, under View Selection, you can choose from Month, Week, or Agenda.

To create a dashboard with all three, just insert one of these at a time into the dashboard.

cool dashboards with google sites

Choose a clean layout for the three formats, and you’ll have a highly functional time management dashboard.

Since the Agenda view is so narrow, you could easily fit the Weekly calendar view beside it.

cool dashboards with google sites

Then, add the larger Monthly calendar view underneath both of those.

Also, you can switch the display mode of each of these widgets on the live dashboard at any time. So you aren’t stuck to a static display after setting it up.

cool dashboards with google sites

If you want to include calendars from your other Google accounts on the same page, just scroll down to the bottom and start adding more. Or you can create an entirely new sub-page for each Google account.

The layout you choose for your dashboard is completely up to you!

4. Live News Dashboard

If you’ve ever wanted a “mission control” panel with a bunch of displays streaming lots of information at you all at once, Google Sites is the perfect platform to do it.

In the Insert menu, click on YouTube. This brings up a search field where you can find any video on YouTube you may want to embed on your web page.

Most YouTube videos are static though, which would be pretty boring. Luckily there are live news channels on YouTube you can embed. Just search for “live news” or “live” followed by your favorite news network, to find them.

cool dashboards with google sites

After you’ve embedded all of the live YouTube streams you want to monitor, you can click on each of them to start them playing.

All videos will stream simultaneously on the same page. It looks really cool and will make you feel like you’re sitting at a desk at mission control under Cheyenne Mountain.

5. Dashboard of Places on Google Maps

If you don’t know you can create and share lists in Google Maps, then you’ll want to explore that feature.

It’s a really useful way to keep track of all of your favorite places in organized lists.

cool dashboards with google sites

How can you use this to build a Google Sites dashboard? Easy. When you click on the Insert menu in Google Sites and click on Map, you’ll see a menu option called My Maps.

Click on that, and you’ll see all of the lists storing your favorite locations.

cool dashboards with google sites

Select one of the lists, and you’ll have an embedded map on your dashboard featuring all of those saved locations.

It’s a really convenient way to store all of your favorite spots on one URL.

cool dashboards with google sites

The next time you can’t remember the location of that hiking trail you love to visit, just open up your dashboard and check out your “hiking trails” map.

Switching between all of your dashboards is as simple as clicking the dropdown icon next to Home, and selecting the dashboard you want to see.

cool dashboards with google sites

You could even use a dashboard like this to plot out an itinerary for someone and then share the URL with them.

They could access it from any browser or phone, no matter where they are.

Start Using Google Sites Data Dashboards Today

The examples above are just the tip of the iceberg when it comes to building useful dashboards that’ll make your life a whole lot easier.

Just think of all the ways you could incorporate YouTube content, map locations, information from Google Docs or Google Sheets, and more.

Google Sites has always been an easy way to make web pages, but with the new Google Sites, you can actually make beautiful and useful dashboards like these. There’s no need for dedicated data dashboard software.


Read Full Article

A leaked look at Facebook’s influencer search engine for advertisers


Facebook’s next money-maker could be this tool for connecting marketers to social media creators so they can team up on sponsored content Facebook ad campaigns. The Branded Content Matching search engine lets advertisers select the biographical characteristics of creators’ fans they want to reach, see stats about these audiences, and contact them to hammer out deals.

Leaked screenshots of Facebook’s promotional materials for the tool were first attained and published in german by AllFacebook.de. TechCrunch has now confirmed with Facebook the existence of the test of the search engine. Facebook first vaguely noted it would build a creator-brand tool in March, but now we know what it looks like and exactly how it works.

Even though Facebook will not actually broker or initially take a cut of the deals, the tool could equip brands with much more compelling and original marketing content. That could in turn encourage them to spend more on Facebook ads to spread that content, while also making the ads users see more entertaining and tolerable so they spend longer on the social network. By getting creators paid, even if not directly by Facebook, they’ll invest more in the quality of their content and size of their following on the app instead of with competitors.

How Facebook’s influencer marketing search engine works

A Facebook spokesperson explained the motive behind the tool like this. Facebook wants to help businesses find creators who can reach their target audience in an authentic way, while allowing creators a path to monetizing their Facebook content and fan base. Creators opt in to participating in the test and set up a portfolio showcasing their audience size and metrics plus their best branded content. Facebook is starting the program primarily with a set of lifestyle brands and creators.

Advertisers in the test can search for creators with specific audience demographics using a wide range of targeting options. Those include both general and industry-specific parameters like:

  • Top countries where they’re popular
  • Interests
  • Gender
  • Education history
  • Relationship status
  • Life events
  • Home ownership status
  • Home type

The search engine’s results page shows a list of creators with each’s audience match percentage to the search terms, percentage of their followers they reach, engagement rate, follower count, and video views. Advertisers can save their best matches to private lists, and reach out to contact the creators, though Facebook is still figuring out if it’s best to connect them through their Facebook Page or traditional contact info.

The deals for product placement or sponsored content creation and sharing are then worked out between the brand and creator without Facebook’s involvement. The platform is not taking any revenue cut during the testing phase, but longer-term will evaluate whether it should. The only thing Facebook doesn’t allow is pure re-sharing deals where influencers are paid to just post the brand’s pre-made content they didn’t help create.

The crowsourced future of advertising

Foreshadowed the launch of its dedicated Facebook Creator app in November, this is the company’s first serious foray into influencer marketing. This emerging industry holds the potential to overhaul the way advertising content is produced. In days of old, brands couldn’t target very narrow segments of their customers since they were using broadcast mediums like TV commercials, magazine ads, and billboards, or endoresements from mainstream celebrity like movie actors. They might only make a few separate styles of marketing compaigns that would appeal to wide swaths of their target audience.

With the Internet and targeting data-rich social networks like Facebook, they can reach extremely specific subsets of their customers with marketing messages tuned to their identity. But reaching these niche audiences with corporate content that feels authentic rather than fake and smarmy is difficult. That’s where social media creators come in. Not only do they have a pre-existing and intimate relationship with their fans who’ll take their endorsements to heart. They’ve also already spent years figuring out exactly what type of content appeals to these specific people. When they team up with brands, the businesses get their products recontextualized and interpreted for that audience with content they could never come up with themselves.

Twitter realized this early, which is why it acquired creator-brand deal broker Niche for a reported $50 million back in 2015. [Disclosure: I got fascinated with this industry because my cousin Darren Lachtman is one of the co-founders of Niche] But now as Facebook seeks to attract influencers and their audiences to its social network, it’s trying to find ways to get them paid. Otherwise, they’re likely to stray to YouTube’s ad revenue shares and Patreon’s subscription payments. So far Facebook has tested tipping and subscriptions from fans, as well as letting creators host ad breaks — essentially commercials — during their videos. But brands want the creators’ help designing the content, not just distributing it.

But what about Instagram and YouTube influencers?

The Branded Content Matching search engine will help brands find those creators…but only on Facebook for now. The tool doesn’t pull in their audience sizes and metrics from other important platforms like Instagram, YouTube, Twitter, Snapchat, or Twitch. Brands don’t get a holistic view of the value and reach of a creator, who might be way more popular on another platform than Facebook.

And really, Instagram is where all these influencers spend their time and share their content. Though Facebook owns it, it says it’s not showing Instagram influencers in the tool at the moment. Adding them in, the same way advertisers can push ads to Facebook and Instagram from one interface, would make the search engine much more powerful.

There’s already a whole industry of independent creator search engines and databases for marketers like Hypr, Whalar, Fohr Card, Tap Influence, and Creator IQ. If Facebook built one with first-party data from across its properties, or even pulled stats from competing platforms, it might squash these startups. Alternatively, it might buy one to ramp up its efforts here like how Twitter bought Niche.

Facebook is running out of ad inventory in the News Feed. It needs to make each ad better and more watchable so it can grow revenue by charging more per ads rather than selling more ads. Meanwhile, yesterday it started testing ads in Facebook Stories, where brands will need help navigating the more personal, vertical video format. Awesome content made by creators could be the answer. And Facebook could finally start helping more of these artists, comedians, and storytellers to turn their passion into a profession.


Read Full Article

Fortnite is finally coming to Android this summer


Fornite is finally coming to Android…in a matter of months. After dominating the iOS gaming charts since March, the wildly popular sandbox survival game will be hitting the world’s top mobile operating system at some point this summer.

Creator Epic Games buried the news in the middle of a larger blog post titled, “The State of Mobile,” noting, vaguely, “We know many of you are excited for this release, and we promise that when we have more information to share, you’ll hear it from us first.”

That news comes amid a flurry of other Fornite related announcements this week. Earlier this morning, Epic unveiled a Battle Royale competition with a large in-game cash prize. This morning, the company also laid out plans to bring voice chat and improved gameplay and controls to the mobile side of things. Stats are coming to mobile, as well, along with a reduced install size.

Not that any of those issues have hampered the games success, of course. Earlier this year, the game was reportedly bringing in $126 million in monthly revenue — even before it arrived on iOS. With its imminent release on Android, that number’s likely to get a whole lot larger. 


Read Full Article

4 Popular Podcast Apps Compared: Which Is Best for You?

5 Ways Data Can Be Stolen From Your PC or Network

eBay Uses Your Interests to Help You Shop Online


Shopping online offers a lot of advantages over shopping in bricks-and-mortar stores. There’s the convenience of just tapping a few buttons and having a box delivered to your door, for starters. And there’s also a much larger range of products to choose from.

However, having more things to choose from isn’t always a good thing. Where do you start? How do you zero in on what you actually want to buy in that moment? Eager to help you buy more things, eBay has a solution, and it involves you revealing your “Interests”.

eBay Is Interested In You

eBay Interests is a new feature designed to help match you with the items you’ll actually want to buy. In a nutshell, you tell eBay what sort of things you’re into, and eBay will create a store unique to you, filled with items you’re going to want to buy.

The only thing you have to do is answer a short survey about your hobbies, your passions in life, and your style. eBay will then use this information, along with your purchase history, to create a storefront unique to you and your interests.

Your homepage will be transformed from a huge repository of random items into a storefront filled with items designed to appeal directly to you. This should, therefore, prevent you from having to wade through countless menus before you can start shopping.

Bradford Shellhammer of eBay said, “Our shopping experience should be as individual as each shopper on eBay. By asking people to tell us a little bit about their interests, we’re delivering a personalized store built around the things you care about most”.

Interests is available in the eBay app on Android and on iOS right now, with eBay promising to roll it out to more platforms and other markets around the world in the coming months.

A Line of Innovations

This is an interesting move by eBay. In many ways it borrows from streaming services, which recommend content based on your previous viewing/listening habits. eBay is using the same kind of approach to help draw your attention to potential purchases.

This is the latest in a line of innovations from eBay. In June 2017, eBay offered a price-match guarantee. In October 2017, eBay launched visual search tools. In March, eBay launched an Under $10 section. And in April, eBay simplified its listing process.


Read Full Article

What Is 404? 4 Common Website Errors and What They Mean


Most of the time, visiting a website is a simple affair. You type in the name of the site you’re interested in or click a browser bookmark, and you see it within a few seconds.

But what about when it goes wrong? Sometimes, you’ll see various errors alerting you to problems with visiting that website. While some of these are out of your control, you can troubleshoot others to find out what’s wrong.

Let’s quickly review some of the most common website errors. Note that errors starting with 4 (like error 451) are client-side errors (issues with your computer), while those starting with 5 are server-side (problems with the website).

1. Error 404

404 is a common error. It signifies that the page you were looking for doesn’t exist. This often occurs when you click a broken link, or if a website moves a page without redirecting it properly. But it can also happen if you mistype a URL.

When you see a 404, check to make sure that you haven’t entered the wrong address. Then try a Google search to find the right page, as it may have moved.

2. Error 401

A 401 error means that you need authentication to access the page, but don’t have it. This usually occurs when you need to log into a website to access something but haven’t done so yet.

If you see this, try visiting the main page of the site and logging in again.

3. Error 403

A 403 error signifies that you’ve made a valid request, but the server won’t complete it because you’re not allowed to access it. This is different than a 401.

A 401 tells you that you haven’t logged in and so it can’t authenticate you. But a 403 error says that it knows who you are, yet won’t let you access the page. Typically, this means you’ve stumbled across something private and need to access the website administrator for access.

4. Error 504

A 504 error signifies a gateway timeout, meaning that a server the website relies on isn’t communicating with it quickly. When this happens, you won’t be able to access the website until its administrators resolve this issue. You can try refreshing the page a few times, but you’ll likely have to wait until it’s fixed.

For some funny errors, check out ridiculous Windows error messages.


Read Full Article

How to Ensure Your Signal Messages Really Disappear for Good


These days, WhatsApp is no longer the only show in town. You have a number of high-quality instant messaging apps to choose from. And while I’m a massive fan of Telegram if you’re looking for a WhatsApp replacement, Signal continues to grow on me with every passing day.

It’s one of most secure messaging apps around. End-to-end encryption is standard, the app offers tools to verify the identity of people in chat groups and the integrity of the data channel, and it doubles as an SMS client.

Except, there’s a security problem. Or at least, there’s a security problem for Mac users.

What’s the Issue With Signal Messages?

Quite simply, messages which are supposed to disappear and leave no trace are leaving a very noticeable trace. Two traces, in fact.

One of the traces is caused by the Notification Center. By default, the Notification Center will show the content of a message along with the sender’s name. This information will persist long after Signal’s copy of the message has self-destructed.

In a worst-case scenario, a hacker could gain control of your machine and see what’s being said. It’s a nightmare if you use Signal to send sensitive data.

The second trace is a database-level copy of every self-destruction message that someone with sufficient computing knowledge could easily access. As we said, not very secure.

How to Ensure Signal Messages Really Disappear

To remedy the notification center issue, you need to tweak some settings in the Signal app.

Go to Preferences > Notifications and select Neither name nor message. Hit Save when you’ve made the changes.

The database issue is more problematic. If you’re feeling adventurous and fancy a project, you can follow Patrick Wardle’s somewhat complicated walkthrough. If that’s all a bit beyond you, you could run his script to see what data has been secretly stored.

And remember, if these revelations have soured Signal in your mind, there are plenty of other secure messaging apps out there.


Read Full Article

How to Use Trello With the New Gmail


More than 1.2 billion users have made Gmail a part of their lives. Several third-party add-ons and browser extensions have helped the humble email inbox become the core part of our everyday productivity.

Let’s take another look at the new Gmail and the “official” add-ons that fuse better with the inbox than the extensions of the past. Trello for Gmail is one of the more popular partnerships that now connect your emails to your boards.

How to Use Trello With the New Gmail

The Trello add-on for Gmail seems more baked in than its previous avatar as a browser extension. They can be specifically used in-context of the email they are connected to. For instance, you can turn one email into an actionable task in Trello and give your team a shared perspective on the work that needs to be done.

More importantly: Each add-on will work the same across the web and Android.

  1. Log into Gmail. Click the Settings (gear) icon and select Get add-ons.
    Install add-ons in Gmail
  2. The GSuite Marketplace opens up with a grid of 31 add-ons as of now. Choose Trello from the available list.
  3. Click Install and give your permission to make the add-on a part of your inbox.
  4. Log-into Trello via the icon next to the message pane.
  5. Open any email and click the Trello icon next to it. The new Trello card will take the email subject line as the card title and the email text as the card description automatically.
    Trello in Gmail
  6. Turn any email into a task or a to-do and track all follow-up actions on the card.

You can apply all Trello features to manage your email like small projects. Due dates, reminders, and the Trello calendar can boost your efficiency right from the inbox. Do remember, with the right idea you can put Trello to many creative uses alongside your inbox.


Read Full Article

7 Ways Wi-Fi Cameras Can Make You a Better Parent

Microsoft’s Xbox Adaptive Controller is an inspiring example of inclusive design


Every gamer with a disability faces a unique challenge for many reasons, one of which is the relative dearth of accessibility-focused peripherals for consoles. Microsoft is taking a big step towards fixing this with its Xbox Adaptive Controller, a device created to address the needs of gamers for whom ordinary gamepads aren’t an option.

The XAC, revealed officially at a recent event but also leaked a few days ago, is essentially a pair of gigantic programmable buttons and an oversized directional pad. 3.5mm ports on the back let a huge variety of assistive devices like blow tubes, pedals, and Microsoft-made accessories plug in.

It’s not meant to be an all-in-one solution by any means, more like a hub that allows gamers with disabilities to easily make and adjust their own setups with a minimum of hassle. Whatever you’re capable of, whatever’s comfortable, whatever gear you already have, the XAC is meant to enable it.

I’d go into detail, but it would be impossible to do better than Microsoft’s extremely interesting and in-depth post introducing the XAC, which goes into the origins of the hardware, the personal stories of the testers and creators, and much more. Absolutely worth taking the time to read.

I look forward to hearing more about the system and how its users put it to use, and I’m glad to see inclusivity and accessibility being pursued in such a practical and carefully researched manner.


Read Full Article