
Got a desktop Mac or MacBook that won’t turn on, or maybe won’t boot past the Apple logo? Don’t worry—it’s frustrating, but usually fixable.
Here are all the steps you need to get your Mac started again. Just work through them in order, unless your Mac won’t boot after a failed operating system update. In that case, skip straight to step 8.
1. Check If the Mac Has Power
First, check that your Mac has a power source. Yes, it’s silly and obvious, but anyone who’s done tech support knows that you have to get the obvious fixes out of the way first.
So if your MacBook won’t boot on battery power, plug it in. The battery may be fully depleted, or could be malfunctioning.
If your MacBook won’t charge or turn on with the power adapter connected, make sure it’s connected properly and not damaged in any way. Try a different power cable, if you’ve got one around. Also, check that the port is clean. A buildup of dust can disrupt older MagSafe chargers.
And while you’re at it, check your external hardware as well. Disconnect any peripherals like printers or graphics tablets, as these can sometimes be the cause. If you’ve got a Mac Mini, make sure the monitor is connected and powered properly.
2. Run a Power Cycle
The next step is to run a power cycle. This completely cuts all traces of power from the Mac and enables you to restart it from scratch.
- On a recent MacBook, disconnect the power cable and hold the power button down for 10 seconds.
- For an older MacBook, disconnect the power cable and remove the battery for at least 10 seconds.
- If you’re using a desktop Mac, disconnect the power cord for at least 10 seconds.
Now reconnect the power and try to restart your computer. This move may be enough to spring it to life.
Holding the Power button down like this is the equivalent to pressing a “reset” button or pulling the plug. It works on phones, ebook readers, and pretty much every other gadget that doesn’t allow you to remove the battery, so is a good tip to remember.
3. Boot in Safe Mode
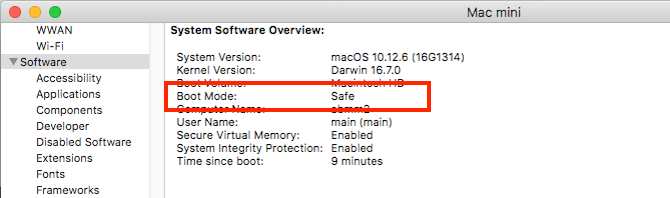
When your MacBook won’t boot, try to remember what you were doing the last time it was working. Were you installing apps, fiddling with fonts, or tweaking the system?
If your Mac shows signs of life when you power it on—it won’t go past the Apple logo or login screen—then booting into Safe Mode may help you fix it.
Press the Power button on your Mac and immediately press and hold the Shift key. Keep it held until you reach the login screen, then continue as normal.
Safe mode runs a bunch diagnostic tests, then boots a stripped-down version of macOS. This doesn’t load your startup apps, custom fonts, extra hardware features, or anything else beyond the basics.
If your Mac boots successfully into Safe Mode, you can start uninstalling any new apps, disabling startup items, removing hardware, or undoing any other recent changes that may cause the problem.
4. Reset SMC
The System Management Controller (SMC) controls a host of basic Mac functions. It handles everything from the keyboard backlight, to battery management, to what happens when you press the Power button.
Resetting the SMC is a good catch-all solution to many problems, including if your MacBook won’t start or it won’t wake up when you open the lid. There are a few ways to do it, depending on what model of Mac you’ve got:
Desktop Macs
- Unplug the power cord and wait 15 seconds.
- Plug the cord back in and wait another five seconds.
- Restart your Mac.
2018 MacBook Pro + MacBooks With T2 Security Chip
- Press and hold the right Shift key, the left Option key (Alt), and the left Control key for seven seconds.
- While keeping these keys pressed, hold down the Power button for another seven seconds.
- Release all the keys, wait a few seconds, then restart.
MacBooks Without Removable Batteries
- Press and hold the left Shift, Option (Alt), and Control keys, plus the Power button (or Touch ID button) for 10 seconds.
- Release all the keys then restart your computer.
Older MacBooks With a Removable Battery
- Remove the battery.
- Press and hold the Power button for five seconds.
- Reconnect the battery, and restart the MacBook.
5. Reset NVRAM or PRAM

NVRAM (non-volatile random access memory) is a special section of memory that stores certain settings a Mac needs to access quickly. Although problems with this are less likely to render your computer unbootable, resetting it as a precaution will do no harm.
Older Macs used PRAM (perimeter RAM) instead. The process for resetting either is the same:
- Press the Power button then immediately press and hold the Option (Alt), Command, P, and R keys.
- Keep the keys pressed for around 20 seconds, even if your Mac appears to restart.
- If your Mac plays a startup sound, release the keys after you hear it chime for the second time.
- If your Mac has the T2 Chip, release the keys after the Apple logo disappears for the second time.
When your Mac has restarted, you’ll find that some basic settings like time zone or volume level might need adjusting.
6. Run Apple Diagnostics
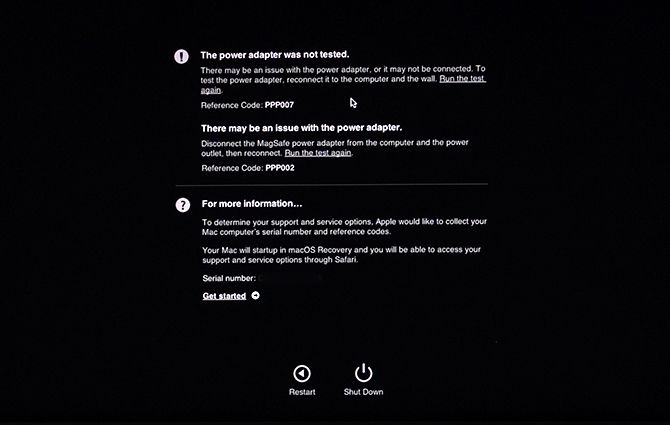
Hopefully by now, your Mac is up and running again. If not you can check for hardware issues by using the Apple Diagnostics tool. This will check for problems, then either suggest fixes or show your support options.
- Disconnect any unnecessary external devices, such as a printer. You can leave your keyboard, mouse, and monitor plugged in if needed.
- Press the Power button.
- Press and hold the D key. Keep it pressed until you see a screen asking you to select your language.
- Pick a language, then Apple Diagnostics will begin running its tests. These take a few minutes to complete.
When done, you’ll see the results of the test. Some will suggest quick fixes, and give you the chance to re-run the test. Others will generate reference codes which you can look up on the Apple Diagnostics page. It’ll also show your Mac support options. If there are no issues, then the fault likely is not with your hardware.
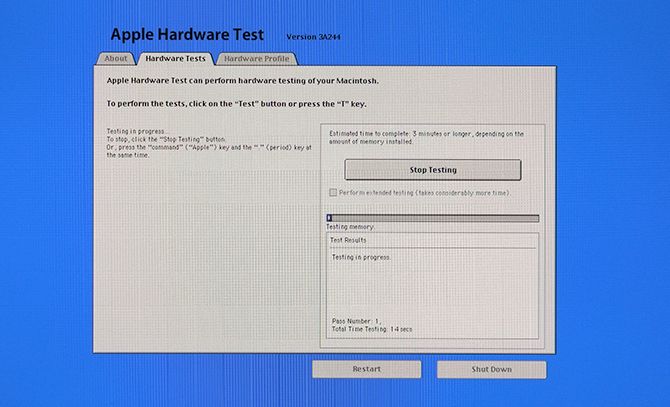
On Macs released before June 2013, you’ll get the Apple Hardware Test instead. You activate it in the same way, and the principle is the same. Select your language, then click Test to begin.
7. Use Recovery Mode Tools
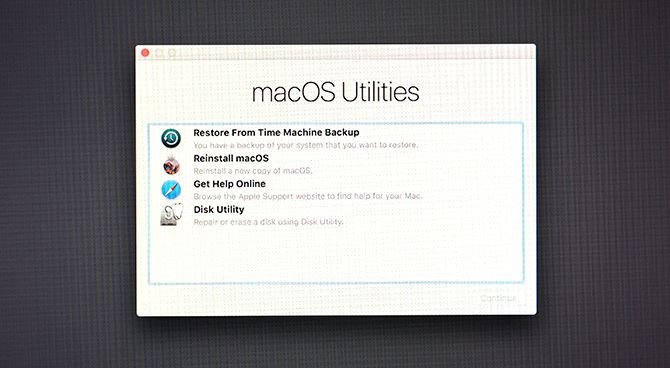
All Macs have a special Recovery partition on the hard drive. This boots independently of the full macOS and gives you access to a suite of tools for repairing your computer.
To boot into Recovery:
- Press the Power button.
- Press and hold the Command and R keys.
- Release the keys when you see the Apple logo.
- When it finishes booting, you’ll see a new macOS Utilities menu.
The one to try first is Disk Utility. This is a version of the same tool that’s available in macOS and enables you to scan and repair your hard drive or SSD. Select the drive and click First Aid to begin the repair process.
There are a few more tools available through the Utilities menu. These include the Terminal for more advanced users.
8. Reinstall macOS in Recovery Mode
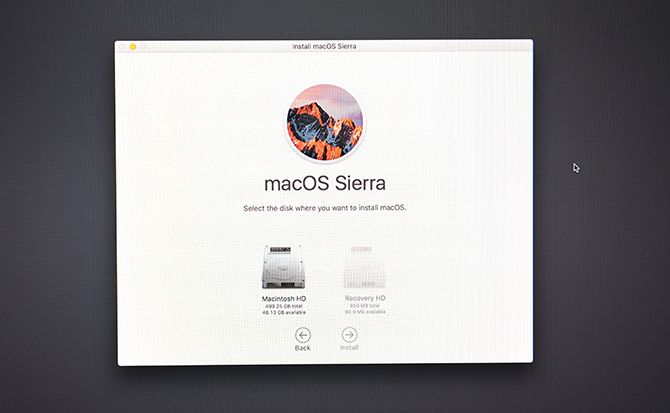
If you’ve gotten this far, then it’s likely that your problem is not hardware-related, nor is it a simple software fix. The best solution now is to restore a Time Machine backup, or reinstall macOS entirely.
You can do this through Recovery. Get started by pressing the Power button and holding down the Command and R keys.
If you’ve got a recent Time Machine backup, you can restore that to see if it solves your problem. If not, choose Reinstall macOS from the menu.
When you choose to reinstall macOS you’re given the option to format your disk as part of the process. Don’t select this if you simply want to repair your installation—there’s no problem with reinstalling macOS on top of itself.
Follow the onscreen guide to complete the installation. You’ll need to be connected to the internet, as the tool will download the operating system from scratch.
Check for Other Warning Signs on Mac
All Macs, whether a high-end MacBook Pro or an older iMac, have great reputations for reliability. But they can still run into problems.
Although it’s often relatively easy to fix a Mac that’s not turning on, it’s best to check for warning signs and patch up problems before they strike.
Follow the advice in our guide to finding and fixing common macOS problems—covering everything from memory to malware—and you’ll keep your Mac running smoothly and problem free.
Read the full article: Mac Won’t Boot? A Step-by-Step Guide to Waking It Up
Read Full Article
No comments:
Post a Comment